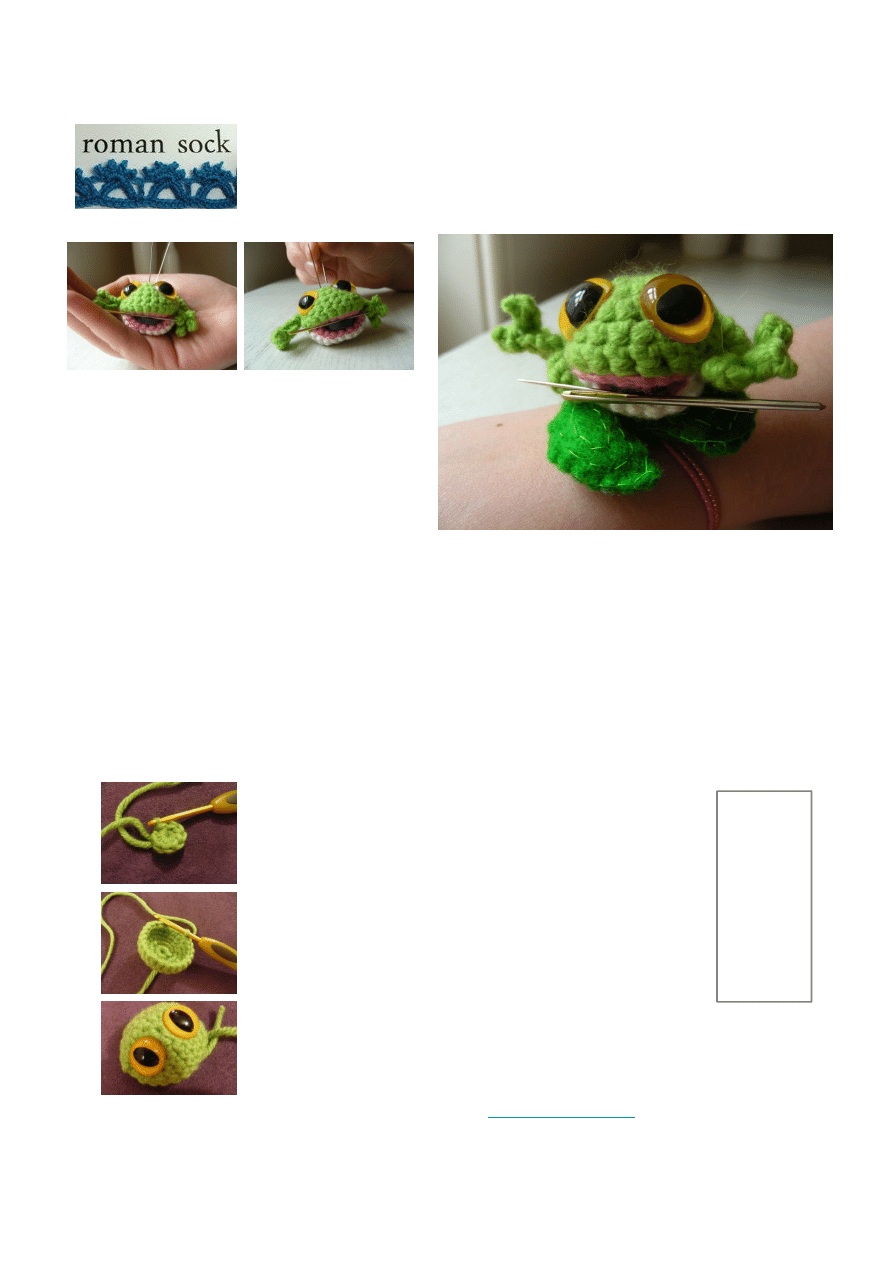
Instant Crochetfication:
Froggy Pincushion
This little frog is cute and useful! He sits on
your wrist and helps you with projects. He
also has a strange magnetic power.
Could you get a more helpful amphibian?
You will need:
• < 10g Green (Aran Weight/Worsted), I used Debbie Bliss Cashmere.
•< 10g Pink (DK/Light Worsted)
•< 5g White (DK/Light Worsted), I used Bamboo
•15mm safety eyes
© 2008 Brigitte Read. All rights reserved
To report errors with this pattern contact
brigitte.read@gmail.com
http://littlegreen.typepad.com/romansock/
•15mm safety eyes
•Green Felt
•Elastic
•Magnet (If you want!)
•A lovely 3.5mm crochet hook, a little stuffing and a needle and thread.
•1 hour!
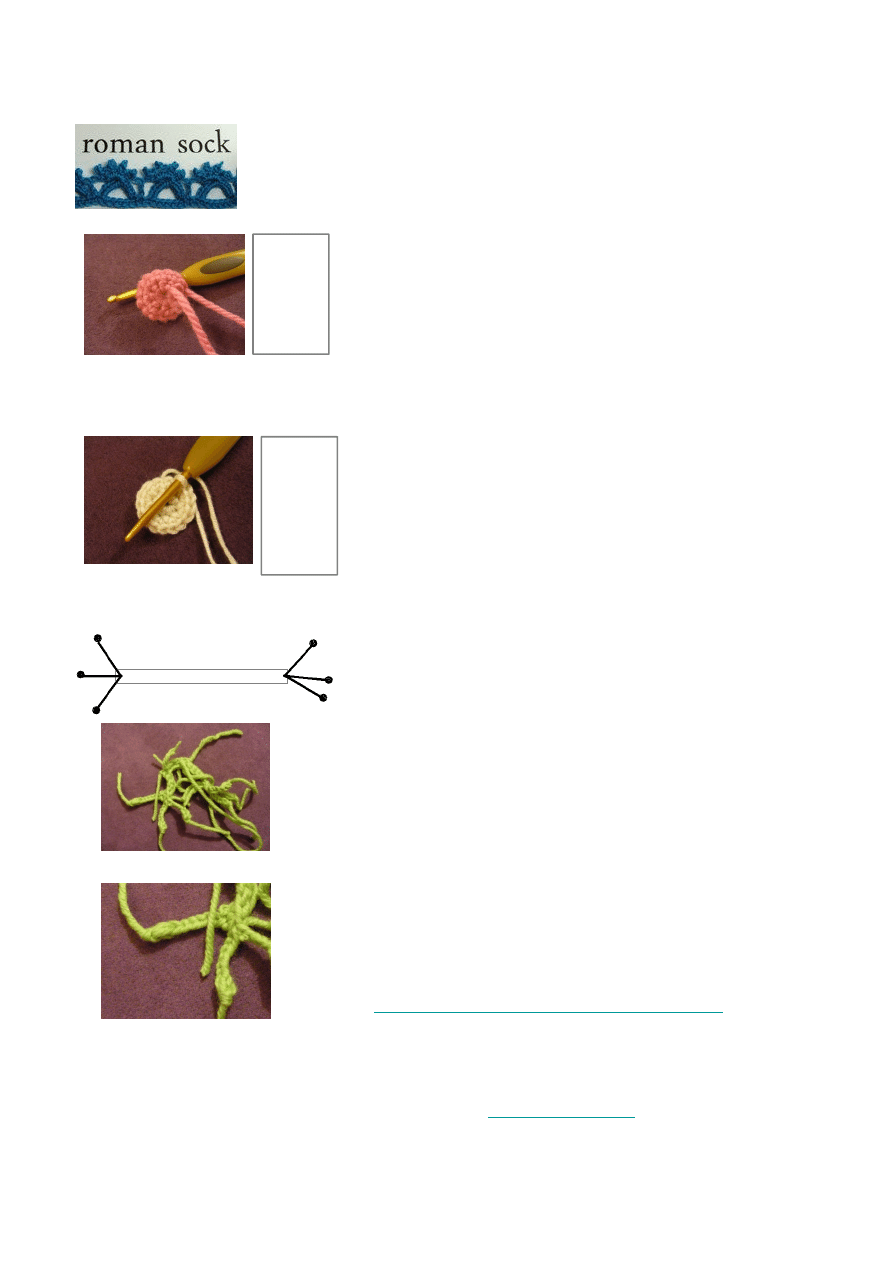
Head Top
Row 1: Using the magic circle technique, crochet 8 single
stitches in a circle
Row 2: Crochet 2 single crochet stitches in the first base
stitch, 1 in the second, then continue in the 2, 1 pattern
until the row is finished. You should have 16 stitches.
Row 3: Crochet 2 single crochet stitches in the first base
stitch, 1 in the second, then continue in the 2, 1 pattern
until the row is finished. You should have 18 stitches.
Row 4: Single crochet in each of the base stitches then
cast off.
Attach eyes
Quick
Guide
8 (1)
16 (2,1)
18 (2,1)
18 (1)
Inner Mouth (x2)
Bottom Mouth (x1)
Row 1: Using the magic circle technique, crochet 8 single
stitches in a circle.
Row 2: Crochet 2 single stitches in each base chain stitch, you
should have 16 stitches.
Row 3: Crochet 2 single stitches in the first base stitch, 1 in the
second, then continue in the 2, 1 pattern until the row is finished.
You should have 22 stitches.
Quick
Guide
8 (1)
16 (2)
22 (2,1)
Row 1: Using the magic circle technique, crochet 8 single
stitches in a circle.
Row 2: Crochet 2 single stitches in each base chain stitch, you
should have 16 stitches.
Row 3: Crochet 2 single crochet stitches in the first base stitch, 1
in the second, then continue in the 2, 1 pattern until the row is
finished. You should have 22 stitches.
Row 4: Single crochet in each of the base stitches then cast off.
Quick
Guide
8 (1)
16 (2)
22 (2,1)
22 (1)
© 2008 Brigitte Read. All rights reserved
To report errors with this pattern contact
brigitte.read@gmail.com
http://littlegreen.typepad.com/romansock/
Toes
Work toes into a gap (force crochet hook through fabric) at
each end of the legs.
Step 1: Crochet into the end of the leg and chain 5
Step 2: Puff stitch into the end of the chain (pull the loop a little
longer, insert through, yarn over – pull through, inset back
through the stitch, yarn over – pull through, should have 3
stitches on the hook – pull yarn through and cast off)
http://www.stitchdiva.com/custom.aspx?id=124
Step 3: Do this another 2 times on one end, and three times on
the other end
Legs (x1)
The legs are made from a row of single crochet
Row 1: Chain 18 (+1 turning chain) then turn
Row 2: Single crochet in each of the base chains
You should have 2 pink inner mouth pieces, a green outer
mouth piece and a white under mouth piece and some
legs!
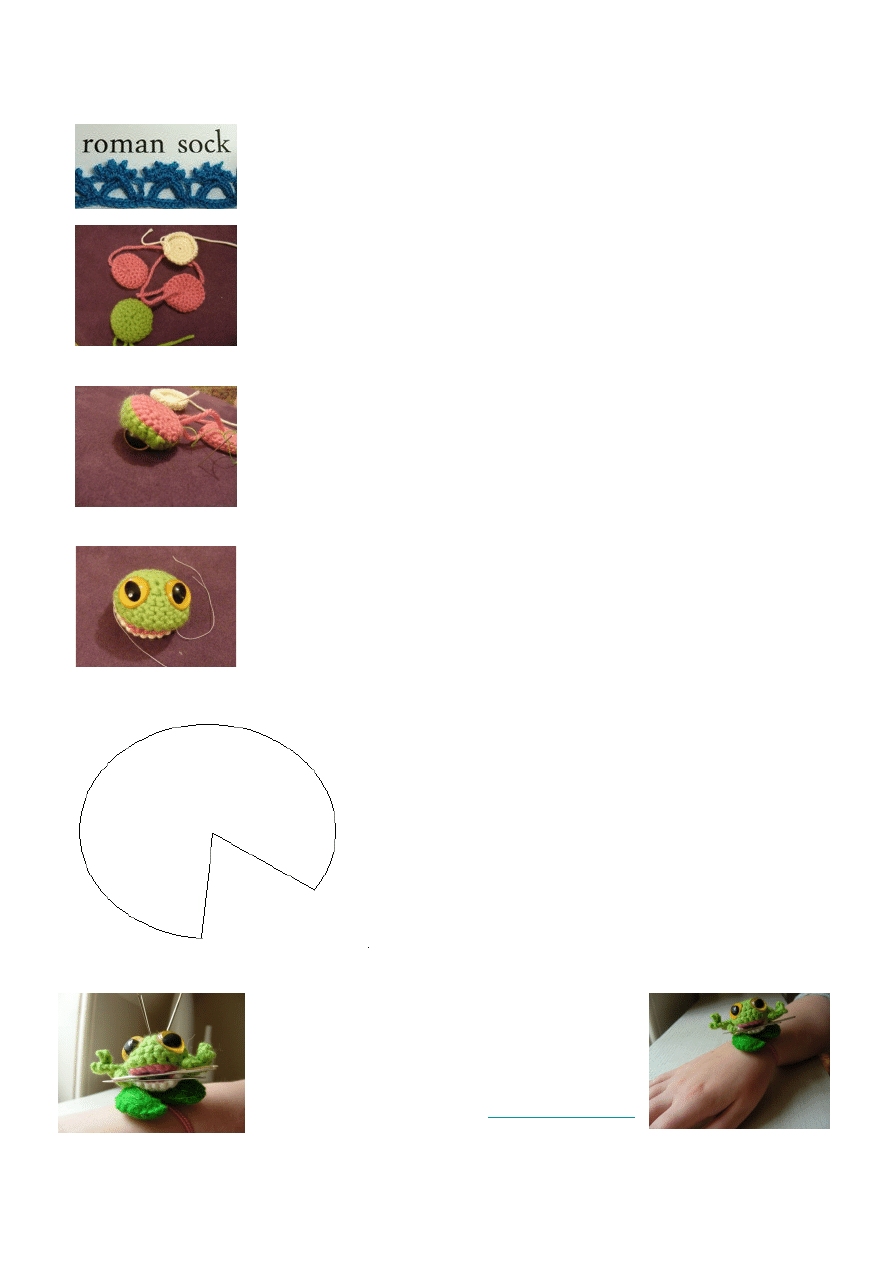
Top of head:
Step 1: Stuff the green head piece with a little stuffing and add an
optional magnet if you want it to be able to quickly collect pins.
Step 2: Sew on the pink inner mouth piece
Bottom of head:
Step 1: Place the pink inner mouth piece inside the white bottom
mouth piece and sew together. (don't use stuffing)
Completing the frog:
Step 1: Sew the two pieces of the head together
Step 2: Sew the frogs legs to the back of the head and
secure them at the side of the head.
Building your frog
© 2008 Brigitte Read. All rights reserved
To report errors with this pattern contact
brigitte.read@gmail.com
http://littlegreen.typepad.com/romansock/
secure them at the side of the head.
Step 1: Cut two lily pad shapes out of green felt, as well
as a small rectangle that will be used to hold some
elastic in place.
Step 2: Cut enough elastic to comfortably and
securely fit your wrist, tie a knot and pin onto one side
of the lily pad. Stitch the rectangle over this on two
sides, so that you can freely rotate the elastic and
remove the pin.
Step 3: Sew and stuff the lily pad, you can also add
some decorative stitches to add interest to the top of
the lily pad, like I do.
Step 4: Stitch the froggy onto his lily pad and get
crafting!
Lily pad
Wyszukiwarka
Podobne podstrony:
Żaba
Pozycja Żaba
ziarenko żaba chronologia
Dlaczego zaba zakład przegrała M Kownacka
biedronka i żaba do kolorowania
ŻABA
Żaba, żółw i żuk
SCENARIUSZ ZAJĘCIA DLA GRUPY 6 - technika mgr. Żaba, Dokumenty do szkoły, przedszkola; inne, wykład
Żaba, Zwierzęta
Origami - Żaba, Harcerstwo, Majsterka, Origami
Hospitacja 06 - 241100 zaba, STUDIA, Hospitacje
Żaba królewną
Żaba
żaba
13 żaba
Eko` pyt sciaga Żaba
więcej podobnych podstron