$24.99/$31.99 Can.
W W W. S T M A R T I N S . C O M
ST. MARTIN’S GRIFFIN
175 FIFTH AVENUE, NEW YORK, NY 10010
DISTRIBUTED IN CANADA BY H. B. FENN AND COMPANY, LTD
PRINTED IN CHINA
L
M
KNITTING
SOCKS
ISeLa PheLPS
A BEGINNER’S GUIDE
TO KNITTING SOCKS
ON A LOOM WITH OVER
50
FUN PROJECTS
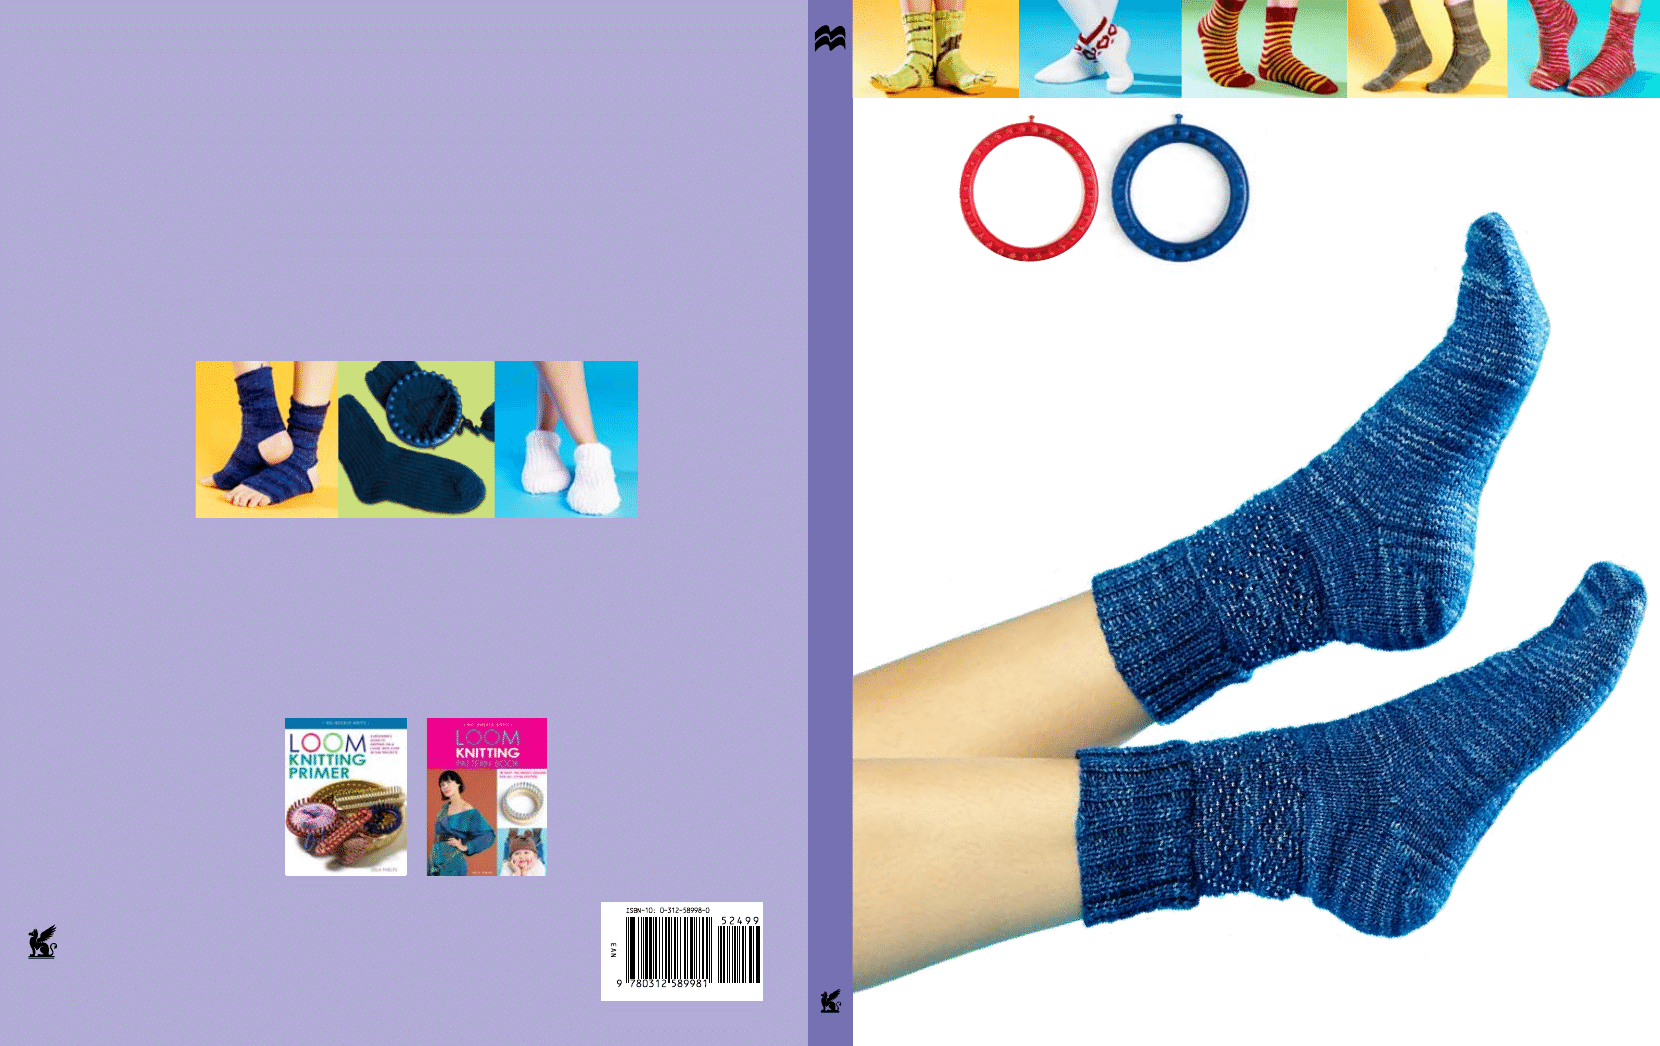
LOOM KNITTING SOCKS
Is
e
la
Phelps
NO-NEEDLE KNITS
Socks are fun and easy projects to loom knit. In just a few hours you
can create fabulous socks in every color, texture, and style imaginable!
From thick socks for cold winters, to breathable sports socks, this book
can help you knit unique designs for all occasions.
A sequel to the popular Loom Knitting Pattern Book by the same author,
this comprehensive book reveals everything you need to know to loom
knit socks. There are 50 projects for
no-needle knitting—from colorful baby booties to beaded
sophisticated numbers.
With an illustrated introductory chapter, this is a book both for beginners
and experienced loomers wanting to learn more tricks of the trade.
Everything from recommended yarns and sock sizes, to looming
techniques and troubleshooting is covered. Start your new loom knitting
adventure today and you’ll never look back!
Also Available from St. Martin’s Griffin:
Visit CraftyBooks.net
for free projects, previews of
our upcoming books,
and more!

This edition published by St. Martin’s Press 2009.
All rights reserved. No part of this book may be used
or reproduced in any manner whatsoever without
written permission except in the case of brief
quotations embodied in critical articles or reviews.
For information, address
St. Martin’s Press, 175 Fifth Avenue, New York
NY 10010
www.stmartins.com
A Quintet Book. Copyright © 2009 Quintet
Publishing Limited
QTT.LKS
No part of this publication may be reproduced,
stored in a retrieval system, or transmitted in any
form or by any means, electronic, mechanical,
photocopying, recording or otherwise, without the
prior written permission of the copyright holder.
This book was designed and produced by
Quintet Publishing Limited, 6 Blundell Street
London N7 9BH, UK
Art Director: Michael Charles
Designer: Tania Field
Photography: Jonny Thompson
Illustrator: Anthony Duke, Bernard Chau
Project Editor: Martha Burley
Managing Editor: Donna Gregory
Publisher: James Tavendale
Printed in China by 1010 Printing International
Limited
Library of Congress Cataloging-in-Publication Data
available upon request
ISBN-13: 978-0-312-38055-7
ISBN-10: 0-312-38055-0
First U.S. Edition: June 2009
10 9 8 7 6 5 4 3 2 1
78 Part IV
fancy: cables & beads
80 Abuelita's socks
82 Braid cable socks
84 Twists and bricks
85 Cascading socks
86 Clustered cable
88 Snaking socks
90 Trellis
92 Hourglass socks
94 Starry night
96 Beaded peaks
98 Waves
100 Part V
lace socks
102 Ladder lace
104 Garden
106 Marbled socks
108 Little wisps of wheat
110 Lazaro shells
112 Part VI
fooTsIes & oTHeR
114 Cherlooms pedi socks
116 Pedi socks
118 Early dawn yoga socks
120 Pink hottie sandal sock
122 House socks
126 Part VII
kId's socks
128 Corazonitos (little hearts)
130 Dress socks—for child
132 Cuff down baby socks
134 Beaded flowers child socks
136 Butterfly kisses
138 Woven child's sock
140 Common abbreviations
141 Resources & contributors
142 Index
144 Acknowledgements
6 Introduction
8 Materials and tools
10 Using the loom
18 Color and design
24 Sock 101
30 Designing your own socks
32 Fixing mistakes
34 Part I
sImPle socks
36 Single rib socks
38 Ribbed socks
40 Classic men's socks
42 Sha sha socks
44 Part II
TexTuRed socks
46 Guppy socks
48 Borderline socks
50 Brocade socks
52 Seeded rib socks
54 Garter stitch
56 Baskets
58 Spiraling tubes
60 Moss stitch
61 Seascape melody
62 Slouch socks
64 Part III
coloRwoRk socks
66 Snow
68 Golden heels and toes
70 Horizontal striped socks
72 Bloom for Bethany
74 Tennis socks
76 Ropes
Contents
INTRoDUCTIoN
12
LooM KNITTING SoCKS
INTRoDUCTIoN
13
LooM KNITTING SoCKS
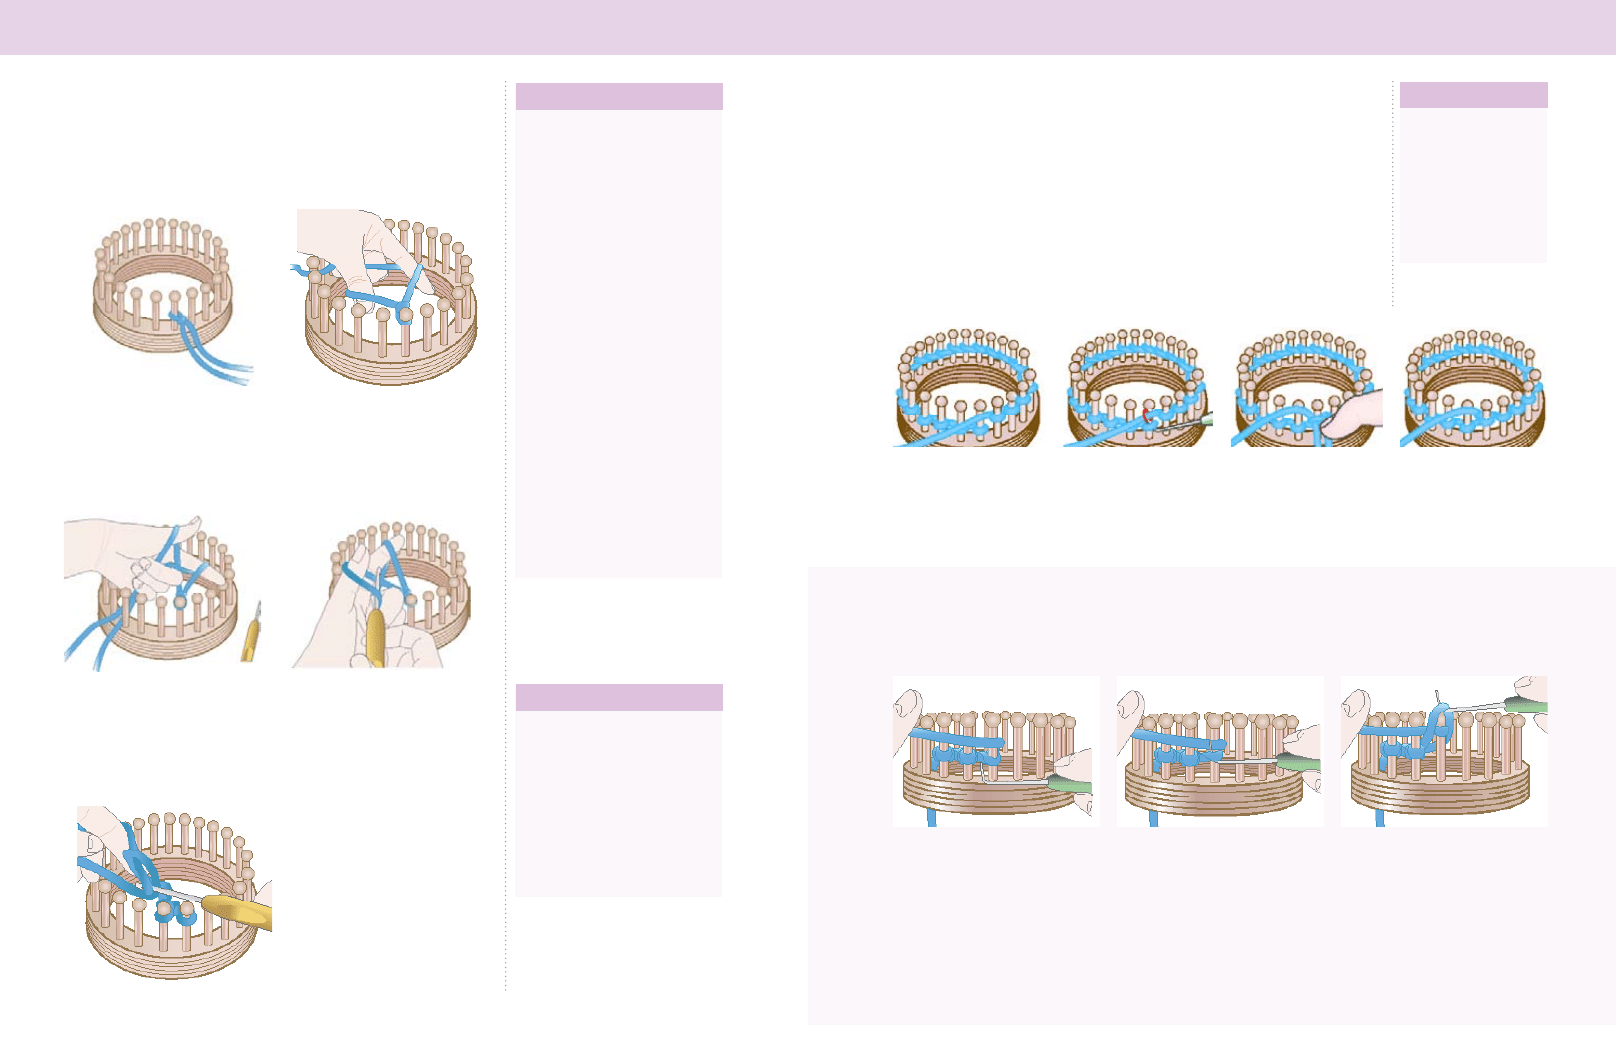
Casting on (continued)
long tail cast on
This is known as the long tail cast on because you use the tail of the yarn
and the working yarn to create the cast on. This is the same term used in
needle knitting. It creates a flexible cast on.
1
Make a slip knot, leaving a tail
that is about four times as long as the
width of your project. Place the slip
knot on a peg. The slip knot will
become your first stitch.
3
Flip your hand toward the left
until your palm faces up. The hand is
now in a slingshot position.
2
Position your left hand palm
down: wrap the working yarn (the one
coming from the skein) around your
index finger and the tail over your
thumb. Hold both yarn ends with the
remaining three fingers.
5
Place the loop on the adjacent
empty peg. Remove your thumb from
its loop and gently tug on the yarn tail
to tighten the new stitch that you
created. Repeat steps 3–5 until you
have the number of stitches called for
in the pattern.
4
Guide the crochet hook by the
palm side of the thumb under the
yarn strand, then guide it over to the
yarn strand on the index finger, hook
the yarn strand on the index finger,
and guide it down through the loop
on your thumb.
There is a method of using long
tail cast on without a crochet
hook but it is slightly more
complicated.
1
With the slip knot on your first
peg, grab the tail yarn and e-
wrap the peg to the left. The peg
now has two loops, knit over so
only one loop remains.
2
Grab yarn coming from the
skein and e-wrap the next
empty peg.
3
Grab the tail yarn and place it
above the e-wrap done in step 2.
Lift the bottom loop over and off
the peg (the peg should remain
wrapped with the tail).
4
Repeat steps 2 and 3 with the
remaining pegs.
You may find it more
●
comfortable to place the loom on
your lap or table to work on the
cast on.
When making your slip knot,
●
it is better to overestimate and
make the tail too long rather
than too short.
Tips
no crochet hook?
Basic stitches
The two basic stitches are the knit, or plain, and purl stitches. With these two stitches
under your belt you will be able to create numerous stitch patterns for your loom
knits.
knit stitch (k)
The knit stitch is the cornerstone of any loom-knitted item. Known also as the plain
stitch, the knit stitch resembles the knit stitch created on knitting needles. It looks like
a small V. Variations on the knit stitch are known as the flat stitch and the u-stitch.
Preparation: The knitting loom must have at least one stitch on each peg (a
cast-on row).
2
Insert the knitting tool
through the stitch on the
peg from bottom up. You
are going to hook the
working yarn where
indicated by the red ring.
1
Take working yarn to the front
of the peg and place it above the
loop on the peg. Do not place any
tension on it, simply rest it above.
2
Insert tool through the loop.
3
Lift the loop off the peg.
1
Lay the working yarn in
front and above the stitch
on the peg.
4
Take the original loop
off the peg and replace
with the new. Gently
tighten the working yarn.
Repeat steps 1–4 to
complete a knit row.
3
Hook the working yarn
with the knitting tool,
making a loop. Grab the
loop with your fingers.
flat stitch (fs)
This variation looks exactly like the knit stitch, except it is a shorter and tighter stitch.
KniT sTiTch basics
knit stitch
: Tall
height and wider stitch
u-stitch
: Medium
height and medium
width
flat stitch
: Short
height and narrower
width
SIMPLE SOCKS
36
LOOM KnIttIng SOCKS
Materials
LEVEL 1
SIMPLE SOCKS
37
LOOM KnIttIng SOCKS
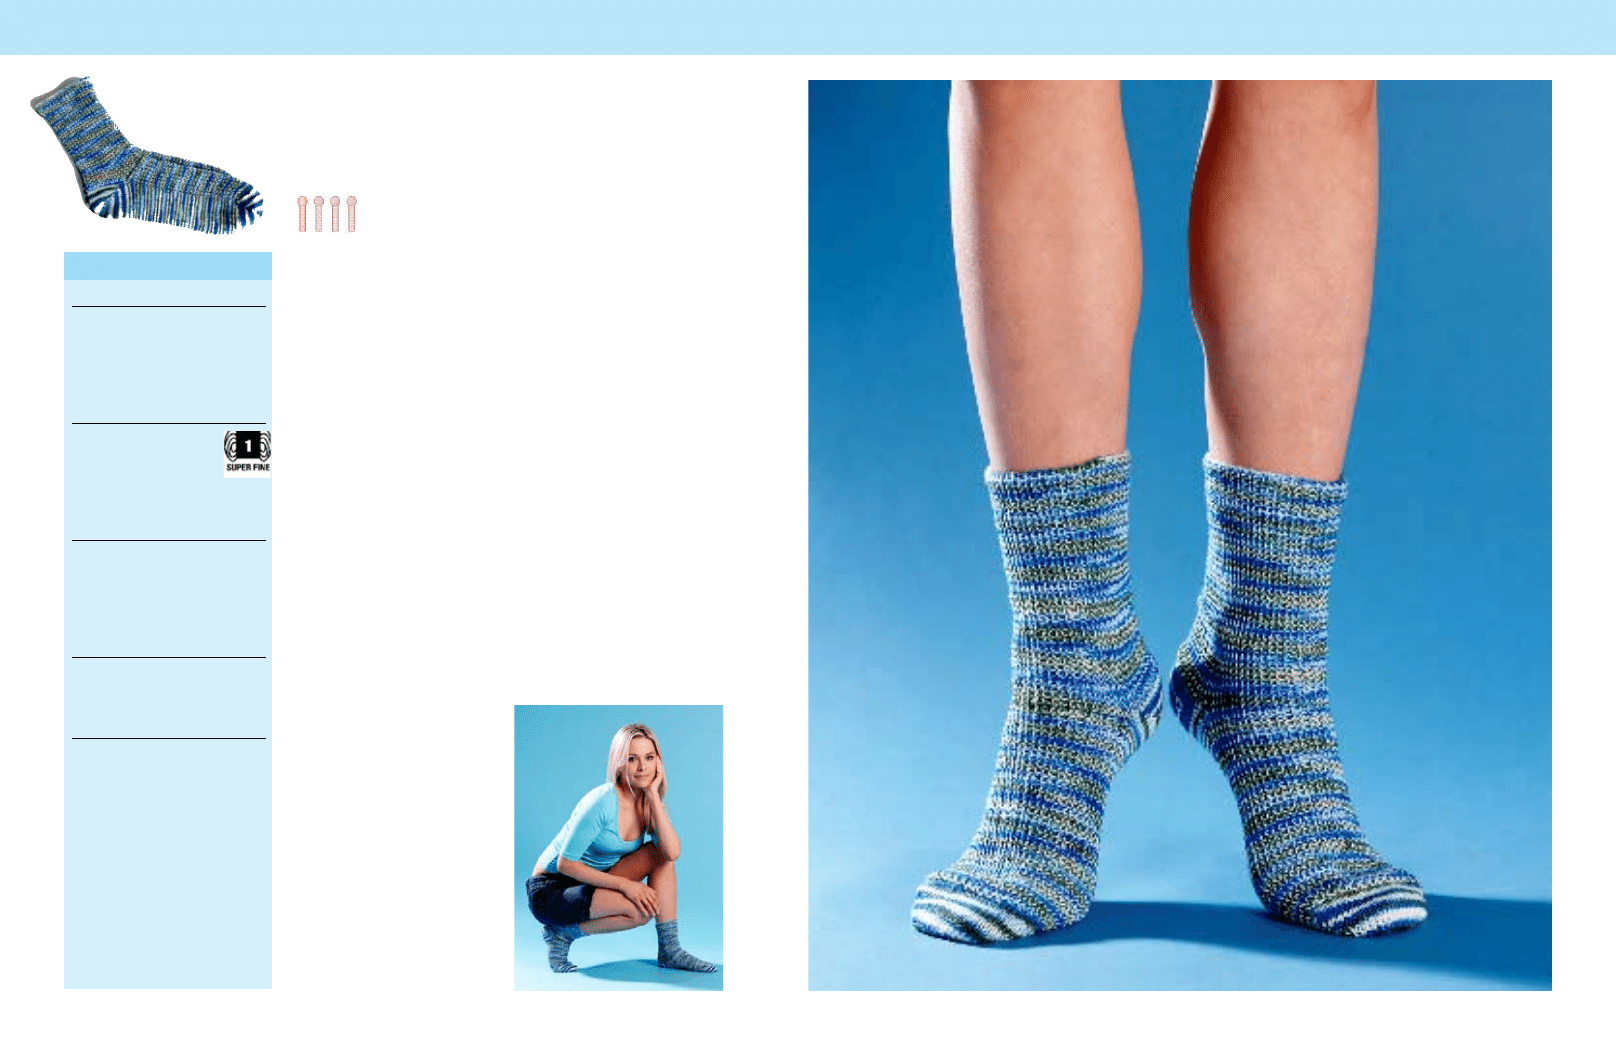
Single rib socks
Single rib socks are classic! The pattern is easily adaptable as it
has a multiple of 2. Make a pair for everyone in the family.
Stitch pattern:
Single Rib stitch
Rnd 1: *K1, p1; rep from * to the
end of rnd.
Rep this rnd throughout.
Directions
Cast on 64sts, join to work in
the round.
Cuff & Leg
Work in single rib st until leg
measures 6 in. (15 cm) from cast-on
edge (or desired length).
Heel
Done in rows as in a flat panel using
short-rows on 32 pegs. Follow
short-row shaping instructions on
page 25 until 12 sts remain
unwrapped. End ready for a
clockwise row.Continue with the
reverse short-row shaping
instructions on page 26.
Foot
Done in the round, sole is done in st
st, instep continues in single rib st.
Next rnd: k31, p1 *k1, p1; rep
from * to the end of rnd.
Repeat last rnd until foot measures
6
1
⁄
2
in. (16.5 cm) from back of heel
(or desired length).
Toe
Follow short-row shaping as
previously done for the heel.
Remove sts from loom as follows:
Place on dpn 1: Sts from pegs 1–32.
Place on dpn 2: Sts from pegs 33–64.
Sts are now prepared to graft close.
Follow grafting instructions to close
the toe (see page 17 for illustrated
instructions).
Finishing
Weave all yarn tail ends.
Block lightly.
Knitting loom
64 peg extra fine gauge knitting
loom. to recreate the pattern,
you will need a knitting loom
with a peg count multiple of 2.
Yarn
400–440 yd (365–402 m)
of sock weight yarn.
(Sample uses Scout’s
Swag in Stocker Pond.)
Tools
Knitting tool
tapestry needle
2 double pointed needles in size
2 (US)
Gauge
18 sts and 24 rows to
2 in. (5 cm) in St st (knit all rows)
Size
Shown in 9 in. (23 cm) foot
circumference. Pattern can be
adapted to any other smaller or
larger loom with a peg multiple
of 2.
10
9
8
7
6
5
4
3
2
1
1
2
3
4
5
6
7
8
Key
Purl
Knit
c4b
fancy socks: caBLEs & BEaDs
86
Loom knitting socks
Materials
Fancy socks: caBLEs & BEaDs
87
Loom knitting socks
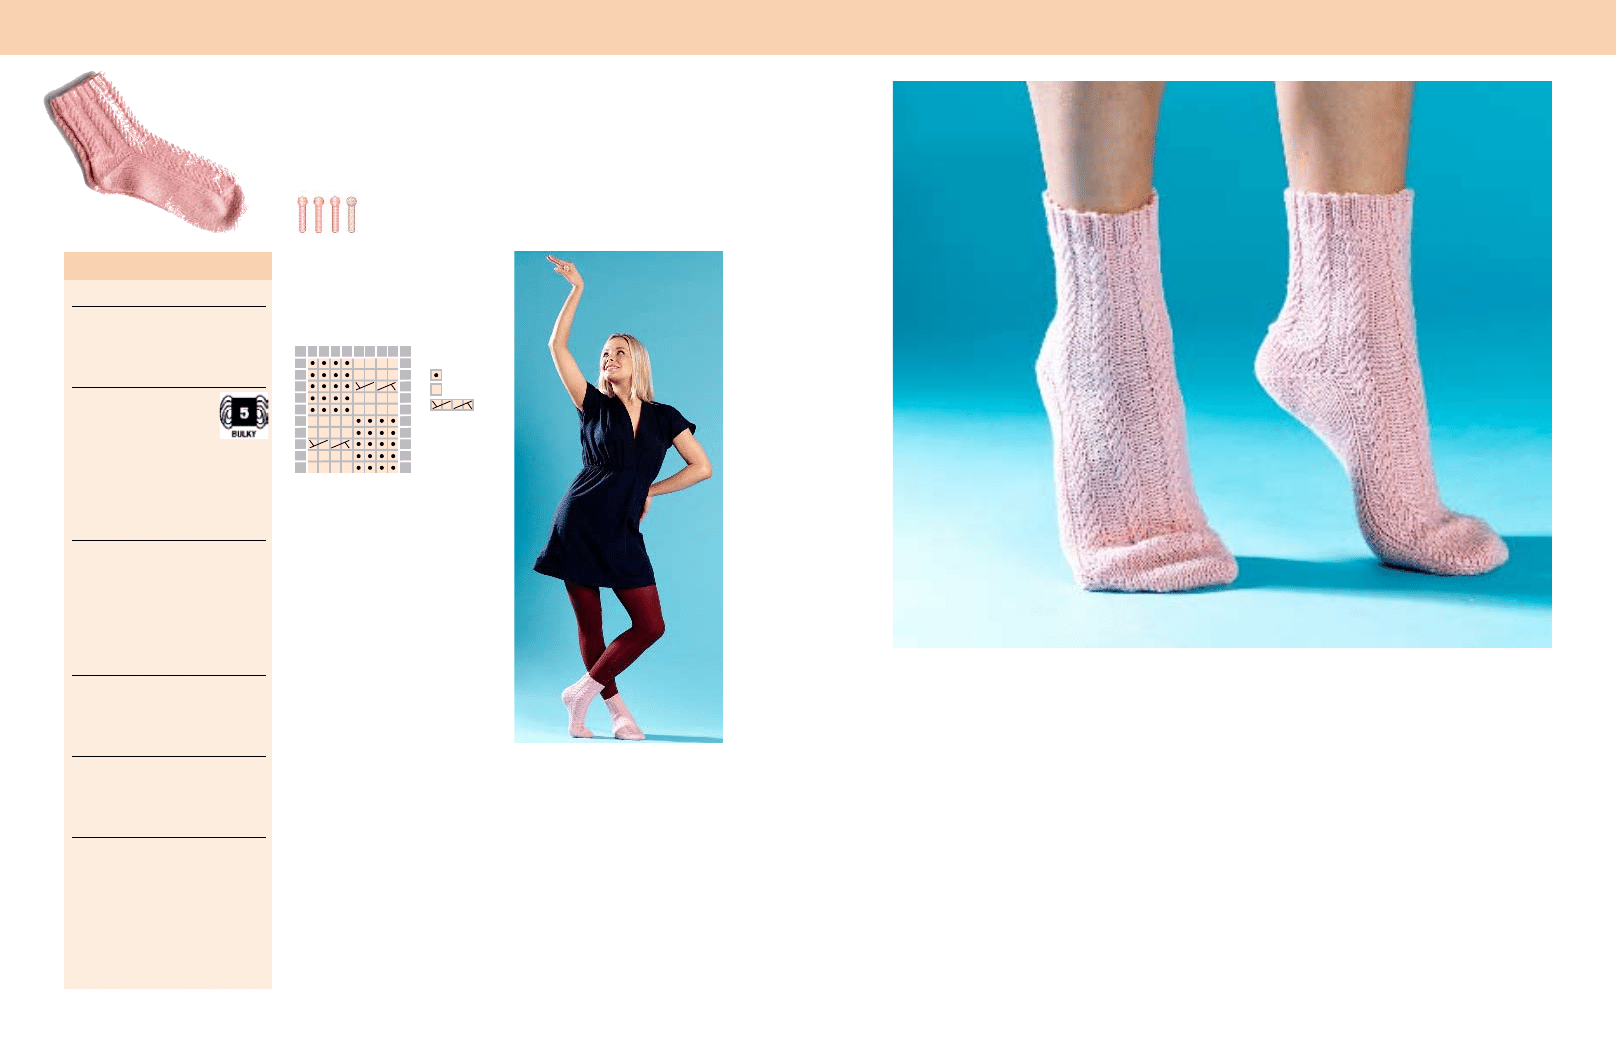
Knitting loom
64 peg extra fine gauge knitting
loom.
Yarn
350–400 yd (320–365 m)
of sock weight yarn.
(sample uses Patons
kroy Heathers 75% wool
25% nylon 152 yd [139 m)
per 50 g.)
Tools
knitting tool
tapestry needle
2 double pointed needles size 2
(Us)
cable needle
Gauge
18 sts and 24 rows to
2 in. (5 cm) in st st (knit all rows)
Size
shown in 8
1
⁄
2
in (21.5 cm) foot
circumference.
Abbreviations
c4f: a cable that takes place over
4 pegs (left cross cable).
Stitch pattern:
Clustered cable
follow instructions on pages 20–21
for cables over 4 stitches.
multiple of 8 + 4
Rnds 1–2: P4, k4.
Rnd 3: P4, c4f.
Rnds 4–5: P4, k4.
Rnds 6–7: k4, p4.
Rnd 8: c4f, p4.
Rnds 9–10: k4, p4.
Directions
cast on 64 sts, join to work in
the round.
Cuff
Rnd 1: *k2, p2; rep from * to the
end of round
Repeat rnd 1 until cuff measures
1
⁄
2
in. (1.5 cm) from cast-on edge.
Leg
start and work clustered cable
pattern until leg measures
6 in. (15 cm) from cast-on edge.
Heel
Done in rows as in a flat panel using
short-rows on 32 pegs. follow
short-row shaping instructions on
page 25 until 12 sts remain
unwrapped. End ready for a
clockwise row. continue with the
reverse short-row shaping
instructions on page 26.
Finishing
Weave all yarn tail ends.
Block lightly.
Foot
Worked in the round. foot is
worked completely in st st (knit
every round) until foot measures
6
1
⁄
2
in. (16.5 cm) from back of heel
(or desired length).
Toe
follow short-row shaping as
previously done for the heel.
Remove sts from loom as follows:
Place on dpn 1: sts from pegs 1–32.
Place on dpn 2: sts from pegs
33–64.
sts are now prepared to graft
closed. follow grafting instructions
to close the toe (see page 17 for
illustrated instructions).
LEVEL 3
clustered cable
When you have a craving for cables, the cluster of cables will
not disappoint. Grab your favorite yarn and get going!
8
7
6
5
4
3
2
1
1
2
3
4
8
7
6
5
4
3
2
1
1
2
3
4
Key
Purl
Knit
Left leg
Right leg
8
7
6
5
4
3
2
1
1
2
3
4
8
7
6
5
4
3
2
1
1
2
3
4
Key
Purl
Knit
Left leg
Right leg
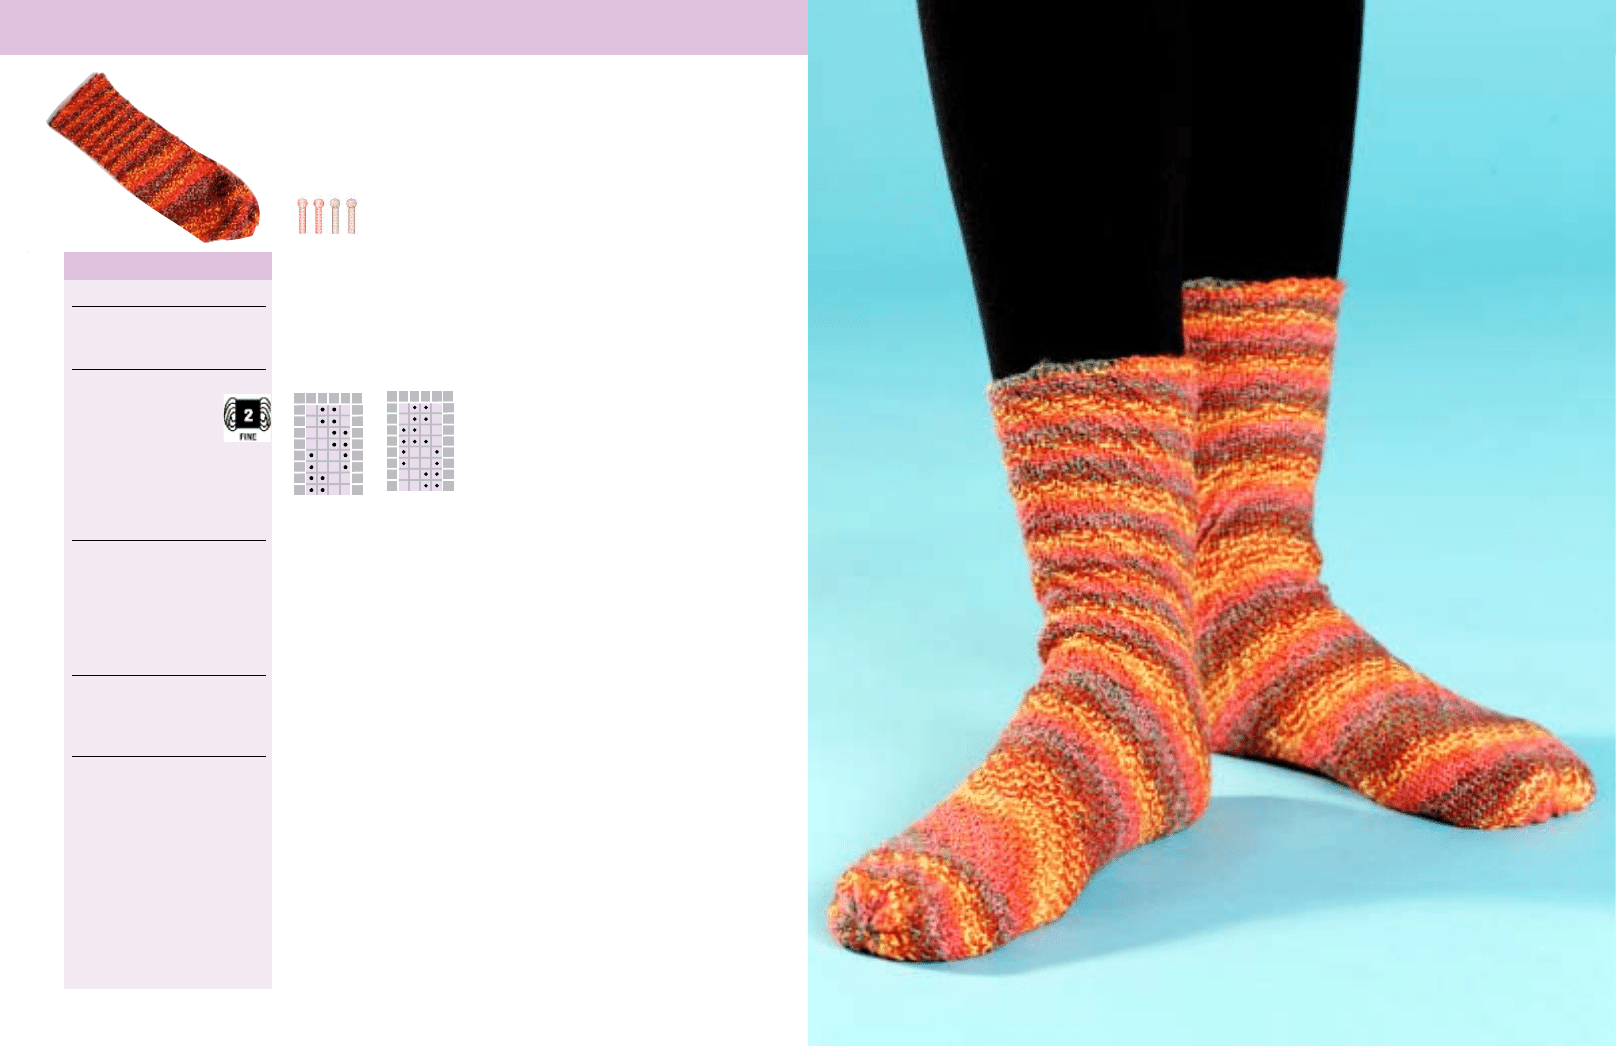
TexTured socks
58
Loom kniTTing socks
Materials
Pattern note
read chart from bottom up. every
round is read from right to left.
Stitch pattern:
Work from chart or use following
instructions.
Right leg
Rnd 1: (rs) k2, p2.
Rnd 2: k2, p2.
Rnds 3 and 4: P1, k2, p1.
Rnds 5 and 6: P2, k2.
Rnds 7 and 8: k1, p2, k1.
Left leg
Rnd 1: (rs) P2, k2.
Rnd 2: P2, k2.
Rnds 3 and 4: P1, k2, p1.
Rnds 5 and 6: k2, p2.
Rnds 7 and 8: k1, p2, k1.
Both legs
rnds 1–8 form pattern and are
repeated throughout.
Directions
cast on 64sts, join to work in
the round.
Right leg
Rnds 1–8: Work in spiraling rib
pattern for right leg.
repeat pattern until entire tube
measures 12 in. (30.5 cm) in length.
Toe
move every loop from the odd pegs
over to the neighboring peg (1 to 2,
3 to 4, etc.) every other peg is
empty and every other peg has 2
loops on it. Treat both loops as
though they were one.
Next rnd: knit.
Bind off
cut yarn leaving a 2 yd (2 m) tail.
Thread tapestry needle with yarn
coming from sock, bind off with
gather bind off method (see
page 16 for illustrated instructions).
Left leg
repeat instructions for right leg
except follow left leg rib pattern.
Finishing
Weave in all ends (see page 27).
spiraling tubes
The spiraling tubes are the most basic project you will find in
this book. It is your basic tube sock with a twist!
Knitting loom
64 peg extra fine gauge loom.
Yar
350–400 yd (320–365 m)
of sock weight yarn.
(sample uses shiBuiknits
fingering weight, 100%
superwash merino, 1.75 oz [50 g]
191 yd [175 m].)
2 x skeins in 51305.
Tools
knitting tool.
Tapestry needle.
2 double pointed needles size 2
(us).
cable needle.
Gauge
18 sts and 24 rows to
2 in. (5 cm) in st st (knit all rows)
Size
shown in 8 in. (20.5 cm) foot
circumference.
LeVeL 2
Wyszukiwarka
Podobne podstrony:
1883 Directions for knitting socks
Sample Disaster Recovery Project Plan
Prezentacja ZPR MS Project
Free Energy Projects 2
First 2015 Writing sample paper Nieznany
Microsoft Office Project Project1 id 299062
AIRBORNE SAMPLES SOLID PHASE extraction
ibt writing sample responses
HAM Sample and Hold SDR 30Khz 70Mhz
project
SAMPLE, segregacja, poszkodowany
89SXX Project Board
Classic Battletech Technical Readout Project Omega
Have Not Sample Vehicles
idioms sample
30 LED Projects
delta module1 sample test01 1
Origami 30 fold by fold projects
projectpriorities
więcej podobnych podstron