
220 Troubleshooting
EN
General paper-path troubleshooting
Jams occur in the printer when print media does not either reach or clear a photosensor along the
printer paper path in a specific amount of time. If a jam occurs, a
13.XX PAPER JAM
message appears
on the printer control panel. The following table contains general questions you might ask and topics
to explore before troubleshooting.
Table 39. General paper-path troubleshooting questions
Troubleshooting check
Action
What is the frequency of the jams (for
example: continuous, one jam per 100
pages, one jam per 1000 pages)?
Verify with the customer. Print the event
log to determine the jam history. See
figure 94, “Sample event log,” on page
191. to evaluate the event log.
Do jams only occur when the print media
is fed from a particular paper input source
(such as tray 1 or tray 2)?
Use the paper path test to isolate the
problem. See “Paper-path test” on page
222.
Do jams only occur when print media is
output to a specific output bin (either the
top output bin or rear output bin)?
Use the paper-path test to isolate the
problem. See “Paper-path test” on page
222.
Do jams occur with a specific type of
paper?
Try different media. See the HP LaserJet
Printer Family Print Media Guide. The
guide is bundled with this service manual.
Where does the leading edge of the first
sheet of paper in the printer paper path
stop when a jam occurs? Are any sheets
of media damaged or torn?
Attempt to duplicate. Use the paper-path
test to isolate the problem. Inspect the
paper path and all paper-path mechanical
assemblies up to the location where the
jams occur.
Is the customer loading the paper trays
correctly?
Observe the customer loading print
media. Do not fan paper. See proper
media handling procedures in the HP
LaserJet Printer Family Print Media Guide.
Is the customer overfilling the paper trays?
Ensure that print media is not over the
maximum fill marks in the paper trays.
Heavy media, such as transparencies,
labels, and card stock, might feed better if
only a few sheets are loaded at a time.
Observe the customer loading paper in
the trays.

EN
Chapter 7 Troubleshooting 221
There are five photosensors (PS102, PS103, PS106, PS107, and PS108) in the paper path for
detecting arrival or passing of the paper. Additional sensors are located in the optional duplexer.
If the sheet does not reach or pass these sensors within the prescribed time, the microprocessor on
the engine controller board assesses a jam. See page 263 for the location and function of sensors.
Are the paper tray guides set correctly?
For tray 1, ensure the guides are adjusted
correctly with the sides of the media. Make
sure the media fits under the tabs on the
guides and not above the load-level
indicators.
For trays 2, 3, and 4:
1. Squeeze the lever on the left guide and
slide the guides into place to match the
width of the paper.
2. Squeeze the lever on the rear paper
guide and slide it to the desired size until it
clicks into place.
3. To make the third adjustment, squeeze
the blue tab located on the right side of the
tray and move it to the correct position
based on the media size required.
4. Make sure the print media is flat in the
tray at all four corners and below the front
and back tabs.
Does the printer need to be cleaned?
Inspect the paper path and paper path
rollers. See the cleaning procedures in
chapter 4.
When was maintenance last performed on
the printer?
Determine from the configuration page the
number of pages since the last
maintenance. (See “Maintenance interval”
on page 77.) The printer maintenance kit
should be installed every 200,000 images.
Table 39. General paper-path troubleshooting questions (continued)
Troubleshooting check
Action

222 Troubleshooting
EN
Paper-path test
To perform a paper-path test:
1
Press
M
ENU
until
INFORMATION MENU
appears.
2
Press
I
TEM
until
PRINT PAPER PATH TEST
appears.
3
Press
S
ELECT
.
INPUT=TRAY 1
is displayed
4
Press
V
ALUE
+
to cycle selections until the desired paper tray appears.
5
Press
S
ELECT
.
OUTPUT=TOP BIN
is displayed.
6
Press
V
ALUE
+
until the desired output bin appears (open the rear output bin to print to it).
7
Press
S
ELECT
.
DUPLEX=ON
is displayed. This selection only appears when a duplexer is installed.
8
Press
V
ALUE
+
until the desired duplex mode (
ON
or
OFF
) appears.
9
Press
S
ELECT
.
COPIES=1
appears.
10 Press
V
ALUE
+
to cycle selections until the desired number of copies appears. Choose 1, 10, 50,
100, or 500 copies.
11 Press
S
ELECT
to perform the paper-path test.
Information pages
From the printer control panel you can print pages that give details about the printer and its current
configuration. The following information pages are described here:
!
Menu map
!
Configuration page
For a complete list of the printer information pages, print a menu map and see the information menu.
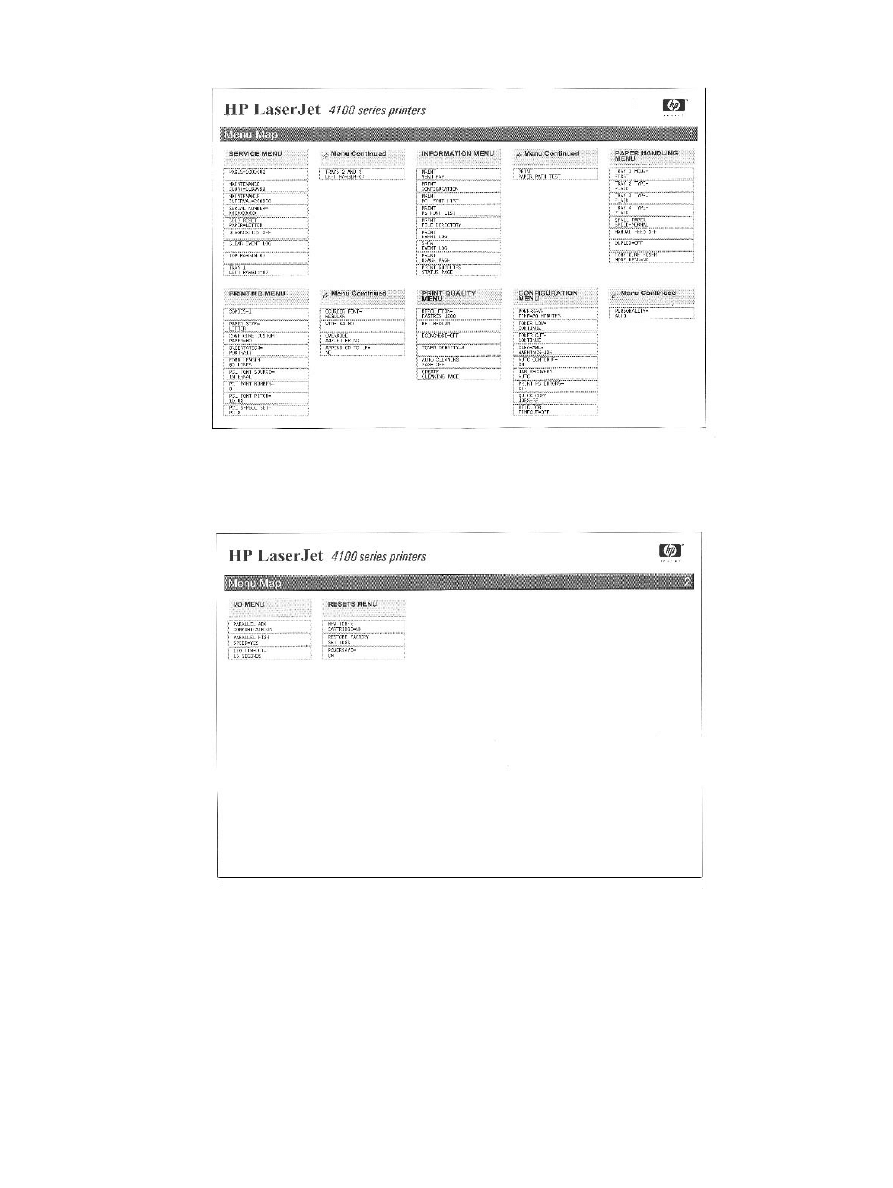
Menu map
To see the current settings for the menus and items available on the control panel, print a control
panel menu map:
1
Press
M
ENU
until
INFORMATION MENU
appears.
2
Press
I
TEM
until
PRINT MENU MAP
appears.
3
Press
S
ELECT
to print the menu map.
The content of the menu map varies, depending on the options currently installed in the printer. The
printer driver or software application can override many of these values.
EN
Chapter 7 Troubleshooting 223
Figure 95.
Sample menu map (1 of 2)
Figure 96.
Sample menu map (2 of 2)

224 Troubleshooting
EN
Embedded Web server
The embedded Web server allows you to view printer and network status and to manage printing
functions from your computer instead of from the printer control panel. This service is designed for
offices using an IP network and a standard Web browser. Below are examples of what you can do
using the embedded Web server:
!
View printer control panel messages.
!
Determine the remaining life of all consumables.
!
Order consumables.
!
View and change tray configurations.
!
View and change the printer control panel menu configuration.
!
View and print internal pages.
!
Receive notification of printer events.
!
View and change network configuration.
To use the embedded Web server, you must have an IP-based network and a Web browser. The
embedded Web server can be used with Microsoft
®
Internet Explorer 4 or above, and with Netscape
™
Navigator 4 and above. IPX-based printer connections are not supported by the embedded Web
server.
To use the embedded Web server
1
Open your Web browser.
2
Type the IP address assigned to the printer into the Address or Location field.
The IP address for the printer is listed on the printer configuration page. For more information about
printing a configuration page, see page 226.
Embedded Web server page sets
The embedded Web server has three sets of internal Web pages for collecting information about the
printer and for changing configuration options. These sets are:
!
Home pages
!
Device pages
!
Networking pages
When the embedded Web server is active, each set of pages is listed on the browser screen. Click
the set that you want to view, and the selection expands to display a list of frequently used Web links.
Note
Each page in the embedded Web server connects to online Help. For more information regarding a
particular page, click the Help button.

EN
Chapter 7 Troubleshooting 225
Home page set
The home pages of the embedded Web server are the informational pages for the printer. These
include:
!
Printer status page
This page displays printer capabilities, control panel messages, and status lights that currently
appear on the printer control panel. From here, you can set the frequency at which the
embedded Web server will check the printer status. This page also displays consumable life
levels and the input tray configurations.
!
Configuration page
This page displays the printer configuration page. For more information about interpreting and
printing the configuration page, see page 226.
!
Supplies status page
This page displays the levels of the consumables for the printer.
!
Usage page
This page displays the amount of each media type that has been used by the printer.
!
Event log page
This page displays the printer event log. For more information about displaying and printing the
event log, page 192.
!
Device identification page
This page displays the name, asset number, network address, model number, and serial number
for this printer.
!
Device page set
The device pages of the embedded Web server allow you to configure the printer from your
computer. The device pages can be password protected. Always consult with your network
administrator before changing the printer’s configuration.
!
Configure printer page
Configure all printer settings from this page.
!
Alerts page
Input a list of recipients for electronic notification of various printer events.
!
E-mail page
Configure the incoming and outgoing mail servers.
!
Security page
Set a password for the embedded Web server. Passwords and features configuration should
only be determined by the network administrator. If a password is set, users will require a
password for entry into the device sections of the embedded Web server.
!
Other links page
Add or customize links to other websites. These links are displayed on the navigational bar
throughout the embedded Web server pages.
There are two permanent links: “Ask a question” where the user can get help with the printer,
and “Order Supplies” where you can order printer supplies. “Order Supplies” is only available
from the device page set.

226 Troubleshooting
EN
!
Language page
Determine the language in which to display the embedded Web server information.
!
Device Identification page
Name the printer and assign an asset number to it. Input the name and e-mail address of the
primary point of contact for information about the printer. This page also shows the printer’s
network names, addresses, and printer model information.
Configuration page
Use the configuration page to view current printer settings, to help troubleshoot printer problems, or
to verify installation of optional accessories, such as memory (DIMMs), paper trays, and printer
languages.
Note
If an HP JetDirect print server EIO card is installed, a JetDirect configuration page will print out as well.
To print a configuration page:
1
Press
M
ENU
until
INFORMATION MENU
appears.
2
Press
I
TEM
until
PRINT CONFIGURATION
appears.
3
Press
S
ELECT
to print the configuration page.
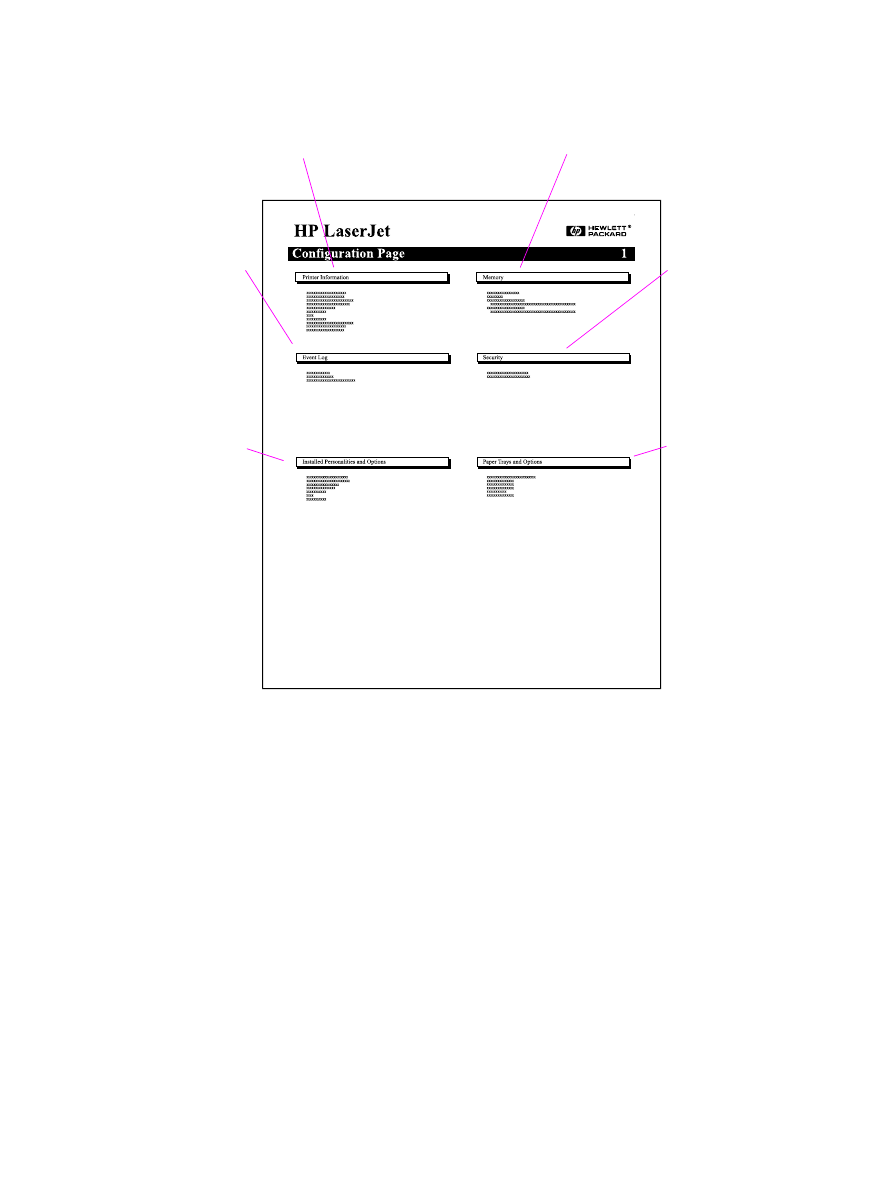
Figure 97 on page 227 is a sample configuration page. The content of the configuration page varies,
depending on the options currently installed in the printer.
EN
Chapter 7 Troubleshooting 227
Figure 97.
Sample configuration page (HP LaserJet 4100 series printer)
Verify installed options
Under “Installed Personalities and Options” on the configuration page, look for options such as hard
disk or DIMM types and sizes.
Verify that the options installed in the printer are reflected on the configuration page. If an installed
device is not shown, reseat the device and print a new configuration page.
Image quality
When you are working with customers, obtain a print sample before you begin troubleshooting the
printer. Ask the customer to explain the quality expected from the printer. The print sample will also
help clarify the customer’s explanation.
4100 Series printers
Printer Information
Lists the serial number, HP JetSend IP
addresses, page counts, and other
information for the printer.
Memory
Lists printer memory, PCL driver work
space (DWS), and I/O buffering and
resource-saving information.
Event Log
Lists the
number of
entries in the
log, the
maximum
number of
entries
viewable, and
the last three
entries.
Security
Lists the
status of
the printer
control
panel lock,
control
panel
password,
and disk
drive.
Installed
Personalities
and Options
Lists all
printer
languages
that are
installed
(such as PCL
and PS) and
lists options
that are
installed in
each DIMM
slot and EIO
slot.
Paper
Trays and
Options
Lists the
size
settings for
all trays and
lists
optional
paper-
handling
accessories
that are
installed.

228 Troubleshooting
EN
Check the toner cartridge
Image formation defects are often the result of problems with the toner cartridge. If there is any
doubt, always replace the toner cartridge before troubleshooting image defects.
Use the following checklist to ensure that the toner cartridge is still operable.
!
Ensure that the toner cartridge has toner. Weight is one indication of the presence of toner, as
shown in table 41.
1.
Depending on the exact pages printed, the toner cartridge might be empty and weigh more
than these values.
!
Check the expiration date of the toner cartridge (stamped on the box).
!
Check the toner cartridge to see if it has been disassembled or refilled.
!
Ensure that the toner cartridge is seated properly in the printer.
!
Inspect the cartridge for toner leaking through worn seals. (If the drum has been manually
rotated, the rotation might have caused internal damage and toner might spill.)
Table 40. Image quality checks
Image quality checks
Action
Does the problem repeat on
the page?
Use the repetitive defect ruler on page 243.
Is the toner cartridge full and
is it manufactured by HP?
Check the toner cartridge using the checklist on page 228.
Is the customer using print
media that meets all HP
paper specification
standards?
For more information about HP’s paper specification standards,
see chapter 1 of this manual and the HP LaserJet Printer Family
Print Media Guide.
Is the print sample similar to
those in the print-quality
tables see page 1-22?
Compare and perform the actions recommended in the print-
quality tables.
Is the problem on the toner
cartridge drum or the
transfer roller?
Perform the half self-test functional check (page 244) to determine
where the defect is.
If a dark and distinct toner image is preset on the drum’s surface,
assume that the first four functions of the electrophotographic
process are functioning (cleaning, conditioning, writing, and
developing–see chapter 5), and troubleshoot the failure as a
transfer or fusing problem.
Table 41. Weights of toner cartridges
Toner Cartridge
Capacity
Full
Weight
Typical Empty
Weight
1
6,000 pages
1343 grams
(47.4 ounces)
1105 grams
(39 ounces)
10,000 pages
1490 grams
(52.59 ounces)
1110 grams
(39.18 ounces)

EN
Chapter 7 Troubleshooting 229
Note
Toner cartridges are rated for 6,000 or 10,000 images at 5 percent coverage (depending on the model).
It is possible to wear out the gears and the cartridge seals before
TONER LOW
appears if the number of
images exceeds 6,000 or 10,000 (depending on the model). See “EconoMode” below. A depleted
cartridge will often create print defects.
!
Check the surface of the photosensitive drum in the cartridge to see if it has been damaged or
scratched. Touching the drum will contaminate the photosensitive surface and can cause
spotting and defects during printing.
!
White areas on the page might indicate that the drum has been exposed to light for too long. If
white areas appear, stop the printer and wait a few minutes. This should eliminate most defective
images. If not, place the toner cartridge in a dark environment for several days. This can restore
some life to the drum.
EconoMode
EconoMode creates draft-quality printing by reducing the amount of toner on the printed page by up
to 50 percent. Advise the customer to turn EconoMode on or off from the printer driver or software
application, because those settings override the control panel settings. EconoMode settings can also
be changed from the print quality menu.
CAUTION
HP does not recommend full-time use of EconoMode. If EconoMode is used frequently, it is possible
that the toner supply will outlast the mechanical parts in the toner cartridge.

230 Troubleshooting
EN
Image defects
The quality of the printer output is subject to the judgment of the user. This section of the manual
helps you define print quality defects and understand what factors affect print quality.
The print samples shown in the following tables illustrate some print quality defects. For future
reference, retain copies of print quality defects encountered in the field with an explanation of their
causes.
The image defects listed below are covered in the following tables.
!
Black page (page 231)
!
Blank spots (page 233)
!
Creases (page 233)
!
Curl (page 234)
!
Contamination on back (page 234)
!
Distorted image (page 235)
!
Dropouts (page 235)
!
Faded print/bubbles (page 235)
!
Gray background (page 236)
!
Horizontal black lines (page 236)
!
Horizontal smudges (page 237)
!
Horizontal white lines (page 237)
!
Light print, dark print, or fade (page 238)
!
Loose toner (page 239)
!
Repetitive defects (page 239)
!
Skew (page 239)
!
Toner smear (page 240)
!
Toner specks (page 240)
!
Vertical black lines (page 241)
!
Vertical dots (page 241)
!
Vertical white lines (page 241)
!
Repeating image (page 242)
!
Misformed characters (page 242)
!
Tire tracks (page 242)
!
White spots on black (page 243)
Hint
If you find a defect that is not depicted, record the probable cause along with the conditions in the
printing environment and save a copy of the defect for future reference.
EN
Chapter 7 Troubleshooting 231
Table 42. Image defects
Problem
Cause
Solution
Black page
The high-voltage power supply
connections are contaminated.
Clean the high-voltage power
supply terminals. (See “Engine
controller board layout,” figure
105 on page 254.) Also clean the
high-voltage springs where they
contact the toner cartridge.
The high-voltage power supply is
installed improperly.
If the high-voltage power supply
has been removed and replaced,
it might not be seated properly.
Remove the engine controller
board and check the connectors
for damage. Reseat the engine
controller board, being certain to
fully seat the connectors.
Defective primary charging roller.
Replace the toner cartridge.
The laser drive circuitry is
damaged on the engine controller
board so that the laser is always
on.
Replace the laser scanner
assembly and engine controller
board, followed by the formatter, if
necessary.
232 Troubleshooting
EN
White page
No toner is available for print.
Remove sealing tape or replace
the toner cartridge.
Defective laser shutter.
Check the laser shutter for free
operation when inserting the
toner cartridge.
Toner cartridge guide damaged,
improperly positioned, or missing.
Make sure the guide is installed
properly above the toner
cartridge.
No transfer roller voltage.
Without transfer roller voltage,
toner cannot be attracted from
the surface of the drum to the
print media. Perform the half
self-test functional check (page
244) to check all other
electrophotographic processes.
Replace the transfer roller if
necessary.
No developing bias.
1. Clean the high-voltage power
supply contacts. With no
developing bias charge, toner is
not attracted to the drum.
2. Replace the engine controller
board.
No drum ground path.
With no ground path, the drum
cannot discharge. The negative
charge on the drum repels toner,
and leaves a white page with
bubble print.
1. Check the drum ground spring
and reconnect it, if necessary.
2. Replace the engine controller
board.
Defective laser scanner cable
assembly.
Low-level signals exchanged
between the laser/scanner
assembly and the engine
controller board might be
affecting laser output. Replace
the laser/scanner cable assembly.
Table 42. Image defects
Problem
Cause
Solution
EN
Chapter 7 Troubleshooting 233
Blank spots
Print media does not meet printer
specifications or is stored
improperly.
1. Print a few more pages to see
if the problem corrects itself.
2. Turn over the stack of media in
the tray. Also try rotating the
media 180°.
3. If the print media does not
meet HP specifications, replace
the paper, and advise the
customer to use the
recommended print media and
store it properly.
Contaminated or deformed
transfer roller.
Replace the transfer roller.
Defective toner cartridge.
Replace the toner cartridge.
See also “Dropouts” on page 235.
Creases
Print media does not meet printer
specifications or is stored
improperly.
1. Print a few more pages to see
if the problem corrects itself.
2. Turn over the stack of media in
the tray. Also try rotating the
media 180°.
3. If the print media does not
meet HP specifications, replace
the paper, and advise the
customer to use the
recommended print media and
store it properly.
Printer’s operating environment
does not meet specifications.
Make sure the printer’s operating
environment meets
specifications.
Print media is loaded incorrectly.
Make sure print media is loaded
correctly and that the guides fit
properly against the media stack.
Wrong tray.
Print from a different tray (such as
tray 1).
Wrong output bin for print media
type.
Print to a different output bin (top
or rear output bin).
Obstruction in paper path.
1. Check the paper path for print
media debris.
2. Check for damaged
components that could be
creasing the media.
Table 42. Image defects
Problem
Cause
Solution

234 Troubleshooting
EN
Curl
Print media does not meet printer
specifications or is stored
improperly.
1. Print a few more pages to see
if the problem corrects itself.
2. Turn over the stack of media in
the tray. Also try rotating the
media 180°.
3. If the print media does not
meet HP specifications, replace
the paper, and advise the
customer to use the
recommended print media and
store it properly.
Printer’s operating environment
does not meet specifications.
Make sure the printer’s operating
environment meets
specifications.
Wrong output bin.
Print to a different output bin (top
or rear output bin).
Wrong fuser setting for print
media type.
From the paper-handling menu
on the control panel, change the
fuser mode setting or choose
another paper type from the
printer driver.
See also “Dropouts” on page 235.
Contamination
on back
Contamination inside printer (tray
separation roller, feed roller,
transfer roller, fuser, toner
cartridge).
1. Print at least 10 pages to see if
the problem goes away.
2. Print a cleaning page (page
84).
Identify and clean the
contaminated part according to
the repetitive defect ruler on
page 243. If contamination
cannot be removed, replace the
contaminated part.
3. Check for toner leaks.
Print media does not meet printer
specifications or is stored
improperly.
1. Print a few more pages to see
if the problem corrects itself.
2. Turn over the stack of media in
the tray. Also try rotating the
media 180°.
3. If the print media does not
meet HP specifications, replace
the paper, and advise the
customer to use the
recommended print media and
store it properly.
Table 42. Image defects
Problem
Cause
Solution
EN
Chapter 7 Troubleshooting 235
Distorted
image
Print media does not meet printer
specifications or is stored
improperly.
1. Print a few more pages to see
if the problem corrects itself.
2. Turn over the stack of media in
the tray. Also try rotating the
media 180°.
3. If the print media does not
meet HP specifications, replace
the paper, and advise the
customer to use the
recommended print media and
store it properly.
Printer’s operating environment
does not meet specifications.
Make sure the printer’s operating
environment meets
specifications.
Wrong output bin for print media
type.
Print to a different output bin.
Poor connection of cables to the
laser scanner.
Reseat the cables connected to
the laser/scanner.
Poor connection of cables to the
engine controller board.
Reseat the cables connected to
the engine controller board.
Defective laser scanner.
Replace the laser scanner.
Defective engine controller board.
Replace the engine controller
board.
Dropouts
Paper might be too smooth.
Check the paper (or other print
media) type and quality.
Printer’s operating environment
does not meet specifications.
Make sure the printer’s operating
environment meets
specifications.
Wrong toner density setting.
From the print-quality menu on
the control panel, adjust the toner
density setting. Make sure
EconoMode is off.
Wrong fuser setting for paper
type.
From the paper-handling menu
on the control panel, change the
fuser mode setting to High1 or
High2 or choose another paper
type from the printer driver.
See also “Blank Spots” on
page 233.
Table 42. Image defects
Problem
Cause
Solution

236 Troubleshooting
EN
Faded print/
bubbles
No drum ground path.
With no ground path, the drum
cannot discharge. The negative
charge on the drum repels toner
and leaves a white page with
bubble print.
1. Check the drum ground spring
and reconnect it, if necessary.
2. Replace the engine controller
board.
Engine controller board.
Replace the engine controller
board.
Gray
background
Print media does not meet printer
specifications or is stored
improperly.
1. Print a few more pages to see
if the problem corrects itself.
2. Turn over the stack of media in
the tray. Also try rotating the
media 180°.
3. If the print media does not
meet HP specifications, replace
the paper, and advise the
customer to use the
recommended print media and
store it properly
Printer’s operating environment
does not meet specifications.
Make sure the printer’s operating
environment meets
specifications.
Wrong toner density setting.
From the print-quality menu on
the control panel, adjust the toner
density setting. Make sure
EconoMode is off.
Faulty toner cartridge.
Replace the toner cartridge.
See also “Light print, dark print,
or fade” on page 238.
Horizontal
black lines
Defective laser scanner assembly
or engine controller board.
1. See the “Repetitive defect
ruler” on page 243.
2. Reseat connectors on the laser
scanner and engine controller
board.
3. Replace the laser/scanner
assembly followed by the engine
controller board, if necessary.
Table 42. Image defects
Problem
Cause
Solution
EN
Chapter 7 Troubleshooting 237
Horizontal
smudges
Paper-path contamination or
damage.
1. See the “Repetitive defect
ruler” on page 243.
2. Check the toner cartridge and
replace it if necessary.
3. Check the fuser and replace it,
if necessary.
Horizontal
white lines
1. Check the toner cartridge and
replace it if necessary.
2. Check the fuser and replace it
if necessary.
3. Replace the laser/scanner
assembly, followed by the engine
controller board, if necessary.
Table 42. Image defects
Problem
Cause
Solution

238 Troubleshooting
EN
Light print,
dark print, or
fade
Wrong toner density setting.
From the print-quality menu on
the control panel, adjust the toner
density setting. Make sure
EconoMode is off.
Toner cartridge is low.
Replace the toner cartridge.
Transfer roller is defective.
Replace the transfer roller.
Print media does not meet printer
specifications or is stored
improperly.
1. Print a few more pages to see
if the problem corrects itself.
2. Turn over the stack of media in
the tray. Also try rotating the
media 180°.
3. If the print media does not
meet HP specifications, replace
the paper, and advise the
customer to use the
recommended print media and
store it properly.
Poor contact to the engine
controller board.
1. Ensure that the drum ground
spring is connected to the engine
controller board correctly.
2. Clean the contacts if they are
contaminated. If the problem
remains after cleaning, or parts
are damaged or deformed,
replace them.
3. Replace the engine controller
board, if necessary.
Defective laser/scanner.
Replace the laser/scanner.
Defective engine controller board.
Replace the engine controller
board.
See also “Faded Print/Bubbles”
on page 236.
Table 42. Image defects
Problem
Cause
Solution
EN
Chapter 7 Troubleshooting 239
Loose toner
Contamination in the printer.
1. Print a few more pages to see
if the problem corrects itself.
2. Clean the inside of the printer
or use the printer’s cleaning page.
(See “Cleaning the printer and
accessories” starting on
page 82.)
Toner cartridge is defective.
Replace the toner cartridge.
Paper might be too smooth.
Check the paper (or other print
media) type and quality.
Wrong fuser setting for paper
type.
From the paper-handling menu
on the control panel, change the
fuser mode setting or choose
another paper type from the
printer driver.
Defective fuser.
1. Maintenance might be due.
Check this by printing a copy of
the supplies status page. If
maintenance is due, order and
install the printer maintenance kit.
2. Replace the fuser.
Repetitive
defects
Contamination or defect on a
roller.
See the “Repetitive defect ruler”
on page 243.
Skew
Print media does not meet printer
specifications or is stored
improperly.
1. Print a few more pages to see
if the problem corrects itself.
2. Verify that there are no torn
pieces of media inside the printer.
3. Turn over the stack of media in
the tray. Also try rotating the
media 180°.
4. If the print media does not
meet HP specifications, replace
the paper, and advise the
customer to use the
recommended print media and
store it properly.
Print media is not loaded
correctly or trays are not adjusted
properly.
Make sure print media is loaded
correctly and that the guides fit
properly against the media stack.
Registration assembly is
improperly installed.
Be sure that the registration
assembly is installed correctly.
Table 42. Image defects
Problem
Cause
Solution
240 Troubleshooting
EN
Toner smear
Contamination in the printer.
1. Print a few more pages to see
if the problem corrects itself.
2. Clean the inside of the printer
or use the printer’s cleaning page.
(See “Cleaning the printer and
accessories” starting on
page 82.)
Paper might be too smooth.
Check the paper (or other print
media) type and quality.
Defective toner cartridge.
Replace the toner cartridge. (See
instructions with the toner
cartridge.)
Wrong fuser setting for paper
type.
From the paper-handling menu
on the control panel, change the
fuser mode setting or choose
another paper type from the
printer driver.
Toner specks
Contamination in printer.
1. Print a few more pages to see
if the problem corrects itself.
2. Clean the inside of the printer
or use the printer’s cleaning page.
(See “Cleaning the printer and
accessories” starting on
page 82.)
3. Activate the automatic cleaning
page in the print-quality menu.
Print media does not meet printer
specifications or is stored
improperly.
1. Print a few more pages to see
if the problem corrects itself.
2. Turn over the stack of media in
the tray. Also try rotating the
media 180°.
3. If the print media does not
meet HP specifications, replace
the paper, and advise the
customer to use the
recommended print media and
store it properly.
Use of alternating small and
standard print media (such as
envelopes and letterhead).
To alternate small and standard
paper, from the configuration
menu on the control panel, set
SMALL PAPER SPEED=SLOW
.
Table 42. Image defects
Problem
Cause
Solution
EN
Chapter 7 Troubleshooting 241
Vertical black
lines
Defective toner cartridge.
Replace the toner cartridge.
Contaminated fuser entrance
guide.
Clean the guide.
Scratches on the fuser.
Replace the fuser.
Worn fuser film.
1. Set the fuser to a lower
temperature mode.
2. Replace the fuser.
Note
To prevent the print-quality
problem, reduce printing on large
volumes of narrow media, such
as envelopes. Instead, alternate
smaller volumes of narrow media
with full-page printing jobs.
Vertical dots
Contaminated static eliminator
teeth.
Clean the static eliminator.
Poor contact between the static
eliminator and the engine
controller board.
Clean the contacts, if
contaminated. If the problem
remains after cleaning, or parts
are damaged or deformed,
replace them.
Deformed or deteriorated transfer
roller.
Replace the transfer roller.
Defective engine controller board.
Replace the engine controller
board.
Vertical white
lines
Lack of toner or faulty toner
cartridge.
Redistribute the toner in the toner
cartridge. If the problem
continues, replace the toner
cartridge.
Contamination in the laser path.
1. Clean the laser path. (Remove
the laser/scanner assembly and
clean the lens.)
2. Replace the laser/scanner
assembly.
Defective fuser.
Replace the fuser assembly.
Table 42. Image defects
Problem
Cause
Solution
242 Troubleshooting
EN
Repeating
image
This type of defect might occur
when using preprinted forms, a
large quantity of narrow media, or
a fuser mode that is set too high
for your media.
1. Print a few more pages and
see if the problem corrects itself.
2. Make sure that print media
type and quality meet HP
specifications.
3. If you observe that this type of
defect occurs on wide paper
(such as letter or A4-size paper)
just after printing on narrow
media (such as envelopes), you
can set
SMALL PAPER SPEED
on
the paper-handling menu to
SLOW
.
Note that this will slow down
printing.
4. Check your fuser mode.
Maintenance due
Print a copy of the supplies status
page. If maintenance is due,
order and install the printer
maintenance kit.
Misformed
characters
Printer’s operating environment
does not meet specifications.
1. Print a few more pages to see
if the problem corrects itself.
2. Make sure that the
environmental specifications for
the printer are being met.
Maintenance due
Print a copy of the supplies status
page. If maintenance is due,
order and install the printer
maintenance kit.
Tire tracks
Toner cartridge is worn out.
1. Replace the toner cartridge
after 6,000 or 10,000 pages,
depending on the type of toner
cartridge that is installed in the
printer.
2. Reduce the number of pages
that you print with very low toner
coverage.
3. Use the 6,000-page cartridge if
you cannot reduce the number of
pages that have very little toner
coverage.
Table 42. Image defects
Problem
Cause
Solution
EN
Chapter 7 Troubleshooting 243
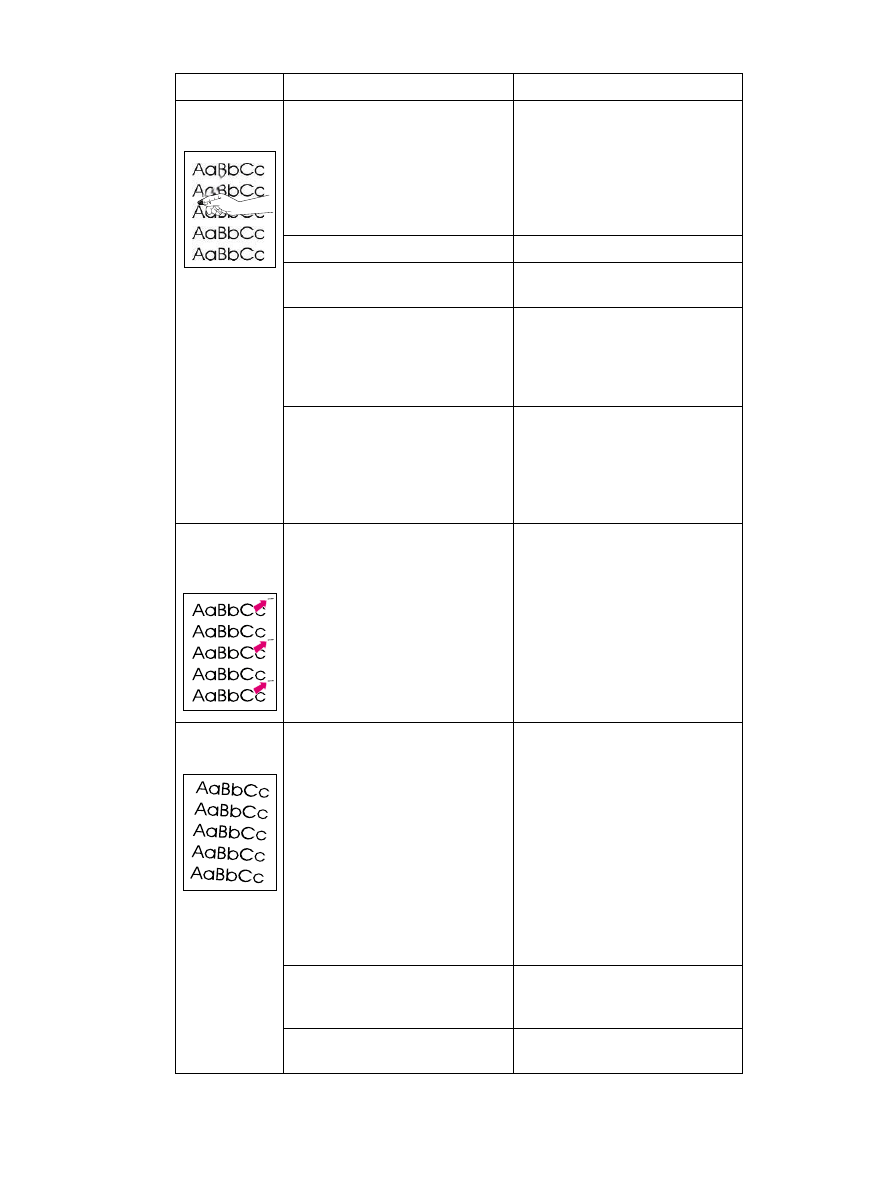
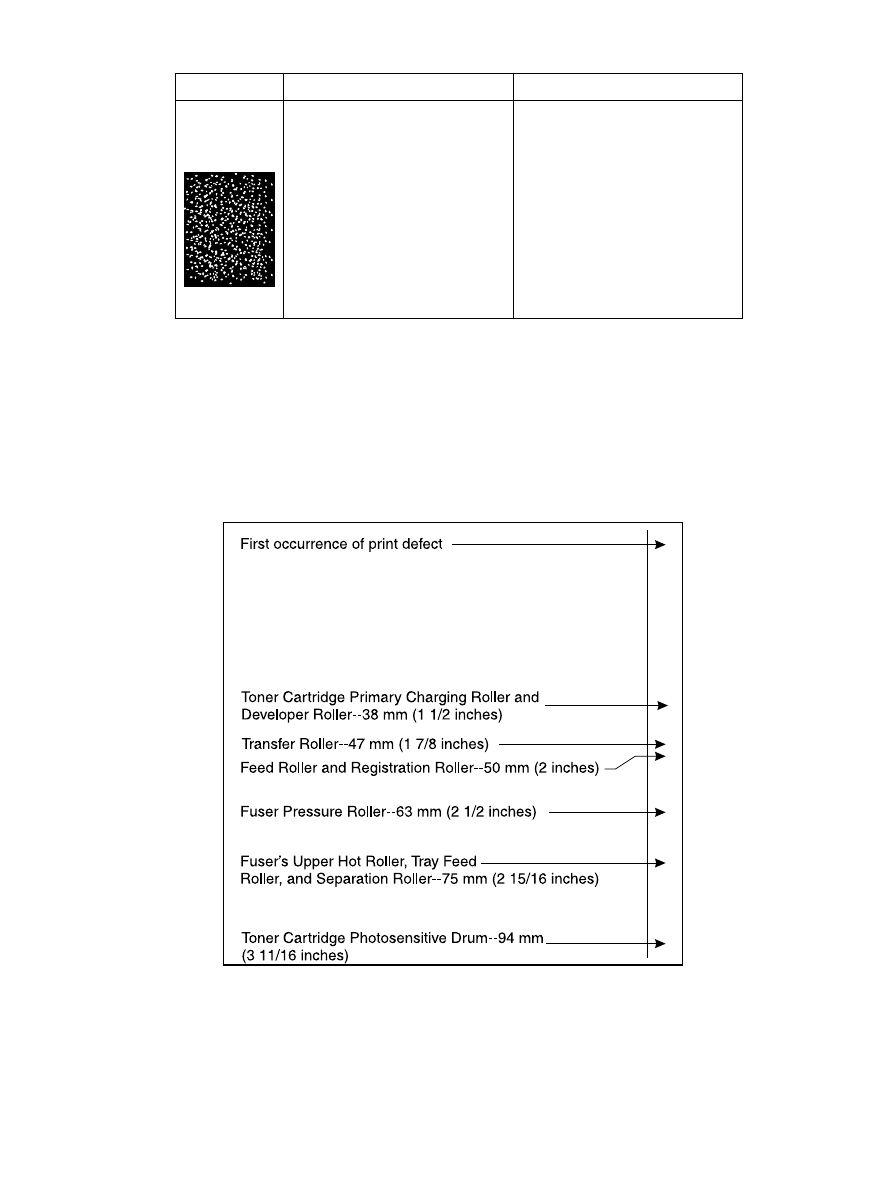
Repetitive defect ruler
Repetitive print defects are usually associated with a specific roller within the printer or the toner
cartridge. Use figure 98 to isolate the cause of repetitive print defects. Align the first occurrence of
the defect with the top of the “ruler” and measure to the next occurrence of the defect to determine
the roller in question. When you are certain that your defect pattern matches the pattern of the ruler,
replace the indicated roller.
Figure 98.
Repetitive print defect ruler
White spots on
black
1. Print a few more pages to see
if the problem corrects itself.
2. Make sure that print media
type and quality meet HP
specifications.
3. Make sure that the
environmental specifications for
the printer are being met.
4. Replace the toner cartridge.
Table 42. Image defects
Problem
Cause
Solution

244 Troubleshooting
EN
Image system troubleshooting
Half self-test functional check
The electrophotographic process can be subdivided into the following stages:
!
Cleaning (removes excess toner from drum surface)
!
Conditioning (places a uniform electrical charge on drum)
!
Writing (laser strikes surface of drum and creates latent image)
!
Developing (forms the toner image on drum)
!
Transferring (charge transfers the image to print media)
!
Fusing (heat and pressure produces a permanent image)
The purpose of the half self-test check is to determine which stage is malfunctioning. Perform the
test as follows:
1
Print a configuration page from the control panel information menu.
2
Open the top cover after the paper advances halfway through the printer (about three seconds
after the main motor begins rotation). The leading edge of the paper should have advanced past
the toner cartridge.
3
Remove the toner cartridge.
4
Open the toner cartridge drum shield to view the drum surface.
If a dark and distinct toner image is present on the drum’s surface, assume that the first four
functions of the electrophotographic process are functioning (cleaning, conditioning, writing, and
developing–see chapter 5), and troubleshoot the failure as a transfer or fusing problem.
If no image is present on the photosensitive drum, perform all the following functional checks.
Drum rotation functional check
The photosensitive drum, located in the toner cartridge, must rotate for the print process to work. The
photosensitive drum receives its drive from the main drive assembly. To verify whether the drum is
rotating:
1
Open the top cover.
2
Remove the toner cartridge.
3
Mark the cartridge’s drive gear with a felt-tipped marker. Note the position of the mark.
4
Install the toner cartridge and close the top cover. The start-up sequence should rotate the drum
enough to move the marked gear.
5
Open the printer and inspect the marked gear. Verify that the mark moved. If the gear did not
move, inspect the main drive assembly to ensure that it is meshing with the toner cartridge
gears. If the drive gears function and the drum does not move, replace the toner cartridge.
Note
This test is especially important if refilled toner cartridges are in use.

EN
Chapter 7 Troubleshooting 245
High-voltage power supply functional check
The high-voltage power supply assembly provides the necessary voltages for the printer’s
electrophotographic processes. The +24 B VDC supply is used to power the high-voltage power
supply assembly. A summary of the major components of the high-voltage system is given in table.
Table 43. High voltage system checks
Checks
Action
Are the connectors for the primary charge
roller, drum ground, developing bias, and
toner level sensor damaged, corroded,
contaminated, or missing?
1. Inspect and correct each item.
2. Check the toner cartridge.
3. Check all wire connections.
4. Replace the engine controller board if
the connection cannot be repaired.
Are the high-voltage power supply
connections contaminated, bent, or
broken?
1. Clean the terminals with alcohol only.
2. Check all wire connections.
3. Replace the engine controller board if
the connection cannot be repaired.
Is the internal toner cartridge damaged?
Replace the toner cartridge.
Wyszukiwarka
Podobne podstrony:
HP LaserJet 4100
instrukcja obsługi HP LASERJET 4L ML O
HP LaserJet Companion Service Manual
HP LaserJet 4600 Service Manual Update
HP LaserJet 1000w Tiskarna
HP LaserJet 8000DN
HP LaserJet Companion Printer Service Manual
HP LaserJet 4200DTN
hp laserjet 4si
HP LaserJet 4200
HP LaserJet 2300
HP LaserJet 2100
HP LaserJet 2300D
HP LaserJet 4000
HP LaserJet 3330MFP Fax Guide
HP LaserJet 45xx Service Manual Update Mar03
HP LaserJet 4050N
HP LaserJet Color 2500
więcej podobnych podstron