
P 226
Handling and Safety Instructions
Handling and Safety Instructions

1
USA
1
General Instructions
USA 2
2
Safety Regulations
USA 3
3
Product Description
USA 4
3.1
Main parts
USA 4
3.2
Main features
USA 5
3.3
Scope of supply
USA 5
4
Transporting the Pistol USA 6
5
Handling the Pistol
USA 6
5.1
General remarks
USA 6
5.2
Initial preparation
USA 6
5.3
Ammunition
USA 6
5.4
Loading the magazine
USA 7
5.5
Loading the pistol
(ready to fire)
USA 7
5.6
Discharging a shot
USA 8
5.7
Reloading during
shooting
USA 9
5.8
Unloading the pistol
USA 9
5.8.1 Unloading the pistol,
magazine not empty
USA 9
5.8.2 Unloading the pistol,
magazine empty,
slide open
USA 10
6
Sight Correction
USA 11
6.1
Sight correction for
windage
USA 11
6.2
Sight correction for
elevation
USA 11
7
Trigger system
USA 12
7.1
Trigger system
USA 12
7.2
Trigger position
USA 12
8
Maintenance of the Pistol USA 12
8.1
Stripping the pistol
USA 12
8.2
Dismantling the magazineUSA 14
8.3
Cleaning the pistol
USA 14
8.4
Assembling the pistol
USA 15
8.5
Checking functions
USA 16
8.6
Care of the pistol
USA 18
9
Functioning of the Pistol USA 19
9.1
Function sequence when
loading
USA 19
9.1.1 Magazine inserted
USA 19
9.1.2 Function sequence
when loading
USA 20
9.2
Function sequence
when firing
USA 21
9.2.1 Firing the pistol with
single action trigger
USA 21
9.2.2 Manual safety
USA 21
9.2.3 Function sequence
at shot discharged
USA 22
9.3 Function
sequence
with
case ejection and and
automatic reloading
USA 23
9.3.1 Unlocking
USA 23
9.3.2 Function sequence with
case ejection and hammer
cocking
USA 24
9.4
Function sequence after
discharging last round
USA 25
10
Pistol Service, Repairs,
Warranty
USA 26
10.1 Cause and correction
of malfunctions
USA 26
10.2 Safekeeping and storage
of the pistol
USA 28
10.3 Shipping the pistol
USA 28
11
Product Line
USA 29
12
Disposal
USA 29
13
Technical Specifications/
Models/Accessories
USA 30
13.1 Standard model
USA 30
13.2 Full equipping
USA 31
14
Spare Parts List
USA 32
Contents

3
USA
2
USA
Instructions
2 Safety Regulations
•
Never use the pistol under the influence of drugs or
alcohol, while ill or suffering other such difficulties.
These conditions can impair your powers of judgment
and reflexes.
•
Always think of the pistol as being loaded and with
the safety off until you have established the opposite
through the unloading procedure (see section 5.8).
•
Always keep the muzzle of the pistol pointed in a safe
direction. A safe direction is defined as towards an
area where there are no people, other life forms or
other people’s property.
•
Never point the pistol at doors, panes of glass, walls,
concrete, stone or flat surfaces (water included).
A bullet can penetrate such surfaces or be ricocheted
in an unsafe direction.
•
Never aim at yourself or other life forms.
•
Never rely on safety mechanisms alone. The safety
mechanisms are not a substitute for careful and correct
handling of the pistol.
•
Always handle your pistol as if the safety mechanisms
were not functioning properly. The best safety precau-
tion is a correct, well-trained and secure handling of
the pistol.
•
Never shoot with a pistol that has been penetrated by
water, sand, dirt or other foreign matter.
•
Never decock the hammer by restraining the hammer
and pulling the trigger at the same time.
•
Never let a loaded pistol out of your hand.
•
Always unload the pistol immediately after firing,
before putting the pistol away, putting it into a holster
or handing it to another authorized person.
•
Never give the pistol to a person who has not tho-
roughly familiarized himself or herself with the safety
regulations and handling of the pistol by reading the
corresponding instructions.
•
Never leave the pistol lying unattended, and protect
the pistol from unauthorized access.
•
Never store the pistol loaded, but rather remove the
magazine and ensure that there is no round in the
barrel chamber by following the unloading procedure
(see section 5.8).
•
Always keep the pistol and the ammunition in different
places and ensure that neither can be obtained by
unauthorized persons or children.
In the individual sections of these instructions, the
following safety indications alert you to various dangers:
1 General Instructions
Please read these instructions carefully before
each and every handling of the SIG SAUER pistol.
Knowledge of and the technically fault-free implementation
of the information contained in these instructions are pre-
requisites for the correct preparation and safety during
handling, care and maintenance of this SIG SAUER pistol.
Do not use this pistol until you have fully understood all
the safety instructions and it’s handling procedures.
Should you require further information, do not hesitate to
contact your dealer, importer or the manufacturer.
Ensure that you always comply with the local and national
laws that govern ownership, carrying and use of firearms.
Always be aware that this pistol, like all other firearms, is
dangerous. The pistol to which these safety instructions
apply is sold under the expressed condition that the
manufacturer and the importer of the pistol do not accept
any liability for the consequences of handling or use of
the pistol. This applies in particular to liability for bodily
harm or damage to property resulting in whole or in part
from:
– Discharge with criminal intent or through negligence
– Improper or careless handling
– Defective, incorrect, hand-loaded or reloaded
ammunition
– Inadequate care of the pistol (e.g. corrosion, damage)
– Disregard of malfunctions
– Resale in contradiction of any applicable law
– Other circumstances outside our direct and immediate
control
These limitations apply regardless of whether liability is
asserted on the basis of a contract, negligence or strict
liability (including any failure to warn).
The manufacturer and the importers are not liable for
incidental or consequential damages, such as loss of
use of property, commercial loss or loss of earnings and
profits.
Safety Regulations
Information on dangers, which if not scrupulously
observed, can directly lead to severe bodily harm or
death.
Information on dangers, which if not scrupulously
observed, can lead to bodily harm, damage to property
and damage to the pistol.
Information on technical requirements, which if not
scrupulously observed, can lead to damage to the
pistol.
Caution
Warning
Notice
4
USA
5
USA
3.2 Main features
SIG SAUER pistols are modern handguns that comply
with the latest technical advances in firearms design for
military, police and sporting use. They function in line
with the principle of a mechanically locked, recoil-operated
pistol with semi-automatic reloading. The automatic firing
pin safety lock, safety notch on the hammer and the
manual safety enable a quick readiness for firing.
The distinctive, contrasting micrometer sight in conjunction
with the ergonomically optimized handle design enable
rapid, precision targeting and firing. The enclosed design
prevents the penetration of dirt into the gun.
The SIG SAUER X-FIVE is designed as a single action
model.
3.3 Scope of supply
Included in the delivery are:
– 1 Pistol
– 1 Magazine
– 1 Handbook with handling and safety instructions
– 1 Test group card
– 1 Trigger lock
Not included in the delivery are:
– Accessories (see section 13.2)
– Spare parts (see section 14)
Product Description
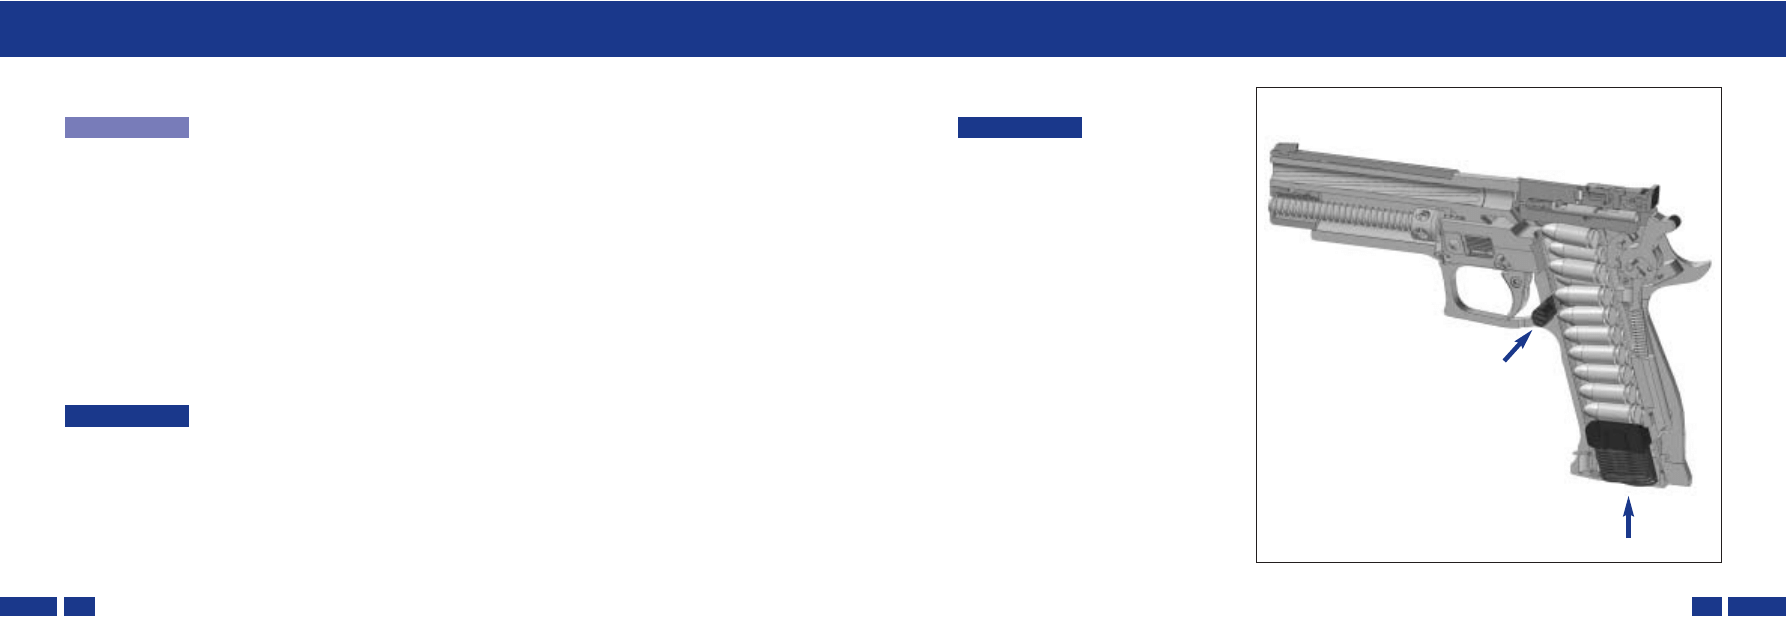
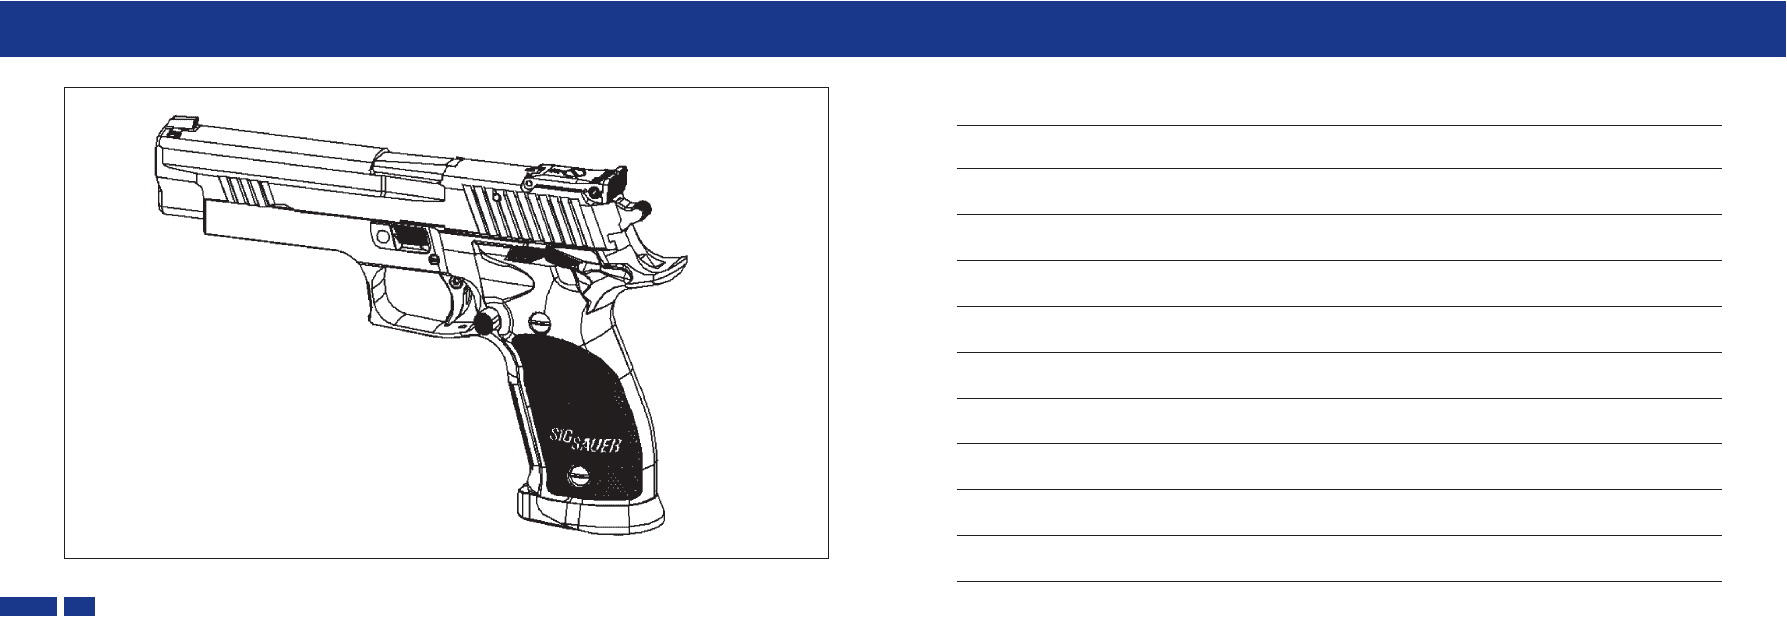
3 Product Description
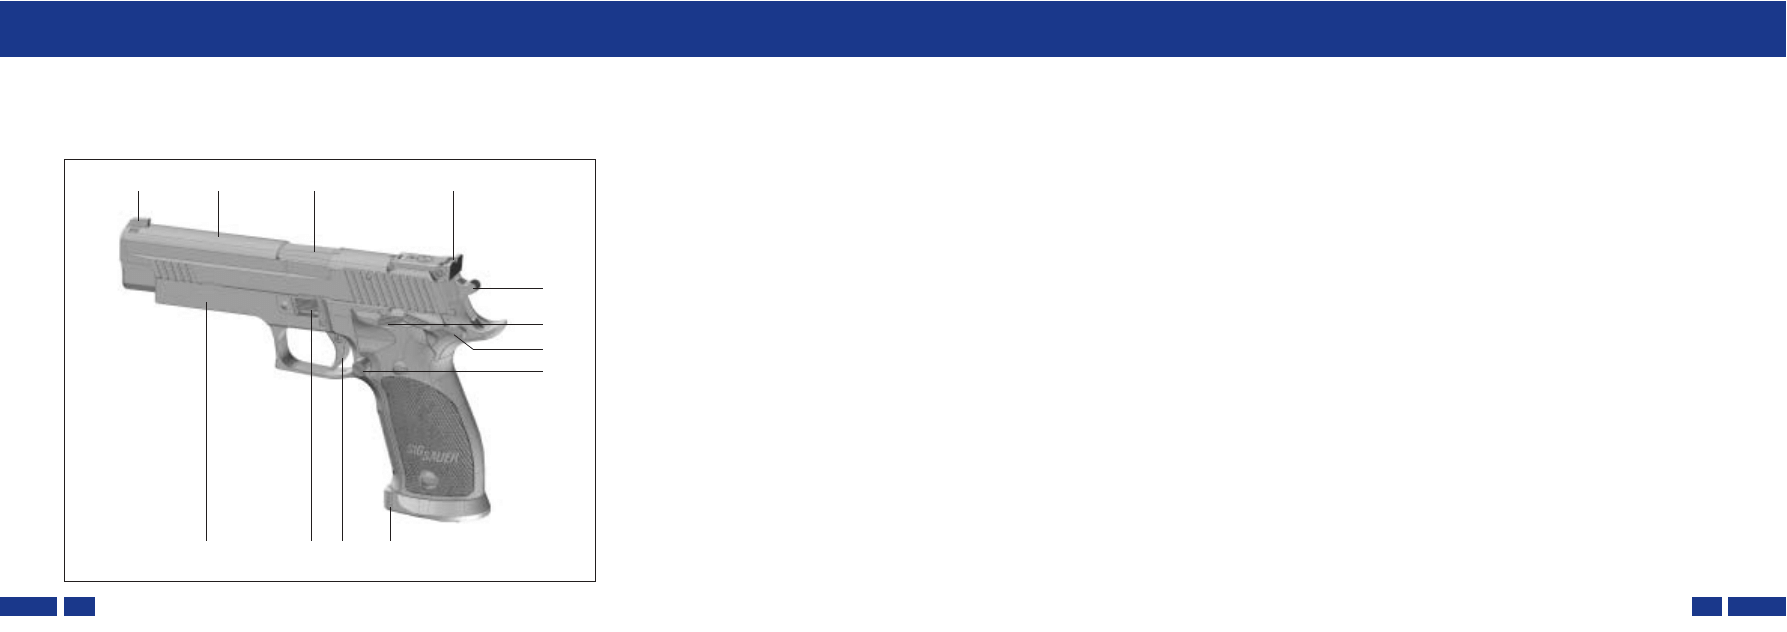
3.1 Main parts
Product Description
57
Barrel
50 Slide
67
Front sight
63 Rear
sight
1
Frame
40
Takedown lever
26
Slide catch lever
16
Trigger
7
Hammer
42
Magazine catch
74
Magazine
29 Safety
lever,
left
67
7
50
57
63
26
29
42
74
16
40
1
Fig. 1

6
USA
7
USA
5.4 Loading the magazine
Procedure
1. Place round on feeder 70, close to the magazine lips.
2. Press round down and slip it to the rear.
3. Load the number of rounds that you intend to shoot.
The number of loaded rounds can be checked through
the slot on the magazine.
5.5 Loading the pistol (ready to fire)
•
Never load or unload the pistol inside a vehicle, inside
a building or any other enclosed space (except in a
designated firing range).
•
Before loading, always wipe off any excess grease and
oil and check to see if there is any foreign matter in the
barrel 57.
•
Always keep the muzzle of the pistol pointed in a safe
direction.
•
Do not put your finger on the trigger 16. Keep your
finger outside the trigger guard.
•
Only load the pistol by first inserting the magazine
immediately before shooting.
•
Never directly draw back hammer 7 by hand in order
to cock it.
•
Never rely on the safety mechanisms alone.
Safety mechanisms are not a substitute for careful and
correct handling of the pistol.
•
Never let a loaded pistol out of your hand.
Procedure
1. Point the pistol in a safe direction.
2. Insert full magazine 74 and check that it engages.
3. Pull slide 50 back until stop and allow to flick forward.
The pistol is loaded and ready for firing with the
single action trigger.
Warning
Handling
4 Transporting the Pistol
•
For your own safety and the safety of others, always
transport the pistol unloaded, decocked and under lock
(see section 5.8).
•
Never carry the pistol on your person with a round in
the chamber and the hammer cocked.
•
Always carry the pistol so that if you fall, slip or some-
thing similar happens, you always have the direction
of the muzzle under control.
•
Transport the pistol separate from the ammunition.
•
Ensure that you comply with all regional and national
laws governing the transport of firearms.
5 Handling the Pistol
5.1 General remarks
The pistol is delivered with a light, protective and preser-
ving coating of grease and oil and it must be stripped
before initial preparation, the protective coatings remo-
ved, and then relubricated.
5.2 Initial Preparation
Procedure
1. Strip the pistol (see section 8.1).
2. Clean and relubricate the pistol (see section 8.3).
3. Assemble the pistol (see section 8.4).
5.3 Ammunition
•
For your pistol, use only commercial grade ammuni-
tion in its original packing ammunition which corre-
sponds with the caliber of the pistol. The correct caliber
is stamped on the pistol.
•
Never use reloaded, „refurbished”, hand-loaded,
non-standard ammunition or ammunition of a different
caliber.
•
Never use dirty, wet, corroded, bent, damaged or
oiled ammunition, or ammunition of an unknown
manufacturer.
•
Never leave the ammunition unattended.
Warning
Warning
Transporting
Handling
8
USA
9
USA
5.7 Reloading during shooting
The slide is caught in the open position.
•
Never let the pistol out of your hand.
•
Keep the pistol pointed at the safe target.
Procedure
1. Remove the empty magazine.
2. Insert full magazine and ensure that it engages.
3. Thumb down slide catch lever 26 or draw back slide 50
until stop and allow to fly forward (see section 5.5).
– The pistol is loaded and ready to fire.
– The pistol can also be secured with the manual safety.
– The pistol is now loaded, decocked and ready to fire.
5.8 Unloading the pistol
5.8.1 Unloading the pistol; magazine not empty
•
Never let the pistol out of your hand before it is
unloaded.
•
The pistol is loaded; a round is in the chamber of the
barrel.
•
Perform the unloading action with only two fingers
from the rear.
•
Never place your hand over the slide ejection port.
Procedure
1. Keep the pistol muzzle pointed in a safe direction.
2. Actuate the magazine catch 42 and remove the magazine
(Fig. 2)
3. Pull slide 50 back until stop and push slide catch lever
26 up. The round is ejected and the slide 50 is caught
in the open position.
Warning
Warning
Handling
Fig. 2
5.6 Discharging a shot
•
Ensure that the target and surroundings allow shots to
be fired without danger.
•
Ensure when firing that your fingers, hands or other
parts of the body are not in front of, above or beside
the barrel muzzle or the ejector port.
•
Never allow other people to stand next to you where
they could be hit by ejected cartridge cases.
•
When shooting, always wear ear protection and
protective eyeglasses. Inform other people close
to you about the need to wear ear protection.
•
With pistols with manual safety, the safety lever 29
must be turned in the horizontal position (down).
•
Stop shooting immediately and unload the pistol
if you suspect that a round has not been chambered
correctly, a case is jammed, a round may have blocked
the barrel or a discharge sounds or gives the sensation
that it is "weak” or unusual.
•
Never try to dislodge a blockage by firing another
round.
Procedure
1. Aim pistol at a safe target.
2. Place finger on trigger 16 and pull back the trigger 16
(discharges a shot).
3. Keep the pistol aimed at the target and fire further
shots as required.
4. Remove the magazine and unload pistol (see section
5.8). If the pistol has been shot until the magazine is
empty, the slide 50 will be caught in the open position.
Reload pistol if further shots are to be fired (see section
5.7).
•
Single action pistols are in a cocked and ready to fire
status after each discharge.
•
If once you decide to stop shooting, you must imme-
diatly and fully unload the pistol.
Warning
Warning
Handling

10
USA
11
USA
6 Sight Correction
Hinweis
Sight Correction
X
X
X
X
X
X
Fig. 4, point of impact, left
Fig. 5, point of impact, deep
Fig. 6, rear sight
Handling
Fig. 3
•
Any adjustment to sights should only
be carried out on an unloaded pistol.
6.1 Sight correction for windage
Correction on the micrometer rear sight
Turning the lateral adjustment screw in the arrow direction
(R) results in an impact point shift on the target to the
right.
Turning the lateral adjustment screw against the arrow
direction (R) results in an impact point shift on the target
to the left (Fig. 4).
Notice
6.2 Sight correction for elevation
Correction on the micrometer rear sight
Turning the vertical adjustment screw in the arrow
direction (UP) results in an upward impact point shift
on the target.
Turning the vertical adjustment screw against the arrow
direction (UP) results in a downward impact point shift
on the target (Fig. 5).
4. Check (visually and manually with appropriate aid),
that the round has been ejected and that no other
round is chambered (Fig. 3).
5. Actuate slide catch lever 26. The slide 50 flys forward.
6. Keep the pistol pointed in a safe direction and decock
via the trigger.
7. Empty magazine.
8. Pick up and clean the ejected round.
The pistol is unloaded and decocked. The pistol must be
cleaned after each shooting session (see section 8).
5.8.2 Unloading the pistol, magazine empty, slide open
•
The pistol must not be let out of your hand until the
magazine has been removed and the pistol is unloaded.
Procedure
1. Keep the pistol muzzle pointed in a safe direction.
2. Actuate magazine catch 42 and remove magazine (Fig. 2)
3. Check (visually and manually with appropriate aid),
that the round has been ejected and that no other
round is chambered (Fig. 3).
4. Actuate slide catch lever 26. The slide 50 flys forward.
5. Keep the pistol pointed in a safe direction and decock
via the trigger.
6. Check load status of the magazine.
The pistol is unloaded and decocked. The pistol must be
cleaned after each shooting session (see section 8).
Warning
12
USA
13
USA
7 Trigger system
7.1 Trigger System
The SIG SAUER P226 X – FIVE trigger system is adjust-
able for trigger pull weight and trigger stop position.
The adjustment range is between 2.2 to 3.5 pounds.
•
Adjustments to the trigger system should only be per-
formed by trained and qualified armors or gunsmiths.
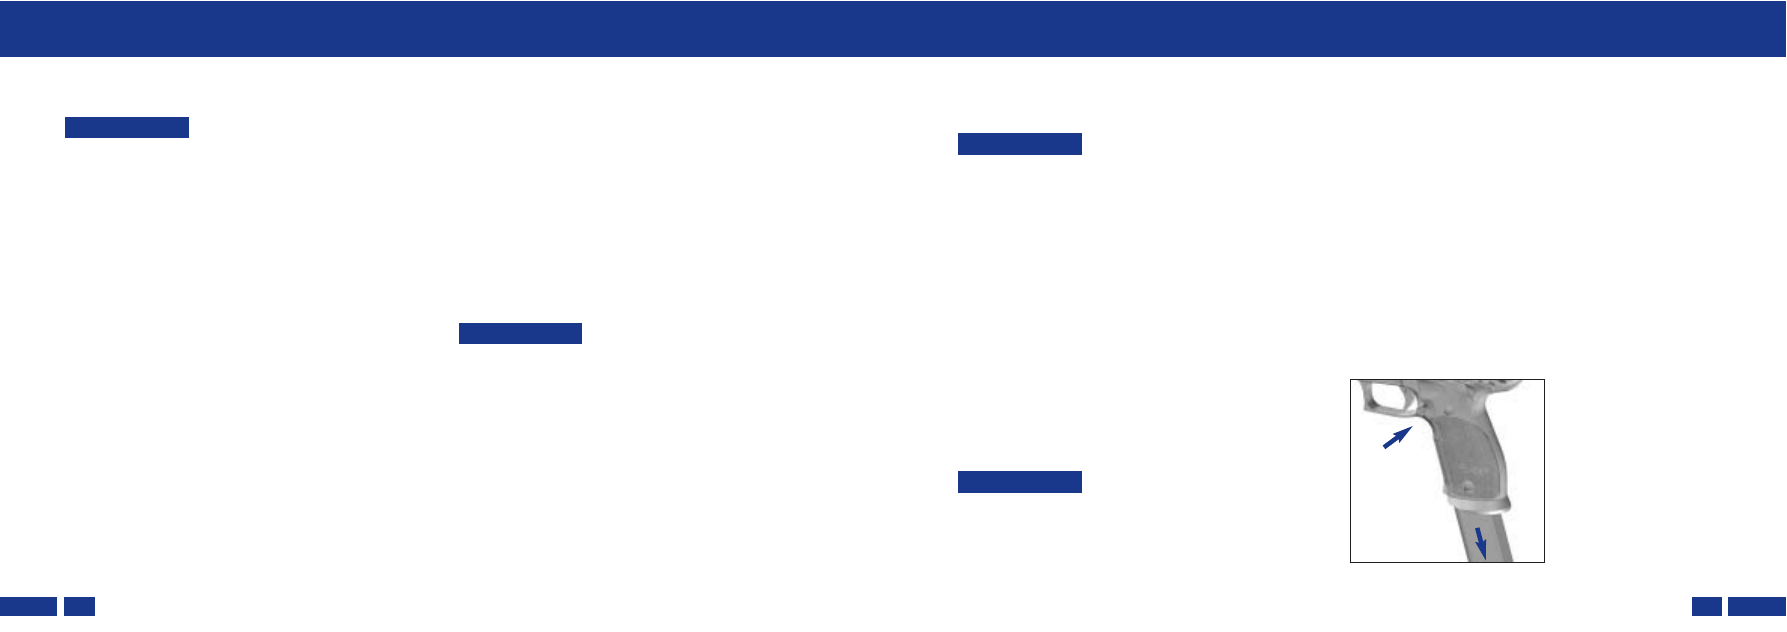
7.2 Trigger Position
•
Any adjustments to the trigger position should only be
carried out on an unloaded pistol.
The SIG SAUER P226 X – FIVE trigger position can be
adjusted up to .390 inches
Adjusting the Trigger Position:
Loosen the Allen (hex head) screw on the left side of the
trigger. The trigger can now slide to the desired position
and to secure re-tighten the screw.
8 Maintenance of the pistol
•
Magazine must be removed from the pistol.
•
Before stripping your pistol for cleaning, ensure once
again that it is unloaded, (see section 5.8).
•
Do not put your fingers into the slide 50.
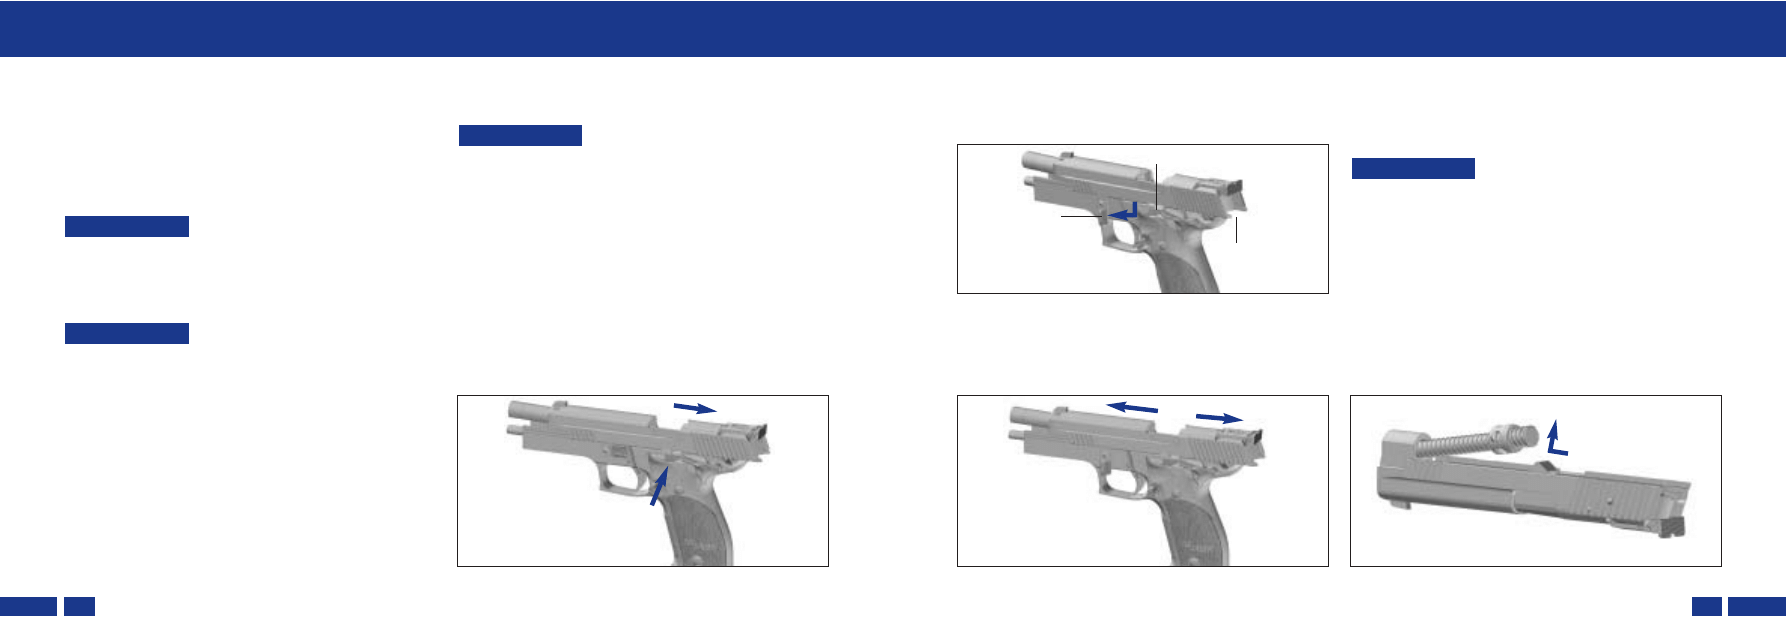
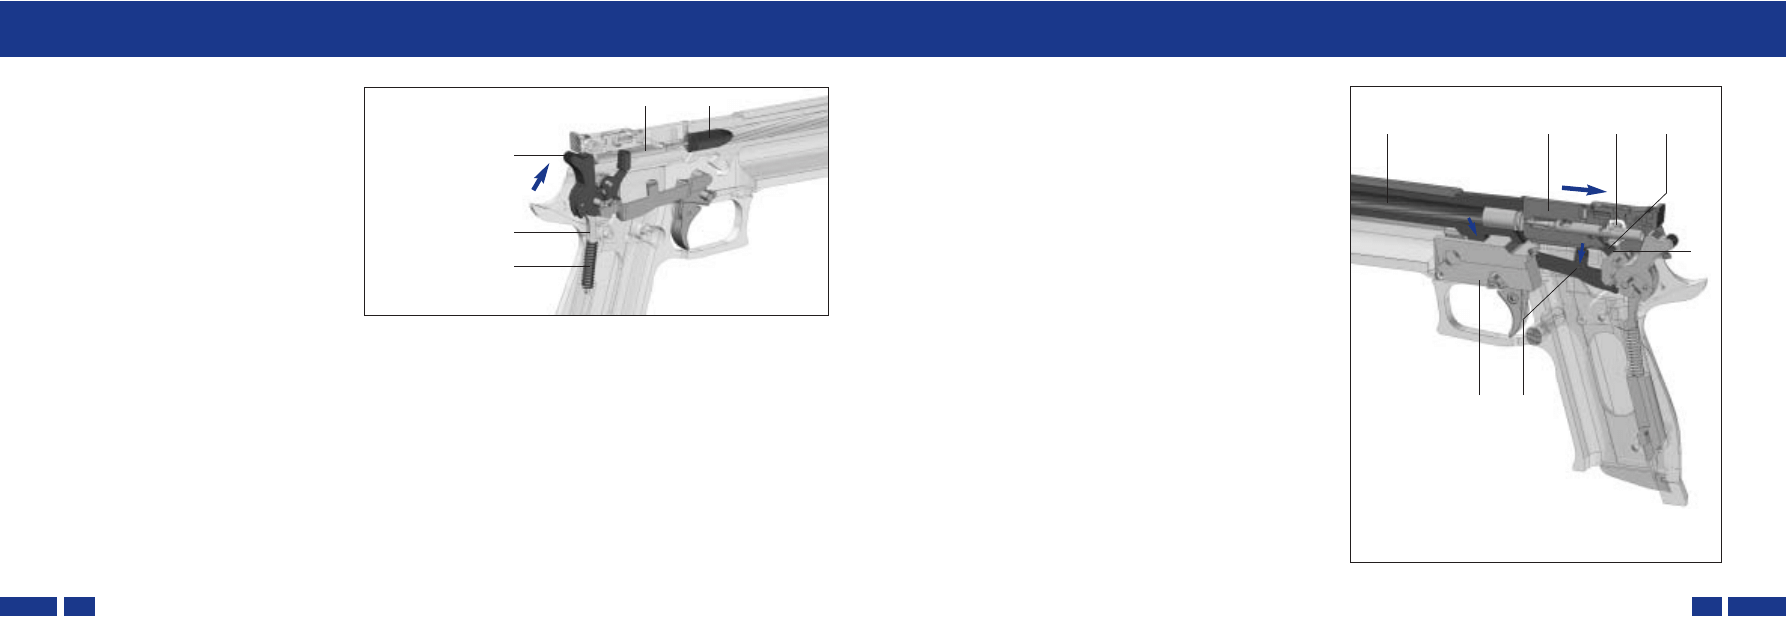
8.1 Stripping the pistol
1. Unload the pistol (see section 5.8).
2. Draw back the slide 50 until stop and hold it in
the open position by thumbing up the slide catch
lever 26 (Fig. 7).
Warning
Warning
Warning
3. Check that there is no round in the chamber
(see Fig. 3, page USA 10).
4. Thumb down takedown lever 40 (Fig. 8).
5. Draw slide 50 back slightly to disengage slide catch
lever 26. Hold slide 50 firmly with the hand and allow
it to glide forward (Fig. 9).
6. Now slip complete assembly (slide 50, barrel 57, recoil
spring 62 and recoil spring guide 61) forward and off
the frame.
•
The recoil spring 3 is compressed. Uncontrolled removal
of the recoil spring guide 61 can cause the guide and
the recoil spring 62 to jump away. When stripping
down, control decompression of the preloaded recoil
spring 62 with your hand.
Procedure
7. Press in recoil spring guide 61, raise it carefully and
remove recoil spring 62 with recoil spring guide 61
from the slide 50 (Fig. 10).
Caution
Trigger System
Maintenance
Maintenance
Fig. 7
Fig. 8
40
26
50
Fig. 9
Fig. 10
8. Pull recoil spring 62 from recoil spring guide 61.
Remove recoil spring bar 58, including buffer spring 60
from the recoil spring guide.
9. Lift barrel 57 out of slide (Fig. 11).
•
This level of stripping is sufficient for a thorough
cleaning after firing.
•
Further dismantling of the pistol may only be carried
out by qualified armors and gunsmiths.
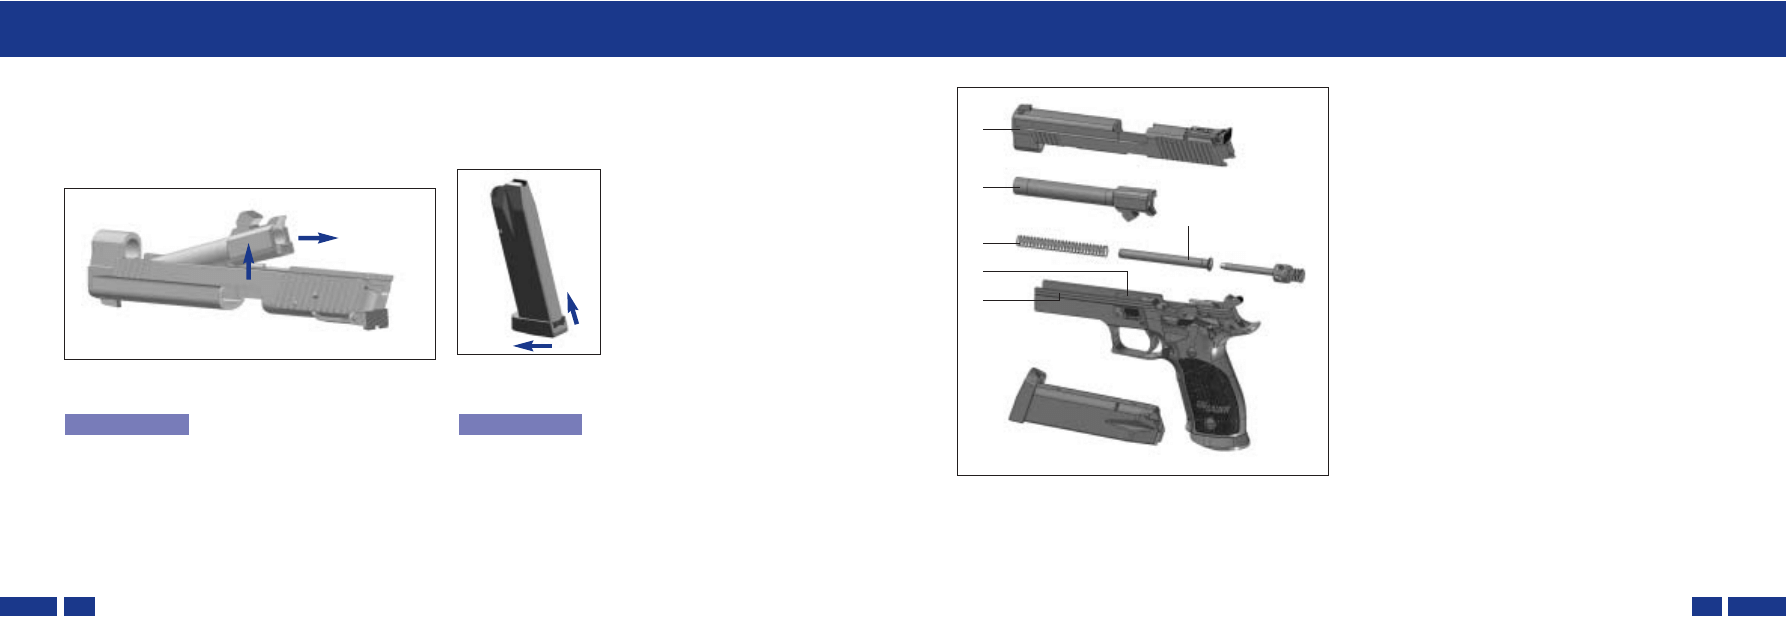
8.2 Dismantling the magazine
Pull floorplate insert 72 up and pull magazine floorplate
73 forward.
Caution: The magazine spring is compressed.
8.3 Cleaning the pistol
•
Never clean the barrel 57 from the muzzle end and
never use steel wire brushes, as these can damage the
smooth surface of the bore. Use a suitable cleaning
rod and brush of the correct caliber (see section 13).
•
Solvents can damage the surfaces of the pistol. Read
the manufacturer’s warnings and instructions before
using solvents or cleansers.
Notice
Notice
14
USA
15
USA
Procedure
1. Moisten the cleaning brush with gun oil and
insert into the barrel 57 through the chamber.
Carefully remove all powder residues and dirt in the
barrel 57 and chamber with the cleaning brush.
2. Free the insides of the barrel 57 and chamber of
powder residues and oil using a cleaning cloth.
3. Clean the external surfaces of the barrel 57 with
a brush moistened with gun oil.
4. Wipe dirt off the guides of the frame 1, internal and
external sides of the slide 50, locking insert 39, recoil
spring guide 61 and recoil spring 62 with a brush or
cloth and then oil or grease with a cloth soaked in gun
oil or gun grease.
5. Lightly oil barrel bore and chamber.
8.4 Assembling the pistol
Procedure
1. Check that there is no foreign matter inside the pistol
and that the barrel serial number corresponds with the
slide and frame serial numbers.
2. Insert the barrel 57 with its locking cam pointing down
into the slide 50.
3. Slip the narrower end of the recoil spring 62 over the
recoil spring guide 61. Remove recoil spring bar 58,
including buffer spring from the recoil spring guide 61.
4. Thumb down takedown lever 40.
Maintenance
Fig. 11
Maintenance
Fig. 12, magazine
Fig. 13, pistol stripped down for cleaning
50
57
62
39
1
61

16
USA
17
USA
3. Check trigger travel and trigger interruption.
– With hammer 7 decocked and trigger 16 pulled through,
draw slide 50 back until stop and release.
– Check that the hammer 7 is held back in the cocked
position (trigger stays pulled back).
4. Check trigger function.
– Release trigger 16.
– Check that the trigger bar 24 reengages and that the
hammer 7 is activated when the trigger is pulled again.
5. Check slide catch lever 26.
– Insert empty magazine, draw slide 50 right back and
release slide 50.
– Check that the slide 50 is held in its rearmost position.
– Actuate slide catch lever 26.
– Check that the slide 50 is released and flys forward with
sufficient energy.
– Remove magazine.
6. Check manual safety.
– Draw slide back and release it so that it flys forward
with sufficient energy. Push manual safety up and press
trigger. The trigger may not actuate.
– Push manual safety down and press trigger.
The trigger must actuate.
7. Check magazine.
– Check condition of the magazine tube 69
(lips and floorplate) for signs of damage or dirt.
– Check that the magazine floorplate is properly secured.
– Check easy running and spring action of the feeder 70.
– Check smooth insertion of the magazine into the frame 1.
– Check magazine catch 42 for clean engagement and
release.
8. Check external condition of the pistol.
– Check front sight 67, rear sight 63, grip plates 47/48
and takedown lever 40 for signs of damage or dirt.
– Check firm securing of rear sight 63, front sight 67
and grip plates 47/48.
9. Checking numbered parts.
– Check that the serial numbers of the barrel 57,
the slide 50 and frame 1 correspond.
Maintenance
•
When the recoil spring 62 is inserted into the slide 50,
it becomes preloaded. Uncontrolled insertion of the
recoil spring guide 61 into the slide 50 can cause this
and the recoil spring 62 to jump away and injure you
or others standing nearby.
5. Insert recoil spring system into the slide 50.
6. From the front, slip the complete system onto
the guide of the frame 1.
7. Draw back slide 50 to the rear stop and push up slide
catch lever 26 to arrest the slide 50 in its open position.
8. Push up takedown lever 40 counter-clockwise.
9. Actuate slide catch lever 26; slide 50 flicks forward.
10. Decock the pistol in a safe direction via the trigger.
•
The pistol is unloaded and decocked.
8.5 Checking functions
•
Checking of all functions must be made on the
assembled pistol
– to determine any causes of malfunctioning,
– after completion of repairs,
– and after each cleaning and assembly of the pistol.
Procedure
1. Remove the magazine and unload pistol (see section 5.8).
2. Check tension of the recoil spring 62 and ease of
running of the slide 50.
– Draw slide 50 back until stop and allow to fly forward.
– Check that the slide 50 flys forward with sufficient energy
and locks into place.
– Repeat check again.
Notice
Notice
Caution
Maintenance
18
USA
19
USA
9 Functioning of the pistol
•
The description of functions is not a set of
instructions covering the use, care or repair
of the pistol. Any handling of or treatment
on the pistol based on the following de-
scription of functions is strictly prohibited.
9.1 Function sequence when loading
9.1.1 Magazine inserted
– Full magazine is inserted up to the stop in
the frame.
– Magazine catch 42 has engaged the
magazine.
Warning
Functioning
8.6 Care of the pistol
•
Always keep your pistol in immaculate condition and
in good working order.
•
Always clean your pistol after each use.
•
Never modify or repair parts of your pistol yourself.
•
Have your pistol checked once a year by a qualified gun-
smith or armor, as defects, wear and tear, corrosion
etc. may not always be visible from the exterior.
•
For repair or service work, however, we recommend
that you return your pistol to the manufacturer. The
manufacturer has a constant supply of replacement
parts in stock.
•
If you order spare parts without returning the pistol, you
are responsible for ordering the correct spare part and
its correct fitting by a qualified gunsmith or armor.
•
The manufacturer and importer cannot be held liable
for faults in the pistol or malfunctions if the pistol has
been modified or parts that are not original parts have
been fitted by third parties.
Caution
Notice
Maintenance
Fig. 14, pistol with magazine inserted
42

Fig. 17, manual safety
20
USA
21
USA
9.1.2 Function sequence when
loading
– The hammer 7 is cocked as the
slide 50 is drawn back.
– The top round P is thrust up into
the feeding position by the maga-
zine spring 71.
– When slide 50 is released, it flicks
forward with the force of the
compressed recoil spring 62.
– Round P is chambered in the
barrel 57 by the slide 50.
The pistol is ready to fire.
The pistol can be secured by
pushing up the manual safety 29.
Functioning
Fig. 15, round being chambered
Functioning
57
62
P
50
7
71
9.2 Function sequence when firing
9.2.1 Function sequence when firing
with single action trigger
– Trigger 16 is pulled.
– Trigger bar 24 pivots safety lever 5
and safety lock lever 32 forward.
The safety lock lever pushes the
safety lock 54 up, thereby liberating
the firing pin 51.
– At the same time, the safety lever 5
disengages the sear 2 from the SA
notch of the hammer 7. Hammer 7
is then released.
– The round is discharged
(see section 9.2.3).
9.2.2 Actuating manual safety
– Push safety lever of the manual
safety up.
– Trigger bar, hammer and slide are
blocked.
Fig. 16, hammer is released
51
54
5
32
2
7
16
24
22
USA
23
USA
9.2.3 Function sequence when
shot is discharged
– Hammer 7 is released.
– Mainspring 15 raises hammer 7 via
hammer strut 13.
– Hammer 7 strikes firing pin 51.
– Firing pin 51 strikes the primer of
round P.
Functioning
Fig. 18, round is discharged
Functioning
51
7
13
15
P
9.3 Function sequence with ejection of the
case and automatic reloading
9.3.1 Unlocking
– Blowback force generated with the discharge thrusts
the slide 50 to the rear.
– This separates the safety lever 5, the safety lock lever
32 and the safety lock 54. The firing pin lock is effective
again.
– Slide 50 depresses the trigger bar 24, thereby
disconnecting the trigger bar 24 from the safety
lever 5 and the safety lock lever 32.
– Barrel 57 is tilted down and unlocked by locking
insert 39.
Safety with slide position not fully closed:
If the slide 50 is not fully closed, the register between the
safety lever 5, safety lock lever 32 and safety lock 54 is
interrupted. The trigger bar 24 is also depressed by the
slide 50. Further trigger functions are consequently also
interrupted.
Fig. 19, barrel is tilted down and arrested
51
50
54
5
32
39
24
24
USA
25
USA
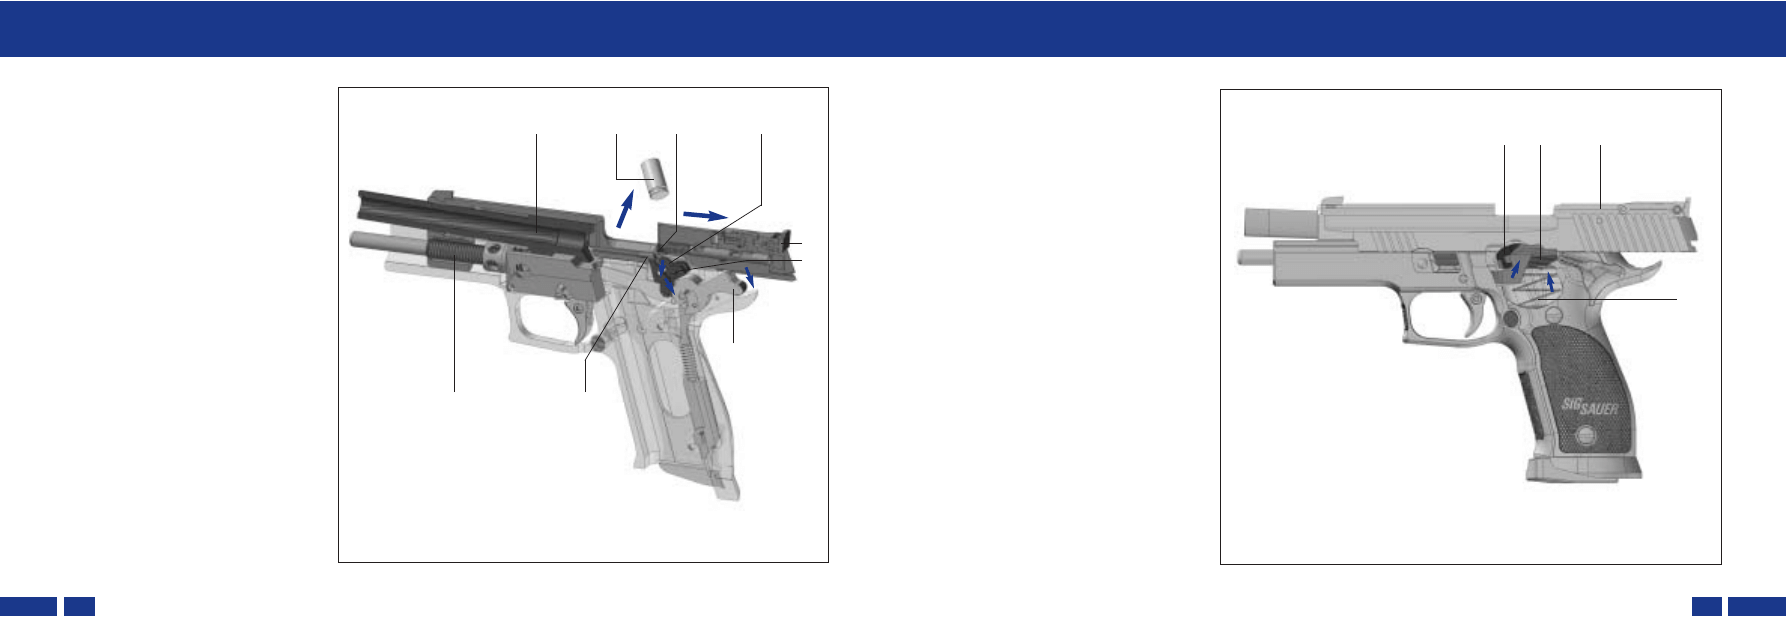
9.3.2 Function sequence with case
ejection and hammer cocking
– Sear spring presses sear 2 and
safety lever 5 into their initial
positions.
– The empty case H is removed by
the extractor 53 and expelled by
the ejector 41.
– As the slide 50 recoils up to its
stop, it cocks the hammer 7 and is
then caught in the SA notch by
the sear 2.
– The slide 50 is pushed forward
with the pressure of the compre-
ssed recoil spring 62 and the next
round is fed in (see section 9.1.2).
The barrel 57 locks up with the slide
50 again.
The pistol is ready to fire.
The hammer 7 is cocked.
Functioning
Fig. 20, case being ejected
Functioning
57
H
53
5
50
2
62
41
7
9.4 Function sequence after
discharging last round
– Blowback force generated with the
discharge thrusts the slide 50 to the
rear to stop.
– In the empty magazine, the magazine
spring 71 raises the feeder 70 and
also pushes up the slide catch lever
26. Slide catch lever 26 registers in
the notch of the slide 50.
– Slide 50 remains in its open position.
Fig. 21, slide is held open when magazine is empty
50
26
71
70

26
USA
27
USA
Hinweis
10 Pistol Service and Repairs
10.1 Cause and correction of malfunctions
Malfunctions can be prevented with the proper mainte-
nance of the pistol (cleaning and inspection). Should,
however, a malfunction occur while firing, proceed as
follows:
•
Hold the pistol pointed in the firing direction
(safe direction) and take your finger from the trigger
while you carry out the steps described below.
1. Remove magazine and deposit safely.
2. Draw slide 50 back until stop and arrest it in the open
position by pushing up the slide catch lever 26.
3. Check (visually and manually with appropriate aid) to
ensure that there is no round, bullet, case or foreign
matter in the chamber or in the barrel (see section 3,
page USA 10). If a blockage is lodged in the barrel
bore, strip the pistol (see section 8.1) and have the
blockage removed by a qualified gunsmith using the
proper tools.
4. Remove all rounds, cases or foreign matter. Clean,
lubricate and assemble the pistol (see section 8.3/8.4).
5. Have pistol checked by a gunsmith or armor.
Warning
Service, Repairs and Warranty
Service, Repairs and Warranty
Hinweis
Assembly/Malfunction
Ammunition feed:
No round chambered.
Slide:
Slide does not close properly.
Possible Cause
Magazine is not inserted correctly,
deformed or dirty.
Pistol or rounds dirty or lubricated
too much.
Pistol defective.
Possible Remedy
Insert magazine correctly or
replace it.
Strip, clean and lubricate pistol (see
sections 8.1 – 8.4), clean or replace
ammunition.
Repair by manufacturer.
Case ejection:
Empty case remains in the chamber
or gets stuck in ejector port.
Misfire:
Hammer strikes but no discharge.
Recoil insufficient because of fouling
with dirt.
Underloaded ammunition.
Pistol defective.
Firing pin sticks in the firing pin
guide.
Defective ammunition.
Pistol defective.
Strip, clean and lubricate the pistol
(see sections 8.1 – 8.4).
Replace ammunition.
Repair by manufacturer.
Strip, clean and lubricate the pistol
(see sections 8.1 – 8.4).
Have pistol checked by armor.
Manually cycle slide to chamber a
new round.
Repair by manufacturer.

28
USA
29
USA
10.2 Safekeeping and storage of the pistol
•
Always store your pistol unloaded and in a cleaned
condition.
•
Always store your pistol separate from its ammunition
and locked away. The pistol and ammunition must
always be kept in a place inaccessible to children and
unauthorized persons.
10.3 Shipping the pistol
•
Familiarize yourself with all laws and regulations
governing shipping and transport of firearms.
1. Check pistol to ensure it is unloaded and decocked.
2. Pack the pistol well (if possible in the original packaging)
so that transport damages are prevented. In order to
ensure that it is not recognized as such during trans-
port, cover the original packaging with a second outer
layer. No other accessories should be packed with the
pistol.
3. Enclose a letter with the following information:
– Your name
– Your address (please provide street, not zip code)
– Your telephone number, at which you can be
contacted during the day
– Model and serial numbers of the pistol
– A detailed description of the problems encountered
or the work that is to be carried out.
4. Send the pistol insured and carriage paid (parcels with
incorrect postage will not be accepted) to:
SIGARMS, Inc.
Attn: Service Department
18 Industrial Drive
Exeter, NH 03833
USA
Phone 603-772-2302
Fax 603-772-9082
Before returning the firearm contact Customer Service at
(603) 772-2302 for an RMA number. Clearly mark the
number on the outside of your package – this number
will assist us in tracking the status of your return.
Important information! Please read and understand the
warranty statement on the following page 29.
If you do not understand the instructions for ope-
rating your pistol, it is your responsibility to call our
service department at (603) 772-2302 before using
your firearm.
Warning
Warning
Warranty Statement
Product Line / Disposal
Service, Repairs and Warranty
Important information! Please read and understand the
warranty statement.
Based on Magnuson-Moss Warranty Act, SIGARMS
Inc. offers no express warranty on their product line.
However, SIGARMS Inc. recognizes its obligations
concerning service to owners of SIGARMS products.
SIGARMS Inc. stands behind its products and will
continue to provide service to their product line as
they have over the years. SIGARMS Inc. products
will be serviced for a period of one year from date of
retail purchase, for defects in materials or workman-
ship, at no charge to the purchaser. Be sure to retain
you have your sales slip as proof of purchase date
when making a claim.
11 Product line
– Pistols for government agencies and the military
– Sports pistols
– Precision rifles (sniper)
– Hunting rifles
– Target rifles
– Accessories for pistols and rifles
12 Disposal
– Always comply with all laws regarding the disposal of
handguns.
– Provided this does not contradict the above mentioned
laws, the shipping of the pistol for disposal is recom-
mended to the address named in section 10.3.
– The provisions set out in section 10.3 must be followed
when shipping the pistol.

30
USA
31
USA
Hinweis
13 Technical
Specifications/Models/Accessories
13.1 Standard model*
Caliber
9 mm Para
.40 S&W
Overall length
224 mm
224 mm
Overall height
136 mm
136 mm
Overall width
44 mm
44 mm
Barrel length
127 mm
127 mm
Rifling length
250 mm
380 mm
Number of grooves
6
6
Sight base
181 mm
181 mm
Weight incl. magazine
1319 g
1319 g
Weight, magazine empty
97 g
97 g
Trigger pull weight
1.0 – 1.6 N
1.0 – 1.6 N
Magazine capacity
15
12
Standard model
– SA trigger system
– Adjustable trigger pull weight
– Adjustable trigger stop
– Trigger length can be adjusted
– Low-lying micrometer rear sight
– Additional grip grooves on the slide front
– Manual safety, both sides
– Integrated beavertail
– Solid steel frame of non-corrosive material (stainless)
– Solid slide of non-corrosive material (stainless)
– Grooves on the front of the handle and the front
of the trigger guard
– Sports barrel with 15 mm diameter
Technical Specifications / Models / Accessories
* Without jet funnel, without wooden grip plates, without magazine exten-
sion
Subject to change without notice
Technical Specifications / Models / Accessories
13.2 Full equipping*
Full equipping (in addition to the standard model):
– Wooden grip plates
– Magazine well
– Magazine extension made of light metal
Accessories:
– Spare magazine, 9 mm Para 10/15/19/20 round/
.40 S&W 10/12/14 round
– Cleaning materials
– Wooden grip plates
– Jet funnel
– Magazine extension made of light metal
– Holster
– Magazine pouches
– Belt
– Pistol case
* With jet funnel, with wooden grip plates, with magazine extension
Subject to change without notice
Caliber
9 mm Para
.40 S&W
Overall length
224 mm
224 mm
Overall height
149,5 mm
149,5 mm
Overall width
44 mm
44 mm
Barrel length
127 mm
127 mm
Rifling length
250 mm
380 mm
Number of grooves
6
6
Sight base
181 mm
181 mm
Weight, including
magazine
1342 g
1342 g
Weight, magazine
empty
103 g 103
g
Trigger pull weight
1,0 – 1,6 N
1,0 – 1,6 N
Magazine capacity
19
14
32
USA
33
Spare parts
Spare parts
Hinweis
1
Frame
2
Catch lever
3
Catch lever pivot
4
Catch lever spring
5
Safety lever
6
Spiral pin, 2x10
7
Hammer
8
Cylinder pin, 2.5x6
9
Hammer pivot pin
10
Stop
11
Roll pin 2x14
12 Reset
spring
13 Hammer
strut
14 Mainspring
seat
15 Mainspring
16 Trigger
17 Trigger
base
18 Trigger spring pin
19 Trigger
retainer
20 Trigger retainer pin
21 Guide
plate
22 Trigger pressure spring
23 Trigger
pivot
24 Trigger
bar
25 Trigger bar spring
26 Slide catch lever
27 Slide catch lever spring
28 Safety
lever,
right
29 Safety
lever,
left
30 Adjusting
screw
31 Safety
spring
32 Safety lock lever
33 Trigger slack adjustment
34
Trigger pressure
adjustment
35 Trigger stop adjustment
36 Jet
funnel
37 Cylinder screw M 3x6
39 Locking
insert
40 Takedown
lever
41 Ejector
42 Magazine
catch
43 Magazine catch spring
44 Magazine catch stop
45 Magazine catch stop
spring
46 Support
plate
47 Grip plate, right
48 Grip plate, left
49 Grip plate screw
50 Solid
slide
51 Firing
pin
52 Firing pin spring
53 Extractor
54 Safety
lock
55 Safety lock spring
56 Firing pin positioning
pin
57 Barrel
58 Recoil spring bar
59 Recoil spring buffer
60 Spring
buffer
61 Recoil spring guide
62 Recoil
spring
63 Rear sight assembly
64 Knurled
screw
65 Rear sight pin
66 Worm
screw
67 Front
sight
68 Snap ring A6
69 Magazine
tube
70 Feeder
71 Magazine
spring
72 Floorplate
insert
73 Magazine floor plate
74 Magazine
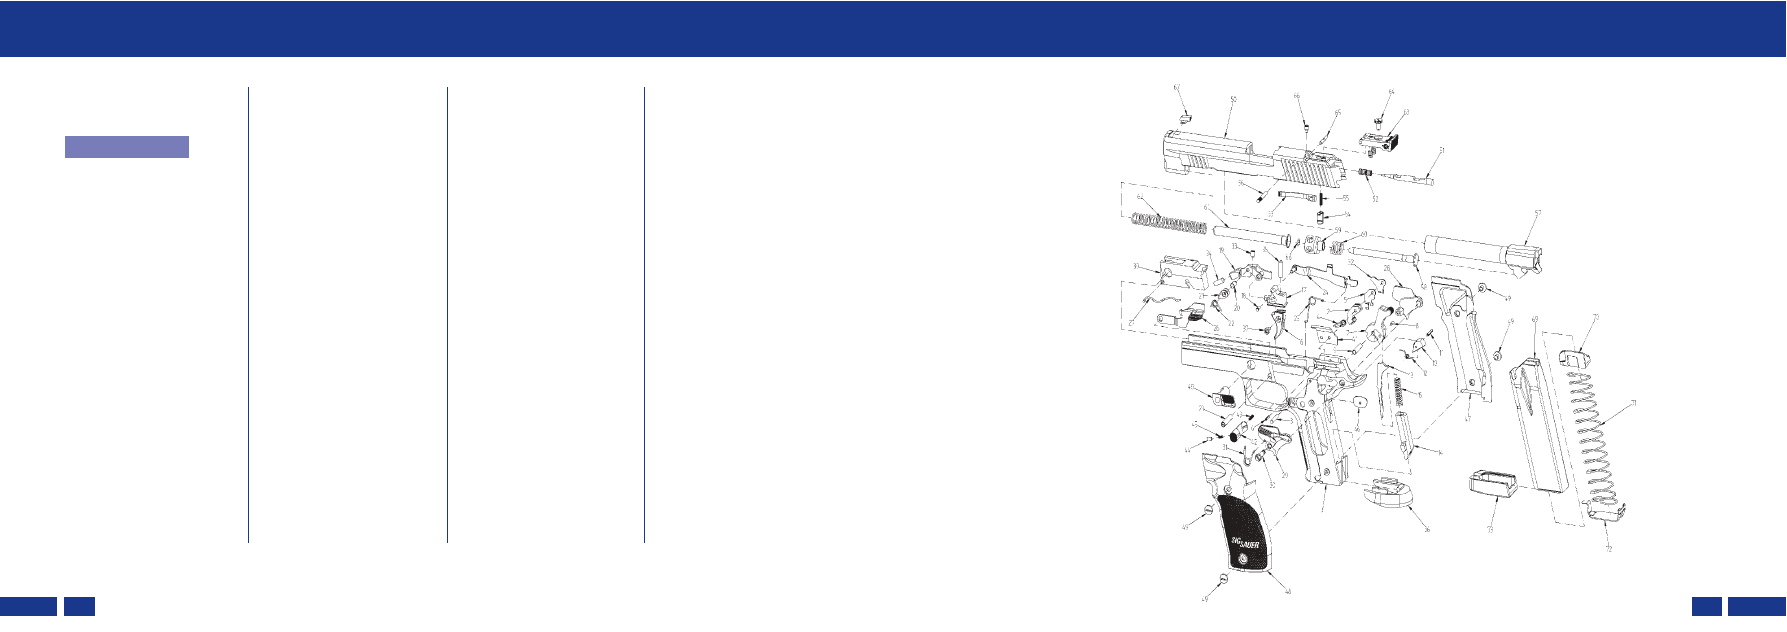
14 Spare Parts List
P 226 X-FIVE
•
Graphic for spare parts
list, see page USA 35.
Essential information
when ordering spare parts
– Pistol model (caliber,
model designation)
– Pistol serial number
– Item number and index
– Part designation
Notice
Item Designation
Item Designation
Item Designation
Hinweis
Fig. 22
USA
34
USA
Fig. 23


SIGARMS, Inc
Attn: Service Department
18 Industrial Drive
Exeter, NH 03833
USA
Telefon 603-772-2302
Telefax 603-772-9082
www.sigarms.com
Wyszukiwarka
Podobne podstrony:
Pistolet SIG Sauer P226 ( ), Części [p226]
sig sg550 switzerland
badania marketingowe, BADANIA MARKETINGOWE, MARK, WYŻSZA SZKOŁA MENADŻERSKA SIG
platan sig opt mic instr2
acad sig
clive cussler bieguny zaglady [2006] [sig] www!osiolek!com X7ETUHPLXZTKGR33TOHVZVNJVFTK2R22OQP5MIA
15cm sIG Ausf. GW II Sturmpanzer, DOC
OPR SIG
Clive Cussler Bieguny Zaglady [2006] [sig] www!OSIOLEK!com
1B Przetworniki Sig, Wojskowa Akademia Techniczna (WAT), Analiza Sygnałów, Wykłady, Piotrowski Zbign
15 cm sIG 33, DOC
presentera sig på en?jtingsajtx
acad sig
Sig Lrs2
Wniosek o przyznanie zmiane cofniecie uprawnien dostepu do systemow informatycznych w siedzibie GUGi
Sig K95
Chuck Hollinger SIG Piper J 3 Cub
SIG SIGMA
Sig R93
więcej podobnych podstron