Instruction manual
WARNING !
Please read and understand this
i n s t ruction manual entire l y,
b e f o re using the rifle. Keep this
manual with your fire a rm .
Upon change of ownership,
transfer this manual with the
f i re a rm .
As a supporting measure to this
i n s t ruction manual, please ask
your dealer to explain your rifle
to you in detail and let him
i n s t ruct you about its use.
I M P O RTA N T:
Do not discard.
Keep this manual with
your firearm. Upon change
of ownership, transfer this
manual with the firearm.
R 93 LRS 2
Long Range Sporter
R-93-LRS_2 6/8/01 2:32 PM Page 1

2
R-93-LRS_2 6/8/01 2:32 PM Page 2
3
R-93-LRS_2 6/8/01 2:32 PM Page 3

4
WARNING !
Please read and understand this
i n s t ruction manual entire l y,
before using the rifle. Keep this
manual with your firearm. Upon
change of ownership, transfer
this manual with the firearm.
As a supporting measure to this
instruction manual, please ask
your dealer to explain your rifle
to you in detail and let him
instruct you about its use.
Rifles are classified as FIREARMS and are
sold by SIG Arms™ with the specific
understanding that SIG Arms™ is not
responsible in any manner whatsoever for
their improper handling, use, or resale
under local laws and regulations. SIG
Arms™ shall not be responsible in any
manner whatsoever for malfunctioning of
the firearm, for physical injury or for prop-
erty damage resulting in whole or part
from (1) criminal or negligent discharge,
(2) improper or careless handling, (3)
unauthorized modification, (4) defective,
i m p ro p e r, hand-loaded, or re - l o a d e d
ammunition, (5) corrosion, (6) neglect, or
(7) other influences beyond our direct and
immediate control. This limitation applies
regardless of whether liability is asserted
on the basis of contract, negligence or
strict liability (including failure to warn).
Under no circumstances shall SIG Arms™
be liable for incidental or consequential
damages, such as loss of use of property,
commercial loss and loss of earnings and
profits.
Carelessness and ignorance cannot be tol-
erated when handling a firearm. Treat
every firearm with respect and follow the
safety rules outlines in this manual.
Teach other members of your family, espe-
cially children, safe gun handling.
Ignorance and carelessness are the major
causes of gun related accidents.
Whenever possible attend a “Hunter
Safety” course of “Fire a rms Safety”
course in your area. This is an investment
in your future. Encourage others to enroll
with you.
FIREARMS SAFETY IS YOUR RESPONSIBILITY
R-93-LRS_2 6/8/01 2:32 PM Page 4

5
Contents
Page
1
1. Safety rules
6 – 7
1
2. Main rifle components
8
1
3. Technical specifications
9
1
4. Assembling, taking down
10 – 11
1
5. Safety and bolt handle lock
12 – 13
1
6. Ammunition
14
1
7. Magazine
15
1
8. Loading the rifle
16
1
9. Firing and repeating
17
10. Unloading the rifle
18
11. Removing and replacing the bolt assembly
19
12. Caliber group table
20
13. Changing the barrel
22
14. Changing the bolt head
22 – 24
15. The trigger assembly
25
16. Stock
26 – 27
17. QD scope mount
28
18. Fixed scope mount
29
19. Optional accessories
30
20. Care and maintenance
31
21. Warranty conditions
32
R-93-LRS_2 6/8/01 2:32 PM Page 5
6
1. Safety rules
Your new Blaser bolt action rifle model
R 93 LRS 2 differs from other repeaters
through a number of special design fea-
tures. Although your Blaser firearm
exhibits additional safety features, do not
forget that you must take care when
handling firearms and also observe the
statutory regulations.
First of all, check you have the right user
manual: the model name R 93 LRS 2 is
located on the left side of the receiver
and the caliber can be found on the left
side of the barrel at the rear.
Safety rules for handling firearms
Make sure the firearm and ammunition
never get into unauthorized hands.
Always store firearm and ammunition
under lock and key in separate cabinets
that are not accessible to unauthorized
persons.
Observe current statutory regulations
for the carrying and safekeeping of
firearms and ammunition.
Never let a loaded firearm out of your
hands.
Never use your firearm when under
influence of alcohol or drugs, during ill-
ness or other complaints; they can
influence your judgement and reflexes.
Always unload your firearm immediate-
ly after firing, before putting it down,
or handing it to another authorised
person.
Never rely on safety mechanisms. They
can never be a substitute for careful
and correct handling of the firearm:
Make sure you are thoroughly familiar
with how to handle your firearm and,
with the firearm unloaded, practice all
of the functions and the actions you
will need to make, before you carry it.
Always treat any firearm as loaded and
ready to shoot. If you are not certain of
its status, check by opening the bolt
and looking in the magazine and
cartridge chamber (barrel). You should
handle an unloaded firearm in the
same way as a loaded one.
Whenever holding the firearm, always
point the muzzle in a safe direction to
ensure you neither injure people nor
damage property.
R-93-LRS_2 6/8/01 2:32 PM Page 6
7
1. Safety rules
Before loading, check the barrel for
obstructions and make sure no foreign
matter (water, snow, soil) can get into
the barrel after loading, too.
Only use CIP-approved ammunition
which is in good condition and check
that the ammunition is correct for the
caliber of the firearm. Wrongly re-
loaded ammunition can damage your
firearm and cause serious injury.
Do not load your firearm until just
before you fire it.
Do not take off safety until you are
ready to fire. When taking off the safe-
ty on your firearm, point the
muzzle in a safe direction.
Before making each shot, check the
terrain in front of and behind the tar-
get.
Aim your firearm only at targets you
have definitely identified.
Keep your finger away from the trigger
unless you wish to fire the firearm.
If a cartridge fails, wait approximately
60 seconds before opening the breech
to avoid danger from a cartridge that
may be late firing.
Always wear ear protection when
shooting.
Unload your firearm
before negotiating obstacles
before climbing into or leaving raised
blinds
before entering a building
before climbing into a vehicle
before entering a town or village.
Special advices regarding the safety of the shooter and to avoid damages
are marked as follows:
WARNING:
Advice concerning a possibly dangerous situation with
fatal consequences or danger of heavy injury.
ATTENTION:
Advice concerning a possibly dangerous situation which
can have slight injuries as a consequence.
NOTE:
Advice regarding threatening material damage.
R-93-LRS_2 6/8/01 2:32 PM Page 7

8
2. Main rifle components
Standard delivery includes:
1 Rifle
1 Magazine
1 Instruction manual
1 T-Allen key SW 4
1 Allen key SW 3
2 Allen screws M5 x 25
R-93-LRS_2 6/8/01 2:32 PM Page 8
9
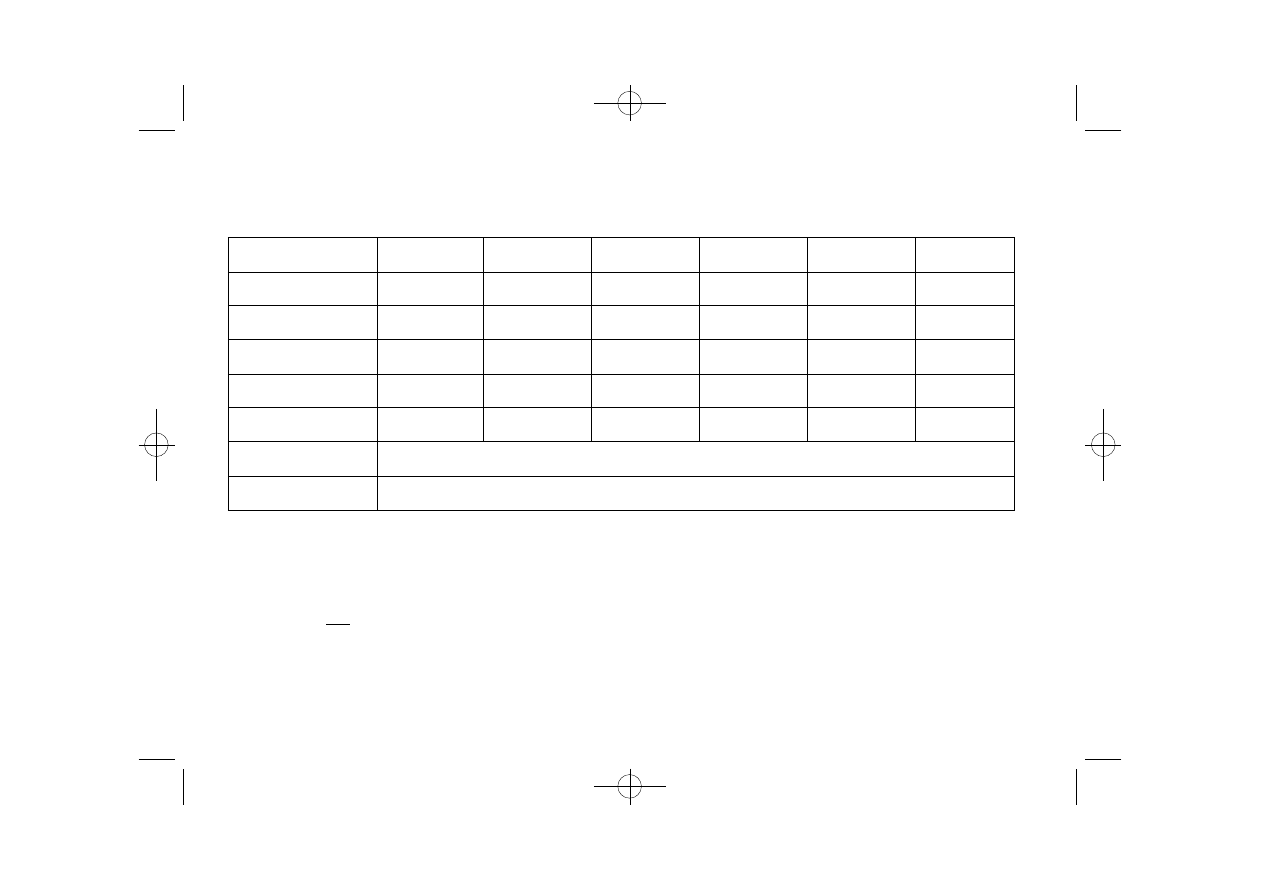
3. Technical specifications
Caliber
.223 Rem.
6 mm Norma BR
6 , 5 x 5 5
.308 Wi n .
.300 Win Mag.
.338 Lapua
Length overall
44.5”
44.5”
44.5”
44.5”
45.3”
45.3”
Barrel length
24.6”
24.6”
24.6”
24.6”
25.6”
25.6”
Rate of twist
1-9“
1-8“
1- 8.6”
1-11“
1-11“
1-11“
No. of grooves
4
4
4
4
6
6
Magazine capacity
5
5
5
5
4
4
Weight (excl. scope)
approx. 10.5 lbs.
Trigger pull weight
approx. 2.65 lbs.
Specifications subject to change without notice !
Some of the listed calibers may not be available.
.338 Lapua is Not interchangeable with other calibers
(See Section 12)
R-93-LRS_2 6/8/01 2:32 PM Page 9
10
4. Assembling, taking down
WARNING:
Make sure there are no cartridges in
the chamber or magazine.
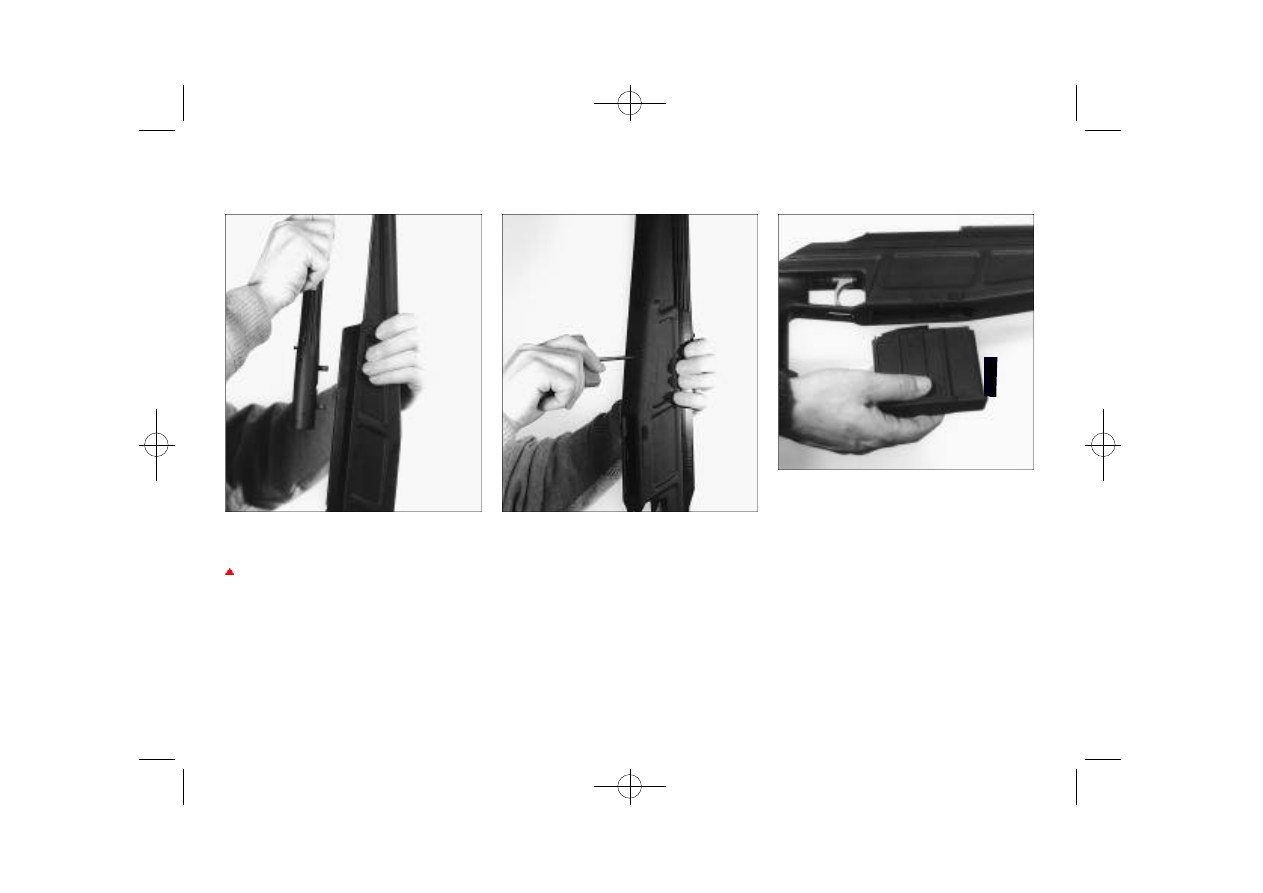
4.1 Assembling
• Remove the large allen key (SW 4)
from its pocket in the shipping carton.
With the barrel screw studs pointing
down, insert the barrel into the receiv-
er (fig. 1).
fig. 1
fig. 2
fig. 3
• Then, insert the allen key into the holes
on the bottom of the fore-end and
tighten the two allen screws equally
locking the barrel and receiver together
(fig. 2).
NOTE:
Do not use any extension tools on the
allen key to tighten screws. Good hand
tightness is sufficient.
• Insert the magazine from the bottom
into the receiver until both magazine
releases are engaged (fig. 3).
R-93-LRS_2 6/8/01 2:32 PM Page 10
11
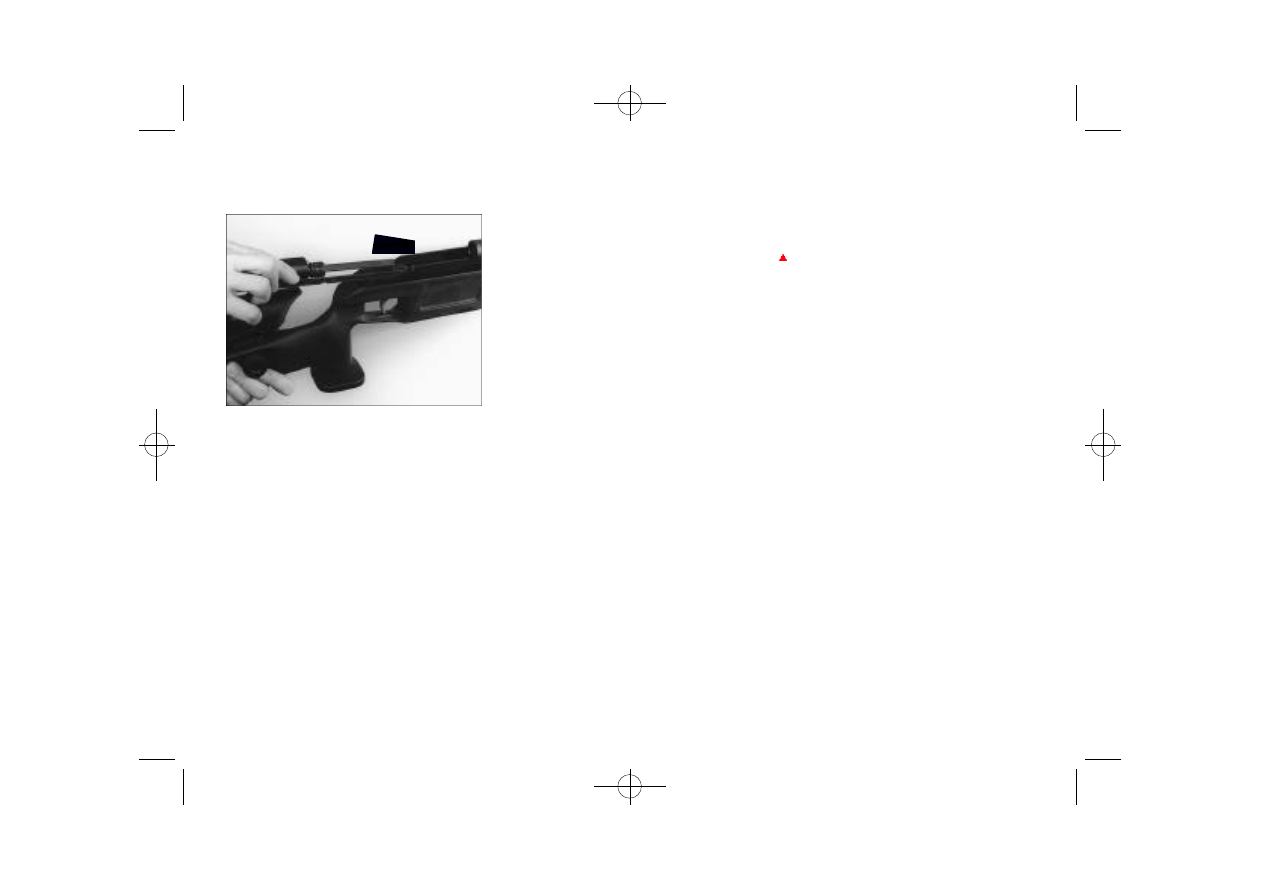
4. Assembling, taking down
fig. 4
• Place both bolt rails parallel on the rear
end of the receiver and insert the bolt
by sliding the bolt rails forward (fig. 4).
Push forward on the bolt handle until
the bolt is closed completely.
NOTE:
Do not use force while inserting and slid-
ing the bolt forward. If you feel any resis-
tance pull the bolt back and repeat the
process.
NOTE:
Always make sure the bolt handle is
locked in the back position when
installing the bolt assembly, i.e. at an
angle of approx. 45°. If the bolt handle is
close to vertical, you cannot mount the
bolt assembly. Pull the bolt handle back
until it engages in the 45° position.
NOTE:
When assembling the rifle, ensure
correct magazine and bolt assembly are
fitted to match the caliber of the barrel
(see chapter 12+13).
WARNING:
Make sure there are no cartridges in
the chamber or magazine.
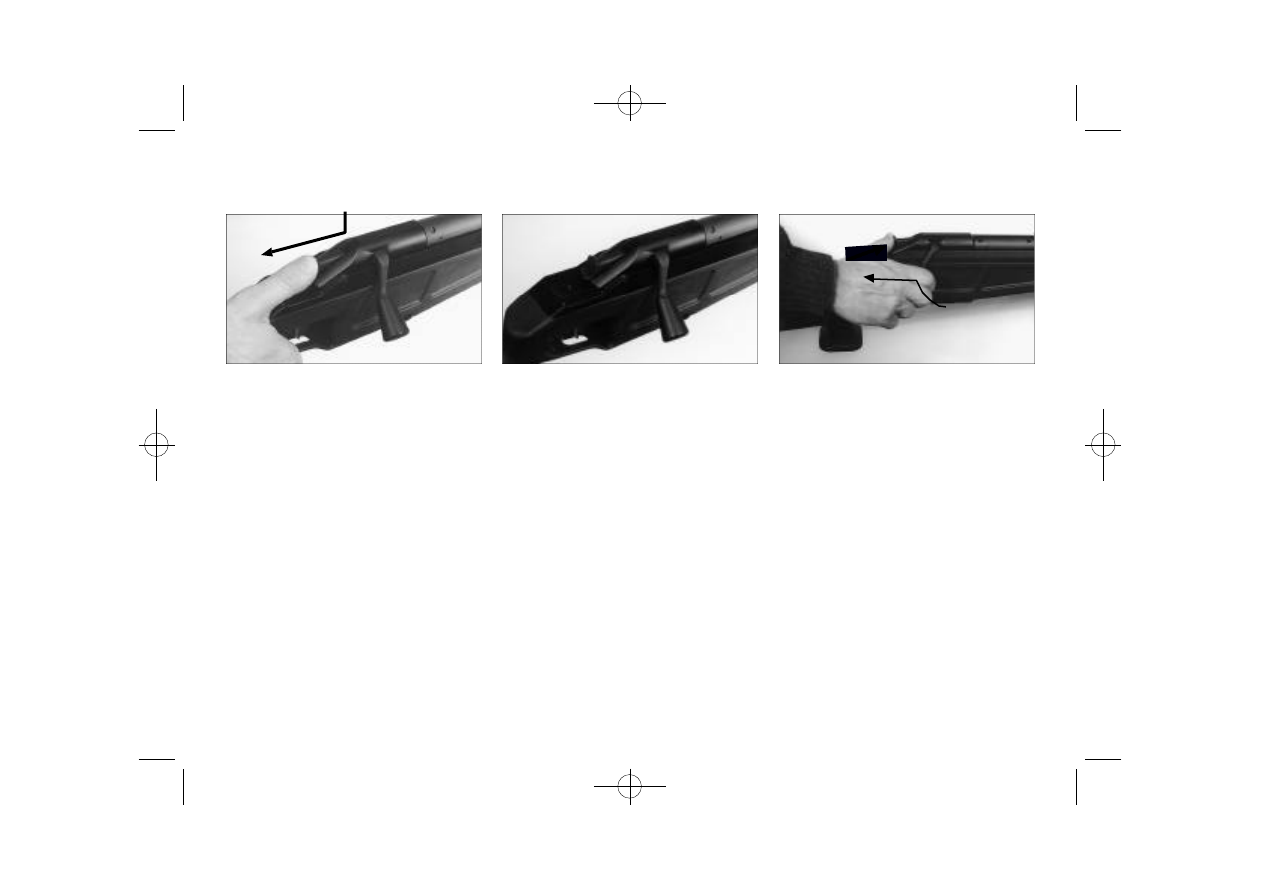
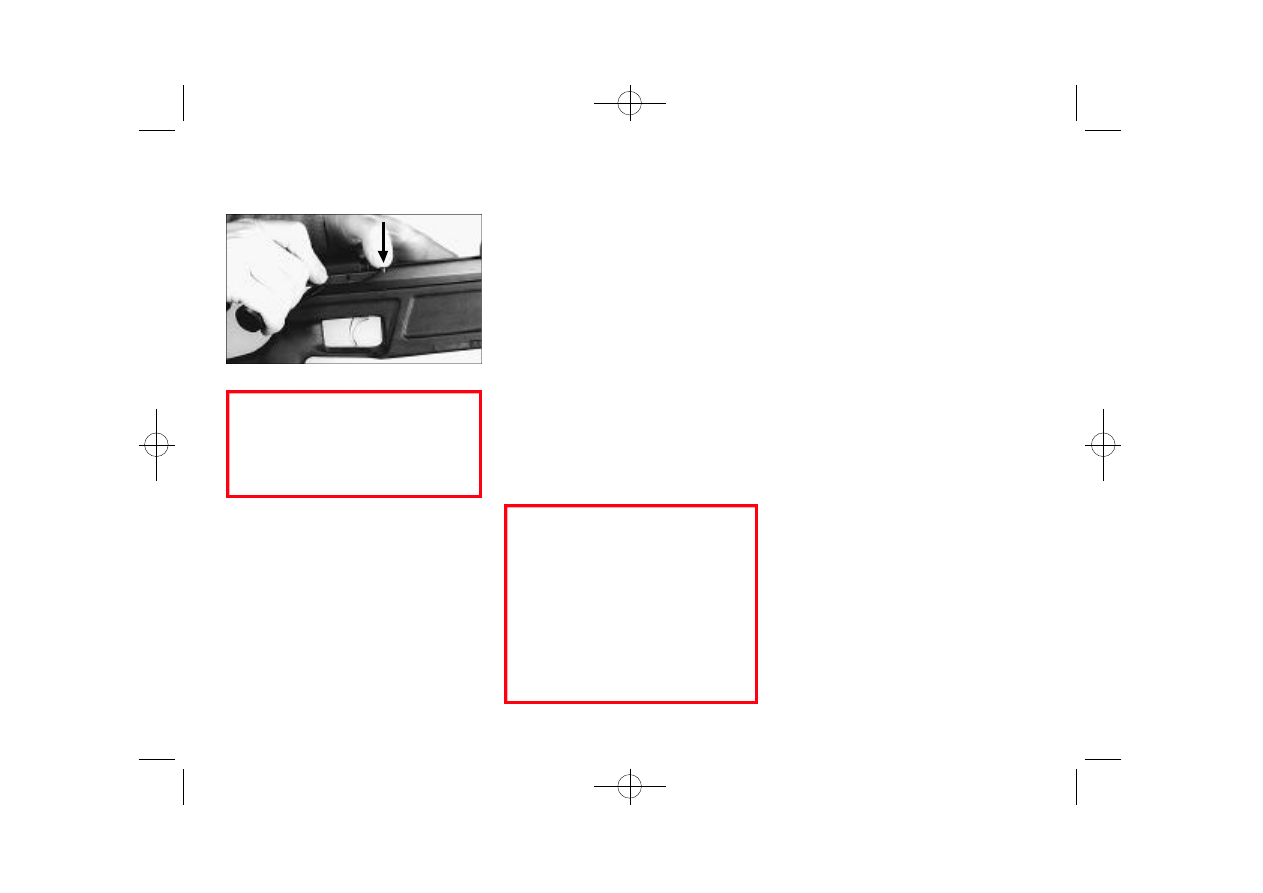
4.2 Taking down
• Push the safety slide forward slightly
with the thumb (approx. 1/16“),
simultaneously pulling the bolt handle
back (see chapter 5.5).
Then pull the bolt all the way straight
back.
• Unload the rifle (see chapter 10).
• Push down and hold the bolt stop pin
(see chapter 11.1) simultaneously with-
drawing the bolt assembly with the
other hand.
• With the 4 mm AF allen key supplied,
undo the two barrel attachment
screws, these are captive so cannot be
lost.
• Remove the barrel.
R-93-LRS_2 6/8/01 2:32 PM Page 11
12
5. Safety and bolt handle lock
5.1 Safety system
The safety system of the Blaser R 93
LRS 2 bolt action rifle is centered on the
uncocked firing spring: you operate the
safety slide to cock the firing spring just
before firing the rifle or to release it
again. When repeating, it remains
cocked. With the safety slide released,
the bolt handle is simultaneously locked
to prevent accidental opening of the bolt
when carrying the rifle, provided this was
fully closed.
WARNING:
Do not touch the trigger while moving
the safety. The firearm will fire when
the trigger is pulled while operating
the safety. Never place your finger or
any object inside the trigger guard until
you are ready to fire the rifle.
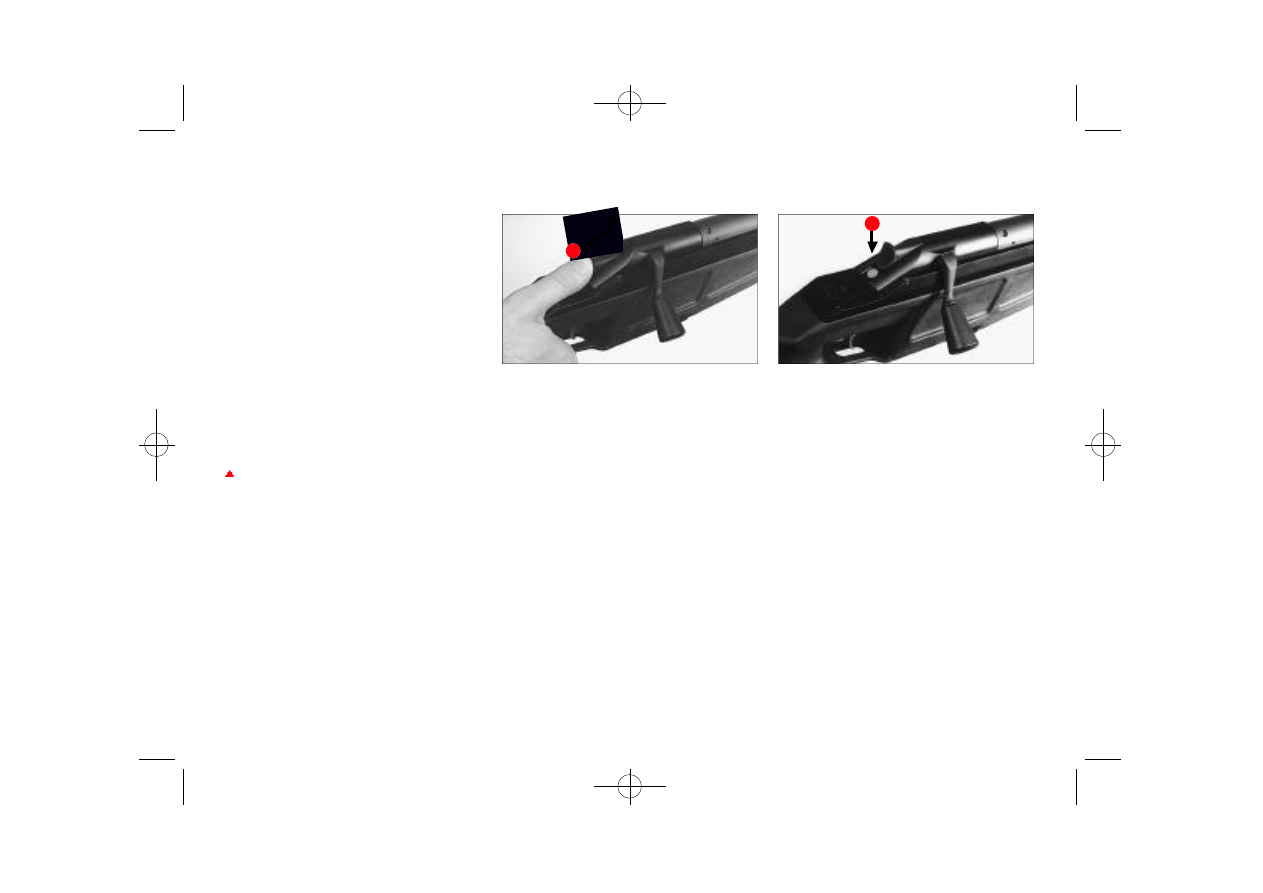
• You should see a red warning dot
behind the safety slide to indicate the
“Off safe“ position (fig. 6).
fig. 5
fig. 6
5.2 “Off safe“ position
• Place your thumb right into the ribbed
finger recess on the safety slide.
• Push the safety slide all the way for-
ward (fig. 5) and lift off your thumb
to lock safety slide into position.
The firing pin spring is cocked.
R-93-LRS_2 6/8/01 2:32 PM Page 12
13
5. Safety and bolt handle lock
fig. 7
fig. 8
fig. 9
5.3 “On Safe“ position
• To release the safety to the most rear-
ward position place your thumb on the
rear portion of the safety slide, push
the safety slide downwards (fig. 7) and
release to the most rearward position
(fig. 8) so the red dot marking cannot
be seen.
5.4 Bolt handle lock
Prevents accidental opening of the bolt.
It is automatically activated when the rifle
is in the “On Safe“ position and fully
locked.
5.5 Opening the bolt in the
“On Safe“ position
• To open the bolt (for loading and
unloading) in the “On Safe“ position,
push the safety slide with your thumb
1/16" forward, hold and simultaneous-
ly pull bolt handle backwards (fig. 9),
then open bolt all the way.
R-93-LRS_2 6/8/01 2:32 PM Page 13

14
6. Ammunition
6.1 Ammunition
WARNING:
Use only commercially available, CIP
proofed ammunition in the original
packaging, and which matches the cal-
iber of your rifle. The correct caliber is
stamped on the left side of the rifle
barrel at the rear.
Never use reloaded, “refurbished“,
hand-loaded, non-standard ammuni-
tion, or ammunition of a different
caliber.
Never use dirty, wet, corroded, bent,
damaged or oiled ammunition.
Never leave ammunition unattended.
CALIFORNIA PROPOSITION 65 WARNING
Discharging firearms in poorly ventilated areas, cleaning firearms, or handling
ammunition may result in exposure to lead and other substances known to cause
birth defects, reproductive harm, and other serious physical injury. Have adequate
ventilation at all times. Wash hands thoroughly after exposure.
WARNING
Using the WRONG ammunition could destroy your rifle
and cause serious personal injury or death. If a bullet is in
the bore, do not attempt to shoot it out by using anoth-
er cartridge. This can generate excessive pressure, dam-
age the firearm and cause serious personal injury.
WARNING
Always use ammunition that complies with
the performance standards established by
the Sporting Arms and Ammunition
Manufacturers’ Institute, Inc. of the United
States (SAAMI)
R-93-LRS_2 6/8/01 2:32 PM Page 14
15
7. Magazine
7.1 Magazine
The Blaser R 93 LRS 2 bolt action rifle is
equipped with a removable single-row
magazine. The detachable magazine is
held in the rifle by two magazine releases
on the right and on the left of the maga-
zine well. See chapter 3 for magazine
capacity.
WARNING:
Ensure correct magazine and ammuni-
tion is used to match the caliber of the
barrel. The magazine is marked on the
left hand side with the caliber for
which it is designed to be used.
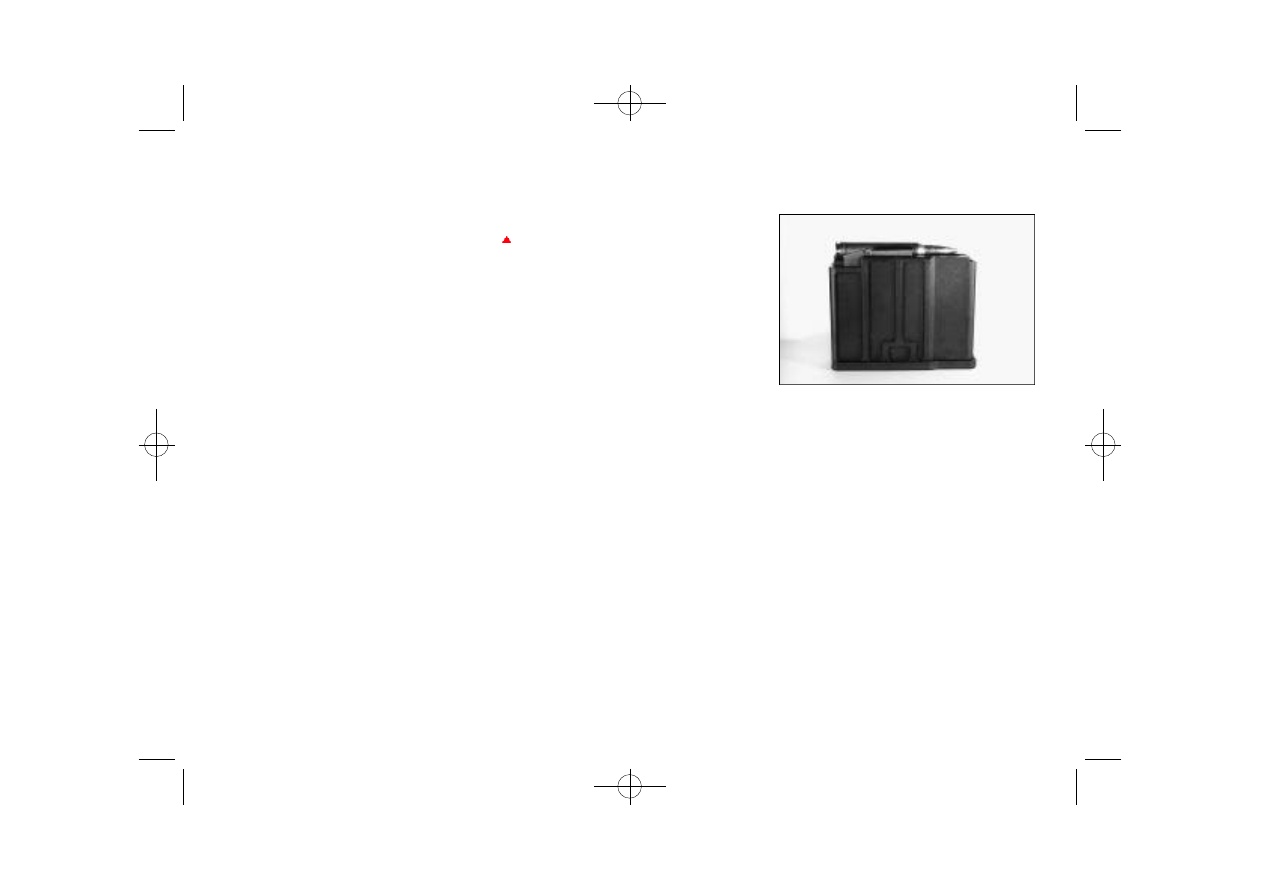
7.2 Filling the magazine
• Place the cartridge on the magazine
and press downwards firmly until the
cartridge snaps through the magazine
lips. Take care, that the cartridge base
is located at the rear of the magazine
(fig. 10).
fig. 10
R-93-LRS_2 6/8/01 2:32 PM Page 15
16
8. Loading the rifle
WARNING:
Always keep muzzle of the rifle point-
ed in a safe direction.
Before loading, always wipe off any
excess grease and oil, then verify that
there is no obstruction in the chamber
or the trigger guard.
Do not place your finger on trigger,
keep it outside of the trigger guard.
Never load or unload the rifle inside a
vehicle, inside a building or other con-
fined space (except in a designated fir-
ing range).
Do not load the rifle by inserting the
magazine until immediately before
shooting.
Never rely on safety mechanisms. They
are never a substitute for careful and
correct handling of your rifle.
Never let a loaded rifle out of your
hands.
8.1 Loading the rifle
• Move the safety slide in the “On safe“
position (see chapter 5.3)
• Open the bolt (see chapter 5.5)
• Insert a loaded magazine from the bot-
tom and make sure it has engaged the
magazine release.
• Push the bolt handle forward all the
way until it locks.
Check that:
• The red dot is not visible, bolt handle is
all the way forward. The rifle is now
loaded, “on safe“ and locked to pre-
vent accidental opening
.
R-93-LRS_2 6/8/01 2:32 PM Page 16

17
9. Firing and repeating
9.1 Firing and repeating
• Push the safety slide all the way for-
ward with the thumb in the “off safe“
position (see chapter 5.2).
• Sight the target.
• Pull trigger to fire rifle.
• Repeating: Pull back the bolt as far as
the bolt stop allows and then push it
forward again.
NOTE:
If the bolt handle is not in its most
forward position, the rifle will not fire
for safety reasons.
WARNING:
Do not move the safety to the
“off safe“ position until you are ready
to fire.
Keep your finger away from the trigger
unless you wish to fire the rifle.
When you interrupt or finish firing
move the safety slide immediately
backwards in the “on safe“ position.
Before making each shot, check the
terrain in front of and behind the
target.
Ensure that the target and the environ-
ment allow shots to be fired without
danger.
Always wear ear protection and safety
glasses when shooting. Alert
bystanders to the importance of wear-
ing ear protection.
If a cartridge fails, wait approximately
60 seconds before opening the breech
to avoid danger from a cartridge that
may be late firing.
WARNING:
You should never point the muzzle at anything, unless you are planning
to shoot, especially when you are loading and unloading the rifle.
Muzzle direction could be the difference between LIFE and DEATH.
R-93-LRS_2 6/8/01 2:32 PM Page 17
18
10. Unloading the rifle
10.1 Unloading the rifle
• Remove your finger from the trigger
and point the rifle in a safe direction.
• Move the safety slide in the “On Safe“
position (see chapter 5.3)
• Press both magazine releases and
remove magazine (fig. 11).
• To remove cartridge from chamber,
push the safety slide 1/16" forward
with your thumb, hold and pull bolt
handle backwards, then open bolt
slowly until the cartridge can be
grasped with the fingers before it
clears the receiver. remove the cart-
ridge from the rifle.
• Check that there is no cartridge in
the rifle.
fig. 11
WARNING:
B e f o re perf o rming any cleaning or
maintenance, make sure the rifle is
completely unloaded. This includes the
magazine and chamber.
R-93-LRS_2 6/8/01 2:32 PM Page 18
19
11. Removing and replacing the bolt assembly
WARNING:
B e f o re perf o rming any cleaning
or maintenance, make sure there are
no cartridges in the chamber or
magazine.
11.1 Removing the bolt assembly
• Unload the rifle (see chapter 10).
• Remove the magazine.
• Pull the bolt assembly all the way back.
• Push down and hold the bolt stop pin
(fig. 12) and simultaneously withdraw
the bolt assembly backwards with the
other hand.
11.2 Installing the bolt assembly
• Carefully position the ends of the two
slide rails onto the rear end of the
receiver in line with the bolt guide.
• slide the bolt assembly forward into
the receiver.
• Close the bolt by pushing the bolt han-
dle forward.
NOTE:
Do not use force when doing this!
If the bolt assembly does not slide on
smoothly, try again taking more care.
fig. 12
WARNING:
If you are having trouble closing the
bolt, stop immediately. Do not force a
round into the chamber, check to make
sure that the ammunition is the correct
caliber, that is not defective, or that an
obstruction does not exist in the bore
or chamber. If the problem still exists,
return your rifle, unloaded, to
SIG Arms™.
R-93-LRS_2 6/8/01 2:32 PM Page 19
20
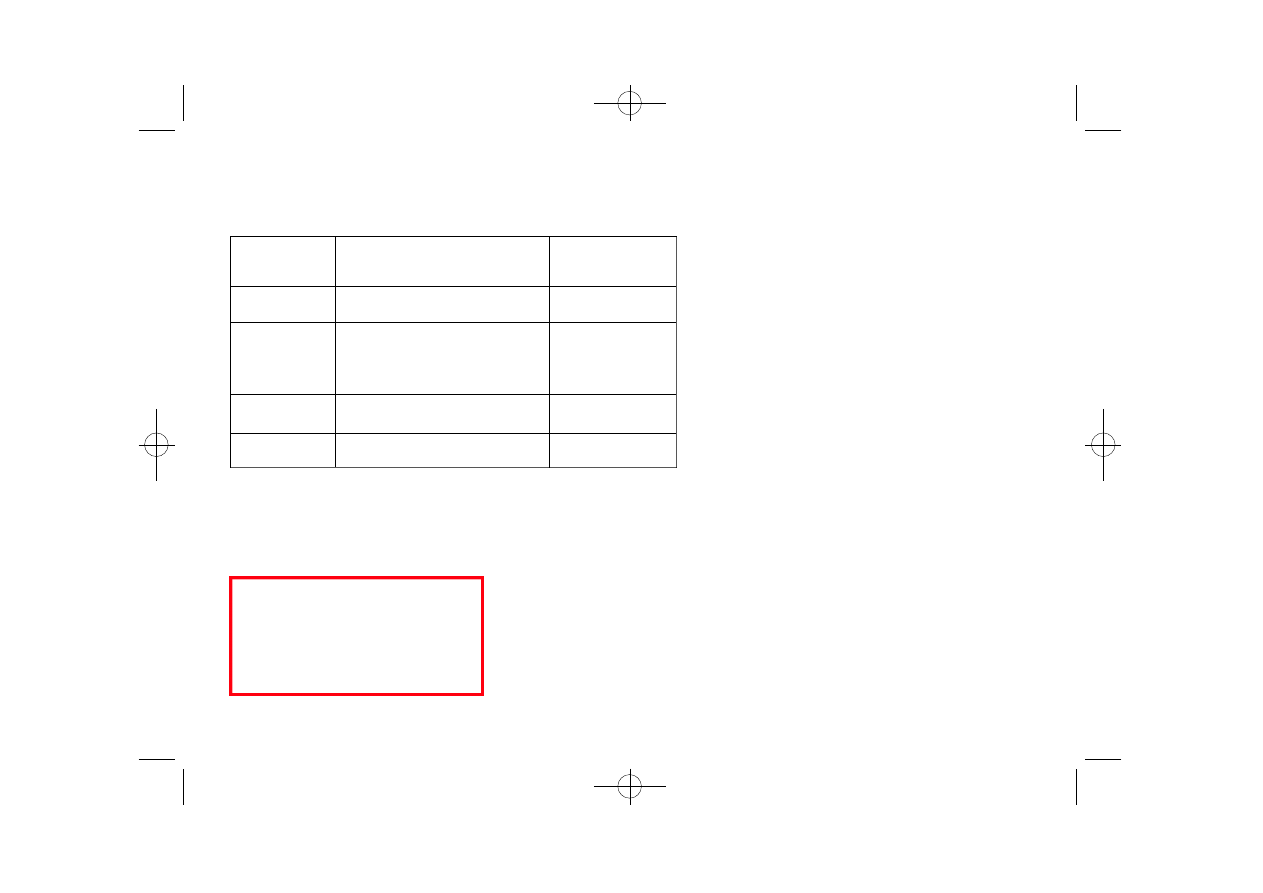
12. Caliber group table
Caliber group
Barrel and Bolt head
Caliber
are stamped with
Mini
MI
.223 Rem.
Standard
ST
6 mm Norma BR
6,5x55
.308 Win.
Magnum
MA
.300 Win. Mag.
338 Lapua
LA
.338 Lapua Mag.
Some of the listed calibers may not be available.
WARNING:
Always ensure you have the correct
barrel & bolt head for the cartridge
selected. Firing a cartridge with the
incorrect barrel & bolt head can cause
serious injury or death.
R-93-LRS_2 6/8/01 2:32 PM Page 20

21
There are 4 caliber groups available (see
table chapter 12). When changing the
barrel to a different caliber group, you
will also have to change the bolt head to
suit the caliber group of the barrel you
have chosen to use. The table (chapter
12) shows the correct components to be
used together. In addition, bolt heads
and barrels are stamped with markings
which identify the caliber group (fig. 13).
Take a final check that these markings
match after the rifle is assembled.
If you change barrels within the same
caliber group you do not have to change
the bolt head.
Caliber group markings:
Mini
Marking MI
Standard
Marking ST
Magnum
Marking MA
338 Lapua
Marking LA
NOTE:
Bolt heads for left-hand bolts are
stamped “L“ below the caliber gro u p
m a r k i n g .
13. Changing the barrel
Make sure you also use the correct mag-
azine to match the caliber of the barrel.
The caliber marking can be
found on the side of the magazine.
WARNING:
Always make sure there are no cart-
ridges in the chamber or magazine.
13.1 Changing the barrel:
• Unload the rifle (see chapter 10).
• Remove the magazine.
• Remove the bolt assembly
(see chapter 11).
• Fully undo both barrel attachment
screws with the 4 mm allen key, these
are captive so cannot be lost.
• Lift the barrel out of the receiver.
• Place the new barrel in the bed of the
receiver.
• Tighten both barrel attachment
screws hand-tight with the allen key.
• Insert a magazine matching the caliber
of the barrel into the magazine hous-
ing.
• Check that the marking stamped on
the bolt head (MI, ST, MA, fig. 13)
matches the caliber group of the barre l .
• If you have to change the bolt head in
the bolt assembly (see chapter 14).
NOTE:
Always keep the barrel bedding clean.
Excessive oil or grease between the barrel
and receiver will impair the accuracy of
the rifle.
fig. 13
ST
ST
NOTE: .338 Lapua is a stand-alone caliber – it is not interchangable with other
caliber groups.
R-93-LRS_2 6/8/01 2:32 PM Page 21
22
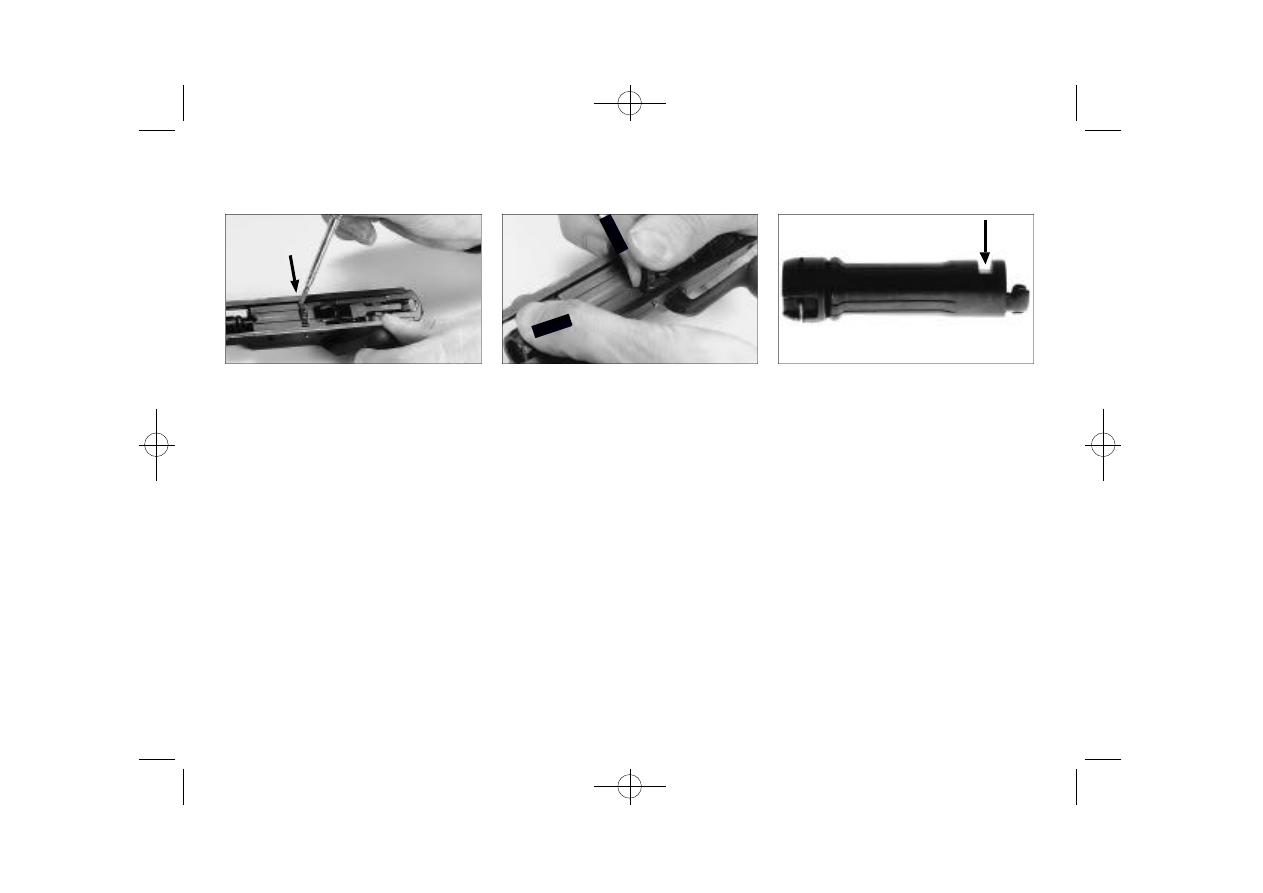
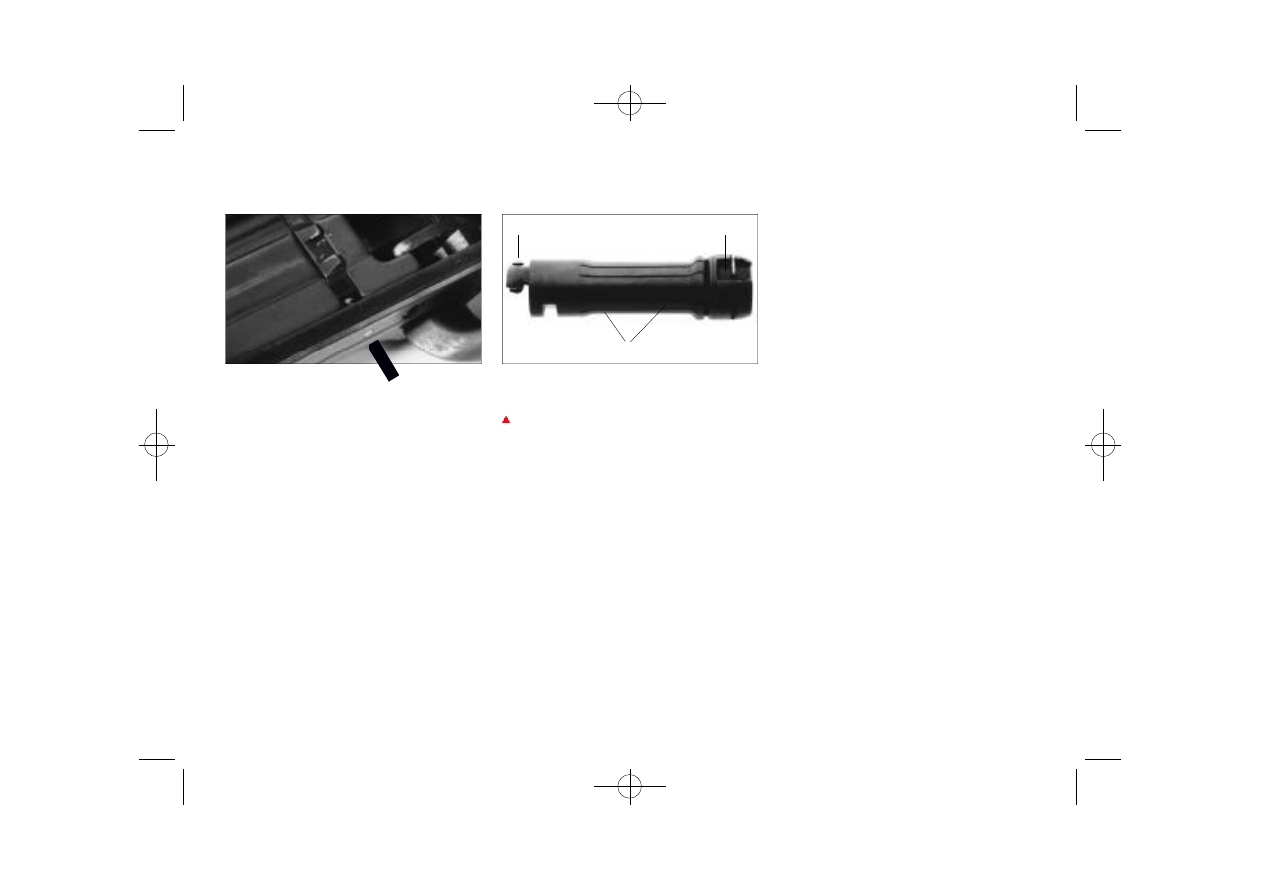
14. Changing the bolt head
fig. 14
fig. 15
fig. 16
14.1 Changing the bolt head
N O T E :
It is advisable to have this operation
explained by your Blaser dealer.
• Unload the rifle (see chapter 10).
• Remove the bolt assembly from the
rifle (see chapter 11).
• Place bolt assembly upside down on a
flat surface.
• With a small screwdriver or similar tool
push the retaining latch to the left side
and up (fig. 14).
• Grasp the retaining latch with thumb
and forefinger and push to the left.
With your other hand pull the bolt
head out of the bolt assembly (fig. 15).
14.2 Installing the bolt head
• Grip the new bolt head to be installed
and line up the two grooves of the
expanding shell and bolt head by turn-
ing them in relation to each other (fig.
16).
R-93-LRS_2 6/8/01 2:32 PM Page 22
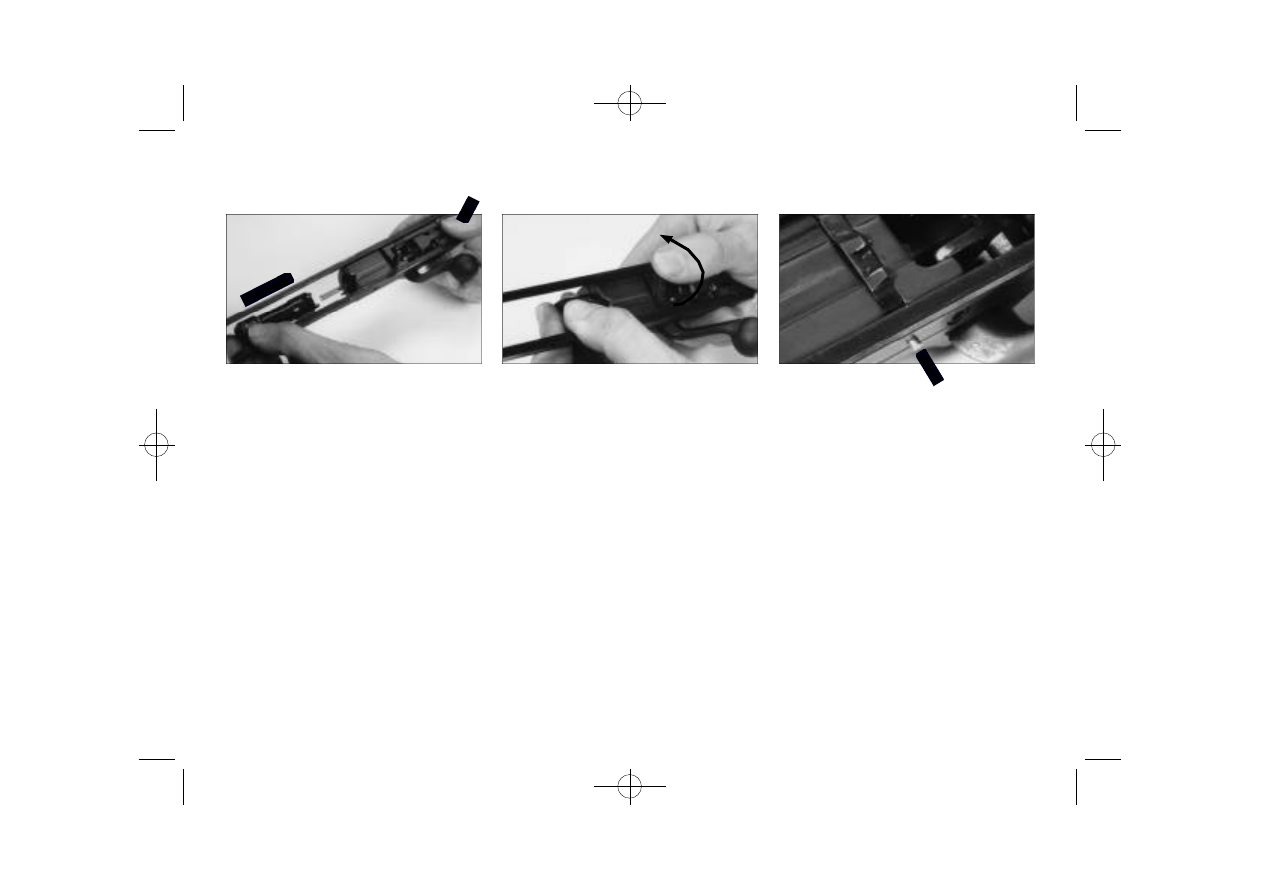
23
• Flip the retaining latch down again and
push it back into its recess so that it
snaps into position (fig. 18).
• Lift the retaining latch in the
bolt housing.
• Now insert the bolt head with the
groove facing exactly upwards into the
bolt assembly over the firing pin as far
as the stop and hold it there.
NOTE:
To make this process easier, jiggle the fir-
ing mechanism up and down with the
thumb of the other hand (fig. 17).
fig. 17
fig. 18
fig. 19
NOTE:
If the retaining latch is not in the correct
position, a warning pin will project from
the outside of the rail (fig. 19).
14. Changing the bolt head
R-93-LRS_2 6/8/01 2:32 PM Page 23
24
fig.20
fig.21
NOTE:
The bolt assembly can only be inserted
in the receiver when the warning pin
is flush in the bolt rail (fig. 20), indicat-
ing that the retaining latch is seated
correctly.
WARNING:
The bolt head assembly consists of two
major parts: The bolt head and the sur-
rounding expanding shell.
These two parts are bound together by
a rivet (fig. 21). It is strictly forbidden
to loosen that rivet!
Firing the rifle with the expanding shell
removed, will inevitably cause the
blow-out of the bolt head assembly
and injury or death to the shooter or
bystanders!
14. Changing the bolt head
rivet
expanding shell
bolt head
R-93-LRS_2 6/8/01 2:32 PM Page 24
25
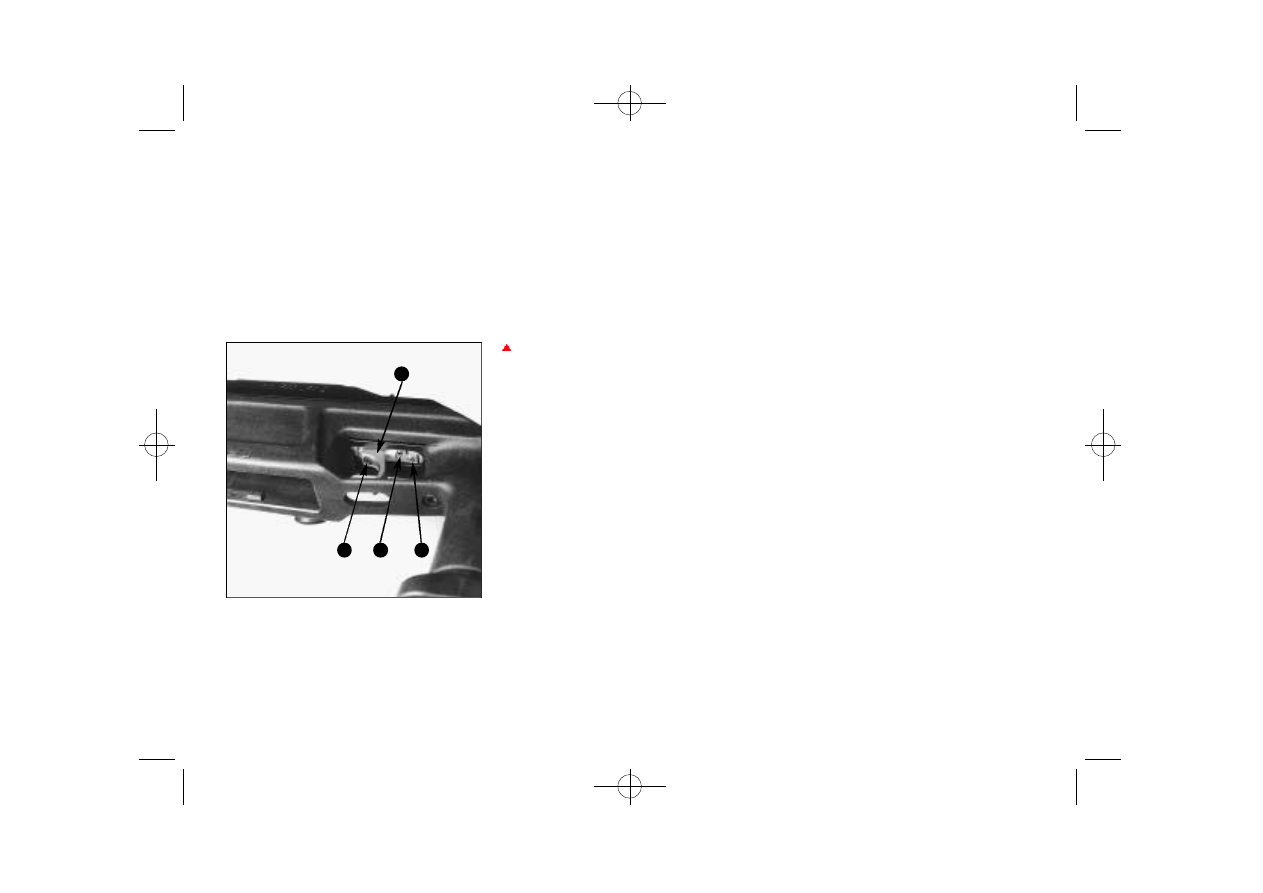
fig.22
15. Trigger assembly
15.1 Trigger assembly
The Blaser R 93 LRS 2 bolt action rifle
is equipped with an adjustable direct
t r i g g e r. The trigger pull weight is adjusted
at the factory to approx. 1200 g (9.8 N).
Adjustment potential:
- Trigger position
- Trigger pull
- Trigger stop
WARNING:
Before making any adjustments
make sure there are no cartridges in
the chamber or magazine.
15.2 Trigger position
The trigger blade (fig. 22-1) can be
moved along the longitudinal axis to
adapt to the hand of the shooter.
• loosen lock screw (fig. 22-2).
• shift trigger blade to the desired
p o s i t i o n .
• tighten lock screw (fig. 22-2).
15.3 Trigger pull
The trigger pull weight can be adjusted
with the trigger pull screw (fig. 22-3):
• increase trigger pull weight
t u rn the trigger pull screw (fig. 22-3)
c l o c k w i s e
• decrease trigger pull weight
t u rn the trigger pull screw (fig. 22-3)
c o u n t e rc l o c k w i s e .
15.4 Tr i g g e r s t o p
The trigger stop can be adjusted with the
trigger stop screw (fig. 22-4):
• t u rn triggerstop screw (fig. 22-4)
clockwise until trigger is past the
release point.
• put the safety in the “off safe“
p o s i t i o n .
• pull the trigger and turn triggerstop
s c rew (fig. 22-4) c o u n t e rclockwise until
the sear releases the firing pin.
• by counting to turn the triggerstop
s c rew (fig. 22-4) c o u n t e rclockwise the
d e s i red travel beyond the release point
can be adjusted.
1
2
3
4
R-93-LRS_2 6/8/01 2:32 PM Page 25

26
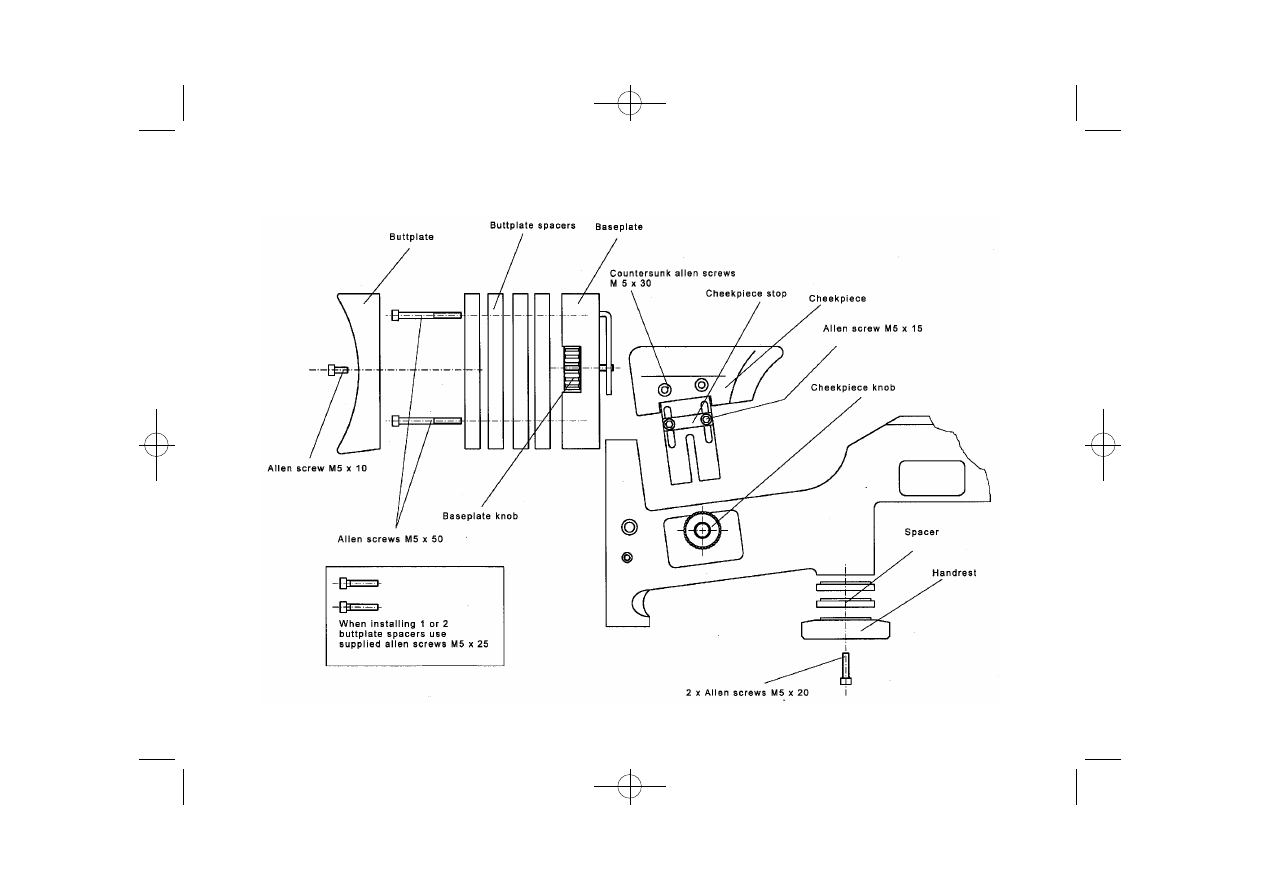
16. Stock
16.3 Cheekpiece:
• After loosening cheekpiece knob the
cheekpiece can be moved up or down.
To remove the cheekpiece from the
stock just pull it out of the top.
• To maintain the same elevation of the
cheekpiece when removing and
installing adjust the cheekpiece stop to
the
d e s i red position.
• Loosen allen screw M5x30 with allen
key SW 3. To adjust the offset of the
cheekpiece add or remove spacers on
the inside.
16.4 Handre s t :
• Loosen the 2 allen screws (SW 4) and
remove handre s t .
• Add or remove spacers to set the
d e s i red height.
• Installation in re v e r s e .
The following adjustments are possible:
- Buttplate elevation
- Length of pull
- Cheekpiece height and off s e t
- Handre s t
16.1 Buttplate
• Loosen baseplate knob and move
buttplate to desired elevation and
tighten.
16.2 Length of pull
• Loosen allen screw (SW 4) and re m o v e
buttplate
• Loosen and remove allen screws (SW 4)
which hold the spacers to the base-
plate. Add or remove spacers to set the
d e s i red length of pull.
• Installation in re v e r s e .
N O T E :
• When installing 1 or 2 buttplate
spacers use allen screws M5x25.
• When installing 3 or 4 buttplate
spacers use allen screws M5x50.
R-93-LRS_2 6/8/01 2:32 PM Page 26
27
16. Stock
R-93-LRS_2 6/8/01 2:32 PM Page 27
28
• First thumb the front lever then the
rear lever back and down as far as they
can go. If you need to apply either no
force or a lot of force when doing this,
then the mount is adjusted wrongly. In
either case, get your authorized dealer
to adjust it to the factory specifications.
The force required to close the locking
levers should be about the same as
that of the safety slide.
• Now close the covers of both locking
levers.
NOTE:
Make sure the mounting faces are
clean and free of grease!
17. QD scope mount
The barrels of the Blaser R 93 LRS 2 bolt
action rifle are equipped with notches to
accept Blaser QD scope mounts with 1“,
26 mm or 30 mm rings or rail or Zeiss
ZM rail. It is assumed that an authorized
dealer has fitted your scope correctly to
match the barre l .
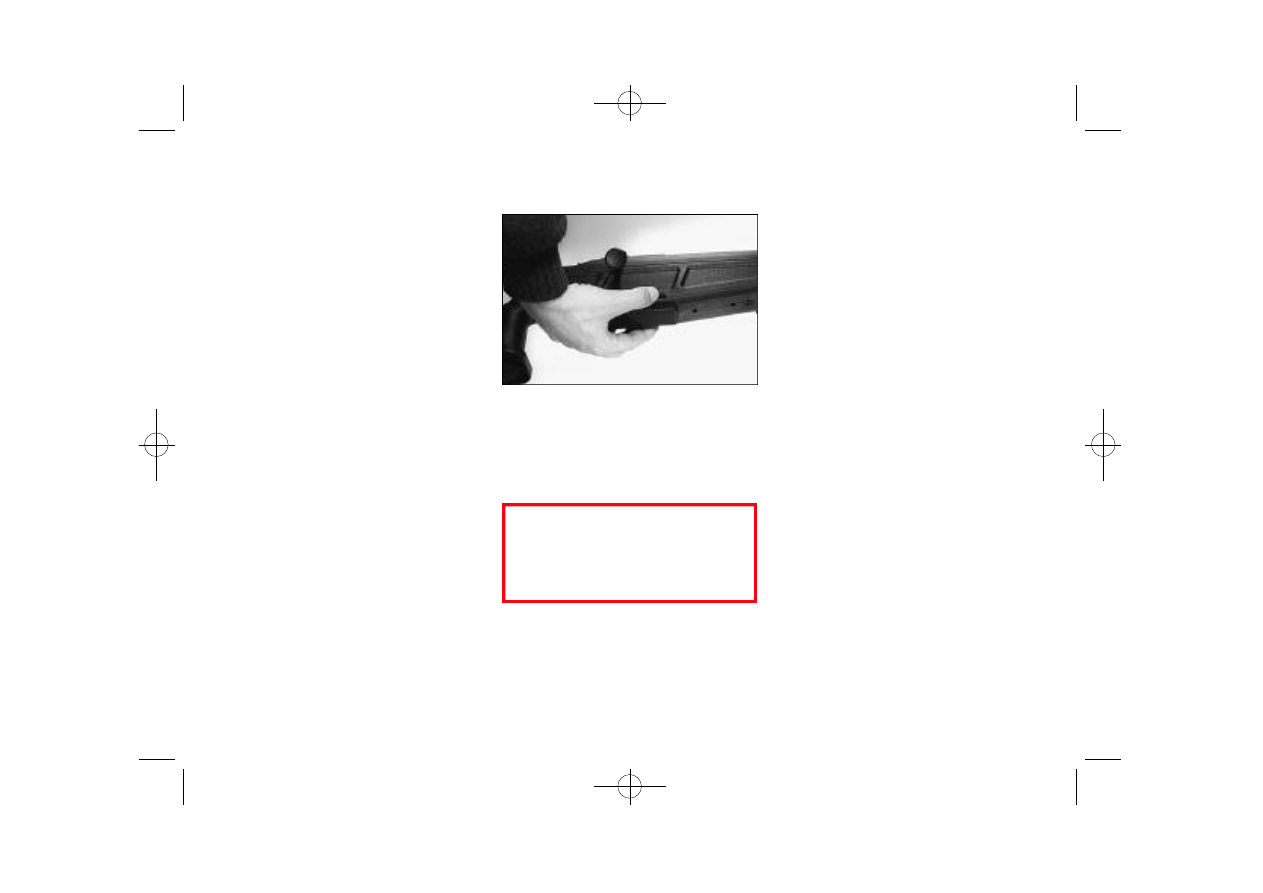
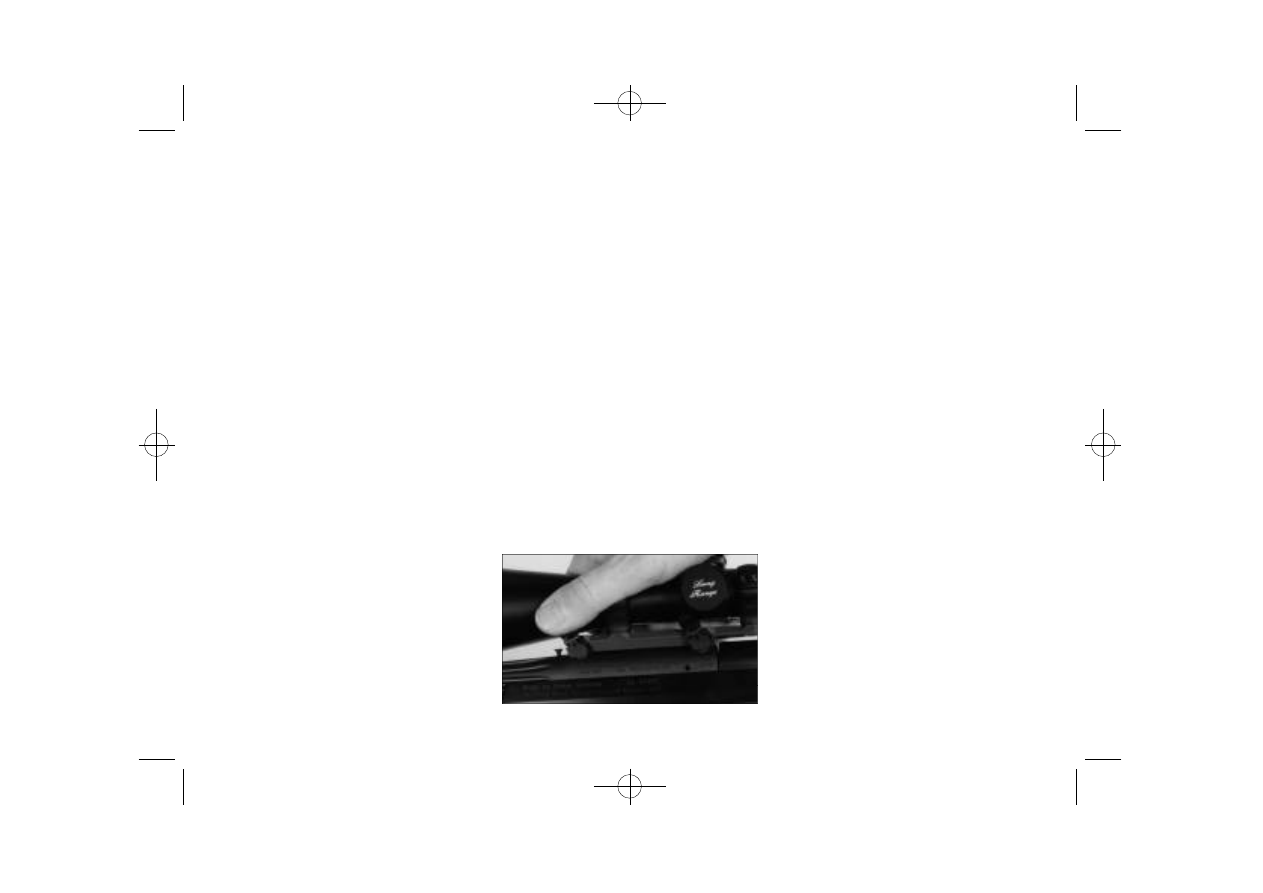
17.1 Mounting the scope
• Flip open the covers of the front and
rear locking lever, then thumb these
fully up and forward.
• Take the center tube of the scope in
your right hand and hold it so that you
can reach the front lever with your
thumb (fig. 23).
• Grasp the stock with your left hand
and steady the stock against your
upper thigh.
• Carefully locate the two round locating
pins of the scope mount in the oval
notches milled into the top right of the
barrel. Tilt scope to the left and hold it
in that position.
17.2 Removing the scope
• Grasp the fore-end with the left hand
and steady the rifle on your upper
thigh.
• Flip open the covers of the two
locking levers.
• First release the rear locking lever
by thumbing it forwards as far as it
can go.
• Grasp the center tube of the scope
mount with the right hand.
• Now release the front locking lever by
thumbing it forwards and upwards as
far as it can go.
• Remove the scope upwards and to the
right.
fig. 23
R-93-LRS_2 6/8/01 2:32 PM Page 28

29
18.2 Removing the scope
• Grasp the rifle with your left hand
around the fore-end and scope,
steadying the rifle on your upper thigh.
• Loosen the two screws on the side of
the mount a few turns with an 1/8“
allen key.
• Remove the scope.
18. Fixed scope mount
18.1 Mounting the scope
• Loosen the two screws on the side of
the mount a few turns with an 1/8“
allen key.
• Grasp the centre tube of the scope
with the right hand above the mount.
• Hold the fore-end of the rifle with your
left hand and steady the stock against
your upper thigh.
• Carefully locate the two round locating
pins of the scope mount in the oval
notches milled into the top right of the
barrel. Tilt scope to the left and hold it
in that position.
• Tighten the two screws on the side of
the mount hand tight with an 1/8“
allen key.
NOTE:
Make sure the mounting faces are
clean and free of grease!
The barrels of the Blaser R 93 LRS 2 bolt
action rifle are equipped with notches to
accept Blaser fixed scope mounts with 1“,
26 mm or 30 mm rings or rail or Zeiss
ZM rail. It is assumed that an authorized
dealer has fitted your scope correctly to
match the barre l .
R-93-LRS_2 6/8/01 2:32 PM Page 29
30
19. Optional accessories
Interchangable barrels
Bolt head
Magazine
Mirage band
Original Blaser scope mount
R-93-LRS_2 6/8/01 2:32 PM Page 30
31
20. Care and maintenance
WARNING:
Before performing any cleaning or
maintenance make sure there are no
cartridges in the chamber or magazine.
Always make sure you use suitable
materials that are intended for the
purpose of cleaning rifles.
Barrels:
After firing, prior to storing for long
periods and after carrying the rifle, treat
barrels and cartridge chamber with suit-
able gun oil, particularly when conditions
are damp or wet. Make sure you thor-
oughly remove excess oil from barrels
and cartridge chamber before firing.
With a heavy build-up of cartridge
deposits, we recommend treating these
parts with chemical barrel cleaners.
ATTENTION:
Make sure you read and adhere to the
instructions and warnings given by the
manufacturer of the cleaning agent.
Metal parts:
Always keep all metal parts of the rifle
clean and lightly oiled.
Optics:
Refer to the service instructions of the
manufacturer.
Maintenance:
Take your rifle to your gun dealer for
examination and maintenance before the
hunting season and before hunting trips.
Like your automobile, your rifle is an item
of equipment that needs regular main-
tenance and inspection.
R-93-LRS_2 6/8/01 2:32 PM Page 31
32
21. Warranty conditions
LIMITED 5 YEAR WARRANTY
BLASER firearms are warranted by the
BLASER Jagdwaffen GmbH to be free of
defects in material or workmanship under
normal use and service for a period of 5
years from date of first purchase by a
consumer.
BLASER’s obligation is limited (at BLASER’s
choice) to repairing or replacing at any
of its authorized warranty service stations
any part of a BLASER fire a rm which
BLASER examination discloses to be
defective.
The warranty shall not apply to problems,
malfunctions or defects resulting from
accidents, alterations, misuse or broken
stocks. If in the opinion of BLASER gun-
smiths or of its authorized warranty ser-
vice stations any modifications, changes
or additions made outside the BLASER
factory have affected the operation of the
weapon to render it faulty, this warranty
shall be void. This warranty shall also be
void if any part not of BLASER manufac-
ture has been incorporated into the rifle
or if other than factory loaded ammuni-
tion is fired in the BLASER rifle.
Should you have occasion require warran-
ty service, please contact your local dealer
or the distributor of your country for
directions on returning your rifle to an
authorized warranty station.
BLASER expressly disclaims any and all
implied warranties arising under the UCC
or Common Law, including warranties of
fitness for a particular purpose and
implied warranties of merchantability.
BLASER shall not be responsible for any
incidental or consequential damages for
economic loss or injury or property dam-
age as a result of any alleged breach of an
express or implied warranty, as a result of
negligence, or as a result of any other act
or omission of BLASER. Exclusion or limi-
tation of consequential or incidental dam-
ages are not allowed in some states so
this limitation or exclusion may not apply
to you.
This warranty gives you specific legal
rights, and you may also have other rights
which vary from state to state.
SAVE YOUR RECEIPT AS PROOF OF
PURCHASE.
USA/Canada
SIGARMS Inc.
18 Industrial Drive
Exeter, NH 03833
(603) 772-2303
www.sigarms.com
SIGARMS is a trademark of
SIGARMS Inc.
Manufacturer:
BLASER Jagdwaffen GmbH
Ziegelstadel 1
D-88316 Isny, GERMANY
R-93-LRS_2 6/8/01 2:32 PM Page 32

33
NOTES
R-93-LRS_2 6/8/01 2:32 PM Page 33
34
NOTES
R-93-LRS_2 6/8/01 2:32 PM Page 34
35
R-93-LRS_2 6/8/01 2:32 PM Page 35
36
Blaser Jagdwaffen GmbH
D-88316 Isny
GERMANY
om-LRS2-USA 8-2000
R-93-LRS_2 6/8/01 2:32 PM Page 36
Wyszukiwarka
Podobne podstrony:
Pistolet SIG Sauer P226 ( ), Części [p226]
sig sg550 switzerland
badania marketingowe, BADANIA MARKETINGOWE, MARK, WYŻSZA SZKOŁA MENADŻERSKA SIG
platan sig opt mic instr2
acad sig
clive cussler bieguny zaglady [2006] [sig] www!osiolek!com X7ETUHPLXZTKGR33TOHVZVNJVFTK2R22OQP5MIA
15cm sIG Ausf. GW II Sturmpanzer, DOC
OPR SIG
Clive Cussler Bieguny Zaglady [2006] [sig] www!OSIOLEK!com
1B Przetworniki Sig, Wojskowa Akademia Techniczna (WAT), Analiza Sygnałów, Wykłady, Piotrowski Zbign
15 cm sIG 33, DOC
presentera sig på en?jtingsajtx
acad sig
Sig P226X5
Wniosek o przyznanie zmiane cofniecie uprawnien dostepu do systemow informatycznych w siedzibie GUGi
Sig K95
Chuck Hollinger SIG Piper J 3 Cub
SIG SIGMA
Sig R93
więcej podobnych podstron