
1-1
HP OmniBook Plug-In Modules
User’s Guide
For other Service and User Manuals, go to www.ManualDepot.com

1-2
Notice
This manual and any examples contained herein are provided “as is” and are
subject to change without notice. Hewlett-Packard Company makes no warranty of
any kind with regard to this manual, including, but not limited to, the implied
warranties of merchantability and fitness for a particular purpose. Hewlett-Packard
Co. shall not be liable for any errors or for incidental or consequential damages in
connection with the furnishing, performance, or use of this manual or the examples
herein.
Consumer transactions in Australia and the United Kingdom: The above disclaimers
and limitations shall not apply to Consumer transactions in Australia and the United
Kingdom and shall not affect the statutory rights of Consumers.
© Copyright Hewlett-Packard Company 1998. All rights reserved. Reproduction,
adaptation, or translation of this manual is prohibited without prior written
permission of Hewlett-Packard Company, except as allowed under the copyright
laws.
The programs that control these products are copyrighted and all rights are
reserved. Reproduction, adaptation, or translation of those programs without prior
written permission of Hewlett-Packard Co. is also prohibited.
Portions of the programs that control this product may also be copyrighted by
Microsoft Corporation, SystemSoft Corp., Crystal Semiconductor Corporation,
Phoenix Technologies, Ltd., and NeoMagic Corporation. See the individual
programs for additional copyright notices.
Microsoft, MS, MS-DOS, and Windows are registered trademarks of Microsoft
Corporation. Pentium and the Intel Inside logo are U.S. registered trademarks and
MMX is a U.S. trademark of Intel Corporation.
For warranty information, see the Support and Service booklet.
,I[PIXX4EGOEVH'SQTER]
1SFMPI'SQTYXMRK(MZMWMSR
4VYRIVMHKI%ZI
'YTIVXMRS'%97%

1-3
Contents
1. Using OmniBook Plug-In Modules
..........................
1-5
To install hot-swap support
...............................
1-7
To replace a plug-in module
...............................
1-7
Using the Floppy disk drive
...............................
1-9
To connect the floppy disk drive externally
..................
1-9
Insert or eject a floppy disk
.............................
1-10
Using the CD-ROM drive
.................................
1-11
To insert or remove a CD
...............................
1-11
To open the CD-ROM drive manually
......................
1-12
Using the LS-120 drive
...................................
1-13
To insert or eject a LS-120 diskette
.........................
1-13
To eject a LS-120 disk manually
..........................
1-13
Using the DVD drive
....................................
1-15
To insert or remove a DVD disk
..........................
1-15
To open the DVD drive manually
.........................
1-16
To install the MPEG-2 PC Card and DVD Player software
.........
1-16
To play a DVD movie
.................................
1-17
Using the Second Battery
.................................
1-18
To handle and store the battery safely
......................
1-18
To maintain and preserve battery life
......................
1-19
2. Troubleshooting
.......................................
1-21
Solving Problems with Plug-In Accessories
.....................
1-23
Floppy disk drive problems
.............................
1-23
CD-ROM drive problems
...............................
1-24
LS-120 drive problems
.................................
1-24
DVD Drive Problems
..................................
1-25
Battery problems
....................................
1-25
3. Specifications and Regulatory Information
...................
1-27
Hardware Specifications and Safety
.........................
1-29
To use the CD-ROM and DVD drive safely
...................
1-29
Regulatory Information
..................................
1-30
U.S.A.
............................................
1-30
Canada
...........................................
1-31
Japan
............................................
1-31
Europe
...........................................
1-32


1-5
1
Using OmniBook Plug-In
Modules
1-6
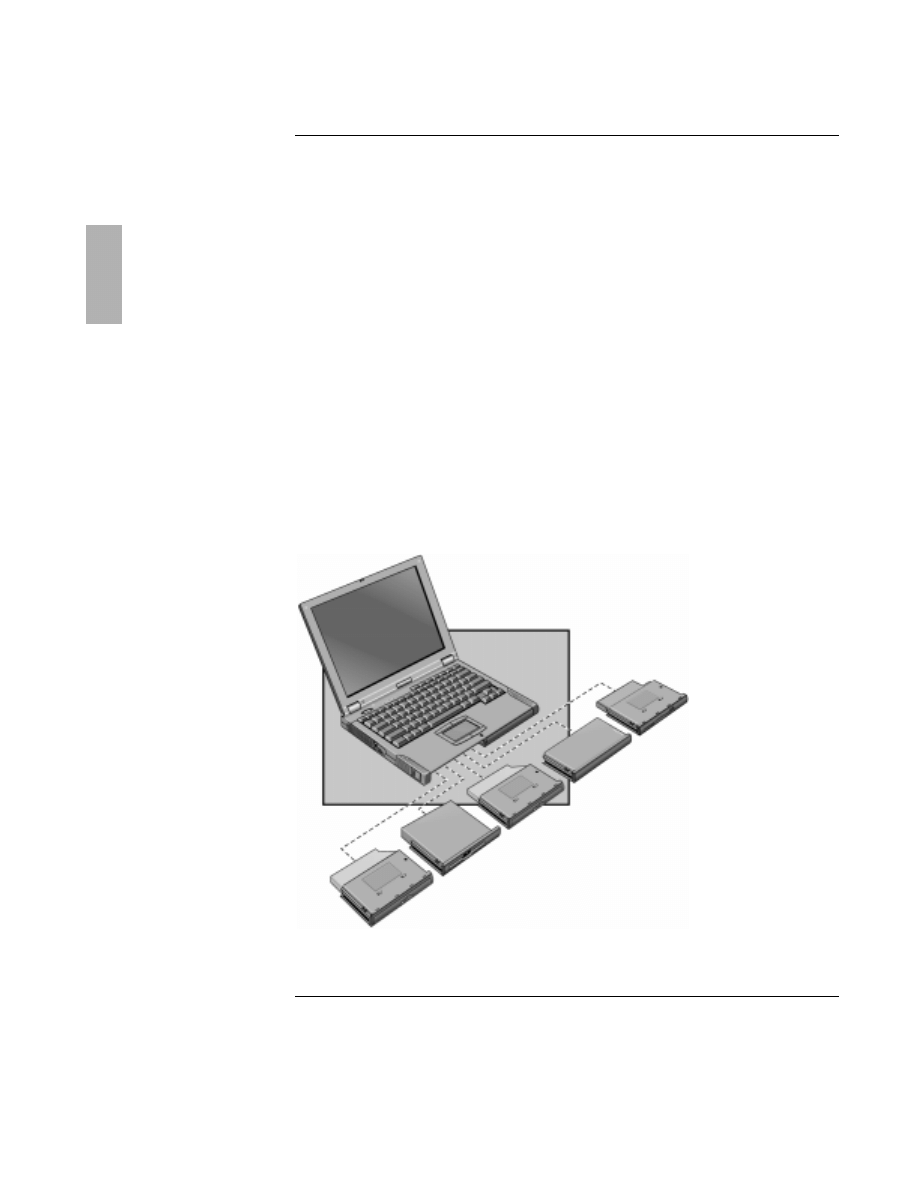
Using OmniBook Plug-In Modules
The OmniBook Plug-in Modules User’s Guide describes OmniBook plug-in accessory
modules and shows you how to install and use them. For complete information
about operating the OmniBook, consult the OmniBook Reference Guide and the
online User’s Handbook.
This manual explains how to
♦
Install hot-swap support
♦
Replace a plug-in accessory module in the OmniBook.
♦
Use the floppy disk drive.
♦
Use the CD-ROM drive.
♦
Use the LS-120 drive.
♦
Use the DVD drive.
♦
Use the second battery.

Using OmniBook Plug-In Modules
8SMRWXEPPLSXW[ETWYTTSVX
1-7
To install hot-swap support
The Agaté Tioman "hot-swap" software for Windows 95 and Windows 98 is loaded
on the hard disk, but it is not installed. If you install this software, you can switch
most modules in the plug-in bay without shutting down the computer and
rebooting. (This software does not support Windows NT.)
•
Click Start, Programs, Agaté Tioman for HP, Setup, then follow the onscreen
instructions.
To replace a plug-in module
2SXI
•
For Windows 95/Windows 98, if Agaté Tioman hot-swap software is installed, a
plug-in module icon appears at the right end of the taskbar. This software lets
you swap most plug-in modules without shutting down the computer.
•
If you are removing or inserting a hard disk drive in the module bay, you must
shut down the computer.
•
If you are removing a battery and inserting another battery, you do not have to
do steps 1 and 2 below—you can just change the batteries.
' % 9 8 - 3 2
-J]SYEVIMRWIVXMRKSVVIQSZMRKE'(631HVMZI(:(HVMZISVER]SXLIVX]TISJ
HVMZI]SYQYWXYWIXLILSXW[ETWSJX[EVISVWLYXHS[RXLIGSQTYXIVSXLIV[MWI
]SYGSYPHPSWIHEXE
1. Close all files that are open from the plug-in module.
2. If the plug-in module icon is present in the taskbar, right-click the icon, then
click Remove Device. When prompted to remove the module, click OK. (You
do not have to do this if the bay is empty or contains a battery.)
–or–
Click Start, Shut Down to shut down the computer. (You must do this if you are
removing or inserting a hard disk drive in the module bay.)
3. Slide the module release latch forward as far as it will go.

Using OmniBook Plug-In Modules
8SVITPEGIETPYKMRQSHYPI
1-8
4. Gently move the release latch back until the module pops out.
5. Grasp the underside of the module firmly, and pull out.
6. With the latch in the open position, slide the new plug-in module into the
OmniBook until flush with the unit.
7. Close the module release latch.
Using OmniBook Plug-In Modules
9WMRKXLI*PSTT]HMWOHVMZI
1-9
Using the Floppy disk drive
You can install the floppy disk drive in the plug-in module bay or attach it externally
to the parallel port.
This section describes how to
♦
Connect the floppy disk drive externally.
♦
Insert or eject a floppy disk.
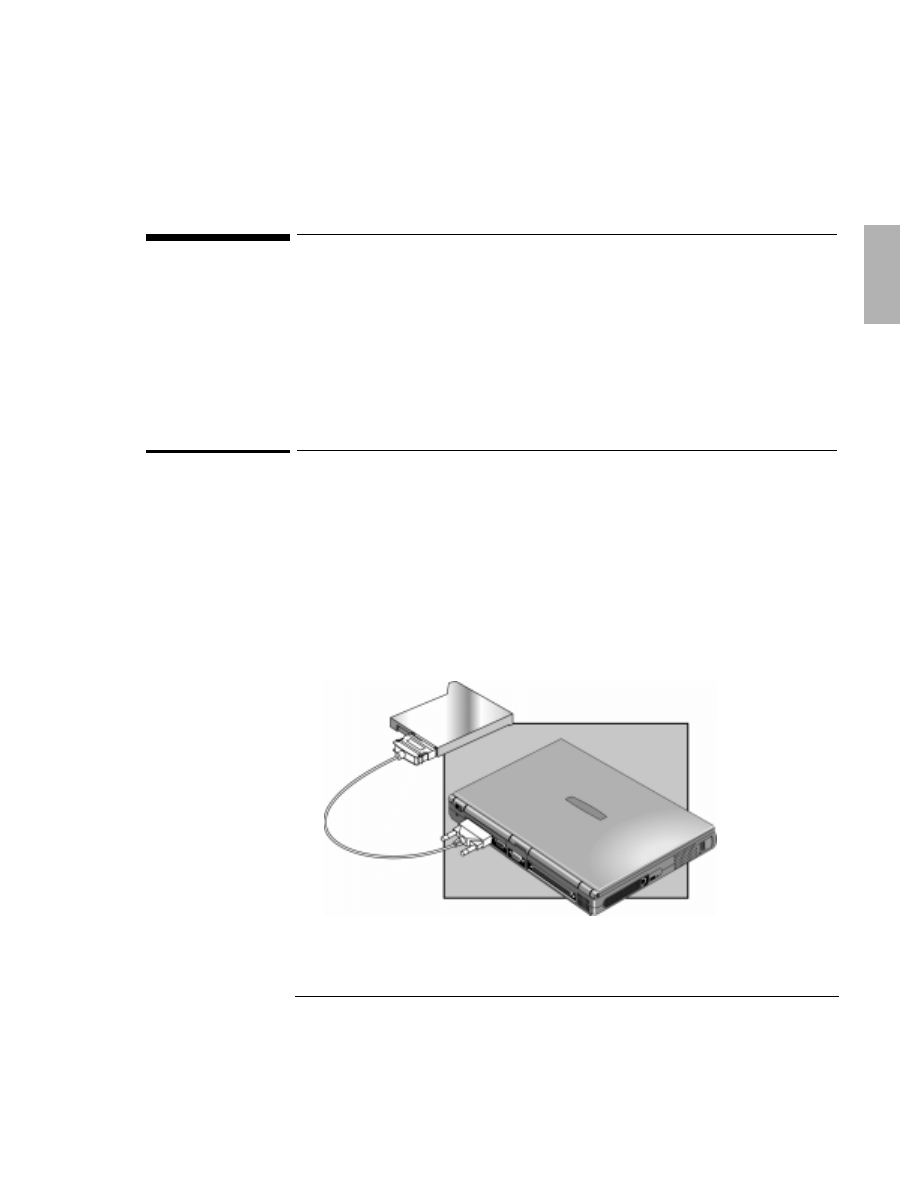
To connect the floppy disk drive externally
If you want to use the floppy disk drive while also using any other OmniBook plug-in
module, you can use the external floppy disk drive cable (optional accessory
F1473A) to connect the floppy disk drive module to the OmniBook via the parallel
port.
1. Connect the floppy cable to the floppy disk drive module and tighten the
knurled thumbscrews.
2. Connect the other end of the floppy disk drive cable to the OmniBook parallel
port, as shown below.
Using OmniBook Plug-In Modules
9WMRKXLI*PSTT]HMWOHVMZI
1-10
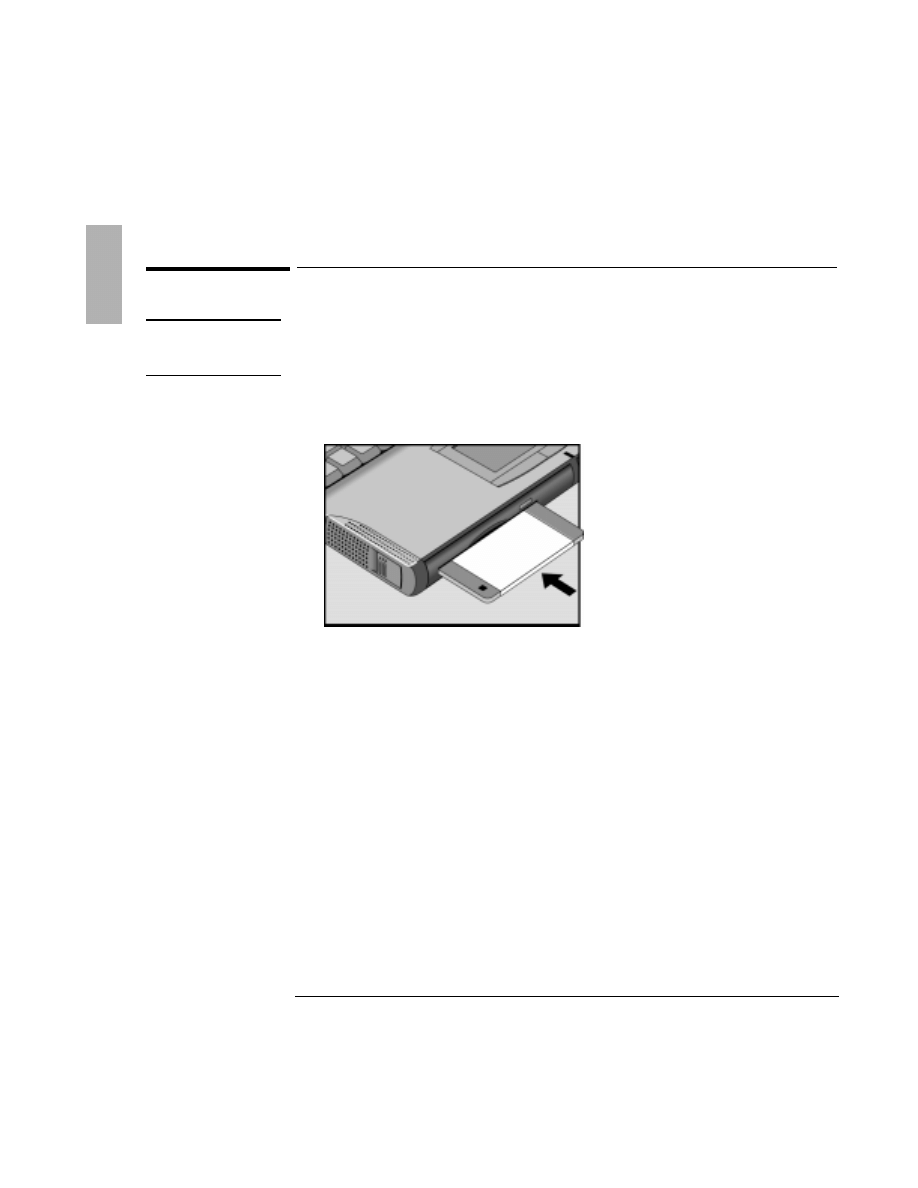
Insert or eject a floppy disk
' % 9 8 - 3 2
(SRSXMRWIVXSVVIQSZIEJPSTT]HMWO[LMPIXLI3QRM&SSOMWEGXMZIP]VIEHMRKSV
[VMXMRKHEXE3XLIV[MWI]SYGSYPHPSWIHEXESVXLI3QRM&SSOGSYPHWXST
VIWTSRHMRK
1. Hold the disk with its face up, then slide it into the floppy disk drive slot until it
clicks into place.
2. To remove the floppy disk, press the eject button on the front of the drive.

Using OmniBook Plug-In Modules
9WMRKXLI'(631HVMZI
1-11
Using the CD-ROM drive
You can install the CD-ROM drive module in the plug-in module bay.
This section describes how to
♦
Insert or remove a CD.
♦
Open the CD-ROM drive manually.
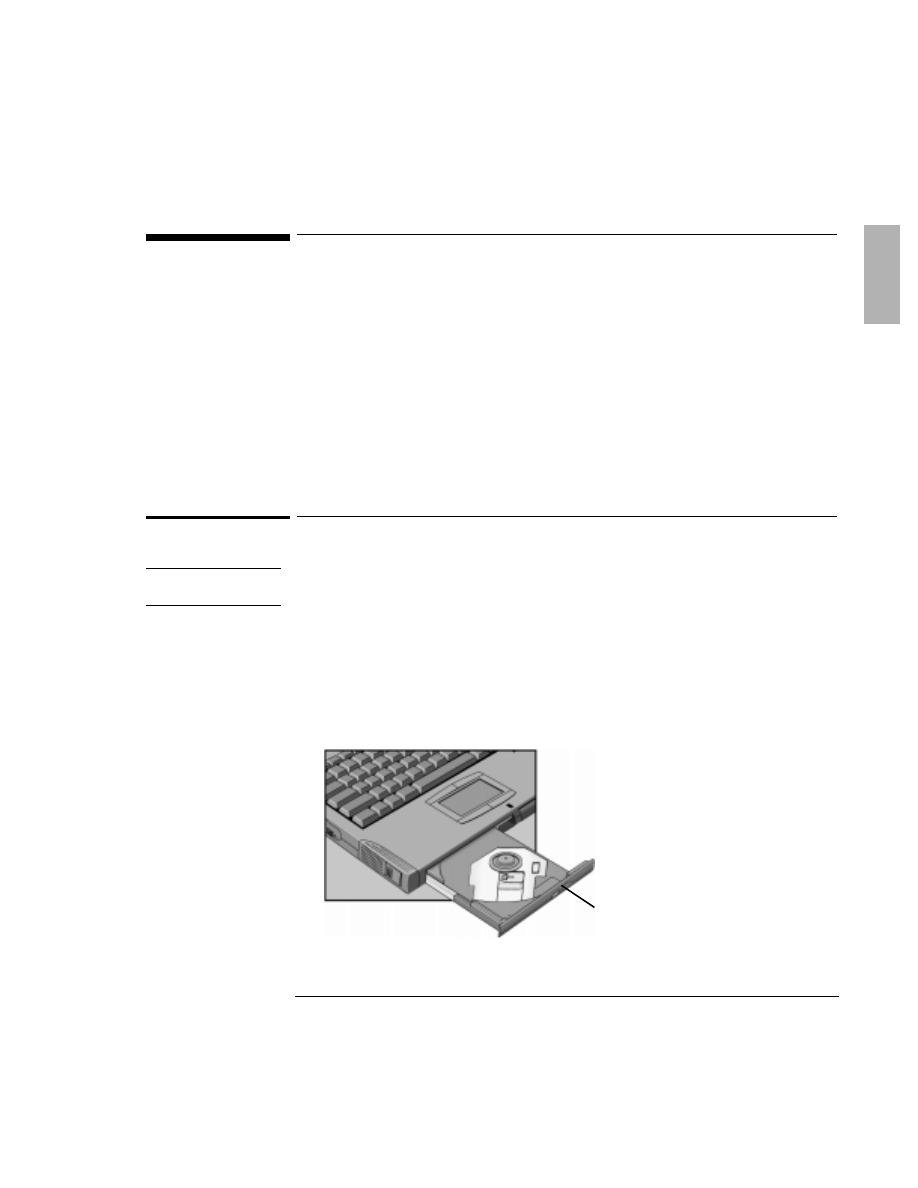
To insert or remove a CD
' % 9 8 - 3 2
(SRSXMRWIVXSVVIQSZIE'([LMPIXLI3QRM&SSOMWEGXMZIP]VIEHMRKHEXE
3XLIV[MWIXLI3QRM&SSOGSYPHWXSTVIWTSRHMRKERH]SYGSYPHPSWIHEXE
1. Press the button on the face of the CD-ROM drive. If you are using this drive for
the first time, be sure to remove the cardboard packing insert if present.
2. Place the CD into the drive (label facing up) and gently press down to seat the
CD on the spindle–or–remove the CD.
3. Slide the CD-ROM tray back into the module to close it.
Open button
Using OmniBook Plug-In Modules
9WMRKXLI'(631HVMZI
1-12
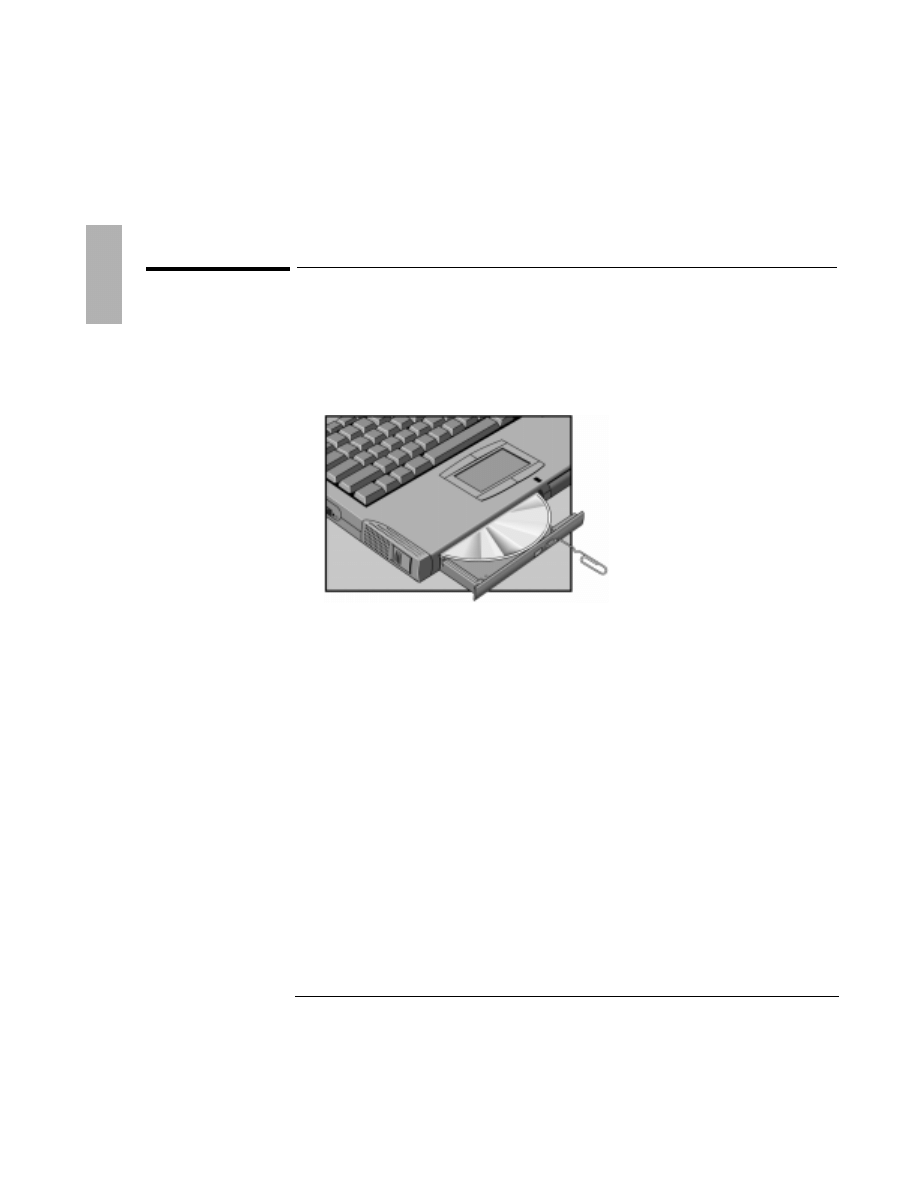
To open the CD-ROM drive manually
If you lose power to the OmniBook, or if you’ve removed the CD-ROM module from
the OmniBook, you can manually open the CD-ROM drive to remove a CD.
•
Carefully insert a straightened paper clip into the emergency eject hole, as
shown below.

Using OmniBook Plug-In Modules
9WMRKXLI07HVMZI
1-13
Using the LS-120 drive
The LS-120 drive reads and writes to LS-120 disks (120 MB) and to conventional 3.5-
inch IBM-formatted disks (1.44 MB), which are the same size and shape. However,
the LS-120 drive reads and writes to LS-120 disks significantly faster than to
conventional disks. You cannot boot from an LS-120 drive.
This section describes how to
♦
Insert or eject a LS-120 disk.
♦
Eject a LS-120 disk manually.
To insert or eject a LS-120 diskette
' % 9 8 - 3 2
(SRSXMRWIVXSVVIQSZIE07HMWO[LMPIXLI3QRM&SSOMWEGXMZIP]VIEHMRKSV
[VMXMRKHEXE3XLIV[MWIXLI3QRM&SSOGSYPHWXSTVIWTSRHMRKERH]SYGSYPHPSWI
HEXE
1. Hold the LS-120 disk with its face up, then slide it into the disk drive slot until it
clicks into place.
2. To remove the LS-120 disk, press the eject button on the front of the drive as you
would with a floppy drive (the drive will take a moment to eject the disk).
–or–
If you’re using Windows 95, right-click the LS-120 drive in Windows Explorer or
My Computer and select Eject. This will not work in Windows NT 4.0.
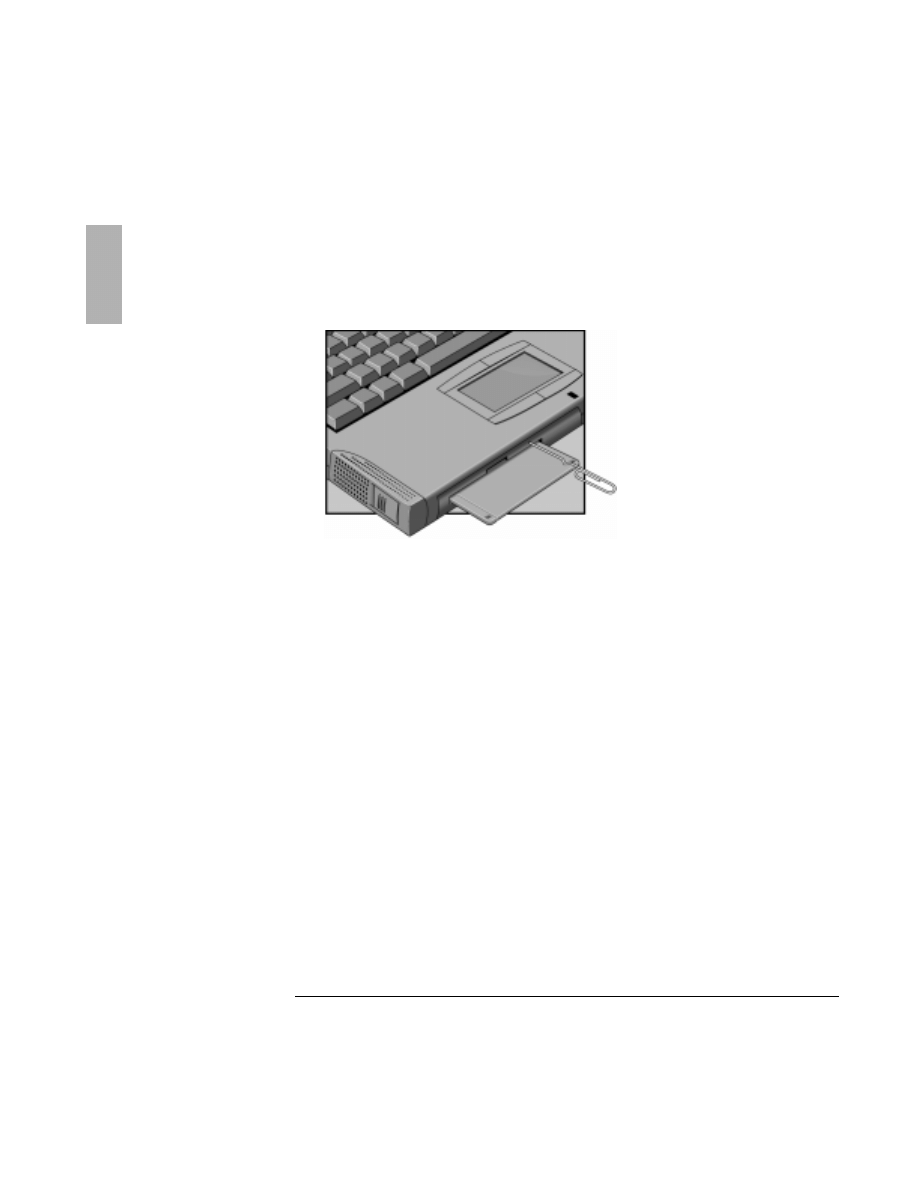
To eject a LS-120 disk manually
' % 9 8 - 3 2
9WIXLIQERYEPHMWOINIGXTVSGIHYVISRP][LIR3QRM&SSOTS[IVMWSJJ(SRSXXV]
XSJSVGMFP]VIQSZIE07HMWOJVSQXLIHVMZI-JXLIHMWOHSIWRSXINIGX
MQQIHMEXIP]VITIEXXLIQERYEPHMWOINIGXTVSGIHYVI
Using OmniBook Plug-In Modules
9WMRKXLI07HVMZI
1-14
The OmniBook must be powered on for normal disk ejection from the LS-120 drive.
You can manually remove an LS-120 disk from the drive when power is off.
•
Carefully push a straightened paper clip into the emergency eject hole located
above the eject button, as shown below.
Using OmniBook Plug-In Modules
9WMRKXLI(:(HVMZI
1-15
Using the DVD drive
Digital Versatile Disk (DVD) is a new standard of data storage. DVD disks deliver up
to seven times the storage of CDs. DVD drives can also read standard CDs. You
cannot boot from a CD or DVD in the DVD drive.
This section describes how to
•
Insert or remove a DVD disk.
•
Open the DVD drive manually.
•
Install the MPEG-2 PC Card and DVD Player software.
•
Play a DVD movie.
To insert or remove a DVD disk
' % 9 8 - 3 2
(SRSXVIQSZIE'([LMPIXLI3QRM&SSOMWEGXMZIP]VIEHMRKHEXE3XLIV[MWIXLI
3QRM&SSOGSYPHWXSTVIWTSRHMRKERH]SYGSYPHPSWIHEXE
1. Press the button on the face of the DVD drive. If you are using this drive for the
first time, be sure to remove the cardboard packing insert if present.
2. Place the DVD into the drive (label facing up) and gently press down to seat the
DVD on the spindle–or–remove the DVD.
3. Slide the DVD tray back into the module to close it.
Open button

Using OmniBook Plug-In Modules
9WMRKXLI(:(HVMZI
1-16
To open the DVD drive manually
If you lose power to the OmniBook, or if you’ve removed the DVD module from the
OmniBook, you can manually open the DVD drive to remove a DVD disk.
•
Carefully insert a straightened paper clip into the emergency eject hole, as
shown below.
To install the MPEG-2 PC Card and DVD Player software
In order to play DVD movies, you must install the MPEG-2 PC Card and DVD Player
software included with your DVD module.
2SXI
If you have Windows NT 4.0 on your OmniBook, you cannot play DVD movies.
Windows NT 4.0 does not support zoomed video.
1. Insert the DVD module in the plug-in module bay.
2. Insert the CD-ROM included with the MPEG-2 PC Card into the DVD drive.
3. Insert the MPEG-2 PC Card in the lower card slot.
4. When the PC Card is detected, follow the instructions to load the appropriate
driver from the CD-ROM.

Using OmniBook Plug-In Modules
9WMRKXLI(:(HVMZI
1-17
5. After the driver is successfully installed, run the Setup program on the CD-ROM
included with the MPEG-2 PC Card and follow the installation instructions. This
installs the DVD Player software onto your hard disk.
2SXI
For complete instructions on the driver and player installation process, refer to the
installation instructions included with the MPEG-2 PC Card.
To play a DVD movie
After you have installed the MPEG-2 PC Card and DVD Player software included with
your DVD module, you can play a DVD movie.
1. Insert the DVD Module and MPEG-2 PC Card into your OmniBook.
2SXI
If you do not have hot-swap drivers installed in your OmniBook, it may be necessary
to shut down Windows prior to inserting the DVD plug-in module.
2. Insert the DVD disk into the module.
3. Click Start, Programs to run the DVD Player software.

Using OmniBook Plug-In Modules
9WMRKXLI7IGSRH&EXXIV]
1-18
Using the Second Battery
To increase the time you can work on battery power, you can install a second
battery in the OmniBook’s plug-in module bay. This battery module is the same as
that used in the main battery bay.
This section contains instructions on the following:
•
To handle and store the battery safely.
•
To maintain and preserve the battery life.
To handle and store the battery safely
To safely use the battery, follow these instructions:
•
To avoid risk of fire, burns, or damage to your battery pack, do not allow metal
objects to touch the battery contacts.
•
The battery pack is suitable for use only with compatible OmniBook models
and specified battery charger. Check the Support and Service booklet for your
local HP contact.
•
Do not disassemble. There are no serviceable parts inside. Do not dispose of
the battery pack in fire or water.
•
Handle a damaged or leaking battery with extreme care. If you come in contact
with the electrolyte, wash the exposed area with soap and water. If it contacts
the eye, flush the eye with water for 15 minutes and seek medical attention.
•
Do not expose the battery pack to high storage temperatures (above 60 °C,
140 °F).
•
When the battery is not in use, store it in a battery pouch or other
nonconductive case.
•
When discarding a battery pack, contact your local waste disposal provider
regarding local restrictions on the disposal or recycling of batteries.
•
To obtain a replacement battery, contact your local dealer or HP sales office.
•
Do not charge the battery pack if the ambient temperature exceeds 45 °C
(113 °F).

Using OmniBook Plug-In Modules
9WMRKXLI7IGSRH&EXXIV]
1-19
To maintain and preserve battery life
To preserve the life of your battery, be sure to charge the battery regularly. In cases
of long-term storage, the battery must be charged at 20–50% to prevent capacity loss
by
self-discharge and to avoid deterioration of battery performance.
•
Do not leave batteries unused for long periods of time. If you have more than
one, rotate them.
•
If you use ac power, make a point of using the battery once a week to keep it
fresh.
•
Unplug your ac adapter when the computer is not in use.


1-21
2
Troubleshooting

1-22
Troubleshooting
If you run into problems installing your OmniBook accessories, you can use the
suggestions in this chapter to correct the problems.
If you have questions that this manual doesn’t answer, you can
•
Check the problem-solving suggestions and references listed in the
troubleshooting section of this manual, the OmniBook Reference Guide, and the
online User’s Handbook.
•
Check with your computer system administrator, if you have one.
•
Contact your dealer, or contact Hewlett-Packard—see the OmniBook Support
and Service booklet or OmniBook Support in the online OmniBook Library.

Troubleshooting
7SPZMRK4VSFPIQW[MXL4PYK-R%GGIWWSVMIW
1-23
Solving Problems with Plug-In Accessories
If your OmniBook accessory doesn’t seem to work properly, find the symptom
below that matches your situation. Try the suggestions one at a time.
For information about the latest software drivers, go to the HP OmniBook website at
http://www.hp.com/omnibook.
This section separates problems into the following categories:
♦
Floppy disk drive problems.
♦
CD-ROM drive problems.
♦
LS-120 drive problems.
♦
DVD drive problems.
♦
Battery problems.
Floppy disk drive problems
If the floppy disk drive doesn’t work
•
Remove and reinsert the floppy disk.
•
If connected externally, check the floppy disk drive cable connection.
•
Try using an alternate connection (internal or external connection).
•
Check to see that the floppy disk drive configuration is correct in the BIOS Setup
utility. See the OmniBook Reference Guide for instructions on running the BIOS
Setup utility.
If the OmniBook doesn’t boot successfully from the floppy disk drive
•
If connected externally, check the floppy disk drive cable connection.
•
Try using an alternate connection (internal or external connection).
•
Run the BIOS Setup utility make sure that the floppy disk drive is the first boot
device. See the OmniBook Reference Guide for instructions on running the BIOS
Setup utility.

Troubleshooting
7SPZMRK4VSFPIQW[MXL4PYK-R%GGIWWSVMIW
1-24
CD-ROM drive problems
If the CD-ROM drive stops responding
•
Remove and reinsert the CD disk.
•
Restart the OmniBook.
•
If restarting the OmniBook does not solve the problem, remove and reinsert the
CD-ROM module.
If you cannot boot from a CD in the CD-ROM drive
•
Check that the CD is bootable.
•
Restart the OmniBook.
•
Remove and reinsert the CD-ROM module.
•
Run the BIOS Setup utility to make sure that the CD-ROM drive is the first boot
devices. See the OmniBook Reference Guide for instructions on running the
BIOS Setup utility.
LS-120 drive problems
If the LS-120 drive doesn’t work
•
Remove and reinsert the LS-120 disk.
•
Restart the OmniBook.
•
Remove and reinsert the LS-120 module.
•
If you are using Windows NT, look for information about updated LS-120 NT
drivers in the readme file on the floppy disk included with your LS-120 drive.
You can also connect to the OmniBook website for updated drivers at
http://www.hp.com/omnibook.

Troubleshooting
7SPZMRK4VSFPIQW[MXL4PYK-R%GGIWWSVMIW
1-25
DVD Drive Problems
If the DVD drive stops responding
•
Remove and reinsert the DVD disk.
•
Reset the OmniBook.
•
Remove and reinsert the DVD module.
•
You cannot boot from a CD or DVD in a DVD drive.
;EVRMRK
If you have installed the hot-swap drivers on your hard disk drive and want to play a
DVD movie, please follow these steps to avoid problems:
•
Right-click the Hot-Swap icon on your Taskbar and select “About” to display the
driver version.
•
If the version displayed is 3.01.04 or earlier, you must download the most recent
driver from the OmniBook website at http://www.hp.com/omnibook and install
it. The latest hot-swap drivers will prevent potential conflicts with the DVD
movie player software.
Battery problems
If the OmniBook doesn’t turn on with a fresh battery
•
The new battery pack may be low. Plug in the ac adapter.
•
If nothing happens, press the blue power button for four seconds, then wait 10
seconds and press the power button again.
If the battery pack doesn’t charge or stops charging
•
Check that the battery is fully installed and locked in place with the safety latch.
•
Shut down the OmniBook and remove the battery, then check that the battery
contacts are clean. Make sure that the ac adapter cables are fully plugged in.

Troubleshooting
7SPZMRK4VSFPIQW[MXL4PYK-R%GGIWWSVMIW
1-26
•
Move the OmniBook away from any nearby heat source. Unplug the ac adapter
and allow the battery to cool down. An elevated battery temperature prevents
charging.
If the battery runs down too fast
•
If the operating time has gotten shorter and the battery pack is more than a year
or two old, you may need a new battery.
If the OmniBook turns off immediately after it turns on
•
Battery power is probably extremely low. Plug in the ac adapter, or turn off the
OmniBook and insert a fresh battery.
If the OmniBook stops responding
•
Try waiting a few minutes for a response. If after a few minutes there is no
response, press CTRL+ALT+DEL to close the non-responding application.
•
If nothing happens, press the blue power button for 4 seconds., After the
computer turns off, press the power button again.
•
Use a paper clip to depress the system off button of the back of the unit, then
press the blue power button.

1-27
3
Specifications and Regulatory
Information

1-28
Specifications and Regulatory Information
Your OmniBook accessories are designed to provide trouble-free operation. The
following suggestions can help you while working with your OmniBook:
♦
Observe the temperature limits and other specifications listed in the next
section.
♦
If you think your OmniBook might need repair service, see the warranty and
service information in the Support and Service booklet.
To contact Hewlett-Packard
If you have questions that the OmniBook manuals don’t answer (even after looking
in the contents and index), you can contact Hewlett-Packard at the address or
phone number listed in the Support and Service booklet or in OmniBook Support in
the online OmniBook Library.
Please have your OmniBook with you when you call for support.

Specifications and Regulatory Information
,EVH[EVI7TIGMJMGEXMSRWERH7EJIX]
1-29
Hardware Specifications and Safety
*PSTT]HMWOHVMZI
Modular 3.5-inch 1.44-MB floppy disk drive with parallel cable (available
separately) for internal or external use.
'(631HVMZI
Modular drive. Photo-CD and CD-plus multi-session specification compliant,
multimedia PC-3 specification compliant, supports sampling and digital filter for
CD audio, software and manual eject.
07HVMZI
Reads / writes LS-120 disks (120 MB).
Reads / writes standard 3.5-inch disks (1.44 MB and 720 KB).
Supports manual eject.
(:(HVMZI
Modular DVD-ROM drive. Photo-CD and CD-Extra multi-session, and Video CD
specification compliant. Plays CD audio, and reads CD-R, DVD-R, and CD-RW.
Software and manual eject.
0MXLMYQFEXXIV]
Battery life (one battery): up to 3 hours (varies with type of usage).
)RZMVSRQIRXEP0MQMXW Operating temperature: 5 to 35 °C (41 to 95 °F),
Operating humidity: 20 to 90 percent (5 to 35 °C).
Storage temperature: –20 to 50 °C (–40 to 122 °F).
To use the CD-ROM and DVD drive safely
•
If the unit requires service, contact an authorized HP service center—see the
OmniBook Support and Service booklet.
•
Do not attempt to make any adjustment to the unit.
•
Avoid direct exposure to the laser beam—do not open the unit.
CLASS 1 LASER PRODUCT
LASER KLASSE 1

Specifications and Regulatory Information
6IKYPEXSV]-RJSVQEXMSR
1-30
Regulatory Information
This section presents information that shows how the OmniBook plug-in modules
comply with regulations in certain regions. Any modifications to the OmniBook or
plug-in modules not expressly approved by Hewlett-Packard could void the
authority to operate the OmniBook in these regions.
U.S.A.
The floppy disk drive generates and uses radio frequency energy and may interfere
with radio and television reception. The floppy disk drive complies with the limits
for a Class B computing device as specified in Part 15 of FCC Rules, which provide
reasonable protection against such interference in a residential installation. In the
unlikely event that there is interference to radio or television reception (which can
be determined by removing the unit’s batteries and ac adapter), try the following:
•
Reorienting or relocating the receiving antenna.
•
Relocating the floppy disk drive with respect to the receiver.
•
Connecting the OmniBook ac adapter to another power outlet.
Connections to Peripheral Devices
To maintain compliance with FCC Rules and Regulations, use properly shielded
cables with this device.
For more information, consult your dealer, an experienced radio/television
technician, or the following booklet, prepared by the Federal Communications
Commission: How to Identify and Resolve Radio-TV Interference Problems. This
booklet is available from the U.S. Government Printing Office, Washington, DC
20402, Stock Number 004-000-00345-4. At the first printing of this manual, the
telephone number was (202) 512-1800.

Specifications and Regulatory Information
6IKYPEXSV]-RJSVQEXMSR
1-31
Declaration of Conformity
6IWTSRWMFPI4EVX]
Hewlett-Packard Company
Manager of Corporate Product Regulations
3000 Hanover Street
Palo Alto, CA 94304
(415) 857-1501
declares that the product(s)
8VEHIREQI
Hewlett-Packard Company
4VSHYGXREQI
F1472A floppy disk drive
F1465A DVD drive
F1470A LS-120
F1474A CD-ROM drive
Complies with Part 15 of the FCC Rules. Operation is subject to the following two conditions:
1. This device may not cause harmful interference, and
2. This device must accept any interference received, including interference that may cause undesired
operation.
Canada
This digital apparatus does not exceed the Class B limits for radio noise emissions
from digital apparatus as set out in the radio interference regulations of the
Canadian Department of Communications.
Le présent appareil numérique n’émet pas de bruits radioélectriques dépassant les
limites applicables aux appareils numériques de Classe B prescrites dans le
règlement sur le brouillage radioélectrique édicté par le Ministère des
Communications du Canada.
Japan

Specifications and Regulatory Information
6IKYPEXSV]-RJSVQEXMSR
1-32
Europe
Products sold in Europe by Hewlett-Packard and its authorized dealers meet the
specifications listed below.
Declaration of Conformity (according to ISO/IEC Guide 22 and EN 45014)
1ERYJEGXYVIV
Hewlett-Packard Company
%HHVIWW
Hewlett-Packard Co.
Mobile Computing Division
19310 Pruneridge Ave.
Cupertino, CA 95014
declares that the following products
4VSHYGXREQI
HP F1472A floppy disk drive
3TXMSRW
All
conforms to the following product specifications
7EJIX]
IEC 950:1991+A1,A2, A3, A4 / EN 60950 (1992)+A1,A2, A3, A4
)1'
CISPR 22:1993 / EN 55022 (1994): Class B [1 ]
EN 50082-1:1992
IEC 801-2:1991 / prEN 55024-2 (1992): 4kV CD, 8kV AD
IEC 801-3:1984 / prEN 55024-3 (1991): 3V/m
IEC 801-4:1988 / prEN 55024-4 (1992): 0.5 kV signal lines, 1.0kV
power lines
7YTTPIQIRXEV]-RJSVQEXMSR
The product herewith complies with the requirements of the Low
Voltage Directive 73/23/EEC and the EMC Directive 89/336/EEC and
carries the CE mark accordingly.
[1] The product was tested in a typical configuration with Hewlett-
Packard personal computer peripherals.
Quality Department
Hewlett-Packard Company
Mobile Computing Division

Specifications and Regulatory Information
6IKYPEXSV]-RJSVQEXMSR
1-33
Declaration of Conformity (according to ISO/IEC Guide 22 and EN 45014)
1ERYJEGXYVIV
Hewlett-Packard Company
%HHVIWW
Hewlett-Packard Co.
Mobile Computing Division
19310 Pruneridge Ave.
Cupertino, CA 95014
declares that the following products
4VSHYGXREQI
HP F1474A CD-ROM drive
3TXMSRW
All
conforms to the following product specifications
7EJIX]
IEC 950:1991+A1,A2, A3, A4 / EN 60950 (1992)+A1,A2, A3, A4
IEC 825/IEC 825-1 (EN60825/EN60825-1:1994):class1
)1'
CISPR 22:1993 / EN 55022 (1994): Class B [1 ]
EN 50082-1:1992
IEC 801-2:1991 / prEN 55024-2 (1992): 4kV CD, 8kV AD
IEC 801-3:1984 / prEN 55024-3 (1991): 3V/m
IEC 801-4:1988 / prEN 55024-4 (1992): 0.5 kV signal lines, 1.0kV
power lines
7YTTPIQIRXEV]-RJSVQEXMSR
The product herewith complies with the requirements of the Low
Voltage Directive 73/23/EEC and the EMC Directive 89/336/EEC and
IEC 825-1 and carries the CE mark accordingly.
[1] The product was tested in a typical configuration with Hewlett-
Packard personal computer peripherals.
Quality Department
Hewlett-Packard Company
Mobile Computing Division

Specifications and Regulatory Information
6IKYPEXSV]-RJSVQEXMSR
1-34
Declaration of Conformity (according to ISO/IEC Guide 22 and EN 45014)
1ERYJEGXYVIV
Hewlett-Packard Company
%HHVIWW
Hewlett-Packard Co.
Mobile Computing Division
19310 Pruneridge Ave.
Cupertino, CA 95014
declares that the following products
4VSHYGXREQI
HP F1470A LS-120 drive
3TXMSRW
All
conforms to the following product specifications
7EJIX]
IEC 950:1991+A1,A2, A3, A4 / EN 60950 (1992)+A1,A2, A3, A4
)1'
CISPR 22:1993 / EN 55022 (1994): Class B [1 ]
EN 50082-1:1992
IEC 801-2:1991 / prEN 55024-2 (1992): 4kV CD, 8kV AD
IEC 801-3:1984 / prEN 55024-3 (1991): 3V/m
IEC 801-4:1988 / prEN 55024-4 (1992): 0.5 kV signal lines, 1.0kV
power lines
7YTTPIQIRXEV]-RJSVQEXMSR
The product herewith complies with the requirements of the Low
Voltage Directive 73/23/EEC and the EMC Directive 89/336/EEC and
carries the CE mark accordingly.
[1] The product was tested in a typical configuration with Hewlett-
Packard personal computer peripherals.
Quality Department
Hewlett-Packard Company
Mobile Computing Division

Specifications and Regulatory Information
6IKYPEXSV]-RJSVQEXMSR
1-35
Declaration of Conformity (according to ISO/IEC Guide 22 and EN 45014)
1ERYJEGXYVIV
Hewlett-Packard Company
%HHVIWW
Hewlett-Packard Co.
Mobile Computing Division
19310 Pruneridge Ave.
Cupertino, CA 95014
declares that the following products
4VSHYGXREQI
HP F1465A DVD drive
3TXMSRW
All
conforms to the following product specifications
7EJIX]
IEC 950:1991+A1,A2, A3, A4 / EN 60950 (1992)+A1,A2, A3, A4
IEC 825/IEC825-1
)1'
CISPR 22:1993 / EN 55022 (1994): Class B [1 ]
EN 50082-1:1992
IEC 801-2:1991 / prEN 55024-2 (1992): 4kV CD, 8kV AD
IEC 801-3:1984 / prEN 55024-3 (1991): 3V/m
IEC 801-4:1988 / prEN 55024-4 (1992): 0.5 kV signal lines, 1.0kV
power lines
7YTTPIQIRXEV]-RJSVQEXMSR
The product herewith complies with the requirements of the Low
Voltage Directive 73/23/EEC and the EMC Directive 89/336/EEC and
carries the CE mark accordingly.
[1] The product was tested in a typical configuration with Hewlett-
Packard personal computer peripherals.
Quality Department
Hewlett-Packard Company
Mobile Computing Division
Wyszukiwarka
Podobne podstrony:
OB7100 PIM ug
OB2100 PIM ug
OB7150 PIM ug
OB7100 7150 PIM ug
OB3100 PIM ug
OB2100 3100 PIM ug
D ug celny(2)
Lęk i samoocena na podstawie Kościelak R Integracja społeczna umysłowo UG, Gdańsk 1995 ppt
detrywializacja, Dziennikarstwo i komunikacja społeczna UŁ, NoK + PiM
REGULAMIN PRAKTYK ZAWODOWYCH, UG, PRAKTYKI
PNOP 2, UG, Zarządzanie II sem, Podstawy nauki o przedsiębiorstwa
finanse przedsiaebiorstw 2311 107, Finanse przedsiębiorstwa UG
więcej podobnych podstron