Easy Mentalism
by J P Jacquard

Welcome to Easy Mentalism. The techniques and effects revealed
in this booklet will enable you to put on a terrific display of mentalist
and mind reading routines that will astonish your friends, family and
colleagues. You may find that after demonstrating your amazing
mental powers, people never think of you in the same way again!
Imagine asking someone to select a card at random from a normal
deck of playing cards. You ask them to concentrate on the design of
the card. You look into their eyes. You examine tiny inflections of
the muscles in their face. Then piece by piece, you name the card
they have. First you state the color, then the suite and finally you
state the exact card they chose! All this is done without ever looking
at their chosen card - not even a sneak peek.
Or how about asking someone to flick through a normal book, then
to read and concentrate on the first line of a chosen page. Again
you look into their eyes and after a short time, scribble something
onto a notepad. You ask the person to read the first line out aloud.
You turn your notepad over, revealing you've written exactly the
same sentence your volunteer was reading.
These two effects alone will convince people you really can read
minds!
You’ll also learn how to make predictions. For instance, you place a
sealed envelope and three coins of differing values on the table.
The spectator chooses one of the coins and flips it. You open the
envelope, revealing that not only have you correctly predicted which
coin they would choose but also whether it would land heads up or
tails up.
Or how about asking someone to draw a simple picture and to seal

it in an envelope. In another demonstration of your mind reading
powers, you can describe the picture they’ve drawn, even
reproducing it exactly if you wish.
All of these routines and more are fully explained in Easy
Mentalism. You’ll have seen effects like these done on television
and stage by famous illusionists. Now you can learn their secret
techniques and perform the illusions yourself. You’ll be amazing
people with your newly-found skills after just a few hours practice
and what’s more, you’ll enjoy the dumbstruck expressions on your
victims’ faces.
The E-Book is divided into two sections. The first presents a wide
selection of mind reading illusions and psychological illusions. The
second part is an introduction to hypnosis.
I'll say it now and repeat it several times throughout the book – the
secret to performing convincing mind reading is in the performance.
Some of the techniques you'll learn are astonishingly simple, so the
more you can do in your performance to distract your audience
away from that fact, the better. The introduction to hypnosis is
included to give you some ideas on how you can phrase your patter
and increase the illusion.
This e book concentrates primarily on techniques; very little
dialogue or direction is included. This is because your personality is
the most important element in mentalism. Once you fully
understand the techniques revealed herein, think about how you
can apply your personality to the proceedings and invent your own
patter to suit.
So let's get going with some mind-blowing illusions ...

Easy Mentalism
Part 1
Illusions

Effect 1: Simple Shape Prediction
You walk out on stage and place a large card on a chair or
easel facing the audience. The card has three shapes drawn
on it; a square, a triangle and a circle.
You choose an audience member and ask him to stand. You
explain that when people are asked to think of a simple
shape, these are the three commonest designs chosen. You
ask him to choose one of the shapes, in this case he
chooses the square.
You then ask him to reach under his chair where he'll find an
envelope stuck underneath. Ask him to remove the envelope
and as he does so, explain that earlier on you made a
prediction as to which shape he would choose and stuck it
under his chair.
When he opens the envelope, there is a postcard inside that
reads 'You will choose the square'.
This is a nice opening effect and usually works very effectively.
Make a large card with the three shapes drawn on it as described
above. On the back write, “You will choose the triangle”. Write “You
will choose the square” on a postcard and seal it in an envelope.
Before the show, stick the envelope underneath a chair in the
auditorium.
To perform the effect, simply reveal the appropriate prediction either
by asking the spectator to remove the card from under their chair or

by asking him to come on stage and turning the card around to
reveal the prediction.
If he chooses the circle, then your prediction fails but all is not lost.
State that most people choose either the square or the triangle and
because he has not done so, that makes him an interesting choice
to participate with an experiment.
Note that you don't mention anything about the prediction until the
spectator has named their choice.
If your prediction is right, then great! If not, disappointing but you've
not yet mentioned your prediction so no one is the wiser. Just get
the person up on stage to assist with a sure fire effect whether the
prediction works or not.

Effect 2 : I’ll Name that Card in One
You produce a normal deck of playing cards and ask a
spectator to cut the deck anywhere they like. They remove
the card they’ve cut to without letting you see it and
concentrate on its design.
After a few moments concentration, you announce the exact
card they’ve chosen. You have read their mind!
You’ll need a normal deck of cards but you need to arrange them in
a special order. Mentalists refer to this as a stacked deck.
One of the easiest methods of stacking a deck is the Si Stebbins
system. In this system, each card has a value; a jack is valued 11, a
queen 12 and a king 13. All the other cards take their respective
value, with an ace valued 1.
The suits are also arranged in the order clubs, hearts, spades,
diamonds. The easiest way to remember this is by the word
'chased':
Clubs Hearts Spades Diamonds.
Start with any club, then for the next card in the stack add 3 to its
value and make it a heart. For the next card, add 3 again and make
it a spade. For the next card, add 3 again and make it a diamond.
When you’re adding 3 to 11, 12 or 13, subtract 13 to get the value
of the next card. The system repeats like this until the whole deck is
stacked.
For instance, if you started with the 3 of clubs (3C), the stacked

order would be:
3C, 6H, 9S, QD, 2C, 5H, 8S and so on.
Place the cards face up as you stack them.
When displaying the deck to your spectator, make sure you fan
them and let them see the faces. Don't make a point of this – just
fan them as you say “normal deck of cards”. Whatever you do, don't
say “As you can see, they're in no particular order!” Statements like
this should be implied non-verbally.
This is important later on, if the spectator tries to 'reconstruct' the
trick and work out how it was done. If they can remember you
casually spreading the cards, they'll discount any theories about the
deck being in a special order or perhaps all the same card.
Put the stacked deck face down on the table and invite a spectator
to cut the deck anywhere they like. Get them to place the top half of
the deck face down next to the bottom half. Invite them to take the
top card from the bottom deck and keep it secret.
Pickup up the bottom half of the deck, place it on the top half and
then pick up the whole deck. You now need to glance at the bottom
card on the deck and there are a couple of ways of doing this. You
can either put the cards back into their box, casually glancing at the
bottom card as you do so. Better still, hold the deck in front of you,
as if demonstrating to the spectator how to hold their card. Either
method will need a simple verbal misdirection such has “Now hold
your card up, still keeping it secret and concentrate on the design.”
As they concentrate, ask them to look into your eyes. Pretend you

are looking for subtle psychological clues as to the value of their
card. Look at micro-movements in their facial muscles also.
All you need to do to name their card is work out the next one in the
sequence. So if the bottom card was the ace of hearts, their card is
the four of spades. Rather than just simply naming their card,
increase the drama and effect of mind-reading by revealing it bit by
bit. The color first, then whether it is a low, high or picture card.
Then name the card in full.
To really play with the system, you can subtly suggest that you are
about to read the wrong card. For instance, if the spectator's card is
the nine of clubs, you might reveal it in the following way:
“OK, its a black card, yes?” Look for visual confirmation.
“I'm getting an 'i' ... 'i' ... five ... a five? No, sounds like five –
its a nine, yes?”
“Definitely not a spade so it must be the nine of clubs!”
Another method of revealing the chosen card is to draw it on a
notepad. Keep your drawing hidden, then invite the spectator to turn
around their card and announce the design. You can then flip over
your notepad, revealing the same design.
This is a terrific routine and with a little thought, the Si Stebbins
stack can be used for many other mind reading effects. What’s
more, the stack is instantly ready to use again simply by putting the
spectator’s chosen card on top of the deck face down.
After revealing these first two effects, I want to address something
you might be feeling. Disappointment.

If you're disappointed to discover you're not divining the chosen
card by reading body language or subtle facial expressions, get
used to it! This is the way all mind reading illusions work.
If it were genuinely possible to read a person's innermost thoughts,
feelings or memories in that way, then the performer would be
decades ahead of the greatest psychologists in the field.
It is all an illusion. You need to sell the idea to your audience and
volunteers through your performance. This is something we'll come
back to throughout the book.

Effect 3 : Heads or Tails?
Onto the table you place a sealed envelope and a 10, 20
and 50 pence piece. The spectator chooses one of the coins
and the others are discarded. The chosen coin is flipped so it
lands heads or tails.
The envelope is opened, turned upside down and a folded
piece of paper falls out. The spectator opens the folded
paper to reveal a prediction. You have correctly predicted the
not only the chosen coin but whether it would land heads up
or tails up.
This simple routine introduces two important concepts important to
mind reading and mental magic.
The first is known as magician’s choice and can used in many
mentalist effects. Although the spectator appears to be getting a
free choice, they are choosing exactly the coin you want them to.
For instance, if you want them to choose the 20p piece, invite them
to choose two of the three coins. If they choose the 10p and 50p,
you ask them to push those to one side, leaving them with the 20p.
If they choose the 10p and 20p, ask them to push the 50p to one
side. Then ask them to choose either the 10p or 20p. If they choose
the 20p, say “You chose the 20p. Then that’s the one we’ll use,“
and ask them to push to 10p to one side. If they choose the 10p,
ask them to push it one side and say, “And you’re left with the 20p.
That’s the one we’ll use.”
Then ask them to flip the coin. See whether it lands heads or tails
and ask them to call it out.
This is where the envelope comes in and as you’ve probably
guessed by now, all is not as it seems.
This is our second important concept - multiple outs. We've already
seen this used in the first effect, where two outcomes were covered
by two different predictions. Effects that use this concept have more
than one way of finishing, so you need to have all possible
outcomes covered.
You will need two identical brown pay envelopes. Take one
envelope and trim off about 1mm from the bottom and sides. Trim
off the flap so you are left with what used to be the front of the
envelope: a rectangle of paper just slightly smaller than the
envelope.

The trimmed envelope slips inside the other envelope, creating two
compartments.
You’ll also need two predictions, one that reads “You’ll choose the
20p and it will land head side up” and another that reads the same
but ending “tail side up”. Place one prediction into each
compartment and stick down the flap.
When you slit open the envelope to reveal the prediction, slip your
first and second fingers inside to open up the envelope. As you do
so, push the flap back or forward depending on which prediction
you need to reveal. Once the flap is in place, hold it there with your
thumb and finger, then tip the envelope upside down so the
appropriate folded prediction falls out.
As the spectator is unfolding and reading the prediction, slip the
envelope into your pocket.

Effect 4 : Remote Viewing
Before the show, ask one of the spectators to draw a simple
design or picture, seal it in an envelope and keep it with
them. Later during the show, you invite them to think about
the picture and after some concentration you draw
something on a notepad. You ask the spectator to open their
envelope and reveal the drawing they made. You spin your
notepad around to reveal a matching drawing.
You need to make a gimmick to achieve this effect. You need one
of those clipboards made of cardboard with a plastic coating. Black
is best. You can find these in most cheap stationers. Using a sharp
craft knife, carefully cut along the bottom of the clipboard to form an
opening across the whole width.
Next take a piece of carbon paper and tape it to a sheet of A4
paper at the top. Slide this into the flap in the clipboard until it is
completely inside. Now glue the flap shut and using a black marker
pen, color the cardboard to match the plastic on the clipboard. The
gimmick is ready.
When you ask the spectator to make a drawing, give them the pad
with a couple of sheets of paper clipped in it and a fairly short
pencil. A shorter pencil forces them to press harder on the paper,
thus creating a clearer carbon impression on the hidden sheet
inside.
In secret before you begin your show, peel back the plastic and
carefully remove the paper inside. The spectator’s drawing will be
clearly visible thanks to the carbon paper.

Most people will draw something simple like a house, a car or a
face - so it shouldn’t be too difficult to remember. However, it
doesn’t matter if you get it slightly wrong - in fact, it may even look
more like real mind-reading.
Remote Viewing - Performance Tips
Remote Viewing is ideal as the second effect in your act. After
wowing the audience with your first illusion, you explain how you got
one of them to make a drawing beforehand and ask them to
produce the envelope. Hold it up to your forehead for a while then
announce “No - I’m not getting it - let’s try something else.” Place
the envelope somewhere in full view and never touch it again. Move
on to some other illusions. You can then reveal the drawing much
later as your penultimate effect, even having another couple of
failed attempts during the show as a running gag.
On the subsequent attempts, just stare at the envelope rather than
holding it and again announce that you’re still not getting it and
move on.
Alternative methods for doing this type of experiment include
observing the tip of the pen or pencil as the spectator makes their
drawing to learn what it is and even special electronic clipboards
that transmit the drawing to the performer, who views it on a tiny TV
screen.

Effect 5 : Book Test
You produce three paperback books and invite a spectator
to choose one of them. Another spectator cuts a deck of
cards anywhere they like and adds together the values of the
first two cards on the bottom pile.
Whatever number they get, you ask the first spectator to
turn to that page in the book and concentrate on the first line
of the page.
You concentrate and then announce a couple of words.
Then you pick up a notepad and scribble something onto it.
You ask the spectator to read the sentence aloud and it
matches what you have written.
Book Tests are a staple part of mind reading and there are
hundreds of methods. This is one of the simplest and uses another
stacked deck, called a 14/15 stack.
To create the stack, remove the Ace of Hearts and Ace of Spades
and arrange the remaining cards as follows, with the 7D at the
bottom, all cards face down:
7C 8C 6D 9S 5C 10H 4D JS 3C QS 2D KS AC KH 2H QC 3D JH
4S 10C 5D 9C 6S 8S 7S 8D 6H 9H 5H 10D 4C JD 3S QH 2S KD
AD KC 2C QD 3H JC 4H 10S 5S 9D 6C 8H 7H 7D
Wherever the cards are cut, the first two cards on the bottom stack
will always total 14 or 15.
You’ve probably figured out that you use the magician’s choice

explained earlier to force your spectator to choose the book you
need.
Book Test - Alternative Handlings:
A variation on this effect is to get a general impression of what’s
happening on pages 14 and 15. You can then draw a picture that
illustrates the action in the book.
You can also perform this giving the spectator a completely free
choice of book. Write lines 14 and 15 from each of the three books
very lightly in pencil on your notepad. This will not be visible from a
distance but means you don't have to memorize each of the six
lines
Effect 6 : Find the Lady
You show three playing cards, one a queen and the other
two ordinary number cards. You place them face down and
shuffle them around rapidly then invite a spectator to find the
lady (the queen). Sometimes they win, sometimes they lose.
Then you invite them to shuffle the cards and you find the
lady. You win every time.
The cards are then turned face up and the same thing is
done, this time with your back turned so you can't see the
cards. Once again your are able to consistently predict
where the spectator will place the Queen.
Find the Lady was a favorite trick amongst street con artists. To
make the first part of the routine work, you need to mark the back of
the queen so you can always find it. This should be done very
subtly so only you know what to look for.
Look at the two card backs below:

The card on the right has been marked by carefully coloring in one
of the white birds on the cyclist’s left shoulder to match the backing.
Depending on the back design, you can mark the card in anyway
you like - so long as you can easily find the queen.
It is also possible to buy whole decks of marked cards but some
systems are rather obvious.
Just remember to only use marked cards for entertainment
purposes - never involve real money betting in Find the Lady.
To make this effect really work, you'll need to improvise patter
based on where they place the Lady. For instance:
“OK, so you put the Queen on the left last time, now most
people will put it in the same place the second time but you
don't seem like most people. I reckon you'll have put it in the
middle.”
“So you put the Queen on the left the first time and in the
middle the second time.
A lot of people would then go back to the left but you know
I'm expecting you not to do the obvious, so you would have
stuck in the middle.
Except you didn't – you suspected I'd know that so have
gone for the right hand side!”
For the second part of the routine you need a confederate. They
signal to you the position of the Queen.
One method you could use is to have your confederate sit or stand
with his chin in his hand.
His forefinger indicates the position of the Queen, as below:
And of course, make sure your confederate sits in a position where
you can easily see them without making strange movements. A
casual glance out into the audience should be enough.
Effect 7 : Extra Sensory Perception
You hand a spectator a sealed envelope, explaining that it
contains a prediction. Ask the spectator to keep the
envelope safe while an ESP experiment is conducted.
You then spreads 10 ESP cards face down in a row on the
table and ask the spectator to pick any number between 1
and 10 inclusive. You count along the cards to the chosen
number, turn over the card and reveal it as the star symbol.
You then ask the spectator to open the sealed envelope and
read the prediction inside. It reads I predict you will choose
the star.
Write I predict you will choose the star on a piece of paper and seal
it in an envelope.
Lay 10 ESP cards (2 of each symbol) face down in a row on the
table, ensuring that a star is at positions 3 and 7 (counting from the
left).
The above image is an example of how to position the cards. For
the effect, they should be face down.

When the spectator has chosen their number, count along the
cards as below.
You will always land on a star.
1
Count O - N - E from the left
2
Count T - W - O from the left
3
Count 1 - 2 - 3 from the left
4
Count 1 - 2 - 3 - 4 from the right
5
Count F - I - V - E from the right
6
Count S - I - X from the left
7
Count 1 - 2 - 3 - 4 - 5 - 6 - 7 from the left
8
Count 1 - 2 - 3 - 4 - 5 - 6 - 7 - 8 from the right
9
Count N - I - N - E from the right
10
Count T - E - N from the left
You can then reveal the other cards to be different.
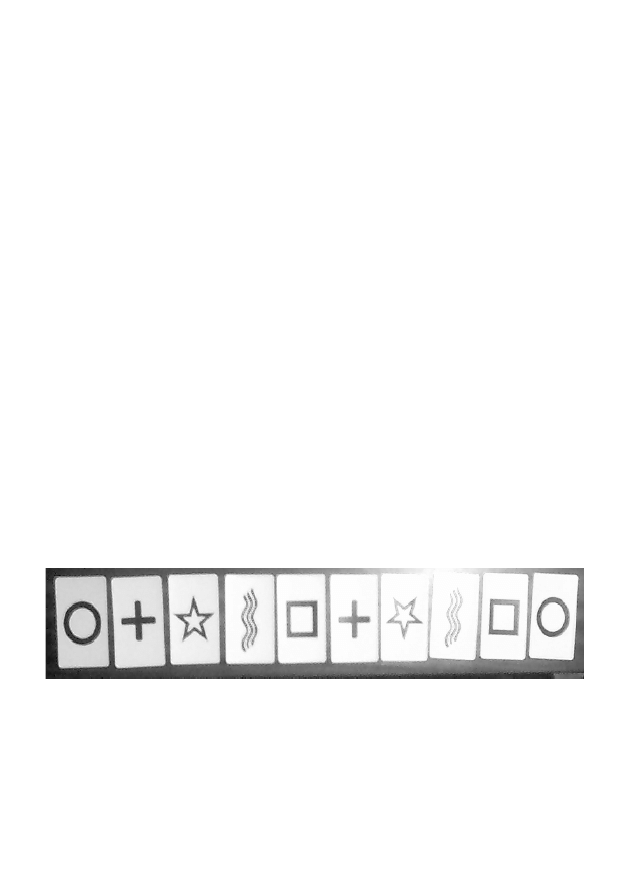
ESP cards, also known as Zener cards, are made up of five
symbols: a circle, a cross, wavy lines, a square and a star.
Professional decks are available very cheaply from magic suppliers
or occultism shops but you can easily make your own based on the
designs shown above.

Effect 8 : A Coin in the Hand
You invite a spectator to take a coin from their pocket and
behind their back to conceal it in one of their fists. They bring
their fists in front and time and time again you correctly
guess in which hand they’ve hidden the coin.
When the spectator brings their fists into view, you’re looking for
visual clues as to which hand contains the coin. Look for the
following:
i. The direction their nose is pointing – seriously!
ii. Which fist looks more clenched. Look for whiteness around
the knuckles.
You won’t necessarily get a match on both of these clues but since
you already have a 50% chance of getting it right just by guessing,
a hit in one of these significantly increases the chance of getting it
right.
Be prepared to get this one wrong occasionally. You can turn it
around and pay a compliment to your spectator, saying “You’re
really good at this!
Also remember to stop while you’re ahead. Correctly guessing just
3 or 4 times is enough to complete the effect. Don’t push your luck
by carrying on - because the spectator will then try to catch you out.

Effect 9 : Mind Reading for Two
You invite two spectators to help you. The first spectator cuts
a deck of cards and removes one card, keeping it secret.
The second spectator takes the next card and similarly
keeps it secret. They are both asked to remember their
chosen card.
The deck is reassembled and the two cards replaced in
random locations and the whole deck is shuffled. You then
begin dealing the cards face down on the table, stopping at
one. That card is moved to one side and the rest of the deck
discarded. You pick up a notepad and scribble something on
it. You ask the first spectator to name their card and you flip
over the notepad revealing that you’ve written the name of
their card. The second spectator is invited to name their card
and turn over the card on the table. It is the card they chose.
This is a complicated routine and will require a lot of practice to get
right. But the results are well worth the effort required.
For this effect you will need a deck of cards with a one way back.
This means that the design on the back of the cards looks different
if the card is turned upside down.
The most obvious type of one way deck is one where the cards
have a photograph or picture on the back. If you invert the card, the
photograph is upside down. This however, would be too obvious for
our purposes. You can buy one way backed cards from magic
dealers, or you could make a small dot in the top left hand corner of
each card in a normal deck - making sure to conceal the dot in the
design.

Whichever method you use, you need to be able to see the
orientation of the card without too much effort.
Put all the cards the same way up in a Si Stebbins stack, face down
on the table in front of you. Stand between your two spectators and
invite one spectator to cut the deck and place the top half to one
side.
Generally, when the spectator cuts the cards he will put the top
stack down in the same orientation as the bottom. If he doesn’t you
need to make a mental note of this so that when you reassemble
the deck, all of the cards are the same orientation.
Ask the first spectator to take the top card from the bottom stack
and the second spectator to take the second. Then reassemble the
deck and fan them out face down.
Ask the first spectator to remember his card then slide it back into
the deck. Then twist through 180 degrees to face the second
spectator and ask him to do the same. By turning to face this
spectator, you are effectively turning the deck through 180 degrees,
so the spectator’s card is ‘upside down’ in relation to the rest of the
deck when it is slid back in.
When you reassemble the deck to shuffle it, you have ample
chance to glimpse at the bottom card. Once you know the bottom
card, you know the first spectators card thanks to the Si Stebbins
stack (add 3 and move to the next suit in the sequence). You also
know the second spectator’s card by again working out the next
card in the stack.
Deal the cards face down onto the table until you reach the one that

is ‘upside down’ and deal it to one side face down. Pick up your
notepad and write the name of the first spectator’s card.
It then only remains for you to ask the spectator’s to call out what
cards they chose and for you to turn over your notepad and the
card on the table.
This effect relies upon good spectator management to ensure the
cards retain their correct orientation. Without good management
the trick will fail, so pay attention at all times to the orientation of the
cards.

Effect 10: Tarot Reading
You produce a pack of Tarot Cards and invite your volunteer
to shuffle them thoroughly. After shuffling them, you take the
pack and deal six cards face down on the table, discarding
the remainder of the pack.
As each card is turned to reveal its symbol, you make
startling revelations about your volunteer that convince them
you can see into their mind and personality.
Tarot Reading relies on a technique known as cold reading. It's a
technique used by clairvoyants, psychics and mentalists to make a
person believe you can read their innermost thoughts. The
statements used are specially designed to sound specific to one
person and yet they are so general, they actually apply to a large
percentage of the population.
Look at the statements below and see how many apply to you.
Imagine if someone claiming to be psychic told you these things;
would you believe they had special powers?
1. You have a need for other people to like and admire you
2. You are overly critical of yourself.
3. You have some personality weaknesses but are generally
able to compensate for them.
4. You have considerable unused capacity that you have not
yet turned to your advantage.
5. Disciplined and self-controlled on the outside, you are
worrisome and insecure on the inside.
6. At times you have serious doubts as to whether you have
made the right decision or done the right thing.

7. You prefer a certain amount of change and variety
8. You pride yourself as an independent thinker and do not
accept others' statements without satisfactory proof.
9. You have found it unwise to be too frank in revealing
yourself to others.
10.At times you are extroverted, affable, and sociable, while
at other times you are introverted, wary, and reserved.
11.Some of your aspirations can be rather unrealistic.
12.You become dissatisfied when hemmed in by restrictions
and limitations.
13.Security is one of your major goals in life.
Now all you need to perform some cold reading is a pack of Tarot
cards and to memorize the above statements. Get your spectator to
shuffle the Tarot deck and then ask them to deal six cards face
down on the table.
Turn over the cards one by one to perform your reading. No matter
what cards turn up, recite the phrases above and try to personalize
the phrases as much as you can. You will get far more 'hits' than
'misses'. And think – how many times have you heard a psychic say
that the images and names of Tarot cards should not be taken
literally in a reading? Now you know why!
Effect 11: Key Bending
You toss a quantity of keys onto the table and invite your
spectators, along with you, to choose a couple and trying
bending the keys with mind power. As they rub their keys in
vain, you announce that one of the keys you chose is
bending. As your spectators watch intently, the bend
becomes ever more visible. But when they try to replicate the
bend using their bare hands, they find it impossible. The
explanation – you bent the key with mind power!
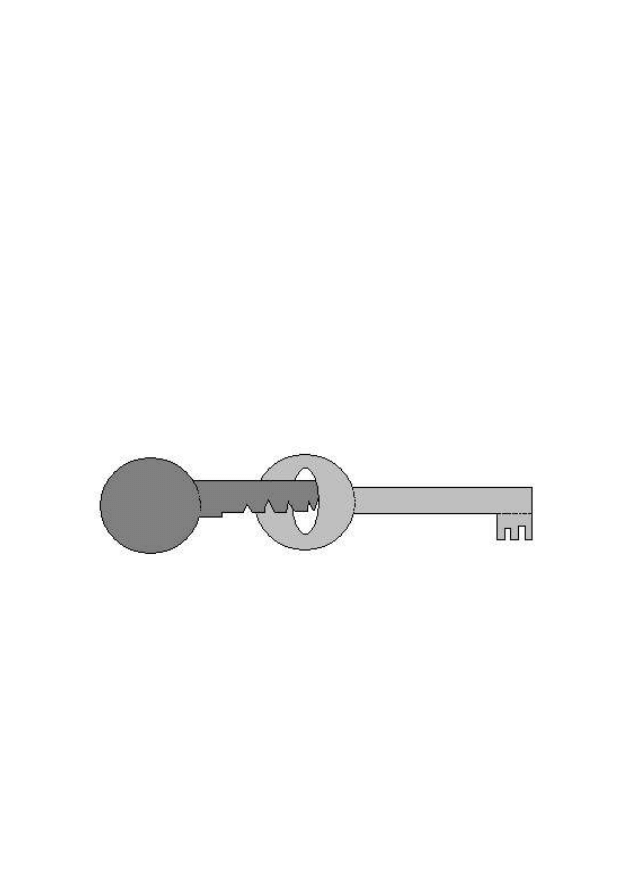
When you choose your keys, pick up a mortice style key and a Yale
style key. When your spectators are absorbed in rubbing their keys
and trying to bend them with their minds, slip the Yale key in the
mortice key as shown below, covering the move with your hands.
This provides the leverage you need to bend the Yale key with your
hands. Just make sure everyone is absorbed with their own bending
when you perform the move.
Discard the mortice key and hide most of the Yale key with your
fingers. As you rub, slide the Yale key into view, revealing more of
the bend as you do. If you hold the key vertically with the teeth
pointing up and rotate it downwards as you rub, the illusion of
movement can be created. Some spectators will swear they saw the

key bending as you rubbed it.
All metal bending, whether it involves keys, forks or spoons, uses a
similar method. Despite what some (very famous) performers claim,
it simply is not possible to bend metal with the power of the mind.
Every bend you've ever seen is achieved by sleight of hand and
misdirection.
Effect 12: Spoon Bending
A spectator holds a teaspoon between their palms. They rub
their hands together and the spoon bends under
psychokinetic power. Taking another spoon, you rub it gently
with your fingertips until the bowl begins to bend and swing
wildly, eventually falling off!
First you need to invest in some easily bendable spoons. As you
become more accomplished at spoon bending you can move up to
heavier cutlery but for now, just buy some cheap stuff.
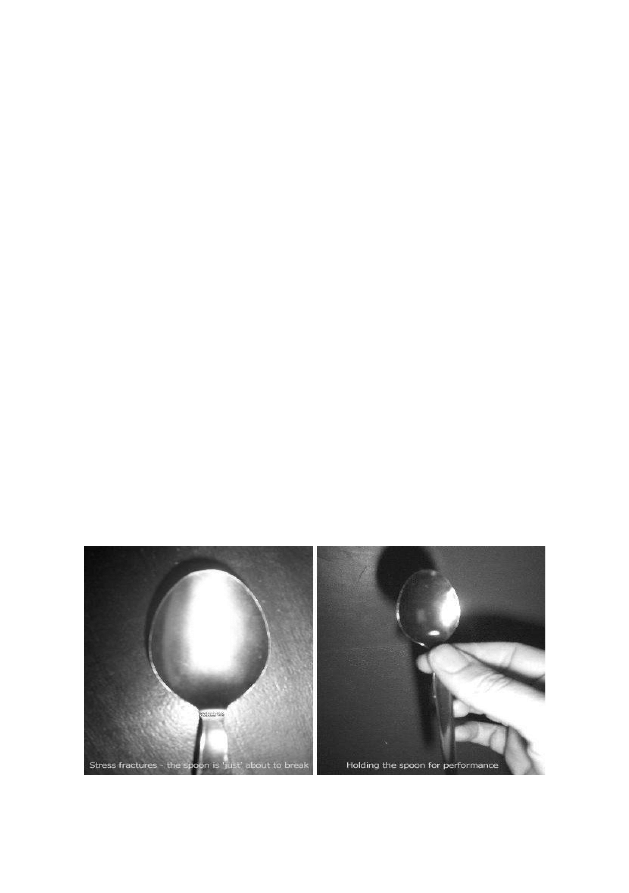
Prepare one spoon by gently bending it back and forth, until you
can see stress fractures starting to appear (as shown in the picture
below). The other spoon is unprepared.
Explain that you are to demonstrate psychokinetic spoon bending
and approach your spectator holding one spoon in each hand as
shown below. Angle your body so that the unprepared spoon is
closest to the spectator and ask them “Which spoon would you like
to use?”

Your positioning is a psychological suggestion for them to choose
the unprepared spoon and they usually will.
Set the prepared spoon down on the table and ask your spectator
to hold out their left palm. At the same time, drop your arm so the
spoon is by your side. During this action, move your thumb up into
the bowl of the spoon and press down, producing a slight bend.
This bend remains hidden by your hand.
Place the bent spoon on their outstretched palm and place your
other hand over theirs at the same time. Ask them to place their
other hand in the same position as your upper hand. Don't remove
your hand until their's is in place, covering the bent spoon.
Now ask them to gently rub their hands together (as if rolling a
sausage). As they do this, suggest that they will begin to feel the
spoon getting warm. They will eventually feel warmth due to friction.
Now suggest that the spoon is probably beginning to bend and they
may even feel the bend rubbing against their palm. Again they will
feel what you suggest.
Ask them to lift up their right hand and examine the spoon. A bend
will be visibly apparent but this can be enforced by holding it
alongside the prepared spoon.
Now explain that you'll demonstrate what can be achieved when
these psychokinetic powers are focused.
Hold the prepared spoon by the handle and cover the stress
fractures with thumb and fingertips. Now begin gently rubbing your
thumb and finger tip together.

After a while, state that the metal is getting really warm and starting
to bend. Hold the spoon by the handle and bowl and gently bend it
up and down. Then rub some more.
Keep doing this until eventually the bowl falls off. You can involve
your spectator by asking them to hold the bowl as you tilt the handle
up and down.
Spoon Bending – Alternative Handling
If the psychological force fails and your spectator chooses the
prepared spoon, launch straight into your spoon bending
demonstration then use the unprepared spoon the demonstrate
what spoon bending powers they have, explaining that they are
likely to be less developed than yours.

Effect 13: Chevreul's Pendulum
Chevreul was a distinguished chemist and Director of the Natural
History Museum in Paris. He developed the simple experiment
outlined below to demonstrate how the unconscious mind can be
used without conscious awareness.
You will need a small weight (such as a ring), a piece of thread
about 8 inches (20 cm) long, a pencil and a piece of paper. Tie
one of the thread to the weight and the other end to one end of
the pencil. On the piece of paper, draw a straight line about 6
inches (15 cm) long. Hold the pencil at one end between finger
and thumb so that the weight is suspended directly over the
straight line at a height of about 1 inch (2.5 cm). Concentrate
intently on the straight line and wait...
Did you find that the pendulum began to swing in the direction
of the line? If you were unsuccessful, keep trying. You really
need to concentrate hard on the line. In effect, you are
entering a light hypnotic trance, shutting out external stimuli
and focusing all your attention on the line. Imperceptible
muscle movements controlled by the unconscious mind produce
movement in the pendulum.
Once you have successfully got the pendulum to swing under
unconscious control, move the piece of paper round so the line
is at right angles to its original position. Eventually, you
will find that the pendulum changes direction and follows the
line once more.
Now draw a second line at right angles to the first, forming a
cross. Repeating the experiment, you should now find that the

pendulum swings along the line upon which you concentrate.
On another piece of paper, draw a circle and see if you can make
the pendulum follow the circle under unconscious control.
This is a simple and powerful demonstration of the unconscious
mind at work. It shows clearly how the unconscious mind can
influence our behavior without us being consciously aware of it
doing so.
Find a willing volunteer and repeat the experiments
outlined above with them holding the pencil rather than
yourself. Use the piece of paper with the cross drawn on it and
suggest to your volunteer which line the pendulum will follow.
When that proves successful, suggest that the pendulum will
swing along the other line. When that proves successful, suggest
to your volunteer that the pendulum will swing in a circle. When
it is swinging in a circle, suggest that it will soon slow down
and come to a stop.
Here we have demonstrated the power of suggestion, the ability
to implant an idea in the unconscious mind of somebody. This
entirely natural ability, which we each possess, is the main
component of performing hypnosis. The subject of hypnosis will be
explored later in this E book but for now, let us examine an effect
that looks like hypnosis but is actually based on the laws of physics.

Effect 14: Pseudo-Hypnosis
You invite a man and a woman to participate in this
experiment. Position the man and woman standing facing
each other and instruct the man to lift the woman by placing
his hands under her armpits. He will successfully lift her.
You then wave a hand in front of the man's face and suggest
to him that the next time he tries to lift her, he will find it more
difficult. The man tries to lift her again and sure enough, this
time he struggles to lift her.
This effect looks like hypnosis but actually relies on a principle of
mechanics to work.
The first time the man lifts the woman, have them standing quite
close together so the man's arms are bent when lifting her. After the
first lift, step between them, stand in front of the man and perform
your pseudo-hypnosis as follows.
Waving your hand in front of his face, say
“OK, just close your eyes for a moment”
“In a moment I'm going to ask you to try lifting this lady again.
On this next attempt, you will find it much more difficult.”
Tap your forefinger on his forehead and say
“OK open your eyes and try lifting her again.”
Here comes the most important part of this effect. Gently guide the

pair into position, with the man and woman twice further apart than
before.
This time the man will need to extend his arms more to lift her.
Twice the difference means double the effort. So even if he can still
lift her, he will find it more difficult. You wording has been
sufficiently vague (“you will find it much more difficult”) that whether
he lifts her or not, both outcomes are valid.

Effect 15: ESPrediction
You produce a pack of 25 Zener cards and invite the
spectator to cut the pack anywhere he likes. The card cut to
is placed to one side, face down, as a prediction.
The remaining 24 cards are divided into 2 packs of 12 - one
for you, one for the spectator. You and the spectator begin
dealing your cards simultaneously until a matching pair is
found. Whenever a matching pair is found, the two cards are
placed alongside the prediction.
When all the cards have been dealt, the prediction card is
turned over and it bears the same symbol as the matching
pairs previously found. An ESP miracle!
The deck needs to be stacked so the five symbols repeat in the
same order. For example, Star, Square, Wavy Lines, Cross and
Circle repeated five times. It doesn't matter what order you put them
in, as long as it repeats five times.
You can have the spectator cut the cards several times because an
order will always be maintained.
The cut to card is removed, placed to one side and the bottom of
the cut deck is placed on top of the other stack.
Now deal off 12 cards for yourself. This reverses the order of your
cards. The remaining 12 cards are given to the spectator.
When the cards are dealt, two pairs will always match and they
have the same symbol as the prediction.

You just need to dress this up with whatever patter feels right for
you and it creates a fantastic ESP routine.

Effect 16: Numerical Prediction
You produce a sealed envelope and announce it contains a
numerical prediction. Placing the envelope on the table for
the moment, you hand a small piece of card and a pen to a
spectator and ask them to write a number between 1 and
1000 on the card.
This done, the spectator hands the card and pencil to
another spectator and you invite them to do the same,
writing their number below the first one. This is repeated with
a third spectator before the card and pencil are retrieved.
The card, pencil and sealed envelope are handed to a fourth
spectator who is asked to total the three numbers written on
the card. When he's done this, he opens the envelope and
finds that your prediction matches the total of the three
numbers.
Write three numbers between 1 and 1000 in different handwriting
on a card. Find the total, write this on another card and seal it in an
envelope.
A blank card is handed to the three spectators. When you retrieve
it, turn your back and walk towards the table to fetch the envelope.
This gives you sufficient opportunity to swap the card for the one
you wrote on earlier. Hand the prepared card and envelope to the
fourth spectator and the effect is complete. What you must ensure
is that the fourth spectator is sitting far from the other three so they
do not realize the numbers added are different to theirs.

Effect 17: More Pseudo-Hypnosis
Against their will, a spectator's fingers stick together under
mind control.
Ask a spectator to fold their hands together, weaving the fingers
and clasping them tightly. After a few moments, ask them to raise
their two index fingers so they are sticking up, about an inch apart.
Now slowly and without touching the spectator's hands, move your
hands theirs and say
"Concentrate on your fingers. Soon they will begin to move
together. You can fight it but they will still touch!"
Slowly but inevitably, their fingers will start to move together.

Effect 18: Cutting Cards by Touch
Producing a deck of cards, you announce that through years
of practice you are able to cut to any number of cards called
out, simply by touch.
A spectator calls out a random number, say 23. Placing your
hand gently over the deck, you cut off a packet of cards and
give it to the spectator. He counts them and finds there are
indeed 23 cards.
This effect requires some practice but nowhere near as much as
your patter would suggest.
You'll need a 'stripper' or 'wizard' deck of cards, available from
magic dealers. In a stripper deck, each card tapers slightly so they
are wider at one end than the other. If all the cards are the same
way round, and one card is then reversed, you can feel the wider
end protruding out where the other cards are thinner.
There are two ways of setting up the deck to perform dead-cutting.
Either reverse every tenth card or arrange the deck in packets of
four, with each packet of four in the reverse position from the one
next to it.
When the spectator has called their random number, use your
thumb to count off the separate packets to get as close to their
number as possible. Keep your thumb at the back, out of sight of
the spectator when performing this maneouvre.
Once you've cut roughly to their number, hold the pack slightly open
with your little finger and then let drop or pick up with your thumb,

enough cards to complete the cut.
Cutting by Touch - Alternative Handling:
Arrange your stripper deck in a Si Stebbins stack. Deal off 13 cards,
reversing the orientation of the first card you deal off. Now place
this package back on top of the deck.
You can then give your patter about about being able to cut to a
certain number of cards. Say something like
“For instance, If I wanted to cut off 13 cards, I'd do this ...”
Cut off the top 13 cards by finding the reversed card, count them
onto the table to show there are indeed 13 cards, then place this
package back on top of the deck. You've not only demonstrated
cutting by touch but now have a perfect Si Stebbins deck ready to
perform a mind reading effect!

Effect 19: More Remote Viewing
You hand 5 ESP cards, a notepad and pencil to a spectator.
Turning your back, you ask him to look through the five
designs, choose one that appeals and draw it on the
notepad. As he does this, you draw on a notepad of your
own.
When the two notepads are turned over, you've both drawn
the same symbol!
This effect relies on two principles:
i. Out of the five Zener designs (circle, cross, wavy lines,
square and star), the star and the wavy lines are the ones
most psychologically appealing and commonly chosen.
ii. The five designs are made up of one, two, three, four and
multiple lines respectively.
By giving the spectator a short pencil, they automatically use more
force to draw the design. You should be able to hear the pencil
moving across the notepad and from the number of lines you hear
drawn, determine which symbol they chose.
If you couldn't hear clearly make an educated guess between the
star and wavy lines based on what you did manage to hear.

Effect 20: Do As I Do!
You produce two decks of cards, one for you and one for a
spectator. You both shuffle your decks, secretly choose and
card, memorize it and then cut it into the middle of the deck.
You then switch decks, and each look for your chosen card
and place it face down on the table. When the cards are
turned over, you've both chosen the same card.
This effect can be done with any two decks of cards – they don't
need to be prepared in any way.
Produce the two decks and invite the spectator to choose one of
them. It doesn't matter which one he chooses. You then both
shuffle your decks.
Now switch decks but as you do so, glimpse the card on the bottom
of your deck and memorize it. This can be done very casually as
you hand the deck over.
Ask the spectator to fan the cards in front of his face, choose one,
memorize it and place it on top of deck without letting you seeing
what card it is.
You do the same but use any card – just keep memorizing the card
from before.
Now ask him to reassemble the deck, cut it and complete the cut so
the his chosen card is lost in the deck. You do the same.
Switch decks again and ask your spectator to look through the deck
until he finds his chosen card. Ask him to remove the card and

place it face down on the table.
As he does this, you look for the card you memorized and remove
the card immediately to the right of it, placing it face down on the
table.
Now recap what you've done. Say:
“We both shuffled our decks, chose a card, switched decks
and then located our chosen card in the other deck. What
you didn't realize was that through subtle use of body
language and phrasing, I subconsciously influenced you to
chose one particular card. The same card that I chose ...”
“Turn over your card ...” He does so.
“Which was exactly the card that I chose!”
And you turn over you card to reveal that it matches his.

Effect 21: Under the Influence
You explain that through subtle use of body language and
verbal phrasing, you will influence a spectator's behavior.
A volunteer comes on stage and you hand him a deck of
cards. You ask him to shuffle them, which he does, then fan
them out with the faces towards you. You mentally select
and remember one of the cards.
The spectator shuffles the deck again and under you
instruction, divides it into four roughly equal packs. You ask
him to pick up each pack in turn, look through them, and use
his instincts to decide whether your chosen card is included
in the pack. If it isn't, he discards it and moves on to the next
pack.
Once the pack containing your card has been selected, you
ask him once again to act on instinct and place your chosen
card face down on the table. All the other cards are
discarded.
He asks you to name your selected card. When the card he
has chosen is turned over, it matches your chosen card.
This effect uses nothing more than a marked deck. Talk your
volunteer through the moves above: shuffle the deck, divide it into
four packs, look through each pack and decide whether your
chosen card is in the pack. When one pack is left, ask him to once
again use his instinct to remove one card and place it face down on
the table.

At this point, you look at the markings and declare that card as the
one you selected earlier. The volunteer turns over the card to reveal
it is correct!
Under the Influence - Alternative Handling:
Whichever card your volunteer chooses, name its mate as your
chosen card. For instance, if he chooses the 8 Clubs, name your
card as the 8 spades. If he chooses the Jack Diamonds, name your
card as the Jack Hearts. This makes it look like the spectator
almost got it right !

Effect 22: Four Thought
You produce a stack of forty or so business cards and show
them to the audience. The cards have various instructions to
think of a random number, a color, a popular meal, famous
actor, politician, country etc.
Gathering up the cards, you invite another spectator to take
part in the experiment. You ask him to verify that each card
has instructions to think of different things. He agrees that
they do.
Placing the cards face down on the table, you ask him to cut
the cards anywhere he likes and take the card he cuts to.
The other cards are discarded.
The spectator then concentrates on the four things listed on
the card. You then correctly name the four things he was
thinking of.
This effect, based on a principle known as dual reality, takes guts to
perform but the results are worth it. Dual reality means that the
spectator's experience of the effect differs from that of the audience
but both experiences are still valid.
As well as taking guts, this effect also requires a fair amount of
preparation – in particular making up the special pack of cards with
which to perform the trick.
These can be hand written or printed with a computer. Choose
whatever method best suits your performance style.
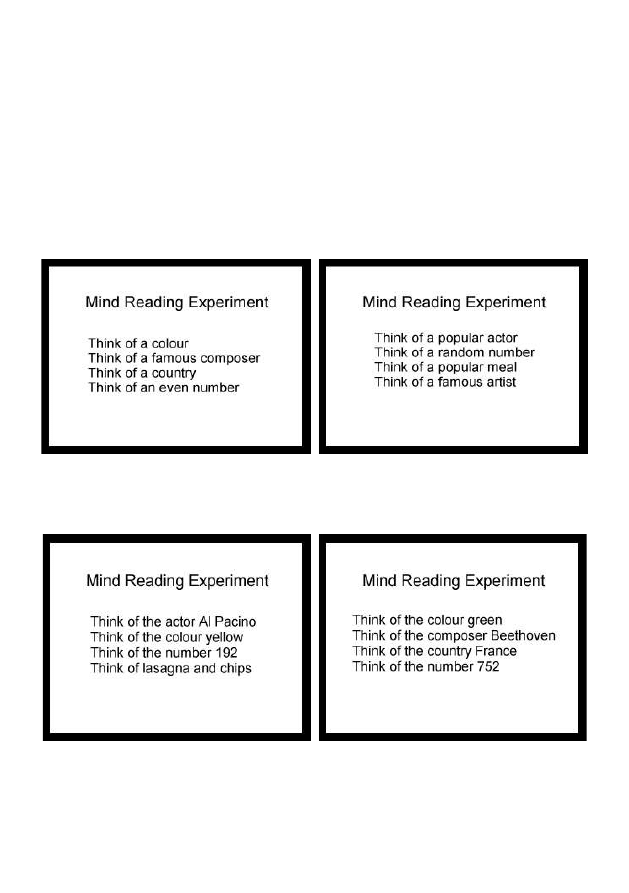
The stack is made up of three different types of cards: two
"spectator" cards (shown to the spectators), twenty one "volunteer"
cards (shown to your volunteer) and twenty "force" cards (ultimately,
the card chosen by your volunteer).
The two spectator cards look like this:
For the "volunteer" cards, make 10 of one and 11 of the other of the
following two cards:
And all twenty "force" cards look like this:
Using a sharp craft knife or guillotine, trim about a 1mm wide strip
off the bottom (longest) edge of each "force" card.
Then stack them face up in the order below (from bottom to top):
Force card, volunteer card, force card, volunteer card, force card,
volunteer card ...
and so on, with the top two cards ending up as "volunteer" cards of
two different types. The two "spectator" cards then go on top,
completing the stack.
To perform the effect, select your volunteer and have him take a
seat on stage. Pick up the stack and approach the audience,
explaining that you have a special deck of cards that instruct
someone to think of particular things like numbers, celebrities,
colors and so on.
Show the stack face up to the spectators so they can see the top
card. Make sure plenty of spectators get to see the card and as you

do so, pick off the top card so they can also see the second card.
Turn the deck towards you and remove the second card also, letting
everyone see it.
As you walk back to your volunteer, place the two “spectator” cards
on the BOTTOM of the deck.
Walk up to your volunteer and show him (but do not hand to him)
the rest of the deck. Pick off the top card (now one of the
"volunteer" cards) and say
"You didn't get a chance to see. The cards have instructions
for you to think of a famous actor, a color, a number ... things
like that."
Keeping the second, different "volunteer" card on top of the deck,
show it to him saying
" ... and on this card, a famous composer, a country, you get
the idea. Forty cards, each asking you to think of different
things."
Here you have set up the dual reality: your description of the cards
satisfies both the volunteer and the spectators. The spectators think
all the other cards are like the ones they saw, the volunteer thinks
the spectators saw cards like the ones he can see. There is no
reason to think otherwise.
Square up the cards and place them face down in front of your
volunteer. Ask him to cut the deck anywhere he likes and remove
the card he cuts to and place it face down on the table. Gather up
the other cards and place them in your pocket.

Because you have trimmed all of the "force" cards, your volunteer
will automatically cut to one of them.
Now turn your back and ask the volunteer to look at his card and
think of the things it tells him to.
Continuing the dual reality, the spectators think the volunteer is
going to think of a random number, country, composer etc himself.
The volunteer understands that he is to think of the things written on
his card and because all the cards are different, you are to read his
mind and discover which card he chose.
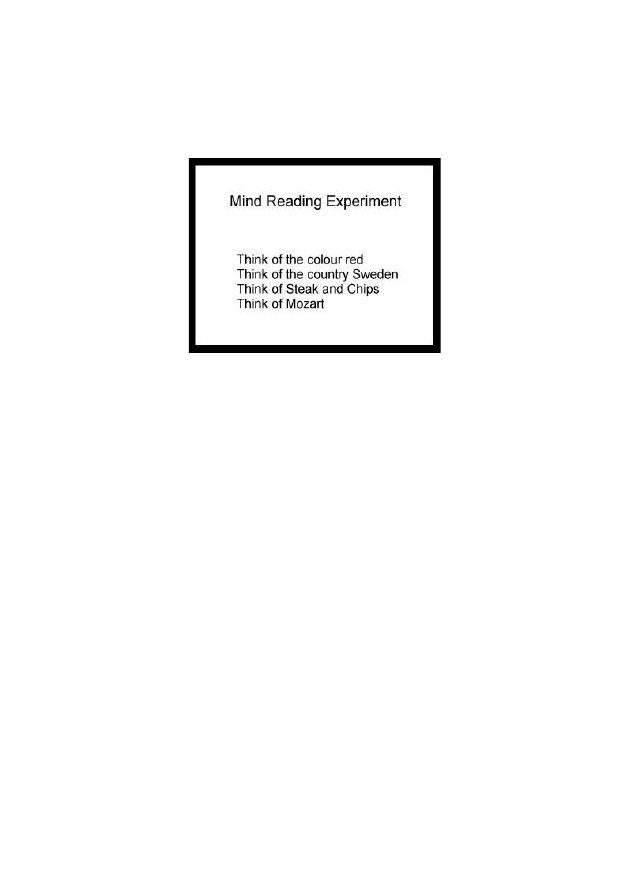
To conclude the effect, say "OK I'm getting it – you're thinking of the
color red, the country is Sweden, the composer is Mozart and ... a
very popular meal indeed - steak and chips! Correct?”
And of course, you are correct!
Four Thought - Alternative Handlings :
i. Reverse the positions of the spectator and volunteer
cards. This allows you to show the cards to volunteer first,
then approach the audience, cutting the volunteer cards to
the bottom as you do so.
ii. Less spectacular but this effect can be performed one-on-
one by removing the spectator cards. You then show your
volunteer just the two top cards as examples of the cards,
before cutting them to the bottom and commencing the
effect.

iii. Holding the cards by the right hand edge allows you to fan
them either to your volunteer or spectators. At most, they
will see the words “Think of ...” on the cards, a powerful
psychological misdirection that makes them believe all the
cards are different without you having to say so.
However you choose to perform this effect, the dual reality principle
is at the cutting edge of modern mentalism. It can be used to give
the illusion that a performer is divining complete memories of past
events; the sights, sounds, smells and feelings associated with a
particular experience. Once again, with a little thought and
imagination, the force card technique used for 'Four Thought' can
be adapted into a whole range of mind reading effects. Have fun!

Effect 23: Wallet, Watch & Coin
A male volunteer places his wallet, watch and a coin on the
table. Turning your back, you invite him to place each of
those objects into his front left and right and one of his back
trouser pockets.
Turn around and explain that through subtle use of body
language, you can determine which object was placed in
which pocket. After looking him up and down for a while, you
correctly name the location of each object,
For this effect, you need a confederate who signals to you where
each object has been placed.
You can use a similar system revealed in Find the Lady or one of
your own devising. For instance, your confederate folds him arms,
signalling 1, 2 or 3 by how many fingers he shows on the uppermost
hand. Your volunteer is positioned behind you and you turn your
back to face the audience and your confederate.
You need a volunteer with, not surprisingly, a watch, a wallet and
some loose change – at least one coin.
Here's how it works. Ask the volunteer to pick up any object and
place it in his left trouser pocket. Each object is assigned a
predetermined number.
1 – “Wone” equals “W”allet
2 - “Two” equals “T”ime (watch)
3 - “Three” equals coin “Three-penny bit”

Work round the positions in the same order every time you perform
this effect: Left front pocket, right front pocket, either back pocket.
So for example, you ask the spectator to choose an object to place
in his left trouser pocket. The spectator chooses the coin, so your
confederate signals “3”.
You then ask the spectator to choose an object to place in his right
front pocket. He chooses the wallet and your confederate signals
“1”.
The third object can go in either rear pocket. A signal is not required
for the third object.
All you need to do is remember the two digit sequence: 3, 1 in the
example above or it might be 2, 1 if the watch went in the left pocket
and wallet went in the right. Doesn't matter!
Explaining that the effect is achieved through subtle body language
is a nice double entendre. You are reading body language – but its
a secret language between you and your confederate, not that of
the spectator! You can also explain that people tend to respond to
certain psychological principles. As an example you state that most
men place the wallet in their right trouser pocket, or most men place
the watch in their right trouser pocket, whatever is the case.
Or you can say “Most men place the wallet in their left trouser
pocket but you're a little unusual; you've placed the coin in the left
pocket!”
Reveal each placement as above, with enough psycho babble to
explain it and your audience will be amazed!
Effect 24 – Magic Square
A spectator gives you a random number and you're instantly
able to create a magic square of numbers in which all rows,
columns, diagonals and corners total his chosen number.
This looks absolutely mind blowing when performed well but is
technically easy to achieve.
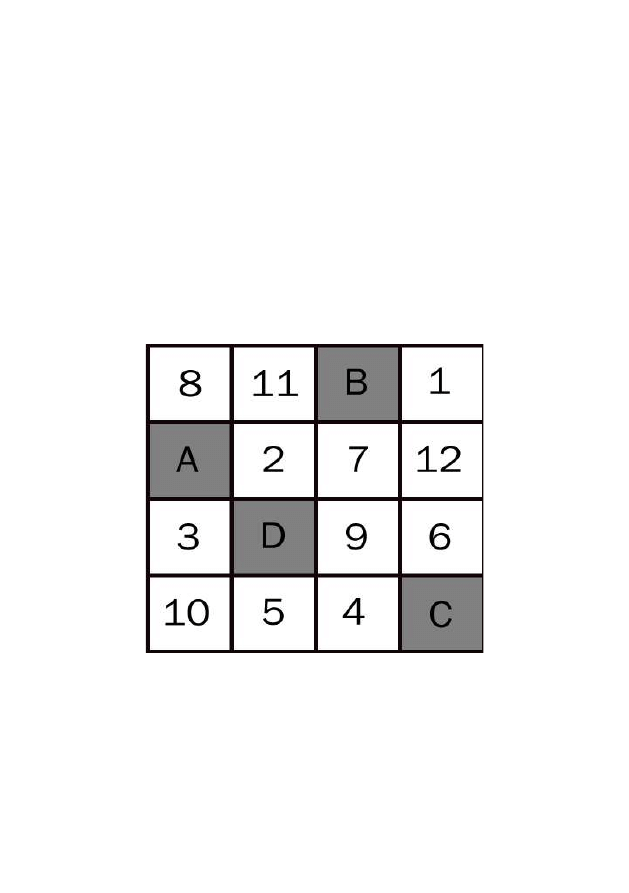
The diagram below shows the basic framework for the square:
The numbers shown in the above square will always be present,
whatever random number is chosen. You need to memorize the
order and positions of those numbers. The grey squares A to D are
where you will add additional numbers to complete the magic
square.
If like me you have a terrible memory, write the basic framework of
the magic square using very light pencil in the corner of your
notepad or flip chart. It will be visible to you but not to your
audience.
To begin, ask for a random number between 25 and 100. Let's say
your spectator chooses the number 37.
Subtract 21 from the number given (in this example, we get 16) and
put it in position A. Then add 1 to this number and put in position B.
Add 1 again for the number in position C and finally 1 again for the
number at D.
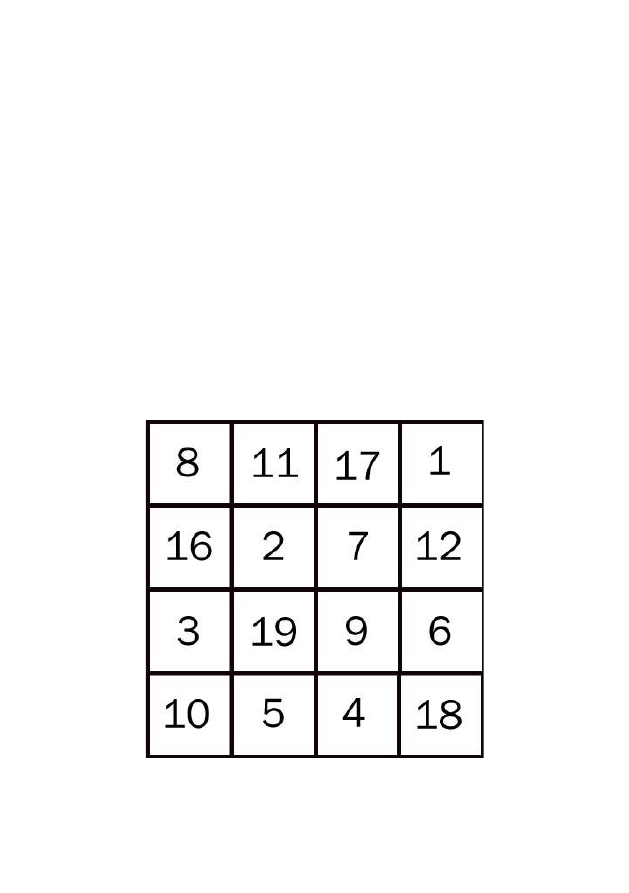
In our example, we finish up with the magic square shown below:

Look at the resulting square and you'll see that all rows and
columns total 37 – the spectators chosen number. Also, both
diagonals total 37. The numbers at each corner also total 37. And
the four 2 by 2 squares at top left, top right, bottom left and bottom
right also total 37 (e.g. 8, 11, 16 and 2; 17, 1, 7 and 12 etc.)!
Actually, there's more! Choose any 3 sided square and the numbers
at each corner also total 37 (e.g. 8, 17, 3 and 9)!
Although this may seem like a simple concept, Derren Brown used
a magic square effect as the encore for his 2004 UK tour and got a
standing ovation!

Effect 25: Three Minds Into One
Three spectators each remove one card from a normal deck.
The 3 cards are mixed by another spectator and then
returned to you face down.
Turning over the first card, you correctly announce which
spectator selected it.
You then do the same for the second card.
Obviously knowing who chose the third card, you leave it
face down on the table and pick up a notepad. After a
moment's deliberation you write something on the pad. The
third spectator is then asked to name his card and as he
does so, you spin the pad around to reveal you've written the
name of his card.
Like some of the previous effects, this one requires a confederate.
Your confederate is the spectator who collects the 3 cards from the
other spectators, who are genuine. This can be the same person
already used because this is the first time they take an active and
visible part in the show.
Here are the workings of the effect:
You hand a deck of cards to a spectator on the left of the audience.
Mentally label him as 'Spectator 1'. You ask him to shuffle the deck
if he likes but in any event, to remove one card, keep that card
hidden from view and pass the deck onto another spectator to his
left. The second spectator ('Spectator 2') does the same and hands
the deck to 'Spectator 3'.

Now you have 3 spectators, each holding a randomly chosen
playing card. Ask them each to concentrate upon and remember
their chosen card.
Now turn to your confederate, gesture to him and say,
“You Sir, would you mind helping with this experiment? Can
you retrieve each card and bring them to me, making sure
they are face down so I can't see them? Bring the remainder
of the deck also.”
Your confederate collects the cards and the remainder of the deck.
As he collects the cards, he marks them for you in a particular way.
To mark the card from Spectator 1, he presses his forefinger and
thumbnail into the top right corner of the card as he holds it face
down. This produces a slight 'nick'. This can be done quickly and
will not be noticed.
With Spectator 2's card, he makes the nick in the middle of the right
hand side, again face down.
Spectator 3's card doesn't need to be marked.
Once he's collected the cards, ask your confederate to place the
remainder of the deck on the table and then hold out your left palm
to accept the cards, again face down.
Ask the three spectators to stand. Holding the three cards face
down in your left hand, you say the following:
“I'm about to look a the top card. When I reveal this card,
please, whoever chose it, make no sound or movement to
give yourself away. Remain calm, motionless and blank
faced.”
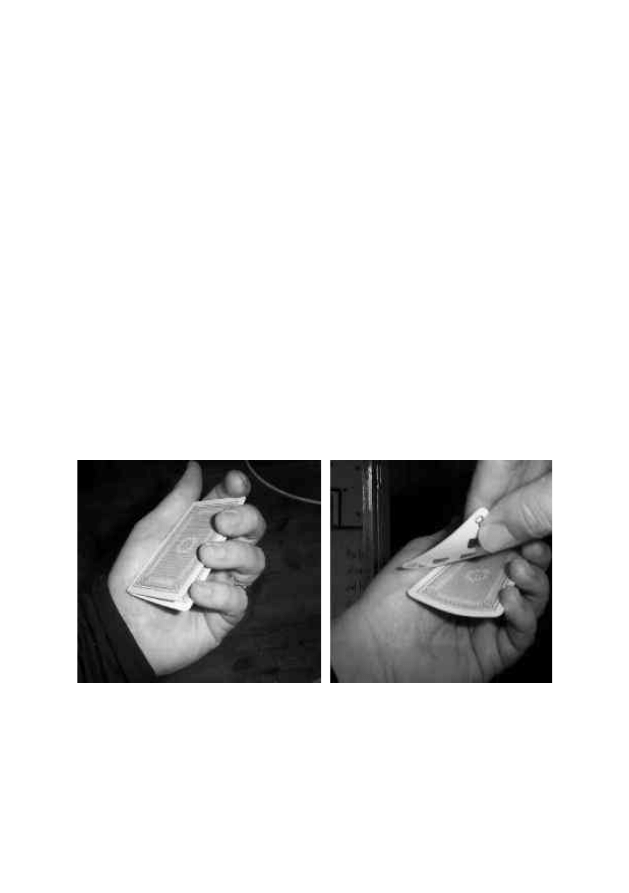
While you are saying this, place your little finger above the bottom
card and slide it in slightly to form a 'break' in the cards. This will be
hidden from view of the spectators by your hand (see photograph
below).
Now flip over the top card (keeping it on top of the cards in your left
hand) and announce it.
“The first card is the three of clubs ...”
Holding your right hand palm down, slip your thumb into the break
created by your left little finger. Position your fingers across the right
hand side of the two top cards (see photograph below).
Now lift these two cards as one, twisting your right hand through 90
degrees so the audience can see the face up top card. This action

reveals to you the face down second card (in this case, the 8 of
spades). Remember that card – you need it for the final part of the
act.
Rotate your hand back and place the two cards on top of the card
remaining in your left hand and say,
“Could the person who chose this card repeat its name over
and over in their head – 3 of clubs, 3 of clubs, 3 of clubs etc.”
Pick up the top card on its own and place the remaining two cards
next to each other (still face down) on the table as your return to
your position.
Look at the card markings to determine which spectator chose that
card. After a little deliberation say
“The three of clubs was chosen by this gentleman ...”
Walk over to the respective spectator and tap him on the shoulder
saying,
“Thank you – sit down please”
Now pick up the third card (the one you haven't glimpsed), look at it
and show it two the audience.
“The next card is the Jack of Diamonds. Again, could the
person who chose this card repeat its name over and over in
their head”
Look at the card markings to determine which spectator chose that

card.
After a little deliberation say
“The Jack of Diamonds was chosen by this gentleman ...”
Walk over to the respective spectator and tap him on the shoulder
saying,
“Thank you too – sit down please”
There is now one card remaining on the table and one spectator left
standing. Say
“Now obviously it doesn't take a mind reader to know who
chose the remaining card, so I'm going to try something
different with this one. Sir, could you also repeat the name of
your chosen card over and over in your head please?”
As he does this, pick up a notepad and pan. Look at him for a while
then draw the card you glimpsed earlier. Keep the drawing
concealed from your audience then ask the remaining spectator to
name his chosen card.
After he has done so, flip around your notepad to reveal that you've
read his mind and drawn a picture of the chosen card.
Three Minds into One – Alternative Handling
1 - Instead of 'nicking' the cards to mark them, your confederate can
simply give them to you in a pre-agreed order, e.g.: Spectator 3's
card on top, Spectator 1's in the middle and Spectator 2's card on

the bottom.
2 - Rather than playing cards, you could hand out business cards
and ask 3 spectators to make a small drawing or write a word on
the back. In this alternative, you don't need a confederate. The
business cards can be pre-marked by you and handed out in order.

Effect 26 – Sit and Stay
A volunteer is invited to sit on a chair on stage. As you talk to
them, they feel heavier and heavier, to the degree that when
you ask them to rise and stand they are unable to do so.
As described, your volunteer takes a seat on stage and you perform
a 'hypnotic induction':
“As you relax in that chair, feel all energy drain from your
body. You are unable to move; you have no need to move.”
Stand in front of the volunteer and place your forefinger on their
forehead.
“Now, when you feel this your whole body becomes heavier.
Your arms and legs become weak. This pressure on your
forehead is becoming ever greater. So great that it glues you
to the chair. Now try to stand ...”
Keep your finger pressed to the volunteer's forehead. They will be
unable to stand.
“Now the pressure is lifted. That heavy weight disappears ...”
Remove your finger from their forehead and let your arm relax.
“The strength returns to your body and you're able to stand.
Rise and stand now please ....
“Thank you so much for your co-operation ...”

Effect 27: Drunk on Water
A spectator drinks water that you supply. Despite it being
purely water, they display signs of drunkenness.
This is a throwaway stunt that can lighten the mood when used
appropriately.
Get an empty wine bottle (and cork) and fill it with water. Invite your
spectator on stage, hand them a plastic cup and uncork the wine
bottle.
“I want to show you how to save a fortune when buying
expensive wine.”
Pour some water into their cup.
“This bottle used to contain wine. But I drank it. This is just
water. Take a sip to confirm that ...”
“Not even expensive mineral water but just tap water, yes?”
Your spectator confirms this.
“OK. Now in a moment I'm going to ask you to take another
sip of water. It will still taste like water but your brain will
believe it is wine. Take another sip ... tastes the same yes?”
“It tastes the same but your brain thinks you're drinking wine.
Take a really big gulp now ...”

“This experiment has been performed with large groups of
people at a party. Half the group were given alcohol, the
other half water. Over the course of an evening, the half
drinking water became just as drunk as those drinking
alcohol.”
“Let's try something. We know that alcohol affects co-
ordination. Here's a really simple test of co-ordination.”
Extend both your arms, holding them about 1 metre apart. Now
extend each forefinger and bring your arms together so both
forefingers touch. Practice doing this until you can do it quite
quickly. Demonstrate the move for your spectator.
Ask your volunteer to do the same. They must bring their fingers
together quickly. Invariably they will miss.
“No like this ...” and perform the move again.
Again they try and fail.
“OK. Take another sip of water. This time your brain knows
that its water. The effects of the wine wear off – the water
cleanses your system and you return to normal.
“Thank you. You can drive home safely now ...”

Effect 28 – Finger on the Pulse
A spectator joins you on stage. You sit facing the audience
and the spectator takes your pulse with one hand. With the
other hand, they tap a glass or tumbler with a pencil in time
with your pulse.
You breathe deeply, more and more slowly. Steadily your
pulse becomes weaker until it stops altogether; the spectator
stops tapping the glass. Your breathing stops.
Moments pass. Your pulse remains stopped.
Suddenly you take a massive breath of air and your pulse
starts again. Your eyes flicker open and your return, slightly
dazed, to normality.
To prepare this effect, take a large handkerchief or scarf and tie a
knot in the middle. Then tie the handkerchief firmly around your left
arm so the large knot rests in your armpit.
By bringing your upper arm gently in towards your body, the knot
presses against the inside of your arm. This pressure stops your
pulse. Releasing the pressure allows your pulse to return. It will take
some practice to get the knot size and positioning right for you.
To take your pulse when practicing, use the first three fingers of
your right hand. Place them along your left wrist just behind the
thumb, with right hand thumb on the back of your left wrist. In
performance, you should direct the spectator to take your pulse in
the same way.

Finger on the Pulse – Alternative Handling
Place a knotted handkerchief under both armpits. The effect can
then be performed with two spectators and allows you to stop your
left pulse, start it again and stop your right pulse, then stop both
together.
That's the mechanics of this effect; the rest is pure showmanship.

Effect 29 – Crafty Stooge Selection
Here's a great way of ensuring a required stooge is selected from a
group, seemingly at random.
Take a bunch of blank business cards and seemingly draw a cross
on one of them. In reality, just scratch the card with your fingernail –
no cross is drawn.
Your stooge already has an identical card with a cross drawn on it.
Mix the cards and hand them to a spectator in the same row that
your stooge is sitting. They should be sitting perhaps two away from
your stooge. Ask him to keep the cards face down, take one and
pass the rest to the spectator next to him (in the direction of your
stooge).
Each spectator in the row takes a card and passes the rest to the
person next to them. Once everyone has a card, ask the spectators
to turn over their card to see who has the one with a cross on it.
At this point, your stooge switches his card for the pre-prepared
card and so joins you on stage to assist with your next effect.
Your stooge can think of a pre-arranged number, childhood
memory, country, playing card, city, favourite film etc that you are
then able to correctly divine without anything ever being written
down.

Effect 30 – Telepathy for Two
This is an experiment in telepathy and automatic writing.
Two spectators are used. The first chooses one of the five
Zener designs. The second is blindfolded and given a white
board and a marker pen. The first spectator is asked to
concentrate on their chosen Zener card and the second
spectator lets the pen drift lightly across the board to
produce unconscious automatic writing.
The design drawn by the second spectator matches the card
selected by the first!
You need to prepare a few gimmicks for this one. First obtain 5 A4
sized pieces of white card. Using a marker pen, draw the five Zener
symbols on the cards – one design on each card. If you're right
handed, do this with your left hand and vice versa. This makes the
design very rough. Now make a few other lines and splodges
across the symbol.
You also need to completely dry out a marker pen so it no longer
writes.
In performance, spectator 1 is seated on the left of the stage and
spectator 2 on the right, both facing the audience. Spectator 1's
chair should be positioned slightly further forward than spectator 2's
chair, so they can't look across and see what is being written.
Spectator 2 is blindfolded and asked to relax.
“The blindfold is to shut out external stimulae and help you

concentrate.”
Approaching spectator 1, you fan out the five ESP cards face up,
ask him to take one and to concentrate on the design.
At this point, note which card he takes.
At the back of your table, have the 5 prepared boards in order
(circle, cross, wavy lines, square, star) with the blank side facing the
audience. Obviously, they need to be stored out of site. A
cardboard folder pinned hanging down the back of the table is ideal.
Take care to keep the blank side facing the audience at all times
when you remove it.
Rest the card vertically on Spectator 2's knees and ask them to hold
it with their non-writing hand. Now hand the dried out marker to
spectator 2 and position the pen just lightly touching the board.
Explain to the spectator that the pen must rest lightly on the card all
the time for automatic writing to take place. Their writing arm must
be held up unsupported. Don't let them rest their arm on their lap.
“Automatic writing is done by the unconscious mind. Don't
think about what to write, don't deliberately move your arm;
just allow it move on its own under unconscious control.”
Ask spectator 1 to concentrate on their card and 'will' the design to
spectator 2. After a while, check the whiteboard and say
“There are a few lines but nothing distinct. (Spectator 1)
you're doing really well – I'm getting the image very strongly.

(Spectator 2) is almost there but needs a little help. Let's get
everyone involved.”
Ask spectator 1 to simply show his chosen card to the audience.
“Can everyone see that? Good. Now, nobody must say
anything but I want you all to concentrate on that design and
'will' it to (Spectator 2). Let's go ...”
After a while, return to spectator 2 and say,
“OK I think you can stop. This is really interesting ...”
Take the pen from the spectator and put it in your pocket. Place the
white board in their lap, blank side up and remove their blindfold.
Let their eyes adjust and say
“Keep that card in your lap for just a moment please ...”
Turn to your audience and say
“Ladies and Gentlemen, thank you. You've all achieved
something really remarkable tonight. You all concentrated on
the 'star' design (or whichever was chosen) and have
successfully transmitted that thought to another person.”
Ask spectator 2 to stand and turn over the white card to show the
design.
“There is the evidence. Ladies and Gentlemen, thank you
once again! And a round of applause for our two brilliant
volunteers!”

Easy Mentalism
Part 2
Hypnosis

An Introduction to Hypnosis
A basic knowledge of hypnosis will greatly enhance the way you
present your mind-reading illusions. Your choice of phrasing and
use of language can turn a simple mechanical deception into a
mind-blowing psychological illusion. With this in mind (no pun
intended!), we shall now examine a few basic concepts about
hypnosis.
The Human Mind
The human mind is composed of two elements, the conscious and
unconscious. The conscious mind is the voice in your head, the one
that you actively think with. It is critical and analytical, sorting
information by comparing and noticing differences.
The unconscious mind contains your memories and intellect; it
contains your emotions and directs your behaviour. The human
mind is not physically separated into two; the terms conscious and
unconscious are merely models for the way your mind works.
You may have heard the term ‘left brain-right brain thinking’, a
theory which supports the idea that the conscious and unconscious
minds actually reside in two separate parts of the brain. This is not
the case.
In truth, although the brain is divided into sections which perform
different functions, these sections are not clearly defined and do not
reside exclusively in either the conscious or unconscious.
Depending upon the physical, emotional or mental tasks required of
these sections at any one time, they may shift between

unconscious and conscious control. For instance, repetitive tasks
are easily handled by the unconscious, but any task which requires
continuous assessment and re-adjustment to circumstances and
surroundings might be better performed by the conscious mind.
Thus, consciousness is not fixed - it is a spectrum of awareness
which changes and shifts throughout the day.
The hypnotic state is a natural part of our conscious awareness that
we often enter automatically. You are going to learn how to induce
this state artificially with the use of hypnotic techniques.
I would like you to consider just how quickly you are able to
tie your shoelaces. It's just a matter of seconds isn't it. Now
think about each individual stage required to perform that
simple task. If you had to describe to someone how to tie a
shoelace it would take quite a long time since there are an
amazing number of separate operations required.
I imagine you can remember first learning to tie a shoelace, the
amount of hard concentration required. And yet now you do it so
easily! That's because when you first tried to tie a shoelace
you were using your conscious mind. Eventually, the repetitive
operation became imprinted in your unconscious mind and now it
takes no effort or concentration at all. This simple example is
an effective demonstration of the extraordinary power of
unconscious thought.
In the Chevreul's Pendulum experiment, we learned the power of
suggestion; the ability to implant behaviour in the unconscious mind
of somebody. This entirely natural ability, which we each possess, is
the main component of performing hypnosis and it is a skill, as we
shall learn later, that can be developed and enhanced by careful

use of language.
A Model of the Human Mind
You might care to imagine the human mind as an office building.
On the top floor is the Managing Director. On the lower floor
are the ordinary workers quietly doing whatever they need to do
to keep the office running. The Managing Director is the
conscious mind, the workers are the unconscious mind. Between
the two floors is a secretary who passes orders from the
Director to the workers and also provides a summary of what the
workers are doing for the Director.
The secretary is very efficient and strict and will only allow
orders to passed if they come from the MD directly. If an
infiltrator, for instance, tried to pass on some orders, the
secretary would spot them immediately and have them destroyed
before the workers could see them. The secretary is also very
fearful of chaos in the office and so if something goes wrong,
will not necessarily pass this information on to the MD.
Sometimes, however, little mistakes escalate and before long the
secretary, out of panic and anxiety, must tell the MD. But now
the situation is so bad that the MD does not know what to do to
put it right.
I stated earlier that the unconscious mind knows how to solve a
problem. What's important here is whether the conscious mind
will allow the unconscious mind to act.
If we consider this in terms of our analogy, imagine that a
photocopier in the office has been malfunctioning for a few

weeks. One of the workers asks the secretary to inform the MD,
but the secretary decides that the MD is too busy to be bothered
by such trivial matters. Eventually the photocopier breaks down
completely and the worker once more asks the secretary to tell
the MD. He wants the MD to authorise a repair man to come and
fix the copier. The secretary informs the MD, but the MD decides
that a repair is too costly and ignores the request. In
desperation, one of the workers rings a repair man but when he
arrives the secretary, being efficient and strict, will not let
him go down to the office. But the repair man charms the
secretary and eventually is allowed to go down and fix the
copier.
So, the purpose of hypnosis is to relax the secretary, make
him less strict, so that orders from outside the office will be
passed on. The workers have no idea that the orders come from
outside, they simply assume that they come from the MD and so
act on them accordingly. If the correct orders are given, the
workers can act to regain control of the office. The secretary
can then pass on the good news to the MD.
In terms of hypnosis, the 'secretary' between the conscious
and unconscious mind is called the critical faculty. This is our
ability to question, analyse, criticise and compare. Just as the
repairman in our analogy charmed the secretary into letting him
go down to the office, by using hypnosis we can bypass the
critical faculty. Once we have access to the unconscious, we can
uncover memories, release repressions, plant positive
suggestions and even reprogram unconscious traits responsible
for habits such as smoking or over eating.
You may not realise it, but you have been in a hypnotic trance

before. While watching television or reading a book, maybe even
reading this, you are often in a hypnotic trance. In such
a state you become unaware of the room around and are focused
on the programme or book. It's not until someone calls your name,
or the telephone rings, that you realise just how deeply you
were involved.
Another good example is when you find that you have driven or
walked some considerable distance and then somebody or
something catches your attention. At this point you realise you can't
remember the preceding part of the journey. You were in a trance
state.
The only difference between these types of trances and a
hypnotic trance is that the latter is deliberately induced.
What is Hypnosis?
When emerging from their first hypnotic trance, the commonest
reaction is the subject claiming that they were not hypnotised
at all. This arises because of a misconception of what a
hypnotic trance actually is. In hypnosis, the subject is still
aware, but in an altered state of awareness. A trance is unique
to the individual involved but there are several characteristics
a hypnotic subject may experience. It would be very unusual for
someone to experience all of these but a list of the commonest
follows.
i. Sensory Awareness Feelings may be more forcible or
numbed; sounds may seem louder, more sharp or quieter.
ii. Fixation - The subject becomes fascinated by an idea, an

image, the sound of their heartbeat or breathing.
iii. Distortion of Time - It is common for an hour spent in
hypnotic trance to seem much shorter, perhaps like just a few
minutes.
iv. Logic - Rather like in the dreaming state, situations and
environments which in the waking state would seem bizarre,
appear entirely logical.
v. Amnesia - It is unusual for a subject to remember clearly
what happened during the trance state. Recall is likely to be
disordered and lacking in detail.
As well as these internal changes, there are also several
external changes that the hypnotist can look for to verify that
hypnotic induction is proceeding as planned.
i. Eyes - During the early stages of induction, when the
subject's eyes are still open, you will observe dilation of the
pupils. As the induction progresses and the eyes close you
will observe the eyelids fluttering. In very deep trance states
Rapid Eye Movement (REM) may become apparent as the
subject visualises.
ii. Face - As the subject becomes more relaxed, blood flows
more easily to the capillaries at the surface of the skin,
producing a slight flush. There may be slight facial spasms
and generally the face will appear more relaxed.
iii. Breathing - Most people will generally breathe more slowly
and deeply while in hypnotic trance.

A good hypnotist will observe the changes in their subject as
they induce hypnosis and comment upon them. As we shall see, by
tying these comments to appropriate suggestions, the hypnotic
state can be deepened. In addition, the more times a subject
experiences trance, the more marked the trance experience will
be. Previous experience of trance aids the development of deeper
trance states in the future and also makes it easier for a
hypnotist to induce trance.
Basic Hypnotic Induction
This basic hypnotic induction follows a classic form, is easy to
perform and therefore great for beginners.
Here are the elements of this type of induction:
a. The Truism
The statement at the start of the induction is the basic
element of a linguistic technique called pacing and leading.
Pacing is the practice of meeting the subject's own
experience. By commenting upon this, the hypnotist can use
it to lead them into hypnotic trance.
At the start of this particular induction, the subject's eyes
are elevated above the normal position. The eye muscles will
inevitably tire because they are in an unnatural and strained
position. The hypnotist anticipates this with the comment
about the eyes becoming tired and the eyelids becoming
heavy. This suggests to the subject that the hypnotist is
actually producing the effect. Further commands will now be
more readily accepted.

b. Rhythm
When hypnotising a subject, I would normally observe
their rate of breathing and synchronise my speech and own
breathing pattern with their breaths. This is done by watching
the chest rise and fall or observing the nostrils. It is most
effective to coincide suggestions of relaxation with the client's
exhalations.
As the breathing rate decreases, so the hypnotist's speech
rhythm decreases to match. This is a process of feedback
since by slowing the speech rhythm, the hypnotist can also
decrease the subject's rate of breathing. The hypnotist
begins by speaking at normal speed and then gradually
decreasing their rate of speech and breathing as the
induction proceeds, until it is about 30% of normal.
c. The Hypnotic Voice
There are two kinds of vocal delivery used for hypnotising.
The first is the monotone delivery, where there is very little
inflexion to the voice. The conscious mind becomes bored by
the hypnotist, while the unconscious mind accepts the
hypnotic commands.
The second type is the undulating delivery, where the voice
gently modulates and soothes the client into trance.
Your hypnosis voice will emanate from the unconscious and
there is no 'secret' to this, it will evolve spontaneously. Just
use a quiet but authoritative voice that suggests you are
confident and know what you are doing. The words should

flow smoothly and easily with no uneasy pauses. It would be
best to memorise the induction so that you can speak easily
and fluently. Eventually, you will discover your own style.
d. Occupying the Conscious Mind
The counting down from 300 is a simple but absorbing task
for the conscious mind to perform. Because it is occupied
doing this, it is less able to spot the hypnotic suggestions
being offered. The critical faculty is being bypassed. This
counting down technique can be enhanced by asking the
subject to
visualise each number as they count down, making
each number a different colour. Any technique that occupies
the conscious mind is useful in hypnosis because it assists
the subject in becoming more inwardly focused and ignoring
the stimuli around them.
e. Overloading the Conscious Mind
Despite being occupied with counting down, the conscious
mind can still occasionally 'listen in' on the induction. In this
induction, confusing combinations of words overload the
conscious mind. When tied to suggestions that it is easier
and easier to relax, this just seems the best way out. Relax,
go with it, suspend conscious thought...
f. Embedded Commands
Commands such as 'relax' or 'your eyes are becoming tired'
are preceded by a slight pause. This has the effect of subtly
separating these commands from the rest of the text,
although this is only perceived by the unconscious mind.

g. Using the Imagination
Remember, the imagination is rooted in the unconscious
mind. By encouraging the subject to visualise, the hypnotist
encourages the subject to abandon the analytical, critical
conscious mind in favour of something more rewarding. The
'message' contained in the treasure chest is entirely personal
to the subject rather than being imposed by the hypnotist.
h. The Release/Trance Termination
It is important that the release be performed correctly if the
trance is to be of benefit to the subject. Don't worry about
taking your time with this part because you cannot bring
someone out of trance too slowly. Bringing them out too
quickly is another matter entirely. For a subject in a very deep
trance it's like being violently woken; disturbing and
traumatic. Too quick a release will destroy the effect of the
trance, so just take your time.
During the release, you should gradually increase the rhythm
of speech and increase volume until you are back to normal
levels, as you were when you began the induction.
Beginning Hypnosis
Follow the full script presented below and look out
for these seven elements. Then practise reading the script
aloud, bearing in mind the eight elements presented above.
If you wish to try the induction out with a willing volunteer,
please feel free, but don't attempt to make your own alterations

or suggestions just yet. Stick to the script as presented and
you and your subject will be perfectly safe.
Your first few attempts will probably be disappointing so keep
trying. Ask for feedback from your volunteer subject. You may
find that they drift up out of trance in response to certain
words or phrases, so find out when this happens and next time,
modify your pronunciation and delivery to compensate.

BASIC HYPNOTIC INDUCTION & RELAXATION SCRIPT
The first thing I would like you to do ...
before going into trance ...
is to make yourself comfortable ...
sit in a chair with your hands resting on your lap ...
and ... as you make yourself comfortable ...
focus your gaze on a point where the wall meets the ceiling ...
that's right ...
just let your eyes rest there ...
focused on that particular spot ...
and begin to relax ...
and as you relax ...
focused on that spot there ...
you can begin to notice any changes
that occur here ...
you might notice how your eyes are becoming tired ...

how your eyelids are becoming heavier ...
and ... as your eyes become tired and your eyelids heavy ...
you will notice how your breathing is deepening ...
how you are beginning to relax ...
I wonder ...
have you noticed how one hand feels more relaxed ...
than the other?
don't worry ...
as you continue to relax ...
the other one will catch up ...
there's no need to worry about anything ...
just relax ...
so calm ...
so peaceful ...
you can just close your eyes now ...
close your eyes ...

rest those tired eyes ...
and ... as your eye muscles relax ...
so that relaxation spreads ...
and it is easier and easier ...
to become more and more aware ...
of sensations and feelings within you ...
that may otherwise go overlooked ...
you can take time to notice how your whole body is relaxing ...
the muscles in your shoulders ...
arms ...
back and legs ...
all are relaxing ...
your breathing is deepening ...
breathe in relaxation ...
and breathe out tension ...
breathe in relaxation ...

and breathe out tension ...
and as you continue your deep breathing ...
try counting down ... in your head ...
from 300 ... like this ...
300 ... 299 ... 298 ... 297 ...
you continue like that ...
and continue your deep breathing ...
and continue relaxing more and more ...
that's right ...
you're doing fine ...
nobody wants anything ...
nobody needs anything ...
all you need to do is relax ...
let your mind drift down ...
drift down with each exhalation ...
that's right ...

with your conscious mind busy counting down ...
your unconscious mind can imagine ...
imagine sitting by the sea shore ...
imagine hearing the peaceful sound of the waves ...
with golden rays of sun warming your skin ...
feel that soothing warmth ...
hear a gentle breeze in the palm leaves ...
imagine ...
pick up a handful of sand ...
feel the soft, fine grains trickling through your fingers ...
trickling down ...
next to you on the beach ...
lying in the soft, white sand ...
is an old treasure chest ...
the once sturdy lock is broken ...
you can open the chest and look inside ...

do it ... ease back the lid ...
inside is a piece of parchment ...
with a message written in ancient script ...
a message just for you ...
and no one else ...
a calming, soothing message that is just right for you ...
right now ...
read it ...
remember it ...
it's just for you ...
as you relax on this beautiful beach ...
with the sea gently lapping at the shore ...
and the breeze brushing through the palm leaves ...
and now you look out ...
across the sea ...
there is a boat ...

waiting to bring you home ...
but it doesn't matter ...
you don't mind ...
because you know that the peace you have
found here ...
can be taken back there ...
as a memory ...
and whenever you need to ...
you can come back here in your mind ...
it won't be the same ...
but you will remember the peacefulness ...
for a while ...
just when you need to ...
and you have your special message ...
for peace of mind ...
so come back now ...

make your way back ...
confident in what you have learned ...
as I count from 1 to 10 ...
you'll awake, refreshed, relaxed and fully alert ...
bringing with you what you need ...
and leaving behind what's best left in
the unconscious ...
one ... two
three ... four ...
beginning to feel wide awake ...
three ... four ...
come back now ...
five ... six ...
wide awake ...
seven ... eight ...
nine and ten ...

mind and body have returned to normality ...
mind and body have returned to normality ...
you feel wide awake ...
mind and body have returned to normality ...
you feel great!

Advanced Hypnosis – The Handshake Induction
The basic form of the Handshake Induction is that of confusion
induction. In plain words, your target expects a certain set of
circumstances to happen and is confused when what occurs does
not match what they expect.
This fact, combined with pacing and leading causes a rapid trance
induction that can be deepened by rapid use of hypnotic language.
Here's how to do it:
Walk up to your victim confidently, make eye contact, raise your
right hand towards them as if to shake hands and say:
"Hi, I'm pleased to..."
Break the handshake pattern NOW by doing something
unexpected:
•
Adjust your cuff-link
•
Scratch your nose
•
Reach for a drink
•
Grab their wrist and lift up their hand
•
Grab your ankle
•
Raise your hand up to your nose
•
Do something unexpected!
But DON'T BREAK EYE CONTACT!
As you do this, pretend to slip into a trance, just let your
mind go blank and let your facial expression follow. They will follow

you!
And then continue:
“Sorry , I know what you're thinking, you're out of it... we all
think that when this happens. So just RELAX. Just SLEEP.
It's great that you're taking time to really think harder about it.
It's as if you're unconscious mind, right now, is making a
trance for you to SLEEP through.
You're drifting. Relaxing. Listening. And breathing deeper ...
as you go into trance ...“
To release this type of trance, you might use a script similar to the
one below:
OK ... as I count from 1 to 5
you'll awake, refreshed, relaxed and fully alert ...
one ... two
beginning to feel wide awake ...
three ...
come back now ...
four ...
wide awake ...

and five ...
wide awake ...
you are wide awake
mind and body have returned to normality ...

Appendix I: Performance Tips
1 - Most people do not believe in mind-reading as fact but they are
more likely to believe you can read body language or influence
behavior. To assist with this, set a mood and enhance your tricks by
dressing them up as psychological illusions.
Ÿ
Dim the lights
Ÿ
Dress appropriately in dark or black clothes
Ÿ
Illuminate the room with candle-light
Ÿ
Subtly suggest you are picking up on unconscious body
language such as micro-expressions of the facial
muscles, tone of voice, body stance and hesitation.
2 - Despite the descriptions used in the booklet, as far as your
audience is concerned you are not performing tricks or illusions.
Ÿ
You are demonstrating effects not tricks
Ÿ
You are conducting experiments
3 - Take Your Time
Ÿ
Don’t rush any of your effects. It is much more dramatic
and realistic to slow things down and reveal your
predictions or revelations piece by piece. In our Book
Test, for example, rather than reciting the whole first
sentence, only a couple of words are revealed first. Then
the whole first line is written down with each word being

deliberated over to maintain the illusion of mind-reading
and to build suspense.
4 - If Things Go Wrong …
Ÿ
Forget about it! These are experiments, so if things don’t
go to plan then simply move on. When things go wrong,
compliment the spectator; say they were difficult to read
and/or manipulate. Not only does this make them feel
good but it also indicates to the rest of the audience that
what you are doing is real rather than magic!
5 - Enjoy the Experience!
Ÿ
If you enjoy yourself your audience will too. Don’t
embarrass your spectators or audience; don’t make them
look foolish and don’t blame them if things go wrong. If a
trick doesn’t work out the way you planned its not their
fault - its yours. Learn from the experience, practice,
practice and practice some more until you have perfected
the art of Easy Mentalism.
6 - Spectator Selection
•
Unlike other forms of magic, Mentalism absolutely relies
on getting spectators to assist you with your experiments.
Getting your first volunteer to join you on stage to assist
can be the most difficult part of the act. When choosing a
spectator, look them directly in the eye and say “You Sir –
would you come up here please?” Phrase this as a
command rather than a polite request and follow it quickly
with “Give him a round of applause, please” even before

he is out of his seat. When you volunteer is up on stage,
shake his hand, lean in and say “Thanks for coming up.
Don't worry, I won't embarrass you or make fun of you.
We're just going to have a bit of fun ...”. Having said this,
stick to your word and further volunteers will be less
difficult to find.

Appendix II– Acknowledgements and Final Thoughts
The effects in this booklet owe a debt to all the creative minds of
mentalism past and present. For further reading and study I
suggest:
•
13 Steps to Mentalism by Tony Corinda - D Robbins
& Co 1968
Corinda is a complete course in mind reading and
mentalism. The 'Book Test' presented in this booklet was
inspired by the 14/15 stack mentioned in Corinda and 'Extra
Sensory Perception' is adapted from the Red Card
Prediction.
•
Practical Mental Magic by Theodore Annemann -
Dover Publications 1983
Almost every effect in Annemann's book contains a method
that can be adapted or used for a trick of your own invention.
An absolute wealth of information and ideas, the loaded
envelope used in 'Heads or Tails?' was adapted from an idea
in this book.
'Simple Shape Prediction' is based on ideas contained in
Banachek's 'Psychological Subtleties'.
'Four Thought' was inspired by two effects. The trimmed card
element was inspired by Max Maven's Mind's Eye deck, in turn
inspired by the classic Svengali deck. The dual reality element was
inspired by a Direct Mind Reading trick in Marc Paul's lecture notes
and Mind 2 Mind DVD.

In writing this booklet, my aim was to bring to the 'weekend
magician' several principles and concepts that have been used by
mentalists for decades and continue to be used today by some of
our most popular and famous mind readers.
Mentalism has undergone a radical change in the last few years
and is often now presented with reference to psychological
techniques such as NLP, hypnosis and body language rather than
any kind of psychic ability. Your audience will decide whether they
accept your ability to read minds or are using psychological
techniques. Leave the choice to them – hint but never explain.
There is always the risk that in exposing secrets such as this, an air
of disappointment is produced in the reader. When you have
watched a skilful and talented performer do something that looks
like real minding (or 'body language reading'), it can be
disheartening to discover such mundane methods behind the
magic.
The key to convincing mind reading and psychological illusions is
not the gimmicks and techniques but the performance, something
which is beyond the scope of this booklet. But if you believe in what
you are doing and have fun, your audience will too.
Easy Mentalism E book Edition by JP Jacquard
Wyszukiwarka
Podobne podstrony:
Human Biology Mental Health Psychology Made Easy The 100 Simple Secrets Of Happy People
JP Seminarium 9 wersja dla studentów
10 Easy Steps to Turning Dreams into Reality!
drzwi czech e60 EASY 719 DC RC
Easy 07290100002
Mentalność-Le Goff, Materiały
Cytaty JP II, e-boki o JPII
Mentalność Magiczna Zapuszcza K
elektrownie 2009 2010 lato(JP)
It's Easy to Earn Money
5 VC Proces inwestycyjny JP FOP Nieznany
JP SS 4 start Java
arkusz odpowiedzi jp zr
jp wykl TM 1213
więcej podobnych podstron