
Wedding Lace Bracelet
© Felinda Bullock
Materials:
11° (Size 11) seed beads in 2 or 3 colors (Colors A, B, C)
15° (Size 15) seed beads in contrasting color
Size 12 beading needle
Silimide ® or Nymo ® to match
Thread Heaven ®
Button with a shank (for clasp)
Basic Instructions:
Squares of beads are first constructed, then joined together to form a lacy length of beads
Part I Instructions:
1. Condition and stretch 1 yard of thread, then thread through needle.
2. Pick up 8 size 11 seed beads of color A. Run needle back through first bead threaded so
beads form a circle. (Fig 1) Pull thread tight.
3. Pick up 3 size 11 seed beads of color B. Skip 1 bead on the circle, and pass needle through
the 3
rd
bead of color A. (Fig 2) Pull thread tight.

4. Pick up 3 more size 11 seed beads of color B, skip a bead in the circle, then pass the needle
through the next circle bead. Repeat twice. (Fig 3) Pull thread tight.
5. Pull thread tight. You will end up with a square with the center now taking on a diamond
shape. (Fig 4)
6. Secure both the tail and the working threads by running them through the 8 bead center
several times. Cut threads close to beads. (Fig 5)
7. You will be making approximately 22 squares. Measure your wrist, then add a half-inch. Line
your finished squares up corner to opposite corner (Fig 6), measure, then add the length of
your button clasp. The total length of your bracelet should equal your wrist measurement plus
a half-inch. Increase or decrease the number of squares as needed.
8. Condition and stretch 1 yard of thread, then thread through needle.
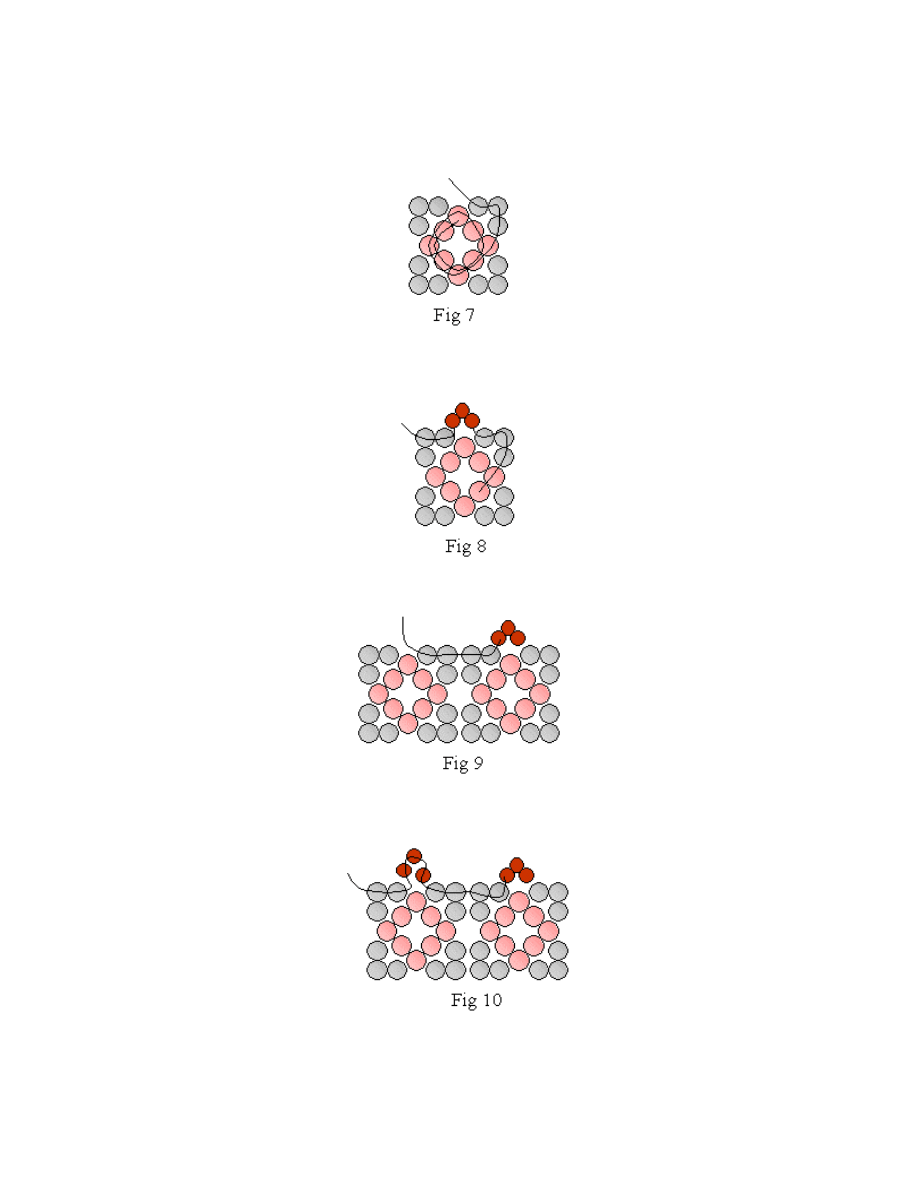
9. Secure thread, burying tail, in the center of one of the squares (Fig 7) and bring needle
through the 3 corner beads.
10. Pick up 3 size 15 seed beads and pass needle through the next top 2 beads of the square.
(Fig 8) Nudge beads to form a neat "peak" shape. Pull thread tight.
11. Pass needle through the top 2 corner beads of another square. (Fig 9)
12. Pick up 3 size 15 seed beads, nudge them into a neat peak, and pass needle through the
remaining top two beads on the square. (Fig 10)
13. Pull thread tight. You will notice that the two squares flip-flop positions. (Fig 11) This is what it
is supposed to do.
14. Keep adding squares until the desired bracelet length minus clasp (button) length is reached.
(Fig 12)
Part 2 Instructions:
15. Condition and stretch 1 yard of thread, then thread through needle.
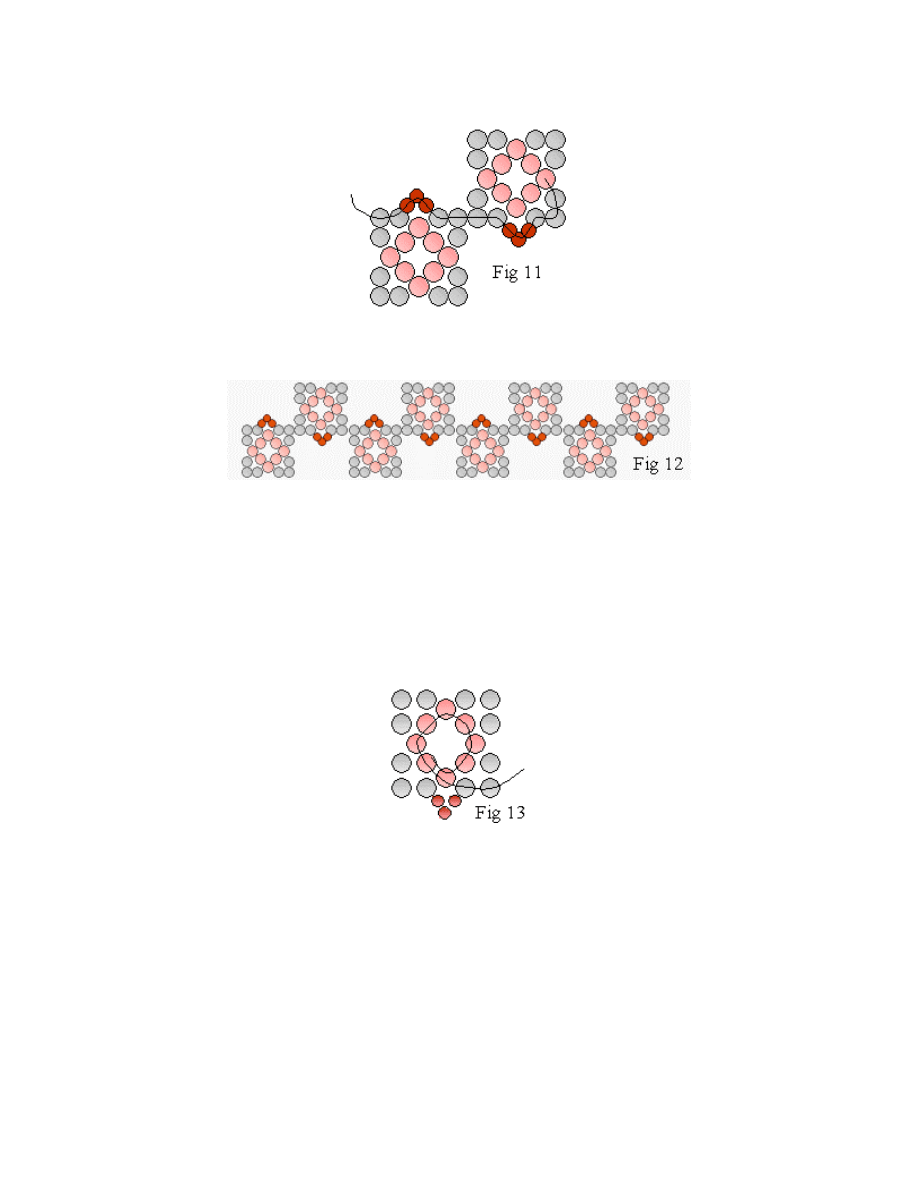
16. Anchor thread, burying tail, in the center of one of the end squares, then bring needle out
through a corner (color B) bead. (Fig 13)
17. Pick up enough beads of your choice of color A, B, or C to make loop to fit over button
(clasp). You will want the loop to just fit comfortably over the button. It should be tight
enough so that it will not fall off while wearing, yet not so tight that the threads will be
stressed when pulling it on or off the button. After the correct number of beads are threaded
(and tested for fit), run the needle through an inside corner bead, towards the center of the
square. Pass the needle through one center bead, then through the other inside corner bead,
then back through the closure loop of beads again. Repeat to strengthen the loops, but
instead of passing through the loop a 3
rd
time, pass needle through the 2
nd
and 3
rd
corner
beads of the square, exiting on the top. (Fig 14)
18. Pick up 3 size 15 beads, then pass needle through remaining two beads on top of square.
(Fig 15)
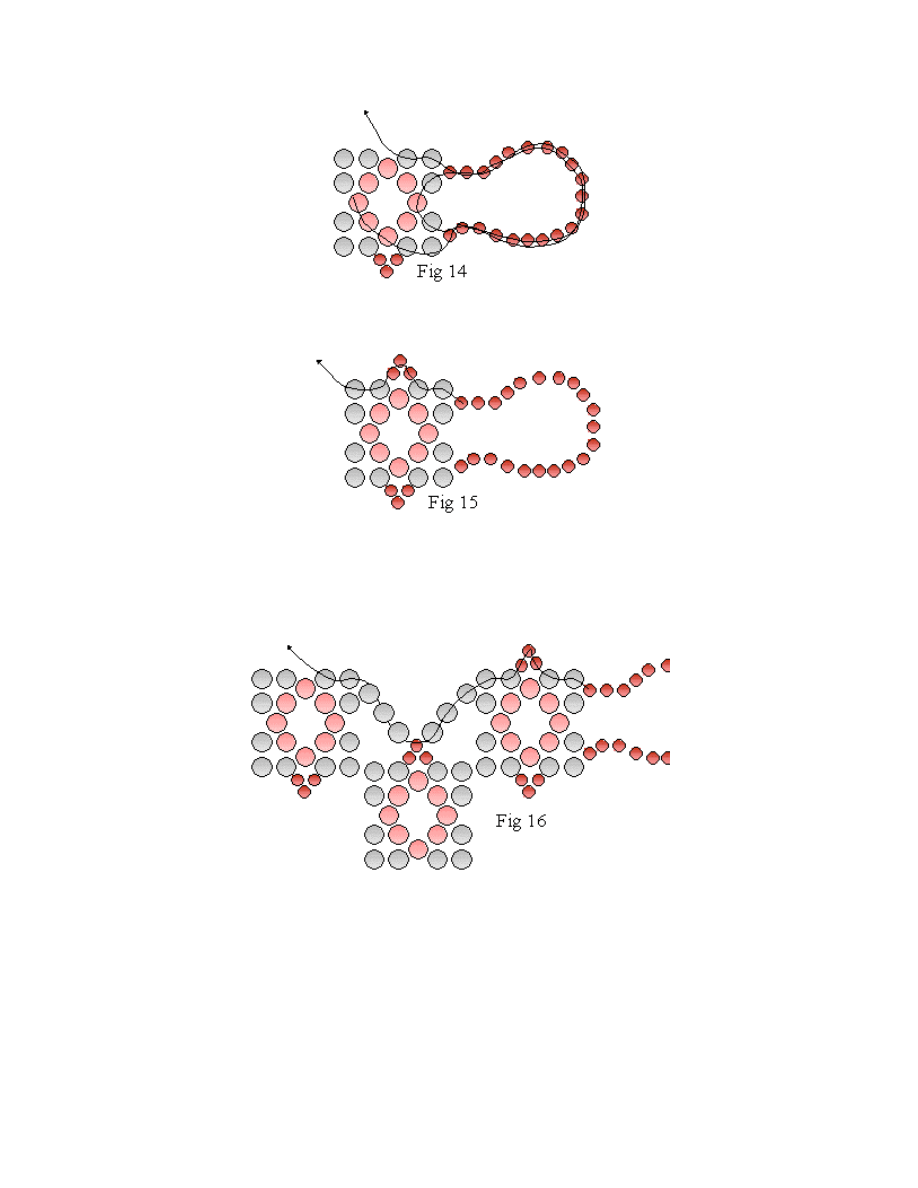
19. Pick up 3 size 11 beads in 3
rd
color (or choice of 1
st
or 2
nd
color if only using 2 colors).
20. Pass needle through the size 15 peak bead in the next offset square, pick up 3 more size 11
beads in 3
rd
color, then pass needle through the top two beads in the next offset square. (Fig
16)
21. Repeat steps 18 through 20 until the end of the row of squares is reached. Pass the needle
through the size 15 point bead and the one next to it, and all 3 corner beads of the last
square. (Fig 17)
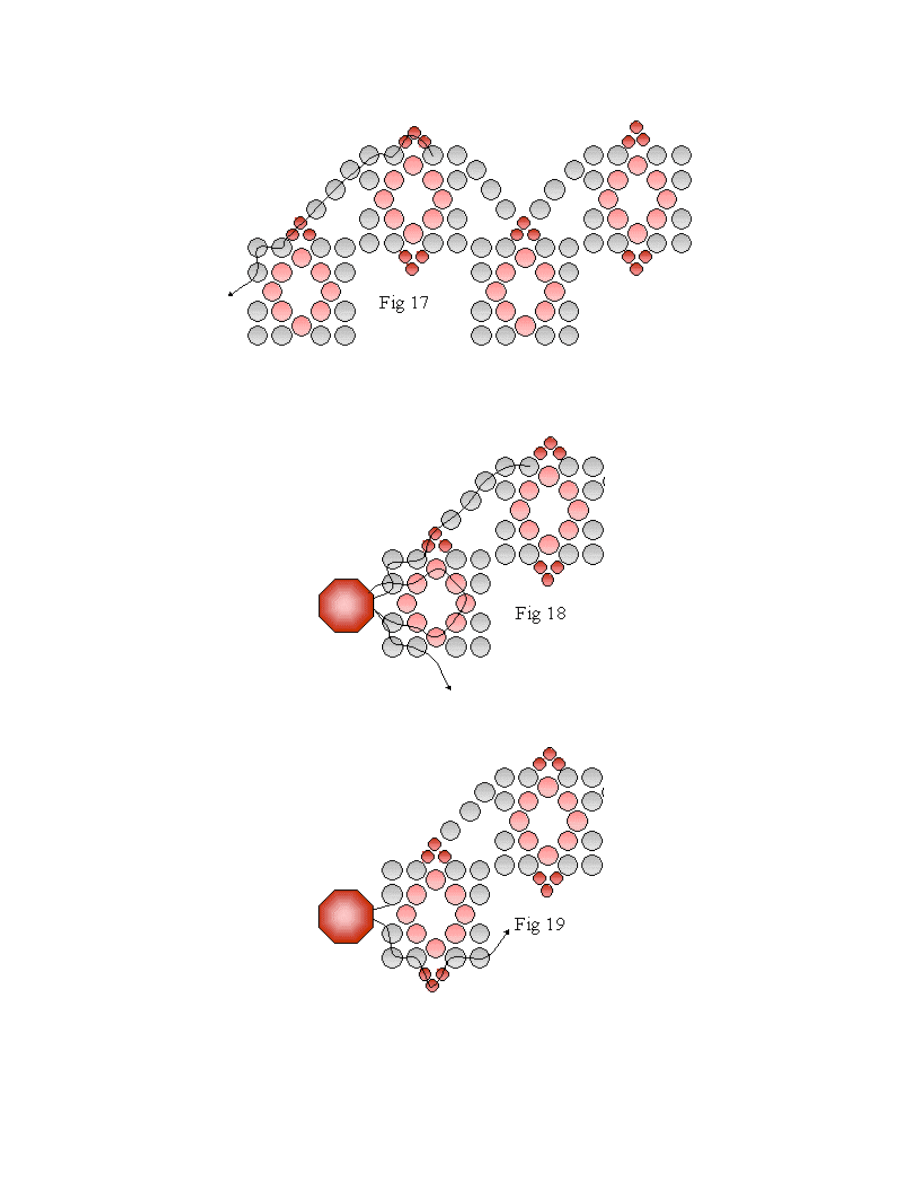
22. Attach button clasp and secure by running thread through center beads of end square. Exit
thread through two next corner beads. (Fig 18)
23. Pick up 3 size 15 beads, then pass needle through next two corner beads. (Fig 19)
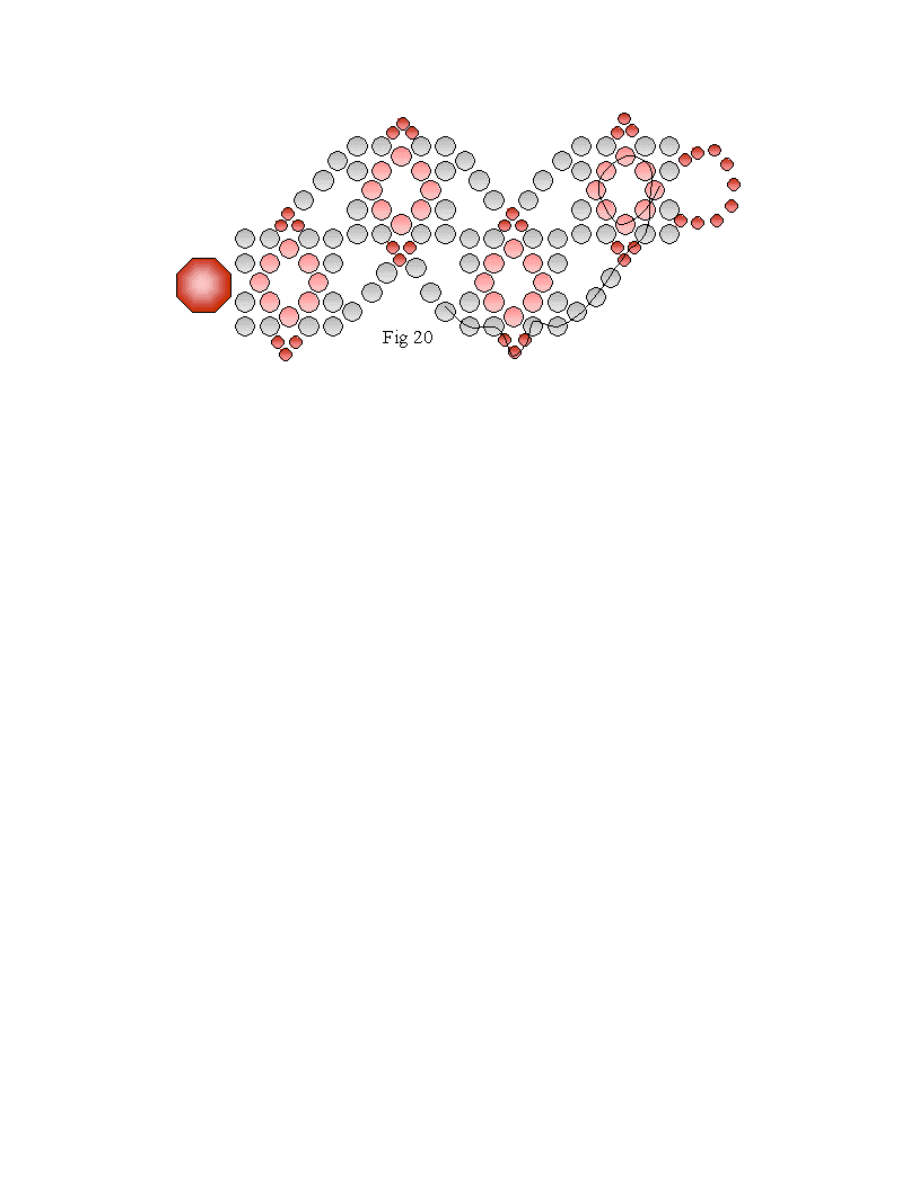
24. Repeat steps 18 through 20 to the end of the bracelet. Secure end of thread in the center of
the last square. (Fig 20)
Wyszukiwarka
Podobne podstrony:
Honey beaded bracelet20121106 1088 1nutcvl 0
Wesołe zabawy na łące, Scenariusze zajęć przedszkole pięciolatki
na wiosennej lace, Gazetki dla rodziców, na gazetkę
zwierzęta na łące
BRACELET CARRE
chain with beaded wire bezels
M 5172 Lace top dress
M 5289 Lace jacket
bead stained glass bracelet
Pattern Choir of Angels Bracelet & Earrings
k shoe lace
Na łące - scenariusz zajęć (aktywność muzyczno-plastyczna), Konspekty zajęć i lekcji
Przebieg zajec WIOSNA NA ŁĄCE, klasa 0
NA ŁĄCE
Zabawy w lesie i na łące
L 5289 Lace jacket
Na wiosennej łące
Kilkadziesiąt lat temu biegał ksiądz boso po łące
Na wiosennej łące - ćwiczenia w ogrodzie przedszkolnym, Konspekty zajęć i lekcji
więcej podobnych podstron