Trouble Shooting Guide, Mechanical
4/000 21-1/FEA 209 544/594 A
Company Internal
©
Sony Ericsson Mobile Communications AB
Trouble Shooting Guide, Mechanical
Applicable for W600i, W600c, W550i, and W550c
Contents
1
General.................................................................................................................................................................... 2
2
Network/Signal Problems ....................................................................................................................................... 2
3
Power Problems ...................................................................................................................................................... 4
4
Audio Problems ...................................................................................................................................................... 6
Microphone: .................................................................................................................................................. 6
Receiver: ....................................................................................................................................................... 6
Rear Base Speaker: ....................................................................................................................................... 8
Side Base Speaker:........................................................................................................................................ 9
5
Key Problems........................................................................................................................................................ 10
Base Keypad: .............................................................................................................................................. 10
Flip Keypad:................................................................................................................................................ 11
Gaming keys: .............................................................................................................................................. 12
Music Player Key:....................................................................................................................................... 12
Volume keys: .............................................................................................................................................. 13
Camera key: ................................................................................................................................................ 13
6
SIM Problems ....................................................................................................................................................... 14
7
IR Problems .......................................................................................................................................................... 15
8
Hands-Free Problems............................................................................................................................................ 15
9
Display Problems .................................................................................................................................................. 16
10
Data Communication Problems ............................................................................................................................ 18
11
Illumination Problems........................................................................................................................................... 18
Base Keypad: .............................................................................................................................................. 18
Flip Keypad (Navigation Keypad): ............................................................................................................. 19
Gaming Key: ............................................................................................................................................... 19
Display: ....................................................................................................................................................... 20
12
Alert Problems ...................................................................................................................................................... 22
Vibrator: ...................................................................................................................................................... 22
Rear Base Speaker: ..................................................................................................................................... 22
Side Base Speaker:...................................................................................................................................... 24
Trouble Shooting Guide, Mechanical
4/000 21-1/FEA 209 544/594 A
Company Internal
©
Sony Ericsson Mobile Communications AB
2(28)
13
Charging/Capacity Problems ................................................................................................................................ 25
14
Camera Problems .................................................................................................................................................. 26
15
Bluetooth Problems............................................................................................................................................... 27
16
Revision History ................................................................................................................................................... 28
1 General
This document outlines the mechanical repairs that should be made in an attempt to fix the common failures that are seen in the field. To gain a
complete understanding of how to test and repair a unit, this document should be used in conjunction with the Test Instructions, Mechanical and
the Working Instructions, Mechanical.
NOTE! A unit should always be inspected for liquid damage and flashed with latest software before using the Mechanical Trouble Shooting
Guide. Refer the Mechanical Test Instructions for details regarding inspecting for liquid damage and upgrading software.
NOTE! If all of the repair actions listed in this document for addressing a problem have been preformed and a unit still is not working,
handle the unit according to your local company directives.
2 Network/Signal Problems
Problem Area
Items to Check
Repair Action
Reference Image
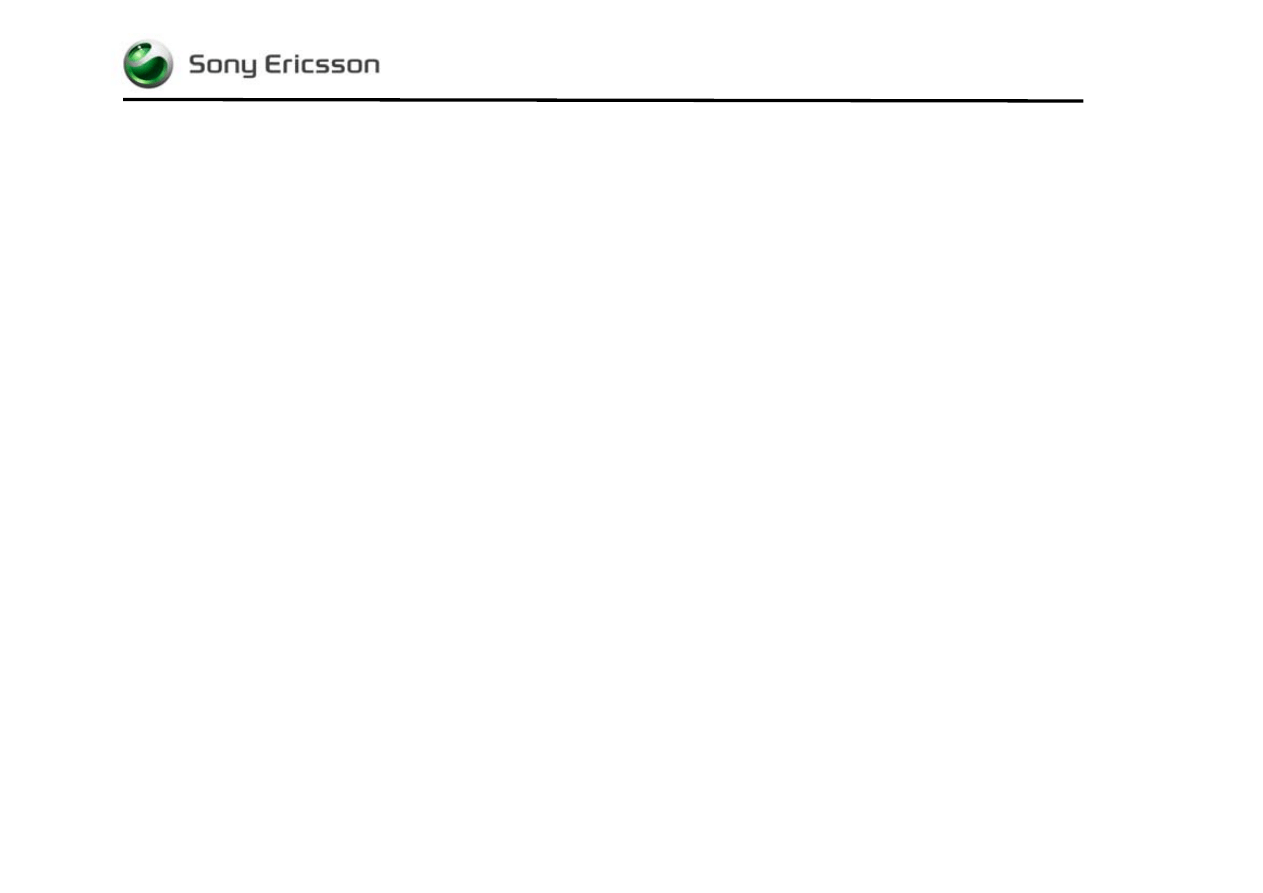
No Signal or Poor
Signal
Inspect SIM holder
• If dirty or oxidized – Clean
• If damaged – Send to an electrical
repair location
Trouble Shooting Guide, Mechanical
4/000 21-1/FEA 209 544/594 A
Company Internal
©
Sony Ericsson Mobile Communications AB
3(28)
Problem Area
Items to Check
Repair Action
Reference Image
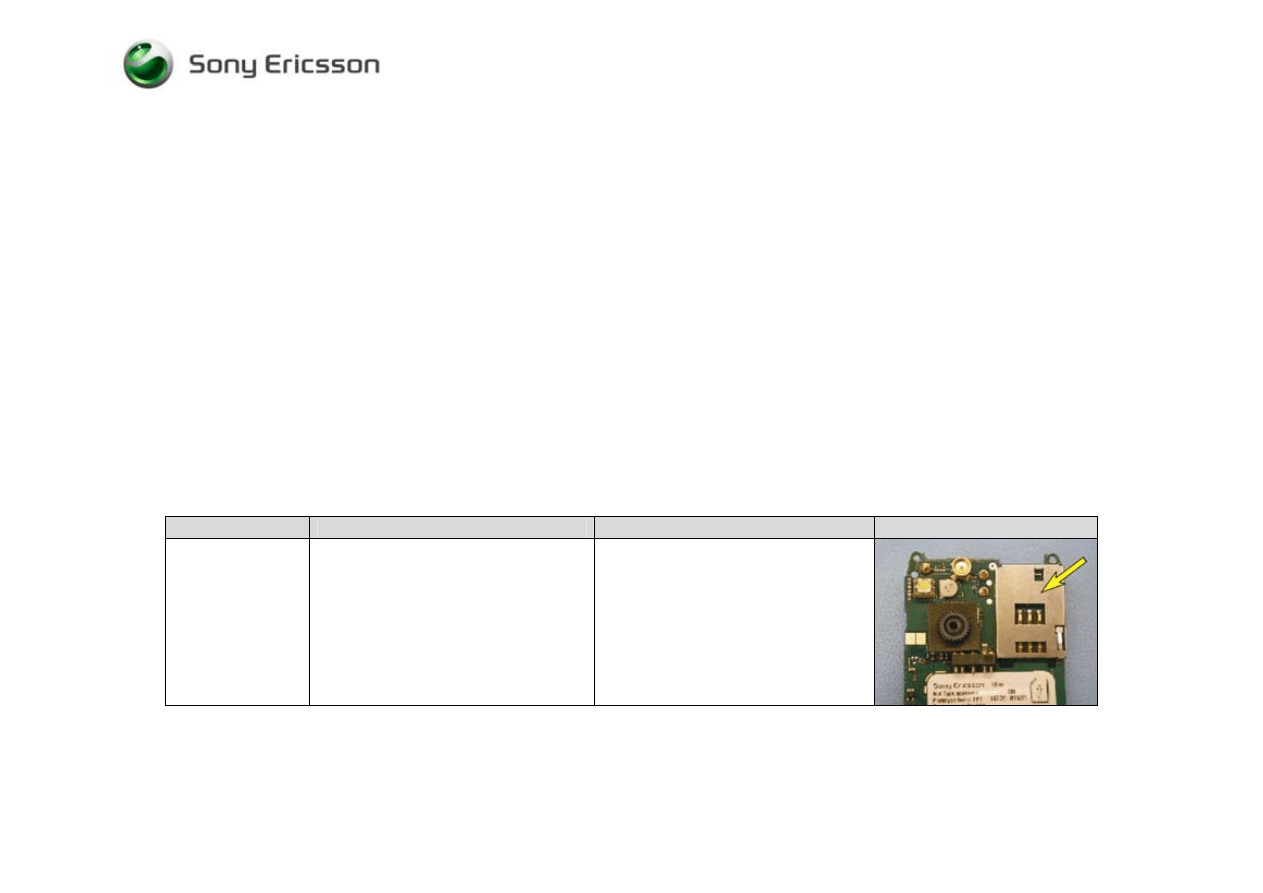
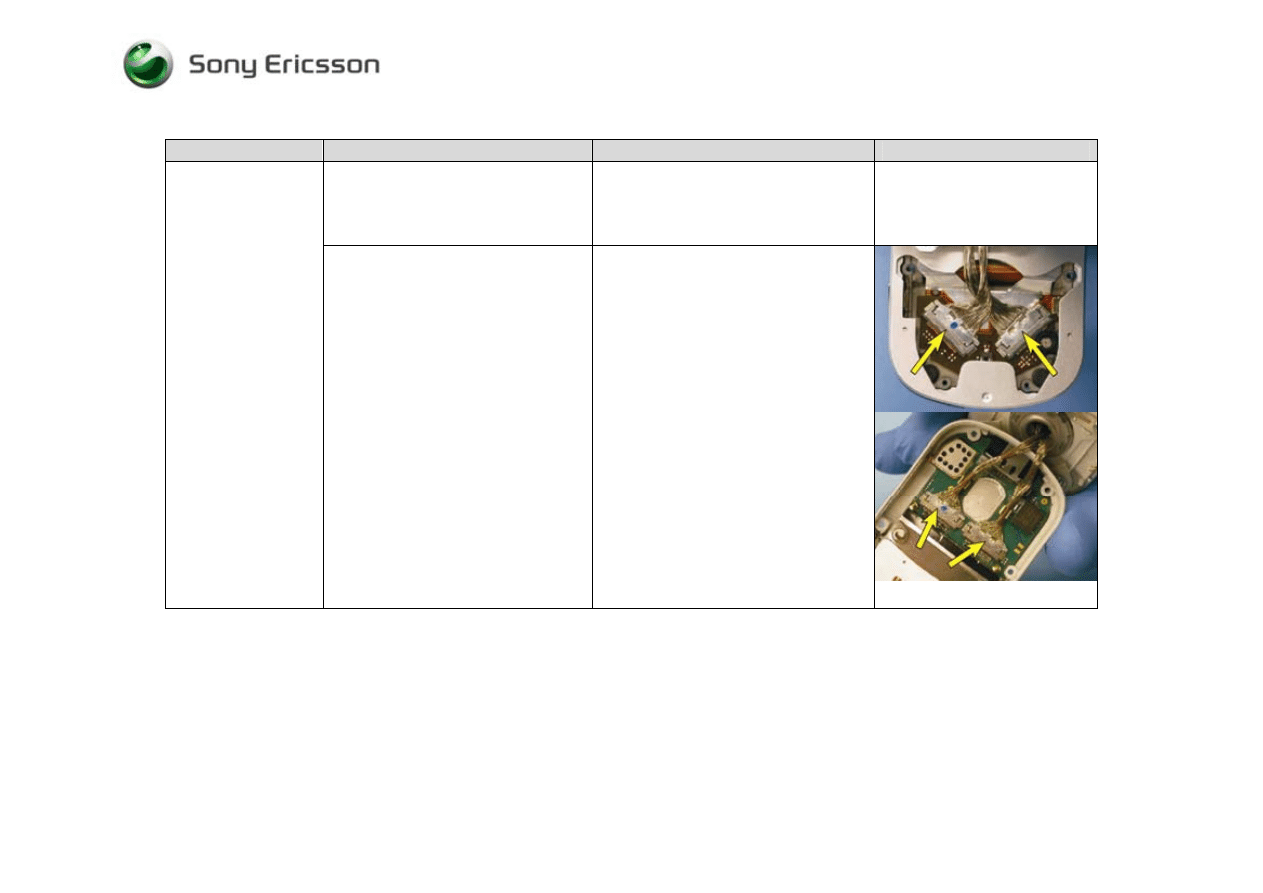
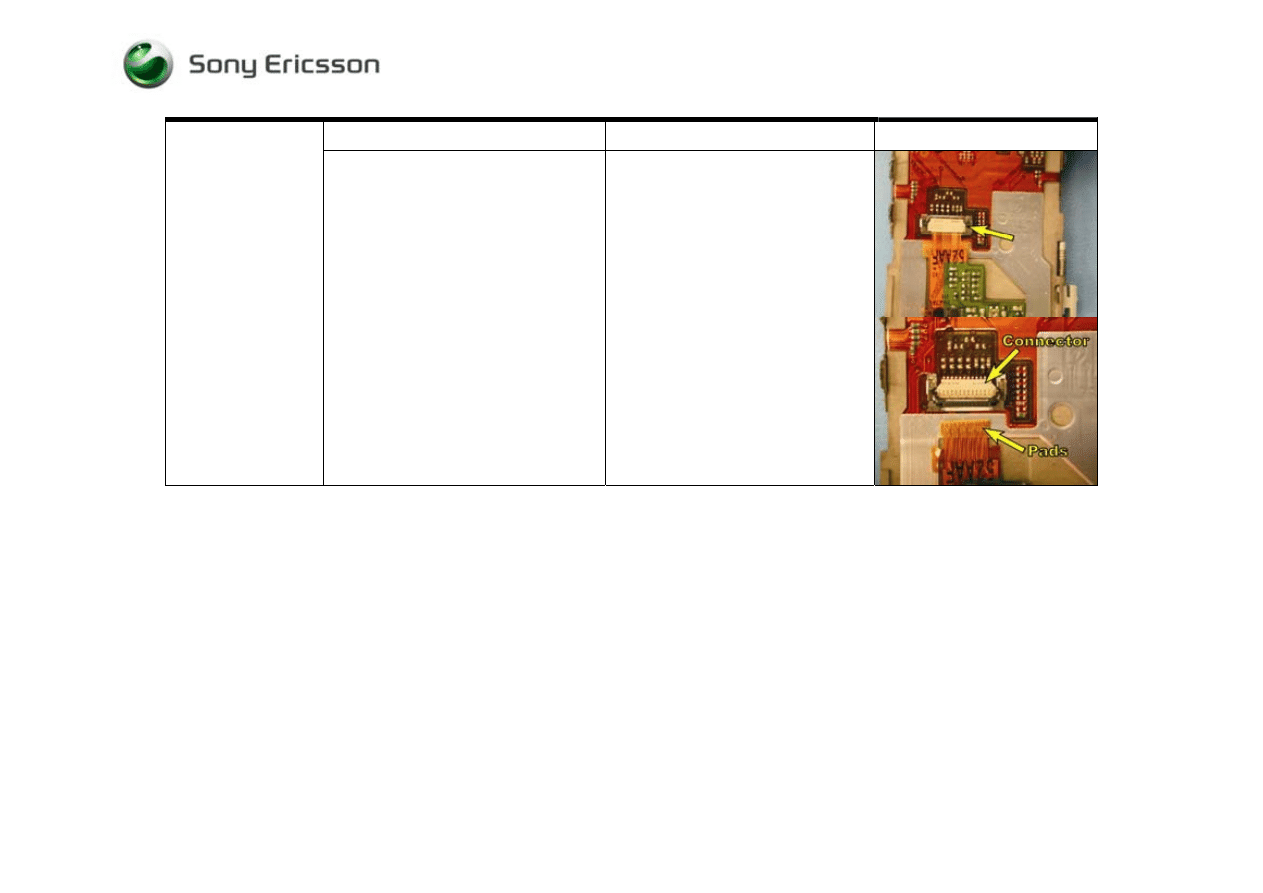
Inspect antenna-to-board connector
• If dirty or oxidized – Clean the
antenna-to-board connector and
replace the antenna assembly
• If damaged – Send to an electrical
repair location
Inspect external RF connector
• If dirty or oxidized – Clean the
external RF connector
• If damaged – Send to an electrical
repair location
No Signal or Poor
Signal (Cont.)
If the issue has not been resolved !
• Replace the antenna assembly if it
has not been replaced

Trouble Shooting Guide, Mechanical
4/000 21-1/FEA 209 544/594 A
Company Internal
©
Sony Ericsson Mobile Communications AB
4(28)
3 Power Problems
Problem Area
Items to Check
Repair Action
Reference Image
With the phone in the open position,
check whether the main keypad
illuminates 5 to 10 seconds after pressing
the power key
• If illumination of the keypad is
detected, refer to the “Display
Problems” section
Visually inspect contact pads on battery
• If dirty or oxidized – Clean the pads
• If damaged – Replace the battery
Visually inspect battery connector
• If dirty or oxidized – Clean
• If damaged – Send to an electrical
repair location
Unit will not Power
On
Visually inspect the power key for debris
or damage
• If dirty – Clean
• If damaged – Replace the power key
Trouble Shooting Guide, Mechanical
4/000 21-1/FEA 209 544/594 A
Company Internal
©
Sony Ericsson Mobile Communications AB
5(28)
Problem Area
Items to Check
Repair Action
Reference Image
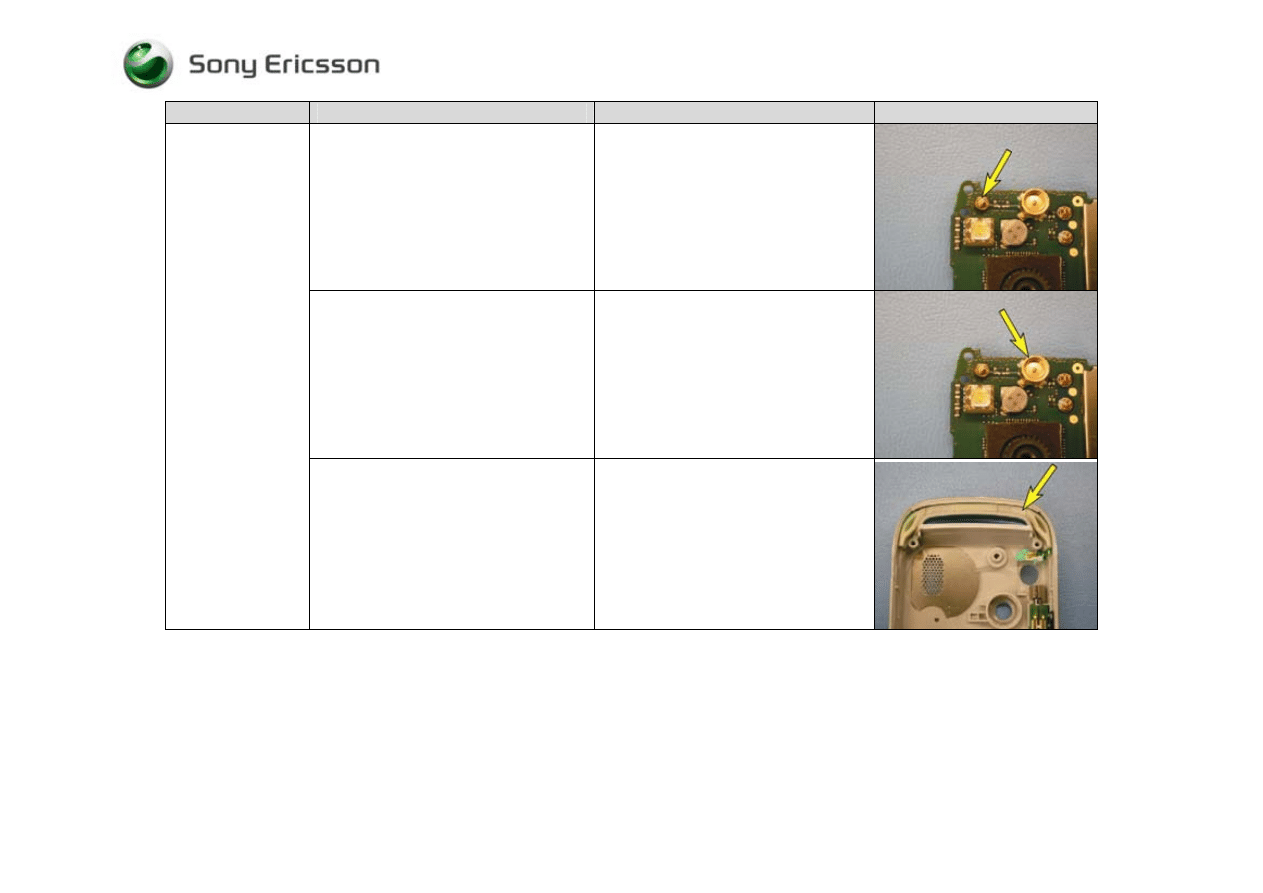
Visually inspect the power switch
portion of the display flex film
• If dirty – Clean the power switch
• If damaged – Replace the display
flex film
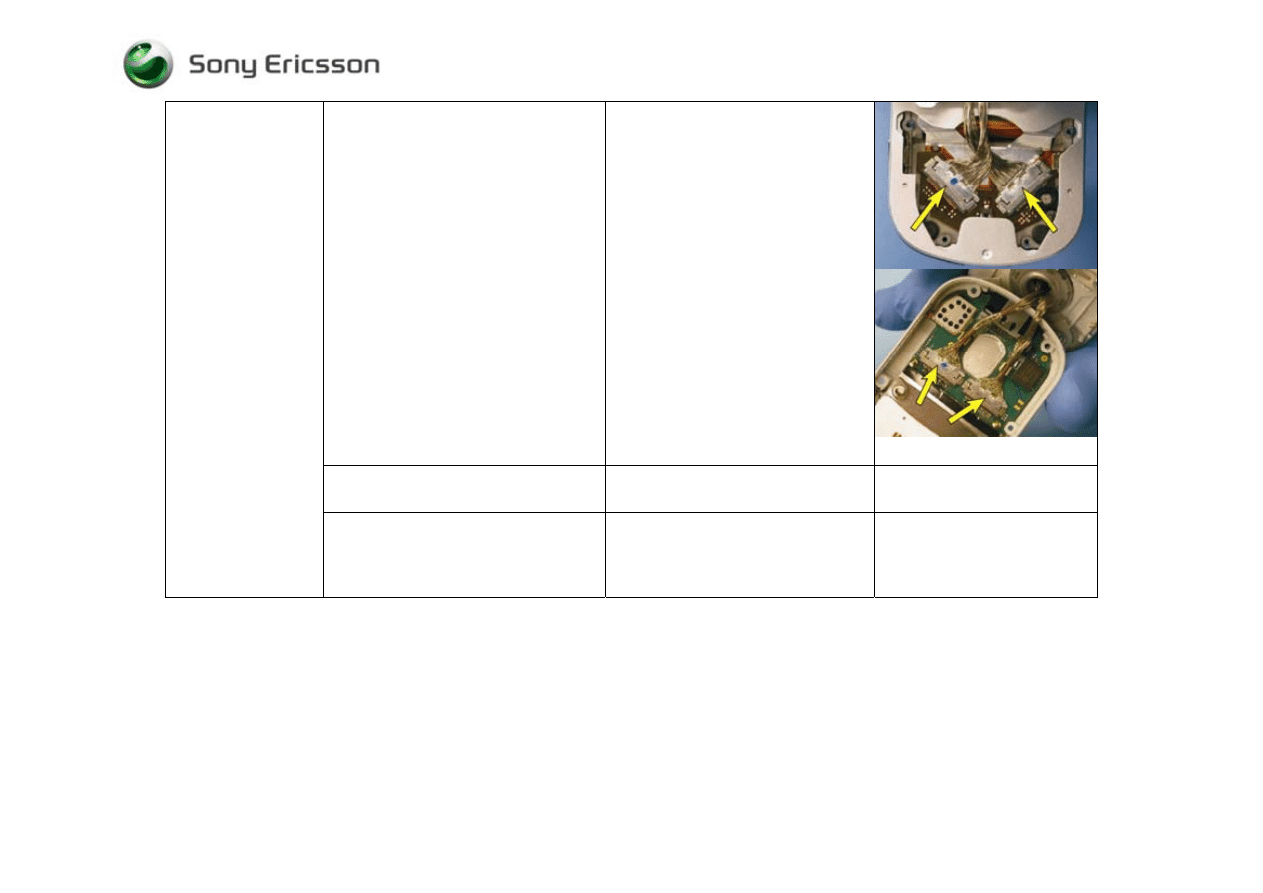
Visually inspect the cable assemblies and
their mating connectors on the display
flex film and the circuit board
• If any of the four cable connections
are improperly connected -
Reestablish a proper connection
• If any portion of the four cable
connections are dirty - Replace both
cables and clean the mating portions
of the cable connections that are on
the display flex film and the circuit
board
• If a cable assembly is damaged –
Replace both cable assemblies
• If a cable connector on the display
flex film is damaged – Replace the
display flex film
• If a cable connector on the circuit
board is damaged – Send to an
electrical repair location
Unit will not Power
On (Cont.)
If the issue has not been resolved!
• Replace the power key, the display
flex film, and both cable assemblies,
if they have not already been
replaced
Trouble Shooting Guide, Mechanical
4/000 21-1/FEA 209 544/594 A
Company Internal
©
Sony Ericsson Mobile Communications AB
6(28)
4 Audio Problems
Problem Area
Items to Check
Repair Action
Reference Image
Before proceeding !
• Perform a setting reset
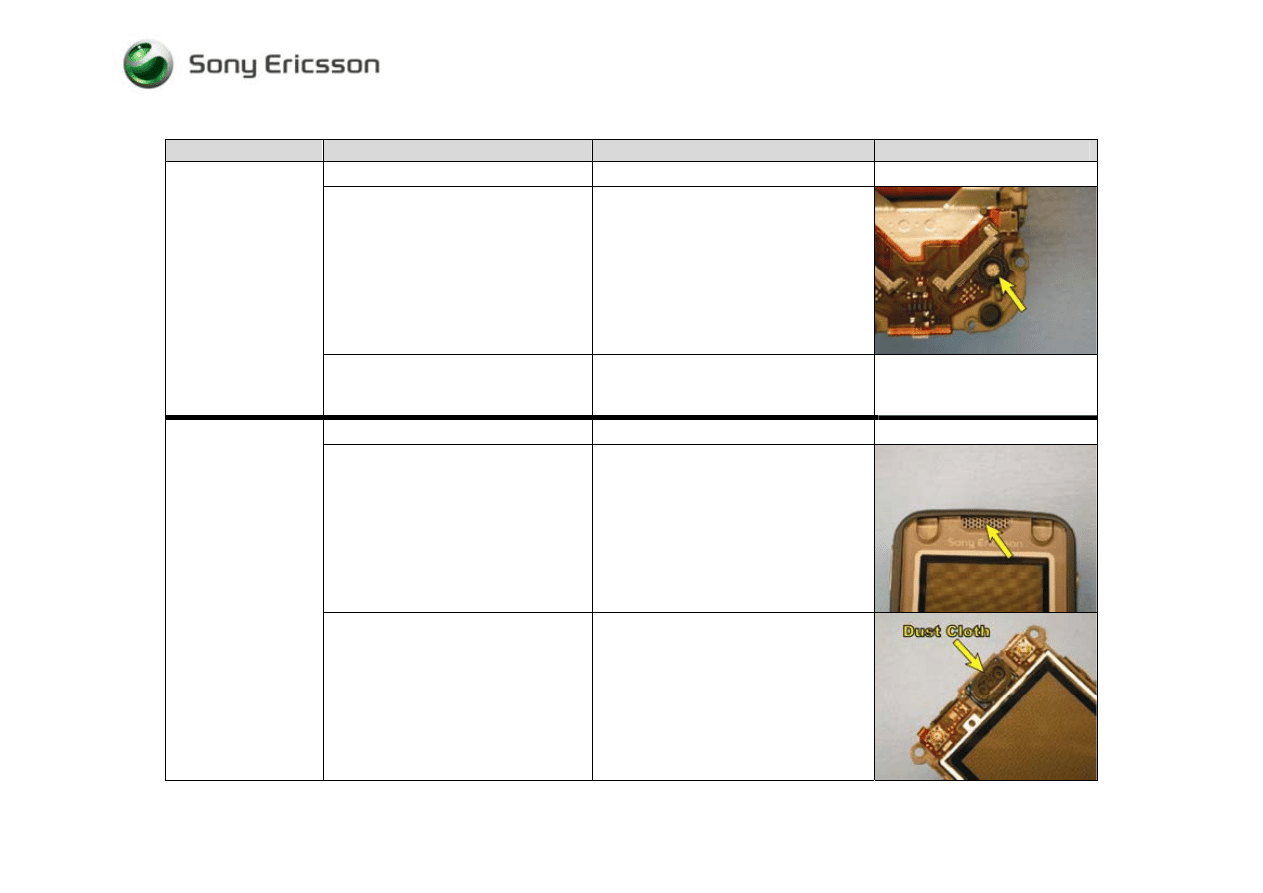
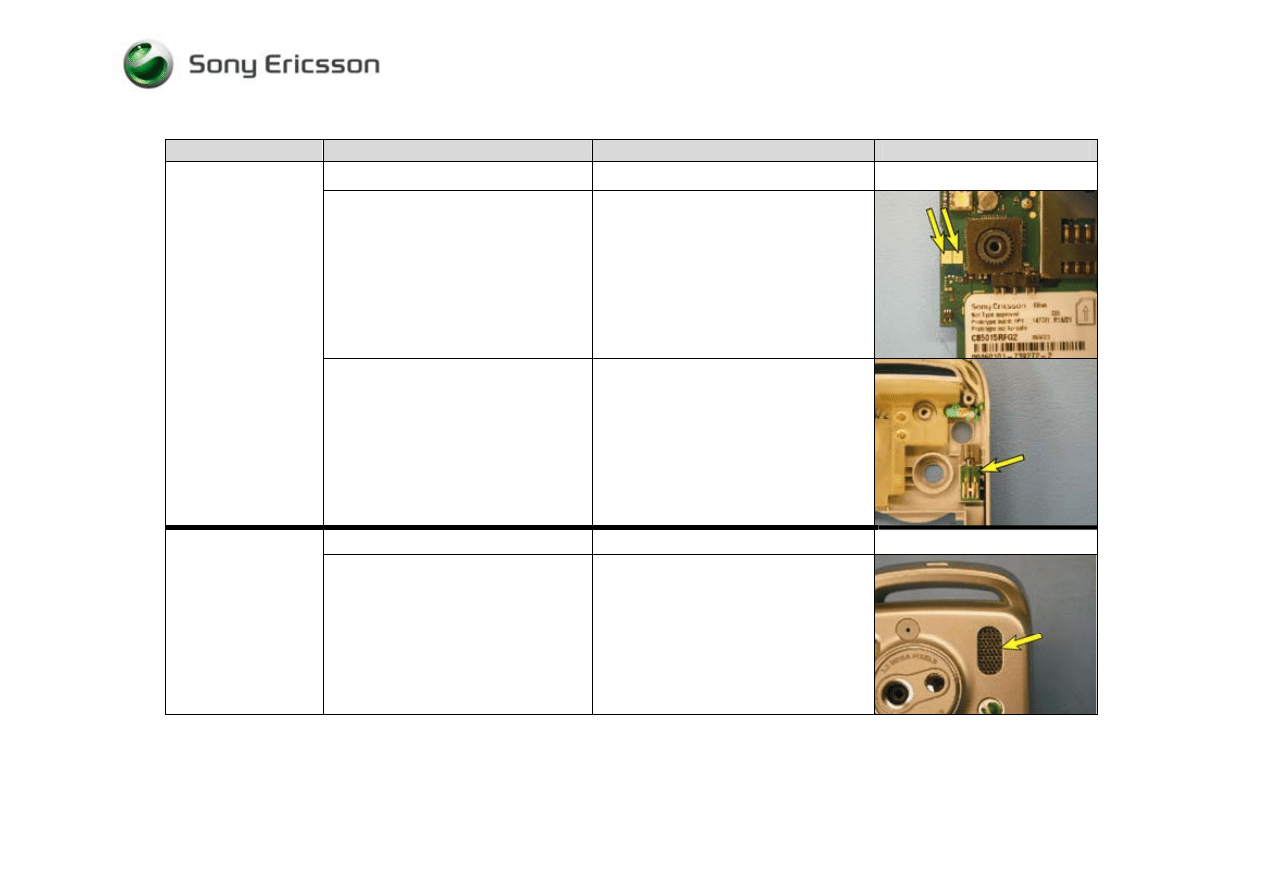
Visually inspect microphone assembly
• If the microphone is dirty – Clean
• If the microphone grommet is
damaged or deformed - Replace the
microphone grommet
• If the microphone is damaged –
Replace the display flex film
Microphone:
If the issue has not been resolved !
• Replace the display flex film and the
microphone grommet, if they have
not been replaced
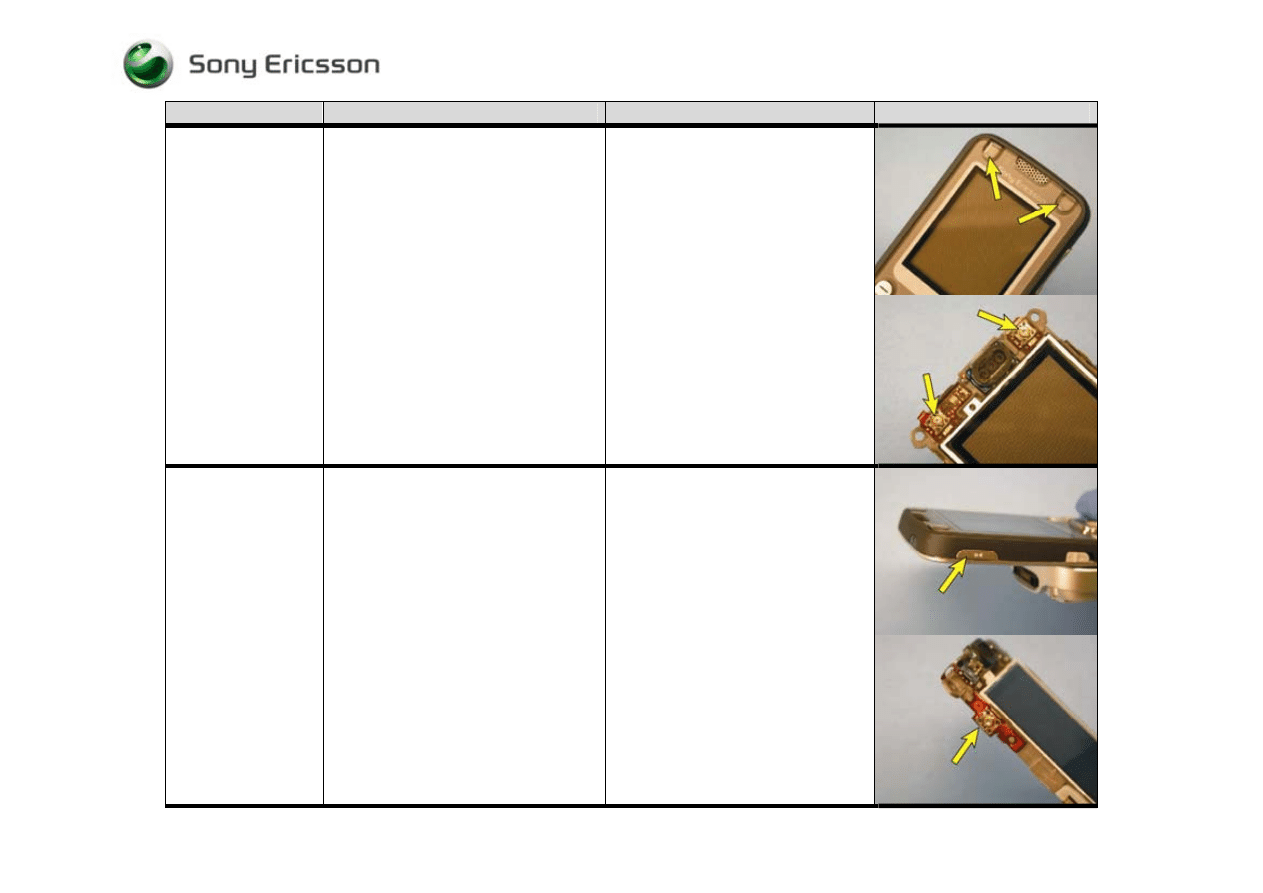
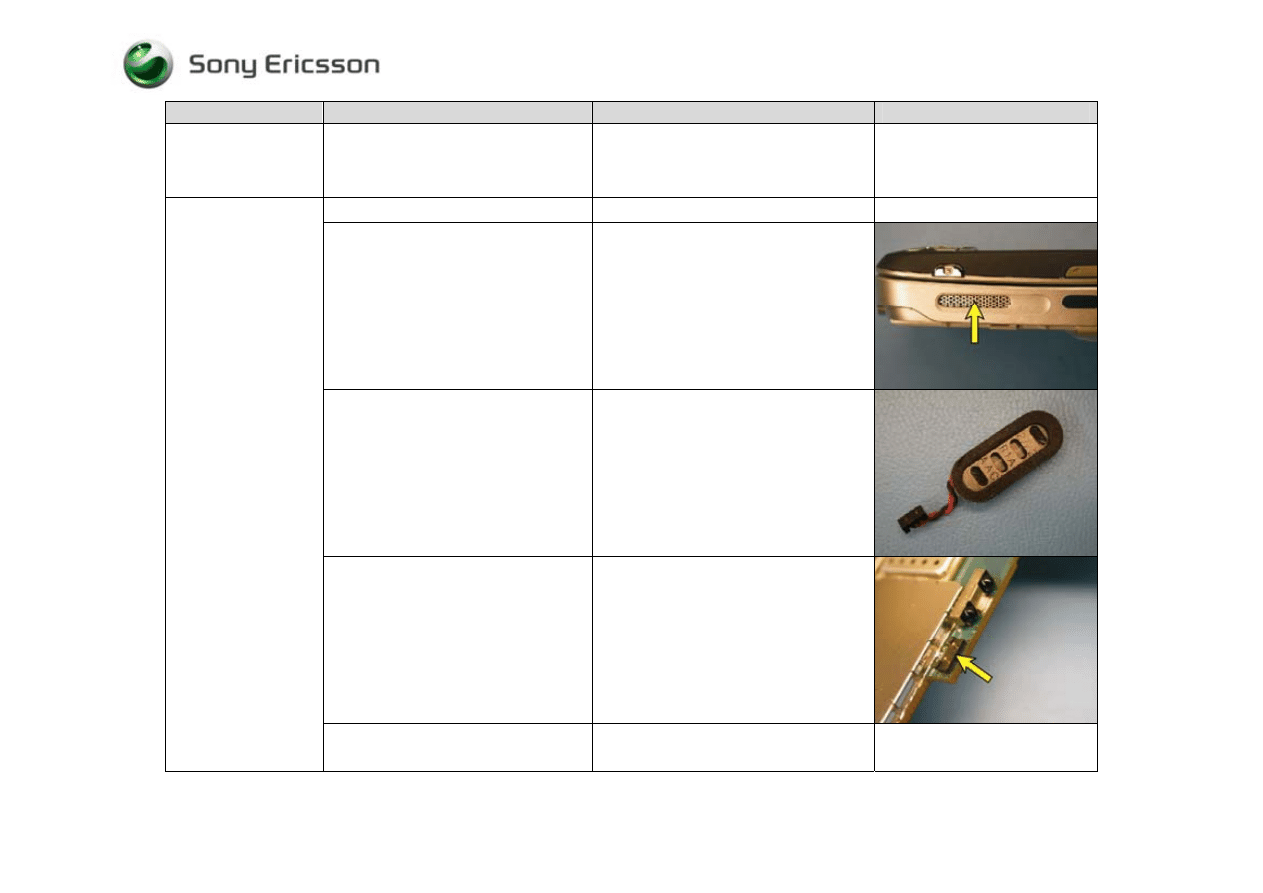
Before proceeding !
• Perform a setting reset
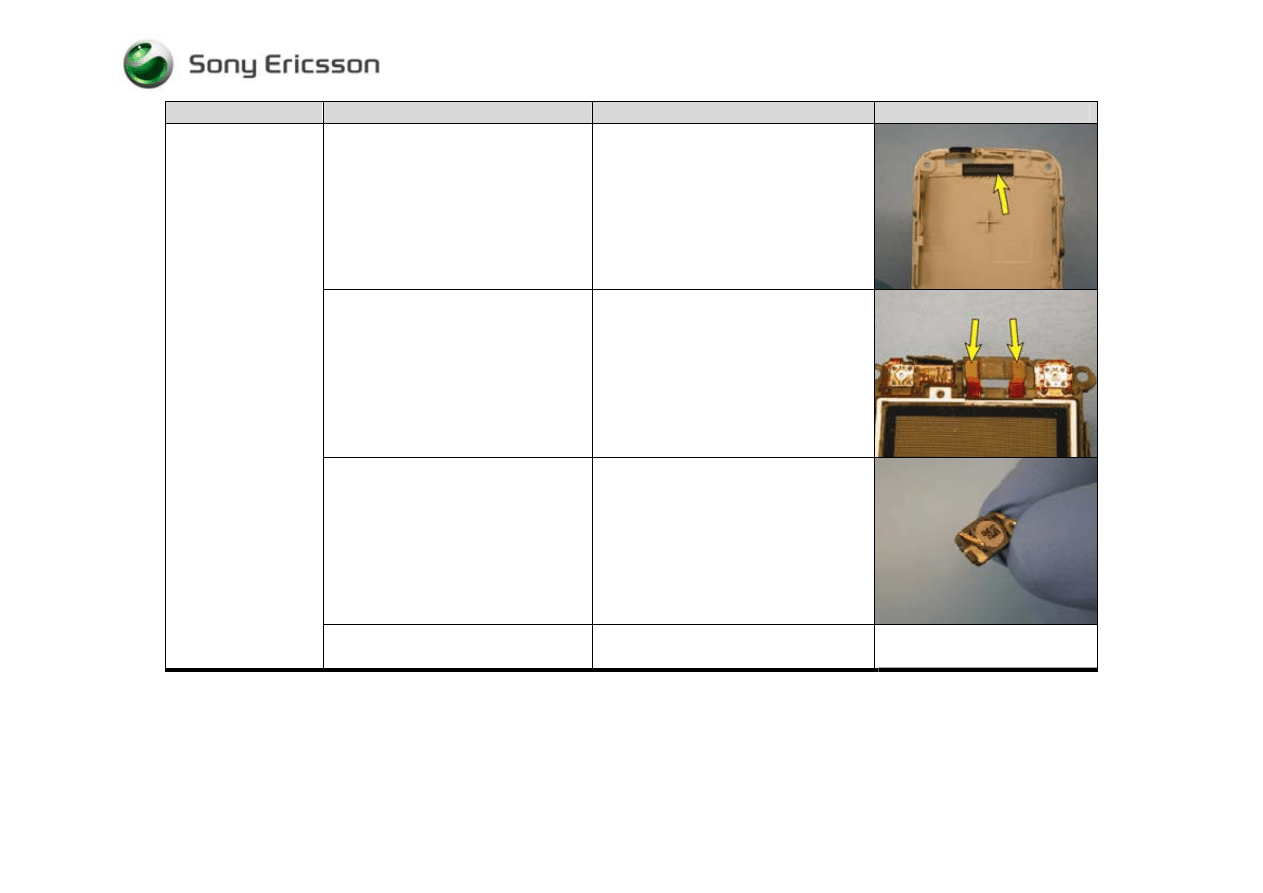
Visually inspect the receiver’s external
port
• If clogged – Clean the port or
replace the display cover as
necessary
Receiver:
No sound or poor
quality sound
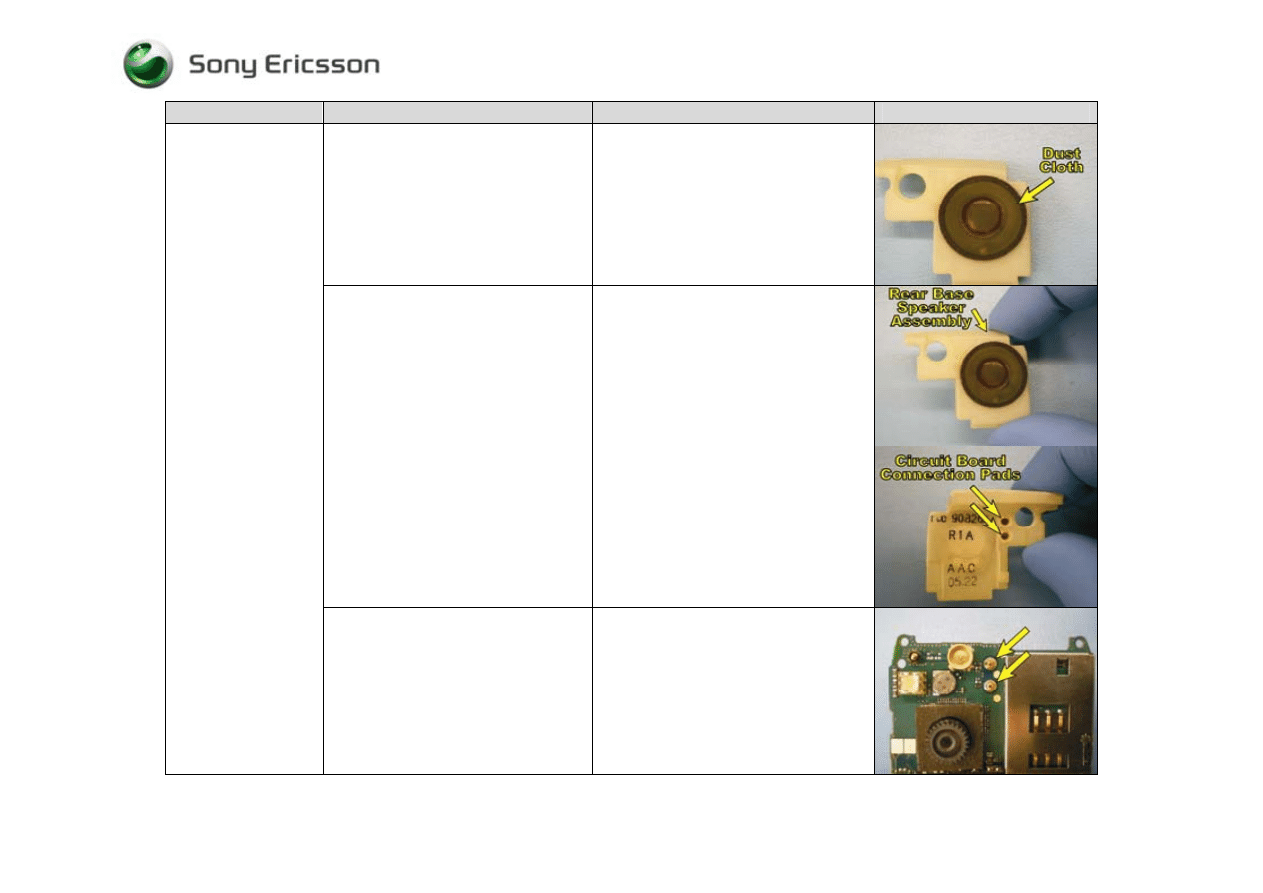
Visually inspect the dust cloth that is
adhered to the receiver
• If clogged – Replace the receiver
Trouble Shooting Guide, Mechanical
4/000 21-1/FEA 209 544/594 A
Company Internal
©
Sony Ericsson Mobile Communications AB
7(28)
Problem Area
Items to Check
Repair Action
Reference Image
Visually inspect the receiver’s dust
cloth that is adhered to the inner flip
cover
• If clogged – Replace the dust cloth
Visually inspect the receiver’s contact
pads on the display flex film
• If dirty - Clean the pads
• If damaged – Replace the display
flex film
Visually inspect the receiver
• If dirty or damaged - Replace
Receiver:
No sound or poor
quality sound (Cont.)
If the issue has not been resolved !
• Replace the receiver, if it has not
been replaced
Trouble Shooting Guide, Mechanical
4/000 21-1/FEA 209 544/594 A
Company Internal
©
Sony Ericsson Mobile Communications AB
8(28)
Before proceeding !
• Perform a setting reset
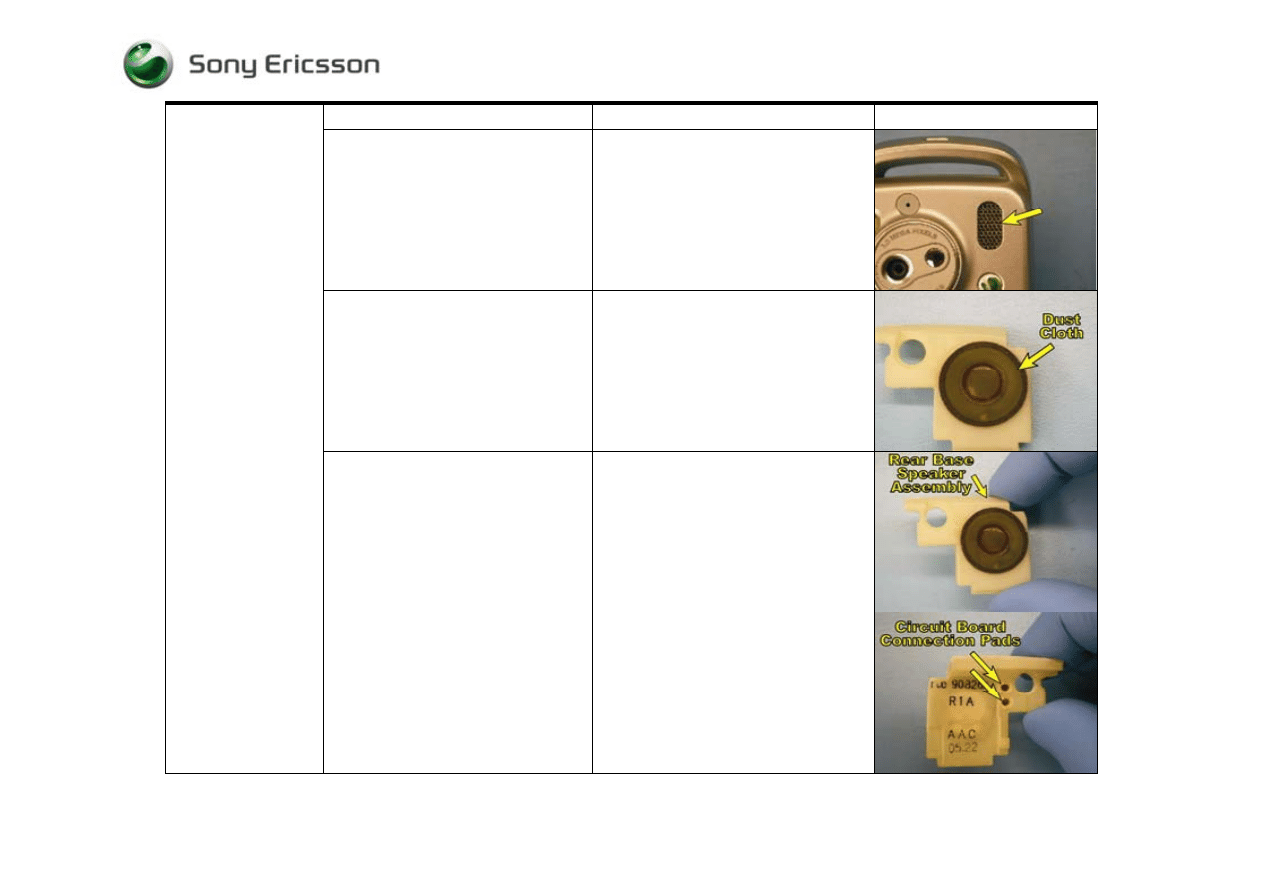
Visually inspect whether the rear base
speaker’s external port is clogged
• If clogged – clean the speaker port
opening in outer base cover
Visually inspect the rear base speaker
assembly’s dust cloth
• If dirty or damaged - Replace the
dust cloth
Rear Base Speaker:
No sound or poor
quality sound
Visually inspect the rear base speaker
assembly (including its circuit board
connection pads)
• If dirty or damaged – Replace the
rear base speaker assembly
Trouble Shooting Guide, Mechanical
4/000 21-1/FEA 209 544/594 A
Company Internal
©
Sony Ericsson Mobile Communications AB
9(28)
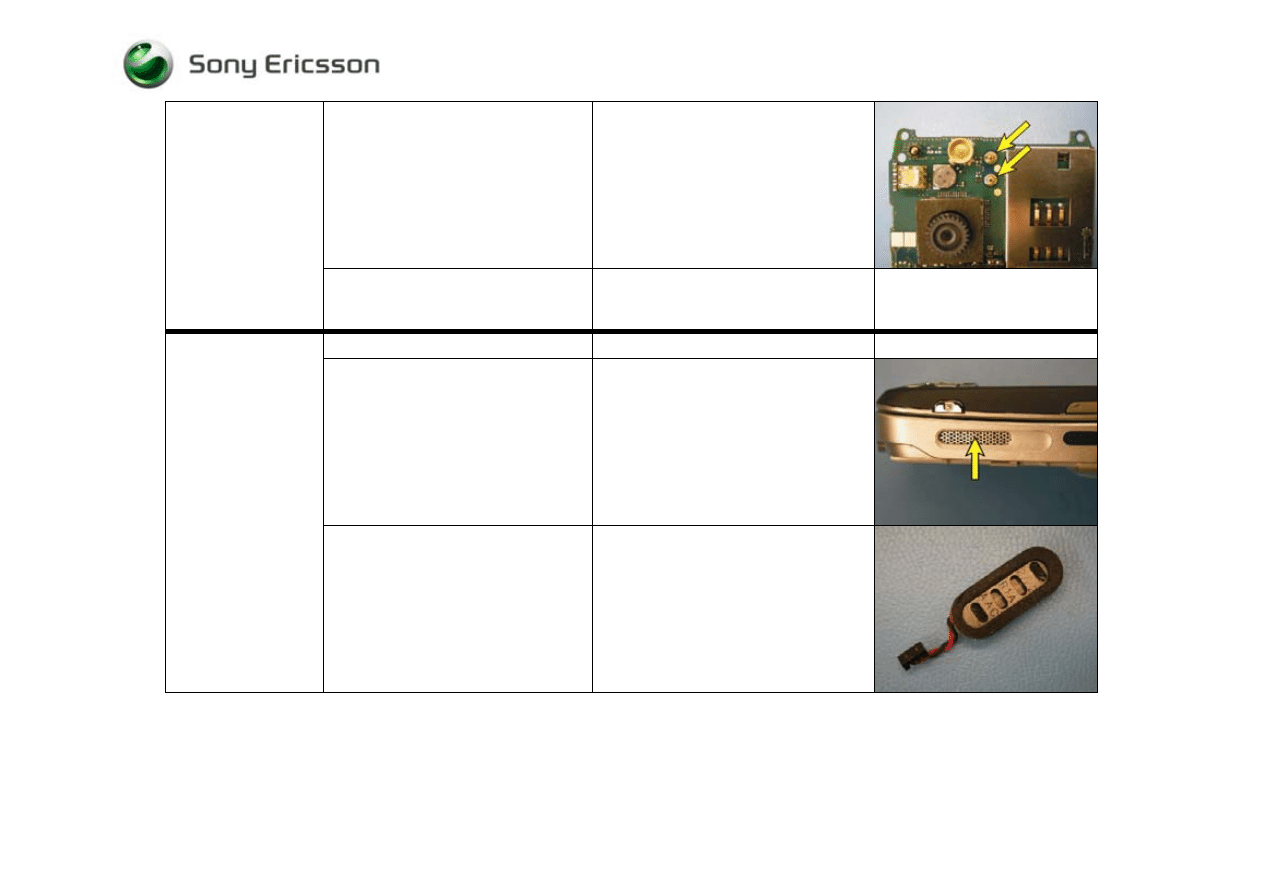
Visually inspect the rear base speaker
connection springs on the circuit board
• If dirty or oxidized – Clean both
springs and their corresponding
connection pads
• If damaged – Send to an electrical
repair location
Rear Base Speaker:
No sound or poor
quality sound (Cont.)
If the issue has not been resolved !
• Replace the rear base speaker
assembly, if it has not already been
replaced
Before proceeding !
• Perform a setting reset
Visually inspect whether the side base
speaker’s external port is clogged
• If clogged – clean its speaker port
opening in outer base cover
Side Base Speaker:
No sound or poor
quality sound
Visually inspect side base speaker
(including the wire connection
extending from it and its dust cloth)
• If dirty –Replace the side base
speaker and clean the connector on
the circuit board
• If damaged - Replace the side base
speaker
Trouble Shooting Guide, Mechanical
4/000 21-1/FEA 209 544/594 A
Company Internal
©
Sony Ericsson Mobile Communications AB
10(28)
Visually inspect the side base speaker
connector on the circuit board
• If dirty – Clean the connector on the
circuit board and replace the side
base speaker
• If damaged – Send to an electrical
repair location
Side Base Speaker:
No sound or poor
quality sound (Cont.)
If the issue has not been resolved !
• Replace the side base speaker, if it
has not already been replaced
5 Key Problems
Problem Area
Items to Check
Repair Action
Reference Image
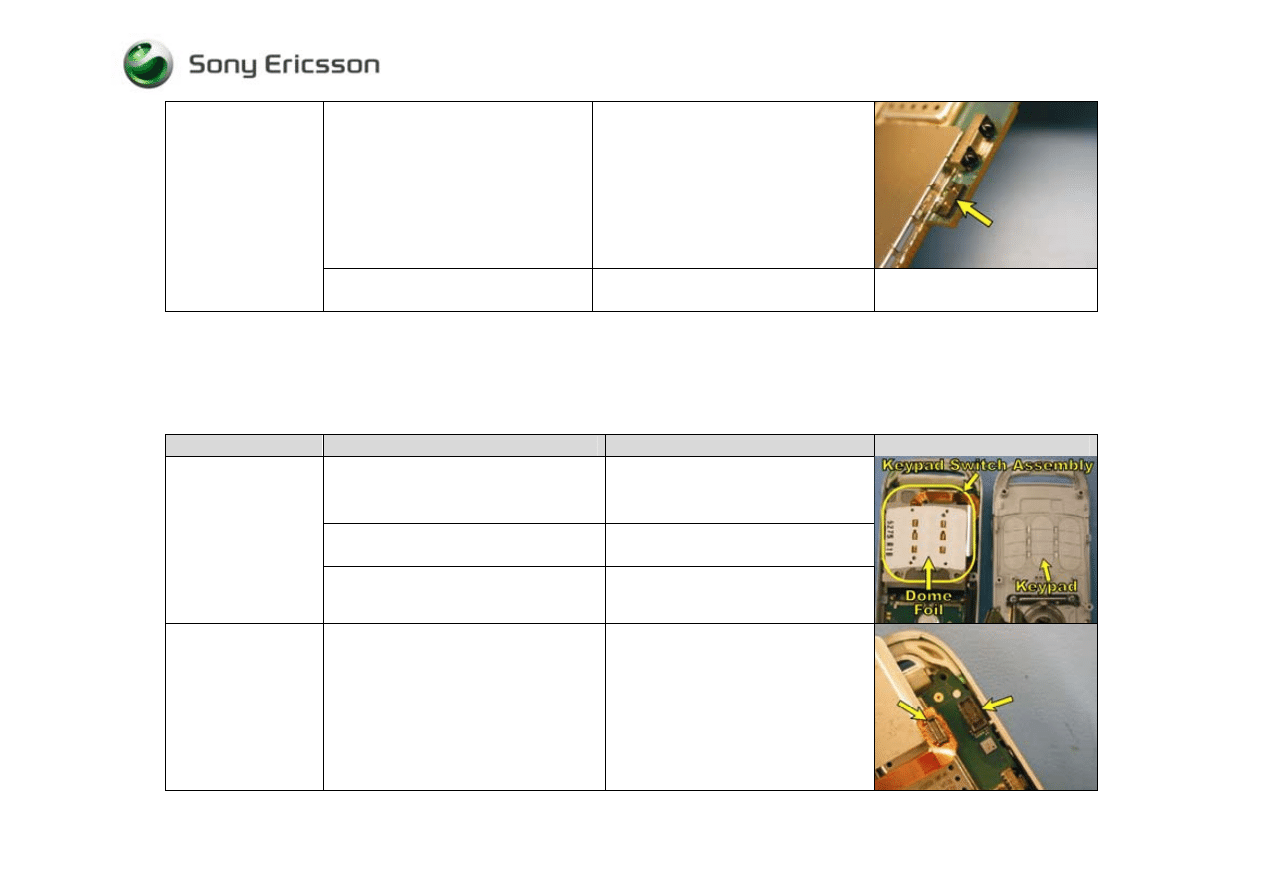
Visually inspect for debris between
and/or damage to the keypad and the
dome foil.
• If dirty – Clean both parts
• If damaged - Replace the keypad
and/or the dome foil as necessary
If the issue has not been resolved !
• Replace the dome foil, if it has not
already been replaced
Base Keypad:
A key on the keypad
is not functioning or
is intermittent
If the issue still has not been resolved !
• Replace the keypad switch
assembly
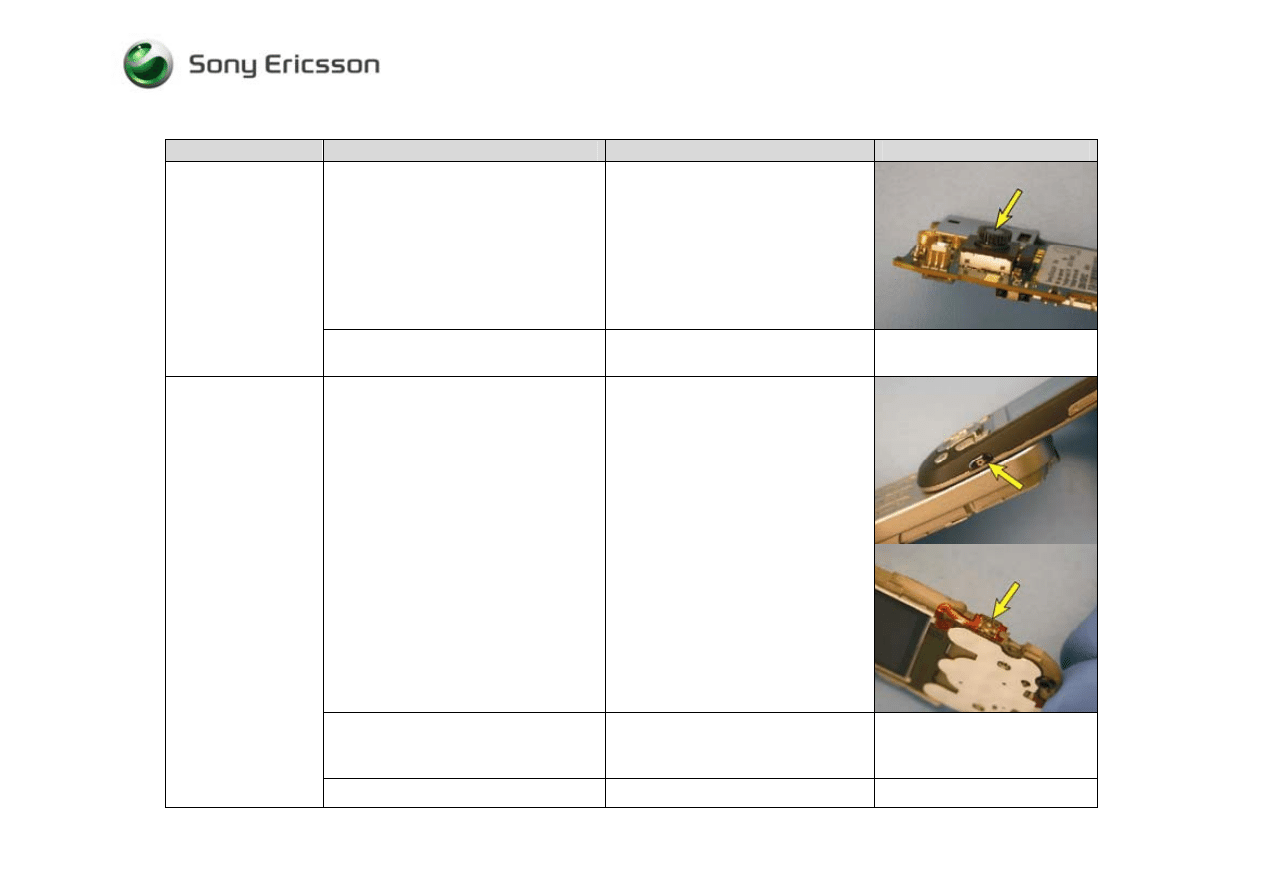
Base Keypad:
Entire keypad is not
functioning or is
intermittent
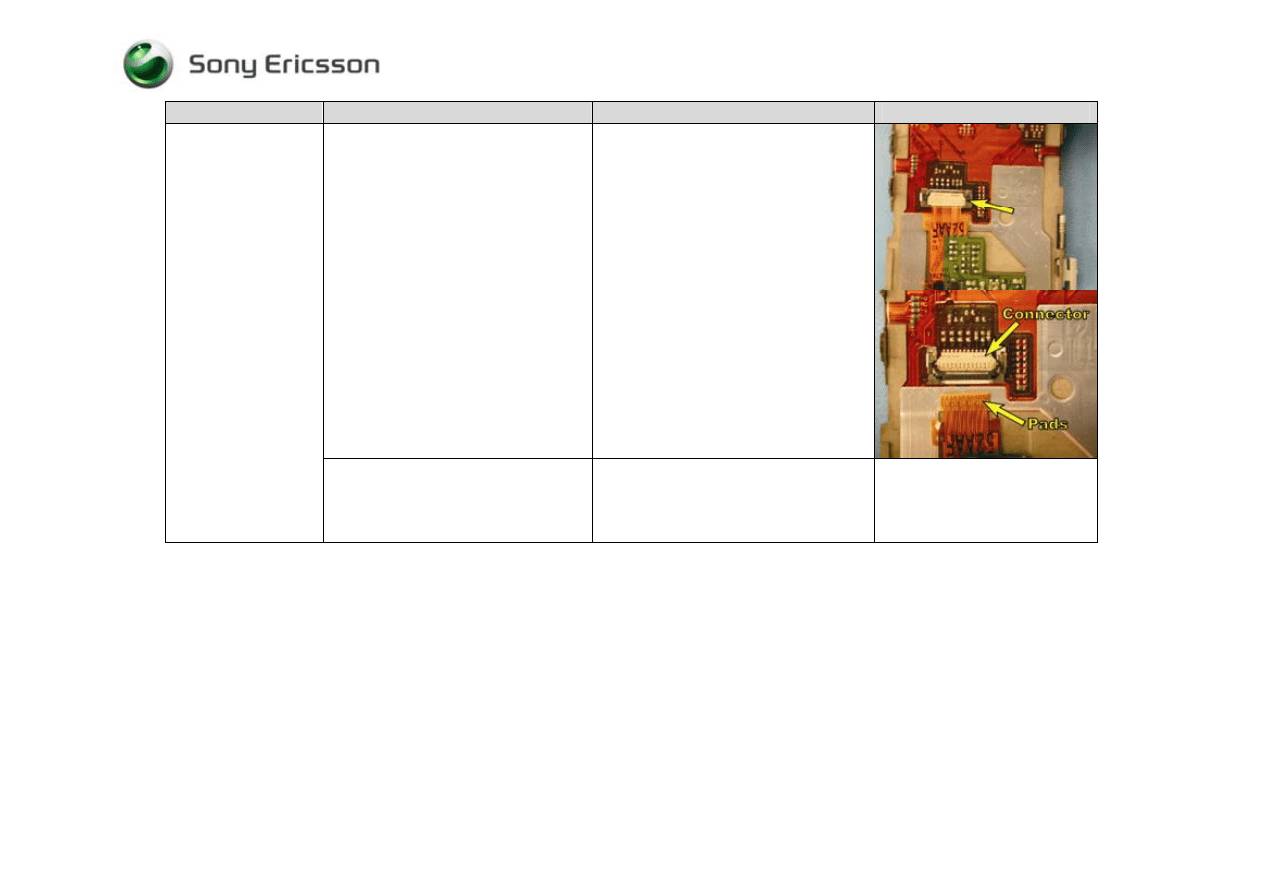
Visually inspect the keypad switch
assembly’s board connection
• If improperly connected –
Reestablish a proper connection
• If the flex film portion of the
connector is damaged – Replace
the keypad switch assembly
• If the circuit board portion of the
connection is damaged – Send to
an electrical repair location
Trouble Shooting Guide, Mechanical
4/000 21-1/FEA 209 544/594 A
Company Internal
©
Sony Ericsson Mobile Communications AB
11(28)
Problem Area
Items to Check
Repair Action
Reference Image
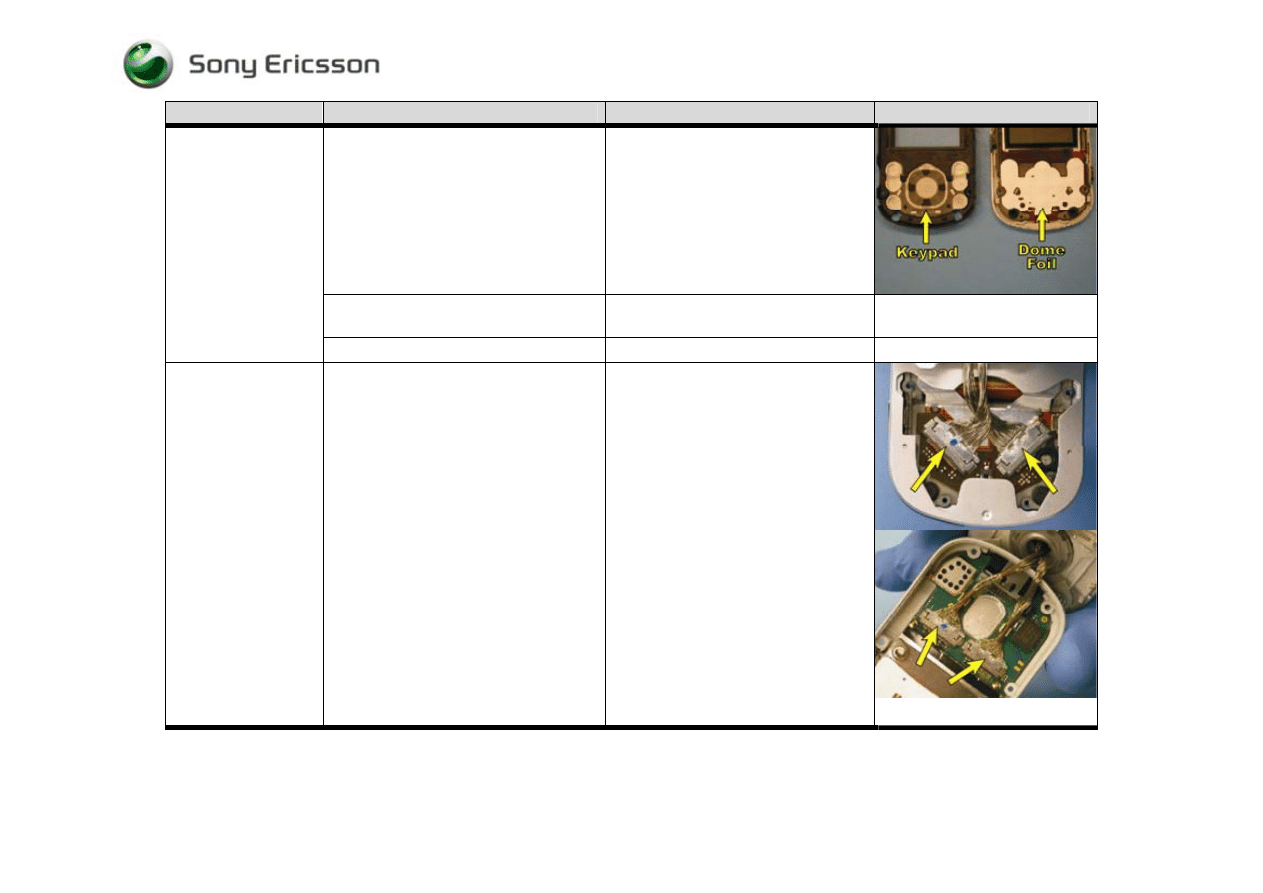
Visually inspect for debris between
and/or damage to the flip keypad and its
dome foil.
• If dirty – Clean both parts
• If damaged - Replace the flip
keypad and/or the dome foil as
necessary
If the issue has not been resolved !
• Replace the flip dome foil, if it has
not already been replaced
Flip Keypad:
One of the keys
around the navigation
key or a portion of
the navigation key is
not functioning or is
intermittent
If the issue still has not been resolved !
• Replace the display flex film
Flip Keypad:
The navigation key
and all of the keys
around the navigation
key are not
functioning
Visually inspect the cable assemblies
and their mating connectors on the
display flex film and the circuit board
• If any of the four cable connections
are improperly connected -
Reestablish a proper connection
• If any portion of the four cable
connections are dirty - Replace
both cables and clean the mating
portions of the cable connections
that are on the display flex film and
the circuit board
• If a cable assembly is damaged –
Replace both cable assemblies
• If a cable connector on the display
flex film is damaged – Replace the
display flex film
• If a cable connector on the circuit
board is damaged – Send to an
electrical repair location
Trouble Shooting Guide, Mechanical
4/000 21-1/FEA 209 544/594 A
Company Internal
©
Sony Ericsson Mobile Communications AB
12(28)
Problem Area
Items to Check
Repair Action
Reference Image
Gaming keys:
Visually inspect for debris between
and/or damage to the gaming key in
question and its switch.
• If dirty – Clean both the key and
its switch
• If the key is damaged – Replace it
• If the switch is damaged – Replace
the display flex film
Music Player Key:
Visually inspect for debris between
and/or damage to the
music player
key
and its switch.
• If dirty – Clean both the key and
its switch
• If the key is damaged – Replace it
• If the switch is damaged – Replace
the display flex film

Trouble Shooting Guide, Mechanical
4/000 21-1/FEA 209 544/594 A
Company Internal
©
Sony Ericsson Mobile Communications AB
13(28)
Problem Area
Items to Check
Repair Action
Reference Image
Volume keys:
Visually inspect for debris between
and/or damage to the volume key and the
volume key switches.
• If dirty – Clean both the volume
key and its switches
• If the volume key is damaged –
Replace it
• If one or both of the volume key’s
switches are damaged - Replace
the display flex film
Camera key:
Visually inspect for debris between
and/or damage to the camera key and its
switch.
• If dirty - Clean both the key and its
switch
• If the key is damaged – Replace it
• If the switch is damaged – Replace
the display flex film
Trouble Shooting Guide, Mechanical
4/000 21-1/FEA 209 544/594 A
Company Internal
©
Sony Ericsson Mobile Communications AB
14(28)
Problem Area
Items to Check
Repair Action
Reference Image
Check the positioning and the condition
of the keypad lock key
Reposition or replace the keypad lock
key as necessary
Keypad Lock Key:
Inspect the keypad lock key’s switch
If dirty - Clean
If damaged - Replace the display flex
film
6 SIM Problems
Problem Area
Items to Check
Repair Action
Reference Image
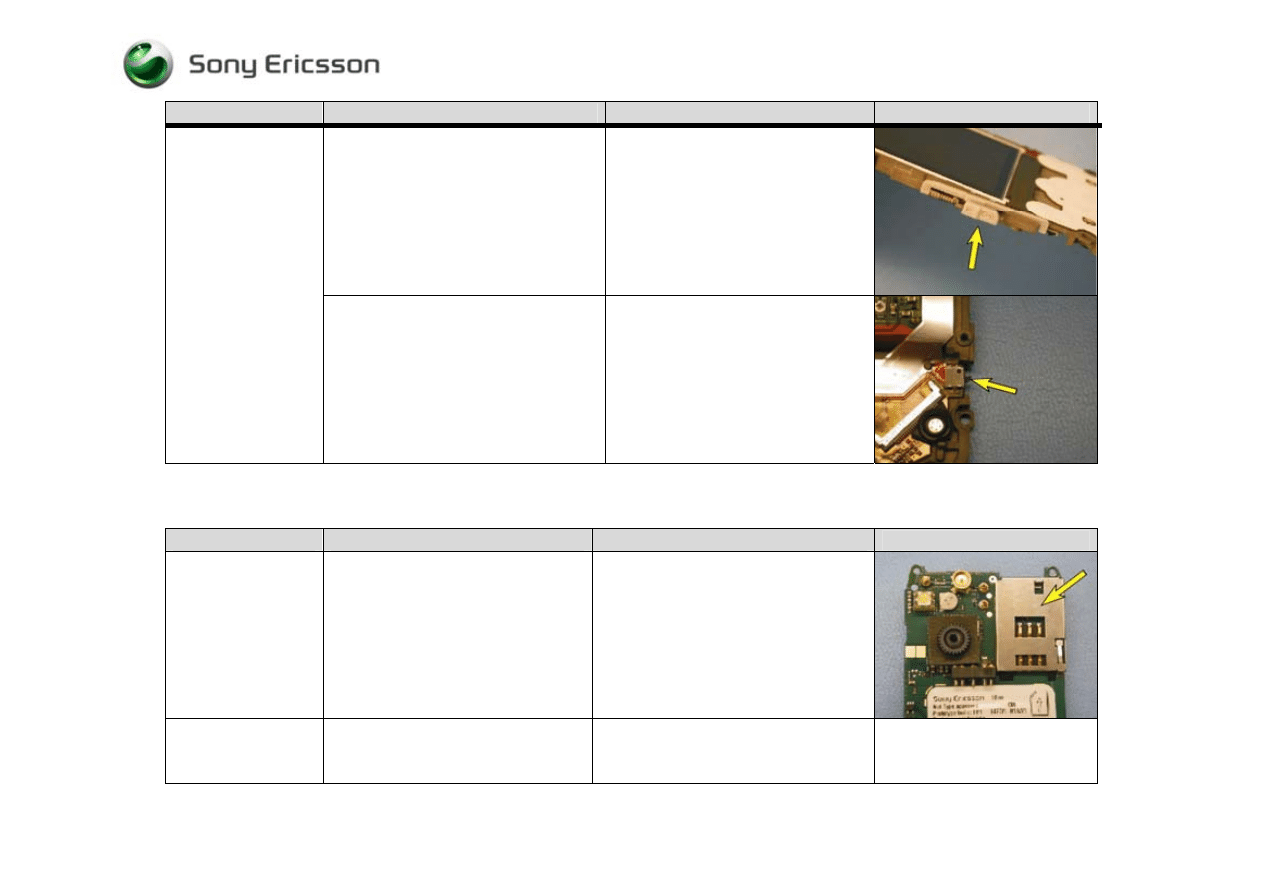
SIM undetected
Inspect SIM holder
• If dirty or oxidized – Clean
• If damaged – Send to an electrical
repair location
Unit indicates the
incorrect SIM is
inserted
Check whether the phone is locked to a
particular carrier and whether the
correct carrier’s SIM is being used
• Use the correct carrier’s SIM or a
test SIM

Trouble Shooting Guide, Mechanical
4/000 21-1/FEA 209 544/594 A
Company Internal
©
Sony Ericsson Mobile Communications AB
15(28)
7 IR Problems
Problem Area
Items to Check
Repair Action
Reference Image
Inspect the IR window for dirt,
scratches, and damage
• If dirty – Clean
• If damaged – Replace the outer base
cover
Will not connect with
a functional IR
device
Inspect the IR transceiver
• If dirty – Clean
• If damaged - Send to an electrical
repair location
8 Hands-Free Problems
Problem Area
Items to Check
Repair Action
Reference Image
Hands-free not
working
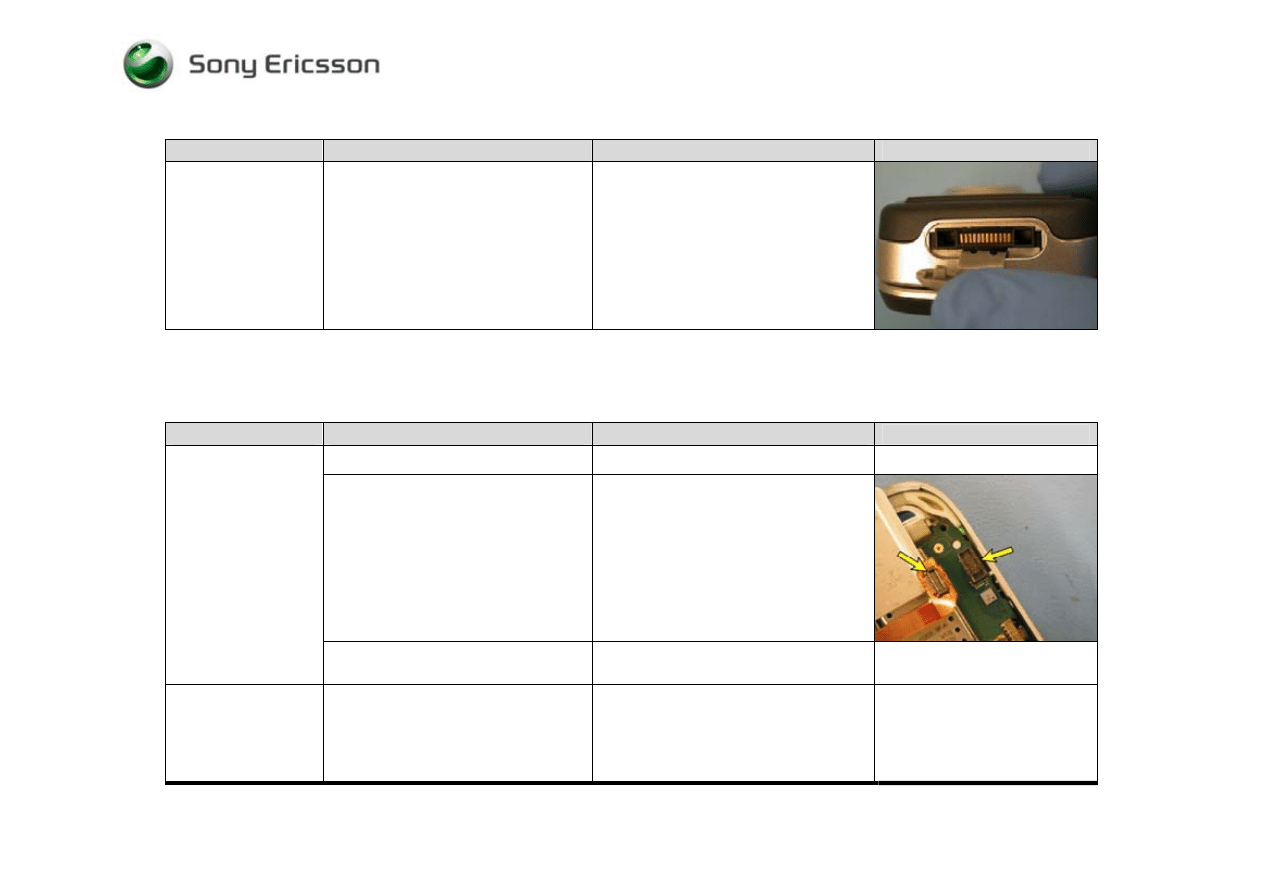
Visually inspect the system connector
• If dirty or oxidized – Replace the
system connector
• If damaged – Replace the system
connector
Trouble Shooting Guide, Mechanical
4/000 21-1/FEA 209 544/594 A
Company Internal
©
Sony Ericsson Mobile Communications AB
16(28)
9 Display Problems
Problem Area
Items to Check
Repair Action
Reference Image
With the phone in the open position,
check whether the base keypad
illuminates 5 to 10 seconds after
pressing the power key
• If illumination of the keypad is not
detected, refer to the “Power
Problems” section
If the display is not
functioning
Visually inspect the cable assemblies
and their mating connectors on the
display flex film and the circuit board
• If any of the four cable connections
are improperly connected -
Reestablish a proper connection
• If any portion of the four cable
connections are dirty - Replace both
cables and clean the mating portions
of the cable connections that are on
the display flex film and the circuit
board
• If a cable assembly is damaged –
Replace both cable assemblies
• If a cable connector on the display
flex film is damaged – Replace the
display flex film
• If a cable connector on the circuit
board is damaged – Send to an
electrical repair location
Trouble Shooting Guide, Mechanical
4/000 21-1/FEA 209 544/594 A
Company Internal
©
Sony Ericsson Mobile Communications AB
17(28)
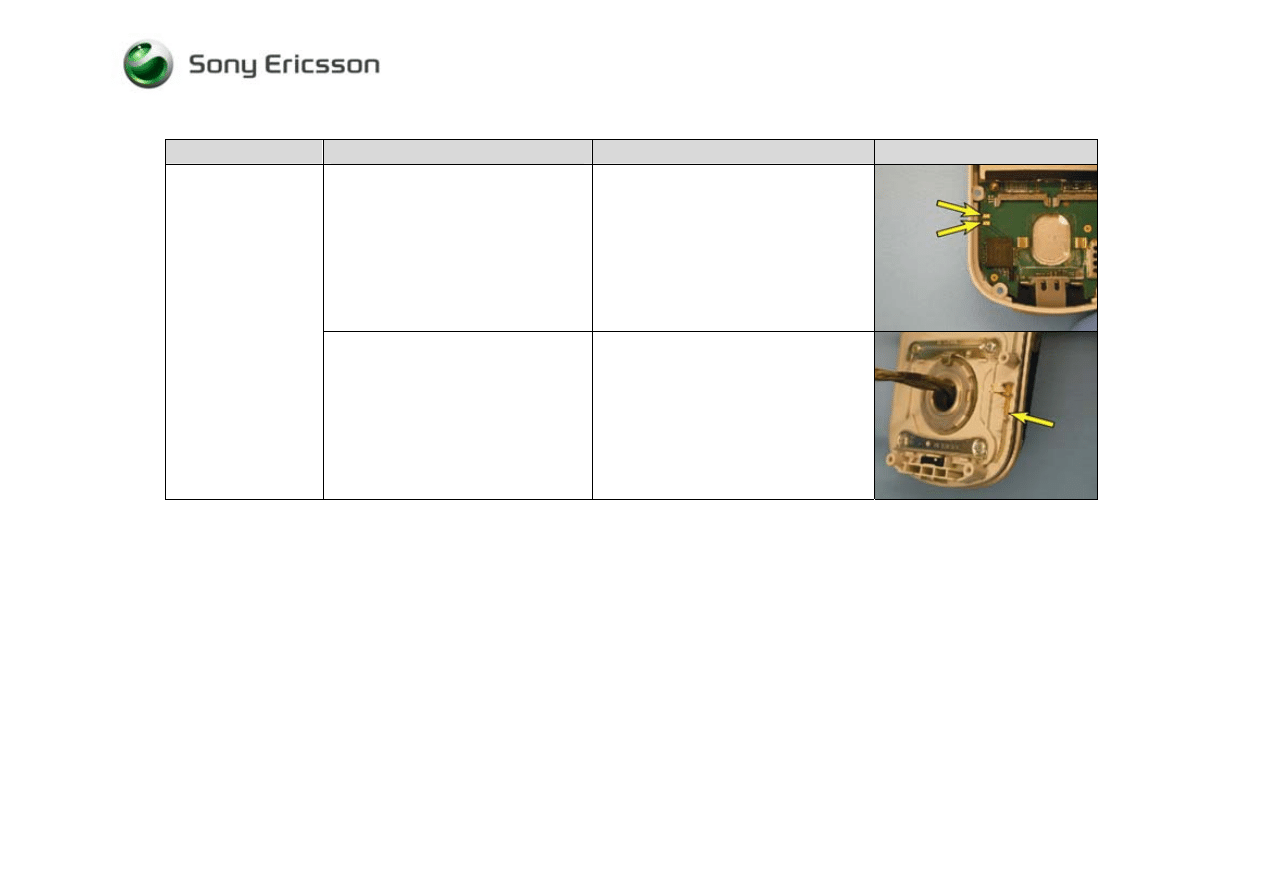
Problem Area
Items to Check
Repair Action
Reference Image
Visually inspect the LCD to display
flex film connection
• If improperly connected -
Reestablish a proper connection
• If dirty or oxidized – Clean ( If it is
determined that cleaning is needed,
clean all pads and contacts that are
part of this connection)
• If pads of the LCD module’s flex
film are damaged - replace LCD
module
• If the LCD connector on the display
flex film is damaged - Replace the
display flex film
If the display is not
functioning (Cont.)
If issue has not been resolved !
• Replace any of the following
components that have not been
replaced - LCD module, display flex
assembly, cable assemblies
Trouble Shooting Guide, Mechanical
4/000 21-1/FEA 209 544/594 A
Company Internal
©
Sony Ericsson Mobile Communications AB
18(28)
10 Data Communication Problems
Problem Area
Items to Check
Repair Action
Reference Image
Problem transferring
data using a direct
connection
Visually inspect the system connector
• If dirty or oxidized – Replace the
system connector
• If damaged – Replace the system
connector
11 Illumination Problems
Problem Area
Items to Check
Repair Action
Reference Image
Before proceeding !
• Perform a setting reset
Visually inspect the keypad switch
assembly’s board connection
• If improperly connected -
Reestablish a proper connection
• If the flex film portion of the
connector is damaged – Replace the
keypad switch assembly
• If the circuit board portion of the
connection is damaged – Send to an
electrical repair location
Base Keypad:
The entire keypad is
not illuminating
If the issue has not been resolved !
• Replace the keypad switch assembly,
if it has not been replaced
Base Keypad:
A portion of the
keypad is not
illuminating
Perform the following action !
• Replace the keypad switch assembly
Trouble Shooting Guide, Mechanical
4/000 21-1/FEA 209 544/594 A
Company Internal
©
Sony Ericsson Mobile Communications AB
19(28)
Before proceeding !
• Perform a setting reset
Visually inspect the cable assemblies
and their mating connectors on the
display flex film and the circuit board
• If any of the four cable connections
are improperly connected -
Reestablish a proper connection
• If any portion of the four cable
connections are dirty - Replace both
cables and clean the mating portions
of the cable connections that are on
the display flex film and the circuit
board
• If a cable assembly is damaged –
Replace both cable assemblies
• If a cable connector on the display
flex film is damaged – Replace the
display flex film
• If a cable connector on the circuit
board is damaged – Send to an
electrical repair location
Flip Keypad
(Navigation
Keypad):
The entire keypad is
not illuminating
If the issue has not been resolved !
• Replace the display flex film, if it
has not been replaced
Flip Keypad:
A portion of the
keypad is not
illuminating
Perform the following action !
• Replace the display flex film
assembly
Gaming Key:
A gaming key is not
illuminating
Perform the following action !
• Replace the display flex film
assembly
Trouble Shooting Guide, Mechanical
4/000 21-1/FEA 209 544/594 A
Company Internal
©
Sony Ericsson Mobile Communications AB
20(28)
Before proceeding !
• Perform a setting reset
Display:
The display is not
illuminating
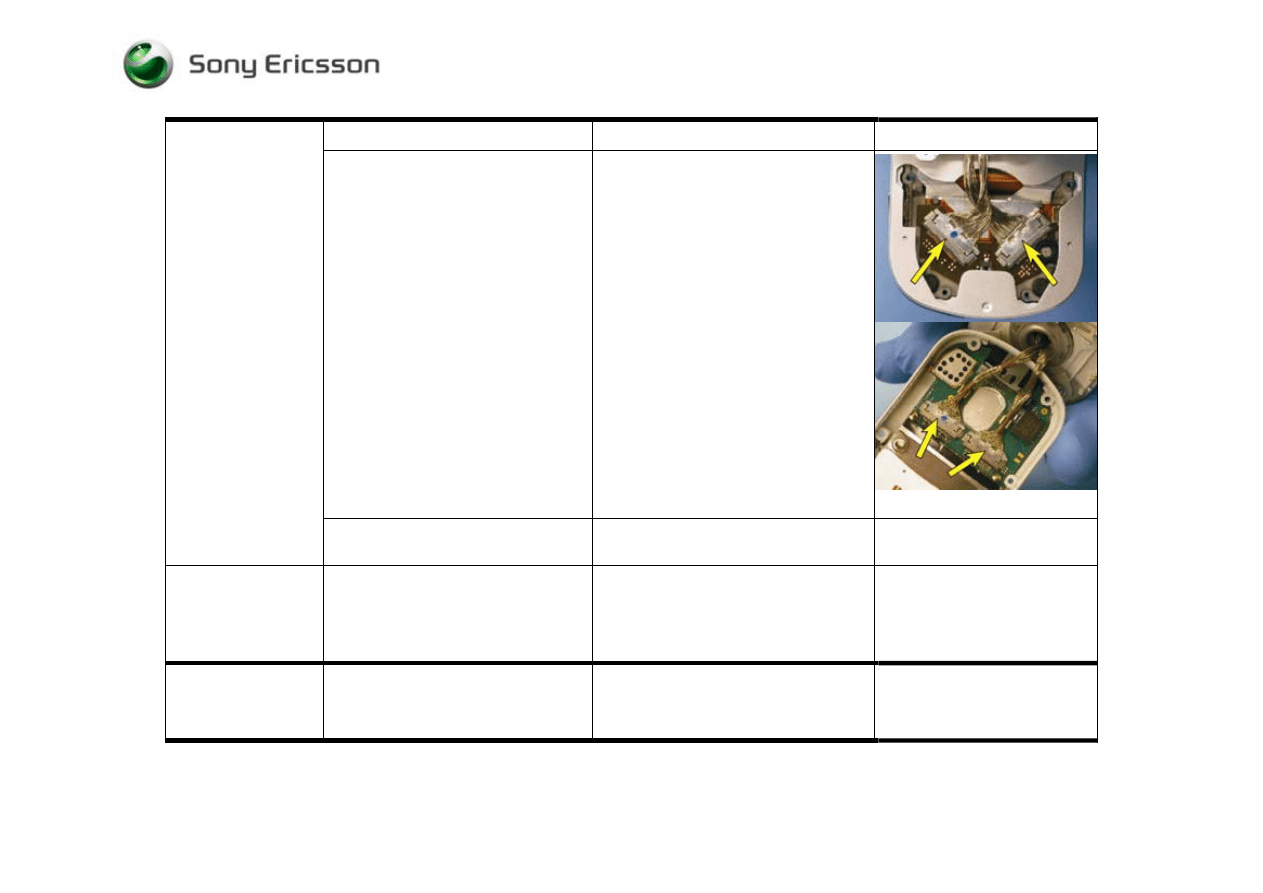
Visually inspect the LCD to display flex
film connection
• If improperly connected -
Reestablish a proper connection
• If dirty or oxidized – Clean ( If it
is determined that cleaning is
needed, clean all pads and contacts
that are part of this connection)
• If any pads of the LCD module’s
flex film are damaged - replace
LCD module
• If the LCD connector on the
display flex film is damaged -
Replace the display flex film
assembly
Trouble Shooting Guide, Mechanical
4/000 21-1/FEA 209 544/594 A
Company Internal
©
Sony Ericsson Mobile Communications AB
21(28)
Visually inspect the cable assemblies and
their mating connectors on the display
flex film and the circuit board
• If any of the four cable connections
are improperly connected -
Reestablish a proper connection
• If any portion of the four cable
connections are dirty - Replace
both cables and clean the mating
portions of the cable connections
that are on the display flex film and
the circuit board
• If a cable assembly is damaged –
Replace both cable assemblies
• If a cable connector on the display
flex film is damaged – Replace the
display flex film assembly
• If a cable connector on the circuit
board is damaged – Send to an
electrical repair location
If the issue has not been resolved !
• Replace the LCD assembly, if it
has not been replaced
The display is not
illuminating (Cont.)
If the issue still has not been resolved !
• Replace the display flex film
assembly and both cable
assemblies, if they have not been
replaced
Trouble Shooting Guide, Mechanical
4/000 21-1/FEA 209 544/594 A
Company Internal
©
Sony Ericsson Mobile Communications AB
22(28)
12 Alert Problems
Problem Area
Items to Check
Repair Action
Reference Image
Before proceeding !
• Perform a setting reset
Visually inspect the vibrator contact
pads on the circuit board
• If dirty or oxidized – Clean
• If damaged – Handle according to
local directives
Vibrator:
Visually inspect the vibrator
• If dirty or oxidized – Replace
vibrator
• If damaged - Replace vibrator
Before proceeding !
• Perform a setting reset
Rear Base Speaker:
No sound or poor
quality sound
Visually inspect whether the rear base
speaker’s external port is clogged
• If clogged – Clean its speaker port
opening in the outer base cover
Trouble Shooting Guide, Mechanical
4/000 21-1/FEA 209 544/594 A
Company Internal
©
Sony Ericsson Mobile Communications AB
23(28)
Problem Area
Items to Check
Repair Action
Reference Image
Visually inspect the rear base speaker
assembly’s dust cloth
• If dirty or damaged – Replace the
dust cloth
Visually inspect the rear base speaker
assembly (including its connection
pads to the circuit board)
• If dirty or damaged - Replace the
rear base speaker assembly
Rear Base Speaker:
No sound or poor
quality sound (Cont.)
Visually inspect the rear base speaker
connection springs on the circuit board
• If dirty or oxidized – Clean both
springs and replace the rear base
speaker assembly
• If damaged – Send to an electrical
repair location
Trouble Shooting Guide, Mechanical
4/000 21-1/FEA 209 544/594 A
Company Internal
©
Sony Ericsson Mobile Communications AB
24(28)
Problem Area
Items to Check
Repair Action
Reference Image
Rear Base Speaker:
No sound or poor
quality sound (Cont.)
If the issue has not been resolved !
• Replace the rear base speaker
assembly, if it has not already been
replaced
Before proceeding !
• Perform a setting reset
Visually inspect whether the side base
speaker’s external port is clogged
• If clogged – Clean its speaker port
opening in outer base cover
Visually inspect side base speaker
(including the wire connection
extending from it and its dust cloth)
• If dirty –Replace the side base
speaker and clean the connector on
the circuit board
• If damaged - Replace side base
speaker
Visually inspect the side base speaker
connector on the circuit board
• If dirty – Clean the connector on the
circuit board and replace the side
base speaker
• If damaged – Send to an electrical
repair location
Side Base Speaker:
No sound or poor
quality sound
If the issue has not been resolved !
• Replace the side base speaker, if it
has not already been replaced

Trouble Shooting Guide, Mechanical
4/000 21-1/FEA 209 544/594 A
Company Internal
©
Sony Ericsson Mobile Communications AB
25(28)
13 Charging/Capacity Problems
Problem Area
Items to Check
Repair Action
Reference Image
Visually inspect the contact pads of the
battery
• If dirty or oxidized – Clean
• If damaged – Replace the battery
Visually inspect the of the connector
that connects the battery to the circuit
board
• If dirty or oxidized – Clean
• If damaged – Send to an electrical
repair location
Battery will not
charge
Visually inspect the system connector
• If dirty or oxidized – Replace the
system connector
• If damaged – Replace the system
connector
Trouble Shooting Guide, Mechanical
4/000 21-1/FEA 209 544/594 A
Company Internal
©
Sony Ericsson Mobile Communications AB
26(28)
14 Camera Problems
Problem Area
Items to Check
Repair Action
Reference Image
Visually inspect the camera lens
• If dirty – Clean the camera lens
• If scratched or damaged – Replace
the camera module
Lines or marks in
picture
If the issue has not been resolved !
• Replace the camera module, if it
has not been replaced
Visually inspect for debris between
and/or damage to the camera key and its
switch.
• If dirty - Clean both the key and its
switch
• If the key is damaged – Replace it
• If the switch is damaged – Replace
the display flex film
If the issue has not been resolved !
• Replace the display flex film
assembly, if it has not already been
replaced
Will not capture an
image
If the issue still has not been resolved !
• Replace the camera module
Trouble Shooting Guide, Mechanical
4/000 21-1/FEA 209 544/594 A
Company Internal
©
Sony Ericsson Mobile Communications AB
27(28)
15 Bluetooth Problems
Problem Area
Items to check
Repair Action
Check the Bluetooth antenna contact
pads on the circuit board
• If dirty or oxidized – Clean
• If damaged, handle according to
your local company directives
Will not connect with
a functional
Bluetooth device
Check the Bluetooth antenna
• If dirty – Clean
• If damaged - Replace

Trouble Shooting Guide, Mechanical
4/000 21-1/FEA 209 544/594 A
Company Internal
©
Sony Ericsson Mobile Communications AB
28(28)
16 Revision History
Rev
Date
Changes / Comments
A 2005-Sept
13
Initial
Release
Wyszukiwarka
Podobne podstrony:
M DiPasquale ANABOLIC TROUBLESHOOTER GUIDE
Danfoss troubleshooting guide
Troubleshooting Guide
Compaq Troubleshooter Guide
M DiPasquale ANABOLIC TROUBLESHOOTER GUIDE
A8Jn Troubleshooting Guide
Halley RF Troubleshooting and Maintenance Guide V1 0
Electrician's Troubleshooting and Testing Pocket Guide
Z1010 Trouble Shooting Guide
Trouble Shooting Guide 04
guide camino aragones pl
Herbs for Sports Performance, Energy and Recovery Guide to Optimal Sports Nutrition
Meezan Banks Guide to Islamic Banking
NLP for Beginners An Idiot Proof Guide to Neuro Linguistic Programming
freespan spec guide
Eaton VP 33 76 Ball Guide Unit Drawing
Herbs to Relieve Headaches Keats Good Herb Guide
50 Common Birds An Illistrated Guide to 50 of the Most Common North American Birds
więcej podobnych podstron