
Trouble Shooting Guide, Mechanical
4/00021-1/FEA 209 544/77A
Sony Ericsson Mobile Communications AB
Approved according to 000 21-LXE 107 42/1
Trouble shooting guide, Mechanical
Applicable for Z1010
Contents:
1
Explanations ....................................................................................................................2
1.1
Service functions in the software.......................................................................2
1.2
Liquid damage ...................................................................................................2
1.2.1
Action ................................................................................................................2
2
Appearance Problems.....................................................................................................3
3
Alert Problems ................................................................................................................4
3.1
Vibrator .............................................................................................................4
4
Audio Problems...............................................................................................................5
4.1
Microphone........................................................................................................5
4.2
Headset ..............................................................................................................5
5
Charging/Capacity Problems.........................................................................................6
5.1
Charging ............................................................................................................6
5.2
Capacity.............................................................................................................6
6
Data Communication Problems.....................................................................................6
7
Key/Flip problems...........................................................................................................7
7.1
Side Keys...........................................................................................................7
7.2
Keyboard ...........................................................................................................7
7.3
Switch Flip ........................................................................................................8
8
LCD/Illumination Problems ..........................................................................................9
8.1
Main LCD..........................................................................................................9
8.2
Sub LCD............................................................................................................9
8.3
Illumination .....................................................................................................10
9
On/Off Problems ...........................................................................................................11
9.1
On/Off key or On/Off switch ..........................................................................11
9.2
Battery or battery connector ............................................................................12
10
Other Problems .............................................................................................................13
10.1
Camera.............................................................................................................13
10.2
MS module ......................................................................................................13
11
Software Problems ........................................................................................................14
12
Revision History ............................................................................................................15

Trouble Shooting Guide, Mechanical
4/00021-1/FEA 209 544/77 A
Sony Ericsson Mobile Communications AB
2(15)
1 Explanations
1.1 Service functions in the software
The service menu will be accessed with the following key combination. Use the Jog dial.
►*◄◄*◄*
They are as follows:
1. Service
info
2. Service
tests
3. Text
labels
The service test menu looks like this:
1. Main
screen
2. External
display
3. Camera
4. Video call camera
5. LED/Illumination
6. Keyboard
7. Vibrator
8. Earphone
9. Microphone
10. Total call time
1.2 Liquid damage
1.2.1 Action
Make a general visual inspection for corrosion and oxidation from liquid damage. No further
action should be taken for a liquid damaged phone. Handle the unit according to local
company or GSP directives.
Trouble Shooting Guide, Mechanical
4/00021-1/FEA 209 544/77 A
Sony Ericsson Mobile Communications AB
3(15)
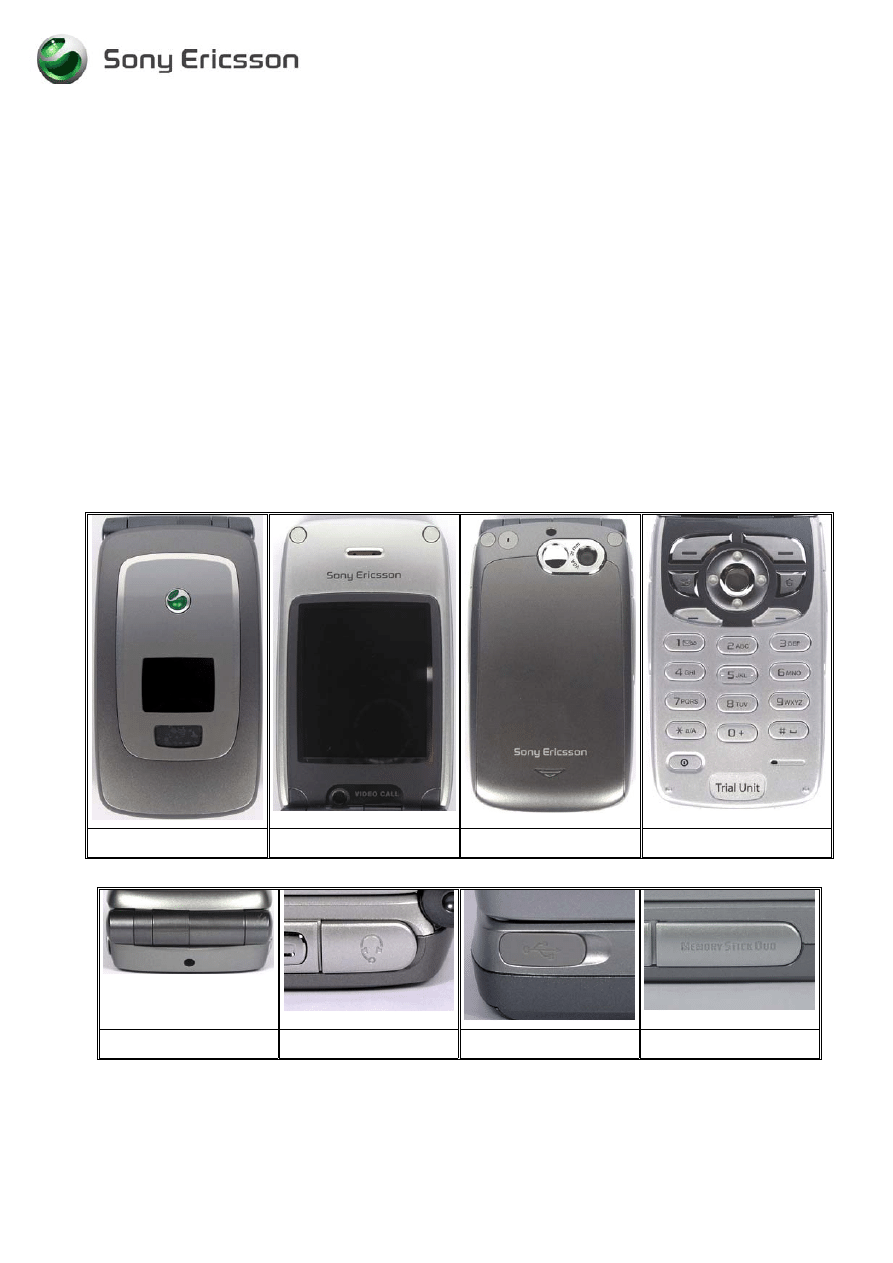
2 Appearance
Problems
•
Make a general visual inspection for corrosion and oxidation from liquid damage
according to point 1.2
•
Check the Upper Rear Cabinet (Fig. 2.1), the Upper Inside Cabinet (Fig. 2.2), the Lower
Rear Cabinet (Fig. 2.3) and the Lower Inside Cabinet (Fig. 2.4) for damage, scratches and
that the parts fit correctly. Replace the faulty components if necessary.
•
Check the Keyboard (Fig. 2.4), the IMD plate (Fig. 2.1) and the SEMC Icon (Fig. 2.1) for
damage, scratches and that the parts fit correctly. Replace the faulty components if
necessary.
•
Check the screw covers, the hinge covers (Fig.2.5), the battery lid (Fig. 2.3), and the cover
mirror camera (Fig. 2.3) for damage, scratches and that the parts fit correctly. Replace the
faulty components if necessary.
•
Check the cover audio jack (Fig. 2.6), the cover USB connector (Fig. 2.7), the cover MS
duo connector (Fig. 2.8) and the cover ext. antenna connector (Fig. 2.3) for damage,
scratches and that the parts fit correctly. Replace the faulty components if necessary.
If the failure still occurs, handle the unit according to the local company or the GSP directives.
Fig. 2.1
Fig. 2.2
Fig. 2.3
Fig. 2.4
Fig. 2.5
Fig. 2.6
Fig. 2.7
Fig. 2.8
Trouble Shooting Guide, Mechanical
4/00021-1/FEA 209 544/77 A
Sony Ericsson Mobile Communications AB
4(15)
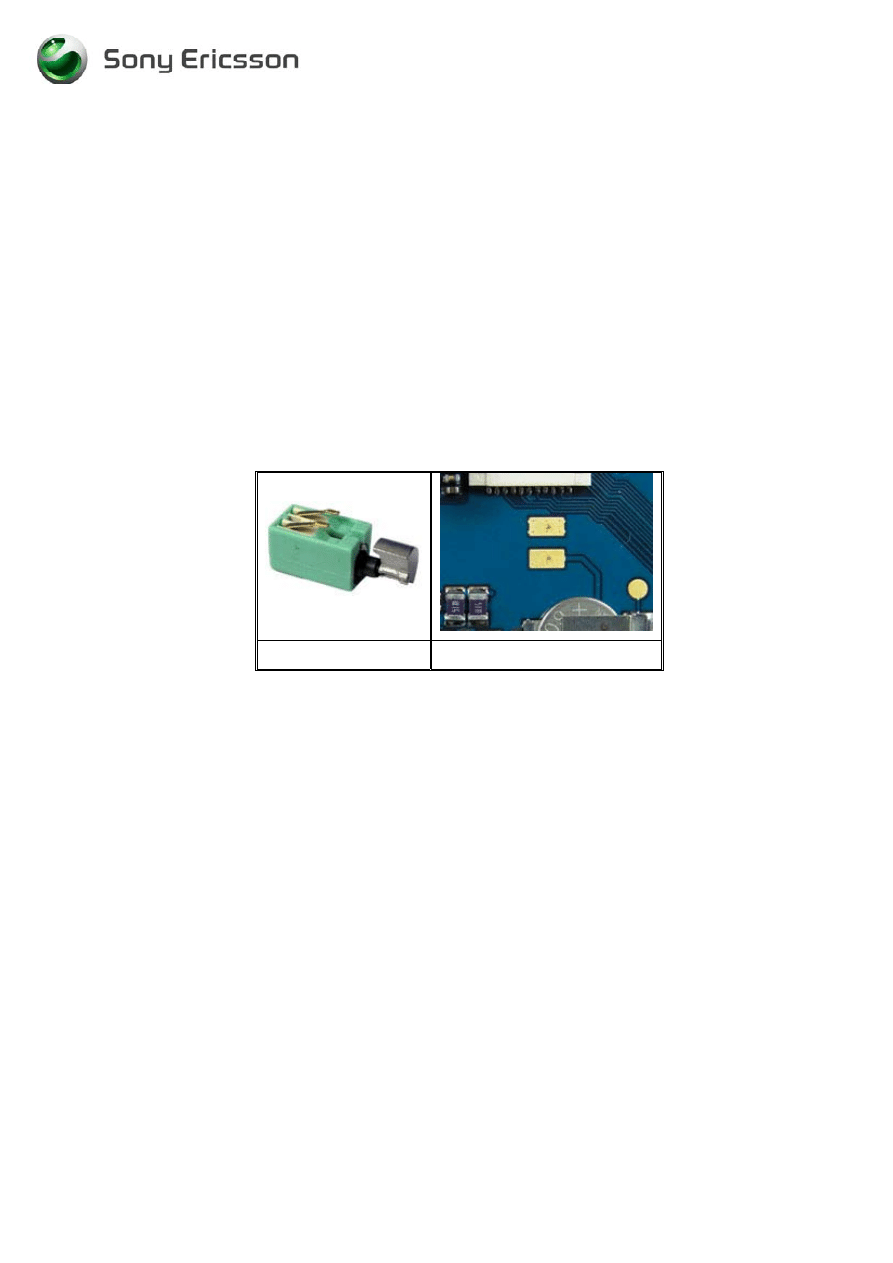
3 Alert
Problems
•
Make a general visual inspection for corrosion and oxidation from liquid damage
according to point 1.2
3.1 Vibrator
•
Turn on the phone. Go to the service test menu; choose “Vibrator”. Press any key to check
the vibrator works properly.
•
Check if the vibrator (Fig. 3.5) is mechanically damaged, dirty or oxidized. Replace it if
necessary.
•
Check if the vibrator pads (Fig. 3.6) are dirty or oxidized. Clean them if necessary.
If the fault still occurs, try updating the phone with the latest available software version. If this
does not solve the problem, handle the unit according to the local company or the GSP
directives.
Fig. 3.5
Fig. 3.6
Trouble Shooting Guide, Mechanical
4/00021-1/FEA 209 544/77 A
Sony Ericsson Mobile Communications AB
5(15)
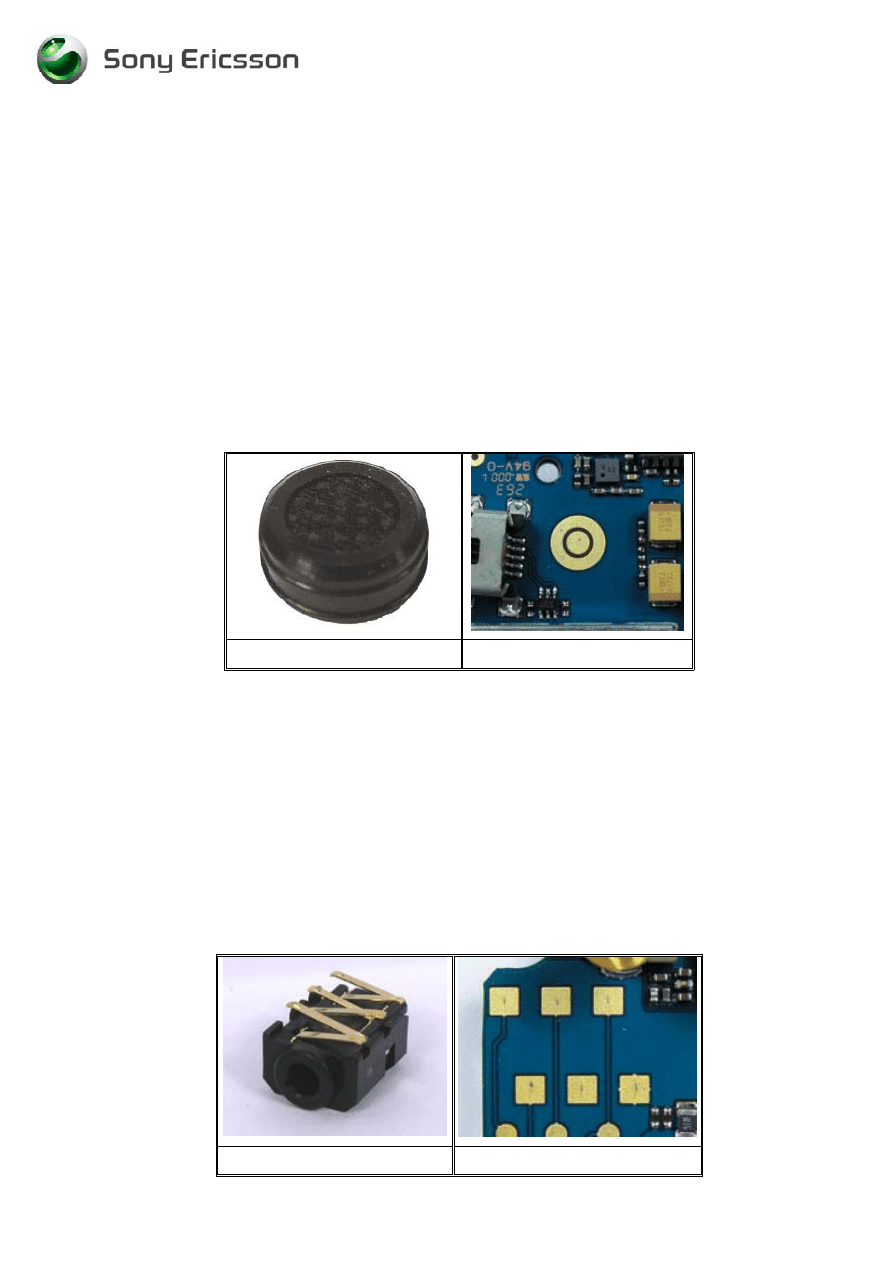
4 Audio
Problems
•
Make a general visual inspection for corrosion and oxidation from liquid damage
according to point 1.2
4.1 Microphone
•
Insert a working SIM card to the Z1010 and turn it on; make a call to the phone.
•
Check if the microphone (Fig. 4.5) is mechanically damaged, dirty or oxidized. Replace it
if necessary.
•
Check if the microphone pads (Fig.4.6) are dirty or oxidized. Clean them if necessary.
If the fault still occurs, try updating the phone with the latest available software version. If this
does not solve the problem, handle the unit according to the local company or the GSP
directives.
Fig. 4.5
Fig. 4.6
4.2 Headset
•
Insert a working headset to the Audio jack connector.
•
Insert a working SIM card to the Z1010 and turn it on; make a call to the phone.
•
Check if there is sound from the earphone and that the microphone is working. Replace
the Audio jack connector if necessary (Fig. 4.7).
•
Check if the Audio jack pads on the Main PCB (Fig. 4.8) are dirty or oxidized. Clean them
if necessary.
If the fault still occurs, try updating the phone to the latest available software version. If this
does not solve the problem, handle the unit according to the local company or the GSP
directives.
Fig. 4.7
Fig. 4.8

Trouble Shooting Guide, Mechanical
4/00021-1/FEA 209 544/77 A
Sony Ericsson Mobile Communications AB
6(15)
5 Charging/Capacity
Problems
•
Make a general visual inspection for corrosion and oxidation from liquid damage
according to point 1.2
5.1 Charging
•
Use a working battery and connect a working charger to the phone, if the battery voltage is
too low the phone will charge the battery without turning on the phone (this will usually
not take more than 10 minutes) and when the battery voltage is high enough the phone will
be able to turn on and show charging in the LCD.
If the fault still occurs, try updating the phone with the latest available software version. If this
does not solve the problem, handle the unit according to the local company or the GSP
directives.
5.2 Capacity
•
The standby time will be reduced if, the light is turned on all the time, the bluetooth is
turned on, or if the infrared is turned on.
If the fault still occurs, try updating the phone with the latest available software version. If this
does not solve the problem, handle the unit according to the local company or the GSP
directives.
6 Data Communication Problems
•
Make a general visual inspection for corrosion and oxidation from liquid damage
according to point 1.2
•
If no communication, is accomplished via bluetooth or infrared. Try performing a master
reset on the phone.
If the fault still occurs, try updating the phone with the latest available software version. If this
does not solve the problem, handle the unit according to the local company or the GSP
directives.
Trouble Shooting Guide, Mechanical
4/00021-1/FEA 209 544/77 A
Sony Ericsson Mobile Communications AB
7(15)
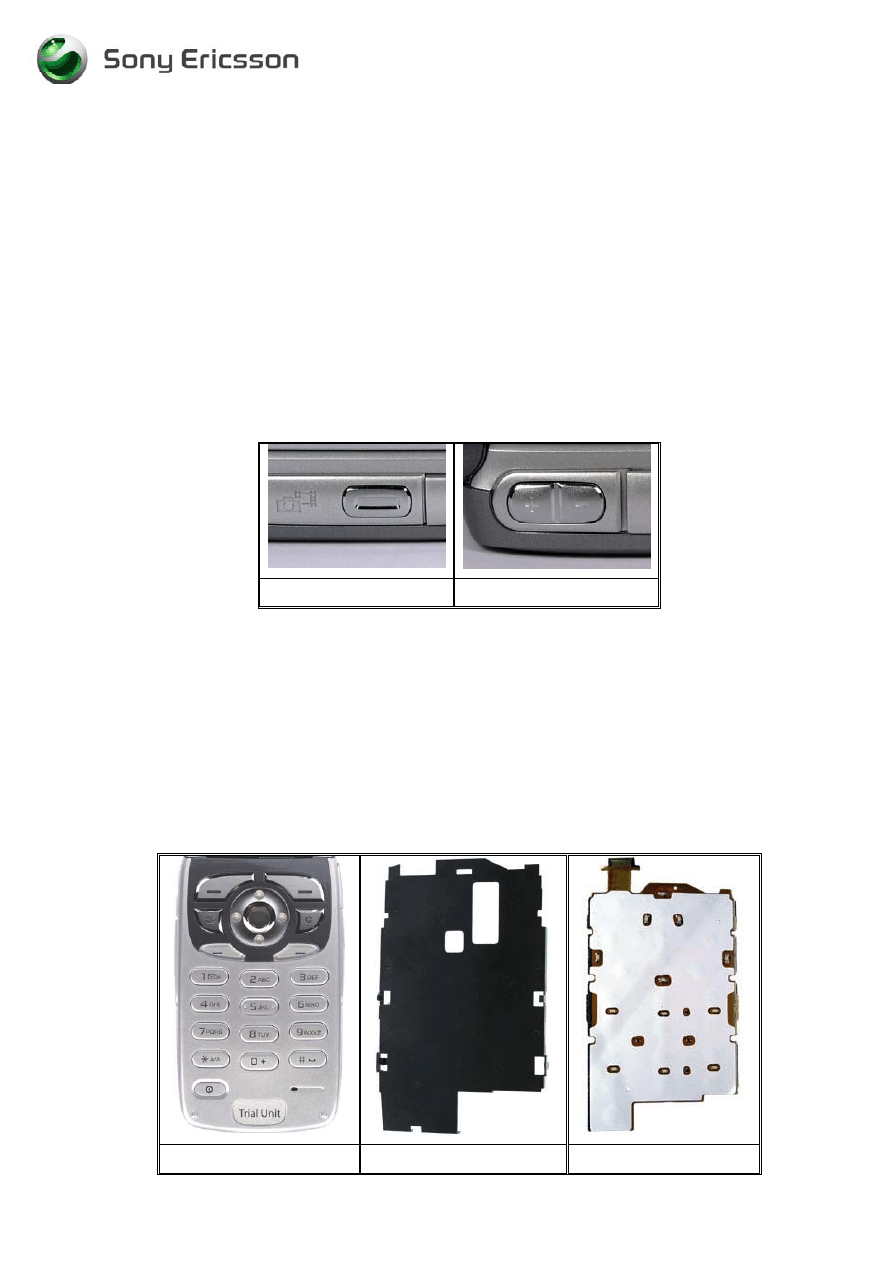
7 Key/Flip problems
•
Make a general visual inspection for corrosion and oxidation from liquid damage
according to point 1.2
7.1 Side Keys
•
Turn on the phone. Go to the service test menu; choose “Keyboard”. The pressed key will
be indicated in the LCD.
•
Check if the camera key (Fig. 7.1) and the volume keys (Fig. 7.2) are working properly
and that the mechanical response feels normal. Replace keyboard (Fig. 7.3) if necessary.
If the fault still occurs, try updating the phone with the latest available software version. If this
does not solve the problem, handle the unit according to the local company or the GSP
directives.
Fig. 7.1
Fig. 7.2
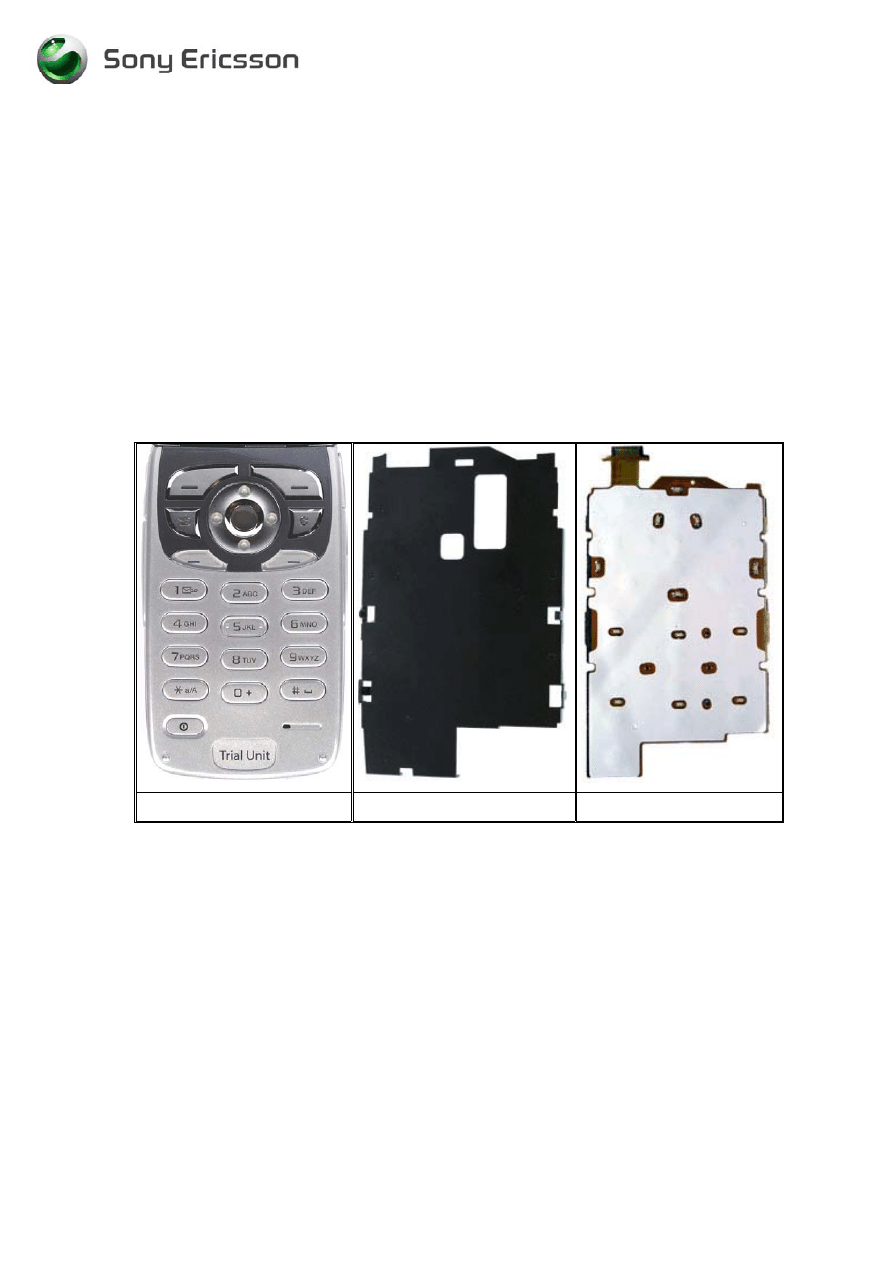
7.2 Keyboard
•
Turn on the phone. Go to the service test menu; choose “Keyboard”. Press all the keys.
The pressed key will be indicated in the LCD and a click is being heard.
•
Check if the keyboard (Fig. 7.3) is working properly. Check if the mechanical response
feels normal and that all the keys have been showed in the LCD. Replace the keyboard
(Fig. 7.3), the keyboard support (Fig. 7.4) or the keyboard PCB (Fig. 7.5) if necessary.
If the fault still occurs, try updating the phone with the latest available software version. If this
does not solve the problem, handle the unit according to the local company or the GSP
directives.
Fig. 7.3
Fig. 7.4
Fig. 7.5
Trouble Shooting Guide, Mechanical
4/00021-1/FEA 209 544/77 A
Sony Ericsson Mobile Communications AB
8(15)
7.3 Switch Flip
•
Insert a working SIM card into the Z1010 and turn it on and close the flip.
•
Check if the Keyboard light turns off and the status LCD turns on. Replace the Upper
inside Cabinet (Fig. 7.6) if necessary.
•
Check if the upper and lower part of the phone fits tight together, when closing the flip.
Replace the frame if necessary.
If the fault still occurs, try updating the phone with the latest available software version. If this
does not solve the problem, handle the unit according to the local company or the GSP
directives.
Fig. 7.6

Trouble Shooting Guide, Mechanical
4/00021-1/FEA 209 544/77 A
Sony Ericsson Mobile Communications AB
9(15)
8 LCD/Illumination
Problems
•
Make a general visual inspection for corrosion and oxidation from liquid damage
according to point 1.2
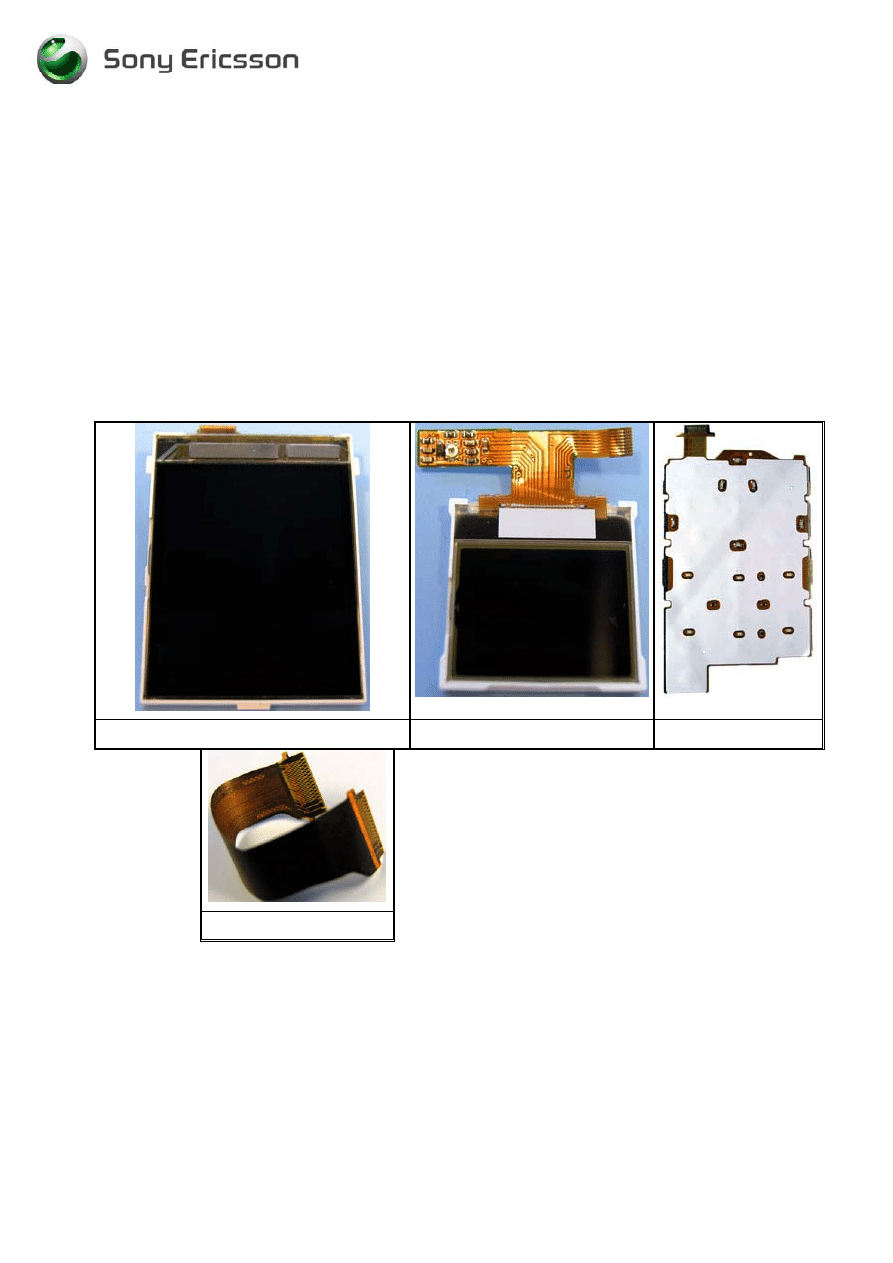
8.1 Main LCD
•
Turn on the phone. Go to the service test menu; choose “Main screen”.
•
Check if the main LCD (Fig 8.1) is working properly and if there are missing lines or
discolours. Replace it if necessary.
•
Check if the flex film (Fig 8.4) is mechanically damaged. Replace it if necessary.
If the fault still occurs, try updating the phone with the latest available software version. If this
does not solve the problem, handle the unit according to the local company or the GSP
directives.
8.2 Sub LCD
•
Turn on the phone. Go to the service test menu; choose “External display”.
•
Check if the status LCD (Fig 8.2) is working properly and if there are missing lines or
rows. Replace it if necessary.
•
Check if the flex film (Fig 8.4) is mechanically damaged. Replace it if necessary.
If the fault still occurs, try updating the phone with the latest available software version. If this
does not solve the problem, handle the unit according to the local company or the GSP
directives.
Trouble Shooting Guide, Mechanical
4/00021-1/FEA 209 544/77 A
Sony Ericsson Mobile Communications AB
10(15)
8.3 Illumination
•
Turn on the phone. Go to the service test menu; choose “LED/Illumination”.
•
Check if the illumination is balanced all over the main LCD. Replace the main LCD if
necessary.
•
Check if the illumination is balanced all over the sub LCD. Replace the sub LCD if
necessary.
•
Check if the flex film (Fig 8.4) is mechanically damaged. Replace it if necessary.
•
Check if the illumination is balanced in all the keys. Replace the keyboard PCB (Fig. 8.3)
if necessary.
If the fault still occurs, try updating the phone with the latest available software version. If this
does not solve the problem, handle the unit according to the local company or the GSP
directives.
Fig 8.1
Fig 8.2
Fig 8.3
Fig 8.4
Trouble Shooting Guide, Mechanical
4/00021-1/FEA 209 544/77 A
Sony Ericsson Mobile Communications AB
11(15)
9 On/Off
Problems
•
Make a general visual inspection for corrosion or oxidation from liquid damage according
to point 1.2
9.1 On/Off key or On/Off switch
•
Turn on the phone with a working battery. If it fails;
•
Check if the On/Off key (Fig. 9.1) is working properly. Check if the mechanical response
feels normal. Replace the keyboard (Fig. 9.1), the keyboard support (Fig. 9.2) or the
keyboard PCB (Fig. 9.3) if necessary.
If the fault still occurs, try updating the phone with the latest available software version. If this
does not solve the problem, handle the unit according to the local company or the GSP
directives.
Fig 9.1
Fig 9.2
Fig 9.3
Trouble Shooting Guide, Mechanical
4/00021-1/FEA 209 544/77 A
Sony Ericsson Mobile Communications AB
12(15)
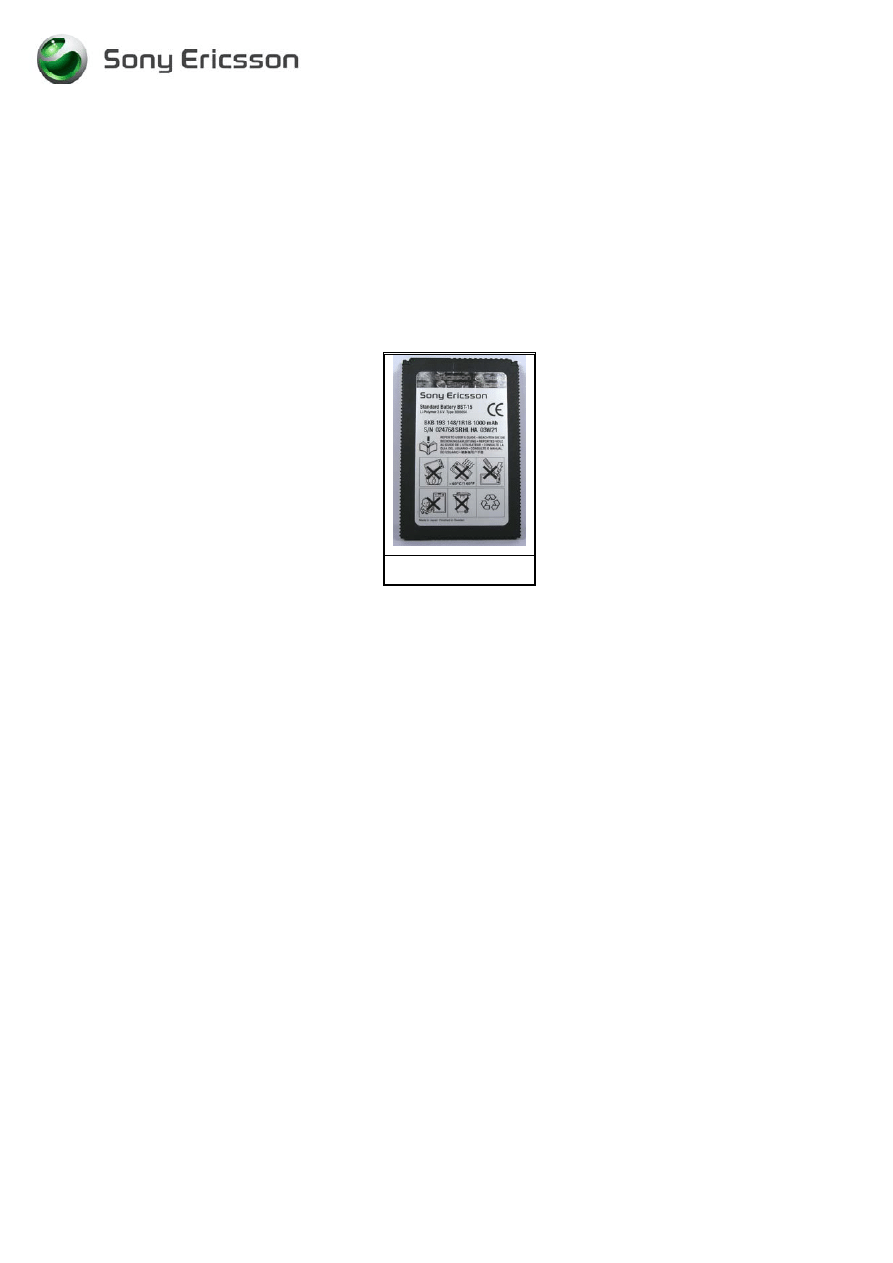
9.2 Battery or battery connector
•
Turn on the phone with the customer’s battery. If it fails, connect a charger to the phone, if
the battery voltage is too low the phone will charge the battery without turning on the
phone (this will usually not take more than 10 minutes) and when the battery voltage is
high enough the phone will be able to turn on and show charging in the LCD.
If it still fails to turn on;
•
Check if the battery (Fig. 9.4) is not mechanically damage. Replace it if necessary.
If the fault still occurs, try updating the phone with the latest available software version. If this
does not solve the problem, handle the unit according to the local company or the GSP
directives.
Fig 9.4
Trouble Shooting Guide, Mechanical
4/00021-1/FEA 209 544/77 A
Sony Ericsson Mobile Communications AB
13(15)
10 Other Problems
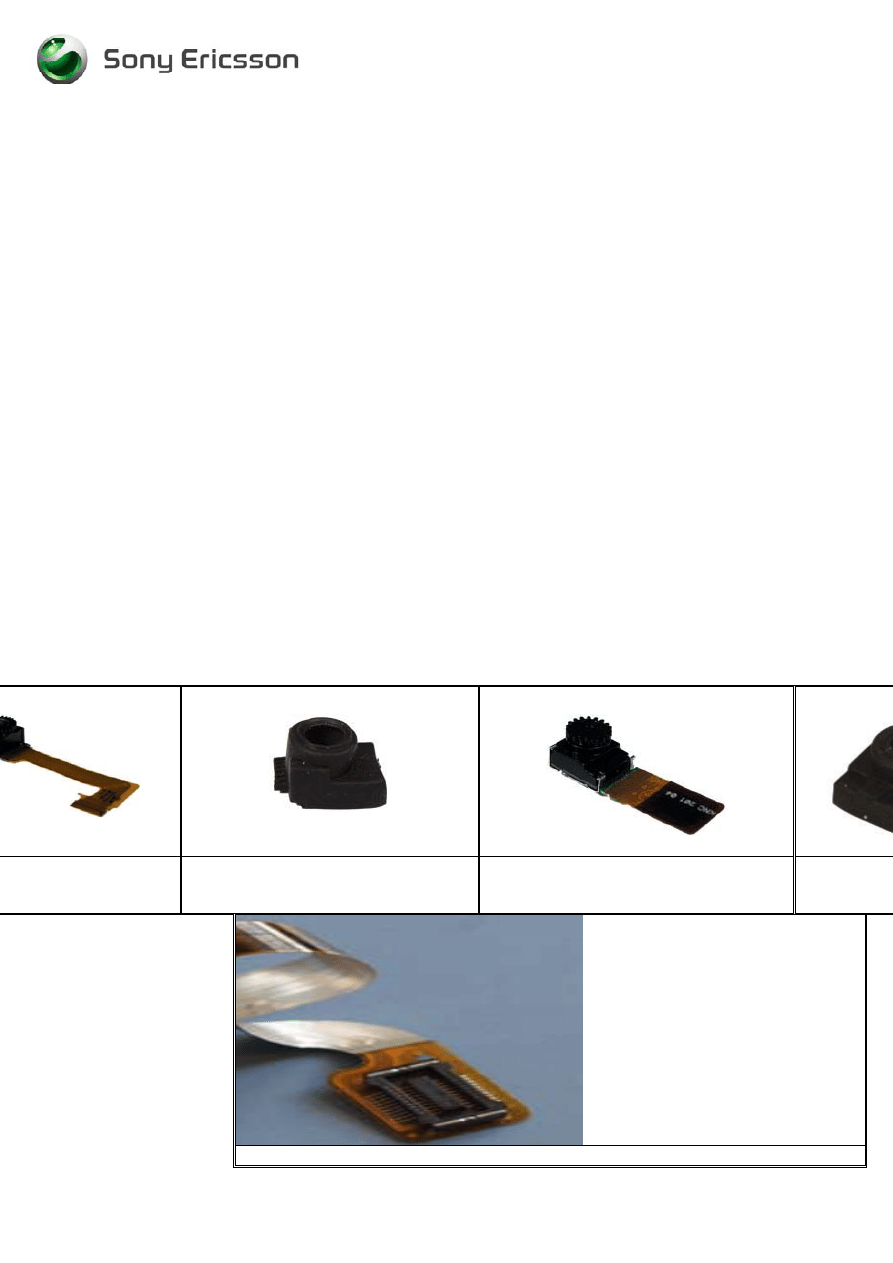
10.1 Camera
•
Make a general visual inspection for corrosion and oxidation from liquid damage according to point
1.2
•
Turn on the phone. Go to the service test menu; choose “Camera”.
•
Check if the VGA camera module (Fig. 10.1) works properly; verify the viewfinder functionality in
the LCD and check if the picture can be saved. Replace it if necessary.
•
Check if the VGA camera gasket (Fig. 10.2) is mechanically damaged. Replace it if necessary
Note: Do not touch the camera lens, when replacing the camera.
Note: The VGA camera is the camera used to capture pictures or to record videos. It is located on the
rear cover of the phone.
•
Turn on the phone. Go to the service test menu; choose “Video call camera”.
•
Check if the CIF camera module (Fig. 10.3) works properly; verify the viewfinder functionality in
the LCD. Replace it if necessary.
•
Check if the CIF camera gasket (Fig. 10.4) is mechanically damaged. Replace it if necessary.
•
Check if the PCB assembly (Fig. 10.5) is mechanically damaged or oxidized. Replace it if
necessary.
Note: Do not touch the camera lens, when replacing the camera.
Note: The CIF camera is the camera used during video calls. It is placed inside the phone.
If the fault still occurs, try updating the phone with the latest available software version. If this does not
solve the problem, handle the unit according to the local company or the GSP directives.
10.1
Fig. 10.2
Fig. 10.3
Fig
Fig. 10.5
Trouble Shooting Guide, Mechanical
4/00021-1/FEA 209 544/77 A
Sony Ericsson Mobile Communications AB
14(15)
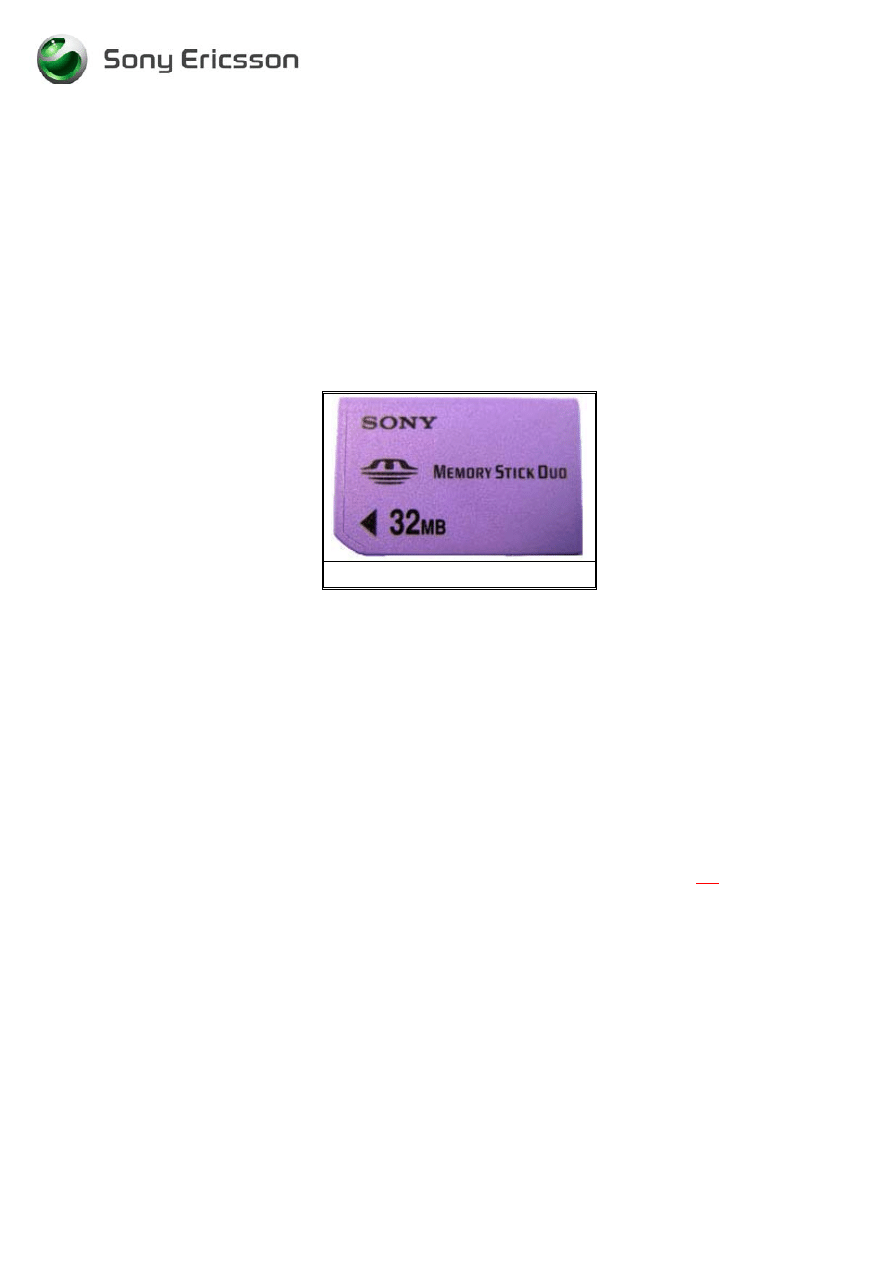
10.2 MS module
•
Make a general visual inspection for corrosion and oxidation from liquid damage
according to point 1.2
•
Insert a working SIM card into the Z1010 and turn it on.
•
Go to the file manager check if it is possible to copy or move some contents to the
Memory Stick Duo.
•
Check if a Memory Stick Duo (Fig. 10.6) fits correct into MS module. Replace the
Memory Stick Duo if necessary.
If the fault still occurs, try updating the phone with the latest available software version. If this
does not solve the problem, handle the unit according to the local company or the GSP
directives.
Fig. 10.6
11 Software Problems
•
If there are problems with the response of the keypad commands, or spelling errors in the
menu, they are not related to mechanical damage, perform a master reset and upgrade the
phone with the latest software from EMMA II.
•
Checking the software revision can be done in the Service info, see chapter Service
functions in the software.
Choose: Service info / SW information.
The Software revision and date will be shown in the display.
Note: Perform a SW upgrade before sending the unit to a higher level. Do not scrap a phone
that has not been upgraded.
If the failure still occurs, handle the unit according to the local company or the GSP
directives.
Trouble Shooting Guide, Mechanical
4/00021-1/FEA 209 544/77 A
Sony Ericsson Mobile Communications AB
15(15)
12 Revision History
Rev.
Date
Changes / Comments
A 2004-04-21 First
release
Wyszukiwarka
Podobne podstrony:
Trouble Shooting Guide 04
Jvc Power Supply Description And Trouble Shooting Procedure
SHSBC024 RAW MEAT TROUBLE SHOOTING
Sevcon Powerpak trouble shooting guid 1
trouble shooting
Q7T4 FP71G 99 L1C72 000 trouble shooting
RF Trouble Shooting V9vs V975 L3 1[1] 0 050427154852
46b D Jetronic Trouble Shooting
Trouble Shooting carb and compression BRIGGS & STRATTON
basic trouble shooting
Halley RF Troubleshooting and Maintenance Guide V1 0
M DiPasquale ANABOLIC TROUBLESHOOTER GUIDE
Danfoss troubleshooting guide
Electrician's Troubleshooting and Testing Pocket Guide
Air Rifle Airgun Shooting Sports Safety Guide
Troubleshooting Guide
Compaq Troubleshooter Guide
M DiPasquale ANABOLIC TROUBLESHOOTER GUIDE
więcej podobnych podstron