Page 1
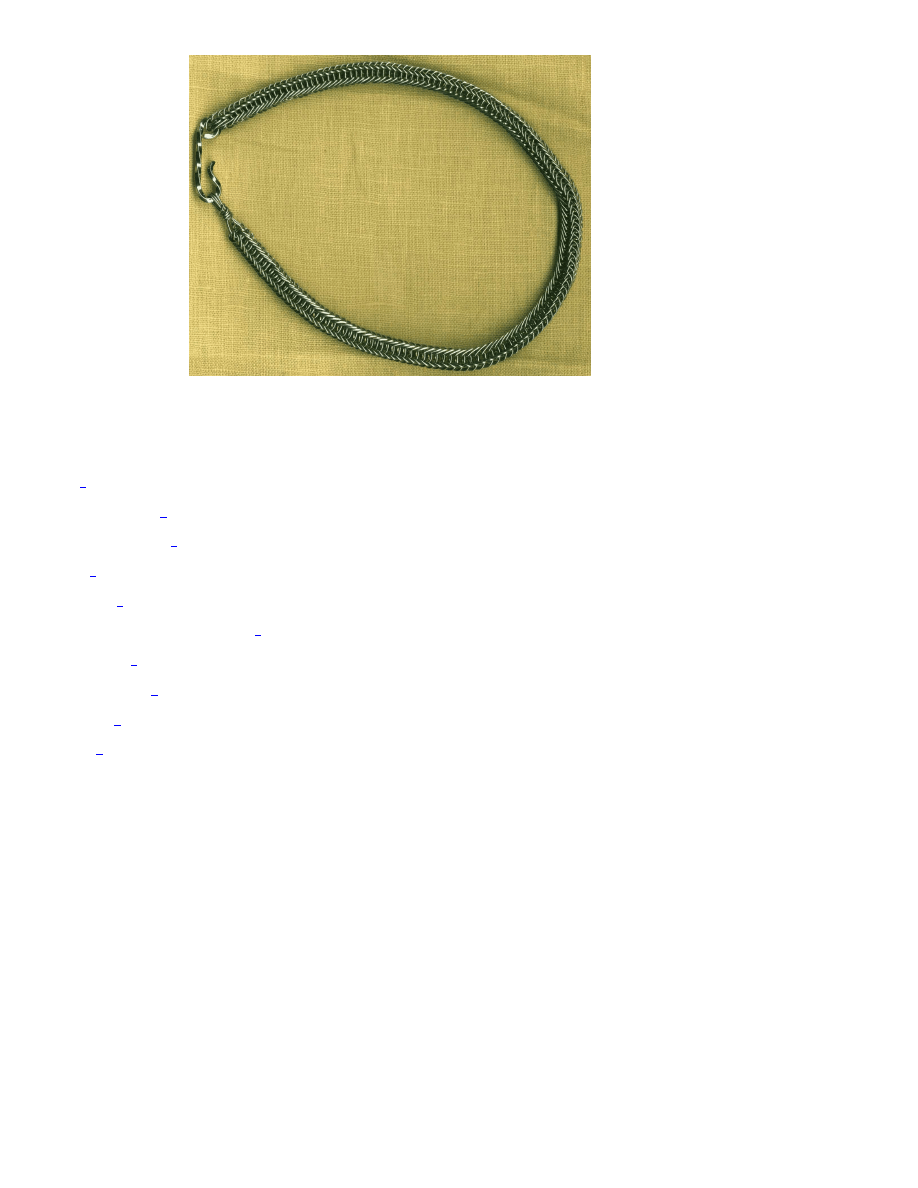
Woven Wire Arm Ring
06/04/2006 11:32:46 AM
http://www.willadsenfamily.org/sca/danr_as/woven-arm-ring/woven-arm-ring.htm
10
th
Century
Danish Woven
Wire Arm Ring
by Danr Bjornsson
September 2001 - April
2002
Note: This page contains copyrighted material which is presented as documentation in the course of scholarly research. The owners of this page do not, and in some cases
cannot, give permission to copy the content here.
Table of Contents
Summary
*
Historical Documentation
*
Wire Weaving Pattern
*
Wire
*
Arm Rings
*
Silversmithing and Worked Silver Hook
*
Materials and Tools
*
Method of Construction
*
Lessons Learned
*
Bibliography
*
Summary
About a year ago, I found a photo of a wire artifact from Viking Age Denmark that was woven in a pattern that was completely new to me. It took a
trip to Denmark to find a book that explained how to accomplish this pattern, and some experimentation to find the most efficient and effective
techniques. I learned a lot about period silversmithing in the process. The result is a beautiful and unusual form of wire jewelry that is fun, if time-
consuming, to create.
Historical Documentation
Wire Weaving Pattern
Page 2
Woven Wire Arm Ring
06/04/2006 11:32:46 AM
http://www.willadsenfamily.org/sca/danr_as/woven-arm-ring/woven-arm-ring.htm
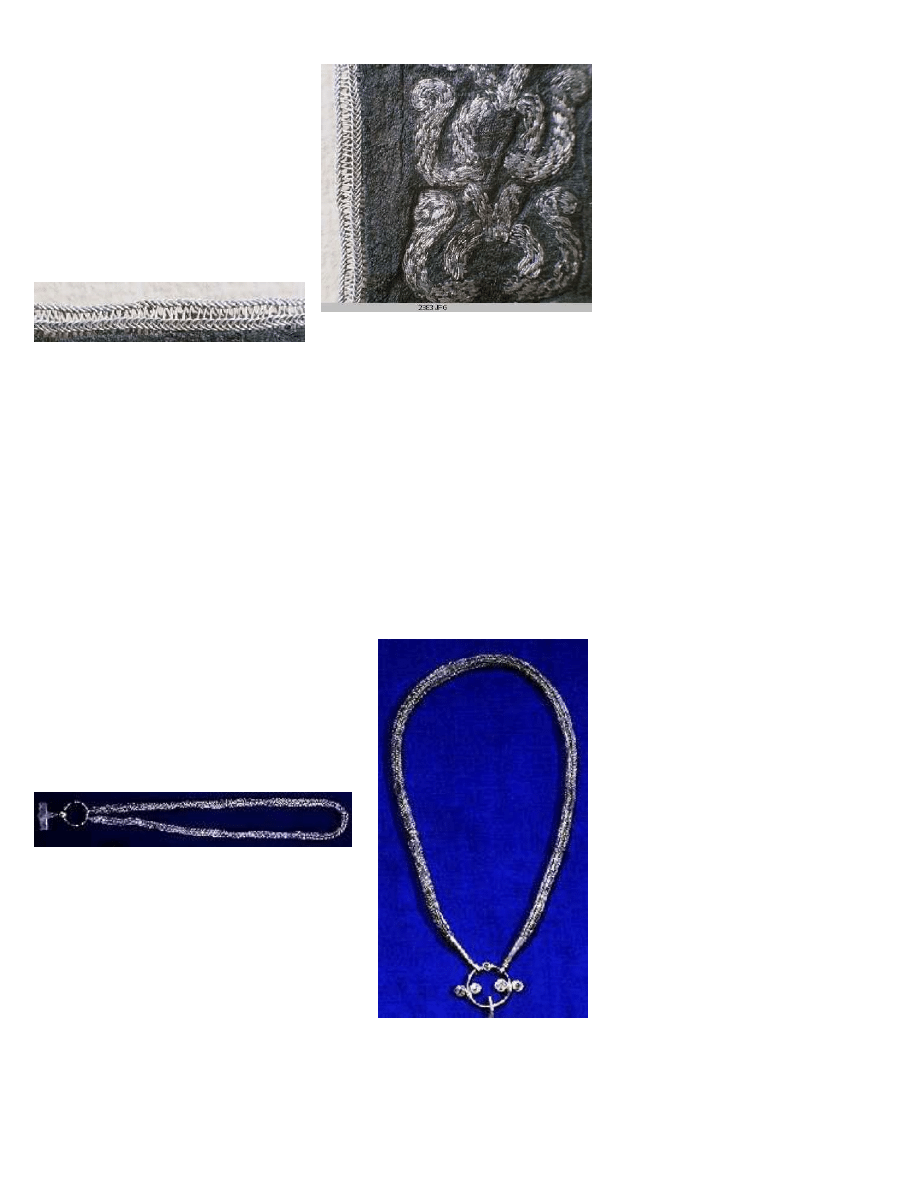
While browsing our World of the Vikings
(WOV) CD, I found this image of a man's cuff
shown to the right (2383). It is embroidered
with silver-wrapped thread and edged with
woven silver wire. A closer look at this edging
is shown below. After studying the image, my
lady realized that the weaving pattern for this
wire edging was the same pattern that, in
nälbinding, is called the "Mammen Stitch."
However, this wire weaving appeared to be
cylindrical, which would require a different
technique than the usual nälbinding. We
e-mailed the National Museum of Denmark to find out more about this wire edging, but none of the people who answered were able to provide any
information. When we visited the National Museum of Denmark last summer, we searched for this textile but were unable to find it or any other
textiles that used this wire edging. I believe that this edging was sewn on the edge of a cuff because it could protect an area of the garment that was
prone to wear, while retaining its good looks.
I was not able to accurately pinpoint this textile artifact to a date and location, though the museums involved in the WOV project were the Danish
National Museum and the York Archeological Trust. The use of silver rather than gold makes it likely to be 10
th
Century or later. I base this assertion
on the proliferation of gold in the Iron Age bog burials, and the relative absence of gold artifacts in Denmark beginning in the 10
th
Century. My walk
through the Danish National Museum in Copenhagen showed me that nearly all the jewelry artifacts were gold through the 8
th
Century, with a mix of
silver and gold in the 9
th
Century, and then almost all silver from the 10
th t
to 12
th
Centuries. This change could have been due to several factors.
There was probably a gradual reduction in the gold supply because it was being buried in bogs. Trade gradually became more common than plunder
in Denmark at this time, and silver coinage was more common in Europe than gold. Finally, the conversion to Christianity changed the burial rites, in
which case gold jewelry would be passed on to the heirs instead of buried. Most likely it was a combination of these things that led to the decrease in
gold finds.
WOV 5059, a silver hoard from 10
th
Century Denmark,
includes a necklace made using the woven-wire
technique used for this project, and is shown below.
WOV 3773, a Danish necklace whose date is less well
documented, also uses this technique and is shown to the
right. These artifacts prove that the woven-wire
technique was used for jewelry as well as textile
decoration.
When my lady and I visited several museums in Denmark, we came across a book in the museum bookstores (Jensen). It was written in Danish and
was clearly a craft book, but it described in detail the tools and methods, developed through experimentation, for creating this exact pattern in silver
wire. In the book, Jensen references the same necklace pictured above. The process he described produces the correct pattern, and uses tools and
methods within the capability of Iron Age or later craftsmen.
Wire
Page 3
Woven Wire Arm Ring
06/04/2006 11:32:46 AM
http://www.willadsenfamily.org/sca/danr_as/woven-arm-ring/woven-arm-ring.htm
Since ancient times, wire has been made through a process called drawing, in which the wire is pulled through gradually-smaller holes in a case-
hardened drawplate (Theophilus, 87). Each time the wire is drawn, it becomes harder as its diameter is reduced, and it must be annealed to avoid
breaking during the next drawing (Theophilus, 125). Wire could be round, square, or any other shape required by the silversmith. The labor-intensive
nature of its production ensured that any item made of wire would be valued beyond the cost of its raw materials.
Arm Rings
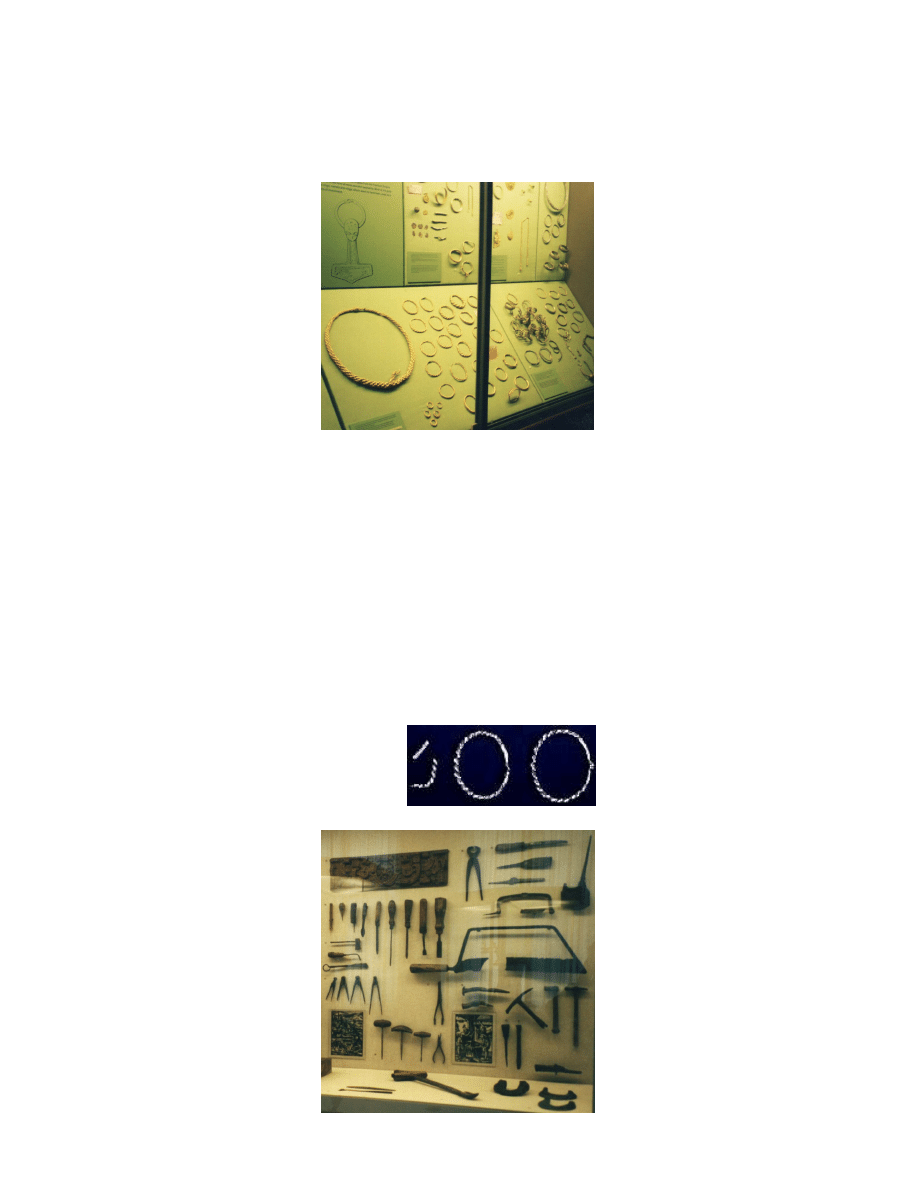
The photo to the right was taken by my lady
during our trip to the Danish National Museum
in Copenhagen. It shows a variety of necklaces
(left and upper right), arm rings (center),
bracelets (center right), and finger rings
(bottom left), mostly of gold with some of
silver, and all from bog burials in Denmark
dating to the 8
th
-9
th
Centuries. This photo
shows the relative sizes of these items. Some of
these items are too large to wear on the wrist,
because they would slip off the hand, but too
small to wear around the neck. It is therefore
most likely that items in this size range were
designed to be armbands, i.e. worn on the arm
above the elbow, as the archeologists usually
interpret them.
Jensen, in describing certain bracelet-like items of jewelry, uses the Danish term for "bracelet" (worn on the wrist) rather than "arm ring" (worn
above the elbow) which, my translator tells me, would be a different word. All my other sources, written in English, refer to these items as arm rings.
This departure by Jensen from the traditional interpretation is surprising considering his association with the Lehre Försogcenter. Unfortunately, both
times we visited the Center during our trip to Denmark, the jewelry archeologists were not on site, so I could not clarify the point. It is possible this is
only a problem of translation with the modern Danish language, and such jewelry was worn both ways. A ring that fits one person's arm may only fit
another person's wrist, for example.
Silversmithing and Worked Silver Hook
Using this woven-wire pattern as an armband requires a hook to close it around the arm. While the more conventional wire and hammered armbands
had integrated hooks, the thin wire used for the weaving is not strong enough for this purpose. While it is possible to twist together several thin wires
and solder them for greater strength, I have found no evidence of this being done for that purpose in the Viking Age. A separate hook, decoratively
worked out of thicker wire, would be function and better fit the evidence.
The archeological evidence for worked silver in 10
th
Century
Denmark is extensive. This small photo is a detail from WOV
5059, from a silver hoard dated to the 10
th
Century. This
picture documents the use of twisted square silver wire as a
form of decorative jewelry.
The exact methods and tools used in the Viking
Age for working metal are somewhat less
documentable than the silver itself. The photo
to the right, taken by my lady at the Danish
National Museum, shows an assortment of
tongs, pliers, hammers, chisels, gravers, and
other tools that were likely to have been used in
carpentry but some of which could also be used
in metalworking. The Mästermyr find, from
Sweden, also has similar tools. The museum
display did not provide any information as to
where these tools were found, but the display
was in the Viking Age wing of the museum.
Page 4
Woven Wire Arm Ring
06/04/2006 11:32:46 AM
http://www.willadsenfamily.org/sca/danr_as/woven-arm-ring/woven-arm-ring.htm
The archeological digs at the Coppergate site in York, England, dated to Viking Age York, found some silversmithing tools and items of silver. These
included many crucibles, ingot molds, and cupels, as well as some items of silver including a twisted wire (Bayley, 799). These items are the only
evidence I have found from Viking Age Scandinavia as to the tools and methods specific to silversmithing.
Works from later time periods such as the writings of Theophilus and Biringuccio, however, can fill these gaps in our knowledge. The technology of
silversmithing is believed to have changed little during the Middle Ages, so it is likely that tools and techniques from later periods could be applied to
the Viking Age.
Metal, when hammered or bent, gradually loses its strength. To restore strength to the metal, it is necessary to heat it to a temperature somewhat
below its melting point by a process called annealing. Theophilus mentions annealing as being done at each stage of working silver (102, 138). His
failure to define or describe the annealing process in a work that is otherwise very detailed is evidence that the concept of annealing was commonly
known to metalworkers in the 12
th
Century. Biringuccio describes the process of annealing copper-silver alloy using a charcoal fire (362), and
reiterates the importance of annealing after hammering (367).
Annealing, unfortunately, tends to discolor the surface of the metal through the action of oxygen and impurities introduced by the fire. While
polishing could eventually remove this dark coating, there is a faster way. Aqua fortis is an acid made from saltpeter, alum, vitriol, sal ammoniac, and
verdigris, and distilling it creates another acid called aqua regia (Biringuccio 383). Aqua regia could be used in parting gold from silver, by dissolving
the metal. A quick immersion in aqua regia will dissolve away the surface layer of silver, carrying the discoloration with it. The silver can later be
recovered by evaporation in a crucible (ibid).
Finishing jewelry consists of shaping, smoothing, and polishing. Theophilus describes the process of shaping silver with a flat hone (102), an item the
Norse would have called a whetstone. He describes smoothing with a piece of oak covered in ground charcoal (102) or fine sand and cloth (152). He
describes polishing with a cloth covered in chalk (102) or powdered clay tiles and water128), or saliva-moistened shale followed by ear wax (115).
Biringuccio describes shaping as done with files, smoothing with cane dipped in powdered pumice, and polishing using tripoli powder (366). Clearly,
there were many abrasives available in period, chosen by their availability and relative effectiveness on the material being worked.
Materials and Tools
Because this was my first project with wirework of any type, I used nickel instead of silver because it was cheaper and gives the same look. This
choice would lead to challenges later, and I eventually chose to make the hook from silver. I bought these materials as ready-made wire, rather than
drawing them myself.
The tools needed are:
a notched mandrel as shown to the right
(Jensen), which I made from a large nail,
using a hacksaw and file
round-nose pliers, chain-nose pliers, and
wire cutters
a wooden drawplate (a block of wood
with assorted diameter holes drilled
through it in increments of 1/64
th
inches),
which I made from an oak board
a small vise or other device to hold the
mandrel and drawplate securely while
they are used
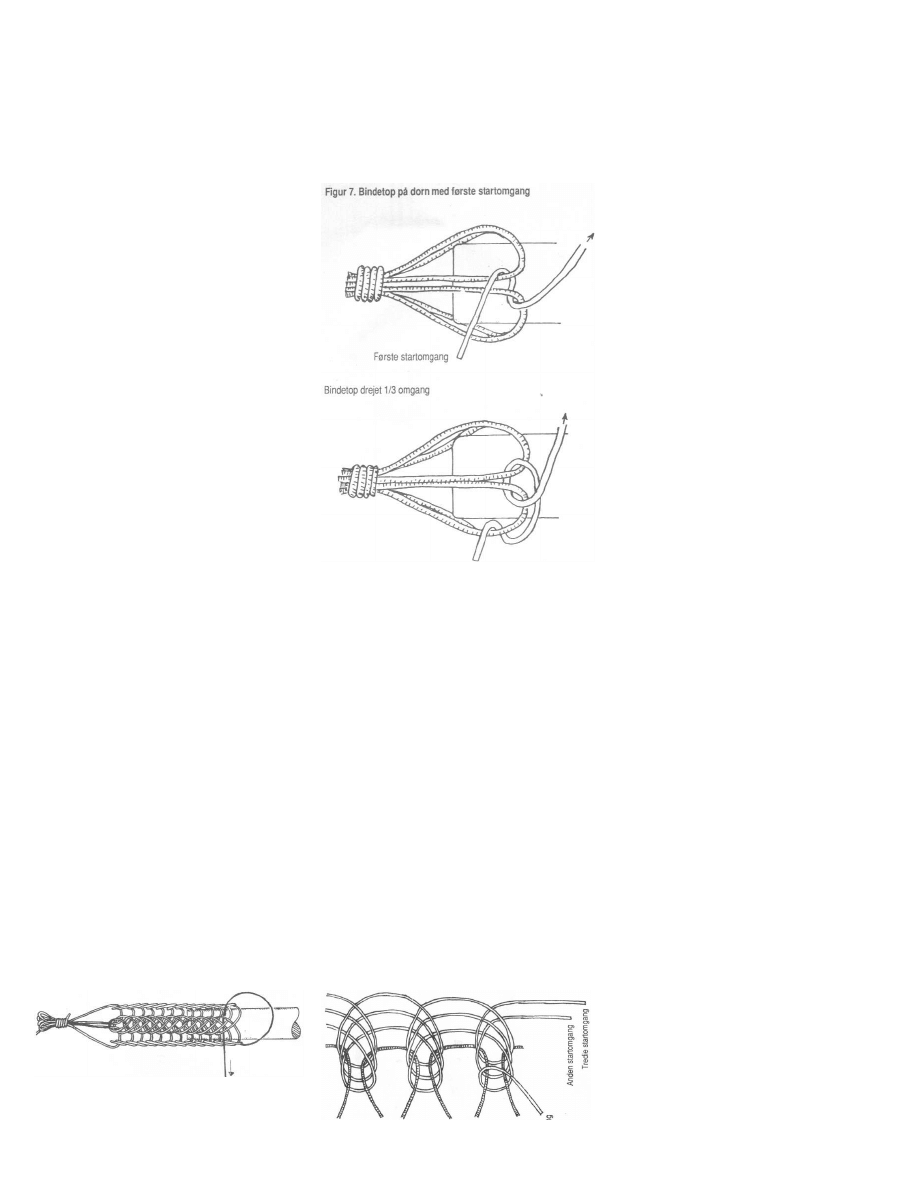
Method of Construction
The diagrams in this section are all from Jensen's book. The photographs are scans of the entry.
Set up the mandrel in a vise, with the notched end facing toward you at table height, good lighting, and a clear space out to arm's length on both sides
for safety. Put your coil of wire and pliers where you can reach them, and you are ready to begin.
First, make the base loop. This consists of three
long loops of wire, with the ends twisted
around the middle (closer to one end) as shown
to the right. It is difficult to get a neat
appearance, but well worth the effort. I found
that this is easiest to do over the two prongs of
a round-nose plier.
Page 5
Woven Wire Arm Ring
06/04/2006 11:32:46 AM
http://www.willadsenfamily.org/sca/danr_as/woven-arm-ring/woven-arm-ring.htm
After wrapping the loops and securing them in the middle, the small loops should be laid together to make a single loop, and the large loops are
separated and made to lay edge-to edge. Slip the large loops over the end of the mandrel, and position a pair of loops together over the notch. This is
the starting point for the weaving. The drawing shows the base loops very long, but for a better appearance these should be as short as possible and
still fit over the mandrel. For this reason, I actually made two notches in my mandrel, one very near the end for the starting loops and the other 1/2
inch from the end, for better control once I had woven half an inch or more. You can see these shorter starting loops in the close-up of the hook
shown below.
Next, cut a piece of wire about the length of
one of your arms. Run the wire through the
notch and twist it around the first loop pair, as
shown to the right. This first loop may not look
very good, but it is the starting loop, and from
this point forward the weaving will improve.
The important thing about this first loop is that
the end is tucked under.
Rotate the entire assembly 1/3 of a turn on the
mandrel until the edges of the next pair of
loops is over the notch. Bend the wire over the
top from right to left. Be careful not to put any
kinks or sharp bends in it.
Then, run the wire back under the starting
loops and through the notch from left to right,
as shown here. For the first two rotations of
loops, the loops will seem to stack on top of
each other, because there are not enough
previous rows to form the pattern yet. This can
be seen in the drawing below, and the close-up
of the entry that is also shown below, where
the pattern does not fully appear until the third
row of loops.
When pulling the wire through the notch and under the other wires, grab the tip of the wire with chain-nose pliers and pull it tight, until the loop is
uniform with previous loops. This works best if you pull it straight out to your side, which is why you need a clear space to your right side and why
the wire should be no longer than your arm. Try to avoid handling the wire by any part but its tip, because the more you handle the wire, the more it
becomes hard and brittle, and stopping to anneal a long piece of wire will ruin your rhythm. By grabbing it by the tip, only the last half-inch becomes
unusable. Pull the wire through until the loop you made in the last step is uniform with the previous loops.
Then, bend the wire over the top from right to left, in preparation to form the next loop. This is why you need a clear space to your left side, to keep
the long protruding wire from poking out anyone's eye. This is best accomplished by sending onlookers to a safe distance while you turn. The pliers
are not usually needed for this; the important part is that the bend is uniform with previous loops. However, you should try not to put your pliers down
but keep them in your right hand, in order to maintain your rhythm.
Turn the assembly 1/3 of a turn. Repeat the over-under-turn movement, many times.
As you progress, the pattern will begin to appear. Each time, put the thread through the notch one
step past where the thread went the last time around. That is, go over the top, under the last two
previous loops, and over the top again. The picture to the lower right shows what it would look
like, from the weaver's perspective, if laid out flat (where the lower right of the picture is the
starting point). The picture to the lower left shows exactly where the wire goes during the
"under" step, as seen after the weaving has progressed for a time. After weaving a dozen loops,
the pattern will become second nature and you can focus on consistency.
Page 6
Woven Wire Arm Ring
06/04/2006 11:32:46 AM
http://www.willadsenfamily.org/sca/danr_as/woven-arm-ring/woven-arm-ring.htm
The key to a successful weave is consistency in pulling and bending. If you pull the wire too tightly through the notch, the weave will drift in a
clockwise spiral. If you bend the loop too tightly, the weave will drift counterclockwise. If you are inconsistent from one loop to the next, it is
possible for different parts to drift in different ways, so that two of the three "corners" drift together, leaving no room between them to insert the wire
to make succeeding loops. Since the weaving progresses at the rate of about 2 inches per hour, depending on your skill and experience, this
consistency is best achieved by having a comfortable work area with minimal interruptions in your rhythm, so you can concentrate on keeping the
loops uniform and even.
After weaving a few inches, the wire will run out. Simply cut (or break) it off in the notch, flush with where it protrudes from the weave, cut a new
wire, insert the end of a new wire into the notch at the same place, carefully bend it over for the next loop, and continue. When you turn the weaving
for the next loop, the friction between the new wire and the mandrel will hold it in place, if you are careful when turning it out of the notch. You can
continue weaving, and the joint will be visible only under close inspection. Jensen suggests tucking the end inside, but cutting it flush is easier,
stronger, and produces the same good visual result.
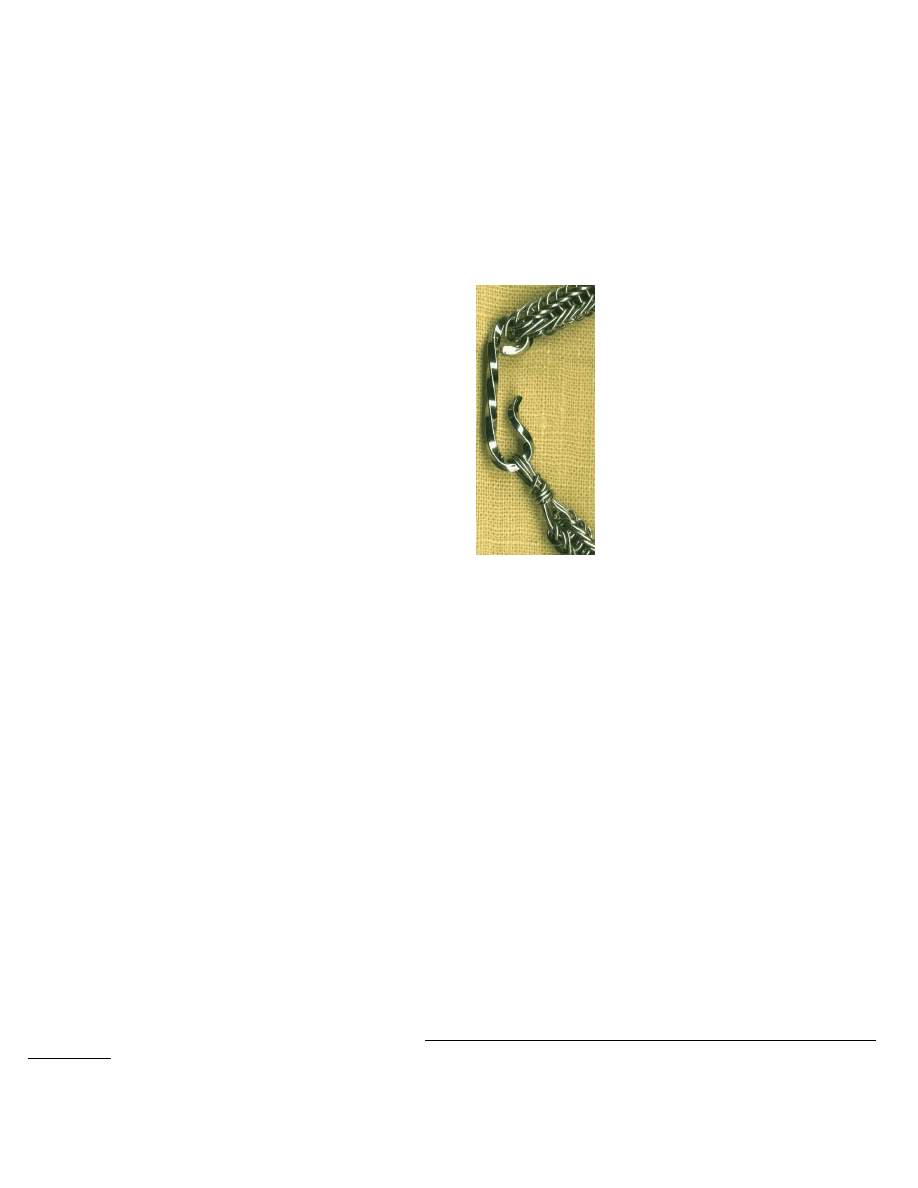
When the weaving is long enough, make your last loop and bend the end
inside the weave. Careful measurement, factoring in the length of the
hook, will prevent your arm band from being too short or too long.
Carefully bend the last two sets of loops into aligning with each other as a
single loop-shaped bundle, in order to insert the base of your hook. This is
shown in the photo, but is easier to understand by experimenting than
looking at the picture. With practice you will be able to plan ahead for
this, and modify your last two rotations of loops to be all the same length
and thereby create a strong ending-loop bundle with little effort.
Then, make a drawplate from hardwood, such as oak, by drilling it with
holes in 1/64
th
inch increments. Draw the weave through the drawplate,
going through smaller holes each time, until it passes through with some
resistance. When pulling, pull from the starting-loop end to pull the
correct direction. This arm band started with a 5/16 hole and finished with
a 9/32 hole. Drawing the weave makes it more even, more flexible, and
slightly longer. This arm band only got 2mm longer, so drawing is not a
way to lengthen a band that was made too short. Varying the length of the
hook can fix minor miscalculations in length, and in the worst case a band
that is too short for the arm will fit the wrist just fine.
The hook was troublesome to make. Nickel is very hard in comparison to silver and only marginally workable. While I formed some hooks from
nickel, my efforts to decoratively hammer, shape, and twist nickel wire did not result in anything worth having.
Therefore I made a decorative hook from commercially purchased square silver wire. I annealed the wire with a torch, applied a decorative twist with
pliers, annealed again, worked it into the hook shape with pliers, cut it to length, and filed the ends to the desired shape. After a 10-minute dip in
aqua regia to remove the firescale, I polished the hook to a shine on a buffing wheel, attached it to the arm ring, and dropped the entire assembly into
a mass finisher for a week, equipped with mixed stainless steel media. The buffing wheel and mass finisher put a mirror shine on the silver that
would have required a week of polishing by hand using period methods. The photo of the hook shown above highlights the slight difference in shine
between the silver hook and the nickel weave.
Lessons Learned
Nickel, while it looks like silver, is much harder, and proved difficult to work with. Nickel did work sufficiently well for the weaving to validate the
tools and methods. I plan to make more jewelry of this type from actual silver wire in the future, though the nickel ones are great for everyday wear.
The investment in time to make one of these is much greater than that in materials, given the availability of wire in modern times. Therefore, a project
like this is worth using silver once you have learned the technique.
The entry took about 8 hours to weave the arm ring, and another 2 hours to twist, form, and polish the hook. The arm ring, properly sized to fit, is
quite comfortable to wear for long periods of time.
Bibliography
Bayley, Justine, Non-Ferrous Metalworking from Coppergate, from The Archeology of York, Vol 17 The Small Finds, Fasc. 7 Craft, Industry and
Everyday Life, Council for British Archeology, York, 2000. ISBN 1.872414.30.3. This small book in the Archeology of York series focuses on the
evidence for gold, silver, copper, lead, tin, and alloy crafts from the Coppergate site in York. Most of the evidence is for the tools and methods of
parting and refining these metals.

Page 7
Woven Wire Arm Ring
06/04/2006 11:32:46 AM
http://www.willadsenfamily.org/sca/danr_as/woven-arm-ring/woven-arm-ring.htm
Biringuccio, Vannoccio, trans. Cyril Smith and Marth Grundi, Pirotechnia, Dover Books, New York, 1959, ISBN 0-486-26134-4. This translation of
a sixteenth-century work on metals and metalworking contains a great deal of information on metallurgy and casting, but is useful for other branches
of metalworking as well.
Jensen, Jørn Veje, Vikingesmykker som Du Selv Kan Lave, Jørn Veje Jensen, Lyngby DK, 1995. No ISBN. The author may be reached at
Slotsvænget 24, 2800 Lyngby, Denmark. Special thanks go to Lars C. A. Willadsen for confirming that my rudimentary translation of the technical
details was correct, and for translating the rest of this book for me.
Theophilus, trans. John Hawthorne and Cyril Smith, On Divers Arts, Dover Books, New York, 1979, ISBN 0-486-23784-2. This translation of an
early twelfth-century treatise on painting, glassworking, and metalwork is one of the foremost period sources for researchers of these arts.
York Archaeological Trust and the National Museum of Denmark, The World of the Vikings (CD-ROM), Past Forward Limited, undated. This CD
contains hundreds of photos of artifacts, but the photos are not well-documented and, unfortunately, the CD was made so long ago that the museums
are unable to answer questions about them. However, it is still a good source to establish certain things, and is a fine starting point for further
research.
Back to Danr's A&S page.
Wyszukiwarka
Podobne podstrony:
jewelry pattern wire ring 1
coiled wire ring
Asembler ARM przyklady II
Artistic Wire Green or Magenta Single Spiral Bead Necklace & Earrings
J R R TOLKIEN 1 The Fellowship of the Ring
Fascia in the Lateral Upper Arm tapeSP
arm assembly
6 ARM obsluga LCD Nieznany
Mikrokontrolery ARM cz18
Mikrokontrolery ARM cz5
butterfly wire pendant a
fras,systemy wbudowane L, sprawozdanie ARM 7 obsługa przetwornika?
WNIOSKI Token Ring
SHSBC324 THE TONE ARM
Методичка курс ARM LPC2148 USB Keil
LotR War of the Ring scenario
Mikrokontrolery ARM cz16
1 wire full
więcej podobnych podstron