A
M E R I C A
'
S
F
AVO R I T E
W
O O D WO R K I N G
P
L A N S
U - B I L D
B RO U G H T TO YO U BY
:
Two-Door Ice Box
Plan No. 686
Copyright U-Build, Inc., 2003.
All rights reserved. Printed in the U.S.A.
Bill of Material
Quantity
Size
Material
10
3/4” x 6” x 96”*
oak
1
1/8” x 48” x 48”
oak plywood
60
3/8” x 2”
dowels
1 small box
1 1/4”
finish nails
1 small bottle
wood glue
1 small can
oil or stain
6
brass ice box hinges
2
brass ice box handles
1
brass top lid handle
*approximately 40 board feet
NOTES
1. Read all instructions and check materials before
beginning work.
2. Read manufacturer’s instructions before operat-
ing equipment.
3. Oak is preferred for this project.
4. Edge-gluing is required to achieve the necessary
width of boards F, H, N, X, AA and EE.
5. When using finish nails on oak, drill pilot holes
to avoid splitting.
6.
Always
wear safety glasses.
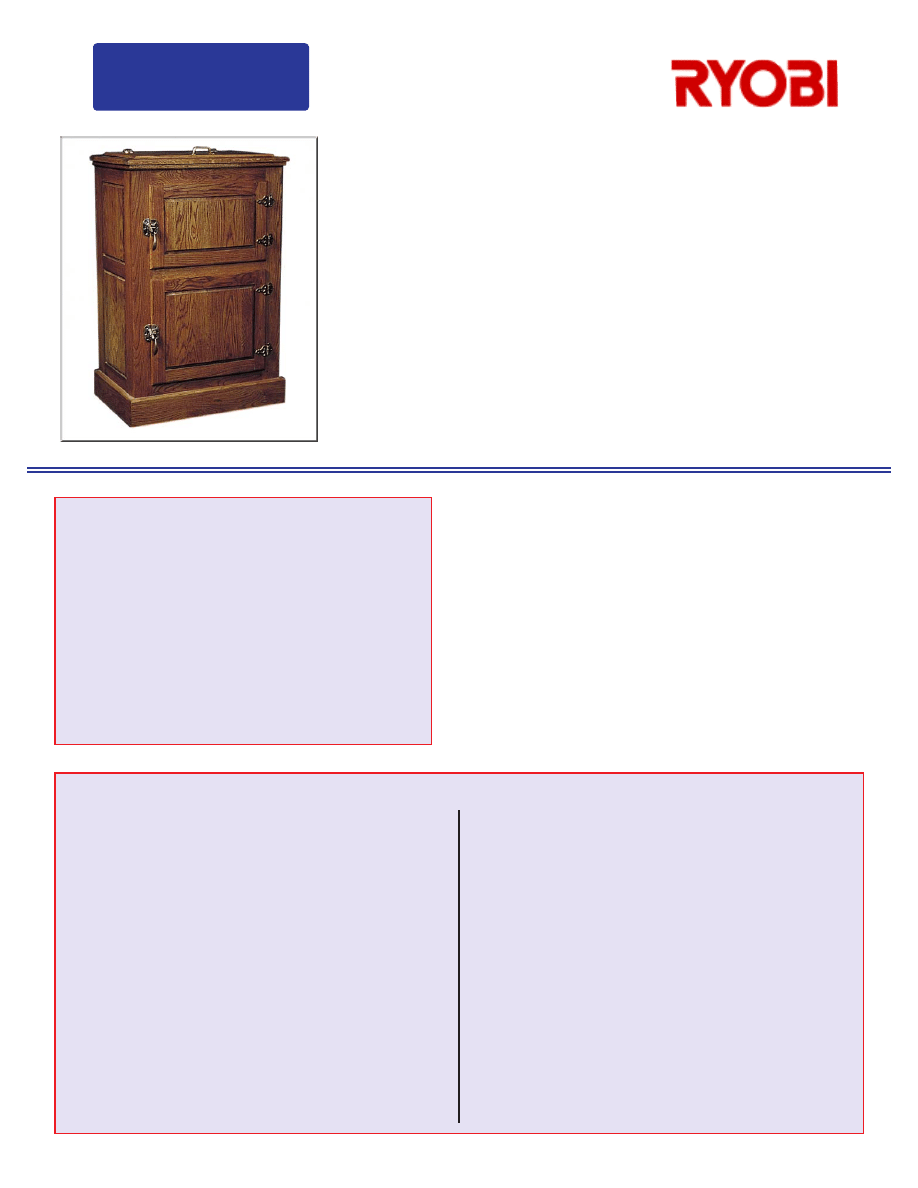
Although refrigerators long ago rendered them obsolete, antique oak ice boxes remain
popular with collectors, even though they’re expensive and hard to find.
This do-it-yourself version is neither: it’s both inexpensive and easy to build. An
authentic reproduction of an original, the project is especially popular when used as a
bar, but it has many other uses. The top opens up to reveal a convenient storage area,
and the lower cabinet features two compartments perfect for glassware and other frag-
ile items.
The ice box measures 38 inches high by 24 inches wide by 16 inches deep.
Item
Qty
T
W
L
Material
A
2
3/4”
3”
35 1/4”
oak
B
2
3/4”
2 1/4”
35 1/4”
oak
C
2
3/4”
3”
10”
oak
D
2
3/4”
2”
10”
oak
E
2
3/4”
4”
10”
oak
F
2
3/4”
10”
11 1/4”
oak
G
2
1/8”
10 1/2”
11 3/4”
oak plywood
H
2
3/4”
10”
15”
oak
I
2
1/8”
10 1/2”
15 1/2”
oak plywood
J
2
3/4”
3”
35 1/4”
oak
K
1
3/4”
3”
18”
oak
L
1
3/4”
2”
18”
oak
M
1
3/4”
4”
18”
oak
N
3
3/4”
15 1/8”
22 1/2”
oak
O
1
3/4”
2 1/4”
22 1/2”
oak
P
1
3/4”
2”
24”
oak
Item
Qty
T
W
L
Material
Q
2
3/4”
4”
16 3/4”
oak
R
1
3/4”
4”
25 1/2”
oak
S
1
1/8”
23 1/4”
37 1/4”
oak plywood
T
2
3/4”
2”
12 3/4”
oak
U
2
3/4”
2”
25 1/2”
oak
V
2
3/8”
3/4”
16 3/8”
oak
W
1
3/8”
3/4”
24 3/4”
oak
X
1
3/4”
13 3/8”
22 1/8”
oak
Y
2
3/4”
2”
14 5/8”
oak
Z
2
3/4”
2”
11 7/8”
oak
AA
1
3/4”
7 7/8”
14 5/8”
oak
BB
1
1/8”
8 3/8”
15 1/8”
oak plywood
CC
2
3/4”
2”
14 5/8”
oak
DD
2
3/4”
2”
15 5/8”
oak
EE
1
3/4”
11 5/8”
14 5/8”
oak
FF
1
1/8”
12 1/8”
15 1/8”
oak plywood
Cutting Schedule
Isometric
Note that Parts G, P and BB
do not appear on this drawing.
X
A
C
C
B
B
A
U
S
C
A
B
J
J
F
D
H
I
E
Q
R
M
N
Q
U
W
N
N
Z
Y
Y
L
Z
AA
K
O
T
T
V
45 DEGREE
MITER CUT.
Lower Door
DD
DD
CC
EE
FF
CC
Section A-A
Section B-B
Section C-C
X
X
N
N
N
P
R
M
L
Y
Y
AA
CC
CC
EE
U
O
K
W
U
T
C
V
N
F
G
D
H
N
F
A
B
J
Z
E
Q
N
BB
FF
I
S
S
G
Front
Back
Raised center panel
F, H, AA, EE
(See Figure 2)
Typical location of dowels
in parts A, B, C, D, E, J, K,
L, M, T, U, Y, Z, CC and DD
1/4” wide by 1/8” deep
rabbet
Round-over this edge
of doors
Run a 3/8”
x 3/8” rab-
bet around
this edge
of doors
1/8” plywood panel
Detail 1
Door & Side Panel Construction
Figure 1
End View of Top Lid X
Showing Annular Rings Reversed
Figure 2
F
A
S
G
Figure 3
Optional Decorative Cuts
for Raised Center Panels

3. Mark location for dowels in pieces A, B, C, D, E, J, K, L, M, T, U, Y, Z, CC and DD and drill 3/8” holes for dowels. Refer to
Detail 1.
1. Construct top lid X using three pieces of lumber, reversing direction of the grain and gluing and clamping (this will minimize
warping). See Figure 1. Allow glue-up to dry thoroughly.
2. Round-over all four top edges and run a 3/8” x 3/8” rabbet around all four bottom edges of board X. See Sections A-A and B-B.
4. Assemble and clamp face frame, side frames and door frames using 3/8” dowels and wood glue. Check for squareness. Refer
to Isometric.
5. Rout a 1/4” wide by 1/8” deep rabbet around the inside edges of the openings in side panels and door frames to accommodate
1/8” plywood. See Sections A-A, B-B and C-C and Detail 1.
7. Glue 1/8” plywood panels to inside side and door frames (do not use nails). See Detail 1.
8. Using your router, create raised center panels F, H, AA and EE. See Figure 3.
6. Cut a 1/8” deep by 3/8” wide rabbet inside back edge of side panel frames. See Figure 2.
Read all instructions before beginning any work. Cut all material to sizes shown in cutting schedule.
Assembly Instructions
10. Nail and glue side panels to shelves N (see Note 5). Refer to Sections A-A and B-B for position. Check for squareness.
11. Attach face frame J, K, L and M to cabinet using 1 1/4” finish nails and glue. Refer to Isometric.
12. Round-over top edges of base boards Q and R (see Section A-A and B-B). Attach boards Q and R to cabinet using 1 1/4” fin-
ish nails and glue. Refer to Isometric and Sections A-A and B-B.
9. Glue raised center panels to 1/8” plywood inserts (do not use nails). See Isometric, Sections A-A and B-B and Detail 1.
13. Attach boards O and P to side frames using 1 1/4” finish nails and glue. Refer to Section B-B.
14. Round-over bottom edges of boards V and W. Align top frame T and U and molding V and W and attach using 1 1/4” finish
nails and glue. Refer to Isometric and Sections A-A and B-B.
15. Nail plywood S to back of unit. Refer to Sections B-B and C-C.
16. Round-over all four edges of boards Y, Z, CC and DD on the outside of the doors. Run a 3/8” x 3/8” rabbet around all four edges of
boards Y, Z, CC and DD on the inside of the doors so that doors sit 3/8” into frames. Refer to Sections A-A and B-B and Detail 1.
17. Sand and stain the project.
18. Attach top lid and doors using brass ice box hardware.
Wyszukiwarka
Podobne podstrony:
Cabinet One door icebox
Cabinet three door bookcase
box taurus cabinets manual
box taurus cabinets manual
Cabinets Raised Panel Door Tools and Techniques
All Flesh Must Be Eaten Two Rotted Thumbs Up
Brit M Two Men and a Lady Prequel [Ravenous] (pdf)
picket window box
In literary studies literary translation is a term of two meanings rev ag
christmas box
DiagLab UkładKrzepnięcia 2 BOX
Day Two Creating Instant Confidence
horse creep box
Ortopedia Egzamin 2012 BOX
gift box a p
Corner Buffet Cabinet(1)
Bentwood Box
więcej podobnych podstron