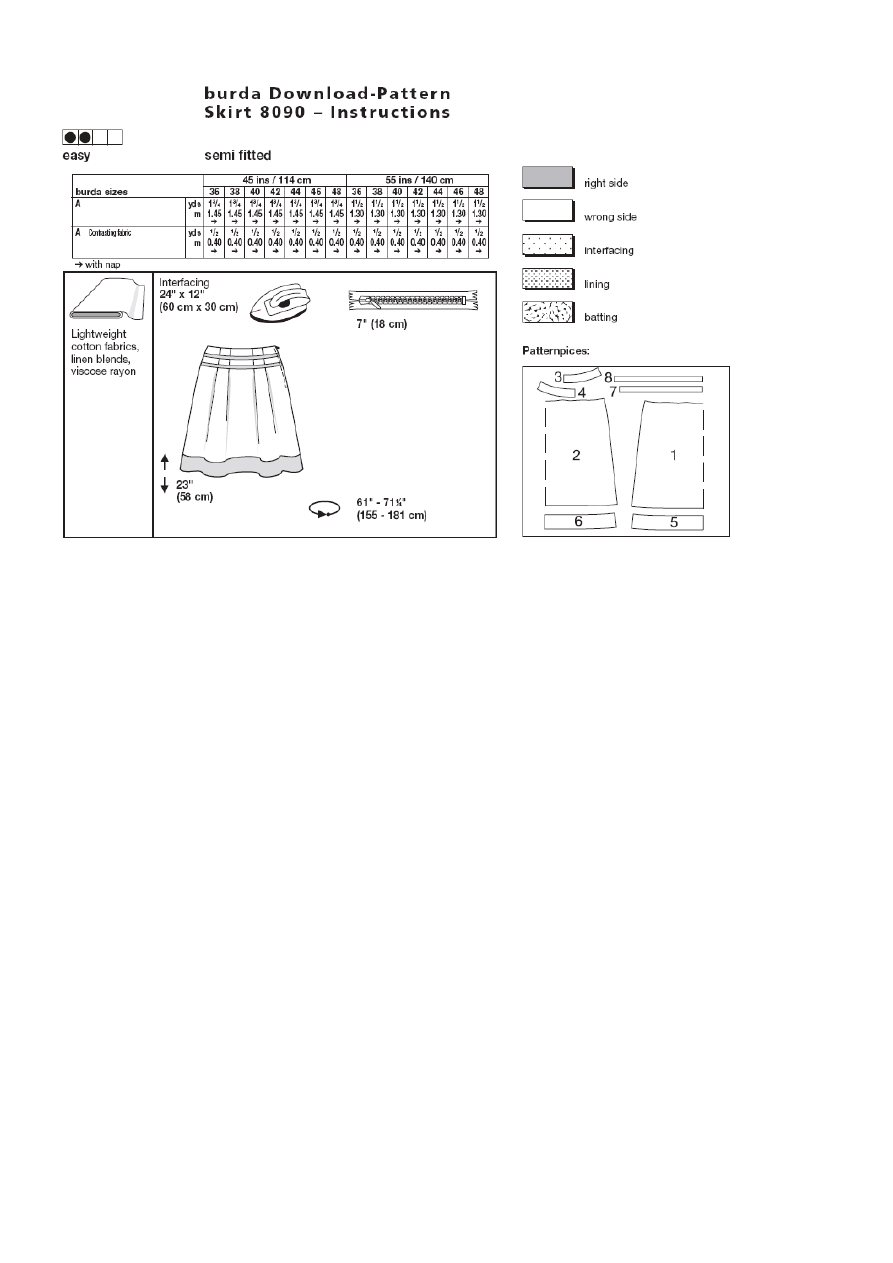
PATTERN
1 Front skirt panel 1x
2 Back skirt panel 1x
3 Front facing 1x
4 Back facing 1x
5 Front placket / Hem 1x
6 Back placket / hem 1x
7 Strip I 2x
8 Strip II 2x
Paper cut for ANSI A (German DIN A4) prints:
The patterns are printed out on 20 sheets with a thin
frame. Wait, until all sheets are printed out. Arrange the
sheets so that they fit together (see extra page with the
overview of the prints). Cut off the single sheets on the
upper and right edge along the thin frame lines. Begin
with the left lower sheet and then glue the parts in the
frame lines together precisely.
Select your size according to the Burda size chart:
Dresses, blouses, jackets and coats according to the bust
size, trousers and skirts according to the hip width.
Change the patterns according to size (inches or cm) if
necessary, to fit your measurements if they deviate from
the Burda size chart.
Cut out the pattern according to your size. Top skirt
edge = 1” (2.5 cm) below the waist
LENGTHENING
OR
SHORTENING
THE
PATTERN PIECES
Our pattern is calculated for a height of 5’ 6” (168 cm). If
you are taller or shorter, you may adjust the pattern to fit
your size at the lines marked "lengthen or shorten here".
Thus the fit is preserved.
Make sure that you adjust all pieces of one model by the
same amount at the same lines.
How to lengthen and shorten pattern pieces:
Cut the pattern pieces along the marked lines.
To lengthen, slide the two halves of the pattern piece as
far apart as necessary.
To shorten, overlap the two halves of the pattern piece as
far as necessary. Even out the side edges.
CUTTING OUT
FOLD (– – – –) means: here is the center of a pattern
piece but never a cut edge or a seam. The piece should be
cut double, with the fold line forming the centre line.
Pattern pieces that are outlined with a broken line in the
cutting diagrams are to be placed face down on the fabric.
The cutting diagrams on the pattern sheet show how
the pattern pieces should be placed on the fabric.
For a single layer of fabric, the pattern pieces are pinned
to the right side of the fabric. For double layers of fabric,
the right sides are facing and the pattern pieces are pinned
to the left side. The pattern pieces that are shown in the
cutting diagram, extending over the fold of the fabric,
should be cut last from a single layer of fabric.
Important: Trim the skirt pattern pieces from the single
layer of fabric, the pattern pieces are pinned to the right
side of the fabric, the labeled pattern side on top = see
cutting diagram
SEAM
AND
HEMLINE
ALLOWANCES
are
included on an average:
5/8” (1.5 cm) for all edges and seams. Use BURDA
carbon paper to transfer all pattern lines and markings to
the left side of the fabric pieces. You will find
instructions in the packet.
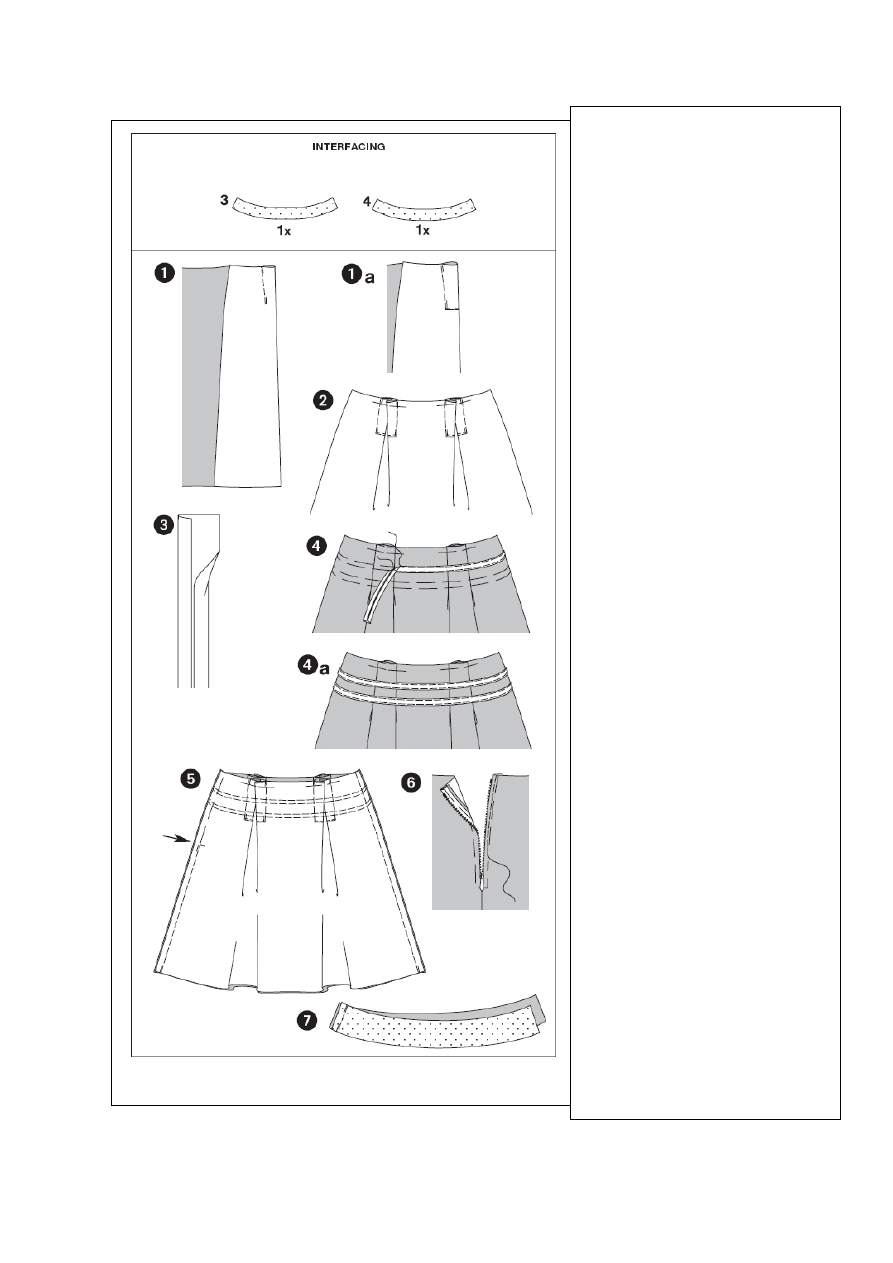
Interfacing
Cut interfacing according to drawing and
press onto the left fabric side.
SEWING
When sewing the right fabric sides are
facing.
Transfer all lines on the pattern using a
basting stitch to the right fabric side.
SKIRT
Pleats
1) Fold the front skirt panel in such a way
that the pleat notches meet; right fabric side
inside. Stitch on pleat lines from the top to
the arrow and across pleat intake to create
tuck pleats.
2) Fold and press pleats intake inwards to
corresponding pleat. Pin the top. Stitch the
pleats of the back panels the same way and
press.
Strips
3) Press the lengthwise edges of the strips
towards the center.
4) Baste strip I – the marked lines meeting –
onto the front and back skirt panels and
topstitch closely on both sides. In the same
way, stitch strip II as marked in equal
distances below (4a).
Side seams
5) Position the front skirt panel onto the back
skirt panel, right sides facing, baste side
seams (seam 1), making sure the strips line
up. Stitch right side seam. Stitch the left side
seam from the slit (arrow) down to the hem.
Secure thread ends. Keep slit basted. Trim
allowances and press apart.
Zipper
6) Baste the invisible zipper under the slit
edges. Stitch zipper using the zipper foot.
Top skirt edge / Facing
7) Position the front facing onto the back
facing with the right sides facing, stitch the
right side seam (reverse towards the skirt /
seam 2). Press allowances apart. Neaten the
bottom facing edge.
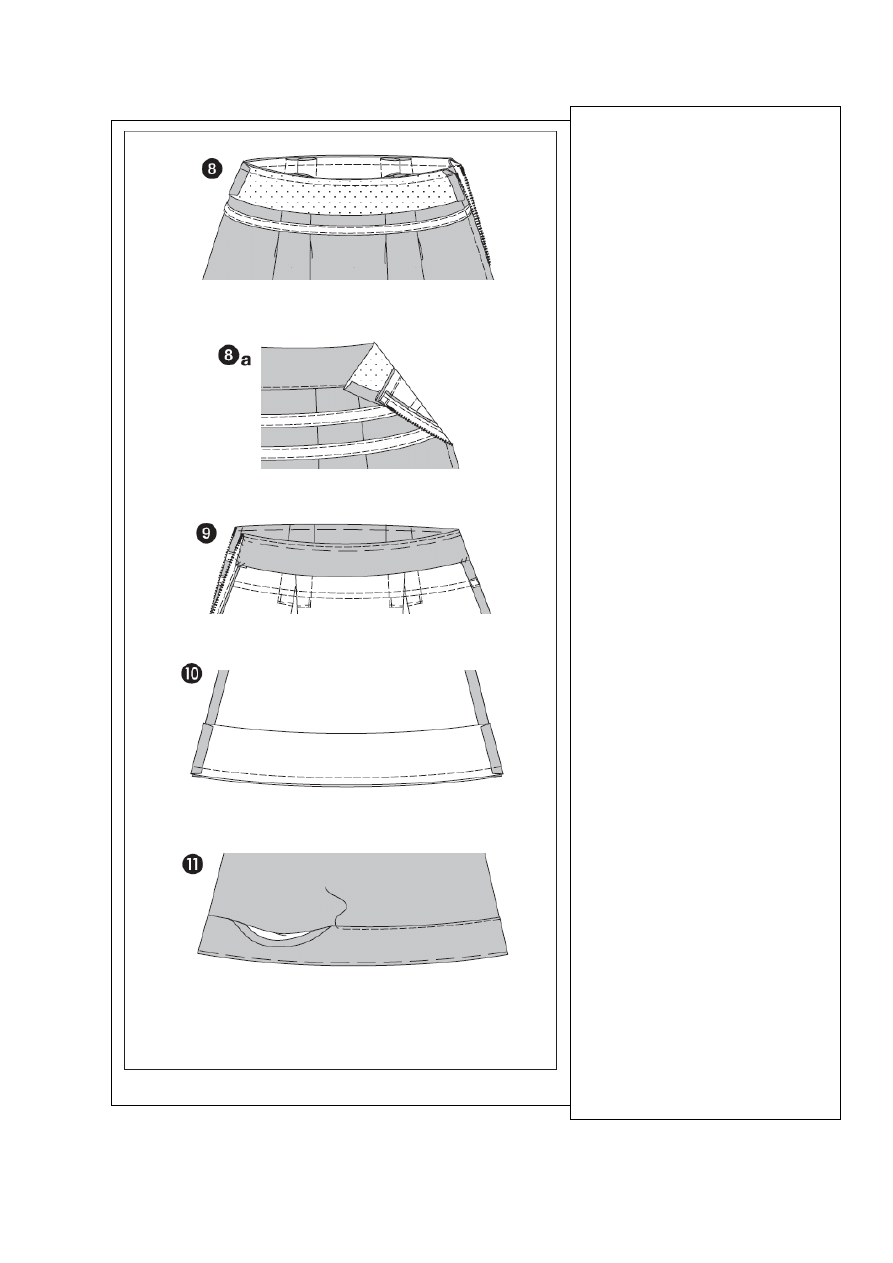
8) Baste the facing onto the top skirt edge
with the right sides facing; side seams meet.
Fold the side facing edges inwards. Stitch
facing around waist. Trim allowances. Fold
facing upwards, press allowances in towards
the facing, and stitch in the ditch along the
waist. (8a).
9) Turn the facing inwards, press. Stitch side
facing edges onto the zipper allowances and
the allowances of the right side seam.
Placket / hem
Position front placket onto the back placket,
right sides facing: stitch side seams (seam 3).
Press allowances apart.
10) Baste the right fabric side of the placket
onto the left fabric side of the bottom skirt
edge; side seams meet. Stitch. Trim
allowances.
11) Turn the placket over towards the right
skirt side. Baste bottom edges, press. Baste
top placket edge at the marked line after
folding it inwards. Topstitch close to the
edge.
Document Outline
Wyszukiwarka
Podobne podstrony:
marie pencil skirt instructions
Laurelle Jeans Skirt instructions
Vanessa Skirt instructions
Sidonie aline skirt instructions
alma skirt instructions
6012 Skirt Kasia Instructions
high waisted skirt pattern instructions
132 Skirt drafting and sewing instructions original
wykład 6 instrukcje i informacje zwrotne
Instrumenty rynku kapitałowego VIII
05 Instrukcje warunkoweid 5533 ppt
Instrukcja Konwojowa
2 Instrumenty marketingu mix
Promocja jako instrument marketingowy 1
więcej podobnych podstron