HOW TO BUILD AN
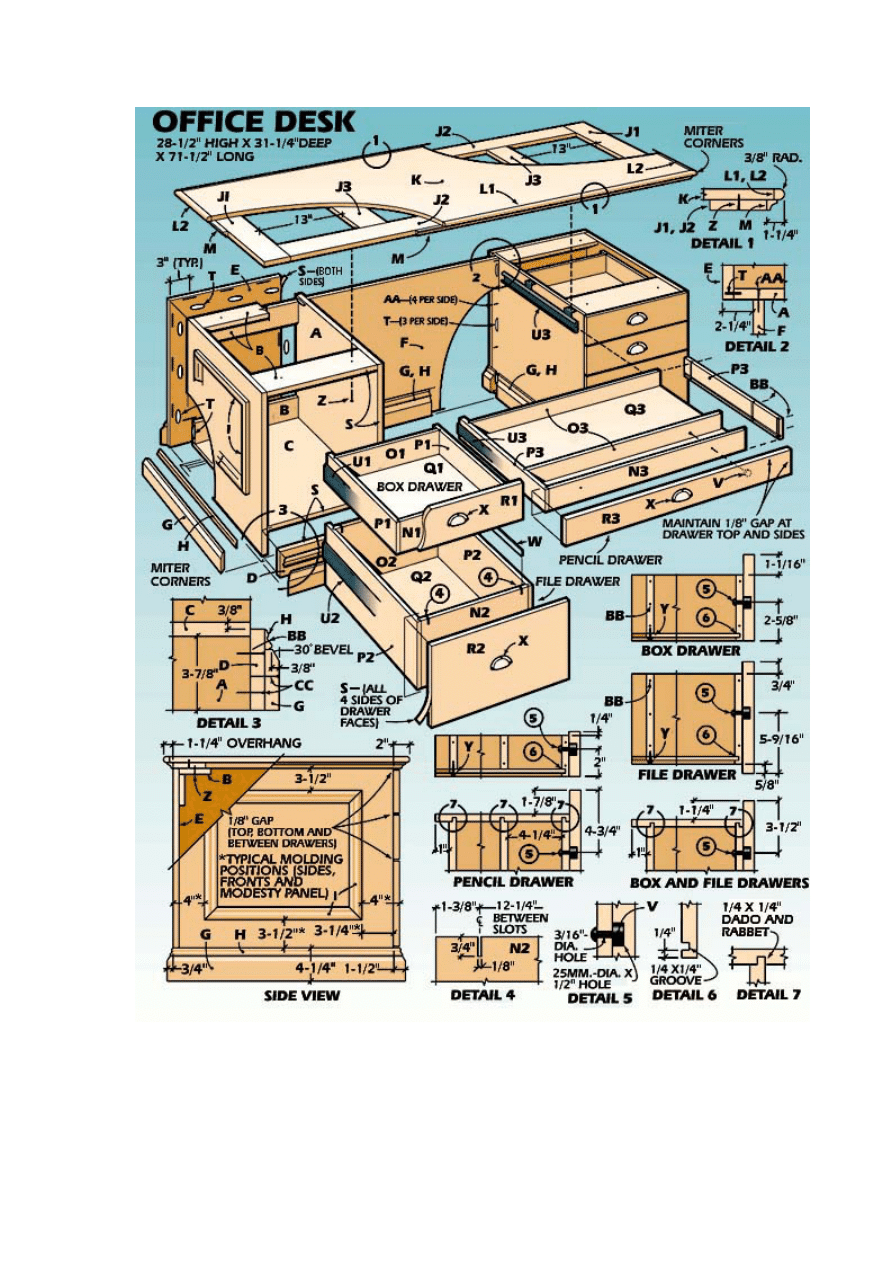
OFFICE DESK
A comfortable and spacious worksurface with full-size file drawers below.
One of the reasons that home offices are so popular these
days is that the term can mean so many different things.
We may call it a home office now, but it's not much different
from the den, library and study of days gone by. And
though the electronic hardware may well have changed, the
essential function has remained the same. It's the place to
work when you're serious about getting something done.
nd, as always, the heart of the room is the
A
.
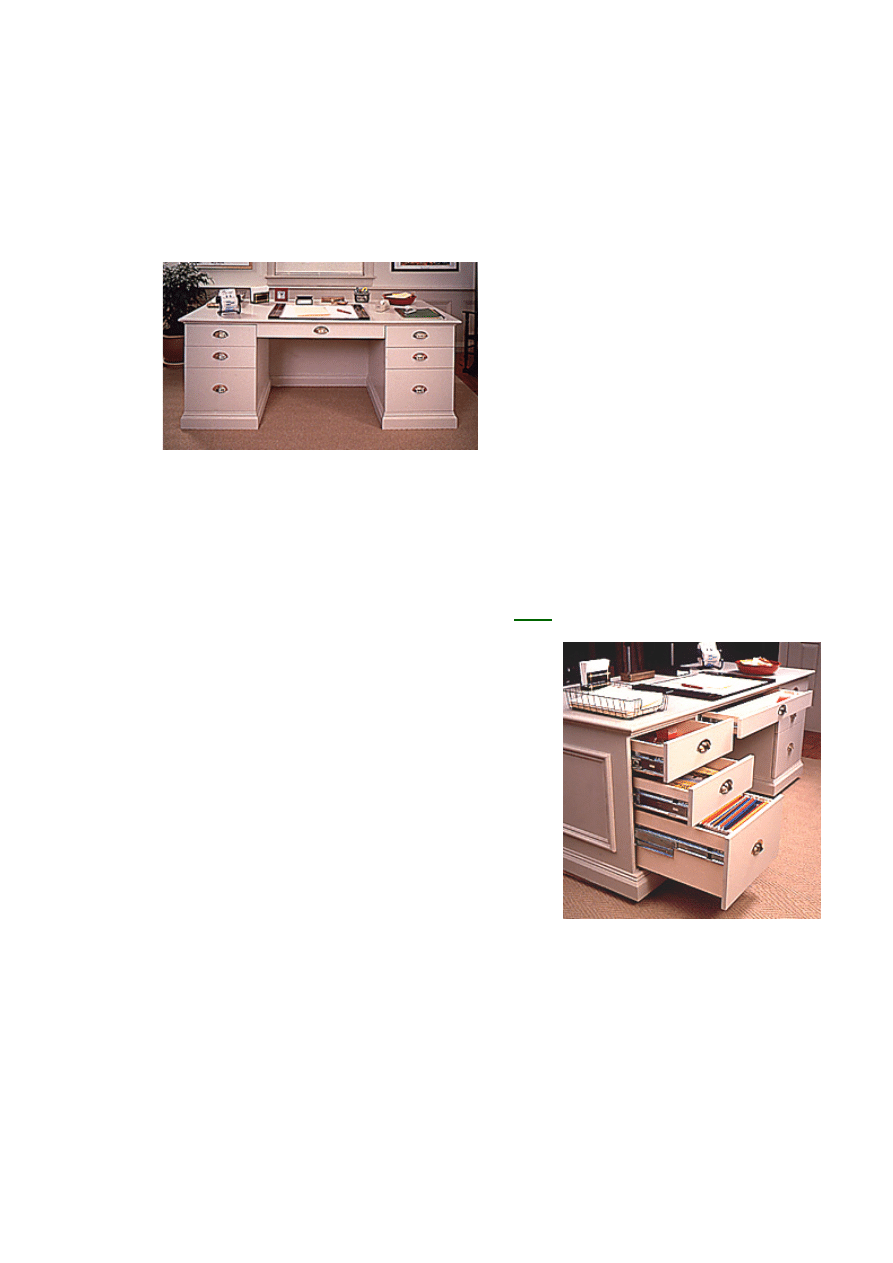
The one we've designed here has plenty of
storage space--seven drawers in all--and plenty of
surface area too, nearly 16 sq. ft. Its cool, clean
lines suggest a seriousness of purpose that's
good for any work environment. This design is
also the starting point for the credenza and wall-
unit pieces that follow. All three are based on the
same easy-to-build module. On the desk, each
module has one file drawer and two utility
drawers. On the credenza, each has two file
drawers. And on the wall unit, you can choose
drawers or doors. Here, we go into great detail
about building the modules and the drawers. So
be sure to review these instructions even if you
plan only to build one of the others.
This desk is loaded with space. Each
pedestal has one file and two utility
drawers. And, there's a pencil drawer in
etween.
b
Desk
pedestals
Begin construction by laying out your desk parts
on sheets of 3/4-in. birch plywood. Cut them to
rough size using a circular saw and a
straightedge guide. Then, use a table saw to rip
and crosscut the parts to the finished size. The
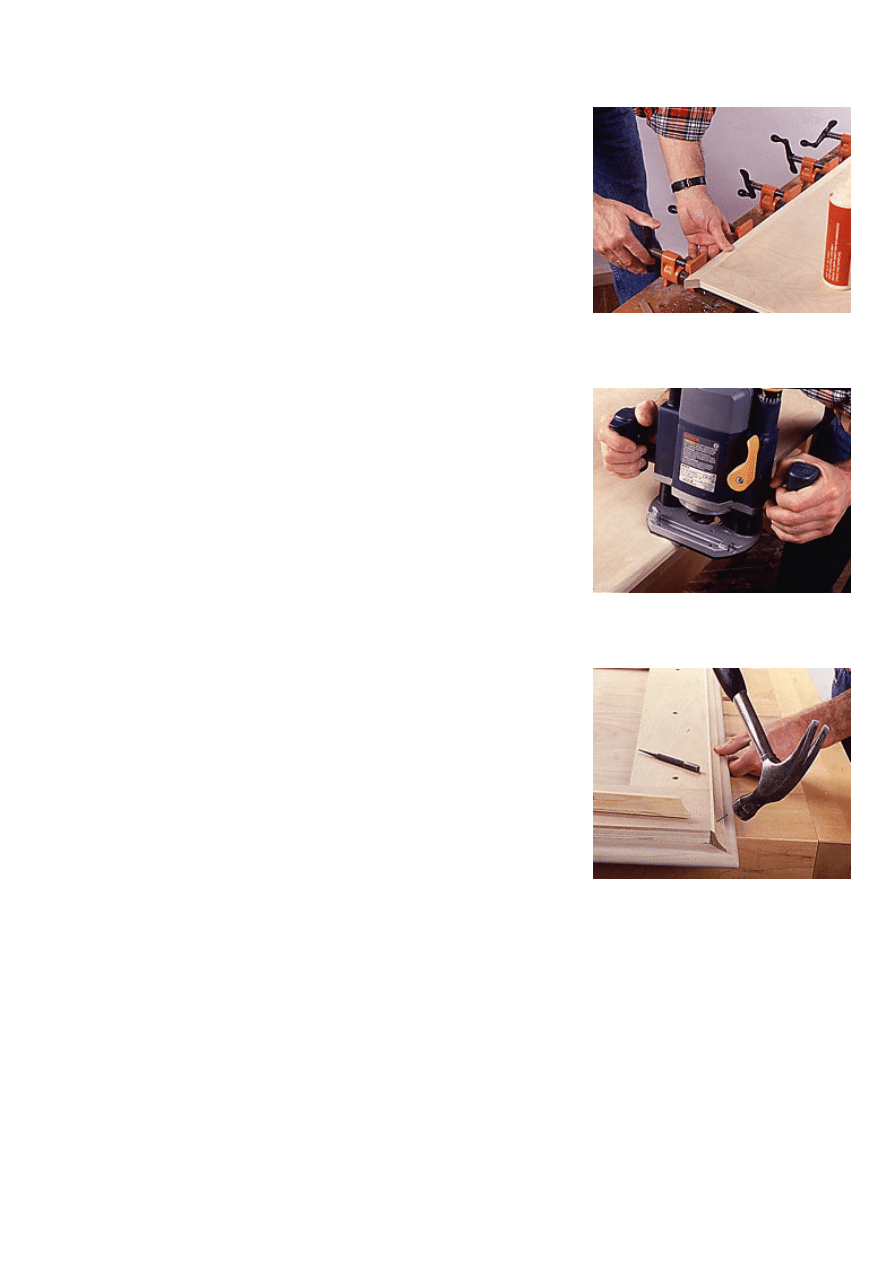
quickest and least expensive way to edge-band
the panels is to apply veneer edge tape. This tape
comes in strips that are 13/16 in. wide x 8 ft. long,
and it has hot-melt adhesive on its back side. To
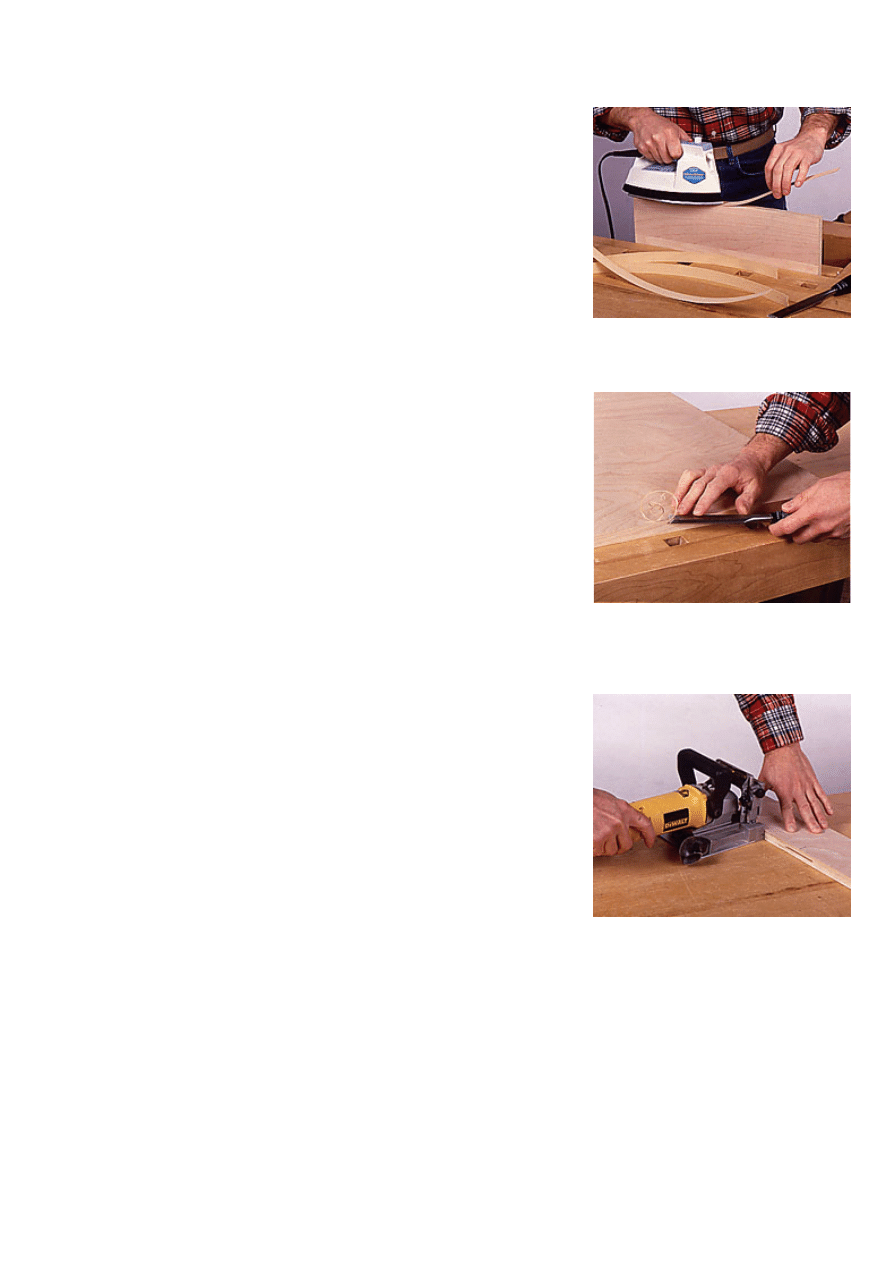
bond the veneer to the edge, just clamp the panel
in a vise, then using a household iron -- set on
High -- press the tape onto the edge (Photo 1).
The heat activates the glue.
Once the veneer edging has cooled-which takes
only a minute or two -- use a sharp chisel to trim
the tape flush to the panel's surface (Photo 2).
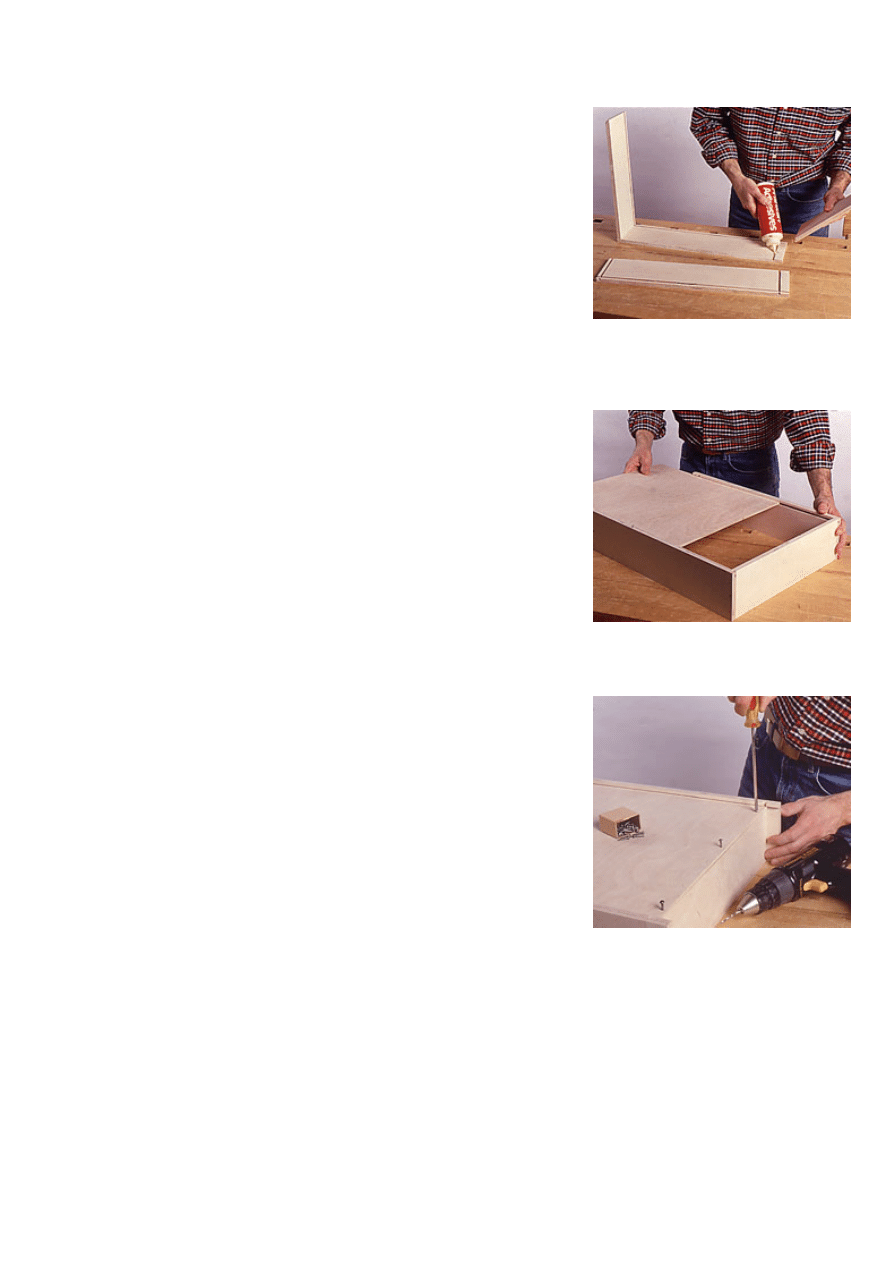
Next, lay out the location of the joining-plate slots
on the case bottom, back and top rails. Use the
plate joiner to cut the slots (Photo 3).
When it's necessary to cut the slots perpendicular
to the edge of a panel-at the back of the case
bottom, for example-clamp the panel to the table-
saw rip fence and use the saw table as a
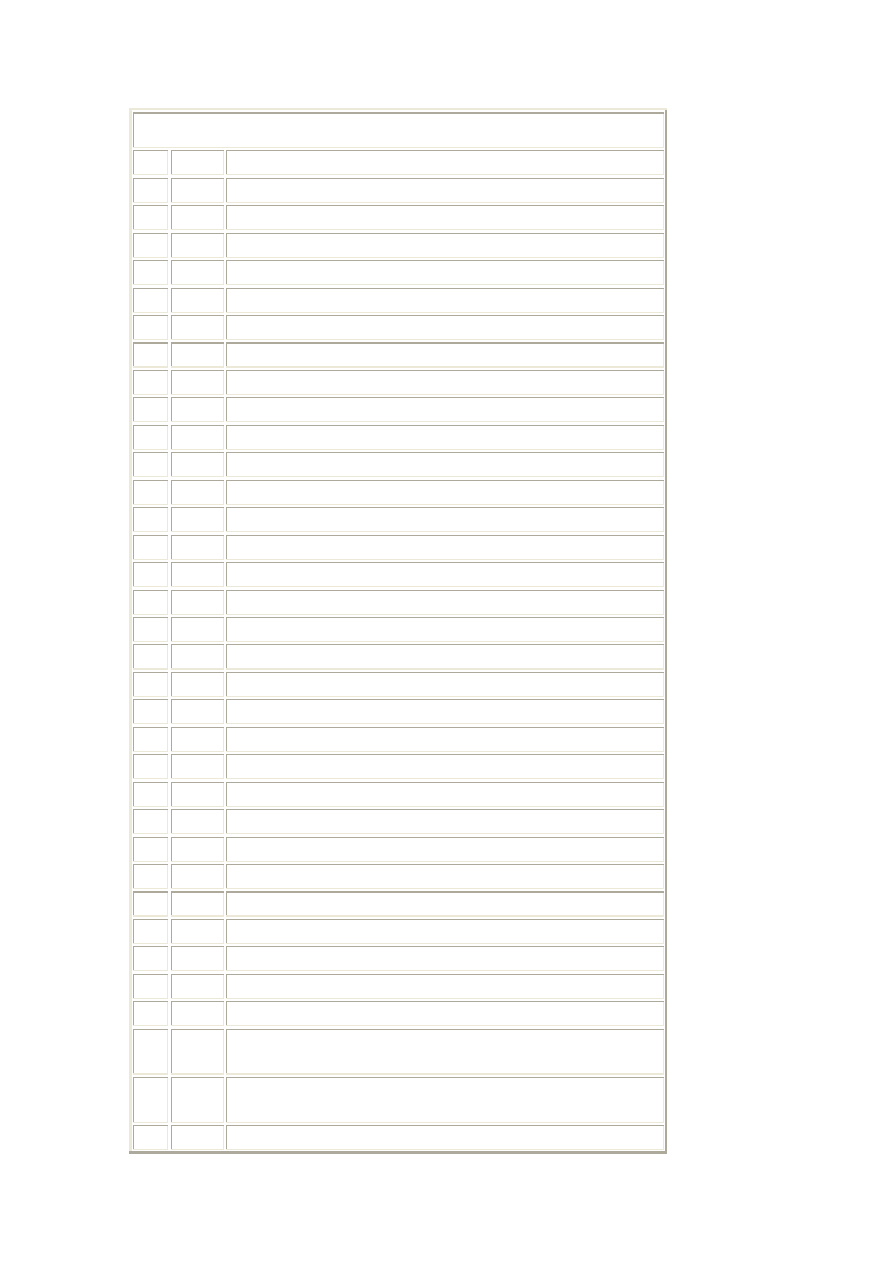
registration surface (Photo 4). Apply glue to slots
and plates, then assemble the bottom-, top- and
back-rail joints.
1--Finish the plywood edges with iron-on
veneer tape. Set the iron for high heat and
press down to activate the hot-melt glue.
2--Trim the edging tape flush to the panel
with a sharp chisel. Cut with the grain
direction, not against it, to prevent
splitting.
3--After cutting all the case parts to size
and applying the edge tape, begin
assembly by cutting plate slots in the back
rails.
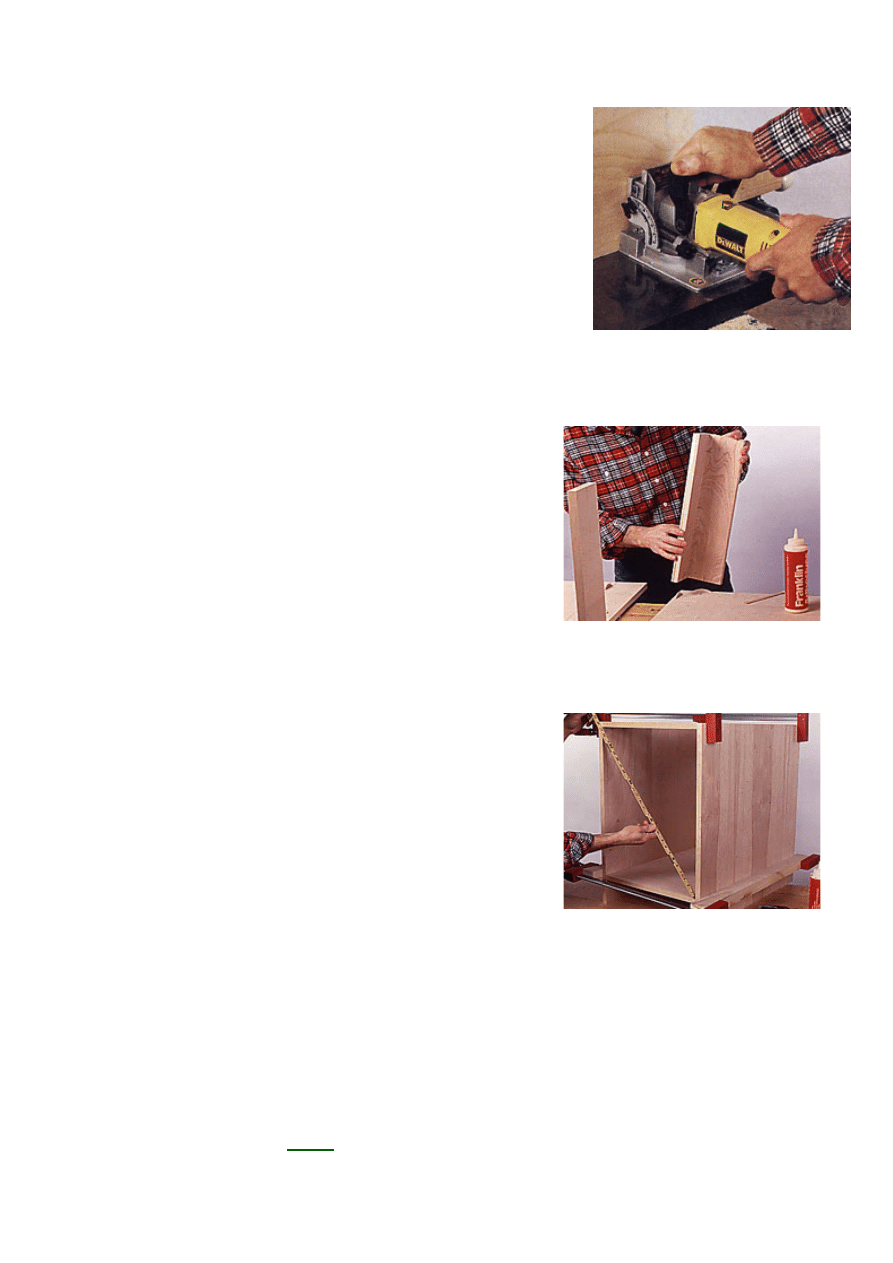
4--Cut the plate slots in the case bottom
by clamping the panel to your table-saw
fence and sliding the plate joiner across
he table.
t
Lay out and cut the plate slots for the joints
between the case bottom assembly and sides,
and also between the top rails and sides. Then,
assemble the pedestal box by gluing together the
case sides, bottom assembly and top rails (Photo
5).
Use clamps to pull the joints tight, then compare
opposite diagonal measurements to be sure that
the assembly is square (Photo 6).
Readjust the clamps, if necessary, then let the
glue set. Because the desk pedestals are
exposed on all sides, the back of the cases must
be finished. Fabricate these backs by applying
solid wood edging to the two long edges of the
plywood panels, as shown in the drawing. Then,
lay out and cut the joining-plate slots in the back
panels and in the mating edges of the case sides.
These plates are not absolutely necessary for
structural integrity, but they do make positioning
of the back panels automatic during assembly.
Glue and clamp the parts in place. Then, cut and
edge-band the top edge of the baseboard
blocking. These blocks are used to bring out the
surface of the baseboard beyond the front surface
of the drawer faces. Install the blocks with glue
and 4d finishing nails. Use clamps to temporarily
hold the modesty panel in place against one of
the pedestals. Mark the locations of the joining-
plate slots, then do the same for the other
pedestal. Cut the plate slots for these joints using
a straightedge guide (Photo 7).
pilot holes from inside
5--Begin assembly with one side on the
bench. Apply glue to plates, slots and
edges, then push the second side in
place.
6--Draw all joints tight with clamps, then
check the case for square by comparing
opposite diagonal measurements.
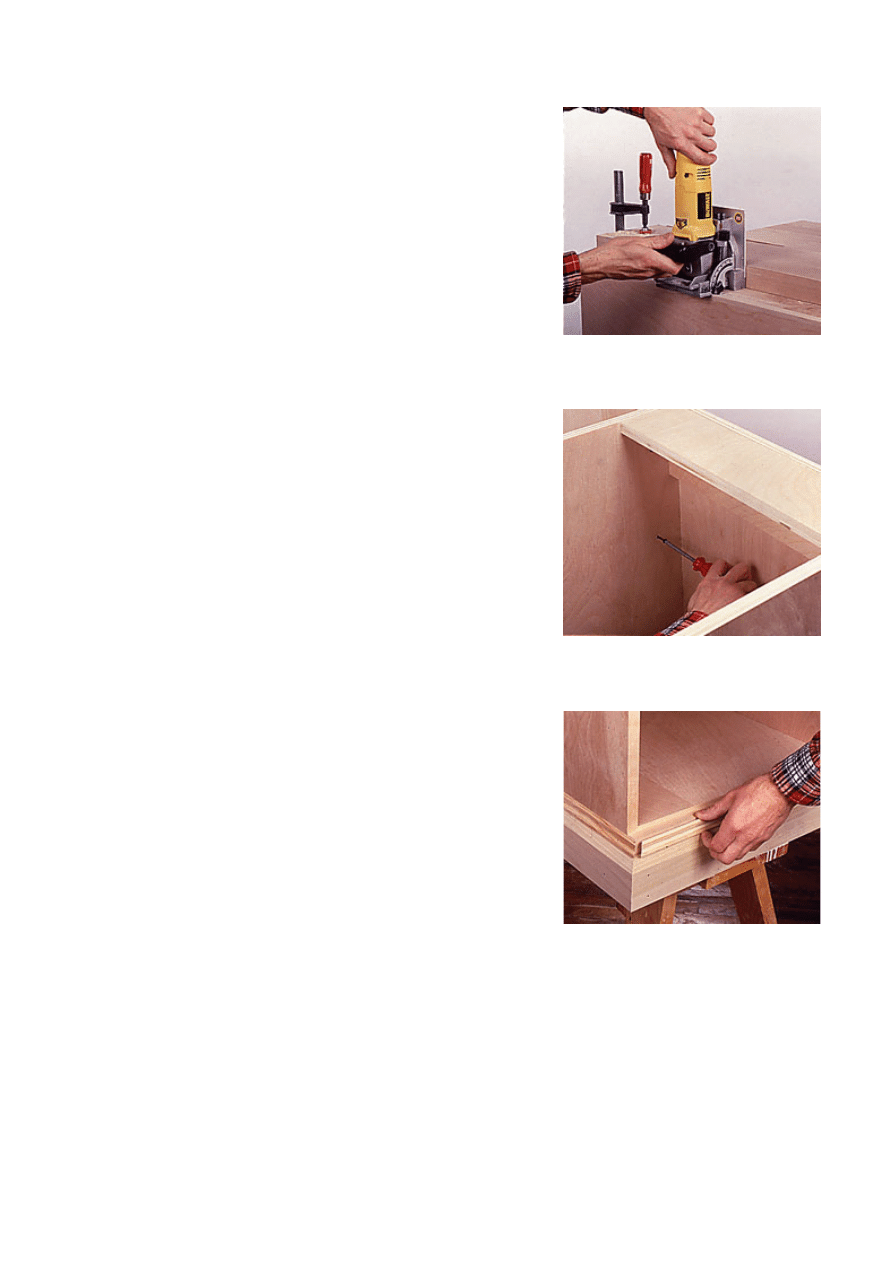
the pedestals to fasten the panel in place. These
screws eliminate the need for awkward clamping.
Apply glue to slots and plates, then join the
modesty panel to the pedestal. Drive 2-in. screws
into the panel. Then do the same thing for the
other pedestal (Photo 8).
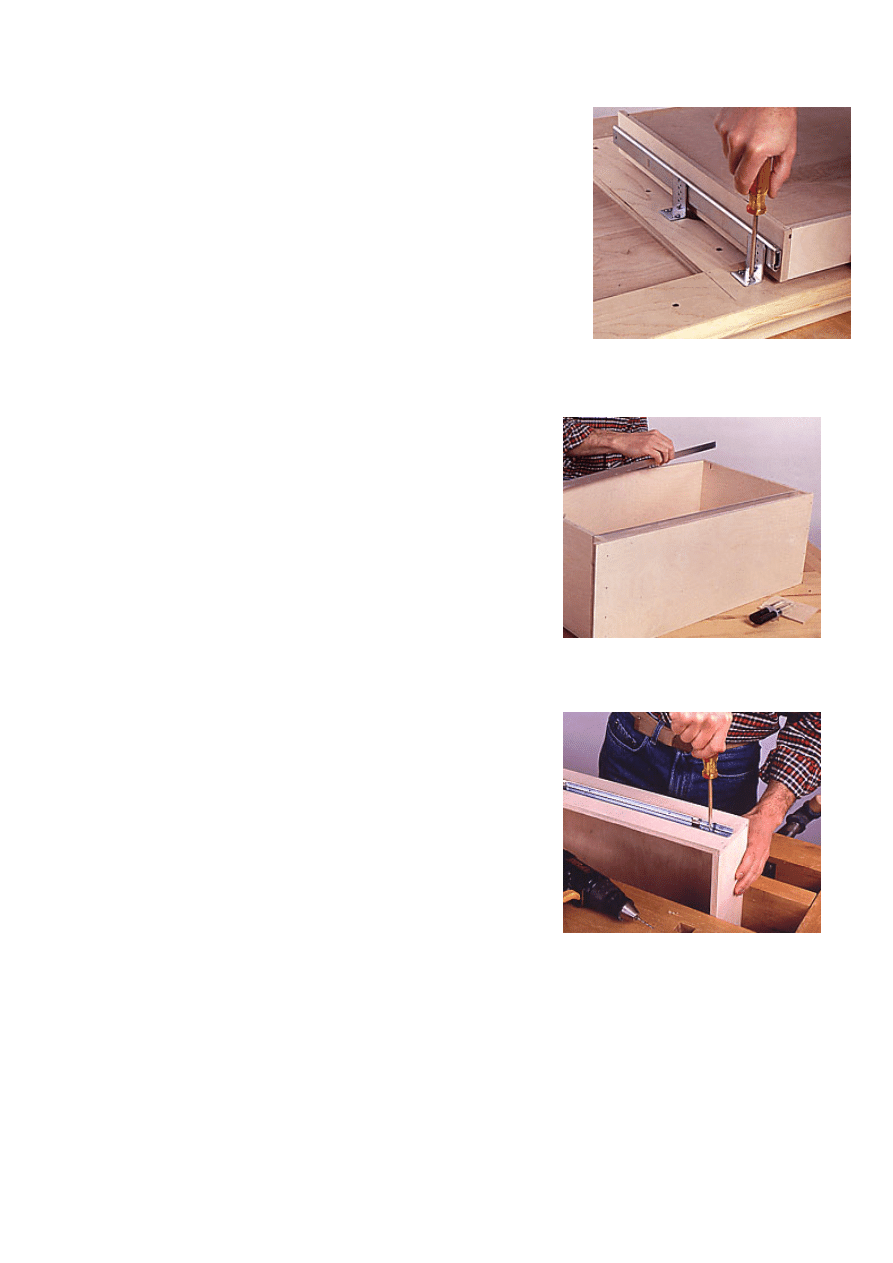
Cut the baseboard stock to size, then use a 30o
chamfer bit in a router table to shape the top edge
of the molding. Miter the ends and fasten them in
place using glue and 4d finishing nails. Then, cut
and install the small panel molding around the top
of the baseboard, using 1-in. brads (Photo 9).
Mark the position of the large panel molding on
the desk sides and front, as shown in the drawing.
Again, attach the panel molding to the desk with
1-in. brads.
7--Clamp a straightedge to the case side
to guide the joiner. Then, cut slots for the
plates used to attach the modesty panel.
8--Apply glue to the modesty panel, plates
and slots and push together. Bore pilot
holes and drive screws to tighten the joint.
9--Install the baseboard around the desk,
then finish the profile by nailing panel
molding above the baseboard.
Desktop
Cut the plywood panel to size for the desktop.
Then, cut the edging to size, miter the ends and
glue and clamp the edging to the top (Photo 10).
When the glue is dry, use a router with a 3/8-in.-
rad. rounding-over bit to shape the top edge of
the desk (Photo 11).
These bits have a ball-bearing pilot that rides
against the edge of the work. So, when it comes
time to shape the underside of the top, the
bearing no longer has a proper surface to ride
against. Instead, use a router fence to guide the
router for the bottom cut. With the desktop upside
down, cut and install the build-up strips 1 1/4 in.
from the outside edges of the top. Use glue and
screws to fasten the strips. Next, cut and install
the cove molding against the build-up strips
(Photo 12).
To provide proper fastening of the top to the
pedestals and to provide a place to hang the
pencil-drawer slides, install two cross strips as
shown in the drawing.
10--Begin the desktop by cutting panel to
size and cutting solid wood banding to fit
the edges. Miter corners of banding.
11--Glue and clamp the edge banding in
place and, when glue is dry, route the top
edge with a 3e8-in.-rad. rounding-over bit.
12--After the support strips have been
installed on the bottom of the top, miter
nd nail cove molding to edges of strips.
a
Drawers
The drawers are constructed of 1/2-in.-thick Baltic
birch plywood. Begin by ripping and crosscutting
the material to size for drawer sides, fronts and
backs. Cut the dadoes at the front edge of the
drawer sides using dado blades in a table or
radial-arm saw. Then, cut the dadoes at the back
edge of the sides. Follow this by cutting a rabbet
at each end of the front and back panels, again
using the dado blades. These rabbets form a
tongue on the end of the drawer fronts and backs
that fits neatly into the dadoes in the sides. Cut
the same dado on the ends of the pencil-drawer
partition. Finish the joinery cuts by making a
groove in the sides and front to accept the drawer
bottom. The file drawers are designed to accept
aluminum rails that support hanging file folders.
These rails are cut from 1/8 x 3/4-in. aluminum
flat stock, readily available from hardware
suppliers. To cut the notches for these rails in the
front and back panels, clamp a panel to a table-
saw miter gauge in a vertical position. Then, set
the saw blade to a 3/4-in. height and make one
pass over the blade. Repeat the procedure at the
opposite end. Cut the drawer bottoms from 1/4-
in.-thick birch plywood, taking care that these
pieces are cut square. Next, sand all of the
interior drawer parts with 120- and 220-grit
sandpaper and dust off thoroughly. Begin the
assembly of each drawer by gluing together the
front, back and side panels (Photo 13).
Drive 1-in. wire nails through the sides and into
the ends of the front and back panels. Finally,
slide the bottom panel in place (Photo 14) and
fasten it to the bottom edge of the drawer back
with screws (Photo 15).
When all drawers have been assembled, finish
sand the drawer exteriors with 120- followed by
220-grit sandpaper. Make sure to ease the top
edges of the drawer box to prevent cuts and
splinters. The pencil-drawer slides that we used
have hanger brackets that mount to the bottom of
the desktop. Fasten these brackets to the slide,
with the screws provided, so the flange points
outward. Then, pull the slides apart and attach the
other section to the sides of the drawers. Use only
the slotted vertical holes for attachment at this
time to allow for adjustment of the drawer later.
13--Cut the drawer parts to size and finish
sand with 220-grit paper. Dust off, then
apply glue to all joints and assemble
parts.
14--Cut the drawer bottom to size and
sand smooth with 220-grit paper. Then,
slide the bottom into the drawer assembly.
15--Once the bottom is completely seated
in drawer, bore pilot holes into the drawer
back and install screws. Do not use glue.
Push the slides together again and fasten the
whole assembly to the desktop by driving screws
through the slotted mounting holes (Photo 16).
16--Attach slides to pencil drawer and
plane on bottom side of top. Drive
ounting screws through slotted holes.
m
Before installing the drawer slides on the file
drawers, make kerf cuts in the drawer front and
back pieces to accommodate the aluminum bar
stock that supports the hanging files. Then, cut
the bar stock to length and file the ends smooth.
Next, place a drop of 5-minute epoxy in the kerfs
and slide the bars into position (Photo 17).
The drawer slides we used on the box and file
drawers are different in design than the ones
used for the pencil drawer. But the basic
installation system is the same. Carefully read the
instructions that accompany the slides, then lay
out the locations of the screw centerlines on the
drawer boxes. Fasten one side of each slide to
the sides of the boxes, using the vertically slotted
holes (Photo 18).
Bore pilot holes for the mounting screws, and
hang the other side of each slide on the sides of
the pedestals. Once all the drawers are installed,
check for proper operation and fit. Make any
necessary adjustments, then install the rest of the
slide mounting screws. Remove the drawers from
the cases and place the desktop in position over
the pedestals. Use clamps to temporarily hold the
top in place while you screw through the pedestal
stretchers into the bottom side of the desktop
(Photo 19).
Next, cut and edge-band the drawer face panels.
Since aligning these faces can be a slow and
painstaking task, we used drawer face adjusters
to join the faces and drawer fronts. These
adjusters allow for 3/16 in. of movement of the
17--Cut aluminum bars for hanging files to
length. Then, apply a dab of epoxy to the
support slots and push the bars in place.
18--Install the slides on the other drawer
assemblies. Again, use the slotted holes
so you can easily adjust the parts later.

face in any direction, making alignment easy. To
mount the faces, first clamp them to the boxes in
their desired position. Bore a 3/16-in.-dia. hole for
each adjuster through the drawer box front and
just slightly into the back side of the face. This
marks the location of the adjuster. Remove the
face and use the drill press to bore a 25mm x 1/2-
in.-deep recess for each adjuster, centered on the
pilot holes. Then, use a hammer to tap an
adjuster into each recess (Photo 20).
Finally, attach the faces to the drawer boxes with
the machine screws provided (Photo 21).
Reinstall the drawers in the pedestals and make
adjustments as necessary to achieve nice, even
margins between all drawers. Finally, lay out and
bore pilot holes for the drawer pulls and set all
nailheads. Fill any holes with a quality wood filler
and when it's dry, sand the entire desk with 220-
grit sandpaper. Apply one coat of acrylic latex
primer and sand it lightly after it has dried. Then,
cover the piece with two more coats of quality
latex paint. Install the drawers and the drawer
hardware, and you're done.
19--Place top on the desk pedestals and
clamp in place. Bore pilot holes through
the rails into the top and install screws.
20--Bore holes in the back side of each
drawer face for the adjusters. Then, tap
adjusters into the holes. No glue needed.
21--Attach the drawer faces to the drawer
boxes by driving the screws through the
drawer fronts and into the face adjusters.
MATERIALS LIST-OFFICE DESK
Key No. Size and description (use)
A
4
3/4 x 27 x 27 1/4" plywood (side)
B
8
3/4 x 4 x 16 1/2" plywood (rail)
C
2
3/4 x 16 1/2 x 27 1/4" plywood (bottom)
D
2
3/4 x 4 1/4 x 18" plywood (blocking)
E
2
3/4 x 18 x 27" plywood (panel)
F
1
3/4 x 27 x 33" plywood (modesty panel)
G
24 ft. 3/4 x 3 3/16" x poplar (base molding)
H
24 ft. 3/8 x 1 1/16" pine (base trim)
I
50 ft. 11/16 x 1 5/8" pine (panel molding)
J1
1
3/4 x 4 x 28 3/4" plywood (support strip)
J2
2
3/4 x 4 x 61" plywood (support strip)
J3
2
3/4 x 4 x 20 3/4" plywood (support strip)
K
1
3/4 x 29 3/4 x 70" plywood (top)
L1
2
3/4 x 3/4 x 71 1/2" poplar (edge band)
L2
2
3/4 x 3/4 x 31 1/4" poplar (edge band)
M 18 ft. 3/4 x 3/4" pine (cove molding)
N1
4
1/2 x 4 1/2 x 15" plywood (drawer front)
N2
2
1/2 x 9 3/4 x 15" plywood (drawer front)
N3
1
1/2 x 3 x 28 1/2" plywood (drawer front)
O1
4
1/2 x 4 x 15" plywood (drawer back)
O2
2
1/2 x 9 1/4 x 15" plywood (drawer back)
O3
2
1/2 x 2 1/2 x 28 1/2" plywood (drawer back, partition)
P1
8
1/2 x 4 1/2 x 20" plywood (drawer side)
P2
4
1/2 x 9 3/4 x 26" plywood (drawer side)
P3
2
1/2 x 3 x 20" plywood (drawer side)
Q1
4
1/4 x 15 x 18 3/4" plywood (drawer bottom)
Q2
2
1/4 x 15 x 24 3/4" plywood (drawer bottom)
Q3
1
1/4 x 18 3/4 x 28 1/2" plywood (drawer bottom)
R1
4
3/4 x 5 9/16 x 18" plywood (drawer face)
R2
2
3/4 x 11 1/8 x 18" plywood (drawer face)
R3
1
3/4 x 3 1/4 x 32 3/4" plywood (drawer face)
S
As
reqd.
iron-on veneer tape
T
As
reqd.
No. 20 joining plates
U1* 4 pr. No. 3037 Accuride drawer slide, 20" long
U2* 2 pr. No. 4034 Accuride drawer slide, 26" long
U3* 1 pr. No. 2009 Accuride drawer slide, 20" long
V*
14
No. 28936 drawer face adjusters
W
4
1/8 x 3/4 x 19 1/4" aluminum flat stock (file hangers)
X**
7
No. G 18.01 brass drawer pulls
Y
21
5/8" No. 5 rh screws
Z
24
1 1/4" No. 8 fh screws
AA
8
2" No. 8 fh screws
BB
As
reqd.
1" brads
CC
As
reqd.
4d finishing nails
Misc: 120- and 220-grit sandpaper, carpenter's glue,
epoxy glue, wood filler, latex primer, latex paint
* Available from The Woodworkers' Store, 4365 Willow
Dr., Medina, MN 55346
** Available from Garrett Wade, 161 Avenue of the
Americas, New York, NY 10013
Document Outline
Wyszukiwarka
Podobne podstrony:
Office Desk
Desk OFFICE DESK
Darmowa wyszukiwarka - HELP DESK, Ulepszanie Chomika, Wyszukiwarki
Build Desk
Polish On Your Desk Na Biurku 1
Desk Set
Opis czytnika Mifare TRD DESK PS2 ver1 0 PL
Greek Key Desk
analiza desk research - Polski rynek margaryn miękkich, Marketing
desk caddy(1)
Building Desk Drawers
Plywood Desk
Computer Desk
Darmowa wyszukiwarka - HELP DESK, Ulepszanie Chomika, Wyszukiwarki
więcej podobnych podstron