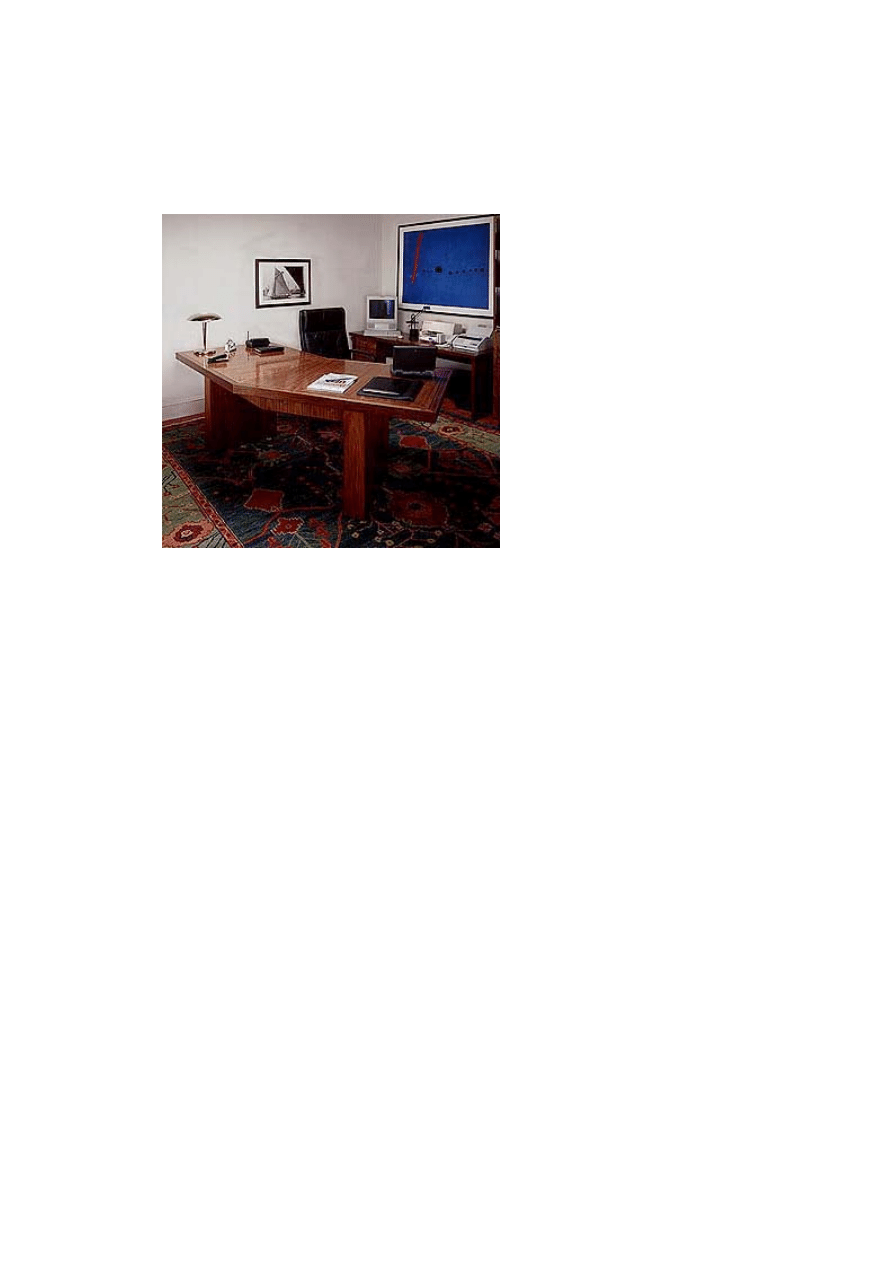
OFFICE DESK
Office furniture with attitude.
The modern executive office desk isn't simply a place to
hold a telephone. These days, it's the launching platform for
grand ideas and big decisions. It's the basic real estate for
projects, proposals, plans and programs. And, like any
other business commodity, the more you have, the more
work you get done.
Our custom desk is designed with a generous surface area
and is ideal for those who need to spread out their work.
While the broad V shape imparts a strong, dynamic visual
effect, it also makes the space more accessible.
Of course, a high-end desk needs to look the part, as well.
Our design features matched walnut-veneer panels with a
decorative black inlay. The result is an elegant surface
that's as functional as it is eye-catching.
To achieve the mirrored effect of the matched veneer
panels, you'll need to order stock that has walnut veneers
cut sequentially from the log. When you order the panels,
specify that they be "sequence matched and numbered."
The panel manufacturer will glue each veneer to its panel
substrate in the same order that the veneers were cut.
Each panel has a number that indicates its place in the
sequence. When you plan the material for your desk, lay
out your cut lines to make the best use of matching grain.
For our piece, we used walnut veneer on an MDF (medium-
density fiberboard) core. These panels tend to be flatter
and more stable than those with a veneer core (plywood).
They also are about twice the weight of veneer-core
panels, so you'll need a helper to move the parts around
he shop.
t
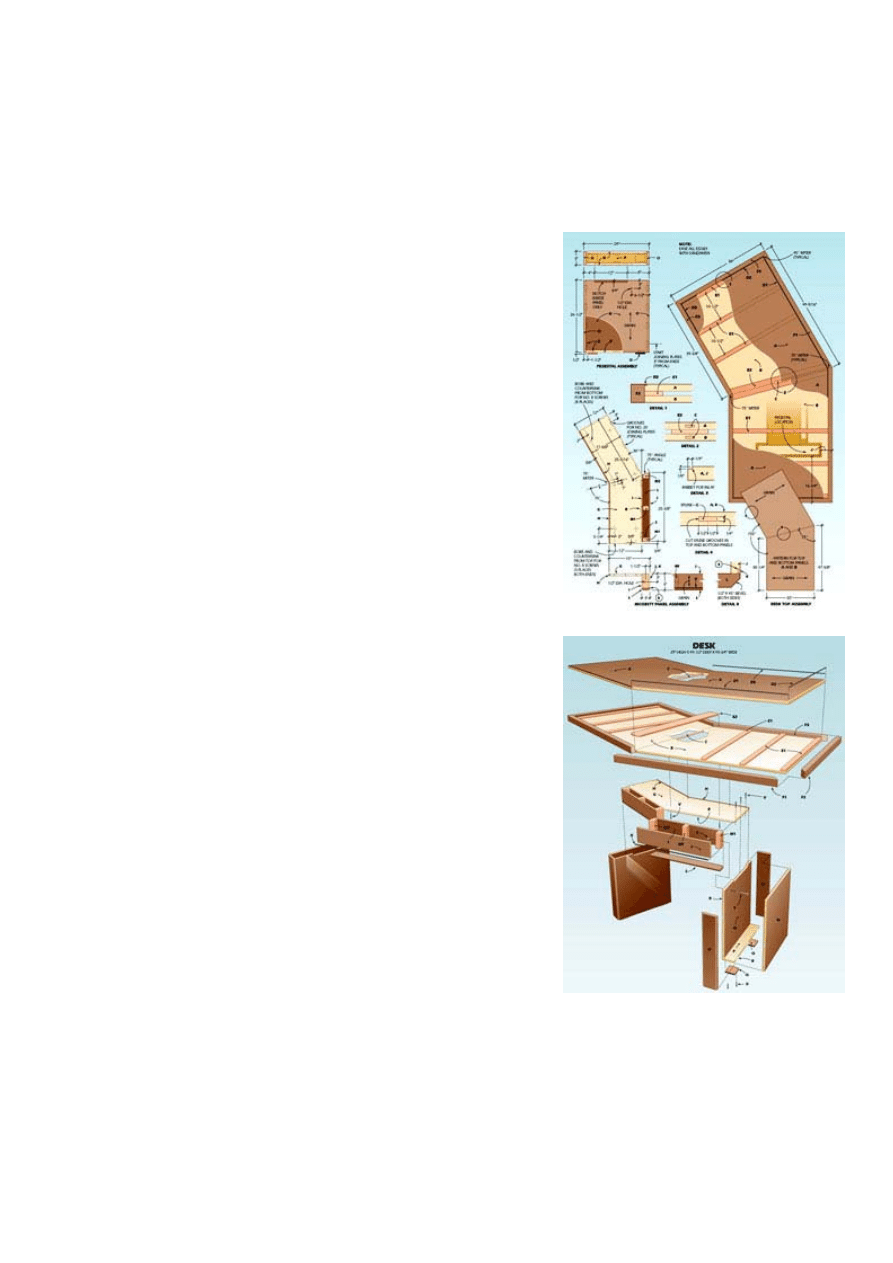
The Pedestals
The two pedestal bases that support the desktop
are constructed of veneered side panels with solid-
walnut caps, all joined over a solid-poplar base.
Study the plans to be sure you understand the
construction details, then cut the pedestal sides
(N), endcaps (O) and bases (P) to exact size.
Mark the position of the joining plate slots in these
pieces and use a plate joiner to make the cuts.
Lay out the notches on the two inner pedestal
panels and cut these with a sabre saw. Then lay
out and bore the hole in each panel for the bolt
that connects each pedestal to the modesty panel
assembly.
Apply glue to the slots, plates and edges of one of
the poplar base pieces (P), install the plates and
join two sides to the base. Use clamps to pull the
joints tight and let the glue set. Repeat the process
for the second pedestal.
Next glue the endcaps to the pedestal
subassemblies using plate joints as shown. When
the glue has dried, use a router and chamfer bit to
cut the 1/2-in. bevel along the vertical edges of the
pedestal faces.
The Modesty Panel
Cut the parts for the modesty panel to size. Pay
close attention to the veneer on the front panels
(J) so that, when assembled, one side of the
modesty panel is a mirror image of the other.
Begin assembly by joining the two mitered poplar
blocks (M2) that form the core of the panel. Apply
glue to the mating surfaces and clamp the blocks
together. While the glue is drying, bore the 1/2-in.-
dia. holes in the two end blocks (M1). Install a 3/8-
in. T-nut on the inner surface of each block by
tapping it into the hole with a hammer.
Next, glue and clamp one of the inner panels (I) to

the center block assembly. Join the end and
middle spacer blocks in the same way. Note that
the end block must have the T-nut on its inner
surface. Join the opposite inner panel to the center
block and add the two spacers. When the
subassembly is dry, glue the outer panels in place.
Pay close attention to the quality of the miter joint
at the front as this spot is quite prominent.
Use a router with straightedge guide to cut the
rabbet along the bottom front edge of the modesty
panel. Cut pieces of 1/8 X 1/4-in. black inlay strips
(K) to size, and then apply glue to the rabbet and
position the strips. Use pieces of masking tape
placed about 2 in. apart to clamp the strips in
place. Let the glue set for about 30 minutes, then
remove the tape and scrape off any excess glue.
Apply glue to the bottom edges of the modesty
panel and to the solid-walnut bottom caps (L).
Then clamp the caps to the panel. After the glue
sets, use a chamfer bit in the router to bevel the
bottom edges of the cap.
Cut the subtop (G) to size and shape. Rip 3/8 X
3/4-in. edgeband strips of solid walnut (H) and
glue them to the exposed edge of the subtop. Lay
out and cut the joining-plate slots in the subtop
edge and on the inside surface of the modesty
panel. Then apply glue and join the parts. Bore
and countersink holes in the subtop for fastening it
to the pedestals and to the desktop.
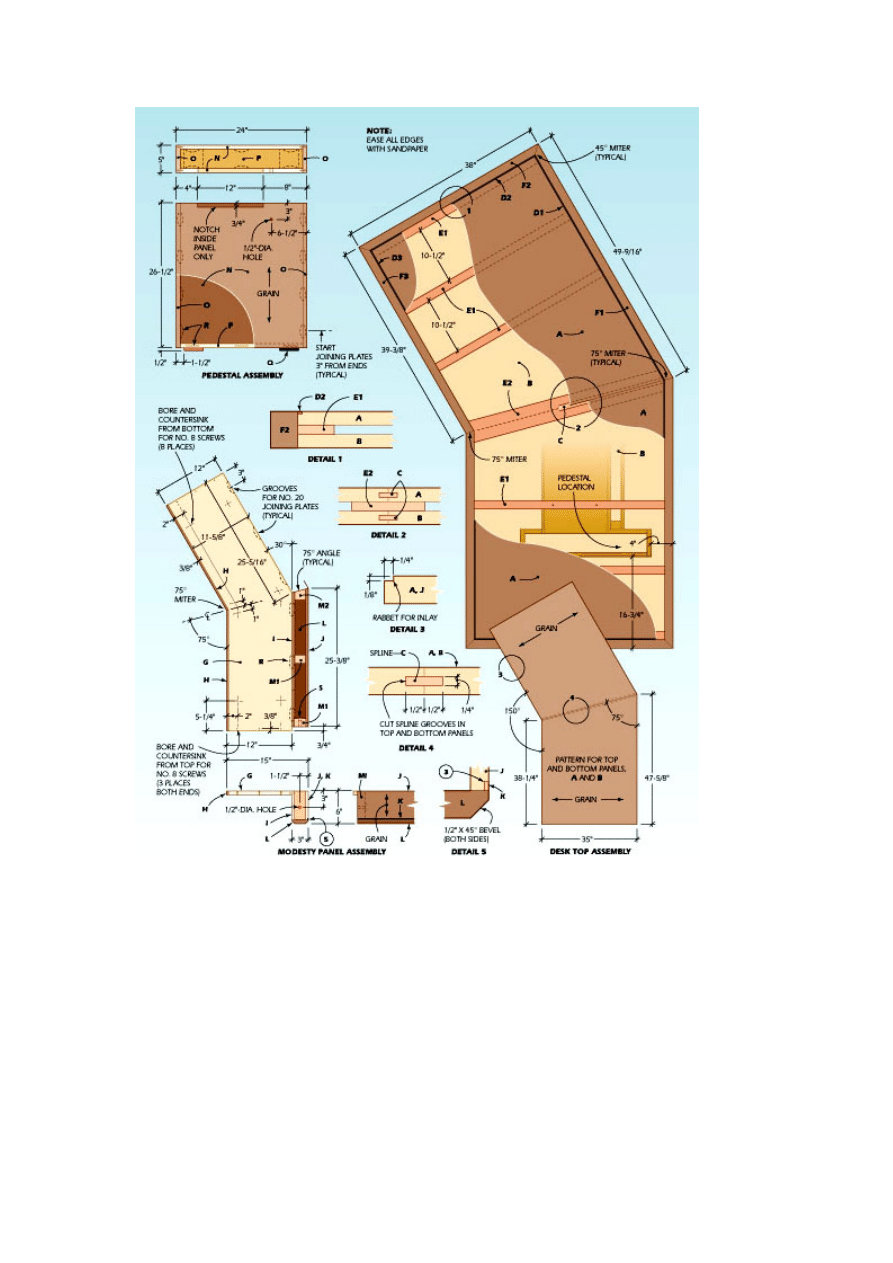
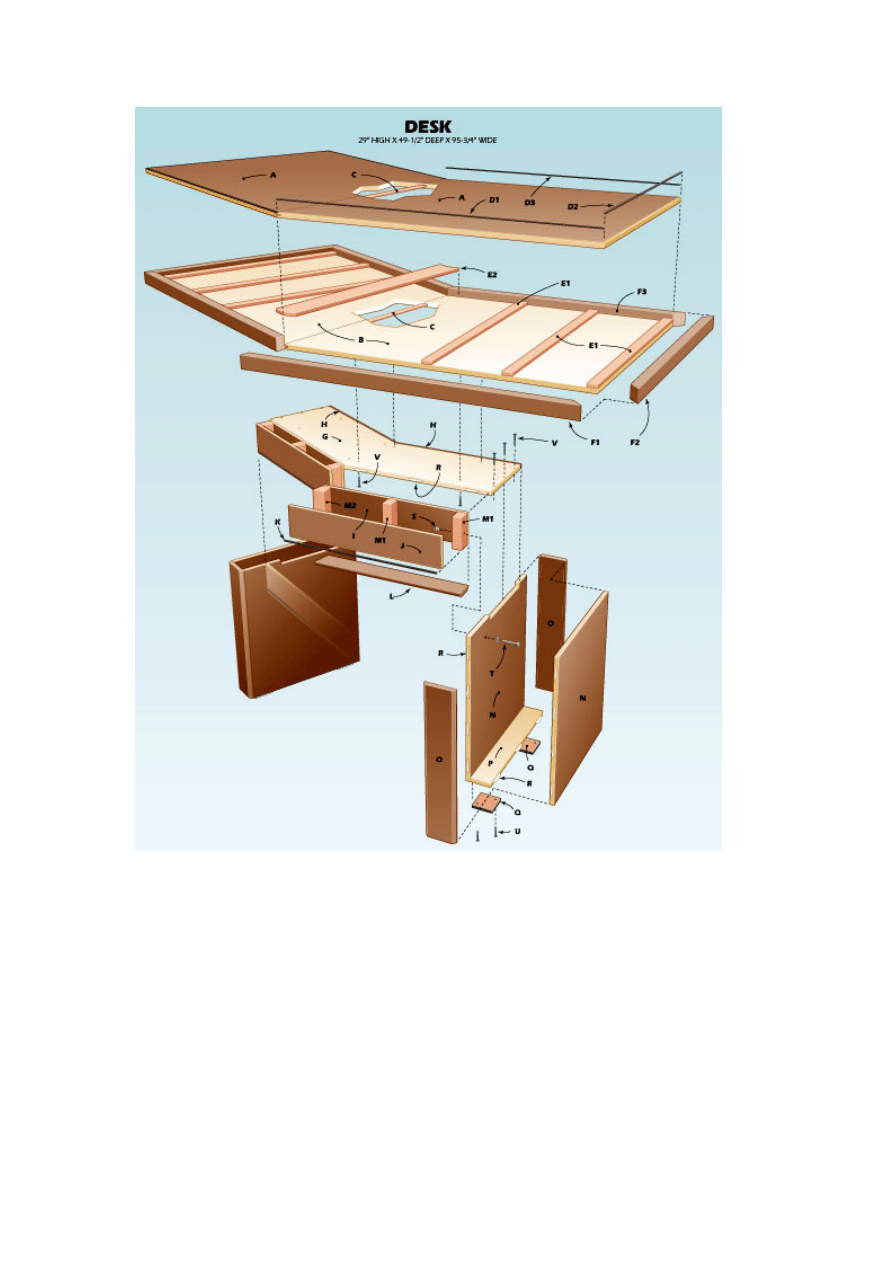
The Desktop
In order to guarantee accuracy in cutting the desktop parts, make a template
for one-half of the assembled desktop panel. You can then use this template
to first outline and then cut the panel parts to finished dimension. Use a sheet
of 1/4-in. tempered hardboard for the pattern, trimming it to exact size with a
router and straight bit guided by a straightedge.
Lay out the desktop panels (A, B) by tracing around the template. Pay
particular attention to achieving a good veneer match across the center joint
of the top panel pieces. The bottom panels can be made out of a less
expensive material or you can stick to walnut for consistency.

To accurately cut the panels, first use a sabre saw to rough cut them within
1/4 in. of finished dimensions. For final trimming, clamp the template to the
panel and use the router with a flush-trimming bit to make the cuts. This
leaves the smoothest possible surface with the least chance of chipped
veneer.
Use a slotting cutter in the router to cut the spline grooves along the central
panel joints. Then cut the poplar blocking strips (E1, E2) and maple splines
(C) to size. The splines should be snug in their grooves, but not so tight that
they need to be forced into place.
Join the two halves of the bottom panel first, so that you can get the feel for
the process before moving on to the more critical top joint. Apply glue to the
spline, spline groove and mating edges. Insert the spline and bring the two
halves together. Use long bar clamps to gently pull the joint tight. Place pads
under the clamp jaws to be sure that the clamps don't damage the panel
edges. Follow the same procedure for the top panel. Handle these panels
very carefully because the joint is rather fragile until the entire top is
assembled.
Apply glue to the poplar spacing blocks and position them on the top surface
of the bottom panel as shown in the drawing. Use clamps to hold the blocks in
place until the glue sets. Then apply glue to the top of the blocks and position
the top panel. Carefully check that the top and bottom panels are perfectly
aligned before clamping them together.
Use long cauls across the width of the top to distribute the clamping pressure.
The cauls work best if they have a slight bow and are used with the convex
side toward the work. If the cauls happen to be straight, place a veneer shim
under the center of each caul to ensure adequate pressure in the middle of
the panel.
Use a router and straightedge guide to cut the rabbet around the desktop. Cut
the black-dyed inlay strips (D1, D2, D3) to size, then apply glue to the rabbet,
position the strips and use masking tape to clamp them until the glue sets.
Carefully scrape off any excess glue from the top and edge of the panel.
Cut the solid walnut edge (F1, F2, F3) for the desktop from 2-in. stock.
Installing one walnut edge at a time, apply glue to the mating surfaces and
clamp each piece in place. At the ends, use special edging clamps that grip
the panel surfaces to apply pressure on the edge.
Finishing
Sand the desktop, modesty panel and pedestals with 120-, 180- and 220-grit
sandpaper, dusting off thoroughly between grits. Be sure to ease all edges
and corners. Remove all sanding dust, then wipe the surfaces with a tack
cloth.

In order to achieve a glass-smooth finish on the desktop, we used a paste
filler on the top to fill the open grain of the walnut. These open pores are not a
problem on the vertical surfaces, but on a horizontal surface, they would
catch the light and be a distraction from the veneer pattern.
We used Behlen's Pore-O-Pac paste wood filler in Van Dyke Brown. Spread
the filler across the grain of the top with a brush or rubber squeegee. Then,
lightly reapply the filler with the grain. When the filler takes on a dull
appearance, use a plastic scraper to remove the excess, and vigorously wipe
the surface with burlap cloths to remove any remaining filler. Let the top dry
overnight to allow any solvent to evaporate.
To provide a tough, yet attractive, finish for the desk, we used three coats of
Behlen's Rockhard Table Top Varnish. Thin the first coat approximately 20%
with the appropriate reducer and use a quality bristle brush to apply the finish.
Allow the finish to dry at least 12 hours, then sand lightly with 400-grit paper
and dust off thoroughly. Allow the second coat to dry overnight, then lightly
sand before flowing on the final coat.
While you wait for the finish to dry between coats, you can cut, bore and
countersink the maple feet for the pedestals. Sand the edges smooth, then
use black enamel paint to finish the feet. Apply two or three coats as required
for a good finish. When the paint and varnish are dry, screw the feet to the
bottom of the pedestals.
To achieve a smooth, satin finish, you should rub out the varnish, especially
on the desktop. Since this varnish is extremely hard, it should be rubbed and
polished within 20 hours of applying the last coat. First, sand the top with 600-
grit waterproof paper, using paraffin oil as a lubricant. When all dust particles
and uneven spots are leveled, wipe the surface with a clean cloth and use
No. 0000 steel wool to burnish the surface to an even satin glow. Polish the
top with a soft cloth.
Join the modesty panel to the two pedestals. Use 3/8 X 2-1/2-in. hexhead
bolts with washers to connect the parts. Then install screws through the
subtop into the pedestal sides. Position the desktop over the base and fasten
it with 2-in. No. 8 screws.
MATERIALS LIST–OFFICE DESK
Key No.
Size and description (use)
A
2 3/4 X 35 X 47-5/8" walnut panel stock* (upper top)
B
2 3/4 X 35 X 47-5/8" panel stock** (lower top)
C
2 1/4 X 1 X 36-3/8" maple (spline)
D1
2 1/8 X 1/4 X 47-5/8" maple† (inlay)
D2
2 1/8 X 1/4 X 35" maple† (inlay)
D3
2 1/8 X 1/4 X 38-5/16" maple† (inlay)

E1
6 1/2 X 1-1/2 X 35" poplar (spacer)
E2
2 1/2 X 4 X 36-3/4" poplar (spacer)
F1
2 1-1/2 X 2 X 49-9/16" walnut (edge)
F2
2 1-1/2 X 2 X 38" walnut (edge)
F3
1 1-1/2 X 2 X 39-3/4" walnut (edge)
G
1 3/4 X 17-13/16 X 48-15/16" panel stock** (subtop)
H
2 3/8 X 3/4 X 22-1/4" walnut (edge band)
I
2 3/4 X 5-1/4 X 24-11/16" walnut panel stock (inner panel)
J
2 3/4 X 5-1/4 X 25-3/8" walnut panel stock (outer panel)
K
2 1/8 X 1/4 X 25-3/8" maple† (inlay)
L
2 3/4 X 3 X 25-3/8" walnut (bottom cap)
M1 4 1-1/2 X 2 X 5-1/2" poplar (block)
M2 2 2 X 2 X 5-1/2" poplar (block)
N
4 3/4 X 22-1/2 X 26-1/2" walnut panel stock (pedestal side)
O
4 3/4 X 5 X 26-1/2" walnut (pedestal endcap)
P
2 3/4 X 3-1/2 X 22-1/2" poplar (pedestal base)
Q
4 1/2 X 3-1/2 X 3-1/2" maple†† (foot)
R
50 No. 20 joining plate
S
2 3/8" T-nut
T
2 3/8 X 2-1/2" hexhead bolt and washer
U
8 1-1/4" No. 8 fh woodscrew
V
14 2" No. 8 fh woodscrew
*Walnut-veneer MDF or veneer-core panel
** Walnut-, maple- or birch-veneer MDF or veneer-core panel
† Black-dyed inlay strips available from Dover Inlay Mfg. Co. Inc., Box 151, Williamsport, MD 2179
†† Painted black
Misc: Glue; 120-, 180-, 220- and 400-grit sandpaper; 600-grit waterproof paper; Behlen's Pore-O-Pac
wood filler (Van Dyke Brown) No. B744-IF346; Behlen's Rockhard Table Top Varnish No. B603-28
Behlen's Rockhard Varnish Reducer; black satin enamel paint.
Document Outline
Wyszukiwarka
Podobne podstrony:
Office Desk
Desk Presidential Office Desk
Darmowa wyszukiwarka - HELP DESK, Ulepszanie Chomika, Wyszukiwarki
Build Desk
Polish On Your Desk Na Biurku 1
Desk Set
Opis czytnika Mifare TRD DESK PS2 ver1 0 PL
Greek Key Desk
analiza desk research - Polski rynek margaryn miękkich, Marketing
desk caddy(1)
Building Desk Drawers
Plywood Desk
Computer Desk
Darmowa wyszukiwarka - HELP DESK, Ulepszanie Chomika, Wyszukiwarki
więcej podobnych podstron