Here’s how
1
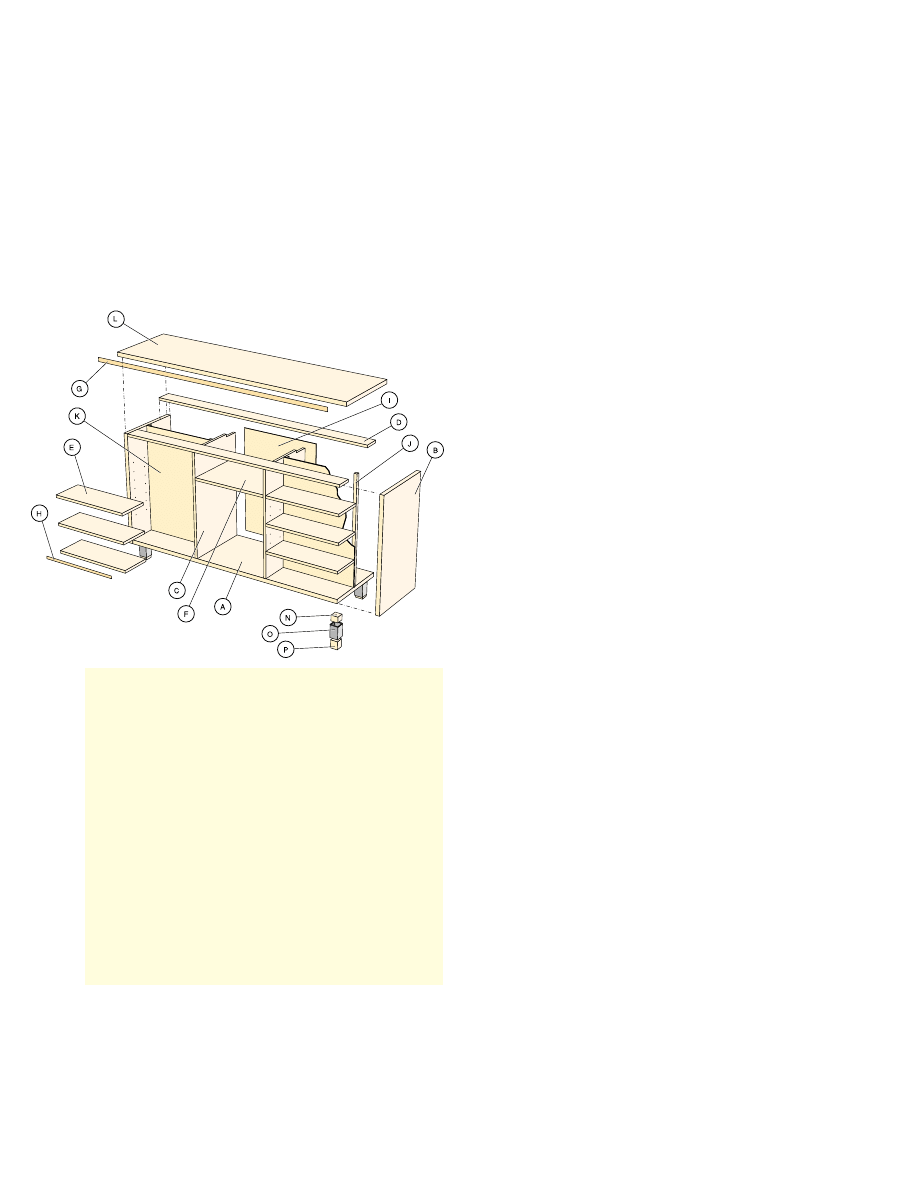
Cut base and side panels (A,
B). Cut panels with face side
down. Run the power saw
with sharp fine toothed blade
along straight timber batten
spaced and clamped to allow
for distance between saw blade
and edge of base plate of saw.
2
Cut out dividers (C) and
top rails (D) as well as side
and central shelves (E, F).
Pre-cutting most of the
materials allows you to edge-
veneer all components in
one process.
3
Cut slightly long lengths of
edge veneer (G, H) to suit the
thickness of the boards. Run a
household iron over veneer as
you hold it in place to soften
glue and, when soft, press
in place by rubbing with a
cork block. Trim overhanging
edges with a file, sand smooth.
Edge-veneer all visible edges
of base, top, sides, front top
rail and shelves.
4
Join boards with a biscuit
joiner, making sure joints are
not misaligned. To join a bottom
corner, stand a side on the
base. With a pencil, mark joints
on both pieces. Extend the
marks to outside edge of
base as all biscuit cutting is
done from outside corners. Set
biscuit cutter to cut slots for
no. 20 biscuits spaced 11mm
from edge for 25mm boards
(7mm for 16mm boards). Align
mark on cutter with pencil marks
and cut slots. We used three
biscuits along bottom joints and
one for each end of top rails.
5
Apply glue to biscuits and
push into slots in the sides.
Set base on sash cramps
then bring sides to base. Push
together, then tighten cramps.
Set top rails in place and hold
with sash cramps.
6
To fit dividers, cut a 90 x
16mm recess at front of panels
and 86 x 16mm recess at back.
Insert dividers between top and
bottom, flush with front and
spaced exactly 460mm from
each side (use a side shelf as
a spacer). Pre-drill, countersink
and screw in place from top and
underside.
7
Glue and pin on central
back panel (I) in the recess
left by the dividers.
8
Screw cleats (J) to inside of
side bays 179mm from front,
using screws short enough so
they don’t protrude into centre.
Countersink for heads. Glue and
pin on side back panels (K).
9
Cut top (L) and apply wide
veneer to front and side edges.
If your room has skirting boards
and you want the top to sit flush
against a wall, add thickness of
skirting to top width to make
this possible. Centre top over
unit with 20mm front overhang,
then screw on from the
underside through the rails.
10
To drill holes for shelf pins,
make a template (M): clearly
mark the top and draw a line
40mm in from each long edge.
From the bottom measure 150,
205, 260, 315, 370, 425 and
480mm up both lines for the
position of the top of each hole.
Place template inside sides and
dividers and drill a 5mm hole at
each mark to a depth of 10mm.
In the central section only drill
the top holes.
11
Tip the unit on its back and
mark 45mm in from each edge
for the centre of each leg.
Glue and screw leg blocks
(N) to these positions, apply
construction adhesive to the
block and fit sleeve (O) over
block. Glue the leg (P) inside
the sleeve – it should protrude
about 5mm from aluminium
sleeve.
12
Finish unit with two or three
coats of Danish Oil or similar for
a low sheen finish.
WHAT YOU WILL NEED
Item Part Size Material
A Base 1410 x 400 x 25mm Particleboard
B Sides (2) 690 x 400 x 25mm Particleboard
C Dividers (2) 665 x 396 x 16mm Particleboard
D Top rails (2) 1410 x 90 x 16mm Particleboard
E Side shelves (6) 175 x 460 x 16mm Particleboard
F Central shelf 396 x 458 x 16mm Particleboard
G Wide edging (total) 40mm x 5.5m Beech veneer
H Narrow edging (total) 21mm x 7m Beech veneer
I Central back panel 649 x 490 x 4mm Plywood
J Cleats (4) 19 x 19 x 665mm Maple
K Side back panels (2) 460 x 665 x 4mm Plywood
L Top 1500 x 420 x 25mm Particleboard
M Hole template 645 x 175 x 3mm MDF
N Leg block (4) 44 x 44 x 35mm Maple
O Sleeve 50 x 50 x 3 x 80mm Aluminium tube
P Leg 44 x 44 x 50mm Maple
E
njoying your favourite music or TV program
is one of life’s simple pleasures. It’s even
better when everything is within reach and organised.
By Dieter Mylius, Greg Fahey
Photog
raph
y John Halfhide;
styling Jim O
’Br
ien; diag
rams T
ech Vie
w
Studio
Entertainment
central
Build our neat little
entertainment unit
The panels are cut from one 25mm and one 16mm sheet of
veneered particleboard, with 4mm veneered plywood for the
backs and joined with a biscuit joiner (about $30 a day to
hire). This joins panels like dowelling, but allows some leeway
in setting out. You will also need 1800mm long sash cramps,
no. 20 biscuits, assorted screws, wood glue, 28 x 5mm shelf
pins; cartridge of construction adhesive.
Wyszukiwarka
Podobne podstrony:
Cabinet entertainment center2
Cabinet Entertainment Center
Cabinet entertainment center3
Cabinet Entertainment Center Plans
Cabinet Entertainment Center Plans
Cabinet Shaker entertainment center
Cabinet Modular Entertainment Center
Cabinet small entertainment center
Entertainment Center (2)
Cabinet Video Game Center (Part 1)
Cabinet Video Game Center (Part 2)
Cabinet Fold Away Hobby Center(Part 2)
Cabinet Fold Away Hobby Center(Part 1)
Corner Buffet Cabinet(1)
Dribbling Center
Consular Electronic Application Center Print Application
cabinetmakerupho00sher
Corner Cabinet 1
więcej podobnych podstron