1
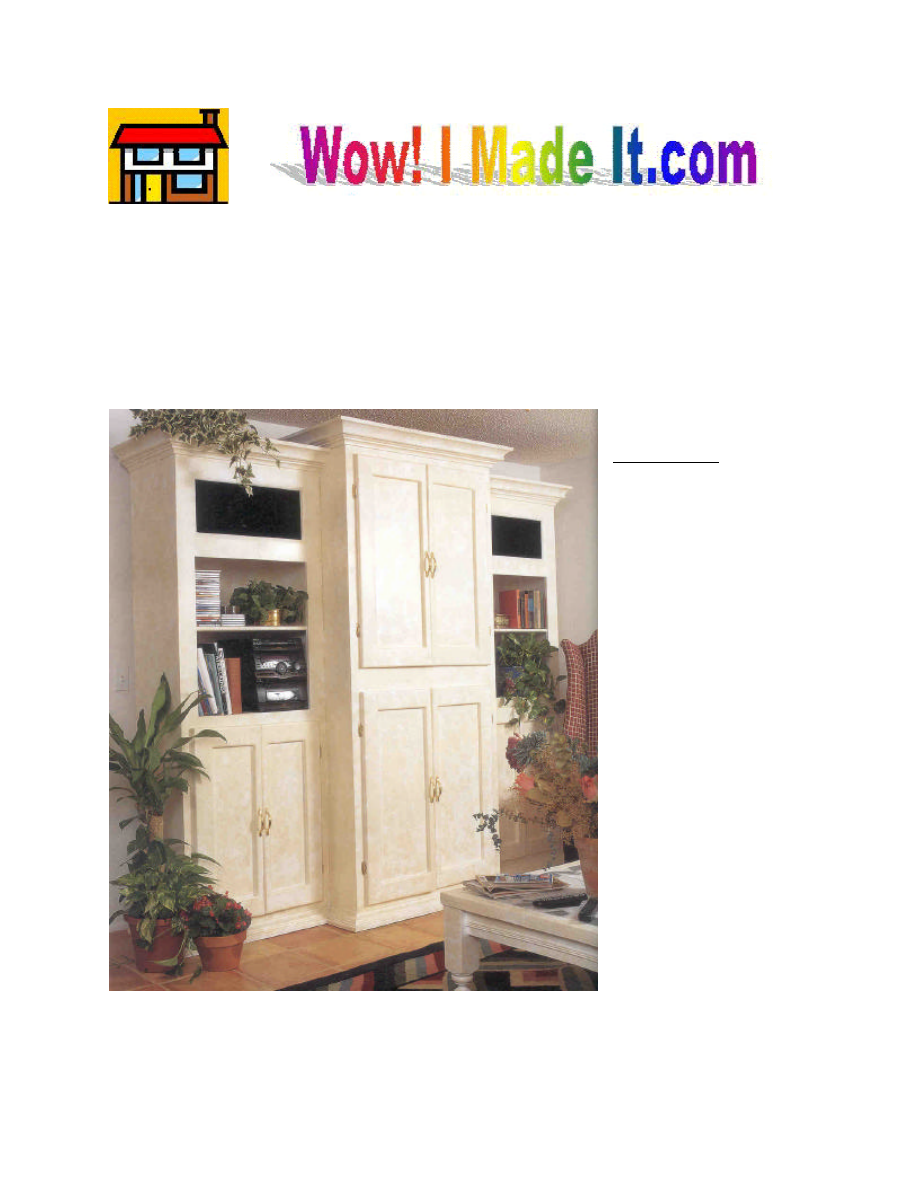
ntertainment Center
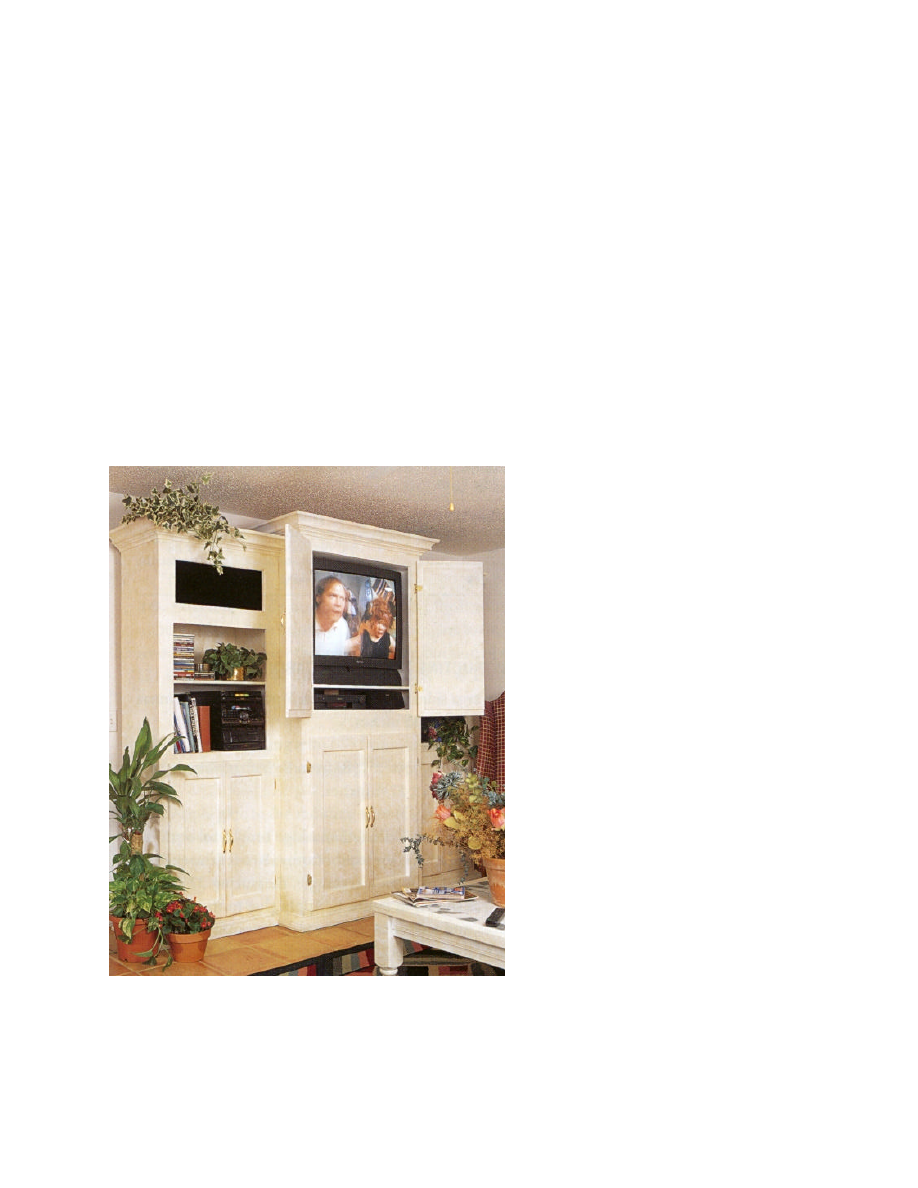
If you have always wanted a good-looking entertainment center to house your stereo,
television, records, CDs, and books, here’s the answer. You can build it for much less
than you would pay in a furniture store. This one is built in three individual sections so
that it can be moved easily. We sponge-painted ours and are very happy with the finished
project.
Materials
The materials specified are
enough to make two outer
cabinets and one center
cabinet.
§ 27 linear feet of 1 x 2
pine
§ 150 linear feet of 1 x 4
pine
§ 36 linear feet of 2 x 4
pine
§ 3 linear feet of 1 x 8
pine
§ 17 linear feet of 5-1/2"
crown molding
§ 13 linear feet of 3"
crown molding
§ 24 linear feet of 3/4"
rope molding
§ 7-1/2 (4' x 8') sheets of
3/4" plywood
§ 4-1/2 sheets of (4 x 8
feet) 1/4" plywood
E
2
Hardware
§ 325 3/4" wire brads
§ 250 1" (2d) finishing nails
§ 20 1-1/4" (3d) finishing nails
§ 350 1-1/2" screws
§ 36 2" screws
§ 24 2-1/2" screws
§ 24 3" screws
§ 16 cabinet door hinges
§ 8 door pulls
§ 8 magnetic catches
Special Tools and Techniques
§ Router
§ Pipe clamps or long bar clamps
§ Staple gun
§ Miters
Cutting List
Code Description
Qty Materials
Dimensions
A
Sides
2
3/4" plywood
23-1/4” x 82-1/2”
B
Top/Bottom
2
3/4" plywood
23-1/4” x 37-1/2”
C
Shelf
4
3/4" plywood
23-1/4" x 36”
D
Vertical Trim
2
1 x 4 pine
84” long
E
Horizontal Trim
2
1 x 4 pine
30-1/2" long
F
Wide Horizontal Trim
1
1 x 8 pine
30-1/2" long
G
Molding Trim
1
3/4" rope molding
30-1/2" long
H
Top/Bottom Door Trim
8
1 x 4 pine
15" long
I
Wide Side Door Trim
4
1 x 4 pine
38" long
J
Narrow Side Door Trim
4
1 x 2 pine
38” long
K
Door Panel
4
1/4" plywood
14-3/4” x 34-1/2”
3
L
Support Blocks
2
1 x 2 pine
4" long
M
Base Sides
2
2 x 4 pine
18-1/2" long
N
Base Front/Back
2
2 x 4 pine
35" long
O
Base Supports
4
2 x 4 pine
12" long
P
Back
1
1/4" plywood
37-1/2" x 84"
Q
Sides
4
3/4" plywood
16” x 78-1/2"
R
Top/Bottom
4
3/4" plywood
16” x 30"
S
Shelf
10
3/4" plywood
16” x 28-1/2"
T
Vertical Trim
4
1 x 4 pine
80" long
U
Horizontal Trim
8
1 x 4 pine
23" long
V
Molding Trim
2
3/4" rope molding
23" long
W
Top/Bottom Door Trim
8
1 x 4 pine
11-1/2" long
X
Wide Side Door Trim
4
1 x 4 pine
32-1/2" long
Y
Narrow Side Door Trim
4
1 x 2 pine
32-1/2” long
Z
Door Panel
4
1/4" plywood
11-1/4" x 29"
AA
Support Blocks
8
1 x 2 pine
4" long
BB
Base Sides
4
2 x 4 pine
11" long
CC
Base Front/Back
4
2 x 4 pine
28" long
DD
Base Supports
8
2 x 4 pine
7-1/2” long
EE
Back
2
¼” plywood
30” x 80”
FF
Top Molding
5-1/2” crown molding
Cut to fit
GG
Rope Molding
¾” rope molding
Cut to fit
HH
Bottom Molding
3” crown molding
Cut to fit
Constructing the Center Cabinet
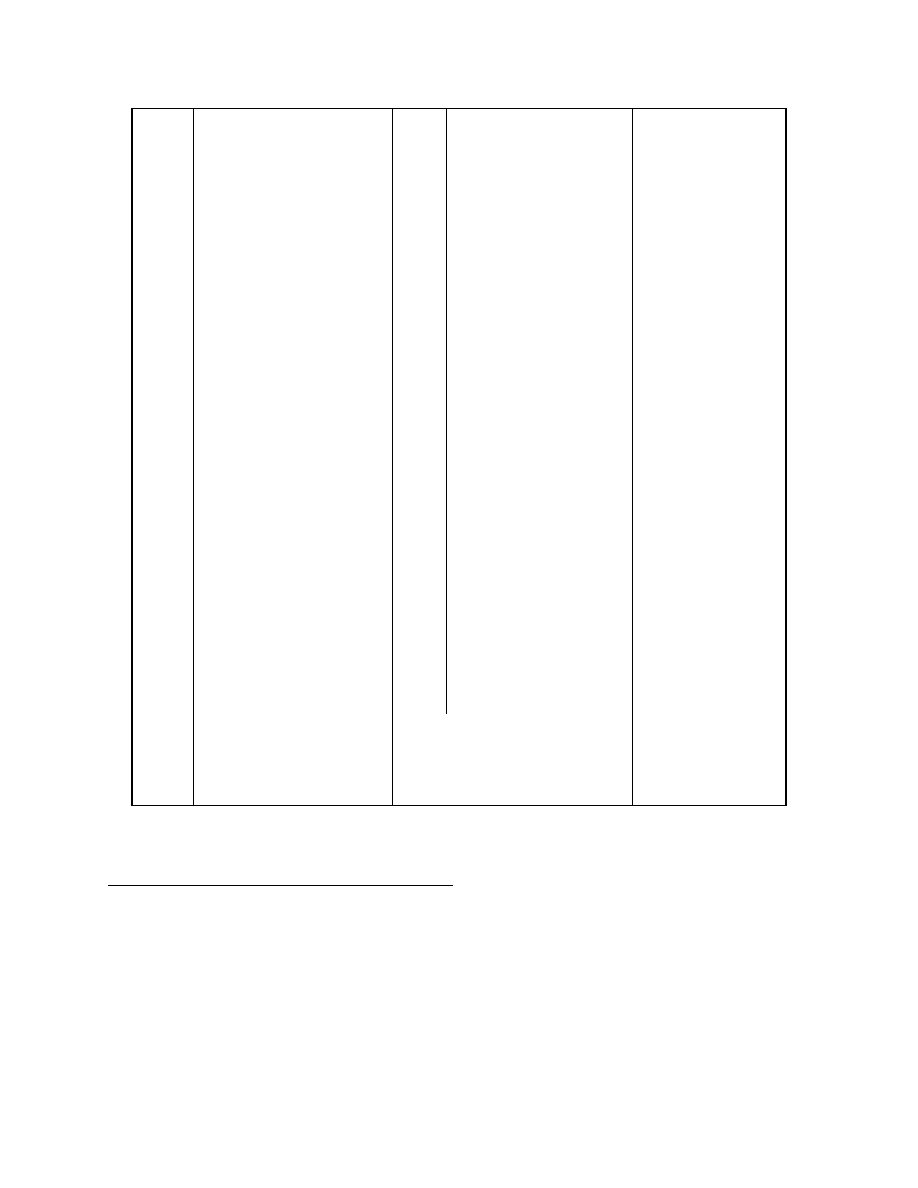
1. Cut two sides (A) from 3/4-inch plywood, each measuring 23-1/4 x 82-1/2inches.
2. Cut two top/bottoms (B) from 3/4-inch plywood, each measuring 23-1/4 x 37-1/2 inches.
3. Place the two sides (A) on edge on a level surface, 36 inches apart. Fit the top/bottoms (B)
over the ends of the sides (A) to form a rectangle, measuring 37-1/2 x 84 inches, as shown
in Figure 1. Apply glue to the meeting surfaces and screw through the top/bottoms (B)
4
into the edges of the sides (A). Use 1-1/2-inch screws spaced about every 5 inches.
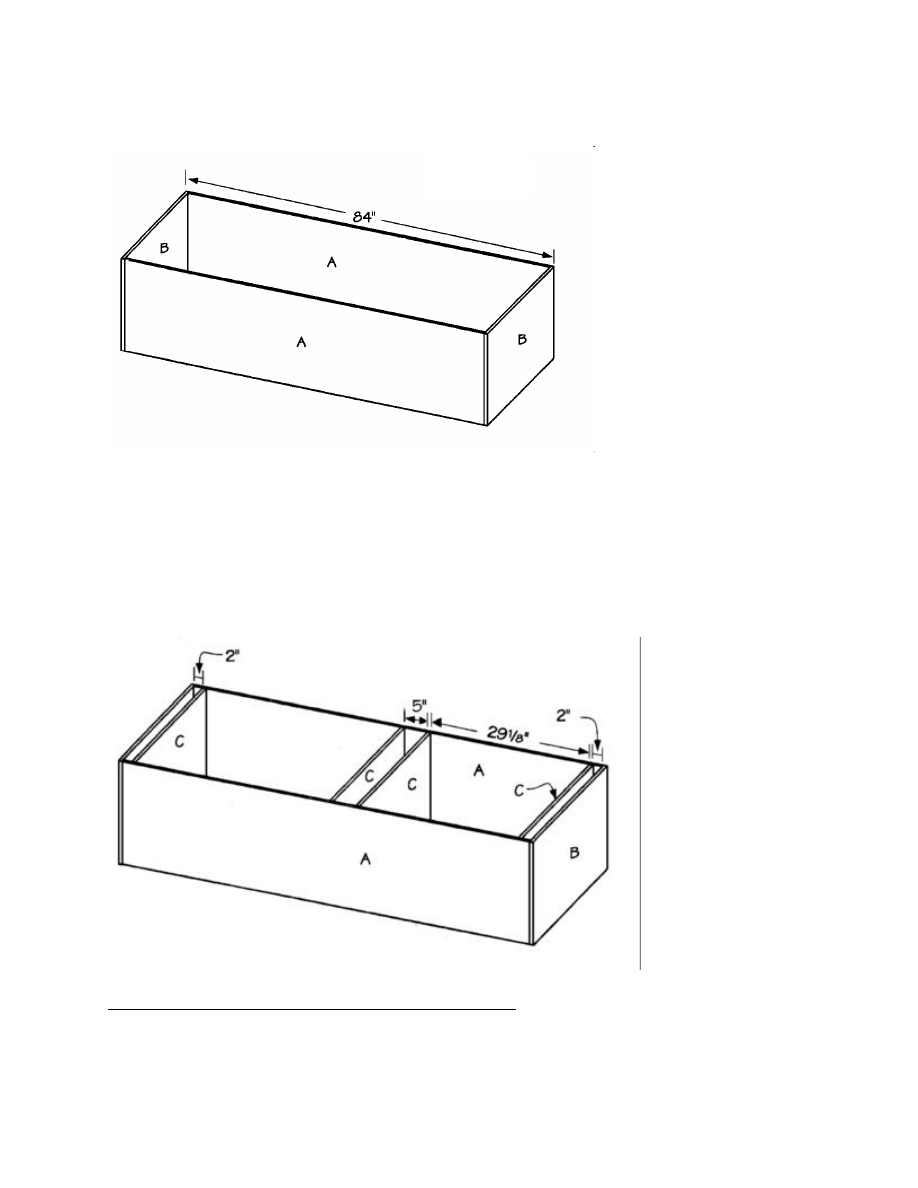
4. Cut four shelves (C)
from 3/4-inch
plywood, each
measuring 23-1/4 x
36 inches.
5. Place the first shelf
(C) 2 inches below
the top (B). Screw
through the sides (A)
into the edges of the
shelf (C), as shown
in Figure 2. Use
1-1/2-inch screws spaced about every 5 inches.
6. Repeat the procedure in Step 5 to attach the second shelf (C) 29-1/8 inches below the first
one.
7. Attach the third shelf (C) 5 inches below the second one.
8. Attach the fourth shelf (C) 2 inches above the bottom (B).
Adding the Trim to the Center Cabinet
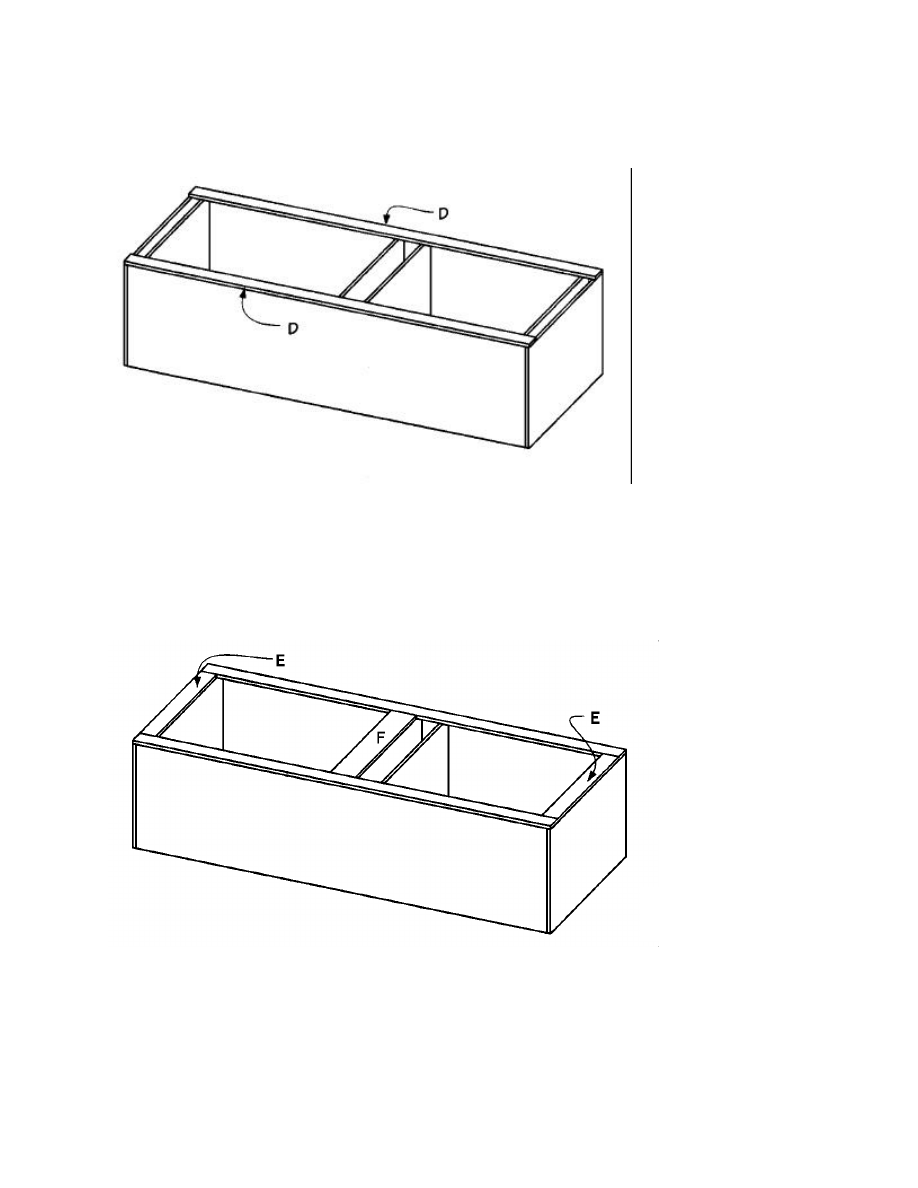
1. Cut two vertical trims (D) from 1 x 4 pine each measuring 84 inches long.
Figure 1
Figure 2
5
2. Apply glue to the meeting surfaces and screw one vertical trim (D) to the edge of one side
(A), as shown in Figure 3. Use 1-1/2-inch screws spaced about every 5 inches.
3. Repeat Step 3
to attach the
remaining
vertical trim (D)
to the opposite
side (A).
4. Cut two
horizontal trims
(E) from 1 x 4
pine each
measuring 30-
1/2 inches long.
5. Apply glue to the plywood edges and attach one horizontal trim (E) over the edges of the
top (B) and the first shelf (C), as shown in Figure 4. Screw through the horizontal trim (E)
into the edges of the top (B) and shelf (C) using 1-1/2-inch screws about every six inches.
6. Repeat Step 5 to attach the second horizontal trim (E) to the third shelf (C) and the bottom
(B).
7. Cut one wide horizontal trim (F) from 1 x 8 pine, measuring 30-1/2 inches long.
8. Attach the wide horizontal trim (F) flush with the upper surface of the third shelf (C).
Apply glue to the plywood edge, and screw through the wide horizontal trim (F) into the
Figure 4
6
edge of the third shelf (C). Use 1-1/2-inch screws placed about six inches apart.
9. Cut one molding trim (G) from 3/4-inch rope molding, measuring 30-1/2 inches long.
10. Apply glue to the molding trim (G) and nail it over the exposed edge of the second shelf
(C), using 1-inch (2d) nails spaced about every 5 inches.
Making the Doors for the Center Cabinet
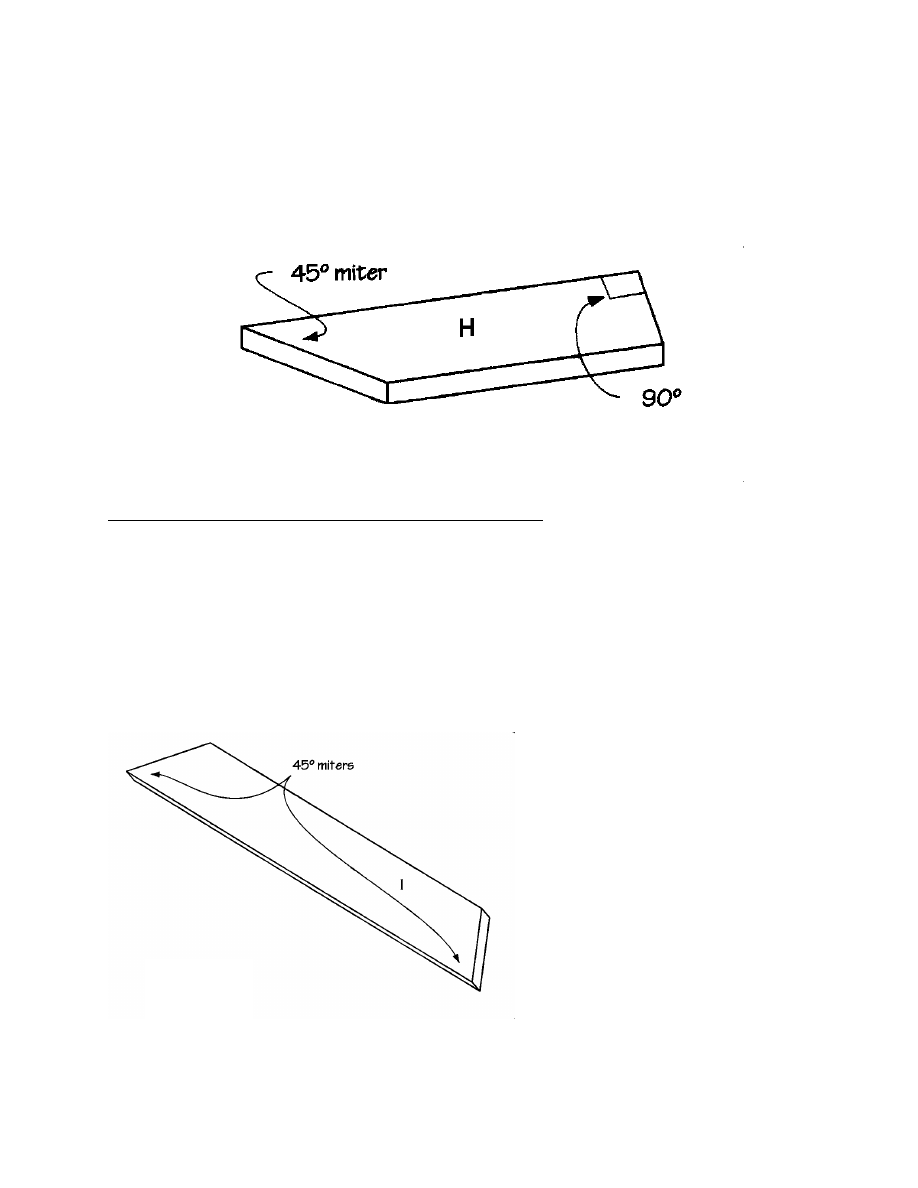
1. Cut 8 top/bottom door trims (H) from 1 x 4 pine, each measuring 15 inches long.
2. Miter each of the 8 top/bottom door trims (H) at opposing 45-degree angles, as shown in
Figure 5.
3. Cut four wide side door trims (I) from 1 x 4 pine, each measuring 38 inches long.
4. Miter each of the 4 wide side door trims (I) at opposing 45-degree angles, as shown in
Figure 6.
5. Cut four narrow side door trims
(J) from 1 x 2 pine, each
measuring 38 inches long.
6. Cut four door panels (K) from
1/4-inch plywood, measuring
14-3/4 x 34-1/2 inches.
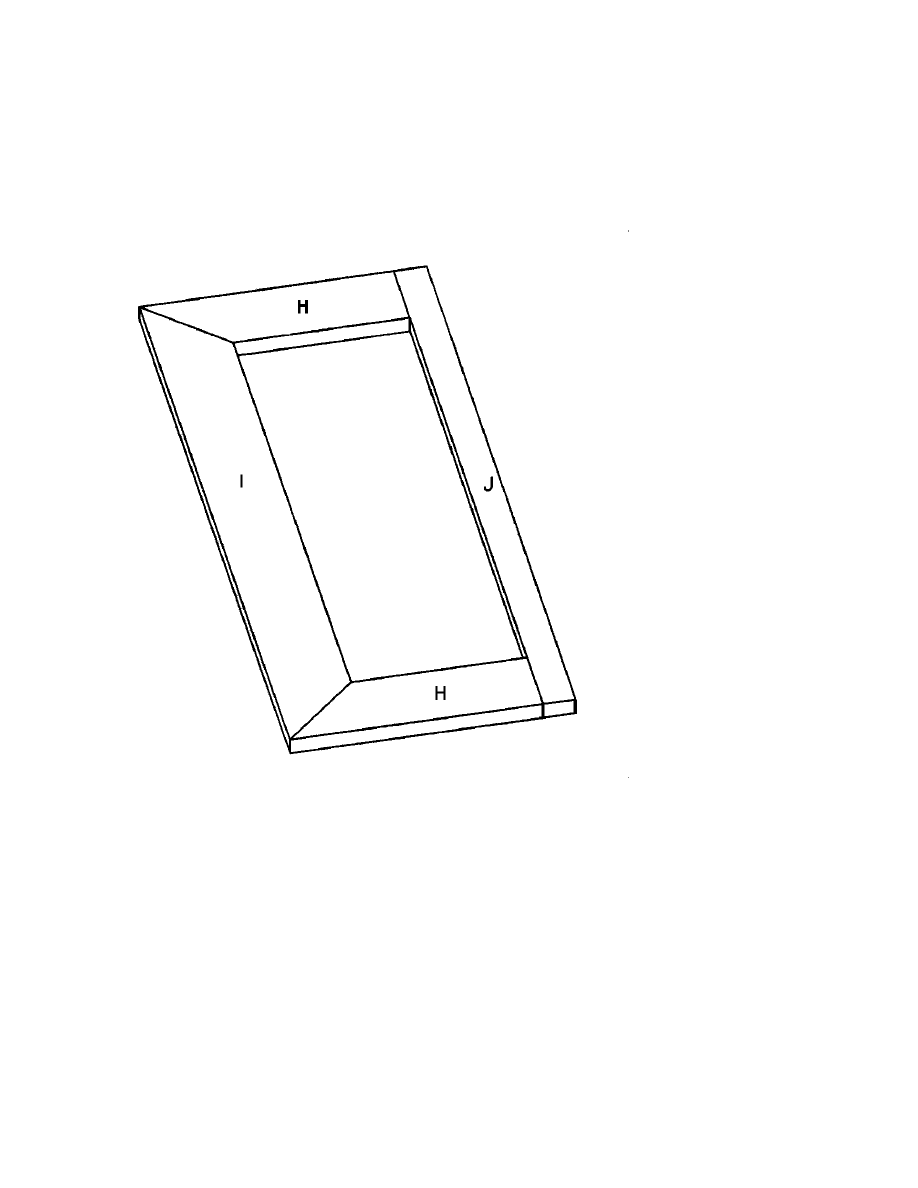
7. Place two top/bottom door
trims (H) face down, 31 inches
apart, and parallel to each other.
The miters should oppose each
other, as shown in Figure 7.
Figure 5
Figure 6
7
8. Fit one side door trim (I) between the two top/bottom door trims (H), as shown in Figure
7.
9. Place one narrow door trim (J) against the flat ends of the two top/bottom door trims (H),
as shown in Figure 7.
10. Apply glue to
the meeting
surfaces and
clamp the four
pieces together
for several
hours.
11. Repeat Steps 25
through 28
three more
times using the
remaining six
top/bottom door
trims (H), three
wide side door
trims (I), and
three narrow
side door trims
(J).
12. The next step is
optional. We
routed both the
inside and
outside edges of the front of the assembled door trims (H, I, and J) using a round-over bit.
Before routing, we temporarily added extra support to the 4 glued joints by stapling across
each joint using a staple gun. After the routing was complete, we removed the staples.
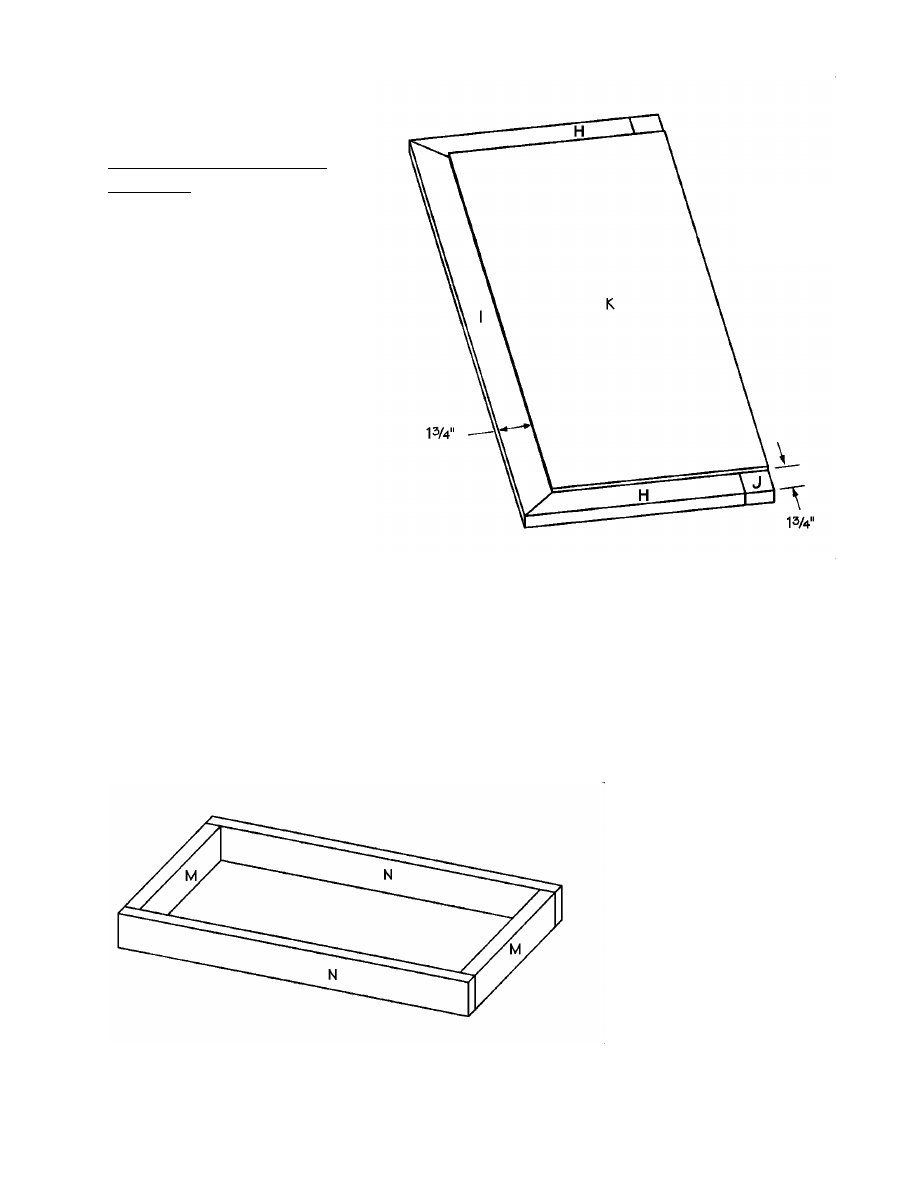
13. Place a routed trim assembly (routed side down) on a flat surface. Place a door panel (K)
over the assembly, flush with the outer edge of the narrow side door trim (J), as shown in
Figure 8. The other three trim pieces (H and I) should be exposed by 1-3/4 inches. Apply
glue to the meeting surfaces, and nail through the door panel (K) into each of the four trim
pieces (H, I, and J), using small 3/4 “ brads, placed about every 4 inches.
14. Repeat Step 13 three more times to complete the remaining 3 cabinet doors.
Figure 7
8
Finishing the Center
Cabinet
1. Cut 2 support blocks (L)
from 1 x 2 pine, each
measuring 4 inches long.
2. Place the completed cabinet
on its front. Apply glue to
the meeting surfaces and
nail each of the support
blocks (K) over the two
joints between the vertical
trims (D) and the wide
horizontal trim (F) flush
with the lower edge of the
wide horizontal trim (F).
Nail through each support
block (L), using two
1-1/4-inch (3d) finishing
nails, one on each side of the joint.
3. Cut two base sides (M) from 2 x 4 pine, each measuring 18-1/2 inches long.
4. Cut two base front/backs (N) from 2 x 4 pine, each measuring 35 inches long.
5. Place the two base sides (M) parallel to each other and 32 inches apart. Fit the two base
front/backs (N) over the base sides (M), to form a rectangle measuring 35 x 21-1/2 inches,
as shown in Figure 9. Screw through the base front/backs (N) into the base sides (M) using
two 2-1/2-inch screws on each joint.
Figure 8
Figure 9
9
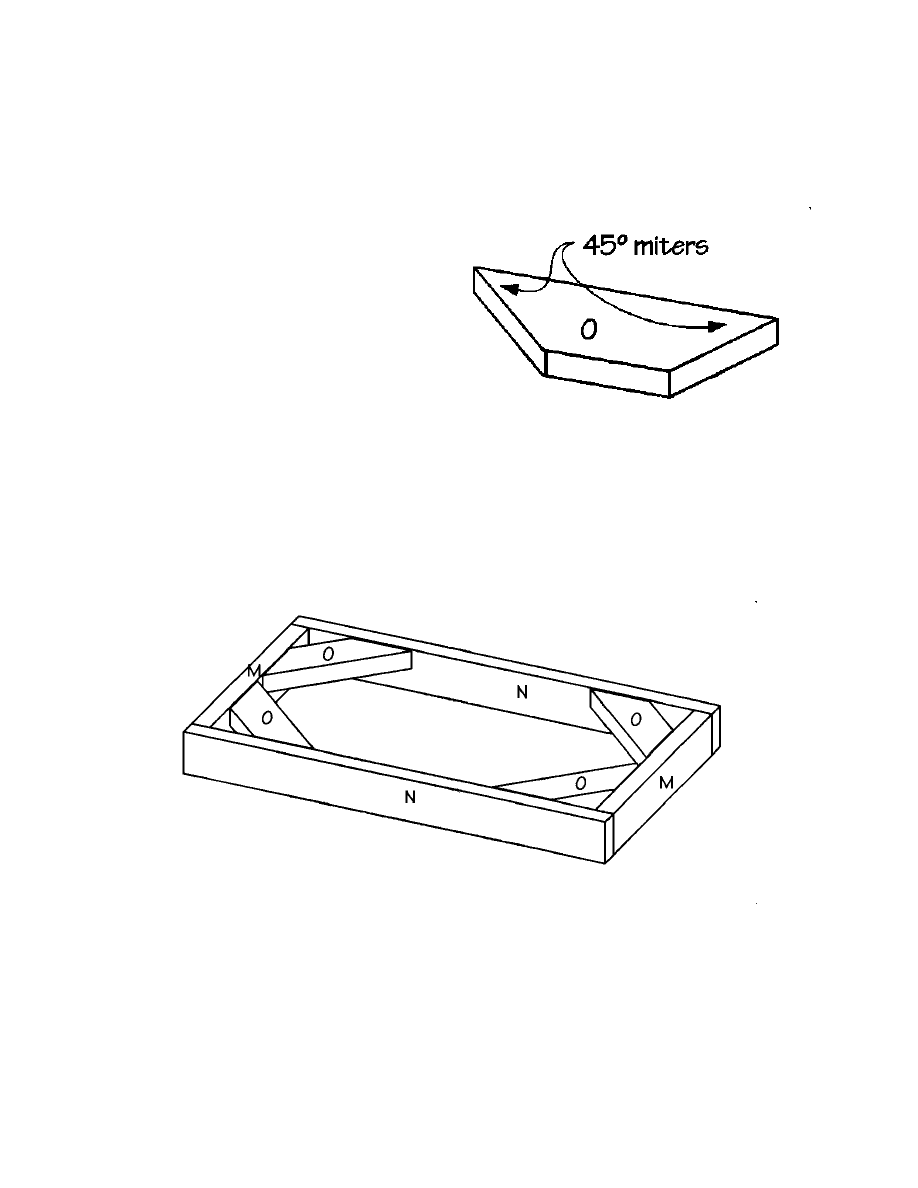
6. Cut four base supports (O) from 2 x 4 pine, each measuring 12 inches long.
7. Miter the ends of each base support (O) across the width at opposing 45-degree angles, as
shown in Figure 10.
8. Place the base assembly on a
perfectly level surface. Apply
glue to the mitered ends and
screw a base support (O) into
each of the four corners of the
base assembly, as shown in
Figure 11. The base supports
(O) will be flush with what will
be the top of the base assembly.
Use two 3-inch-long screws on each of the base supports (O).
9. Center the base assembly on the bottom of the cabinet, with the base supports (O) meeting
the cabinet bottom (B). The base assembly should be 1-1/4 inch from each of the edges of
the cabinet bottom (B) and the front of the bottom horizontal trim (E). Apply glue to the
top of the base assembly, and screw through the base supports (O) into the cabinet bottom
(B) using three 2-inch screws on each base support (N).
10. Cut one back (P) from 1/4-inch plywood, measuring 84 x 37-1/2 inches.
11. Place the back (P) over the back of the cabinet, overlapping the sides (A) and top/bottoms
(B). Apply glue to the meeting surfaces and nail through the back (P) into the edges of the
sides (A) and top/bottoms (B) using 1-inch (2d) finishing nails spaced every 4 inches.
Figure 10
Figure 11
10
12. Turn the completed cabinet on its back and place the four cabinet doors over the front
openings in the cabinet. Allow about 1/8-inch space between each pair of doors. Check to
make certain that the doors are straight and that the door panels (K) fit evenly inside each
of the openings in the cabinet assembly. Then attach the doors to the cabinet using two
hinges on each door. Also install door catches on each of the cabinet doors to make certain
that they will stay closed when you shut them.
13. The top and bottom crown moldings will be added later after all three cabinets are finished.
Constructing the Outer Cabinets
The instructions here are for one outer cabinet. Obviously, two cabinets must be built to complete
the entertainment center. You may wish to cut the pieces for the second outer cabinet at the same
time as you cut those for the first. This saves time and insures that both cabinets will be the same.
The Cutting List shows the quantities needed for both cabinets.
1. Cut two sides (Q) from 3/4-inch plywood, each measuring 16-1/4 x 78-1/2 inches.
2. Cut two top/bottoms (R) from 3/4-inch plywood, each measuring 16 x 30 inches.
3. Place the two sides (Q) on edge on a level surface, 28-1/2 inches apart. Fit the top/bottoms
(R) over the ends of the sides (Q) to form a rectangle measuring 30 x 80 inches, as shown
in Figure 12. Apply glue to the meeting surfaces and screw through the top/bottoms (R)
into the edges of the sides (Q). Use 1-1/2-inch screws spaced about every 5 inches.
4. Cut five shelves (S) from 3/4-inch plywood, each measuring 16 x 28-1/2 inches.
Figure 12
11
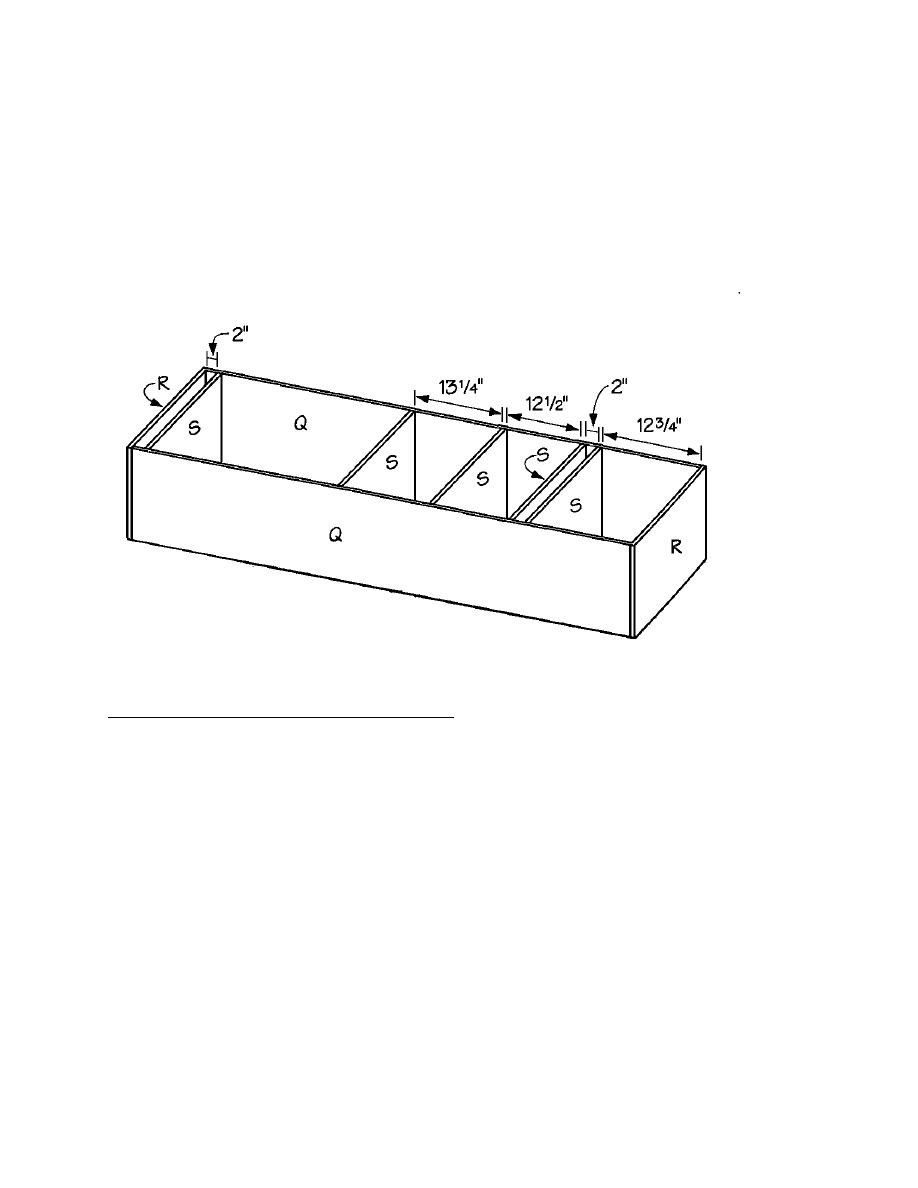
5. Place the first shelf (S) 12-3/4 inches below the top (R). Screw through the sides (Q) into
the edges of the shelf (S), as shown in Figure 12. Use 1-1/2-inch screws spaced about
every 5 inches.
6. Repeat the procedure in Step 5 to attach the second shelf (S) 2 inches below the first one.
7. Attach the third shelf (S) 12-1/2 inches below the second one.
8. Attach the fourth shelf (S) 13-1/4 inches below the third one.
9. Attach the fifth shelf (S) 2 inches above the bottom (R).
Adding the Trim to the Outer Cabinets
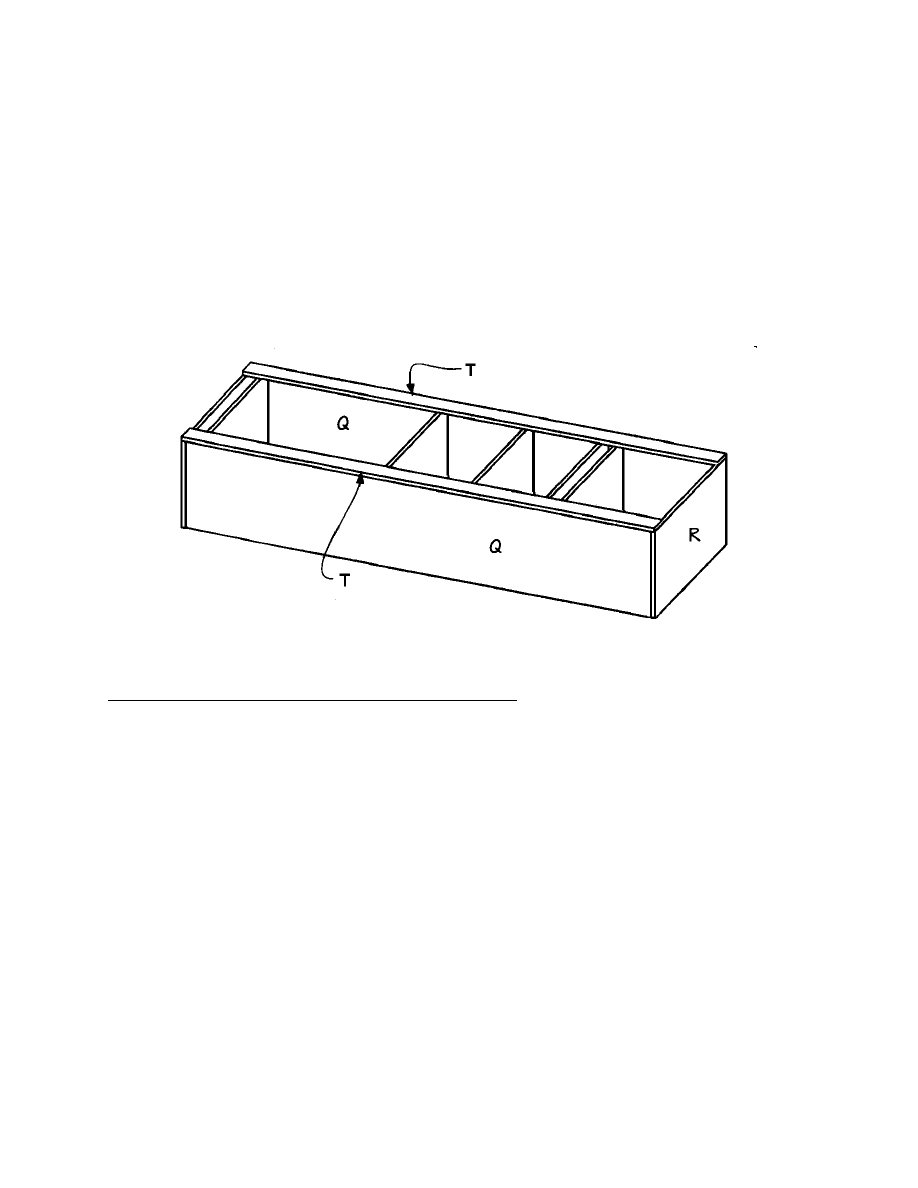
1. Cut two vertical trims (T) from 1 x 4 pine, each measuring 80 inches long.
2. Apply glue to the meeting surfaces and screw one vertical trim (T) to the edge of one side
(Q), as shown in Figure 13. Use 1-1/2-inch screws spaced about every 5 inches.
3. Repeat Step 2 to attach the remaining vertical trim (T) to the opposite side (Q).
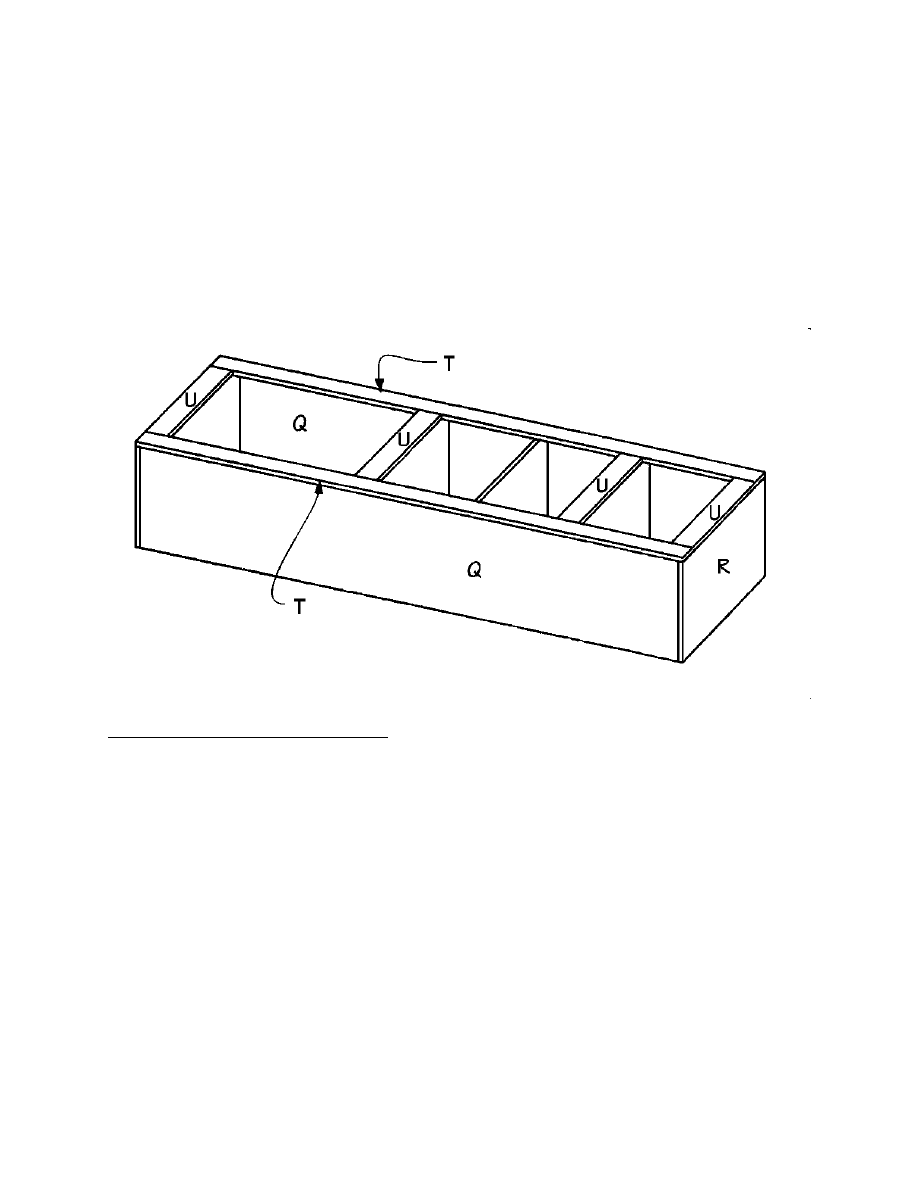
4. Cut four horizontal trims (U) from 1 x 4 pine, each measuring 23 inches.
5. Apply glue to the plywood edge and attach one horizontal trim (U) over the edge of the
top (R), as shown in Figure 14. Screw through the horizontal trim (U) into the edge of the
top (R) using 1-1/2-inch screws about every 6 inches.
6. Repeat Step 5 to attach the second horizontal trim (U) over the edges of the second and
third shelves (S).
Figure 13
12
7. Attach the third horizontal trim (U) flush with the top surface of the fourth shelf (S).
8. Attach the fourth horizontal trim (U) over the edges of the fifth shelf (S) and the bottom
(R).
9. Cut one molding trim (V) from 3/4-inch-wide rope molding, measuring 23 inches long.
10. Apply glue to the meeting surfaces and nail the molding trim (V) over the exposed edge of
the third shelf (S). Nail it in place using 1-inch (2d) finishing nails spaced about every 5
inches.
Making the Cabinet Doors
1. Cut four top/bottom door trims (W) from 1 x 4 pine, each measuring 11-1/2 inches long.
2. Miter each of the 4 top/bottom door trims (V) at opposing 45-degree angles, as shown in
Figure 5.
3. Cut four side door trims (X) from 1 x 4 pine, each measuring 3-1/2 inches long.
4. Miter each of the 4 side door trims (X) at opposing 45-degree angles, as shown in Figure
6.
5. Cut 4 narrow side door trims (Y) from 1 x 2 pine each measuring 32-1/2 inches long.
6. Cut 4 door panels (Z) from 1/4-inch plywood, measuring 11-1/4 x 29 inches.
7. Place two top/bottom door trims (W), face down, 25-1/2 inches apart, and parallel to each
Figure 14

13
other. The miters should oppose each other, as shown in Figure 7.
8. Fit one wide side door trim (X) between the 2 top/bottom door trims (W), as shown in
Figure 7.
9. Apply glue to the meeting surfaces and clamp the four pieces together for several hours.
10. Repeat Steps 7 through 9, using the remaining two top/bottom door trims (W), wide side
door trim (X), and narrow side door trim (Y).
11. Center a door panel (X) over the assembly, as shown in Figure 7. There should be a
3/4-inch border of trim on all sides of the door panel (X). Apply glue to the meeting
surfaces and nail through the door panel (X) into each of the four trim pieces (V and W)
using 3/4-inch brads placed about every four inches.
12. The next step is optional. We routed both the inside and outside edges of the front of the
assembled door trims (W, X, and Y) using a round-over bit. Before routing, we
temporarily added extra support to the four glued joints by stapling across each joint using
a staple gun. After the routing was complete, we removed the staples.
13. Place a routed trim assembly (routed side down) on a flat surface. Place a door panel (Z)
over the assembly, flush with the outer edge of the narrow side door trim (y), as shown in
Figure 8. The other three trim pieces (W and X) should be exposed by 1-3/4 inches.
Apply glue to the meeting surfaces, and nail through the door panel (Z) into each of the
four trim pieces (W, X, and Y), using small ¾” brads, placed every 4 inches.
14. Repeat Step 13 to complete the other cabinet door.
Finishing the Outer Cabinet
1. Cut four support blocks (AA) from 1 x 2 pine, each measuring 4 inches long.
2. Place the completed cabinet on its front. Apply glue to the meeting surfaces and nail each
of the support blocks (AA) over the four exposed between the vertical trims (T) and the
horizontal trims (U). Nail through each support block (Y), using two 1-1/4-inch (3d)
finishing nails, one on each side of the joint.
3. Cut two base sides (BB) from 2 x 4 pine, each measuring 11 inches long.
4. Cut two base front/backs (CC) from 2 x 4 pine, each measuring 28 inches long.
5. Place the two base sides (BB) parallel to each other and 25 inches apart. Fit the two base
front/backs (CC) over the base sides (BB), to form a rectangle measuring 28 x 14 inches,
as shown in Figure 9. Screw through the base front/back (CC) into the base sides (BB)
using two 2-1/2- inch screws on each joint.
14
6. Cut four base supports (DD) from 2 x 4 pine, each measuring 7-1/2 inches long.
7. Miter the ends of each base support (DD) across the width at opposing 45-degree angles,
as shown in Figure 10.
8. Place the base assembly on a perfectly level surface. Apply glue to the meeting surfaces and
screw a base support (DD) into each of the four corners of the base assembly, flush with
what will be the top of the base assembly, as shown in Figure 11. Use two 3-inch screws
on each of the base supports (DD).
9. Center the base assembly on the bottom of the cabinet with the base supports (DD)
meeting the cabinet bottom (R). The base assembly should be 1 inch from each of the
edges of the cabinet bottom (R). Apply glue to the meeting surfaces and screw through the
base supports (DD) into the cabinet bottom (R) using three 2-inch screws on each base
support (DD).
10. Cut one back (EE) from 1/4-inch plywood, measuring 80 x 30 inches.
11. Place the back (EE) over the
back of the cabinet, overlapping
the sides (Q) and top/bottoms
(R). Apply glue to the meeting
surfaces and nail through the
back (EE) into the edges of the
sides (Q) and top/bottoms (R)
using 1-inch (2d) finishing nails
spaced every 4 inches.
12. Turn the completed cabinet on its
back and place the two cabinet
doors over the lower opening in
the cabinet. Allow about 1/8-inch
space between the doors. Check
to make certain that the doors are
straight and that the door panels
(Z) fit evenly inside the opening
in the cabinet assembly. Then
attach the doors to the cabinet
using two hinges on each door.
Also install door catches on each
of the cabinet doors to make
certain that they will stay closed
when you shut them.

15
13. The top and bottom crown molding will be added later after all three cabinets are finished.
14. Take a deep breath, admire your handiwork–and make another outer cabinet!
Finishing the Entertainment Center
1. Fill the screw holes, crevices and cracks with wood filler.
2. Sand all surfaces of all three of the completed cabinets.
3. Place the three cabinets together on a level surface. To hold the three cabinets together
temporarily, insert two or three 1-1/4-inch screws through the inside of the center cabinet
into the sides of each of the outer cabinets. Do not glue the cabinets together or you will be
unable to move them through doors.
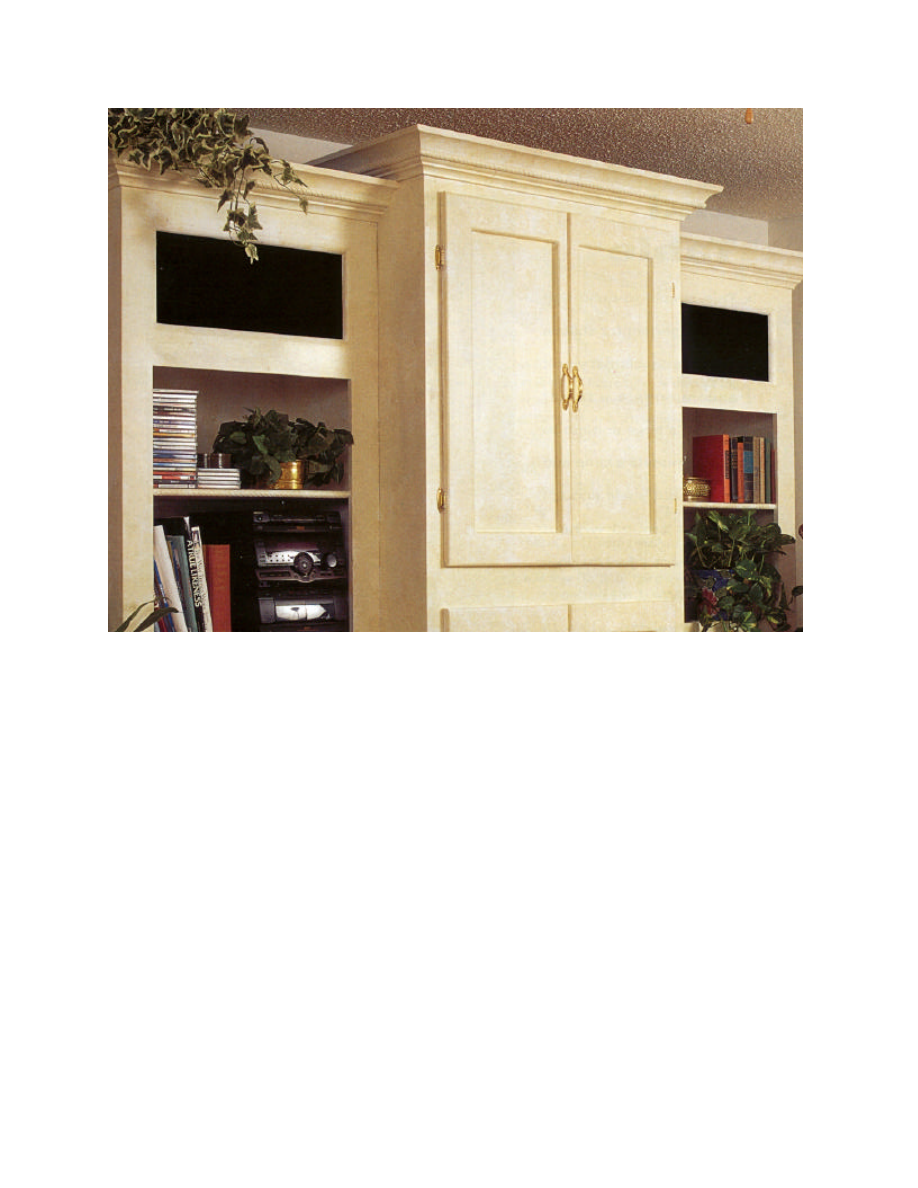
4. Refer to the project photograph for placement of the moldings. Carefully measure and cut
5-1/2-inch-wide crown molding (FF) to fit around the top of the joined cabinets. The
bottom of the top molding (FF) laps onto the top of the cabinets by only ¾ inch. If you are
not skilled in cutting crown molding, refer to the “Tips and Techniques” section for
assistance. Use glue and 1-inch (2d) finishing nails to attach the molding to the individual
cabinets. Do not use glue on the molding joints between the cabinets.
5. Carefully measure and cut rope molding (EE) and attach it to the installed crown molding,
as shown in the photograph.
6. Again, refer to the project photograph. Carefully measure and cut 3-inch-wide crown
molding (HH) to fit around the bottom of each of the cabinets. Use glue and 1-inch (2d)
finishing nails to attach the molding to the individual cabinets. Do not use glue on the
molding joints between the cabinets.
7. Stain or paint the entertainment center the color of your choice. We first painted ours with
a bright white paint and then sponge-painted it with an almond paint. We then sealed it
with a clear polyurethane.
16
17
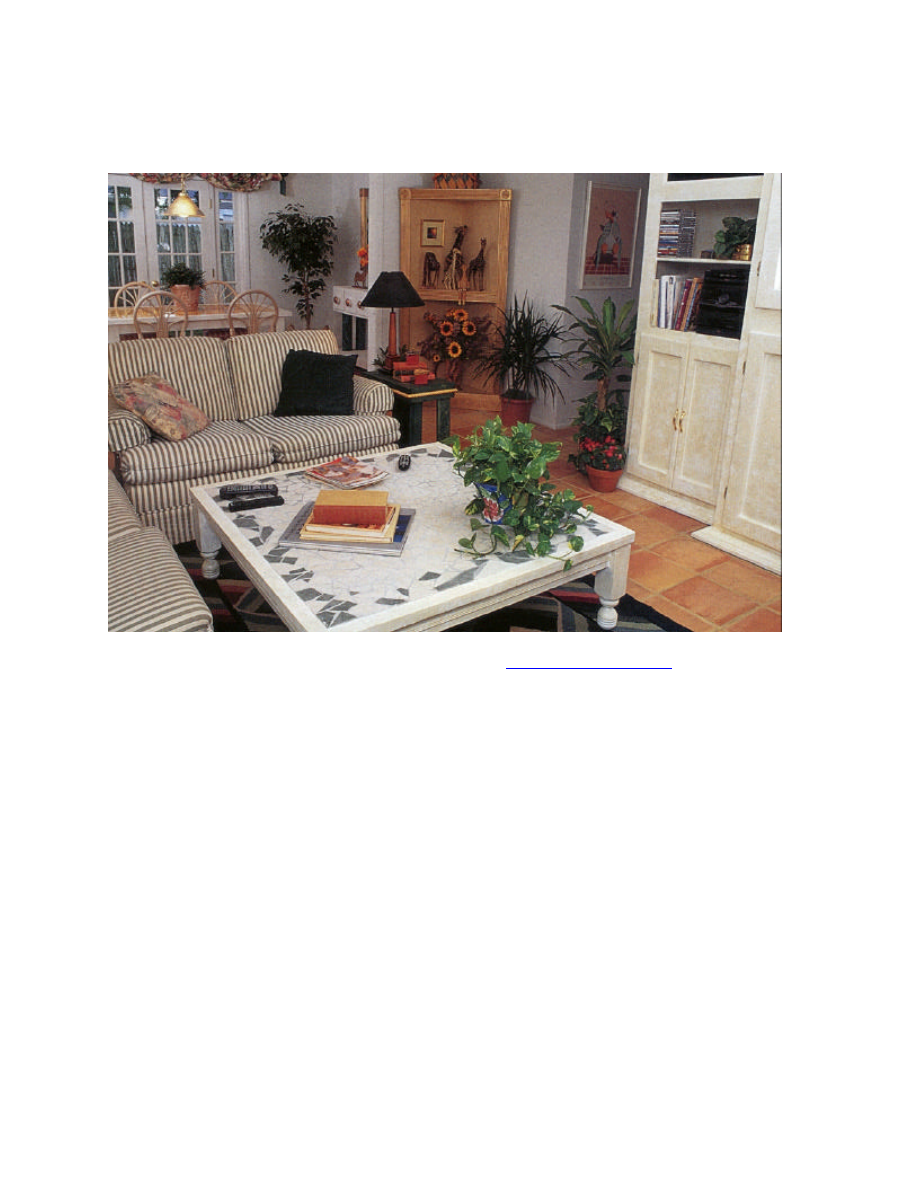
Coordinate Your Room with Matching Pieces from
www.wowimadeit.com!
This photograph contains seven projects available from
www.wowimadeit.com
: Kitchen Table,
Entertainment Center, Tiled Coffee Table, Corner Display Cabinet, End Table, Mirror, and
Buffet. Notice how everything is coordinated, and the rooms look unified because all of these
pieces are designed in a similar scale, made of similar materials, and finished with similar
techniques and colors.
Wyszukiwarka
Podobne podstrony:
Cabinet entertainment center2
Cabinet Entertainment Center
Cabinet entertainment center1
Cabinet Entertainment Center Plans
Cabinet Entertainment Center Plans
Cabinet Shaker entertainment center
Cabinet Modular Entertainment Center
Cabinet small entertainment center
Entertainment Center (2)
Cabinet Video Game Center (Part 1)
Cabinet Video Game Center (Part 2)
Cabinet Fold Away Hobby Center(Part 2)
Cabinet Fold Away Hobby Center(Part 1)
Corner Buffet Cabinet(1)
Dribbling Center
Consular Electronic Application Center Print Application
cabinetmakerupho00sher
Corner Cabinet 1
więcej podobnych podstron