
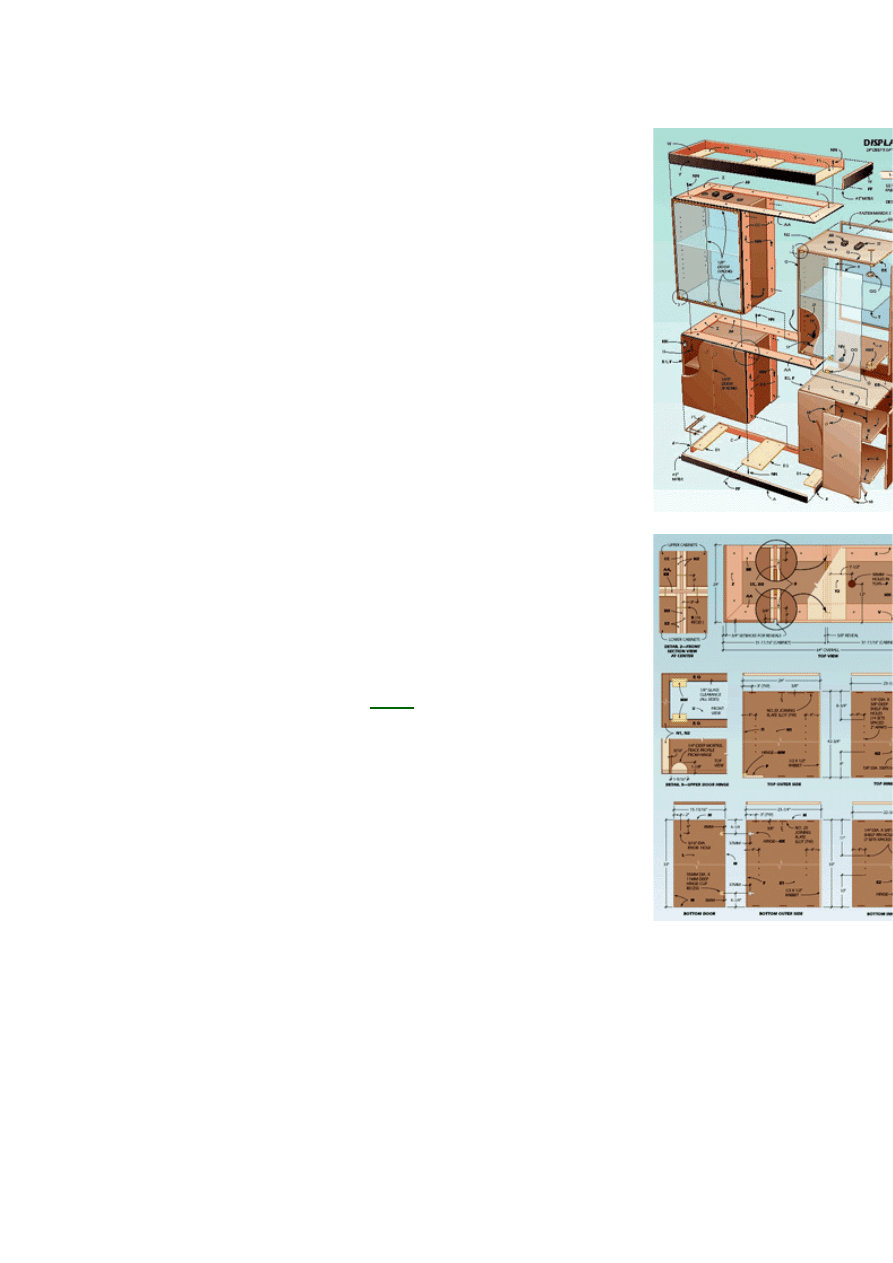
OFFICE DISPLAY
CABINET
Every executive accumulates business mementos,
personal treasures, souvenirs and perhaps even a few
cherished awards. These are the things that personalize an
otherwise utilitarian office space. They make it a
comfortable place to work and an inviting place for
associates to visit. However, the successful executive
needs more than a simple shelf on the wall to display the
collection.
Our walnut cabinet was custom designed to fill this need.
As with our two companion pieces, this case features
matching walnut veneer across the lower doors and on the
cabinet sides. The two upper cases have lighted interiors
and mirrored backs to showcase the objects placed inside.
Tempered glass doors and glass shelves complete the
package.
While this project is ambitious in terms of material cost, the
construction details are within the capabilities of an
experienced home woodworker. We used walnut-veneer
MDF (medium-density fiberboard) for the panels. To
produce the matched-veneer appearance, order the panels
"sequence matched and numbered." Here, each panel will
be numbered to correspond to the order in which the
eneers were cut from the log.
v
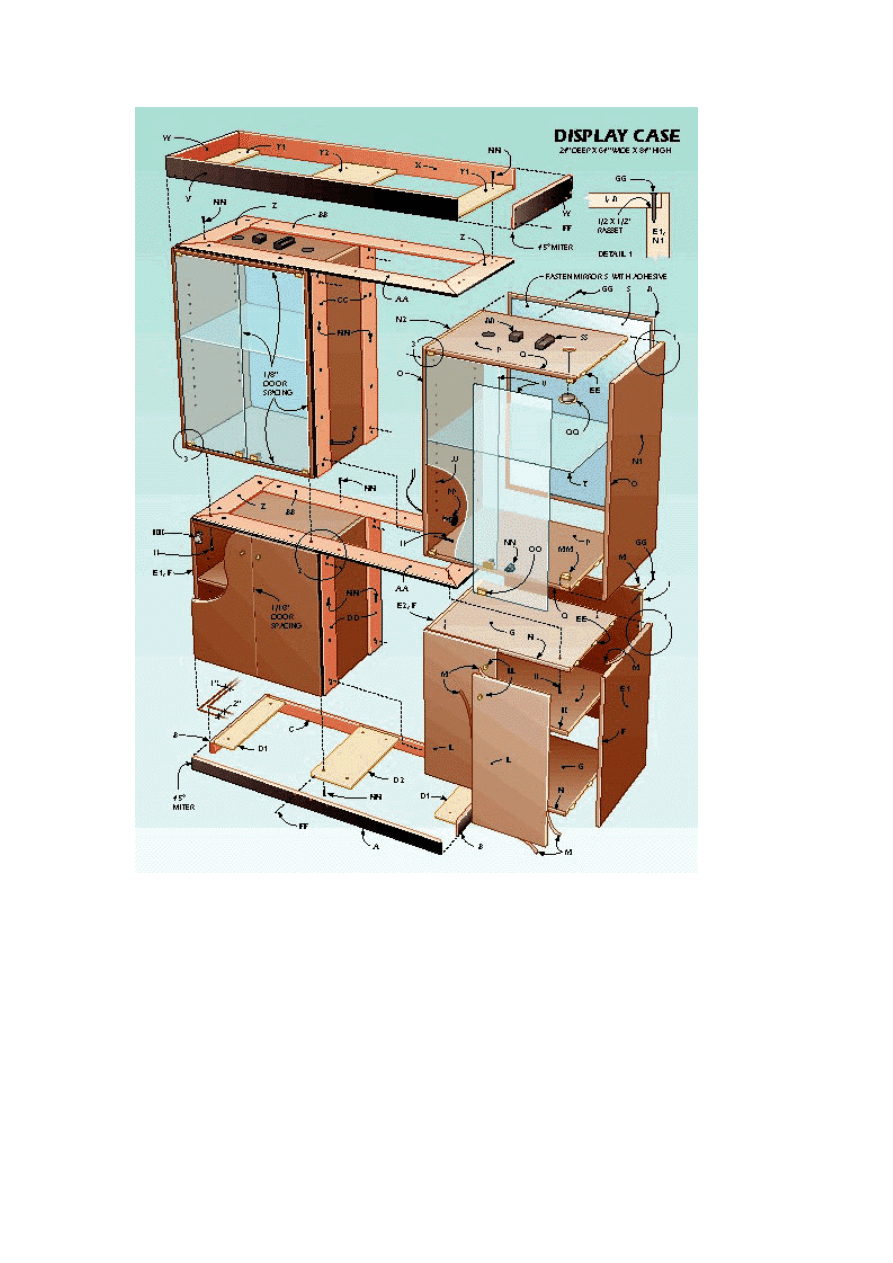
Case Construction
Begin by cutting the walnut panels for the upper and lower
cases. Pay special attention to matching the veneer on the
outer sides so that the grain runs continuously from the
lower- to upper-case side. Cut the panels slightly oversize,
add the solid-walnut edge band (O, F) to the front edges of
all panels and add the walnut veneer tape (M) to the top
edges of the lower-case outer sides (E1). Then cut the
panels to finished size.
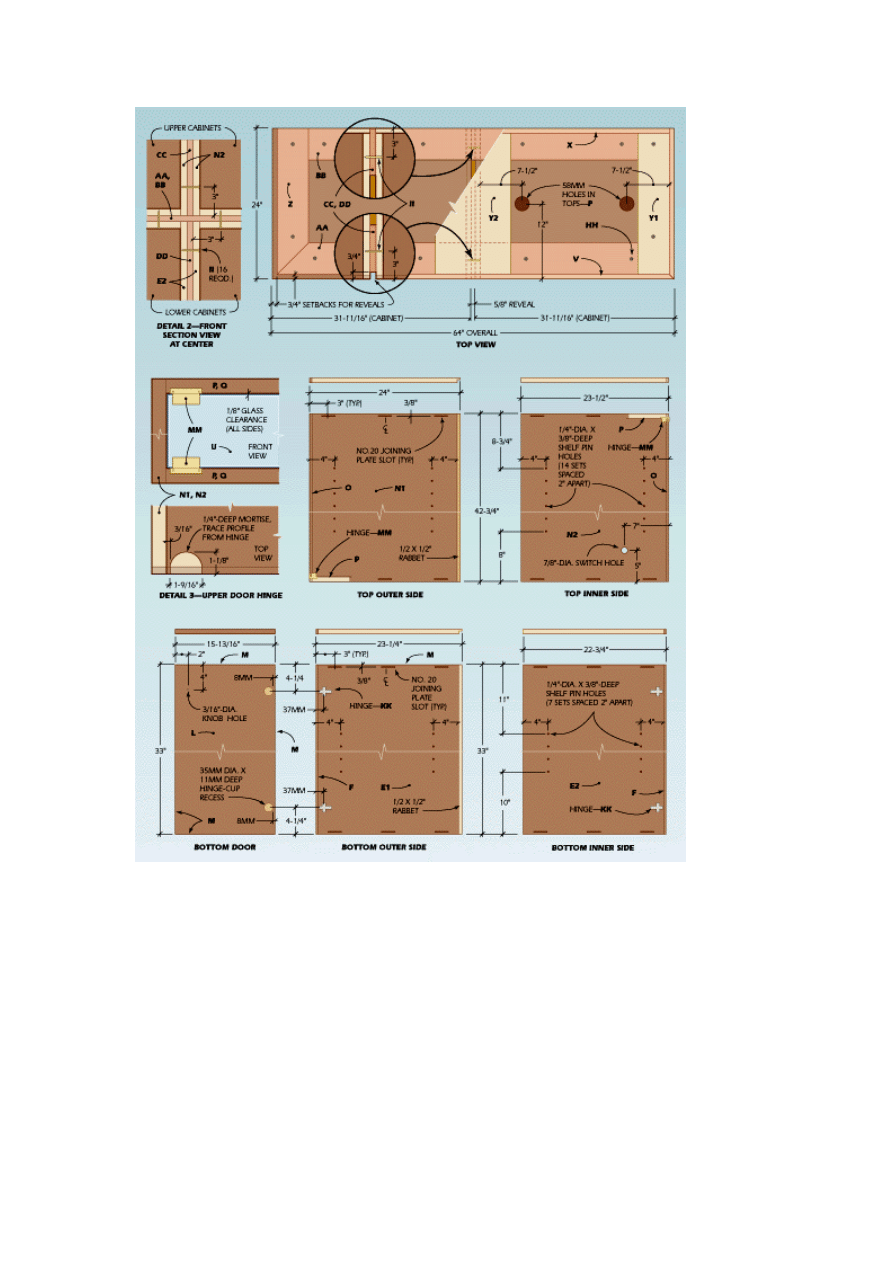
Use the router with straightedge guide to cut the rabbet in the
outer case sides (E1, N1) that hide the cabinet backs. Lay
out the joining-plate slots in sides, tops and bottoms, and cut
the slots with the plate joiner.
Make a boring template for the shelf-pin holes in the lower
cabinets and a second template for the pin holes in the upper
cabinets. A strip of 1/2-in. plywood or MDF is perfect for the
template. Clamp the appropriate template to a cabinet side,
and use it as a guide in boring the holes. A stop on the drill
bit ensures uniform hole depth.
Mark the locations of the glass-hinge mortises on the upper-
case top and bottom panels (P). Trace the hinges for the
proper mortise shape. Use a router and straight bit to remove
most of the waste from the mortises and finish with a sharp
chisel and gouge. Test fit the
bases and make any
necessary adjustments.
Lay out and bore the 7/8-in.-dia. holes for the light switches
in the upper-case sides (N2). Use an adjustable circle cutter
to bore the 58-mm-dia. holes for the halogen lights in the
upper-case tops.
Sand the interior surfaces of the cabinet parts before
assembly, finishing with 220-grit paper. Then, completely
dust off the parts.
To assemble one of the cases, spread glue on each plate
and in its slot before inserting the plate. Join the top and
bottom to one of the case sides, then position the opposite
side and apply clamps to pull the joints tight. Compare
opposite diagonal measurements to check that the cabinet is
square and adjust the clamps if necessary. Let the glue set
for at least 30 minutes before removing the clamps. Repeat
the process for the remaining cases.
Cut the 1/2-in. panels for the case backs (I, R). Note that the

top edge of the lower-case backs must be covered with
walnut-veneer tape. Apply the tape to the edge before cutting
the panel to finished size. Bore pilot holes and temporarily
fasten the backs to the cases with 1-in. No. 5 fh screws.
The Spacers, Base And Soffit
Prepare the maple spacers that fit between the cabinets and
between the upper cases and the soffit. Temporarily screw
the upper vertical spacers (CC) to an upper-case side and
attach the lower vertical spacers (DD) to a lower case.
Cut the maple parts for the base and soffit, as well as the
3/4-in. gussets (Y1, Y2, D1, D2). Assemble the base and
soffit with 4d finishing nails and glue. Set and fill the nail
holes. When the filler dries, sand the assemblies.
Lay the two bottom cases on their backs and clamp them
together so that they are properly aligned. Bore pilot holes
and temporarily screw the two cases together. Next,
temporarily screw the base to the case bottoms. Stand the
assembly on the floor. If necessary, shim the base so the
assembly is level and stable.
Bore and countersink pilot holes in the spacers that separate
the top and bottom cases. Then temporarily screw them to
the top of the lower case assembly. Position the upper cases
over the lower subassembly. Screw the upper cases together
and fasten the upper half to the lower half by screwing
through the tops of the lower cabinets. Then, temporarily
install the top spacers (Z, AA, BB), place the soffit in position
and temporarily secure it.
The Doors And Shelves
Select the panels for the lower cabinet doors so there will be a uniform,
matching grain pattern across the lower cases. Cut the panels to size and
apply walnut-veneer tape on all edges. Bore the 35mm recesses for the
hinges in each door and mount the hinges on the doors. Attach the hinge
mounting plates to the lower-case sides, mount the doors and adjust the
hinges for proper spacing. Bore 3/16-in. holes for the door pulls and fasten the
pulls to the doors.
For safety's sake, it's best to use tempered glass for the display case doors.
Tempered glass must be specially ordered and cannot be altered once the

tempering process is complete. Specify that the glass have polished edges
and "dubbed" (slightly rounded or chamfered) corners.
Mount the glass-door hinge base plates to the cabinet, then attach the hinges
to the tempered glass panels. First install the self-adhesive pressure plates to
the corners of the glass doors. Then slide the hinges over the glass and
gently tighten the screws. Carefully slide the door assembly into the base-
plate tracks and thread in the door stops. Adjust the position of the glass
doors for even spacing on all edges. Then install the strikes along the bottom
edges of the glass doors. Mount the magnetic touch latches to the upper-case
bottom panels.
Cut walnut panels for the lower-cabinet shelves and glue a walnut edge band
to the front edge of each panel. Install shelf pins in the lower cases and test
the fit of each shelf.
Use a dark pencil to outline the inside profile of each upper cabinet on the 1/2-
in. backs. These marks will serve as registration guides for the mirrors. At this
point, you can disassemble the cabinet for finishing. Any final adjustments
and fitting can be done later. Remove all hardware, spacers, and the soffit
and base. Sand all parts with 120-, 180- and 220-grit sandpaper, dusting off
thoroughly between grits. When the sanding is complete, wipe all surfaces
with a tack cloth.
Finishing
Paint the spacers, soffit and base with three coats of black satin enamel.
Sand lightly between coats to achieve a smooth, even finish.
Apply three coats of varnish to the walnut case parts. We used Behlen's
Rockhard Table Top Varnish. Thin the first coat 20% with Behlen's
Rockhard Varnish Reducer and sand lightly with 400-grit paper after
drying for 12 hours. Apply two more coats, full strength, again sanding
lightly between coats. Let the last coat cure for no longer than 20 hours.
Then wet-sand with 600-grit waterproof paper and paraffin oil to remove
any dust particles. Wipe dry with clean cotton cloths, then buff with No.
0000 steel wool. Polish the finish with a clean, dry and soft cotton cloth.
Final Assembly
Use mirror mastic to mount the mirrors to the upper-cabinet backs. Lay
the backs flat on a worktable and apply the mastic to the panels.
Position the mirrors over the backs, aligning them within the
registration marks. Let the mastic cure overnight before reinstalling the
backs.
Reattach the spacers to the lower- and upper-cabinet sides. Join the
lower cabinets together and reattach the base assembly.
Install the halogen lights in the tops of the upper cabinets and connect
the wiring according to the diagrams that come with the lights. The
halogen low-voltage system includes the lamps and a separate
transformer, mounting block and light switch for each case. Fasten the
transformers and mounting blocks to the top of each cabinet. Locate
these parts so that they do not interfere with the placement of the
spacers or soffit gussets. Install the switches on the case sides and
route the wires up the sides and behind the vertical spacers. Use small
electrical staples to hold the wires in place. Plug in the lights and check
their operation before completing the cabinet assembly.
Replace the horizontal spacers on the lower-cabinet tops. Next, place
the upper cabinets on the base, join them to each other and fasten
them to the lower half. Reinstall the top spacers and attach the soffit.
You can bore a 1-1/2-in. hole centered in the back of the soffit to allow
the light cords to pass through, or you can simply let the cords drape
over the top of the soffit.
Mount the hinges and mounting plates for the lower-case doors and
rehang the doors. Rehang the glass doors and attach all door pulls.
Finally, install the shelves.
MATERIALS LIST–OFFICE DISPLAY
CABINET
Key
No.
Size and description (use)
A
1
3/4 X 3 X 62" maple† (base front)
B
2
3/4 X 3 X 22" maple† (base side)
C
1
3/4 X 3 X 60-1/2" maple† (base back)
D1
2
3/4 X 5 X 20-1/2" panel stock**(side gusset)
D2
1
3/4 X 10 X 20-1/2" panel stock** (center gusset)
E1
2
3/4 X 22-7/8 X 33" walnut panel stock* ††(outer side)
E2
2
3/4 X 22-3/8 X 33" walnut panel stock* (inner side)
F
4
3/8 X 3/4 X 33" walnut (edge band)
G
4
3/4 X 22-3/8 X 30-3/16" walnut panel stock*
(top/bottom)
H
4
3/8 X 3/4 X 30-3/16" walnut (edge band)
I
2
1/2 X 31-7/16 X 33" panel stock** †† (back)
J
4
3/4 X 22-5/16 X 30-1/16" walnut panel stock* (shelf)
K
4
3/8 X 3/4 X 30-1/16" walnut (edge band)
L
4
3/4 X 15-13/16 X 33" walnut panel stock* †† (door)
M as reqd. walnut-veneer tape
N1
2
3/4 X 23-5/8 X 42-3/4" walnut panel stock* (outer
side)

N2
2
3/4 X 23-1/8 X 42-3/4" walnut panel stock* (inner
side)
O
4
3/8 X 3/4 X 42-3/4" walnut (edge band)
P
4
3/4 X 23-1/8 X 30-3/16" walnut panel stock*
(top/bottom)
Q
4
3/8 X 3/4 X 30-3/16" walnut (edge band)
R
2
1/2 X 31-7/16 X 42-3/4" panel stock** (back)
S
2
1/4 X 30-1/8 X 41-3/16" mirror
T
6
1/4 X 23-1/8 X 30-1/16" tempered glass (shelf)
U
4
1/4 X 14-7/8 X 41" tempered glass (door)
V
1
3/4 X 4 X 64" maple† (soffit front)
W
2
3/4 X 4 X 24" maple† (soffit side)
X
1
3/4 X 4 X 62-1/2 maple† (soffit back)
Y1
2
3/4 X 5 X 22-1/2" panel stock** (gusset)
Y2
1
3/4 X 12 X 22-1/2" panel stock** (gusset)
Z
4
5/8 X 5 X 23-1/4" maple† (side horizontal spacer)
AA
2
5/8 X 5 X 62-1/2" maple† (front horizontal spacer)
BB
2
5/8 X 5 X 52-1/2" maple† (back horizontal spacer)
CC
2
5/8 X 5 X 42-3/4" maple† (upper vertical spacer)
DD
2
5/8 X 5 X 33" maple† (lower vertical spacer)
EE as reqd. No. 20 joining plates
FF as reqd. 4d finishing nails
GG as reqd. 1" No. 5 fh woodscrews
HH as reqd. 1-1/4" No. 8 fh woodscrews
II as reqd. 2" No. 8 fh brass woodscrews
JJ
40
1/4" shelf pin–No. 62067†††
KK
4
pair bottom cabinet hinges–No. 34710†††
LL
4
polished brass door pull–Sugatsune No. GLA-16
MM
4
pair upper cabinet hinges–Hafele No. 361.49.809
NN
4
touch latch–Hafele No. 245.80.310
OO
4
touch latch strike–Hafele No. 245.63.826
PP
2
light switch–Hafele No. 823.78.327
4
halogen lamp–Hafele No. 823.29.850
RR
2
transformer–Hafele No. 823.24.436
SS
2
mounting block–Hafele No. 823.24.418
*Walnut-veneer MDF or veneer-core panel
**Walnut-, maple- or birch-veneer MDF or veneer-core panel (plywood)

†† Dimension includes walnut veneer-tape edge
††† Available from The Woodworkers' Store, 21801 Industrial Blvd., Rogers, MN 55374
Misc: Glue; 120-, 180-, 220- and 400-grit sandpaper; 600-grit waterproof paper; Behlen's
Pore-O-Pac paste wood filler (Van Dyke Brown) No. B744-IF346; Behlen's Rockhard Table
Top Varnish No. B603-28507; Behlen's Rockhard Varnish Reducer; black satin enamel paint.
Hardware manufacturer addresses: Sugatsune America, Inc., 221 East Selandia Ln., Carson,
CA 90746
Hafele America Co., 3901 Cheyenne Dr., P.O. Box 4000, Archdale, NC 27263
Document Outline
Wyszukiwarka
Podobne podstrony:
Display Cabinet 2
Display Cabinet 3
Cabinet display cabinet
Cabinet Display Cabinet 1
Cabinet Corner Display Cabinet
Corner Buffet Cabinet(1)
cabinetmakerupho00sher
Corner Cabinet 1
Plan and Install Kitchen Cabinets
bathroom cabinet szafka lazienkowa
Brydcliffe Cabinet
box taurus cabinets manual
Atlantic E New IP66 Cabinet id Nieznany
Mobile File Cabinet
I Ogólnopolski Kongres Naukowo Szkoleniowy CABINES Polska ~Dermatologia w kosmetyce i kosmetologii~
constitution of cabinet commitee on uidai 2009
więcej podobnych podstron