B RO U G H T TO YO U BY
:
Display Cabinet
Plan No. 865
Copyright U-Build, Inc., 1997.
All rights reserved. Printed in the U.S.A.
Bill of Material
Quantity
Size
Material
Item
1
3/4
” x
48
” x
96
”
oak plywood
A, B, C, D, E
4 board feet
3/4
”
oak
F, G, H, I,
J, K, L, M
1
3/16
” x
24
” x
24
”
oak plywood
N
1
1 1/16
” x
1 1/4
” x
60
”
oak molding
P, Q
2
1/8
” x
11 3/8
” x
17 1/8
”
tempered glass
9
3/8
” x
1
”
dowels
2
1
”
knobs
2 pairs
1 1/2
”
cabinet hinges
8
5/16
” x
3/4
”
glass clips
2
magnetic latches
1 box
1
”
finish nails
1 box
1 1/2
”
finish nails
1 bottle
wood glue
1 small can
oak wood filler
1 quart
finish
Cutting Schedule
Item
Qty
T
W
L
Material
A
2
3/4
”
7 3/4
”
21 3/8
”
oak plywood
B
1
3/4
”
7 1/4
”
28
”
oak plywood
C
2
3/4
”
6 1/4
”
28
”
oak plywood
D
1
3/4
”
7 3/4
”
28
”
oak plywood
E
1
3/4
”
28
”
20 3/8
”
oak plywood
F
1
1/4
”
3/4
”
28
”
oak
G
2
1/4
”
3/4
”
28
”
oak
H
4
1/4
”
3/4
”
7 3/4
”
oak
I
2
1/4
”
3/4
”
21 7/8
”
oak
J
1
3/4
”
2
”
28
”
oak
K
1
3/4
”
1 1/4
”
19 1/8
”
oak
L
4
3/4
”
1 1/4
”
19
”
oak
M
4
3/4
”
1 1/4
”
10 3/4
”
oak
N
2
3/16
”
11 1/2
”
17 1/4
”
oak plywood
O
2
3/4
”
1 1/4
”
6
”
oak
P
1
1 1/16
”
1 1/4
”
31 5/8
”
oak molding
Q
2
1 1/16
”
1 1/4
”
9 1/16
”
oak molding
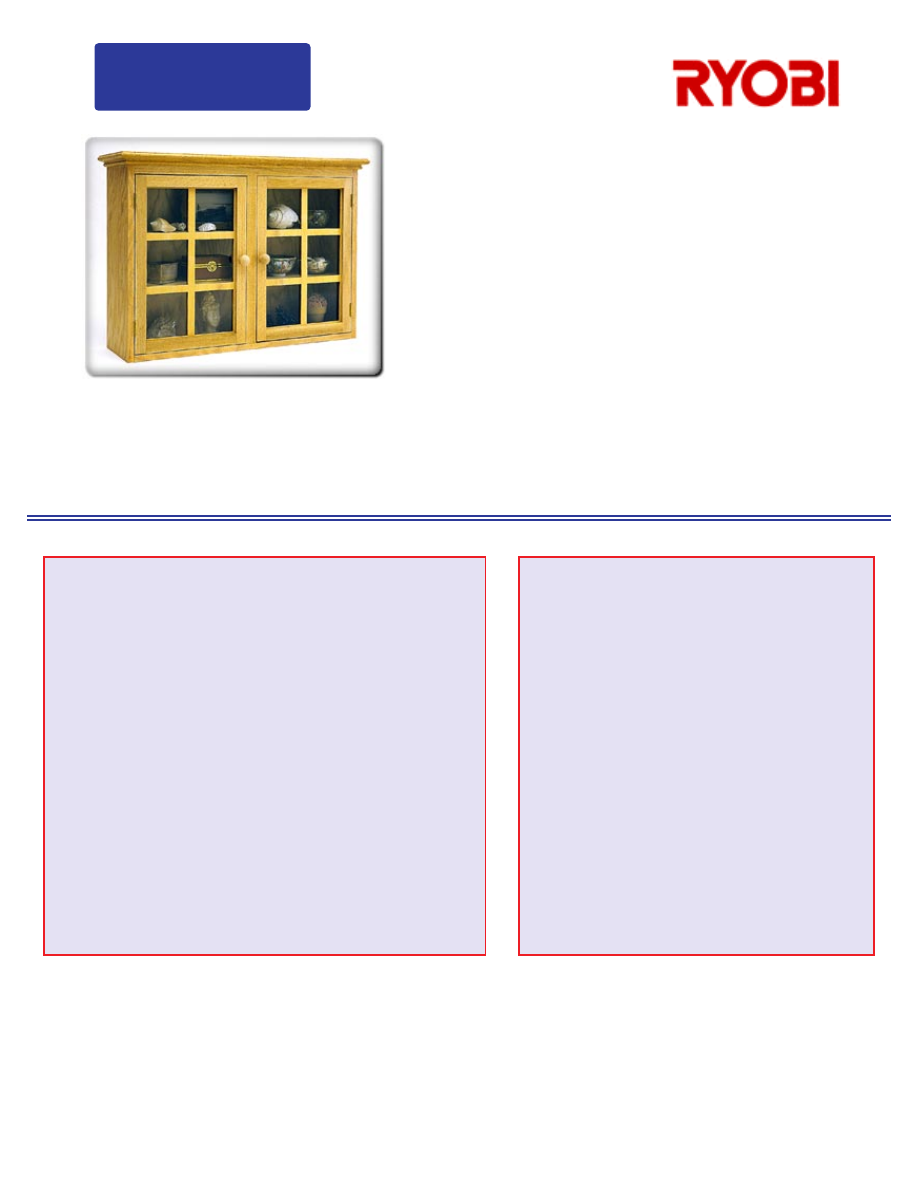
Wall-mounted or placed on a table or countertop, this handsome display cabinet is the perfect way to share any collection while keep-
ing it clean and protected at the same time. Featuring tempered glass doors and three shelves, the cabinet's design calls for all straight
cuts and straightforward construction techniques (simple cut-outs give the effect of multiple panes of glass in the single-pane doors).
Finish is up to the builder, so the project will match any decor.
The display cabinet measures about 32 inches wide by 22 inches tall by 9 inches deep, and the shelves are each about 7 inches deep.
NOTES
1.
Read all instructions and check materials before beginning work.
2.
Read manufacturer’s instructions before operating equipment.
3.
Cut all wood to exact size. Follow the cutting schedule.
4.
Always wear safety glasses.
5.
Use wood glue on all joints.
6.
Drill pilot holes in oak before nailing.
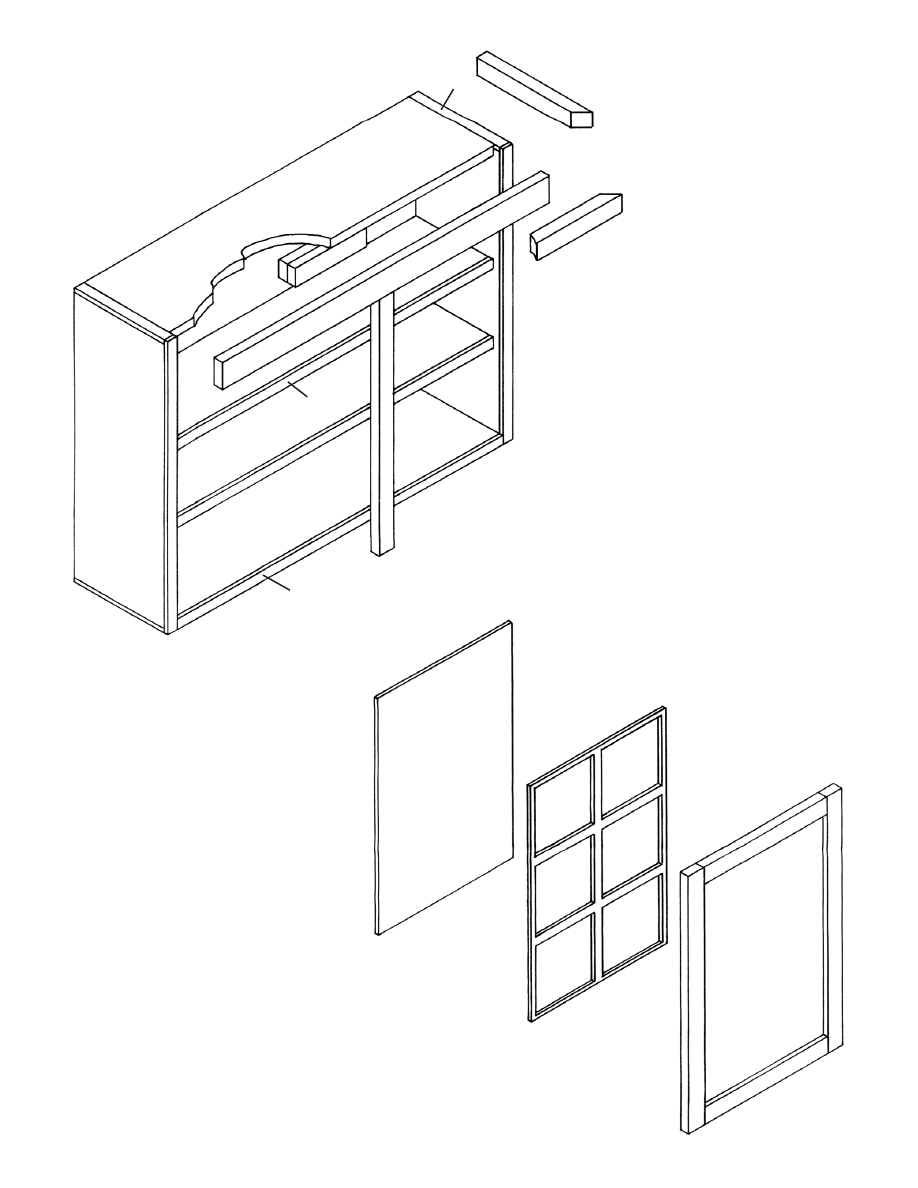
B
E
G
C
D
L
TEMPERED
GLASS
M
N
K
F
A
I
O
J
P
Q
H
Isometric
2.
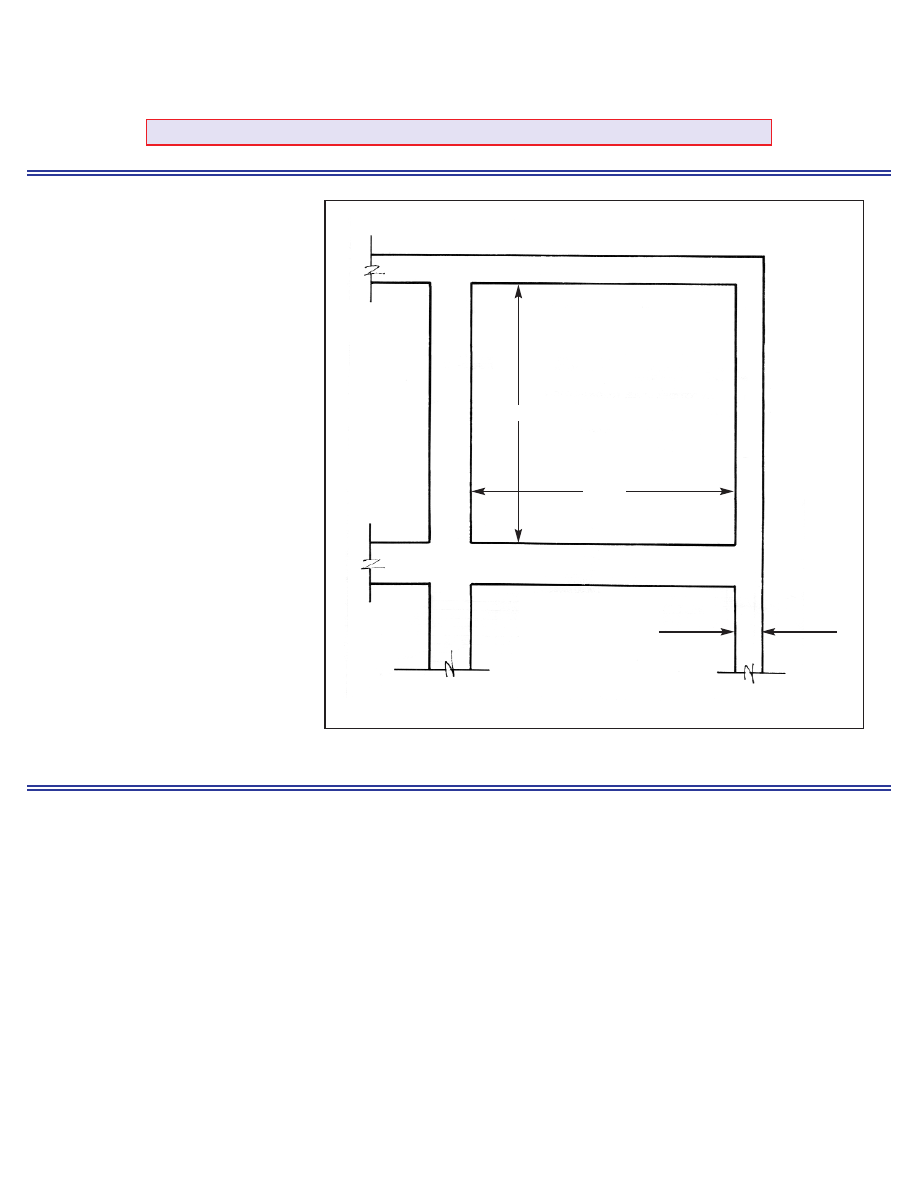
Use 1 1/2” finish nails and glue to attach boards C to E. Make sure that the boards line up square.
Refer to isometric and Figure 3 for location.
Read all instructions before beginning any work. Cut all material to sizes shown in cutting schedule.
Assembly Instructions
Page One
1.
Use 1” nails and glue to attach boards H and I to boards A. Attach G to C and F to D in the same manner.
Refer to Figures 1 and 2 and isometric.
3.
Use 1 1/2” finish nails and glue to attach boards B and D to E.
4.
Use 1 1/2” finish nails and glue to attach boards A to B, C, D and E. Refer to Figures 1 and 2.
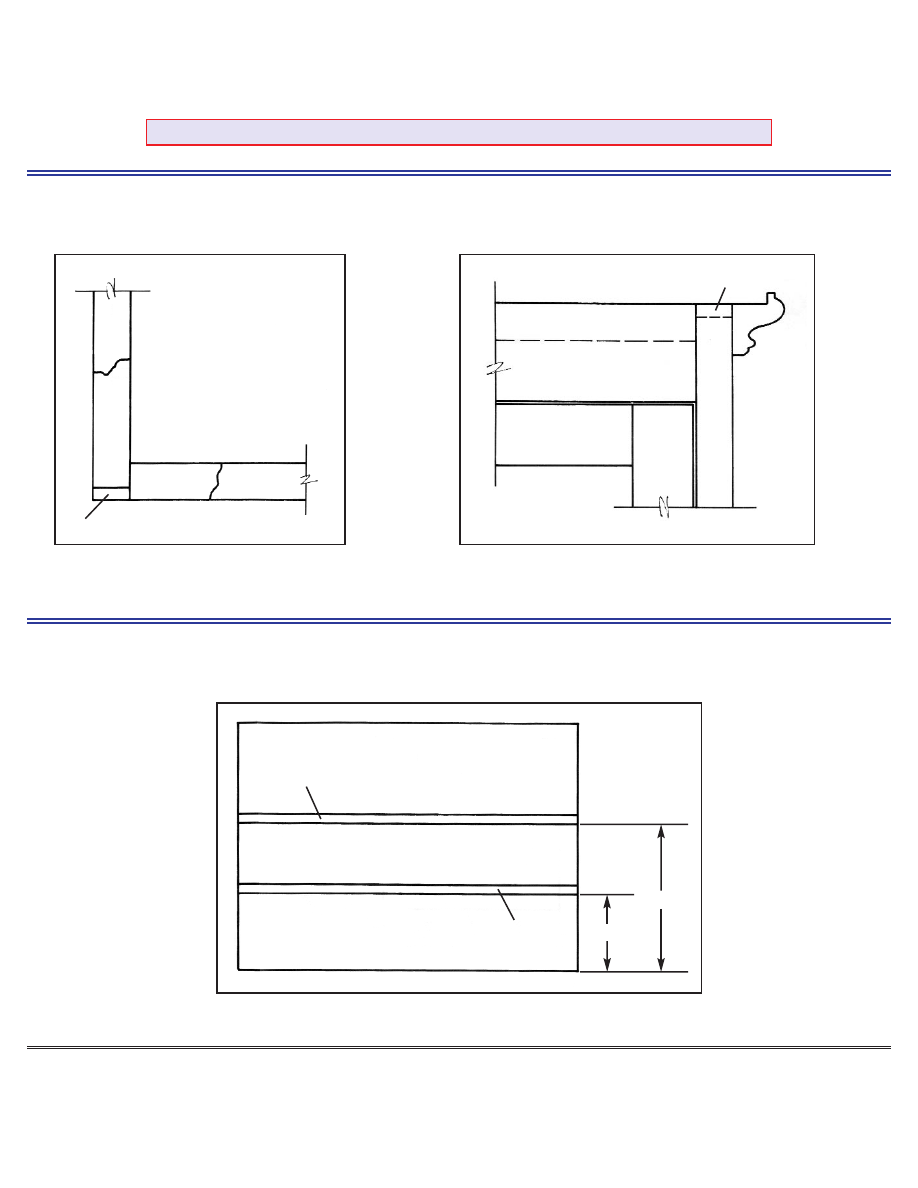
Figure 1
Figure 2
(Note: Part “P” is not shown.)
Figure 3
I
A
F
Q
H
B
J
I
M
L
E
C
C
D
H
6 1/4
12
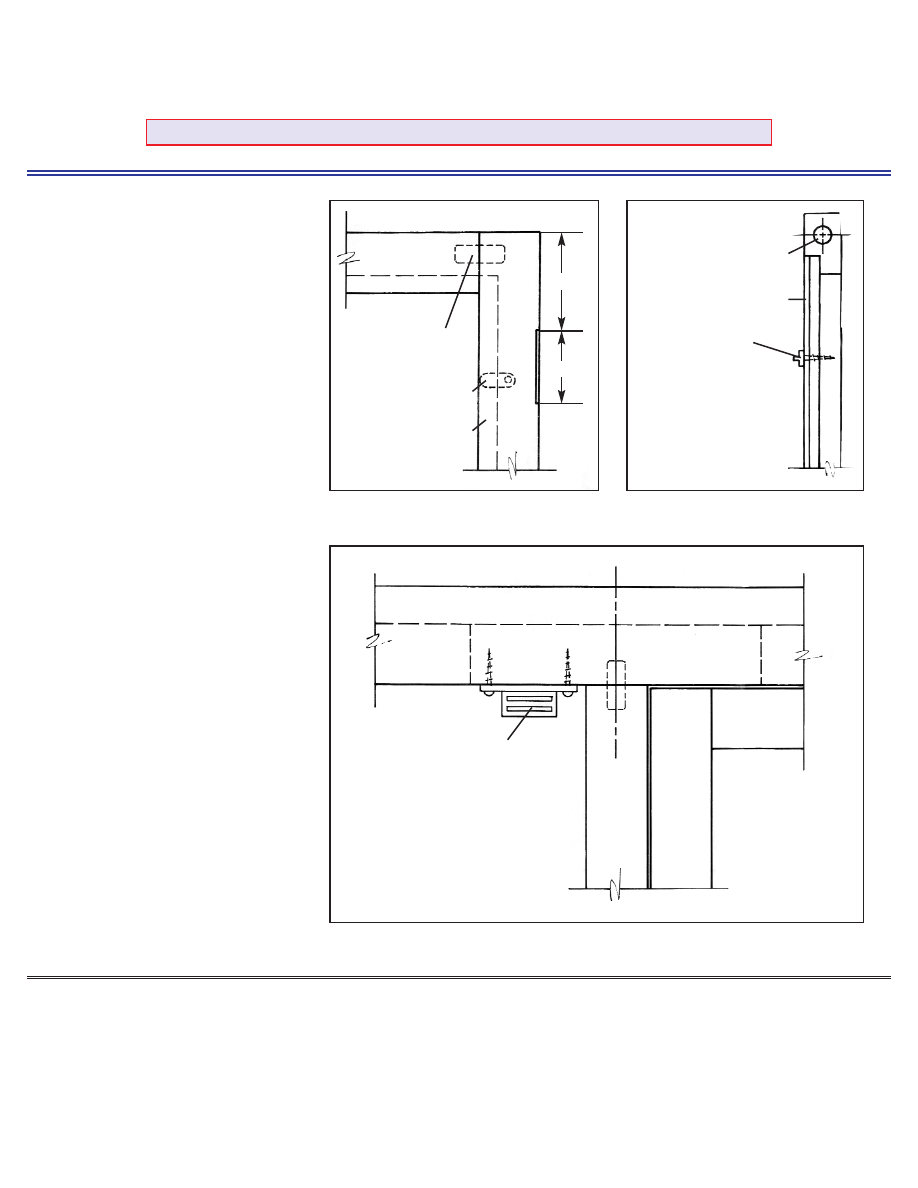
6.
Use 3/8” x 1” dowels and yellow glue to attach boards K to J. Use the same procedure for door frame.
7.
Use 1 1/2” finish nails and glue to attach J and K to A, B and D. Refer to isometric.
5.
Drill a 3/8” hole in boards M and L
for 1” dowel. Refer to Figures 4 and
5. Drill a 3/8” hole is boards J and
K. Refer to Figure 6.
Figure 5
Figure 6
Figure 4
M
L
2
1 1/2
3/8 x 5/16 RABBET
3/8 x 1 DOWEL
GLASS CLIP
MAGNETIC LATCH
1/8 TEMPERED GLASS
N
J
B
O
M
L
K
L
M
3/8 x 1 DOWEL
GLASS CLIP
Read all instructions before beginning any work. Cut all material to sizes shown in cutting schedule.
Assembly Instructions
Page Two
12. Rout a 3/8” x 5/16” deep rabbet on the inside edge of door L and M. Refer to Figures 4 and 5.
13. Apply finish at this time. Locate knobs in the middle of board L. Attach hinges and glass supports. Insert panel N and glass.
Attach two magnetic latches to board O for doors. Refer to Figures 4, 5 and 6.
9.
Glue two O boards to the inside face of board J. Refer to Figure 6 and isometric.
10. Cut and attach molding P and Q. Use 1” finish nails and glue. Refer to Figure 2 and Isometric.
11. Cut a small gain in board L door frame to accommodate hinges. The depth of the gain will be determined by the size of the hinge
and the amount of clearance around the door.
8.
Drill a large hole in one of the pan-
els. Use a jigsaw or scrollsaw to
cut out the six openings in board N.
Refer to Figure 7.
Figure 7
Read all instructions before beginning any work. Cut all material to sizes shown in cutting schedule.
Assembly Instructions
Page Three
1/2
4 7/8
4 7/8
N
Wyszukiwarka
Podobne podstrony:
Display Cabinet 2
Display Cabinet 3
Cabinet Display Cabinet 1
Cabinet Corner Display Cabinet
Cabinet OFFICE DISPLAY CABINET
Corner Buffet Cabinet(1)
cabinetmakerupho00sher
Corner Cabinet 1
Plan and Install Kitchen Cabinets
bathroom cabinet szafka lazienkowa
Brydcliffe Cabinet
box taurus cabinets manual
Atlantic E New IP66 Cabinet id Nieznany
Mobile File Cabinet
I Ogólnopolski Kongres Naukowo Szkoleniowy CABINES Polska ~Dermatologia w kosmetyce i kosmetologii~
constitution of cabinet commitee on uidai 2009
więcej podobnych podstron