Add plenty of storage space
with this easy-to-build, slip-in
drawer cabinet.
The workbench in ShopNotes No.
102 (page 24) offers a lot of stor-
age space on the shelf underneath.
To make better use of that space
for storing smaller items, you can
build the drawer cabinet shown in
the photo above.
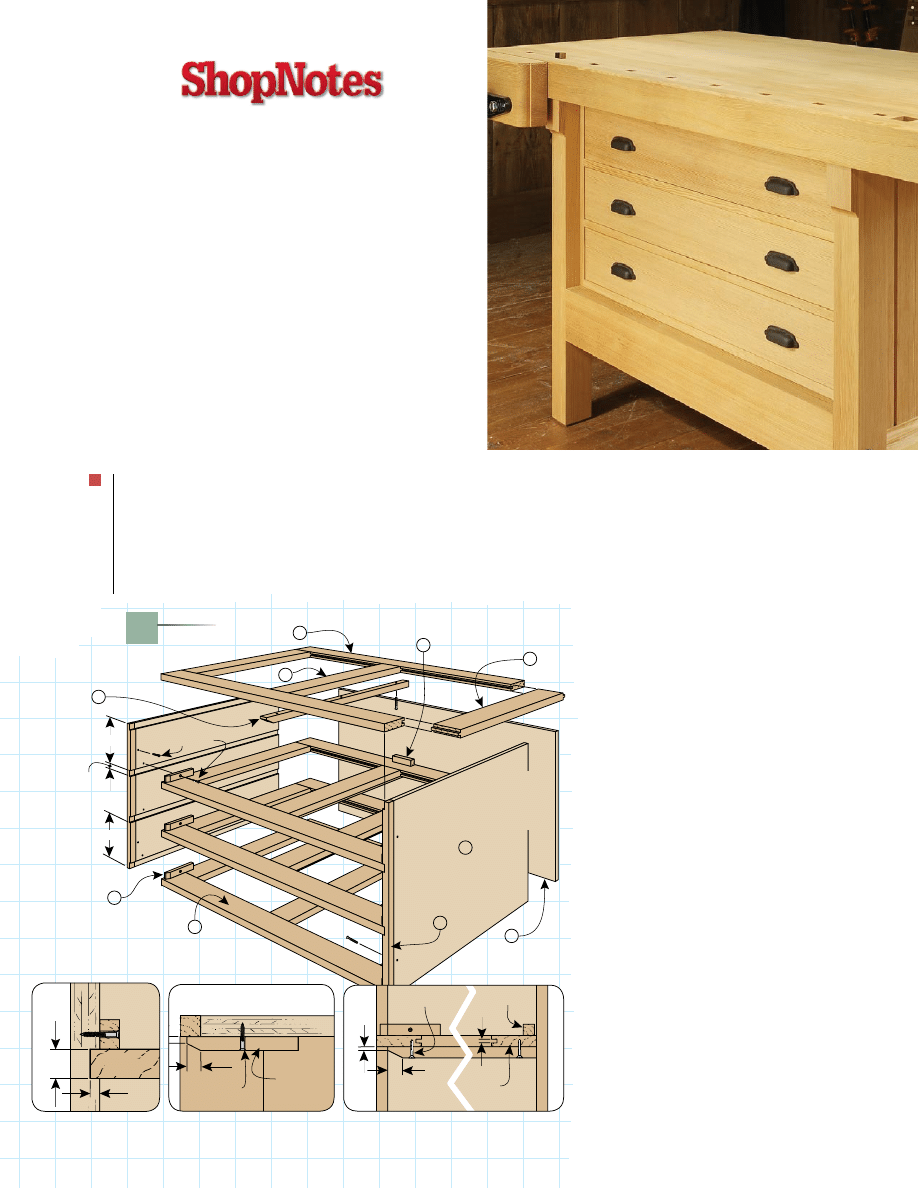
DRAWER CASE
The drawer cabinet consists of an
outer case that slips into the open-
ing under the bench. You’re going
to build the case from the inside
out, starting with the drawer
frames. These frames connect the
sides and form the openings for
the drawers. Figure 1 gives you a
starting point for the dimensions,
but you may need to make some
minor adjustments so the case fi ts
your workbench. I made my case
about
1
⁄
8
" narrower and shorter
than the opening.
Frames.
The two side stiles and
the center stile of each frame are
connected with front and back
rails. I used maple for all of the
frame components except for the
front rails. For these, I used Doug-
las fi r to match the bench.
Front & Rear Rails.
To start
on the frames, I cut the front and
rear rails to size. The length of
the rails and the
1
⁄
4
"-deep dadoes
and rabbets in the case sides will
determine the fi nal width of the
assembled cabinet. As I mentioned
earlier, size the rails so that the cab-
inet will slide easily into the work-
bench opening (right photo, next
page). To fi nish up the rails, cut a
centered groove along one edge
for the stub tenons on the stiles.
Short Stiles.
The only thing
special about the side and center
stiles is the stub tenon on each end.
A dado blade makes quick work of
cutting all the tenons. At this point,
you can glue up the four frames
before adding the center guides.
ShopNotes No. 102 Page 1 of 3 ©2008 August Home Publishing. All rights reserved.
cabinetmaker’s
workbench
Drawers
EDGING
(#/4" x #/4" - 18#/8")
CASE SIDE
(18#/8" x 25" - #/4" Ply.)
REAR RAIL
(#/4" x 3" - 35")
STILE
(#/4" x 3" - 20!/2")
CENTER GUIDE
(#/4" x 1" - 25")
GUIDE BLOCK
(!/2" x #/4" - 3!/2")
FRONT RAIL
(#/4" x 3" - 35")
CASE BACK
(18#/8" x 36" - #/4" ply.)
DRAWER STOP
(#/4" x #/4" - 3")
H
G
F
C
B
A
D
E
C
5&/8
5&/8
#/4
ATTACH CASE BACK
WITH GLUE
AFTER DRAWERS ARE
FITTED AND STOPS
ARE INSTALLED
#8 x 1!/4" Fh
WOODSCREW
NOTE:
DADOES
AND
RABBETS
ARE !/4"
DEEP
AND
SIZED TO
FIT FRAMES
D
1
FIGURE
SIDE
VIEW
!/4
STOP
REAR
RAIL
1
!/4
#8 x 1!/4" Fh
WOODSCREW
c.
TOP VIEW
GUIDE
BLOCK
!/2
!/4
#8 x 1" Fh
WOODSCREW
b.
!/4
WEB
FRAME
FRONT
VIEW
#/4
a.
Center Guides.
After the glue
dries, you can add the center
drawer guides. They’re centered
and attached to the underside of the
top three frames with screws, as
shown in Figure 1.
Case Sides.
With the frames
assembled, the case sides come
next. The sides have dadoes and
rabbets to accept the frames. But
before cutting these, I added hard-
wood trim along the front edge to
hide the plywood.
Assembly.
At this point you’re
ready to assemble the sides and
frames. The key is to keep every-
thing square while the glue dries.
I didn’t attach the back panel
until later. Leaving it off makes
it easier to add the drawer stops
after the drawers are in place.
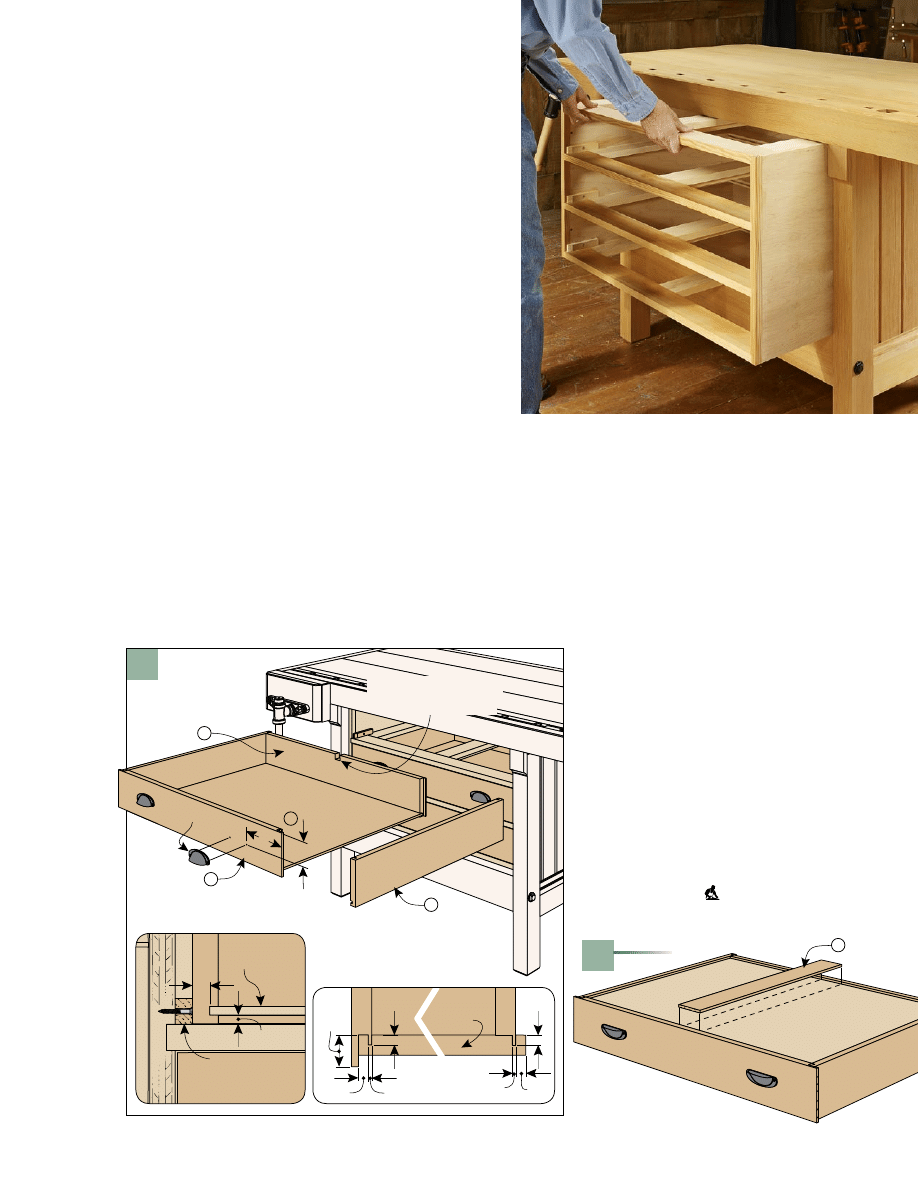
DRAWERS
The three large drawers are iden-
tical in size and construction. The
sides are joined to the front with a
locking rabbet joint and to the back
with a tongue and dado joint. Fig-
ure 2 gives you the details. You can
cut these joints on the table saw. It
just takes a few test cuts to get a
perfect fit. The goal is to
end up with an even gap
at the top and sides of
the drawer front. Once
all of the basic joinery is
done, there are a couple
of things left to do.
Grooves & Notches.
Cutting a groove for
the plywood bottom
is pretty simple. Just
remember to cut the
groove on the inside face
of all the drawer parts.
And before you can
assemble the drawer,
you need to cut a notch
in the drawer back. Size
the notch for a smooth,
sliding fit along the cen-
ter drawer guide.
Assembly.
Finally, you can
assemble the drawers, making
sure they’re square. While the
glue dries, you can cut the stiffen-
ers that are glued to the bottom. A
little glue and a clamping caul are
all you need to attach it.
Guides Block.
As shown in Fig-
ure 1, there are small guide blocks
screwed to each side of the case.
DRAWER FRONT
(#/4" x 5" - 34#/8")
L
K
J
I
DRAWER SIDE
(#/4" x 5" - 25")
DRAWER BACK
(#/4" x 5" - 32#/4")
DRAWER BOTTOM
(23&/8" x 32!/2" - !/4" Ply.)
KNOB
NOTE:
CUT A CENTERED
NOTCH SLIGHTLY LARGER
THAN CENTER GUIDE
5
2!/4
2
!/2
DRAWER
BOTTOM
FRONT VIEW
!/4
GUIDE
BLOCK
a.
TOP VIEW
DRAWER
SIDE
1#/16
#/8
!/8
!/8
#/8
#/8
#/8
b.
To size them, I fastened them with
double-sided tape. I start out by
making them a little thick. This
way, you can sand them down
later for a perfect fit of the drawer.
Hardware and Fitting.
Add-
ing the drawer pulls now makes it
easier to fine-tune the drawers for
a smooth fit. I used a drilling jig to
help locate all of the holes.
Like I said, you may need to sand
or plane the guide blocks while fit-
ting the drawers. And a little wax
on the frames and drawer parts
goes a long way to help the large
drawers slide easily. Then you can
permanently attach the blocks.
Now you can add the rear drawer
stops to position the drawer fronts
flush with the case. Finally, it’s
time to attach the case back with
glue. After that, simply slide the
cabinet into the bench and fasten it
in with screws. Then all you’re left
with is the task of filling the draw-
ers with your tools.
STIFFENER
(!/4" x 3" - 23#/8")
DRAWER
FRONT
M
NOTE:
DRAWER SHOWN
UPSIDE DOWN
DRAWER
BOTTOM
NOTE:
CENTER AND
GLUE STIFFENER TO
DRAWER BOTTOM
3
FIGURE
Sliding Case.
The drawer case
slips into the workbench
frame and is secured with screws.
DRAWER FRONT
(#/4" x 5" - 34#/8")
L
K
J
I
DRAWER SIDE
(#/4" x 5" - 25")
DRAWER BACK
(#/4" x 5" - 32#/4")
DRAWER BOTTOM
(23&/8" x 32!/2" - !/4" Ply.)
KNOB
NOTE:
CUT A CENTERED
NOTCH SLIGHTLY LARGER
THAN CENTER GUIDE
5
2!/4
ShopNotes No. 102 Page 2 of 3 ©2008 August Home Publishing. All rights reserved.
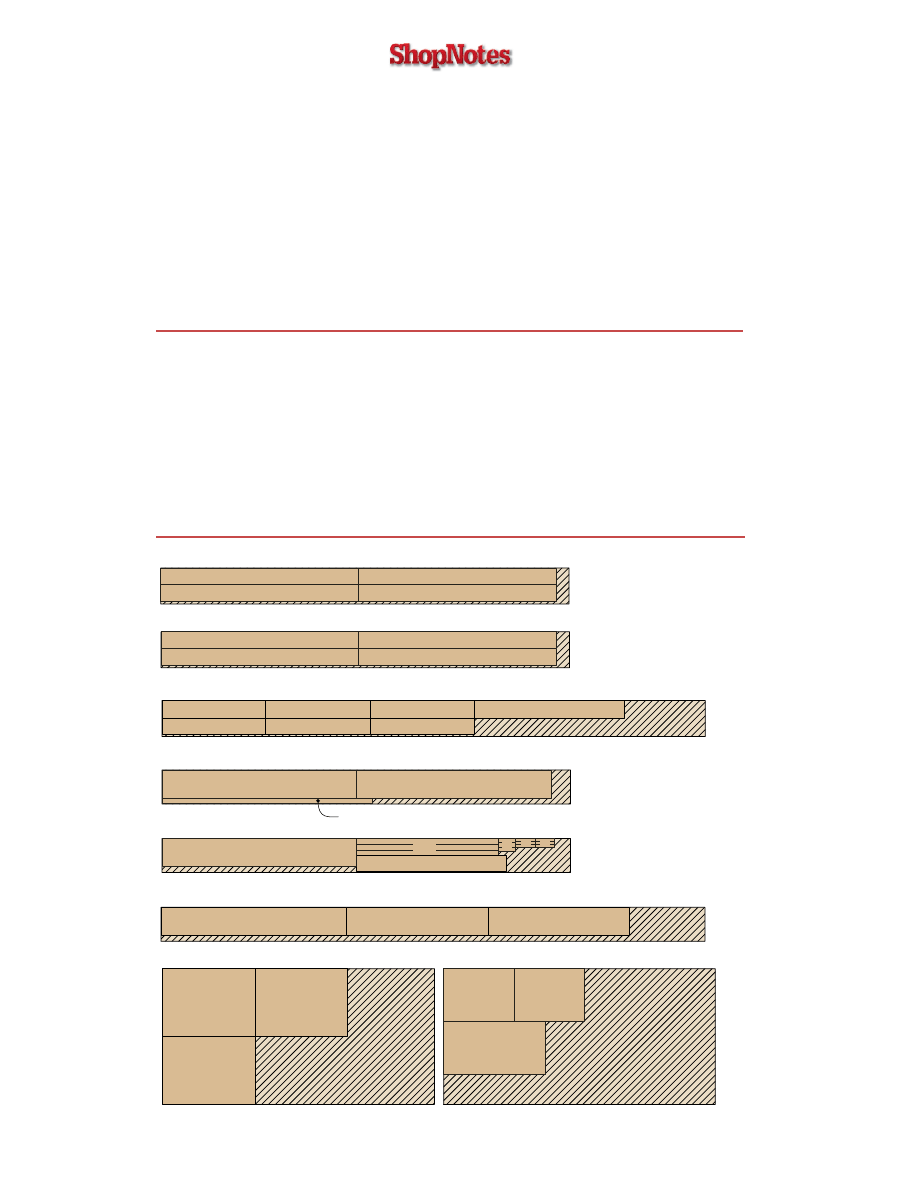
A Case Sides (2)
18
3
/
8
x 25 -
3
/
4
Ply.
B Edging (2)
3
/
4
x
3
/
4
- 18
3
/
8
C Front/Rear Rails (8)
3
/
4
x 3 - 35
D Stiles (12)
3
/
4
x 3 - 20
1
/
2
E Center Guides (3)
3
/
4
x 1
- 25
F Guide Blocks (6)
1
/
2
x
3
/
4
- 3
1
/
2
G Case Back (1)
18
3
/
8
x 36 -
3
/
4
Ply.
H Drawer Stops (3)
3
/
4
x
3
/
4
- 3
I
Drawer Fronts (3)
3
/
4
x 5 - 34
3
/
8
J Drawer Sides (6)
3
/
4
x 5 - 25
K Drawer Backs (3)
3
/
4
x 5 - 32
3
/
4
L Drawer Bottoms (3)
23
7
/
8
x 32
1
/
2
-
1
/
4
Ply.
M Stiffeners (3)
1
/
4
x 3
- 23
3
/
8
• (6) Drawer Pulls (Lee Valley 02W18.09)
C
C
C
C
D
D
D
D
D
D
I
I
I
E
H
B
F
F
J
J
K
L
L
L
A
A
G
#/4"
x 6" - 72" DOUGLAS FIR (4.0 Bd. Ft.)
#/4"
x 6!/2" - 96" MAPLE (2 Boards @ 4.3 Bd. Ft. each)
#/4"
x 6" - 72" DOUGLAS FIR (4.0 Bd. Ft.)
#/4"
x 6!/2" - 72" MAPLE (3.3 Bd. Ft.)
#/4"
x 6!/2" - 96" DOUGLAS FIR (3 Boards @ 4.3 Bd. Ft. each)
48" x 96" - !/4" PLYWOOD
48" x 96" - #/4" PLYWOOD
M
M
C
C
C
C
#/4"
x 6!/2" - 72" DOUGLAS FIR (3.3 Bd. Ft.)
Materials & Hardware
Cutting Diagram
cabinetmaker’s
workbench
Drawers
ShopNotes No. 102 Page 3 of 3 ©2008 August Home Publishing. All rights reserved.
Wyszukiwarka
Podobne podstrony:
Cabinet Stackable Drawers
Cabinets Curved Drawer Fronts
Cabinet Shop Made Drawer Pulls
Cabinet Printer cabinet with matching 2 drawer Lateral File cabinet
Corner Buffet Cabinet(1)
Cwiczenie 6 WorkBench czwórniki pasywne
workbench
workbench
cabinetmakerupho00sher
Corner Cabinet 1
Plan and Install Kitchen Cabinets
bathroom cabinet szafka lazienkowa
ANSYS Getting Started Tutorial Workbench
Brydcliffe Cabinet
Display Cabinet 2
Do it Yourself Workbench id 137 Nieznany
box taurus cabinets manual
American Woodworker Drawer And Door Pulls (2)
Electronics Workbench 4 0 opis programu
więcej podobnych podstron