
KNOW HOW
STAR OFFICE
28 LINUX MAGAZINE 14 · 2001
Many StarOffice users administer their data with the
help of the integrated spreadsheet application –
StarOffice Calc – or even the word processing
module – StarOffice Writer. Most people either
don’t consider the integrated StarOffice Base
software or, due to its large range of functions,
think that it is beyond their capabilities. It is our
intention, with this detailed, two-piece workshop,
to change all that. We will show, with an example
of a music CD administration, how fast, easy and
effective it is to administer your database with
StarOffice Base.
There it is in the cupboard, your arduously
acquired music CD collection. But you’ve lost all
hope of finding the CD you want, thanks to a
sorting method that simply wasn’t up to the task.
And your inventory list, written in StarOffice Writer,
confuses more than it actually helps. On top of all
that, you’d gladly hear that long lost (and rare)
favourite “TuX Hits 2000” again – if only you could
remember whom you lent it to way back then.
If this situation seems familiar to you then
StarOffice, with its database StarOffice Base, could
be just the thing you need. With it, you’ll not only
be able to clearly organise any rare favourites but
you’ll also to be able to lead a precise record of
whom you lent them to and when. With the
following example, we want to make you familiar
with the basis of a simple CD admin system, and
take you step by step through the modes of
operation and concepts of StarOffice Base. You will
see that a database is not only something for large
computing centres, but that it can also be a true
help in many private instances. In contrast to many
other workshops, we want to create something real
and useful, thereby giving you the tools to work
independently on your own projects.
Fundamentals
The first thing we have to do, before even starting
work with StarOffice, is to give some thought to
StarOffice integrates the database
software Adabas D. This
program can enable you
to create database
tables, queries etc. in a
professional way. You will
thereby be able to organise
your data more professionally than is
possible by, for example, StarOffice’s spread
sheet application.
DATA
TAMING
Adabas D
Adabas D is a professional database from
Software AG. Some restrictions apply to the
free version, which comes included with
StarOffice, or which can be downloaded
from the StarOffice homepage. The
restrictions apply to size: each database may
not exceed 100MB, and users: the number
of simultaneous users in the user sharing
system is limited to three. Please note that
Adabas D can not be used as the user root.
Adabas D operates according to the
Client/Server principle, with which a special
program, the “Server”, administers all
databases as well as receiving and
processing inquiries by other programs, the
“Clients”. The Adabas D package
incorporates both the server program as well
as a client program. In the case of StarOffice,
the StarOffice Base module controls both
components, so that you don’t have to
worry about or learn the cryptic text
commands.
You can find further information using the
StarOffice help function under the key word
Adabas, and the Internet on the Adabas D
homepage under http://www.adabas.com /.
Trouble shooting at start-up: If Adabas D
won’t operate, despite being successfully
installed, then this problem is most probably
caused by either missing or incorrect
TIM SCHÜRMANN
KNOW HOW
STAR OFFICE
14 · 2001 LINUX MAGAZINE 29
how we want to set up our database. Even if you
create a new database, you should determine the
structure in advance. This is necessary as in most
cases, the subsequent modification of a database
structure can lead to a not insignificant amount of
lost data.
Each database consists of one or more tables, in
which the individual data is stored. Each column
contains data belonging to a certain category such
as the author or title of a CD. The rows then contain
the complete data record; in our case a row would
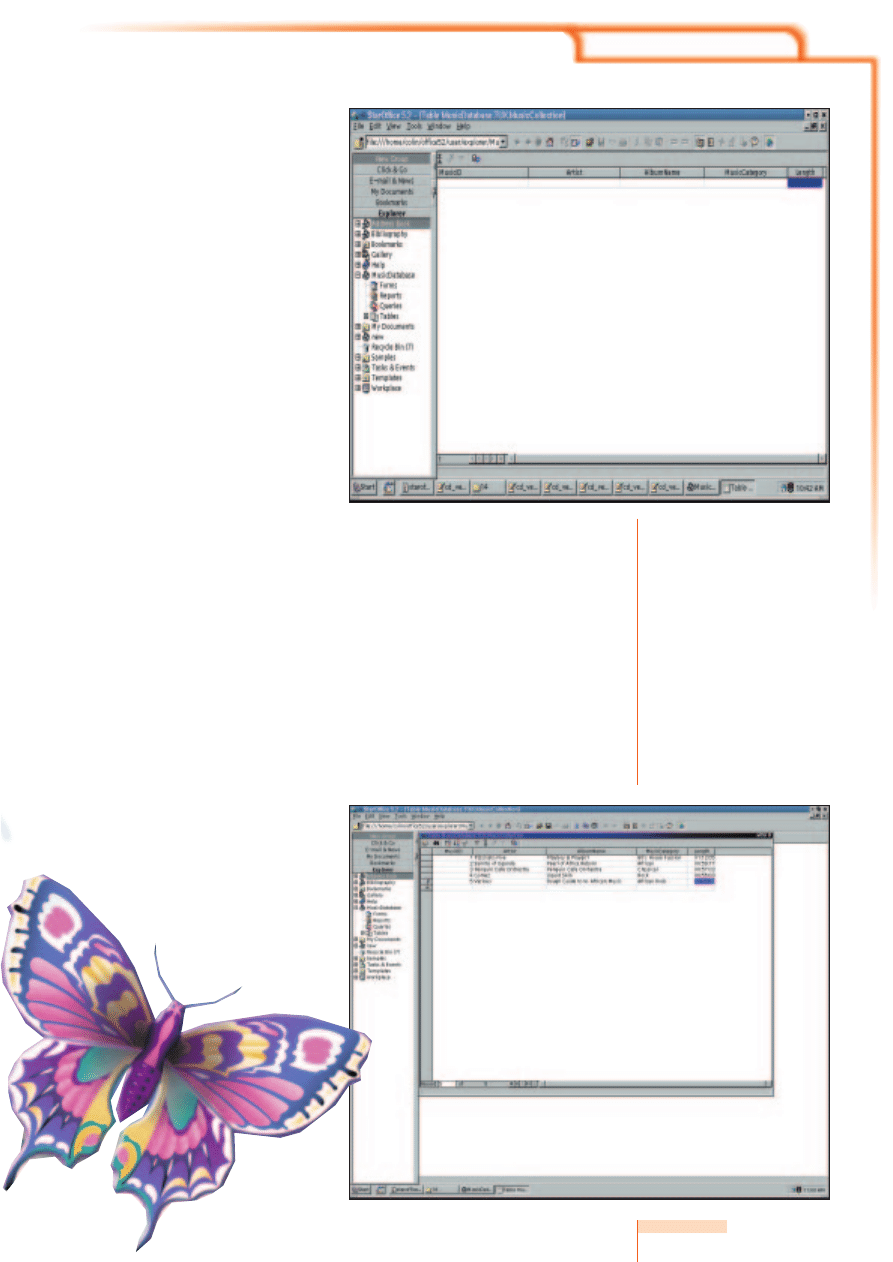
have all the information about a certain CD (see.
figure 7).
We will create two tables for our example: the
first contains the information of the individual CDs,
the second contains all the details about the lending
out of CDs. Although this sounds very much like
having to enter the data twice, fortunately with a
modern database like StarOffice’s Adabas D, this is
no longer the case. This program utilises various
linking mechanisms to permit the connection of
tables containing different types of reference
information. In our example, we will create a special
database array in the second table, which refers to
the appropriate lent CD in the first table. In this way
double data entry can be simply bypassed. More
information will be given on this in the second part
of our workshop.
The CD administration presented here is only a
small example. The larger the table, i.e. the larger
the quantity of the data to be stored, the more
difficult it becomes to find the right data allocation
(what info one puts in which table). A tip is to try to
keep the number of data arrays stored in a table to
a minimum, thus keeping the number of columns as
small as possible. It is of course also possible to keep
all the data in just one, large table. This is advisable
however only with smaller volumes of data, since
increasing table size will not only make the
database access slower, but it also makes it easier to
lose a clear overview.
Installation
In this Workshop, we want to administer the
previously mentioned data using the provided
database Adabas D. If you don’t want to install this
additional module, you can also change to a
database format built into StarOffice Base, for
example dBase. The following steps are more or less
identical for all database formats. StarOffice Base
takes over the control of the database (which
operates in the background) thus making a uniform
user interface available for each format.
If you want to use Adabas D but have not yet
installed it, you should do this now. If you have
StarOffice and Adabas D as a part of your
distribution, you can install these using the attached
set up program. You can refer to your manual, if
necessary, for further assistance. If you don’t have
StarOffice on a CD ROM, you can download Adabas
D free of charge from StarOffice’s homepage
http://www.sun.com/staroffice/. Those in
possession of a StarOffice CD should put it in,
switch to the linux/adabas directory and start the
adabas program. After this, simply follow the
commands given by the installation program’s
graphic interface. After successful installation, you
will have to log off and then log on again to the
Linux system. The reason for this is because Adabas
D changes some environment variables during the
environment variables. During installation,
the set up program automatically tries to
complete some of the entries in one of the
following hidden files: .bashrc (together
with sister file .profile), .cshrc or .tcshr: If
none of these files are available in your
home directory, you should first check your
manual to find out which shell your Linux
system uses. (Most Linux distributions use
Bash as the standard shell.) When you have
found your shell, you must create an empty
configuration file (appropriate to your shell)
with a text editor. If you are unsure of your
shell, you can also create all four of the files
specified above. Then install Adabas D
again.
Problems during operation: If StarOffice
Base gives you an error message, then you
can click the “Extras” button to receive a
detailed description. In order to be able to
interpret the error description completely,
you need both a good knowledge of the
English language, as well as a good
knowledge of the database language SQL.
The StarOffice help unfortunately gives no
information about how Adabas D errors can
be corrected. For those who encounter
running problems, this leaves only a search
on the internet or a change over to a dBase
based database.
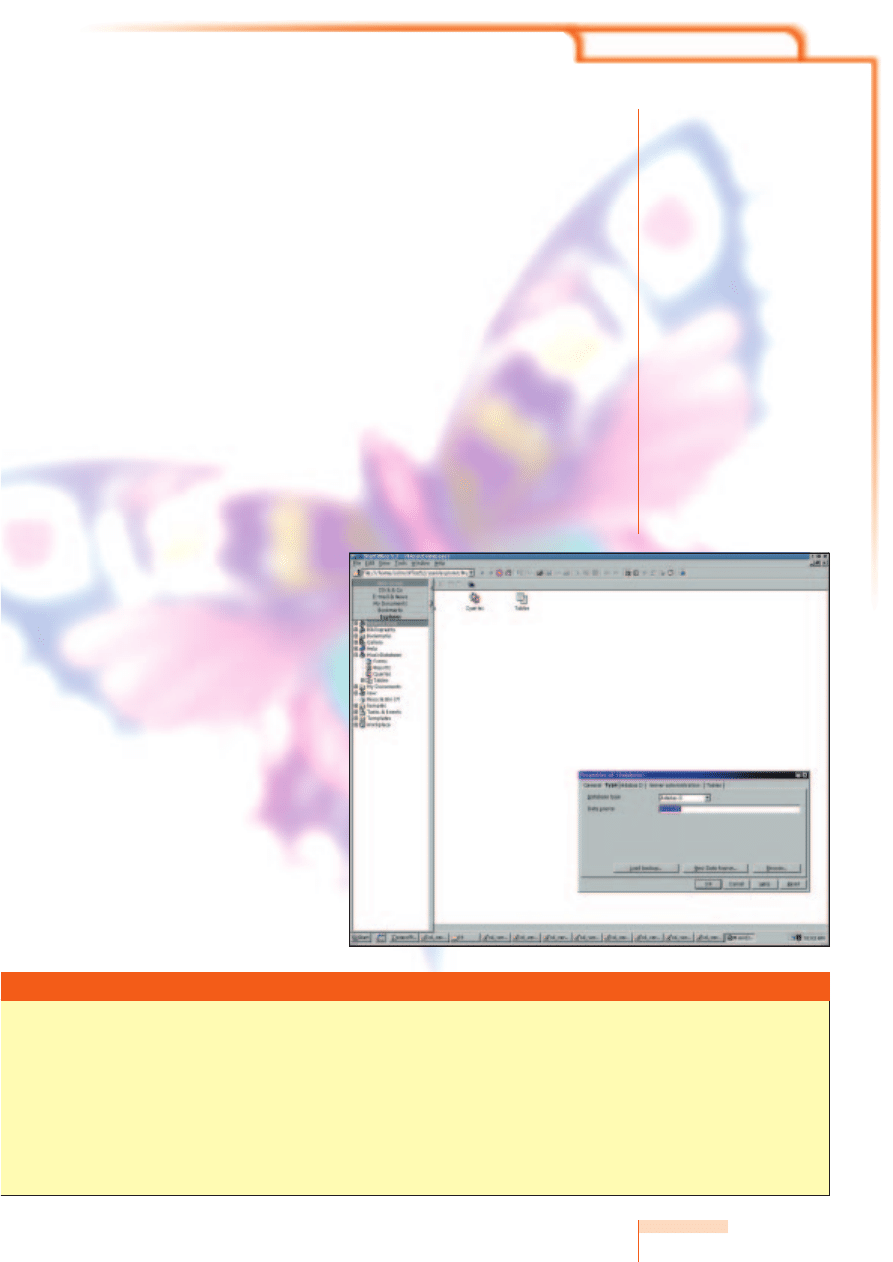
Figure 1: This is the window in
which you determine the type
of database you want to use. In
our example this is Adabas D
KNOW HOW
STAR OFFICE
30 LINUX MAGAZINE 14 · 2001
installation. The renewed logging on to operating
system set these back to their correct values (refer
Box “Adabas D “).
Starting up
When all the preparations are finished and finalised,
StarOffice can be started. You should first open
Explorer from the desktop and place this to the far
left of the screen (View/Explorer). This enables the
only quick and easy access to all databases and their
components. Make sure that the content of the
group Explorer is visible. If this is not the case then
click the button of the same name in the Explorer
window. Finally, fix it by pinning it to the Desktop so
that the work surface doesn’t disappear under it.
Now we can create our music database. To start
off, select New/database from the menu. A window
appears, on which you must enter some important
basic settings. Under the General register, enter a
name for your new database, for example
MusicDatabase. Next, determine the required
database format in the Type register.
Adabas D is selected by default. As already
mentioned, you also have the possibility of selecting
another format, such as dBase. If you have decided
to go with Adabas D, then the Server
Administration password registration must appear.
The absence of this regististration screen is a safe
indication that Adabas D either could not be started
or could not be reached by StarOffice Base (refer
Box 1, Adabas D).
In the case of a dBase database, go to the Type
register and enter the input path, in which your
database is to be stored, into the Directory field. If
you use Adabas D, go to the same field (here
named Data Source) and enter a name up to a
maximum of eight characters long. This could be for
example musicdb for our CD administration record.
Adabas D uses this name for the internal
identification of our database. After you’ve done
this, go ahead and click New Data Source.
You will now see a popup window. StarOffice has
already filled in most fields with sensible values for
you. Only the database administrator needs to
receive a user name and password. This is necessary
as Adabas D permits several users simultaneous
access to the database. The administrator is in this
case a special user with special rights. He or she
may unconditionally change (and also delete) all
areas of the produced database. The administrator
name can, for example, be as the Linux system user
name. The name should not contain umlauts or
special characters, as this may cause identification
problems at a later date. After this, click on
Password and enter your secret password into the
two data entry fields. Click on OK to close all
windows. You will land in a dialog window entitled
Properties of Music database. You may need to
exercise some patience here (especially those of you
with older or slower computers) as, on the one
hand Adabas D only loads in the background, and
on the other hand the database must be set up and
opened. StarOffice will freeze during this time –
DON’T PANIC.
StarOffice should have automatically filled out all
the other registers of the Properties of Music
database window. You have the possibility of
determining if you want Adabas D to automatically
close when you quit out of StarOffice. To do this,
open Server Administration register and mark the
End Service When Quitting StarOffice switch.
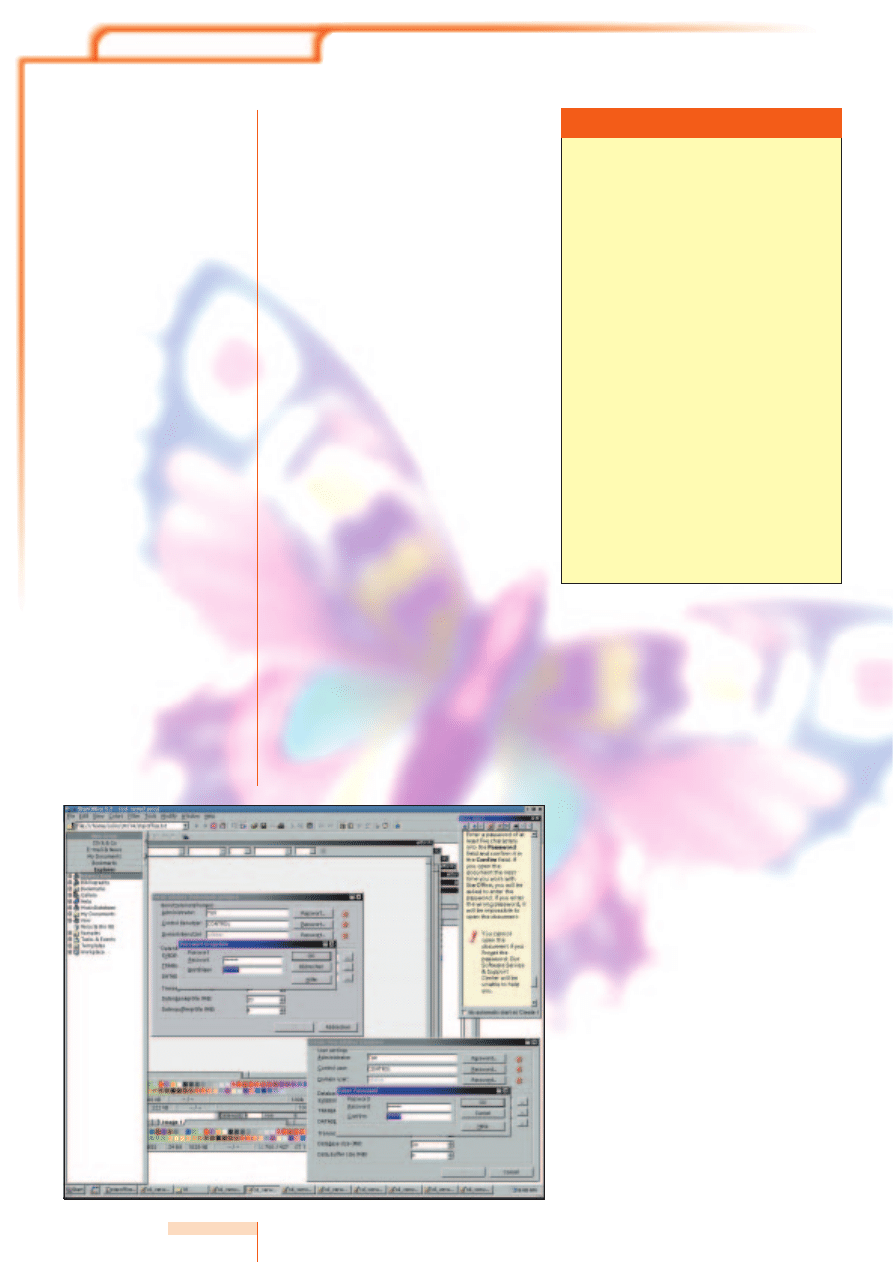
Deleting a database
Figure 2: An Adabas D database
needs a password as well as an
administrator name
Adabas D: First note the name of your database,
how it is denoted in Explorer. Right mouse click
on this entry and select Properties? Select the
second register Type and make a note of the
name in the Data Source field. Leave StarOffice
and switch over to the file manager, to the
User/Explorer directory in your StarOffice
directory. The latter should be located (as a
standard) in your home directory. Delete all files
that include the name of your database in this
directory. After this, go to the sql subdirectory of
the Adabas D installation. Delete all files that
contain the same character string before the
dot, that you previously identified as Data
Source in StarOffice. Repeat the above
procedure in the config subdirectory. To finish
off, delete the subdirectory with the name of
the data source in the work directory. Thus is
your database finally deleted.
dBase: It’s enough here to right mouse click the
database name in Explorer and select Delete in
the context menu. Your database is completely
removed as soon as you confirm this by clicking
Delete in the popup dialog window.
KNOW HOW
STAR OFFICE
14 · 2001 LINUX MAGAZINE 31
Another click on OK will open the database on the
desktop, and at the same time open a new entry
in Explorer.
The settings dialog, which you have just left, can
be called up at any time. This is accessed through
the right mouse button context menu. To do this,
right mouse click the name of the database in
Explorer and select Properties.
Have a look at the status bar of the StarOffice
desktop (located at the lower edge of window).
There beside the clock, you will see a small display
light indicating the status of Adabas D (refer Figure
7). A green colour indicates that the database is
operational. If you have several databases open,
then each database will have its own individual
status light. To find out which status light
corresponds to which database, activate the Tool
Tip assistance (Help/Tip), and position the cursor
over a status light for a couple of seconds. A display
indicating the name of the corresponding database
will pop up.
Creating Tables
Four symbols should be now located on the work
space of the desktop. These can be used to create
new forms, reports, queries or tables, as well as
administering those that already exist. If these
symbols are not displayed automatically, then
double click the database name in the Explorer
window. Alternatively, you can do this directly in
Explorer. Clicking on the plus symbol in front of the
name of the database will bring up the same
symbols as those on the desktop.
We will first create two new tables for our CD
example and then later fill these with relevant
information. The first table will be dealt with in this
part of the workshop and the next part will deal
with the second table. The Autopilot will be used
for the first table. This will come in handy later, by
providing us with some helpful functions. This small
aid offers a whole range of ‘ready made’ database
items, which we then only have to adapt to our
own needs.
Right mouse click either the table symbol on the
desktop or the appropriate entry in the Explorer
window. Select New/Table/Autopilot from the
context menu. Now you have to select the Personal
line from the drop down menu in the upper
selection list of the pop up window. A list will then
appear below this, displaying a selection of tables
that autopilot has already pre-defined for you. For
the purposes of our CD administration, we will
want to select the Music Collection choice. Click
Next to proceed.
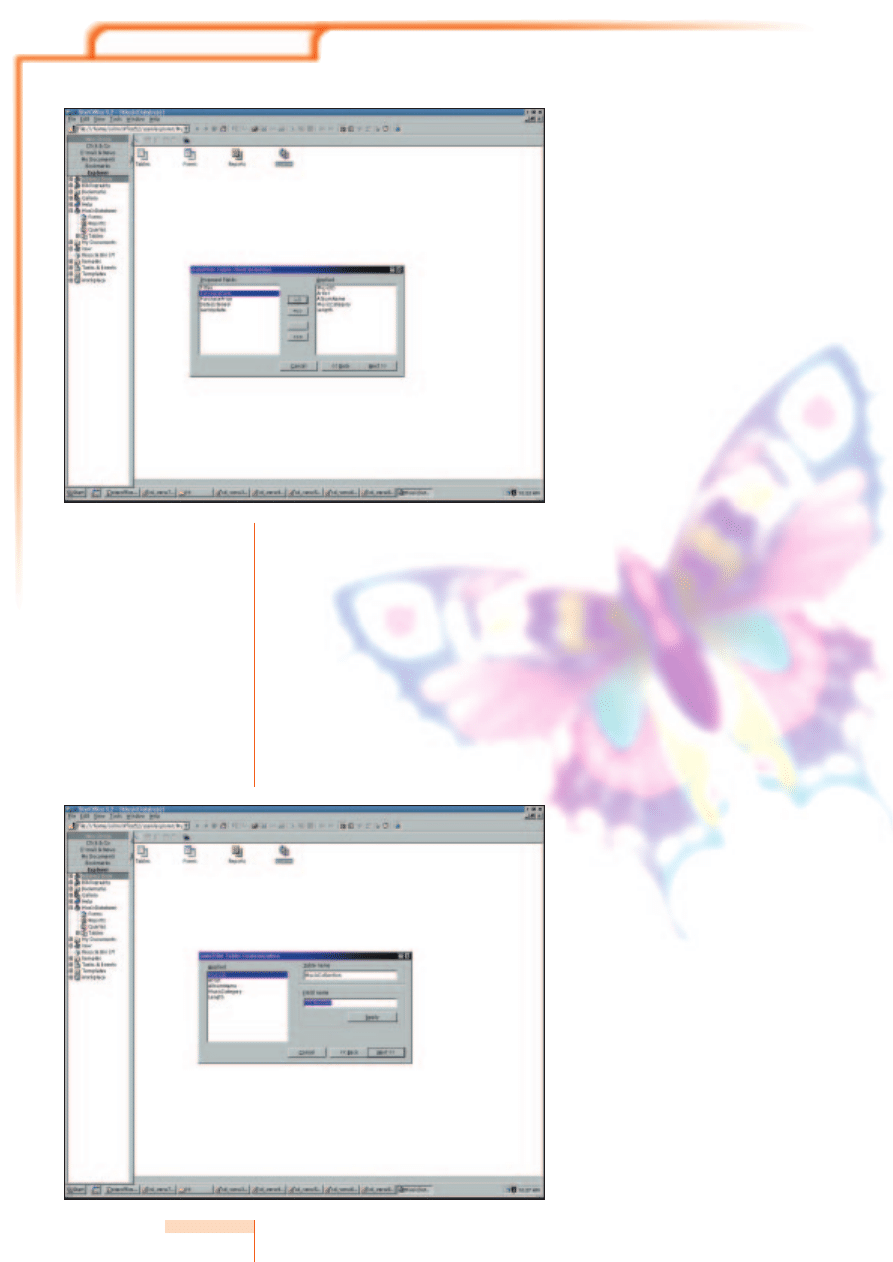
The left side of figure 5 shows some suggestions
of possible database fields. You can select the fields
that are applicable for you by marking a candidate
in the left list and then clicking on the single
arrow. If you would like to
transfer all fields to your
database, you merely have to
click the double arrow. If you
shifted a field on to the right page
by mistake and want to remove it,
then you can use the arrows in the same way
to shift it to the left again. The entries in the
right list will then form the columns of the
database table.
The list entries from top to bottom correspond to
the columns from left to the right. This, in particular,
means that the entry of data takes place in exactly
this order: For example if Author is located in the list
above Album Name, then you must first enter the
authors and then the album names. For our CD
collection, you should transfer the following fields
over to the right hand list: Music ID, Artist, Album
Name, Music Category and Length. Make sure that
they are in this order. These fields are sufficient for
our small example database. The first field, Music
ID, will help us to later link the two tables together.
When you are finished transferring the above fields,
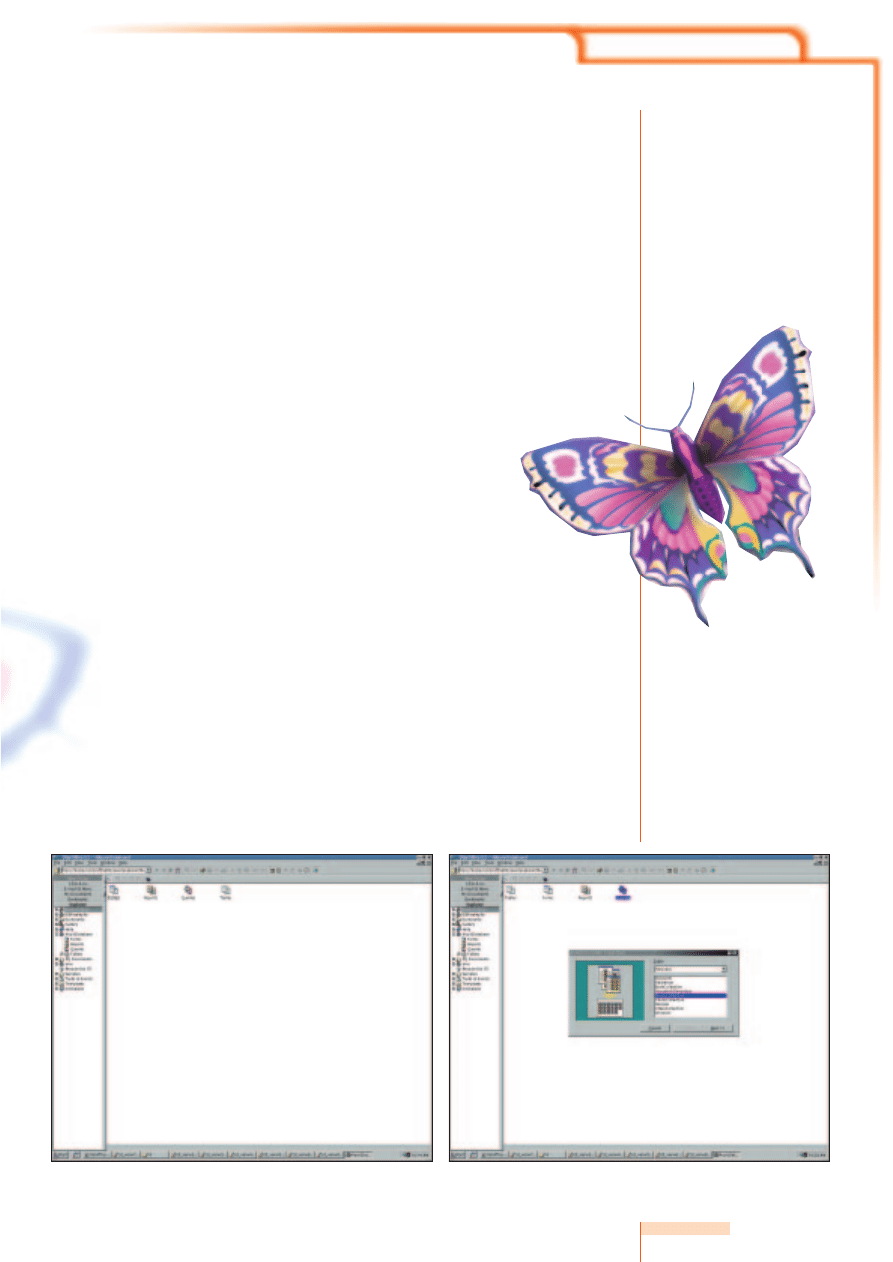
Figure 3: The database is open. Note
that the database can be accessed both
via the desktop and via Explorer.
Figure 4: With the help of the autopilot, a selection of
preformatted tables is presented. The settings shown in this
picture should be selected for our CD administration database.
KNOW HOW
STAR OFFICE
32 LINUX MAGAZINE 14 · 2001
click Next. In the next step, autopilot will offer you
the possibility of renaming both the name of the
table and the names of the individual fields.
To rename database fields, go to the left list and
mark the field, whose name you would like to
modify. Then simply change the name in the Field
Name data entry field. Click the Confirm button to
allow the modified name to be assigned to the
selected field. For the purposes of our example,
rename the Music ID field CD Number. You can
leave the suggested table name unchanged, i.e.
Music Collection (or Musicco1 in the case of a
dBase database). Click Next, and then Create in the
next dialog window to finish setting up this table.
The empty table is then opened onto the desktop,
and you can begin with the entry of your CD data.
Please note that the name of a dBase table may
only be a maximum of eight characters long.
StarOffice Base also offers the option of using
longer names, however this can lead to problems in
the interface with the autopilot.
Data entry
In order to get the hang of the data entry process,
go ahead and use the keyboard to enter the
information pertaining to a couple of your CDs. You
can move between fields either by clicking the
mouse or pressing the tab key. As soon as you begin
with the entry, StarOffice Base creates a new, empty
line, which is marked with an asterisk in the first
(nameless) column. As well as this, the line in which
you current data entry field is located will be
marked with a Pen symbol. Please note that a data
line in Adabas D is only then saved, when you either
change the line or save the table (by clicking the
diskette symbol in the symbol bar or by selecting
File/ Save Current Data Record). After finishing the
entry for a line, you can navigate within the table
using the arrow keys. A small triangle in the
nameless column shows thereby, which data record
you are currently in. If you want to escape with out
saving changes or want to delete the data record
you have just created, all you have to do is right
mouse click the appropriate line in the nameless
column to the left. Then select Delete Row or
Undo: Data Entry from the list of functions in the
context menu.
You will also find, located to the left of the
horizontal picture bar at the bottom edge of the
screen, all the navigation functions. You can: use
the arrows to move between the individual data
records, use the asterisk symbol to create new
entries, or enter a number into the input field to
land directly on the corresponding data record.
When entering the data, you will notice that you
must always enter a unique value into the first field
(in this case CD Number). The reason for this is that
this field was defined by the autopilot as the
“Primary Key Field “. It is thereby guaranteed not
only that for each data record only one CD Number
exists, but also that this number is assigned only
once. The occurrence of double lines is
automatically prevented in this way, and at the
same time double CDs (with same name) are able
to be differentiated from each other. More
information on this will follow in the next section of
the workshop.
You will have probably observed by now that the
entries in the Play Time field are always brought into
a uniform format by StarOffice Base. As in all
databases, StarOffice Base allows all fields to be
assigned with a specific type. In this case, the
autopilot determined that the Play Time field
contained clock times. During the data entry
process, these are automatically brought into an
Figure 5: Not all suggested
fields will be needed in our
example. All fields on the right
list are transferred to the table.
Figure 6: Renaming
database fields
KNOW HOW
STAR OFFICE
14 · 2001 LINUX MAGAZINE 33
appropriate, uniform format by StarOffice Base. If
your CD has for example a playing time of 79
minutes, then you can enter 00:79; this will then be
converted to 01:19:00.
Size and Scale
Apart from the above, using a StarOffice Base
database table is similar to a StarOffice Calc table:
Copy and paste, as well as the modification of a
cell are all carried out similarly using the
appropriate menu functions. The same also applies
to the column width, row height and the
formatting of a table. If, for example, the name of
an author does not fit into the appropriate field,
then there are several ways of moving it into the
right light:
The first possibility is executed by dragging the
mouse. Place the cursor in a position between two
column inscriptions so that it changes into a double
arrow. If you now hold the left mouse button
pressed and move the mouse, you will change the
size of the left of the two columns. Another
method is to first left mouse click the column
inscription, thereby marking the entire column.
Press the right mouse button and select Column
Width? from the context menu. Finally, enter the
absolute value for the desired column width into
the input field in the popup window, and click OK.
Alternatively, you can mark Automatic in the same
popup window. The width of the selected column
will be thereby adjusted to the width of the
column text.
Saving Data
As previously mentioned, StarOffice Base saves
each row directly after the entry in Adabas D has
been completed. For this reason it is not necessary
to save the table before closing. – The table is
always kept up to date.
You can locate all tables in the Explorer window
below the appropriate database entry. Click the
plus symbol in front of the name in Explorer
to expand that part of the tree. Once
found, double click the name to open
the table. As you will be able
to see, three tables already
exist for our
Figure 7: An empty database
table, created with the
assistance of the autopilot
Figure 8: A finished database table
with some example data. The pen in
the unlabelled column to the left
shows that the data record in this
line is currently being processed.
example database. The two additional tables are
created automatically by Adabas D. They
administer running information that the database
needs. In addition to this, the user name of the
creator is located in front database name. On the
basis of this, one can detect who this table
belongs to.
The first part of our workshop comes to an end
here. You shouldn’t however delete the data you
have entered, as we will need it for the next part of
the workshop. There, we will investigate more of
the interesting functions offered by StarOffice
Base. We will also complete our example database
with the second table.
Wyszukiwarka
Podobne podstrony:
2001 03 Using the Text Editor Joe
11 3 4 6 Lab Using the CLI to Gather Network?vice Information
11 3 4 6 Lab Using the CLI to Gather Network (2)
2001 11 Web Browsers on Test Battle of the Browsers
11 Complete the sentences using Present Simple
2001 11 29
[2001] State of the Art of Variable Speed Wind turbines
2001 11 08 2162
2001 11 Szkoła konstruktorów klasa II
2001 11 25 wycena akcji, FCFF, FCFF, dźwignie finansowe, progi rentowności
2001 11 16
2001 11 22
2001 11 22 kol 1
2001 11 20
ei 01 2001 s 11 15
met analizy rynku, Wrocław 2001-11-14
Everyday Practical Electronics 2001 11
DUI0379C using the assembler
więcej podobnych podstron