
Published by Buehler
Volume 4, Issue 3
USING MICROSTRUCTURAL ANALYSIS TO SOLVE PRACTICAL PROBLEMS
Written by:
George Vander Voort
Director, Research
and Technology,
Buehler
Welding Metallography - Ferrous Metals
Introduction
Welding is a very important joining process
and has been used extensively for at least the
past 60 years. Like most processes, there is a
need to control the process and insure a high
quality end result. Welds are no exception
and over the years there have been many
spectacular failures of welded structures that
emphasize this need, e.g., Liberty ship and T2
tanker failures in WWII. Many procedures
involving non-destructive and destructive
tests are used to study weldments. Metallo-
graphic examination can be performed in the
field by grinding and polishing a spot on the
surface of a weld, its heat affected zones or
nearby base metal (the metal being joined
that was unaffected by the heat of the weld-
ing process). This is a reasonably non-destruc-
tive evaluation. However, destructive exami-
nation, where a specimen is removed from
either the welded assembly or test coupons,
is quite commonly preformed. Test coupons
are often used to qualify the welder and
ensure that the techniques and materials cho-
sen will produce a weld with acceptable
soundness and mechanical properties. Post
mortems of failed weldments are also exam-
ined metallographically using sections re-
moved from the welded assembly, generally
after non-destructive examinations are com-
pleted.
Welding Process
There are a great many processes that have
been developed to produce welded joints.
Most people have seen the stick-electrode
process that can be done in the field. But, this
is just one of many welding processes.
Although welding is a comparatively new
technology, forge welding vastly predates all
other methods as it dates from the earliest
days of metalworking. Aside from forge weld-
ing, the other processes date from the 20th
century, particularly since 1940. There are
both gas welding and cutting processes using
an oxyacetylene flame; resistance welding
processes, such as spot welding, induction
welding, flash welding; arc welding processes
Figure 1. Basic terms related to a fillet weld.
such as gas-tungsten-arc (GTA) and metal-inert gas (MIG),
covered electrode processes (stick electrode), submerged-arc
welding, electroslag welding, electron beam and laser weld-
ing, as well as friction welding. Many of these processes have
been further modified in a variety of ways. Some of these
processes use filler metals, generally of somewhat different
composition than the base metal to produce higher strength
in the weld. Others use no filler metal, relying only upon the
melting of the base metal to produce the joint.
Weld Terminology
Figure 1 shows a schematic illustrating the basic features of a
fusion weld. There are three main regions: the base metal, the
heat-affected zone (HAZ) and the weld metal. Regardless of
the welding process, substantial heat is generated in welding
and melting occurs. The heat input can vary greatly with the
welding process used and is influenced by other factors, such
as the thickness of the pieces being joined. The welded joint,
or weld “nugget” is a casting. When wrought metal is welded,
there is a temperature gradient, going from the nugget into
the unaffected base metal, from above the melting point of
the metal or alloy to ambient temperature. This temperature
gradient can produce many effects depending upon the met-
als or alloys being joined. Using steels as an example, the weld
nugget was created by molten metal, in many cases filler
metal, that was heated in the arc until it melted. Solidification
can occur under different cooling conditions, depending upon
the heat input, whether or not pre-heating or post-heating
practices are used, depending upon the mass of the pieces,
ambient temperature, and so forth. Naturally, there is a fusion
line, the boundary between the cast nugget and the non-
melted base metal. Below the fusion line, the temperature
gradually drops to ambient. If the part is made from steel, the
heat-affected zone (between the fusion line and the unaffect-
ed base metal), or at least part of the heat-affected zone, will
be fully austenitic due to temperatures above the upper criti-
cal, A
C3
, of the steel. The grains closest to the fusion line will be
the largest in size. At lower temperatures, the grain size can
be quite small due to recrystallization and nucleation of new
fine grains that may, or may not, grow substantially depend-
ing upon the temperature that they experience after nucle-
ation. Depending upon the way the steel was deoxidized,
columnar grains may be seen. In the region of the HAZ that
was heated into the two phase
α+γ
field, the transformation
on cooling may be quite different. For areas heated below the
lower critical temperature, A
C1
, the original structure may be
tempered or may start to spheroidize. Because the filler metal
is a different composition than the base metal, and some
melting of the base metal occurs, the composition will vary
through the weld to the fusion line. With variations in the
phases or constituents and their grain size in the weld nugget
and heat affected zone, we can expect to see hardness varia-
tions across these gradients.
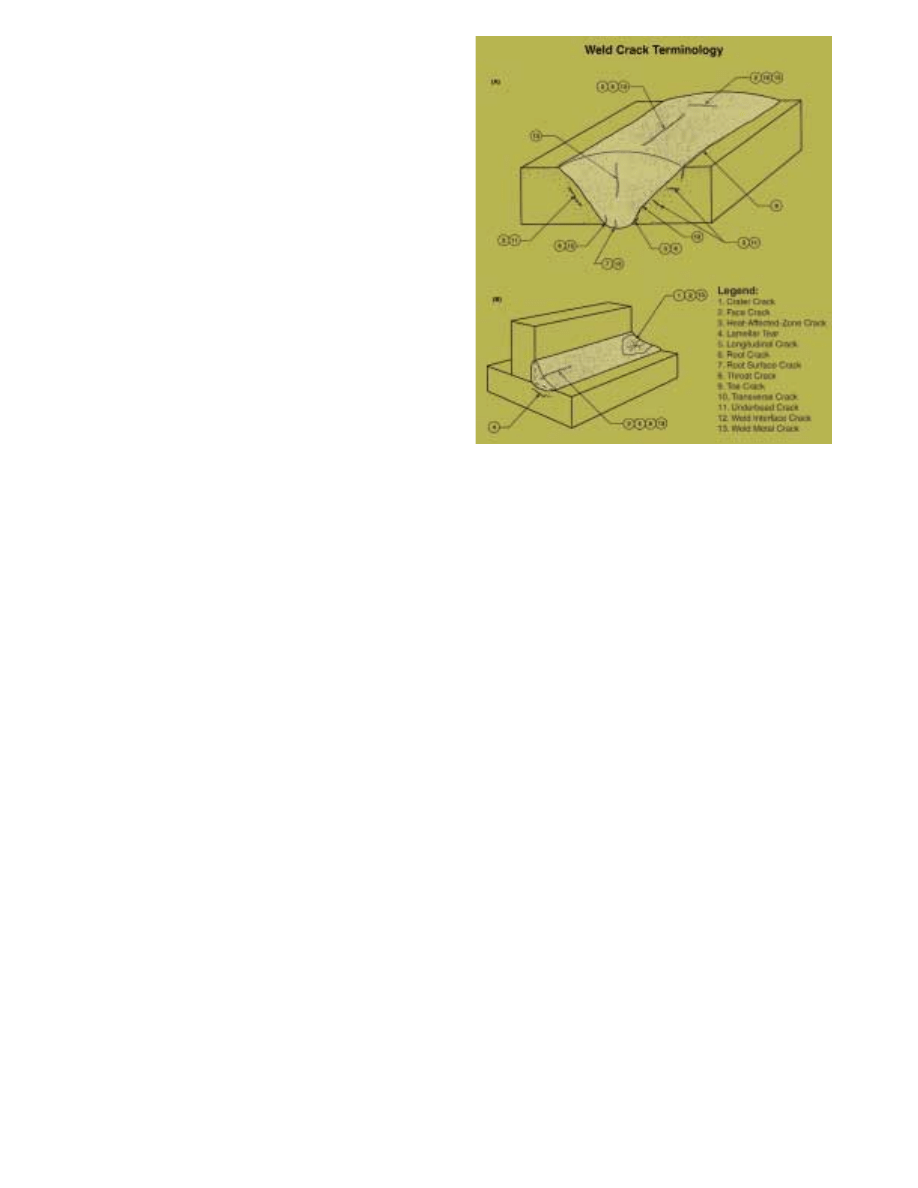
Cracks may be detected in the weld nugget or in the heat-
affected zone. Figure 2 shows a schematic illustrating com-
mon terminology for cracks and voids. Use of correct termi-
nology to describe cracks is very important. Many of the
cracks are described based upon their location - crater cracks,
root cracks, and heat-affected zone cracks are a few exam-
ples. Sometimes cracks are described based on their orienta-
tion with respect to the welding direction – longitudinal and
transverse cracks being obvious cases. They may also be
described by the nature of the problem that caused the crack
– hydrogen-induced cracks, stress-relief cracks, etc.
Reference 1 is a great source of information regarding weld-
ing terminology.
Examination Procedure
The metallographer is often requested to examine a welded
joint. To do this, they must cut out one or more specimens to
sample the structure of the weld, heat-affected zone and
adjacent base metal. Naturally, it is most convenient if all
three regions can be contained within a single specimen. In
many cases, welds are small enough to do this easily. But, in
some cases, such as heavy plate welded by the electroslag
process, the weld nugget alone can be quite large. Even here
it is possible to prepare entire cross sections through the
welds, although it is not as simple to do so as for smaller
welds. The specimen is examined in the as-polished condition
for voids of different types, such as porosity from gas evolu-
tion or shrinkage cavities, cracks that may be present in either
the weld metal or the heat affected zone, regions where the
weld did not exist (lack of fusion or lack of penetration) and for
nonmetallic inclusions associated with the welding operation,
chiefly slag-type in nature, in the weld or between weld pass-
es (for a multi-pass weld).
Obtaining and Preparing Weld Specimens
In some cases, the welded structure is large and, in the case of
a field failure, a section must be removed by flame cutting.
This process produces a substantial damaged zone adjacent
to the cut, perhaps as wide as 10 – 15mm. When the section
gets to the laboratory, the damaged cut region must be
removed by a less-damaging cutting method, such as band
sawing or abrasive sectioning. Then, the metallographer will
cut out coupons using a laboratory abrasive cut-off saw that
introduces less damage than production manufacturing
equipment. Weld samples often tend to be large and irregular
in shape. Many will not fit within a standard 1-, 1.25-, 1.5- or
2- inch (25-, 30-, 40- or 50mm) diameter mold for compres-
sion molding. In such cases, the metallographer often builds
a mold using bent sheet metal, coated perhaps with a mold
release agent, places the specimen inside this mold (after the
mold is glued to a suitable base plate), and encapsulates the
specimen with epoxy resin. After it has cured, the specimen
can be ground and polished using a wide variety of semi-auto-
mated equipment. Figure 3 shows an example of a large weld
Figure 2. Terminology for describing cracks in welds (AWS A3.0: 2001
[1]).
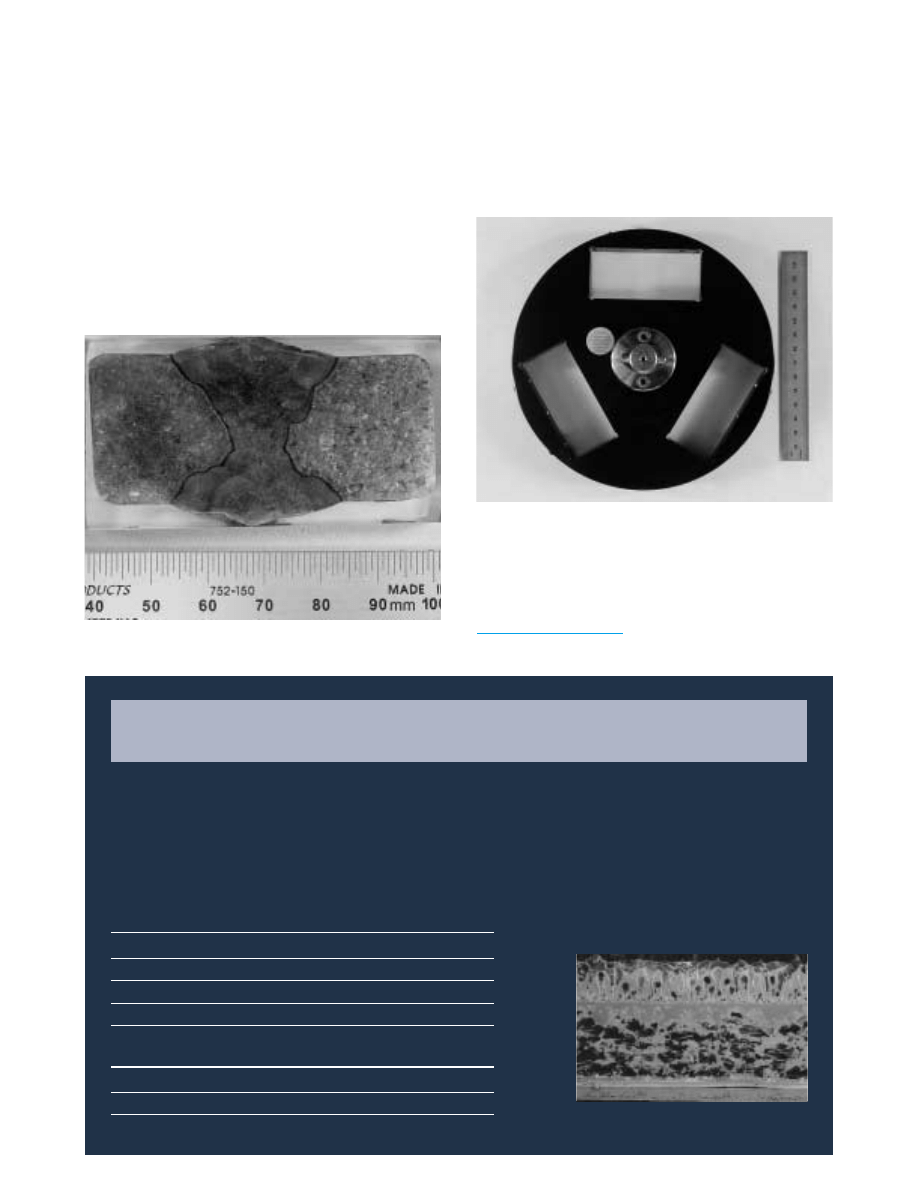
mounted in a custom made mold using an epoxy resin. If care
is taken in cutting the specimen, so that the cut face is flat and
a minimum amount of damage is introduced, then rough
grinding time can be minimized. If rough grinding must be
extensive, either to remove cut surface roughness, or to
obtain a flat surface across the specimen, then it may be advis-
able to perform the grinding step with the
ApexHercules
™
H
disc and a coarse diamond size, e.g., 45mm
MetaDi
®
Supreme Diamond Suspension
. This has a very high removal
rate and is an excellent procedure for obtaining superior flat-
ness.
Another option with rather large specimens is to cut out a disc
through the weld less than 12mm thick. If a machine shop is
available, the opposing sides can be ground flat and parallel
using a Blanchard or other type grinder. Then, the discs can be
attached to a blank specimen holder (a holder without the
holes in it for specimens) using double-sided tape or glue
(must be de-bondable). This requires that the weight be bal-
anced across the holder face so that the head does not vibrate
or chatter. But, using this approach, specimens larger than
can be placed into large cut-out holes in the specimen holder
(Figure 4), can be prepared.
Grinding and polishing cycles for welds differ little from pro-
cedures for the non-welded metals and alloys. The chief dif-
ference may be the need to polish an area that is larger than
normal and the fact that the hardness can vary across the
specimen. The fact that part of the specimen is a casting while
the balance is wrought generally does not affect the prepara-
tion process. Two generic practices relevant for many
commonly welded ferrous alloys are presented in Tables 1 and
2. The reader is directed to the Buehler web site,
http://www.buehler.com
, for preparation methods for a wide
variety of engineering metals and alloys.
Figure 3. Example of a large weld encapsulated in epoxy using a custom-
made mold.
Figure 4. Example of a 7 inch (178mm) diameter specimen holder (for a 12
inch (300mm) diameter platen) with non-conventional openings for large
rectangular specimens (1.375 x 3 inch or 35 x 76mm)
ChemoMet
®
and
MasterPrep
™
— A DYNAMIC DUO THAT GIVE
SUPERIOR POLISHING RESULTS
ChemoMet
®
, a soft, porous, polyurethane pad, gives superior surface finish, increased flatness and better edge reten-
tion than other final polishing pads. It’s porous structure helps retain up to 50% more polishing suspension and also
decreases polishing times.
MasterPrep
™
Alumina Suspension
outperforms traditional alumina suspensions due to the unique sol-gel process the
abrasive was produced with. The abrasive particles in
MasterPrep
have a tightly controlled shape and size distribution,
which gives you uniform scratches and consistent results.
ChemoMet
®
Cloth Diameter
Catalog Number
2
7
⁄
8
″
(73mm)
40-7902
8
″
(203mm) 40-7918
10
″
(250mm)
40-7920
12
″
(305mm)
40-7922
MasterPrep
™
Alumina Suspension
Quantity
Catalog Number
6 oz. (0.18
l)
63-6377-006
32 oz. (0.95
l)
40-6377-032
64 oz. (1.9
l)
40-6377-064
Porous micro-nap (shown here) retains more
polishing suspension, 50x.
If the specimen is particularly difficult to prepare, it may be best
to add a 1
µ
m diamond step to the procedure, in the same man-
ner as the 3
µ
m diamond step, but for 3 minutes. For a holder
with large specimens, the times may need to be increased. As an
alternative, steps 1 and 2 could be performed using the
ApexHercules
™
H or S rigid grinding discs
(RGD). The H disc has
a higher removal rate and can be used to prepare all ferrous
alloys, although when the hardness gets below about 200 HV,
the S disc is preferred. Such a procedure is shown in Table 2.
Again, if the materials are difficult to prepare, a 1
µ
m diamond
step can be added following the same approach as for the 3
µ
m
diamond step, except for a 3 minute duration.
Examination of Welds
Examination should always be performed after polishing and
before etching to detect voids, cracks and inclusions. Then, the
metallographer will etch the specimen to study both the
macrostructure and the microstructure using an etchant appro-
priate for the alloy. In some cases, the weld metal is of suffi-
ciently different composition that an etchant chosen to etch the
base metal and heat affected zone will not reveal the weld metal
structure, and vice versa, or one area may be badly overetched.
If the specimen has been polished, the macrostructural details
are usually adequately revealed by the etchant used to reveal
the microstructure. In some studies, the metallographer will
macroetch the specimen after grinding and study the
macrostructure. This specimen is not suitable for microstructur-
al examination, unless polished.
Most etchants used to reveal the microstructure of welds are
standard general-purpose etchants. After examination with
such an etch, it may prove to be valuable to use a color etching
technique, as these can be far more sensitive for revealing grain
structure, segregation and residual strain and deformation.
However, these etchants are not widely used. Their use does
require a very well prepared specimen for good results. But this
level of perfection is easily achieved with modern equipment
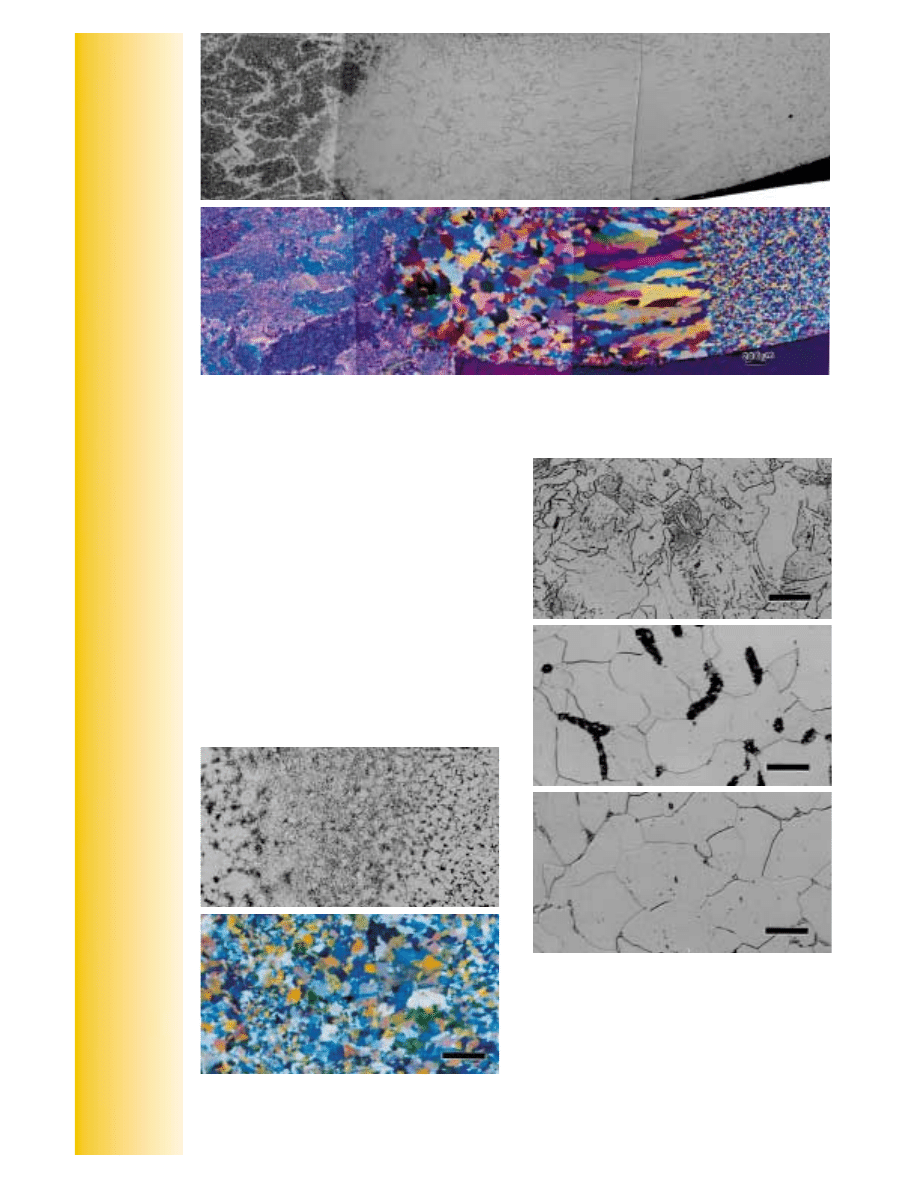
and consumable products. Figure 5 shows an example of the
superiority of color etching over standard etchants in revealing
the grain structure of a low-carbon steel weld. Both etchants
revealed the as-cast structure of the weld metal, but the color
etch was vastly superior in revealing the grain structure in the
heat affected zone and base metal.
Figure 6 shows two low-magnification views of a fusion weld in
AISI/SAE 1006 carbon steel etched with 2% nital and with
Klemm’s I tint etch. Nital does a good job, Figure 6a, revealing
the transition from base metal to heat affected zone to weld
metal. Note the black spots in the heat affected zone; these will
be shown at a higher magnification revealing that they are fine
pearlitic regions due to transformation of small regions that
transformed to austenite, and contained all of the carbon in that
area. These spots are not as easily observed in the color etch,
Figure 6b. On the other hand, the color etch revealed the varia-
tion in grain size and shape far better than nital. Figure 7 shows
the microstructure of the weld (a), heat affected zone (b) and
base metal (c). Note that the base metal contained ferrite and
grain boundary cementite films. In the heat-affected zone,
where the black spots were observed, the temperature was high
enough to locally dissolve the cementite into austenite, but
there was insufficient time for the carbon content to become
uniform. With cooling, these carbon-rich areas transformed to a
pearlitic-like constituent. The weld structure is typical of a cast
low-carbon ferritic grain structure with an acicular appearance
and fine dispersions of cementite.
Table 1. Generic Method for Preparing Ferrous Weld Specimens
Base Speed
Time
Surface
Abrasive/ Size
Load Lb. (N)
(rpm)/Direction
(min)
CarbiMet
®
120/P120-, 180/P180-
6 (27)
240-300
Until
waterproof
or 240/P280-grit SiC
Comp.
Plane
paper
water cooled
UltraPol
™
9
µ
m
MetaDi
®
Supreme
6 (27)
120-150
5
cloth
diamond suspension
Comp.
TexMet
®
1000
3
µ
m
MetaDi Supreme
6 (27)
120-150
4
or
TriDent
™
diamond suspension
Comp.
cloth
MicroCloth
®
or
~0.05
µ
m
MasterMet
®
6 (27)
120-150
2
ChemoMet
®
colloidal silica or
Contra
cloths
MasterPrep
™
sol-gel
alumina suspensions
Table 2. Generic Method for Preparing Ferrous Weld Specimens Using a Rigid Grinding Disc
Base Speed
Time
Surface
Abrasive/ Size
Load Lb. (N)
(rpm)/Direction
(min)
ApexHercules
™
H
45
µ
m
MetaDi Supreme
6 (27)
120-150
Until
disc
diamond suspension
Comp.
Plane
ApexHercules
™
H
9
µ
m
MetaDi Supreme
6 (27)
120-150
5
disc
diamond suspension
Comp.
TexMet
®
1000 or
3
µ
m
MetaDi Supreme
6 (27)
120-150
4
TriDent
™
cloth
diamond suspension
Comp.
MicroCloth
®
,
~0.05
µ
m
MasterMet
®
6 (27)
120-150
2
NanoCloth
™
or
colloidal silica or
Contra
ChemoMet
®
MasterPrep
™
sol-gel
cloth
alumina suspensions
If a weld is given a post heat treatment, which does
happen occasionally, the grain structure will be
refined and the heat-affected zone will not be visi-
ble. As an example, Figure 8 shows the microstruc-
ture of Trimrite martensitic stainless steel (Fe –
0.23%C – 14.25%Cr – 0.65%Ni – 0.7%Mo) that was
GTA welded and then heat treated (843 °C, air
cooled, 788 °C, air cooled). Figure 8a shows the
specimen etched with Vilella’s reagent. The cast
structure of the weld (255 HV) is clearly seen, but
there is no heat-affected zone. The base metal (197
HV) is fine grained. Figure 8b, produced using
Beraha’s sulfamic acid etch (100 mL water, 3 g
potassium metabisulite, 2 g sulfamic acid and 1 g
ammonium bifluoride), reveals the weld nicely and
shows a grain size transition from the fusion line to
the base metal where the HAZ was located. It is
clear that the heat treatment refined the grain
structure in the HAZ, but it is still coarser than in the
base metal and the color etch reveals the transition
in grain size from the fusion line to the base metal.
This grain size variation was not as apparent with
Vilella’s reagent, at least not at this magnification
(50X).
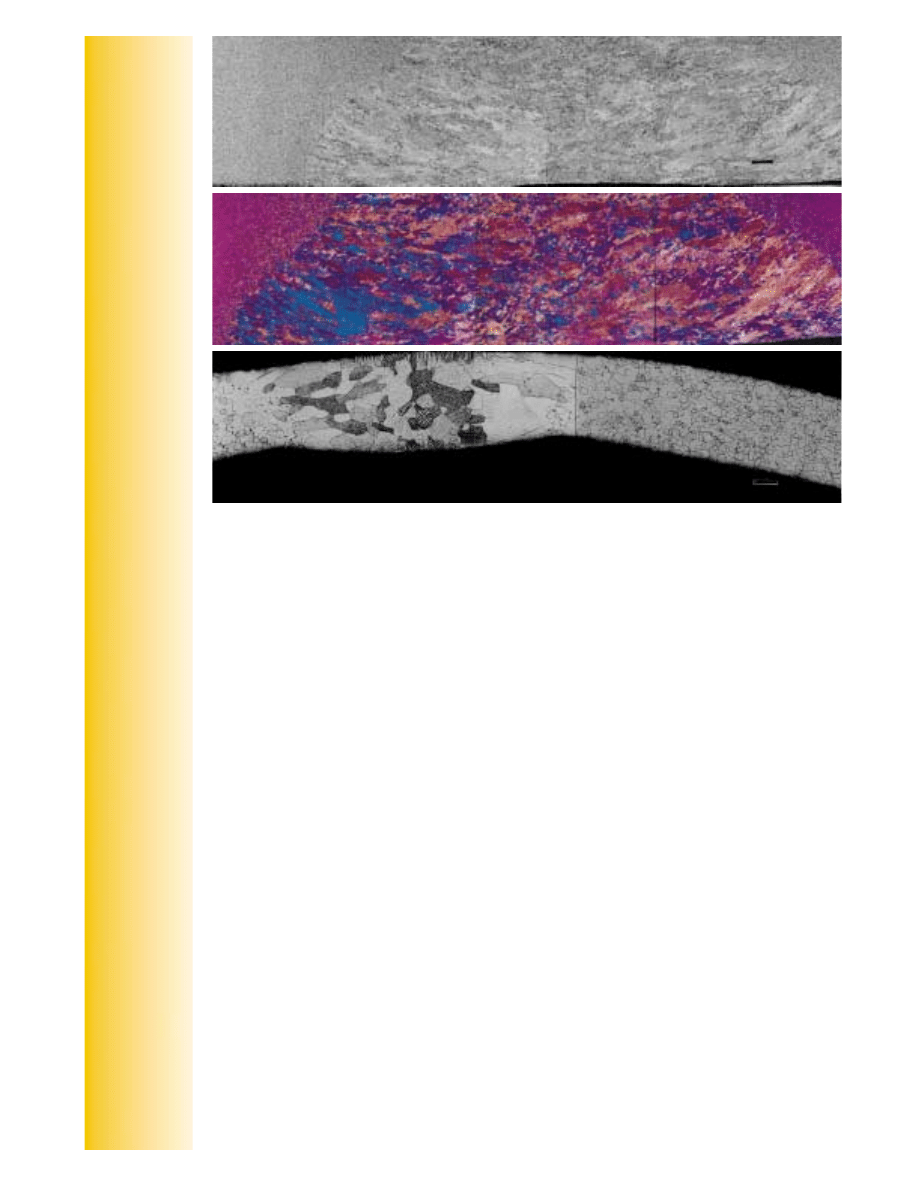
Figure 5. Example of a welded low-carbon steel etched with 2% nital (top) and Klemm’s I (bottom) showing the clear superiority of
color etching in revealing the grain structure. The as-cast weld metal is shown at the far left and the base metal is shown at the far
right, above the
µ
m bar. In between, we see the heat affected zone starting with coarse irregular grains adjacent to the fusion line,
progressing to finer more uniformly shaped grains, then to columnar grains and finally to the very fine-grained equiaxed ferrite
grains in the base metal.
Figure 6. Low magnification view of a fusion weld in 1006 car-
bon steel revealed using 2% nital (top) and with Klemm’s I
(bottom) in polarized light plus sensitive tint (magnification
bar is 200
µ
m long).
Figure 7. Microstructure of the weld (top), heat affected zone
(middle) and base metal (bottom) of welded 1006 carbon steel
etched with 2% nital. (Magnification bars are 20
µ
m long).
Not all metals and alloys are easily color etched,
however. Ferritic stainless steels are rather difficult.
Thin-walled tubes may also be challenging subjects
for the metallographer. Figure 9 shows an example
of a welded thin-wall (0.015 inch, 0.38mm thick)
tube of a “super” ferritic stainless steel, 29-4 (29%
Cr – 4% Mo), that was electrolytically etched with
aqueous 60% HNO
3
at 1.5 V dc. The weld is slightly
thicker than the tube wall and we can see coarse
grains with a dendritic structure that is reasonably
equiaxed in the center but columnar in the outer
regions of the weld. No obvious heat-affected zone
is detected; hence, the tubing may have been
annealed after welding.
References
1. “Standard Welding Terms and Definitions,” AWS
A3.0:2001, The American Welding Society, Miami,
Florida.
If you have a question that you'd like to see
answered, or a tip that you feel would benefit
our readers, please write, call or fax to:
BUEHLER LTD.
George Vander Voort
E-mail: george.vandervoort@buehler.com
41 Waukegan Road • Lake Bluff, Illinois 60044
Tel: (847) 295-6500 • Fax: (847) 295-7942
1-800 BUEHLER (1-800-283-4537)
Web Site: http://www.buehler.com
BUEHLER Germany GmbH
Birgit Hudelmaier
E-mail: Birgit.Hudelmaier@buehler-met.de
In der Steele 2 • Am Schönenkamp
D-40599 Düsseldorf • Germany
Tel: (49) (0211) 974100
Fax: (49) (0211) 9741079
Web Site: http://www.buehler-met.de
BUEHLER UK
Mark Deven
E-mail: Markdeven@buehler.co.uk
Saturn Building
101, Lockhurst Lane
Coventry CV6 5SF • England
Tel: (+44) (0) 2476 582158
Fax: (+44) (0) 2476 582159
BUEHLER FRANCE SARL
Sandrine Morand
E-mail: smorand@buehler.fr
Miniparc de Dardilly, Bât. 0
3, Chemin du Jubin
69570 Dardilly, France
Tel: (04) (37) 59 81 20
Fax: (04) (37) 59 81 29
Web Site: http://www.buehler.fr
BUEHLER ASIA/PACIFIC
Benny Leung
E-mail: benny.leung@buehler.com.hk
Room 3, 5/F Vogue Centre
696 Castle Peak Road
Lai Chi Kok, Kowloon, Hong Kong
Tel: (852) (2) 307-0909 • Fax (852) (2) 307-0233
Figure 8. GTA welded Trimrite
1
martensitic stainless steel that was post heat treated and etched with
Vilella’s reagent (top) and with Beraha’s sulfamic acid reagent (middle). The magnification bars are
200
µ
m in length. Figure 9. (bottom) Microstructure of a thin-walled 29-4 (29Cr-4Mo) ferritic stainless
steel etched electrolytically with aqueous 60% HNO
3
at 1.5 V dc (magnification bar is 100
µ
m long).
1
Trimrite is a registered trademark of Carpenter Technology
Corp., Reading, Pennsylvania.
©2004
BUEHLER LTD.
Wyszukiwarka
Podobne podstrony:
4 Non-ferrous metals, ang.w.met
ferrous metals id 169405 Nieznany
Offenzellige Metallschaume
Paralleling Arc Welding Power Sources
16 197 208 Material Behaviour of Powder Metall Tool Steels in Tensile
Guidelines for Shielded Metal Arc (Stick) Welding (SMAW)
Blacksmith The Origins Of Metallurgy Distinguishing Stone From Metal(1)
Metallica Discography Lyrics
Metallic Text Gimp
METALLICA BLACK TEKSTY
metallica enter sandman level 2z5
Guidelines to Gas Metal Arc Welding (GMAW)
Metallographic Methods for Revealing the Multiphase Microstructure of TRIP Assisted Steels TŁUMA
Metals
Powder Metallurgy
A140E,A314E,A324E L Welding Equipment,M2001
A316E Welding Equipment
Metallica Nothing Else Matters
więcej podobnych podstron