
93
In This Chapter
7
Working with Model Space
and Layouts
In this tutorial, you learn to create scale areas and
viewports as well as detail views in model space and in
the layout in AutoCAD
®
Mechanical 6.
■
Creating a scale area
■
Creating a detail
■
Generating a new viewport
■
Inserting a user through hole
■
Creating a subassembly in a new
layout

94
|
Chapter 7
Working with Model Space and Layouts
Key Terms
Term
Definition
base layer
A layer made up of working layers and standard parts layers. Base layers are
repeated in every layer group.
detail
Enlargement of a portion of the design drawing that cannot be clearly displayed
or dimensioned. The overall representation (surface texture symbols, etc.) can be
enlarged.
drawing
A layout of drawing views in model space or layout.
layer group
A group of associated or related items in a drawing. A major advantage of
working with layer groups is that you can deactivate a specific layer group and a
complete component. The drawing and its overview are enhanced by reduction
in regeneration time.
layout
The tabbed environment in which you create and design floating viewports to be
plotted. Multiple layouts can be created for each drawing.
Power Dimensioning
A command useful for generating linear, radial, and diameter dimensions, which
minimizes the number of the individual actions while generating a dimension.
Power Dimensioning automatically selects the type of the linear dimension
(horizontal, vertical, aligned), based on the selected point.
scale area
Defines the scale for an area of the drawing.
scale monitor
A function to view and control the scale for any scale area.
viewport
A scaled view of the model defined in a layout.
view scale
The scale of a base drawing relative to the model scale. Also, the scale of
dependent views relative to the base view.
working layer
The layer where you are currently working.

Working with Model Space and Layouts
|
95
Working with Model Space and Layouts
Using model space and layouts, you can create different views with different
scales from the same model. The main advantage of working with layouts is
that views are associative; that is, if you make changes in one viewport, those
changes are made in all other viewports as well, since each viewport is just
another view of the same model.
Getting Started
In this tutorial, you work with viewports. You generate an associative detail
and create a subassembly drawing.
To open a file
1
Open the file tut_ex04 in the acadm\tutorial folder.
Menu
File ➤ Open
Command
OPEN
The drawing contains parts of a four-stroke engine.
Save your file under a different name or to a different directory to preserve
the original tutorial file.
Creating a Scale Area
To generate correct views with correct zoom factors in a layout, you must
define a scale area in model space.
First, create the scale area.
To create a scale area
1
Start the Viewport/Scale Area command.
Menu
View ➤ Viewports ➤ Viewport/Scale Area
Command
AMSCAREA
2
Respond to the prompts as follows:
Define the border ...
Specify first point or [Circle/Object]:
Specify the first corner point (1)
Specify second point:
Specify the second corner point (2)
96
|
Chapter 7
Working with Model Space and Layouts
3
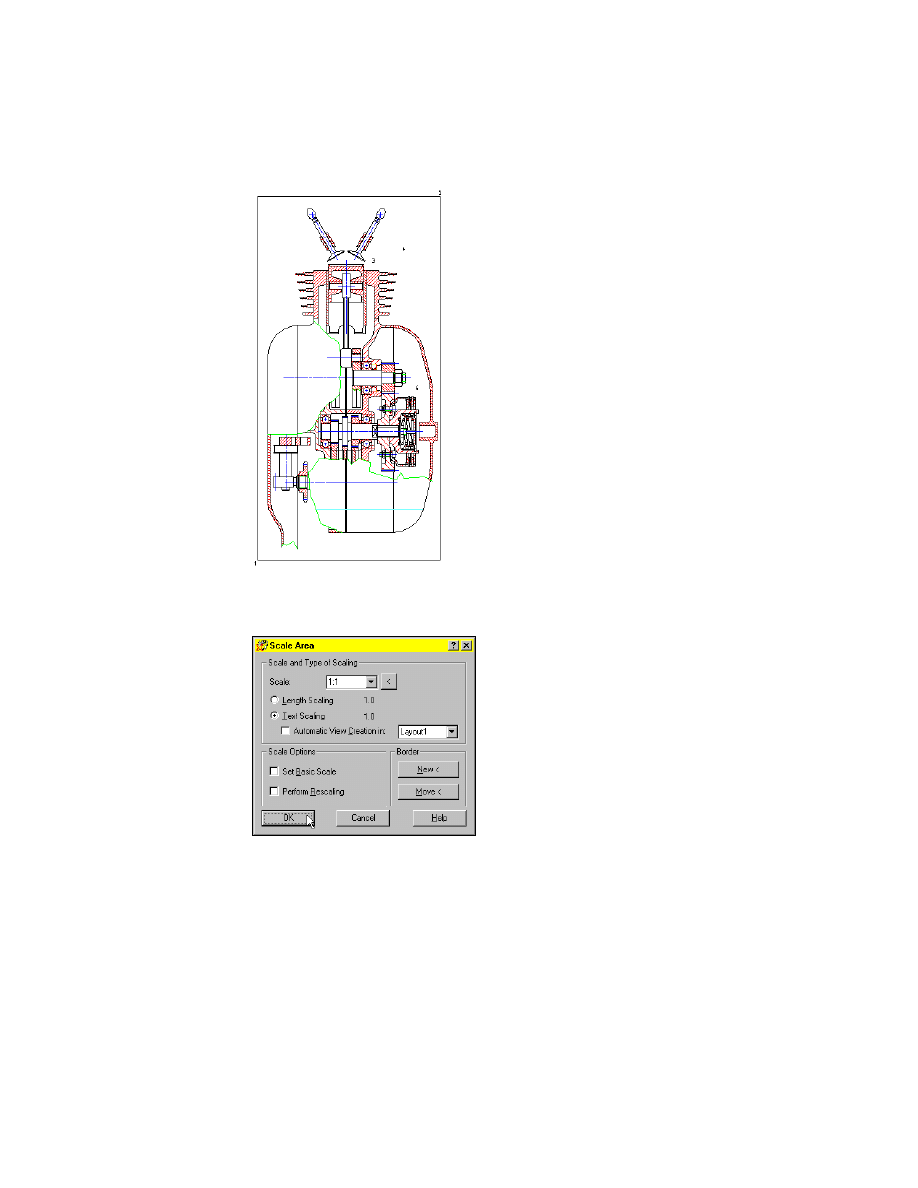
In the Scale Area dialog box, specify:
Scale:
1:1
4
Choose OK.
In the next step, you use Viewport Auto Create to create a viewport automat-
ically.
Working with Model Space and Layouts
|
97
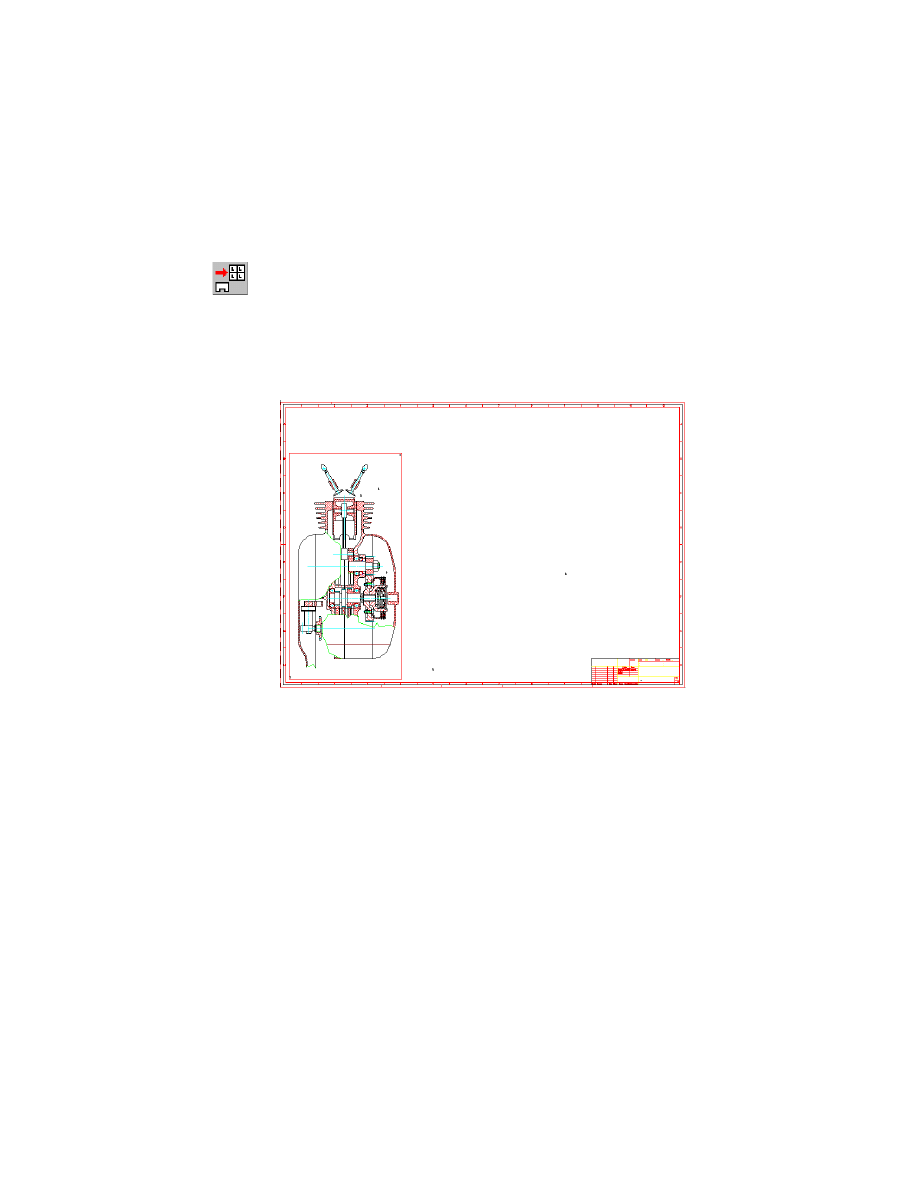
To create a viewport automatically
Here, the viewport will be created, because of the defined scale area.
1
Start the Viewport Auto Create command.
Menu
View ➤ Viewports ➤ Viewport Auto Create
Command
AMVPORTAUTO
2
Respond to the prompts as follows:
Enter layout name (<Return> for “Layout1”):
Press
ENTER
Select target position (<Return> for current position):
Place the viewport on the
left, inside the drawing border
Save your file.
98
|
Chapter 7
Working with Model Space and Layouts
Creating a Detail
There are two types of details, associative and non-associative. In this exer-
cise, you create an associative detail, because you use a viewport.
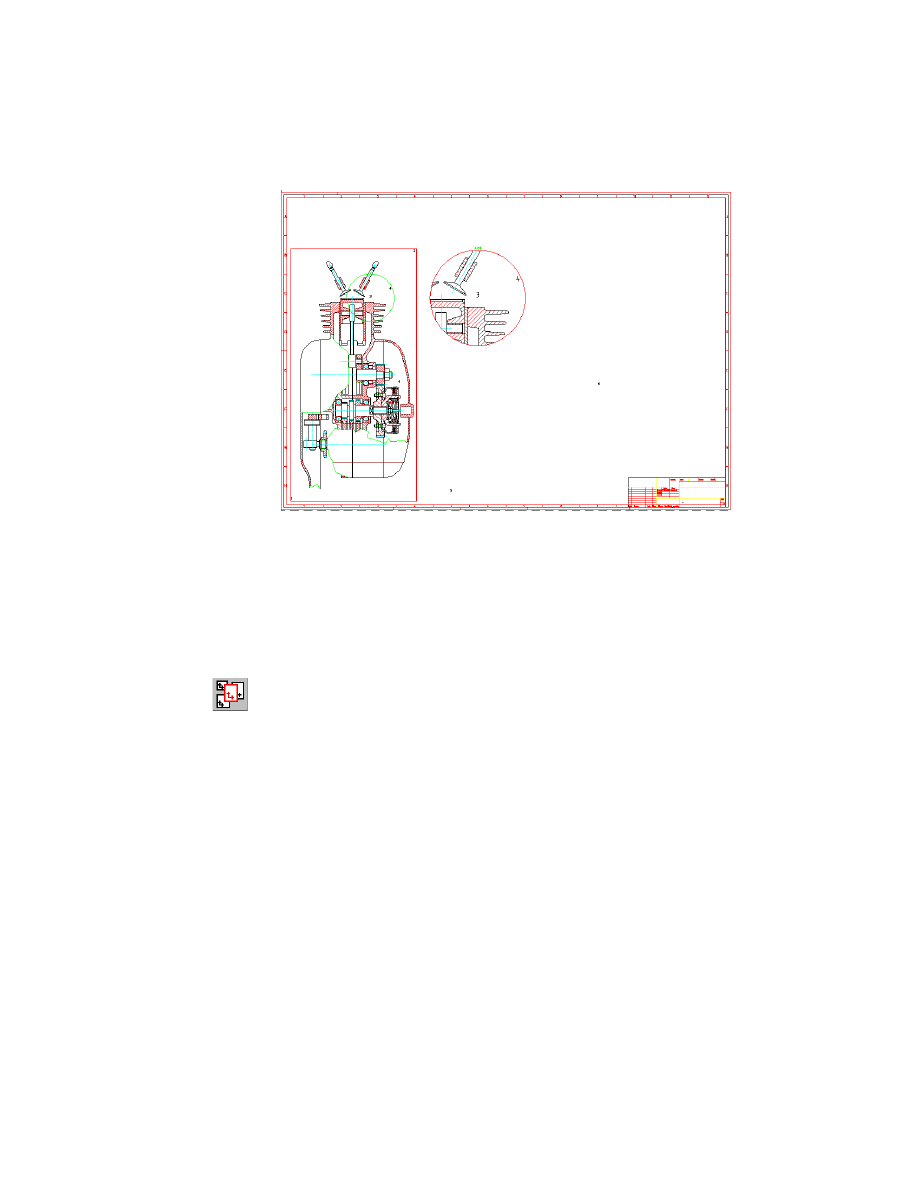
Create an associative detail of the valve.
To create a detail
1
Start the Detail command.
Menu
Design ➤ Detail
Command
AMDETAIL
The viewport is activated automatically.
2
Respond to the prompts as follows:
Define the enlargement area for the detail ...
Center of circle or [Rectangle/Object]:
Select the center of the detail (3)
Specify radius or [Diameter]:
Drag the radius to the desired size (4)
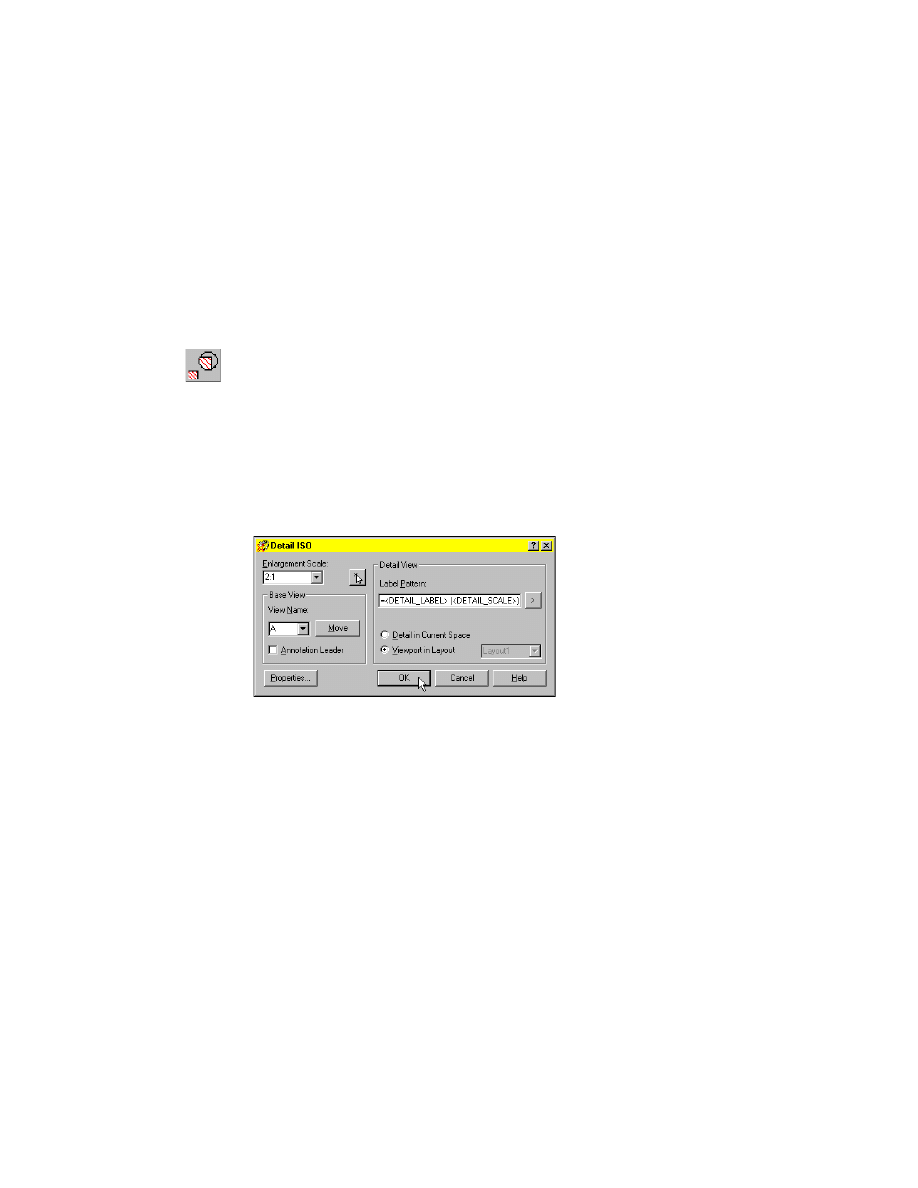
3
In the Detail dialog box, specify the settings shown below.
4
Choose OK.
5
Respond to the prompt as follows:
Select target position (<Return> for current position):
Place the detail to the right of the current viewport
Working with Model Space and Layouts
|
99
Save your file.
Generating a New Viewport
Now, you create a viewport inside a layout.
To create a viewport in the layout
1
Start the Viewport/Scale Area command.
Menu
View ➤ Viewports ➤ Viewport/Scale Area
Command
AMVPORT
2
Respond to the prompts as follows:
Specify first point or [Circle/Border/Object]:
Select the point, marked with 5 in the drawing
Specify second point:
Select the point, marked with 6 in the drawing
100
|
Chapter 7
Working with Model Space and Layouts
3
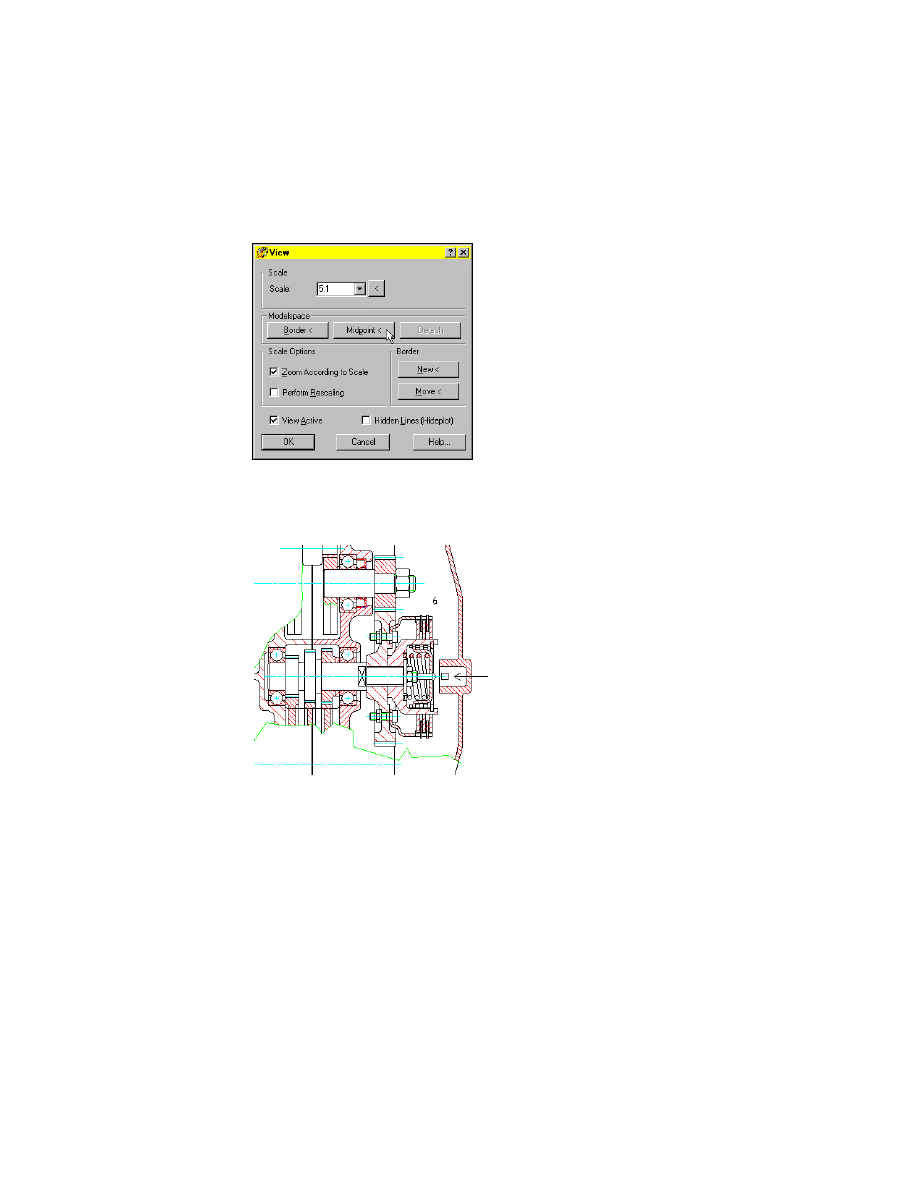
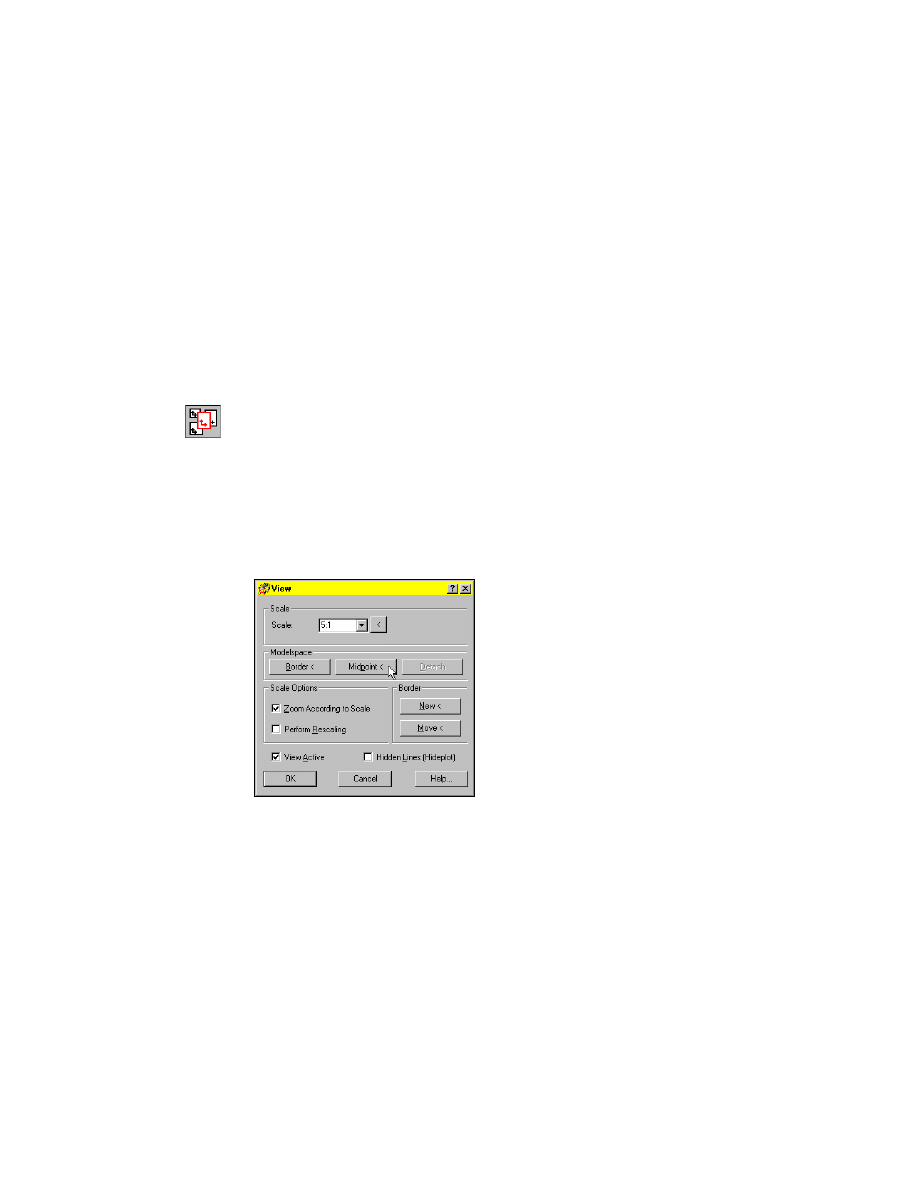
In the View dialog box, specify:
Scale:
5:1
4
Choose Midpoint <.
The drawing is changed to model space so that you can define the midpoint.
5
Select the endpoint of the centerline, as shown below.
6
In the View dialog box, choose OK.
Working with Model Space and Layouts
|
101
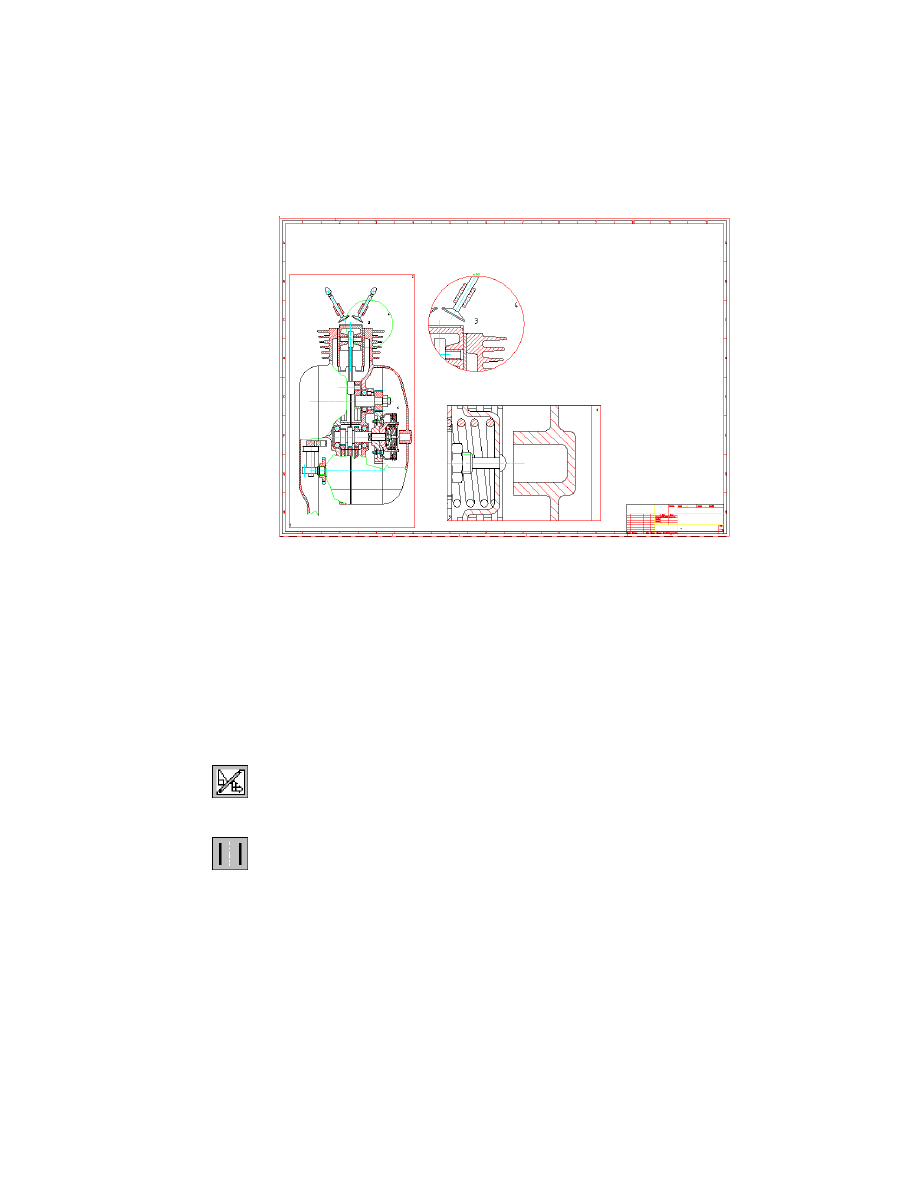
Now, your drawing looks like this:
Save your file.
Inserting a User Through Hole
To demonstrate the main advantage of working with layouts, you will insert
a user through hole in the housing. Notice that this change is immediately
displayed in every view.
Now, insert a user through hole in the previously created viewport.
To insert a through hole
1
Activate the previously created viewport.
Command
MSPACE
The viewport has a thick (highlighted) frame.
2
Start the Through Hole command.
Menu
Content ➤ Holes ➤ Through Holes
Command
AMTHOLE2D
102
|
Chapter 7
Working with Model Space and Layouts
3
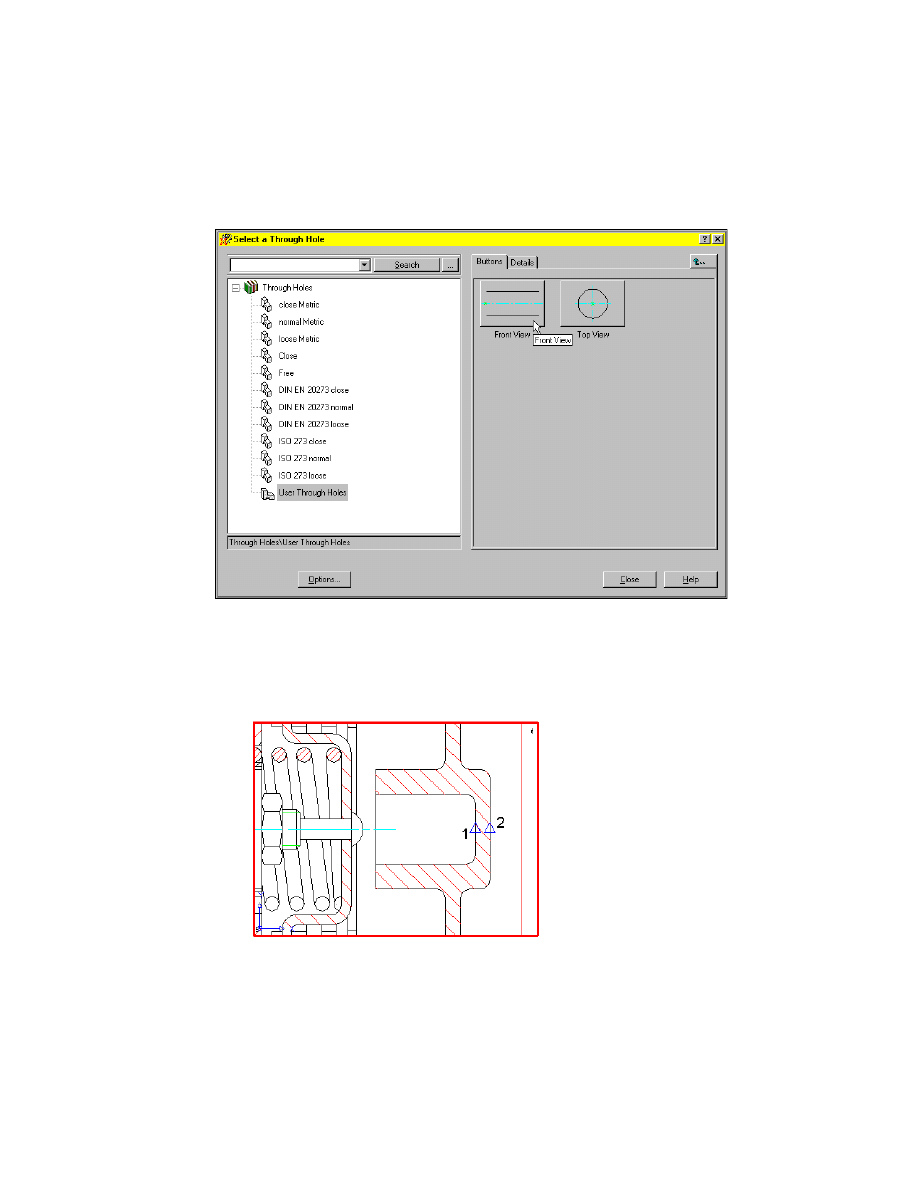
In the Select a Through Hole dialog box, choose User Through Holes - Front
View.
4
Respond to the prompts as follows:
Specify insertion point:
Hold down the
SHIFT
key and right-click.
Choose Midpoint from the shortcut menu.
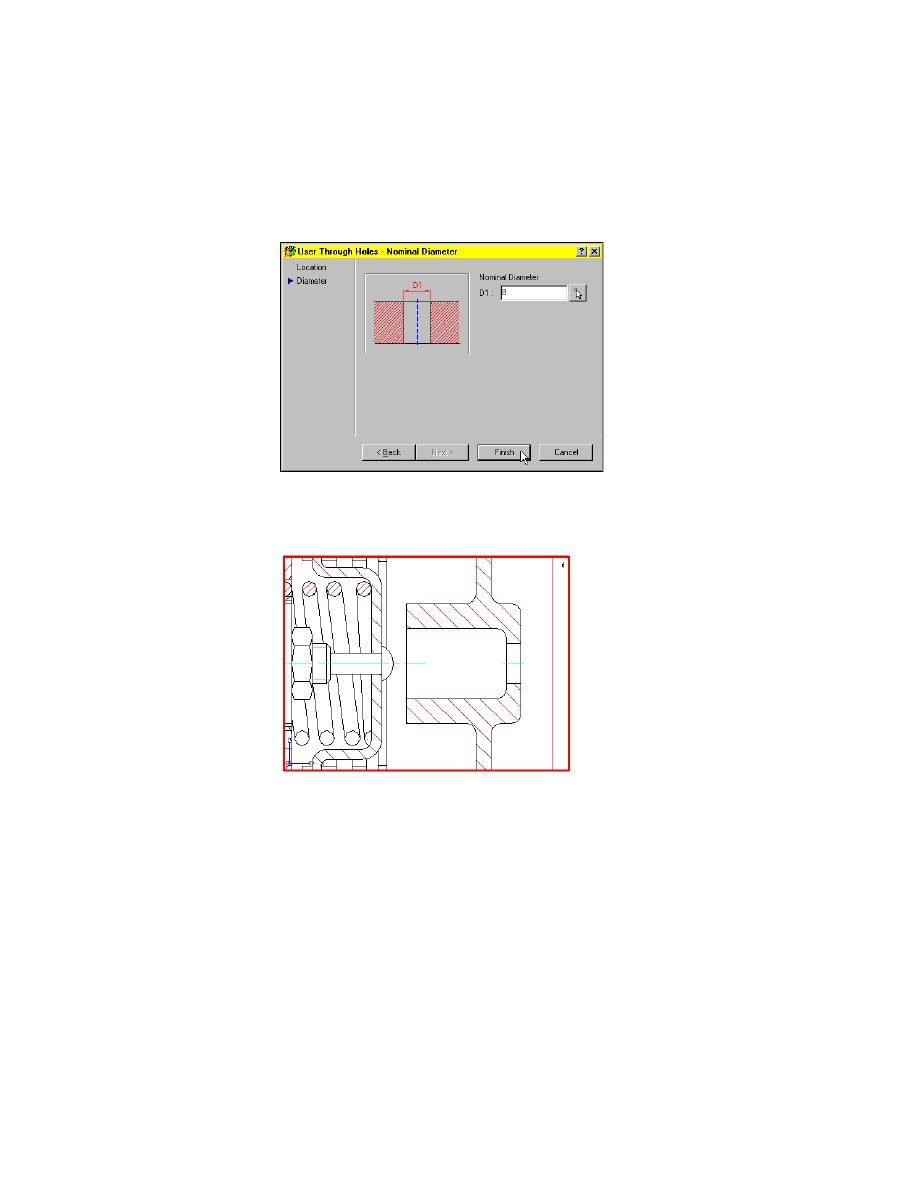
Specify insertion point: _mid of
Select the midpoint of the housing (1)
Specify hole length:
Select the endpoint of the hole (2)
Working with Model Space and Layouts
|
103
5
In the User Through Holes - Nominal Diameter dialog box, specify:
Nominal Diameter:
8
6
Choose Finish.
The user through hole is inserted into your drawing. Now, the drawing looks
like this:
Because of the associativity, the through hole created in the viewport appears
in the original view as well.
In the next step, you dimension the through hole diameter in the viewport.
Since the dimension is to appear only in the detail view, you generate the
dimension directly in the layout without having a viewport active.
104
|
Chapter 7
Working with Model Space and Layouts
To apply a dimension in the layout
1
Change to the layout.
Command
PSPACE
2
Start the Power Dimensioning command
Menu
Annotate ➤ Power Dimensioning
Command
AMPOWERDIM
3
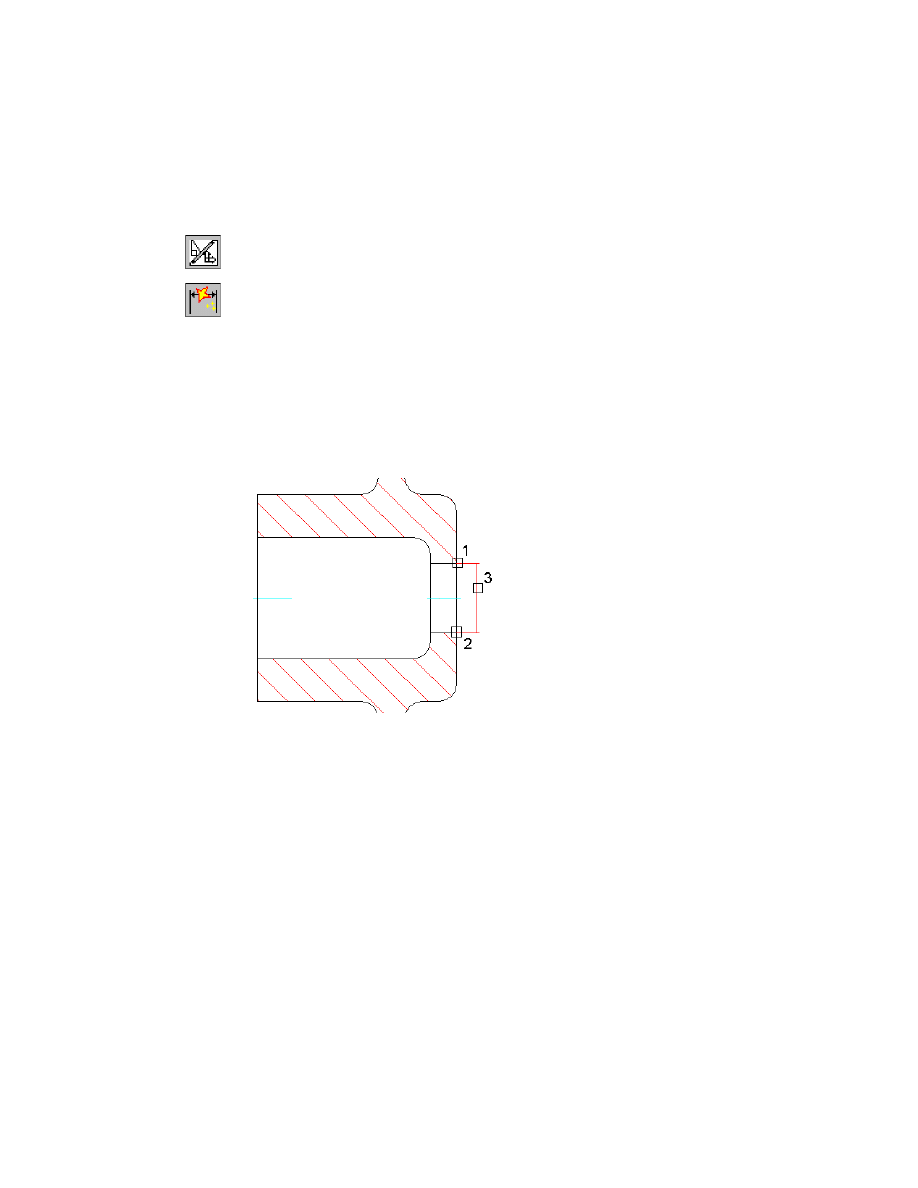
Respond to the prompts as follows:
(SINGLE) Specify first extension line origin for
[Angular/Options/Baseline/Chain/Update] <Select>:
Select the first edge of the hole (1)
Specify second extension line origin:
Select the second edge of the hole (2)
Specify dimension line location [Options/Pickobj]:
Drag the dimension line to the right until it is highlighted in red and left-click (3)
Working with Model Space and Layouts
|
105
4
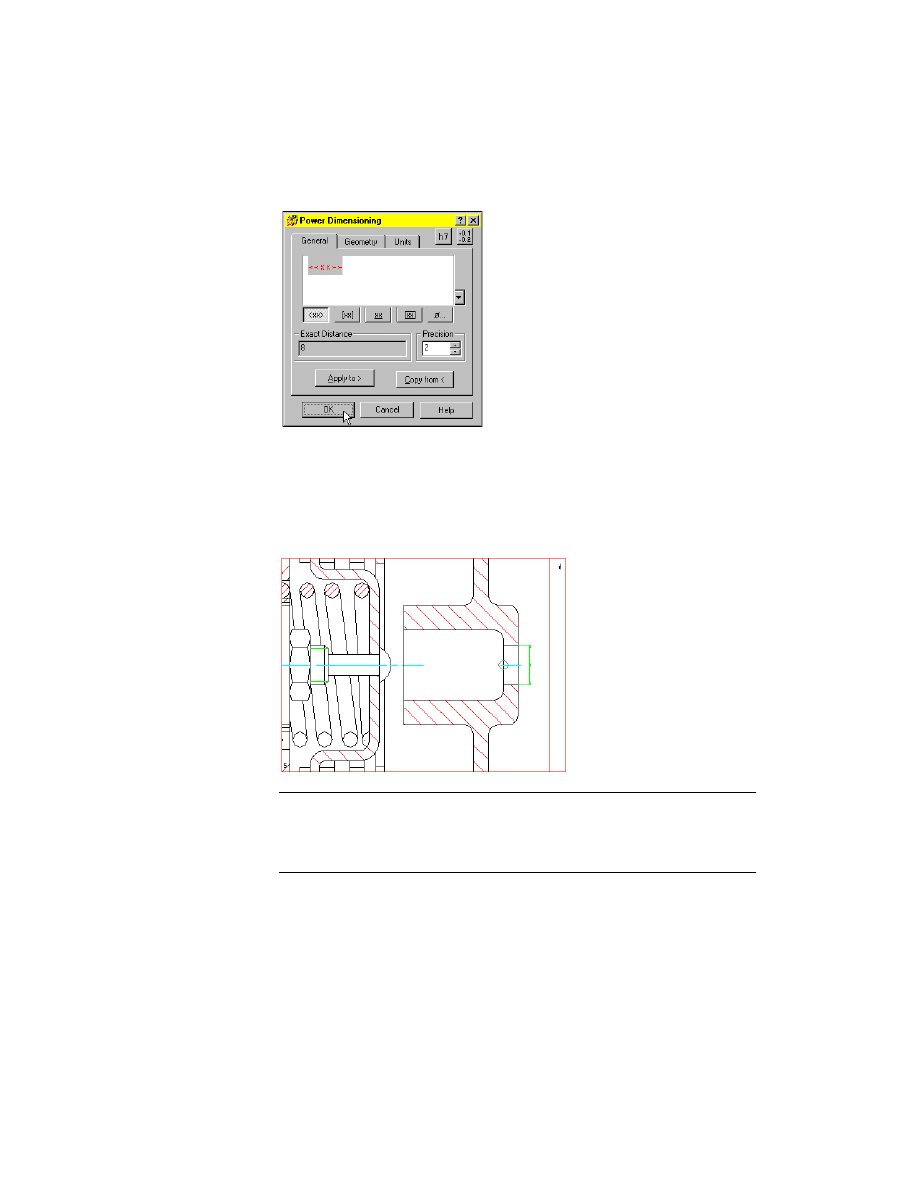
In the Power Dimensioning dialog box, choose OK.
5
Continue to respond to the prompts as follows:
(SINGLE) Specify first extension line origin or [Angular/Options/Baseline/
Chain/Update] <Select>:
Press
ENTER
Select arc, line, circle or dimension:
Press
ENTER
Now, the viewport looks like this:
NOTE
You can also dimension the hole in model space and turn off the layer
of one specific viewport. But the dimension text will only be correct in the 1:1
viewport and not in the detail view. Therefore, you can dimension directly on the
layout.
Save your file.
106
|
Chapter 7
Working with Model Space and Layouts
Creating a Subassembly in a New Layout
If you use layer groups in your assembly drawing, you can easily create detail
and subassembly drawings in layouts. You can switch off selected layer
groups in the viewports, so that only the detail or subassembly is visible.
Now, create an associative view of a subassembly in layout 2.
To create an associative view of a subassembly
1
Change to layout 2, by selecting the Layout 2 tab on the bottom of your
drawing area.
2
Start the Viewport/Scale Area command.
Menu
View ➤ Viewports ➤ Viewport/Scale Area
Command
AMVPORT
3
Respond to the prompts as follows:
Specify first point or [Circle/Border/Object]:
Select drawing point 7
Specify second point:
Select drawing point 8
4
In the View dialog box, specify:
Scale:
5:1
5
Choose Midpoint<.
The drawing is changed to model space.
6
Specify the point, as shown in the following drawing:
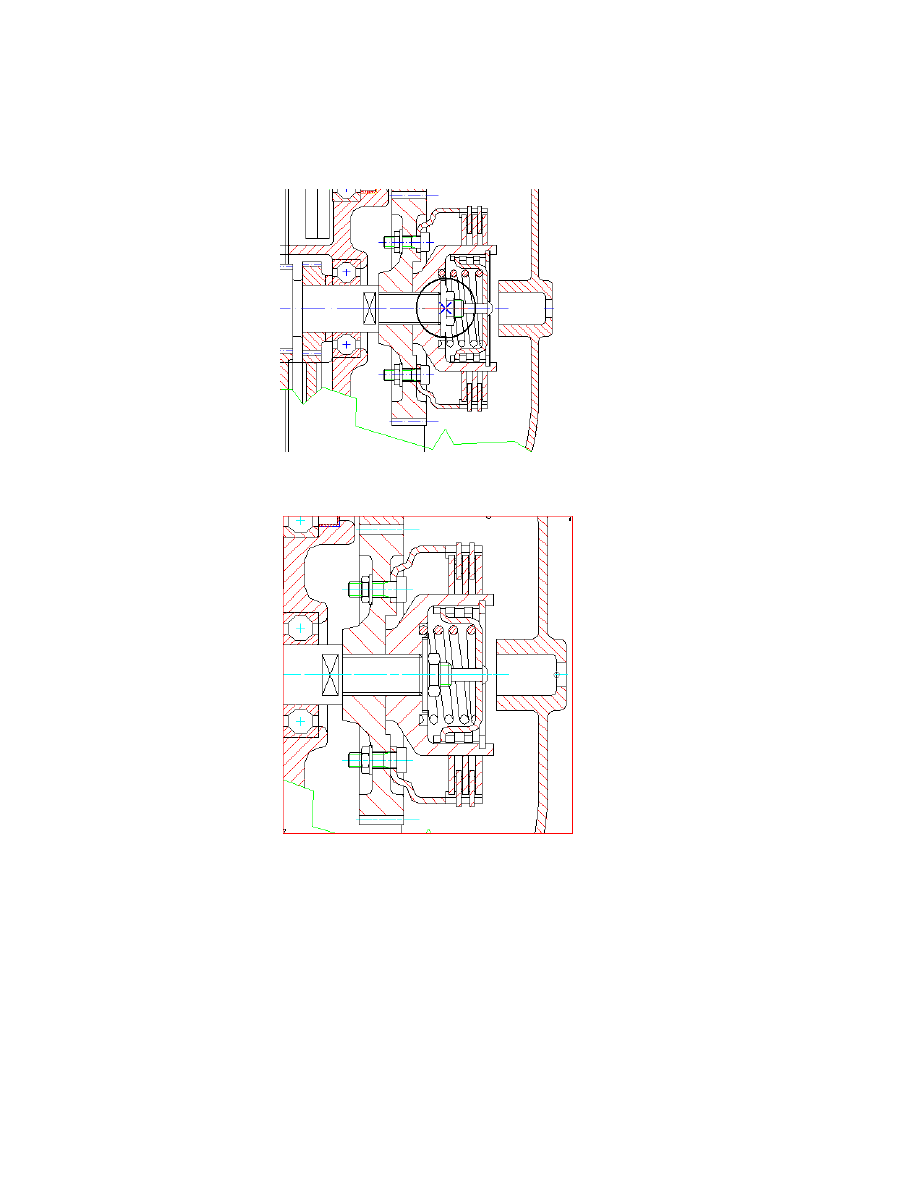
Working with Model Space and Layouts
|
107
7
In the View dialog box, choose OK.
The viewport is created. It looks like this:
Other objects are still visible around the subassembly. You use the Layer
Control command to hide them.
108
|
Chapter 7
Working with Model Space and Layouts
To hide objects
1
Start the Layer Group Control.
Menu
Assist ➤ Layer / Layergroup ➤ Layer/Layer Group Control
Command
AMLAYER
2
In the Layer Control dialog box, choose the Layer Group Control tab.
NOTE
Steps 3 to 5 wouldn’t be necessary in our case, because we have only
one viewport in the layout, but are described to show the proceeding if you have
more than one viewport in the layout.
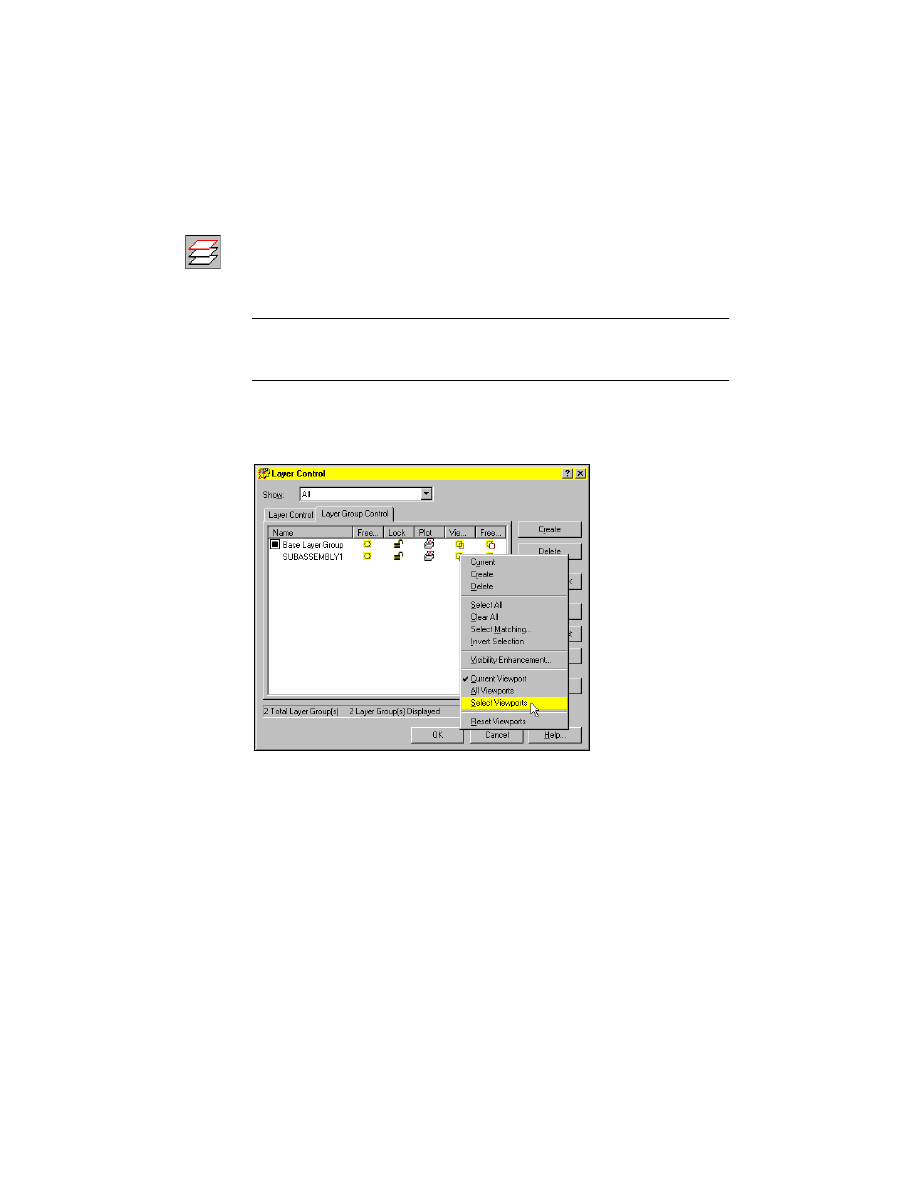
3
Move the cursor to the icon in the column Viewport Control of the layer
group SUBASSEMBLY1, and right-click.
4
In the context menu, choose Select Viewports.
5
Respond to the prompts as follows:
Select viewports:
Select the viewport frame
Select viewports:
Press
ENTER
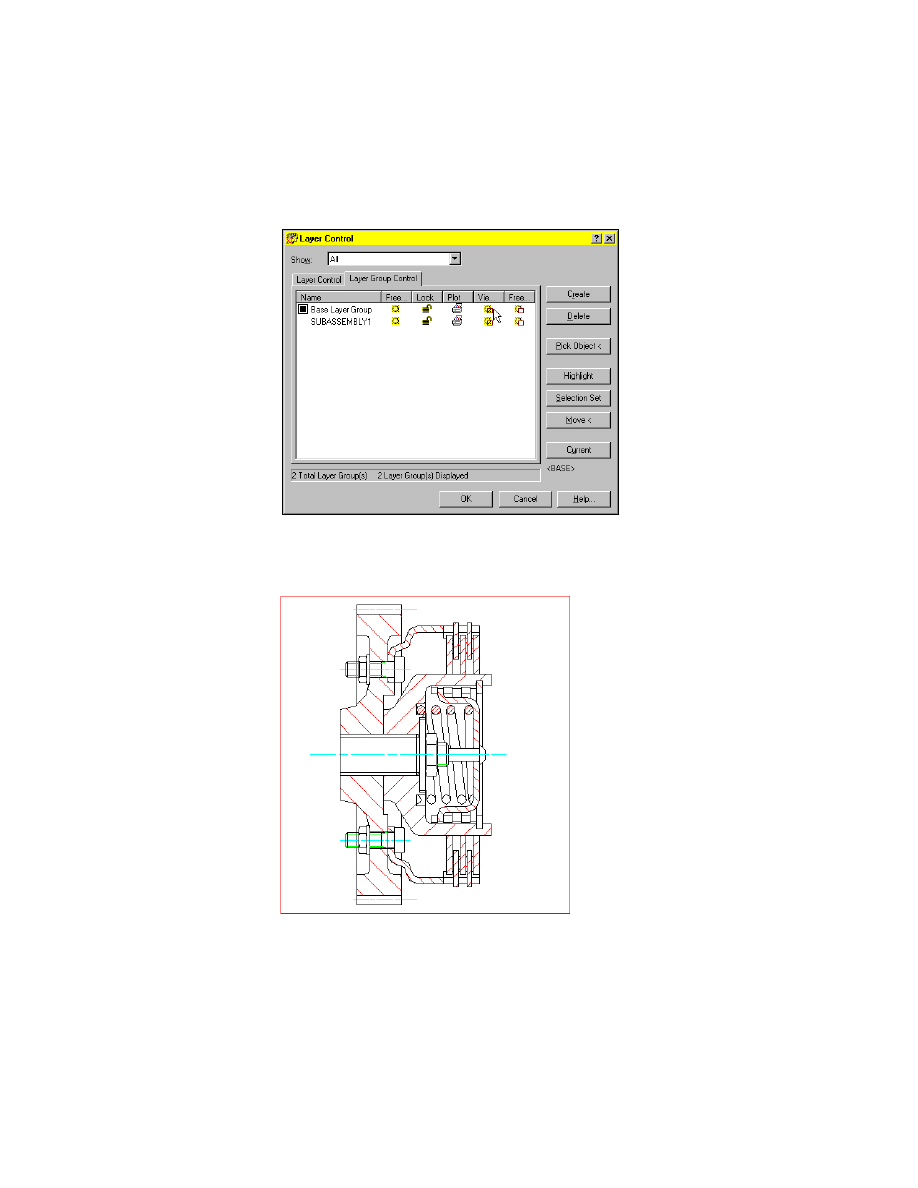
The Layer Control dialog box is displayed.
Working with Model Space and Layouts
|
109
6
In the Layer Control dialog box, move the cursor to the icon in the Viewport
control column and the Base Layer Group row, and click.
Choose OK.
AutoCAD Mechanical 2001 freezes the Base Layer Group, and the subassem-
bly remains visible. Your drawing looks like this:

110
|
Chapter 7
Working with Model Space and Layouts
Now, you can finish your detail drawing with text, remarks, annotations, and
so on.
NOTE
When you plot the drawing, the red viewport frame is turned off auto-
matically. If you have a plotter or printer driver installed, use the plot command,
and preview the drawing.
This is the end of this tutorial chapter.
Save your file.
Wyszukiwarka
Podobne podstrony:
Ch7 Model Space & Layouts
Ch07 Model Space & Layouts
[Paper Model] [Space] [Precision Paper Space Models] Atlas Centuar 10
[Paper Model] [Space Craft] [Betexa 041] ATLANTIS Space Shuttle [1=72, jpg s]
Evolution in Brownian space a model for the origin of the bacterial flagellum N J Mtzke
[Paper Model] [Warhammer 40k] Space Marine Whirlwind
Shan A Model of Wavefunction Collapse in Discrete Space Time
[Paper Model] [Warhammer 40k] Space Marine Thunderhawk Gunship
R 6 1 Obiektowy model zapytan
model relacyjny
model komunikacji dwustronnej
Wyklad V Model konkurencji niedoskonalej
Model Differences V9vsV9ElDi V975 L3 1[1] 0 050131100815
Wykład IV Mo
więcej podobnych podstron