
TechniCom
179-9 Rte. 46W #175
Rockaway, NJ 07866 USA
(973) 470 9110
http://www.technicom.com
Solid Edge Version 20:
Solid Edge Version 20 focuses on modeling with massive
assemblies, managed collaboration, and engineering productivity.
This report reviews and comments on the major changes implemented in
Solid Edge Version 20.
May, 2007
Author: Raymond Kurland, TechniCom

Solid Edge
TechniCom.
Solid Edge V20
Page 1
Executive Summary
Introduction
Ray Kurland, the author of this paper, spent several
days at Solid Edge headquarters in late April 2007,
reviewing Version 20 of Solid Edge. Ray met with Solid
Edge management and technical experts, the goal be-
ing to develop this paper summarizing the most impor-
tant new functions of the software and why they are
important for prospective users.
Ray met with Bruce Boes, Vice President UGS Velocity
Series Marketing, Kris Kasprzak, Director of Solid Edge
Marketing, and Russell Brook, Solid Edge Product
Marketing Manager, for an overview of Version 20.
Kasprzak has primary responsibility for developing the
marketing needs for each new version of Solid Edge
while ensuring that the software meets customer needs
and improves Solid Edge’s competitive position. Ray
also met with Doug Stainbrook, Field Support Engi-
neer for Solid Edge, who elegantly demonstrated and
explained in detail the major new functionality in Solid
Edge Version 20.
Solid Edge continues to move along at a
rapid pace
While the following sections discuss the detailed tech-
nical highlights of Version 20, equally as important is
marketplace acceptance of Solid Edge and UGS’ other
Velocity applications, all aimed at the mid market. On
all fronts the software meets with success. UGS leads
the way in understanding that mid-market companies
have many of the same needs as their larger brethren.
Mid-market companies also need to participate in glob-
al markets and respond to rapidly changing economic
and business requirements, similar to large enterprises.
Their tool needs are similar to those needed by large
enterprises, but need to be easier to use and operate
with little or no IT staff. To address these unique mid-
market needs UGS provides software specially tailored
to integrate tightly with Solid Edge, and if needed, pro-
vide associativity with UGS’ NX. Femap (for analysis),
Teamcenter Express (for PLM), and NX CAM Express
(for machining) represent the balance of the Veloc-
ity applications and also interoperate with other CAD
software, but not quite as tightly as with Solid Edge.
Customers are “voting with their dollars” because the
Velocity revenue is growing at about two times the
overall MCAD market. Femap is enormously popular;
Teamcenter Express early installs predict large growth;
and, NX CAM Express brings a highly capable applica-
tion into the mid-market with an attractive price point
along with extensive capability.
The UGS Velocity Series software for the mid-market
consists of Solid Edge, NX CAM Express, Femap, and
Teamcenter Express; all modular, yet integrated, fully
native Microsoft, delivered with predefined “best in
class” process templates, and they’re all associative
with each other. The velocity organization has restruc-
tured these products so they are a better fit for the
mid-market. Along with deep integration within PDM,
this restructuring includes new user interfaces (UI), dif-
ferent capabilities for mid market companies, an easier
installation process, and Windows native operation.
Solid Edge V20 also supports the new Microsoft Vista
operating system and adds more support for 64-bit
processors. A ten-day implementation plan package
provides for the installation of Teamcenter Express, its
initial operation, and users and administrators trained.
Highlights of Version 20
Solid Edge Version 20 focuses on massive assembly
modeling, managed collaboration, and engineering
productivity.
• Solid Edge Version 20 delivers eleven major
modeling advances, all focused around making
working with massive assemblies (more than
100,000 parts) easier and more productive.
• A new dedicated Structure Editor provides an
interface for re-using existing assemblies to
create new projects in a managed Teamcen-
ter environment. Included with the Solid Edge
Embedded Client, Structure Editor allows clon-
ing existing assemblies, revising, saving-as or
re-using portions of the assembly tree, allowing
ready repurposing of data within a managed
environment.
• Solid Edge V20 adds function that makes
migrating from AutoCAD easier, including
XREFS and color 7, while its stand alone draft-
ing environment should prove more friendly to
maintaining drawings.
• Additional translator functionality improves Sol-
id Edge’s interface to external systems, includ-
ing a new
CATIA V5 bidirectional translator,
updates supporting Pro/E Wildfire 3, and
support for STL files as input for viewing.
• More than 170 other enhancements are also
included in this release.
The following section "Description of the new function-
ality of Solid Edge Version 20" describes in more detail,
not only the major functions of Solid Edge Version 20
that this paper reviews, but also our reaction to these
items.
Conclusions
Overall this is a very impressive release. Many of
the major modeling functions added to V20 focus on
improving the ability to work with massive assemblies.
This is a tough problem to solve, often taxing the

Solid Edge
TechniCom.
Solid Edge V20
Page 2
resources of even the fastest desktop processors.
Solid Edge V20, in our opinion, has made substantial
progress in this area and now has leading edge ca-
pabilities. Some of the new functions that make this
possible are the following:
•
Zones modeling - provides performance
improvements by allowing users to define
and work within small defined areas of large
assemblies.
•
Assembly auto(mated) constraints allow
rapid constraining of imported assemblies for
motion studies, performing in minutes, what
would normally take hours to do manually.
•
Component grouping allows better design
control, yet does not effect the how the as-
sembly is physically constructed. Simplifying
the pathfinder (history tree) will yield more
productive modeling from a simpler presenta-
tion.
•
Drawing review mode - uses Solid Edge's
independent (of the 3D master model) draw-
ing view to quickly view drawings of large
assemblies. This offers a complete visualiza-
tion of massive assemblies in seconds, not
hours, and is only possible because of Solid
Edge's unique method of storing independent
drawing data.
•
If users need to make the full assembly ac-
tive, assemblies can automatically unload
"unused" components to simplify them and
improve their performance "on the fly." Solid
Edge automatically unloads (inactivates)
parts not recently used, thus improving
overall system performance by better utilizing
memory.
•
Dynamic preview of direct edits for compo-
nent modeling shows what a change would
be before it is made and committed, saving
valuable design time.
•
Tabulated drawings introduce a unique ability
to gather and connect master model data to
generate automatic tabulated drawing views
for families of parts.
•
Goal seek, feature grouping, feature library
helpers, and the variable rule editor all act to
improve engineering productivity. Goal seek
presents a simple solution to a vexing prob-
lem, eliminating trial and error solutions in
many cases. Feature library helpers makes
feature libraries many times more useful by
adding clear explantions of how features are
to be placed - simple but powerful.
Beside the above modeling functionality, Solid Edge,
as a the principal component of the UGS velocity
program, is buttressed by the other Velocity compo-
nents, offering users advanced mid market functions
in analysis, data management, and machining, all
associative and supporting a master model concept.
New translators and an even better AutoCAD migra-
tion allow more companies an easy way to migrate
to Solid Edge. These all enhance the comprehensive
coverage of Solid Edge Version 20. Users consid-
ering upgrading or migrating to an advanced 3D
system should definitely put Solid Edge V20 high on
their list.
Users will be able to tell by reviewing the descrip-
tions below, that taken as a whole, UGS and Solid
Edge have made concomitant massive advances
to the "art" of dealing with such large amounts of
data entailing equally massive amounts of compute
resources.
Solid Edge
TechniCom.
Solid Edge V20
Page 3
Description of the new
functionality of Solid Edge
Version 20
Our impressions of Solid Edge Version 20 derive
from discussions and demonstrations with Solid Edge
Field Support Engineers and executives. We were
able to interact closely during demonstrations and
discussions of the key functions discussed below.
Since this is a very visual business, a few screen im-
ages are included below to expand on the text. This
should enable the reader of this paper to obtain an
introductory “feel” for the functions. More images are
on our website at http://www.technicom.com/SEV20.
In case these descriptions whet your appetite for
seeing more details of the software, contact your ap-
propriate Solid Edge representative or reseller. Solid
Edge contact information is at the end of this paper.
You can also contact the author with feedback at
rayk@technicom.com.
Assembly auto(mated) constraints allow
rapid constraining of imported assemblies
for motion studies
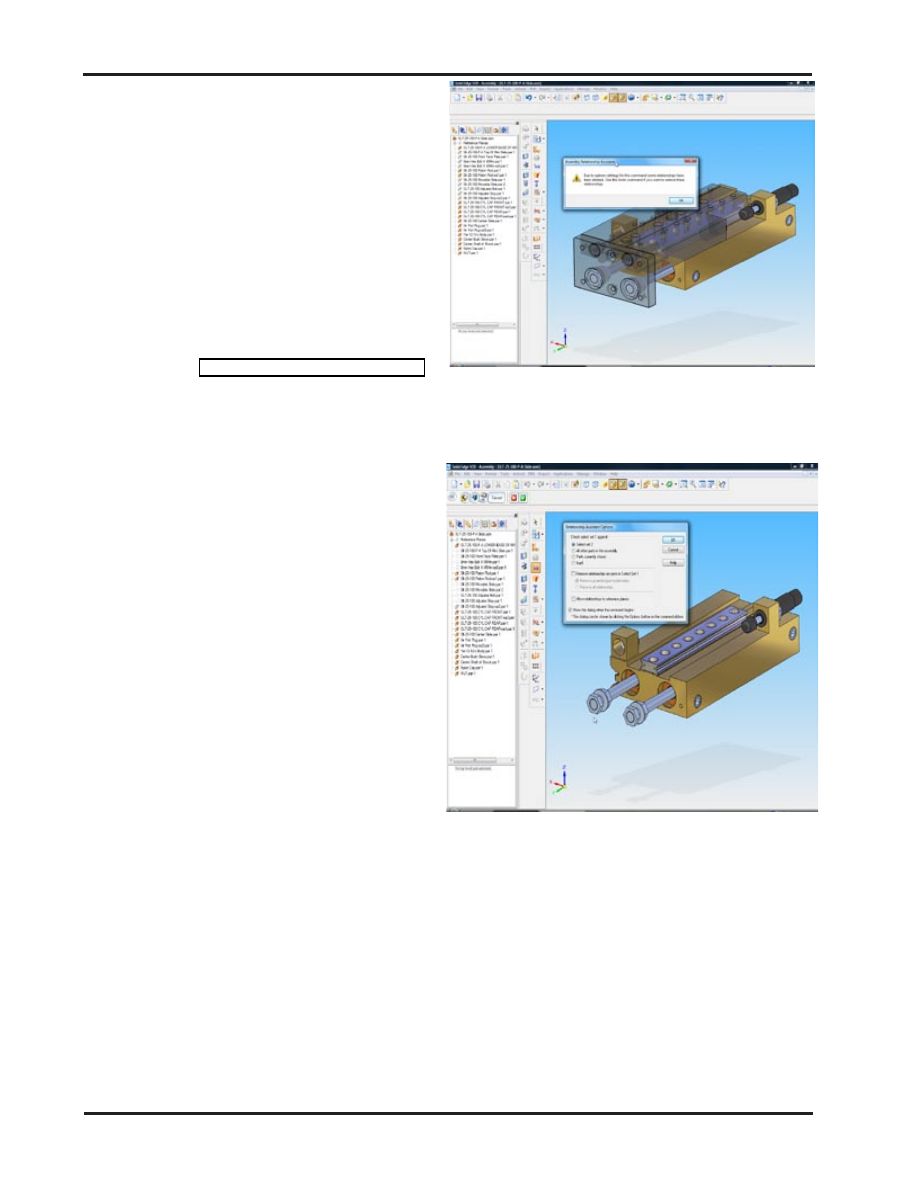
The assembly auto constraining capability (also
called the relationship assistant) would be used to
add constraints to imported geometry for the purpose
of possible motion studies. Solid Edge built geom-
etry would already contain assembly constraints.
Usually this would be a tedious process. However,
using the relationship on the imported geometry
model shown below (01.png) within approximately
5 minutes, we were able to add in the 48+ relation-
ships rather than at least an hour or more building
relationships by manually mating and align parts in
the assembly. By appropriately grouping and asking
the system to automatically compute the possible
mating relationships, the system proposed, using
a series of dialogue boxes, the relationships that it
found. The user could choose to accept or not accept
specific relationships. In our case, we accepted most
of them. In the case of the piston rods we chose not
to accept the proposed mates because we wanted
to allow them to move. The sequence we followed
was to remove the grounded parts (ones that would
not move), then ask the system to suggest axial
alignments, then to suggest mate and planar align-
ments. The system has excellent capabilities for
automating this function. We have not found this
capability in any other system, and it has proves to
be very effective in migrating legacy data or working
with imported assemblies.
Image 1 (02.png) - A warning message to the user
before the system removes the default relationships
(grounds in this case).
Image 2 (03.png) - We have now hidden the
moveable half of the pneumatic cylinder (shown in
light blue in the previous image) to begin making
changes on the bottom half. To start we begin by
specifying two sets of parts to constrain against
each other. The first select set will be the block (in
gold). The second set will be the rest of the parts
(slider, pistons, bushings, and bolts).
Solid Edge
TechniCom.
Solid Edge V20
Page 4
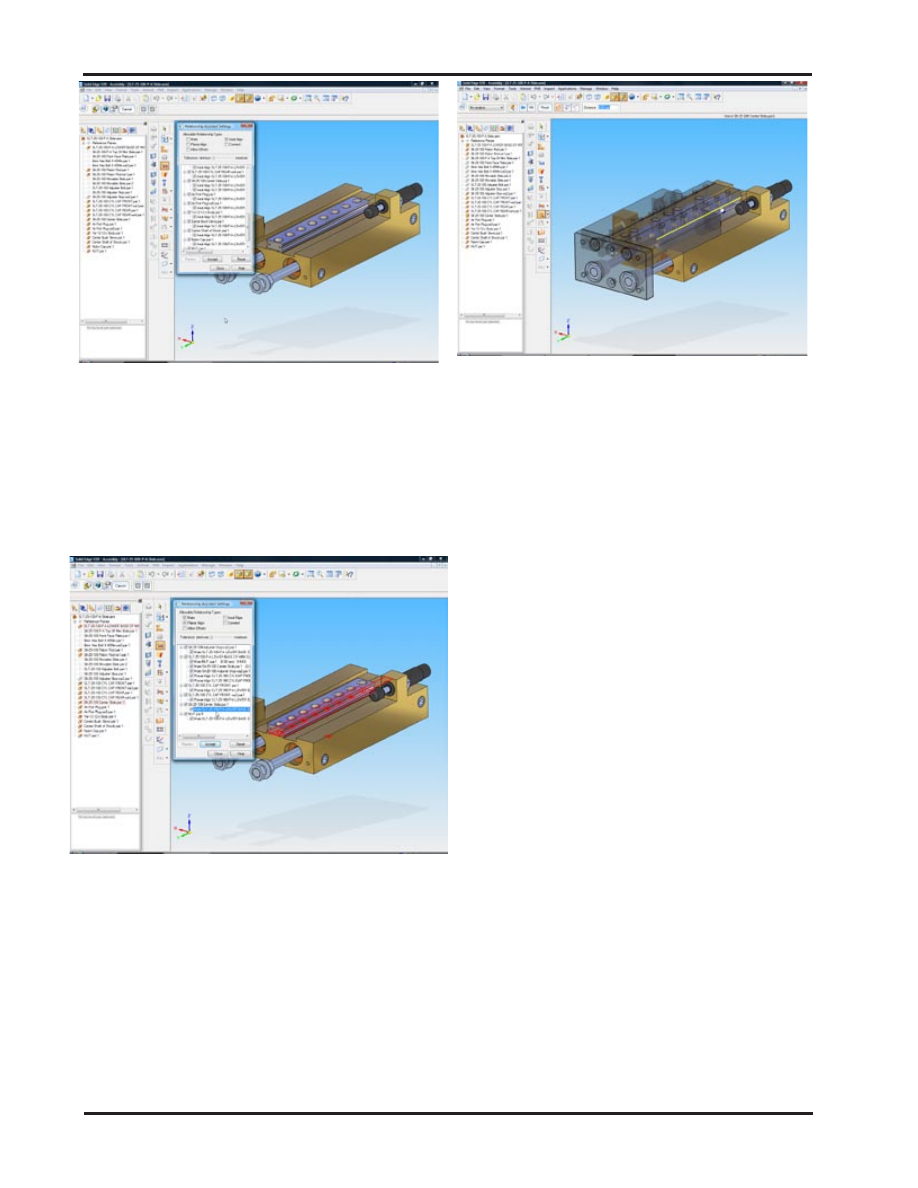
Image 3 (04.png) - Using the relationship assistant
in stages makes it easier to see the results. First,
we set the option to only detect Axial alignments
between the two select sets. The window in the
image above depicts the results of the possible
axial constraints. Any relationship that has a check
will be applied to the assembly after selecting
accept. Note that only axial relationships have been
proposed.
Image 4 (05.png) - Selecting a relationship from
the Relationship Assistant automatically highlights
the faces in the graphics window to show the user
where the relationship will be placed. In this case
the system has been asked to propose mates and
planar alignments.
Image 5 (06b.png) - After Auto-constraining all of
the parts, the movement of the pneumatic slide can
be simulated using the “move” command and the
entire assembly moves as expected.
Dynamic preview of direct edits offers a
complete visualization of the proposed
change
The next capability is dynamic preview in direct
editing. Direct editing has been in Solid Edge since
Version 18. The new capability in Version 20 is the
dynamic preview, allowing a complete visualization
of the change during the process, rather than input-
ting a numeric change value and then observing the
result. This is very slick.
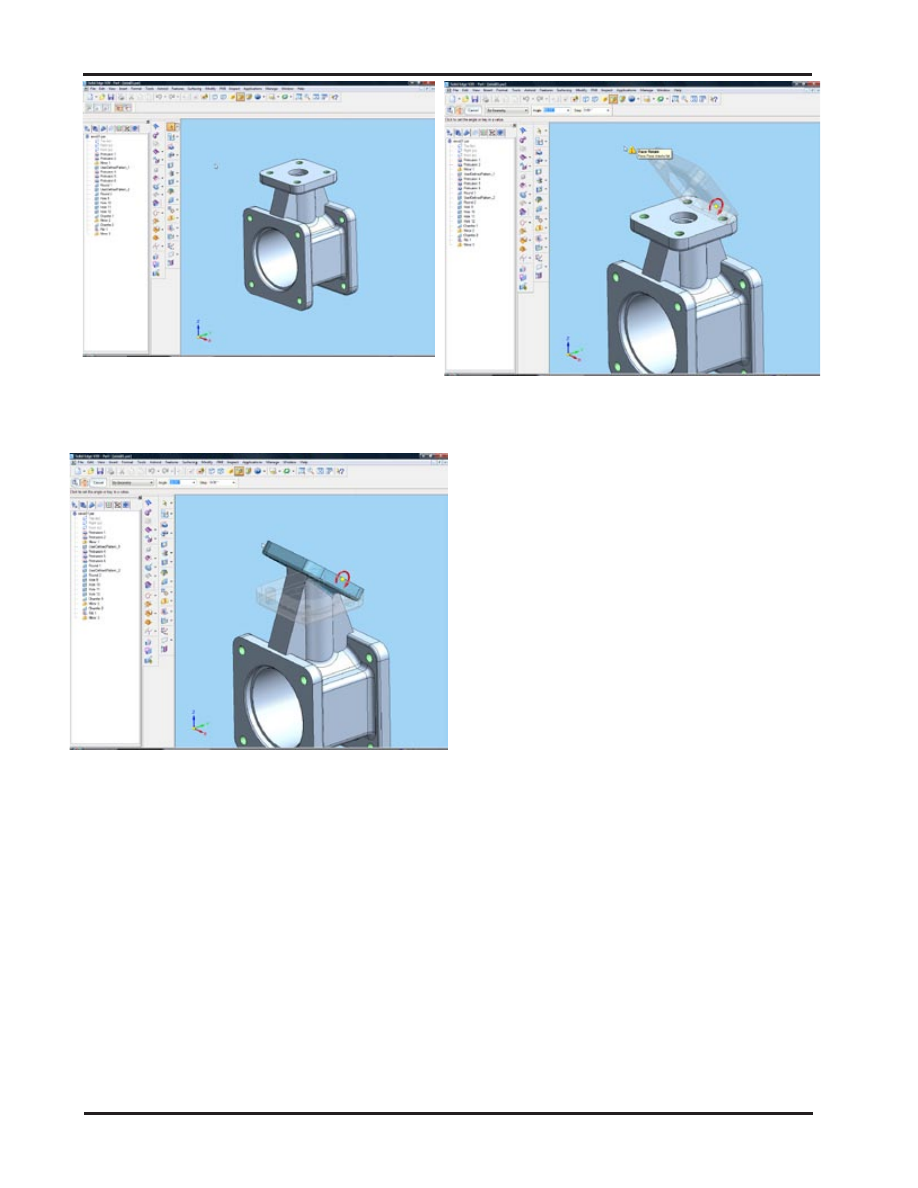
Using the ball valve shown in Image 6, selecting a
small portion of the part, we initiated a significant
angular change on one of the faces. All related fillets
and other portions of the geometry stayed connected,
as expected. In this example, when we reached a
geometric condition that wasn’t possible, the system
presented us with a warning. This is much more ef-
fective in making reliable edits.
Solid Edge
TechniCom.
Solid Edge V20
Page 5
Image 6 (07.png) - This is the “before” image
showing the Valve body, before modifying using
Direct Edit.
Image 7 (08.png) - This image shows the Dynamic
Preview for (new in V20) Direct Edit. The user
can see exactly what the result of the direct Edit
will look like before committing to the change. In
this example we used “Rotate Face” and selected
the features shown in light blue to rotate about
an edge. Note that all the adjacent faces and
rounds update to the change, even in preview
mode.
Image 8 (09.png) - Dynamic Preview in Direct
Edit even gives an indication when the users edit
will cause features to fail. Note that the dynamic
preview disappears and a warning exclamation
mark is displayed. Excellent feedback to the user!
Zones (Modeling within) - provides
performance improvements by allowing
users to define and work within small
defined areas of large assemblies
In this portion of the demonstration, we focused
on some of the massive assembly design tools by
looking at some common workflows found in plant
equipment design and layout. These include zone
modeling, tools to copy, move and rotate an array
of existing subassemblies within an assembly, and
component grouping.
Zone modeling enhances interactive performance
when working with extremely large assemblies.
When opening an assembly, it can be opened in
full mode, lightweight mode, or simplified mode.
The zone modeling capability goes a step further to
improve performance by allowing the user to define
geographic areas (zones) that contain components or
subassemblies. When opening an assembly, the user
has the capability to specify a number of options for
the assembly.
Users can create a zone by selecting parts to define
the zone. In this case, the outer limits of the parts
define the zone box, which is a 3D box showing the
geographic space of the zone. When viewing a zone,
parts can be viewed depending on whether they’re
inside the zone or partially inside the zone giving the
user more display control.
What’s important here is that by being able to define
zones, each user only needs to open the zone they
are responsible for, hence speeding overall system
Solid Edge
TechniCom.
Solid Edge V20
Page 6
performance when working with extremely large as-
semblies. By defining a zone, every time the zone
is opened, Solid Edge knows which parts are in the
zone and therefore does not have to open additional
component not in the zone. This powerful capability
will save design time. Additionally, zones can easily
be switched when users decide to work on different
portions of a massive assembly. As a result, work-
ing with massive assemblies becomes much more
manageable and easy to do.
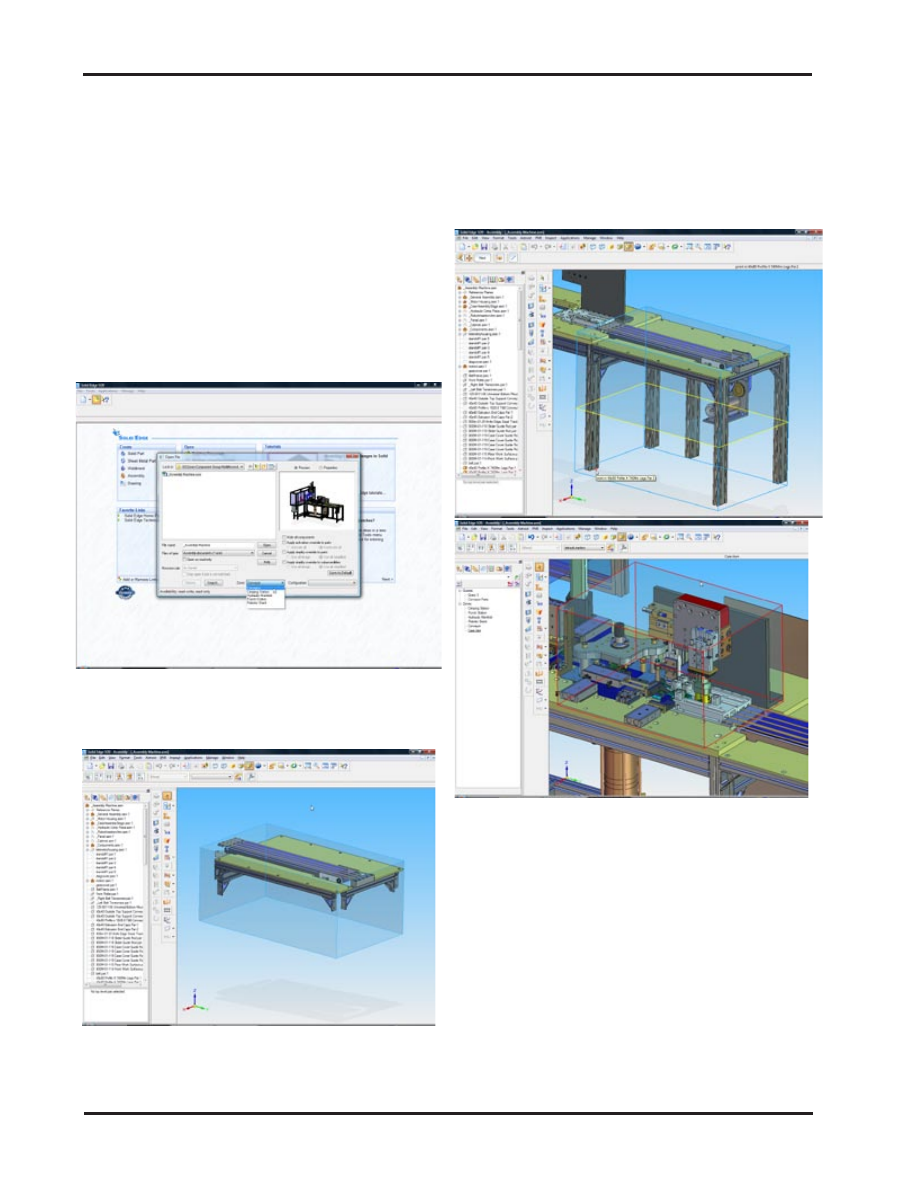
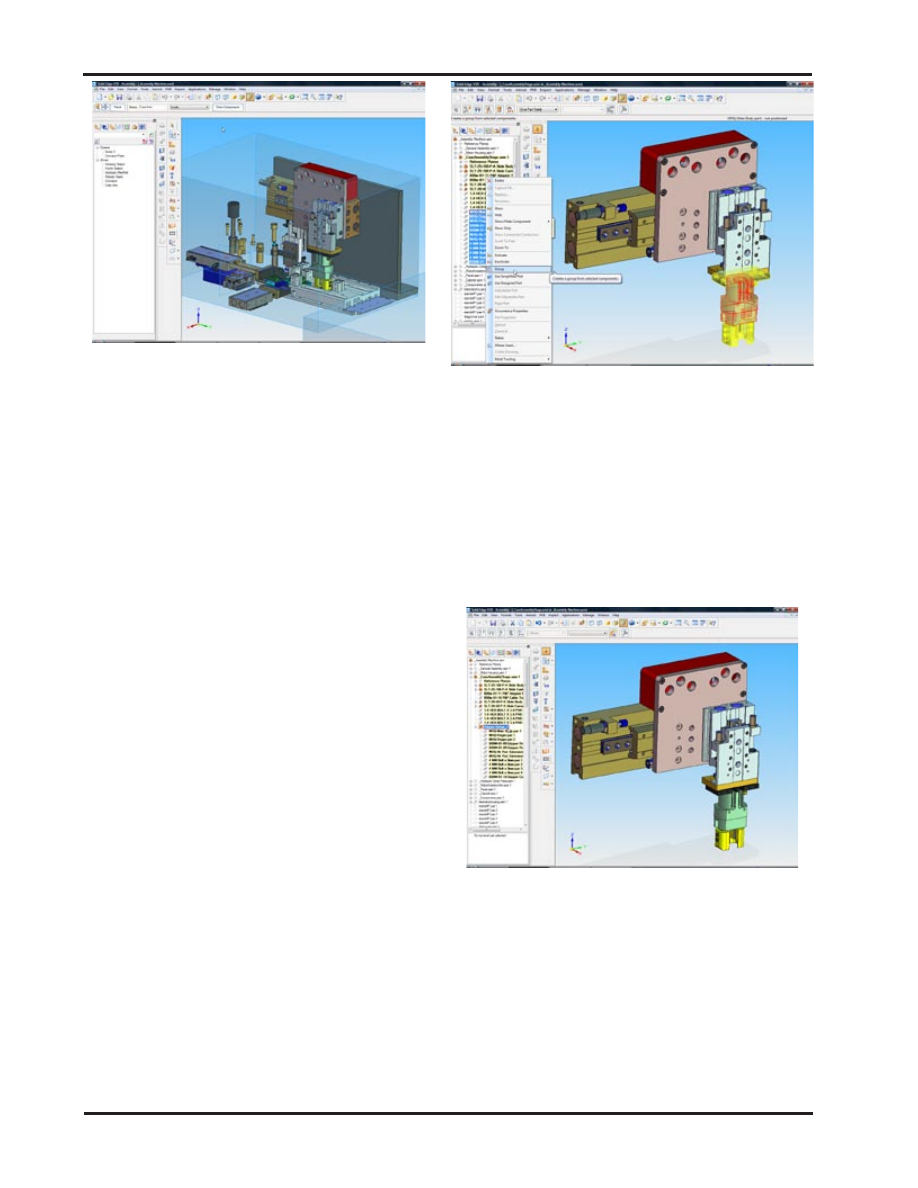
Image 9 shows the new zone capability in the File
Open dialog for opening a large assembly by pre-
defined Zones. In this case we are responsible for
the design of the Conveyor; only the components
within the Conveyor zone were brought into memory;
not the entire assembly.
Image 9 (10.png) - New open dialog allows a Zone
option.
Image 10 (11.png) - Shows the result after File
Open. In this image we can see the Zone was
defined by everything INSIDE the Zone Box.
Other types of zone definitions are possible. Another
is a zone definition that includes everything either
fully or partly within the zone box. Users can change
the size of the zone box by selecting a face of the
box and moving it to a new keypoint of a model. A
zone can also be defined by selecting components
that are to be at the extreme edges of the zone box
in all 6 directions (to define height, width, and length).
Image 11 (13.png) and Image 12 (14c.png) - Show
Zone Boxes defined using different techniques.
Solid Edge
TechniCom.
Solid Edge V20
Page 7
Image 13 (15.png) - Result of “Show Components”
command with the option set to INSIDE.
Component grouping allows better design
control, yet does not effect how the
assembly is physically constructed
The ability to group components further improves
massive assembly design. This technique allows the
user to group components under a single convenient
node while leaving the bill of material and assembly
structure intact. Component grouping has several
advantages such as compacting large trees, simplify-
ing inputs to pattern operations composed of multiple
parts, and organizing common parts such as bolts
into a single node for quick show and hide.
Component positioning eases machine
and factory layouts
To improve the modeling of machine and factory
layouts, component groups in Solid Edge can be
selected for operations such as move, copy, or rotate
while maintaining internal mating relationships. Inter-
nal relationships can optionally be deleted. Building
digital versions of very large machines, frequent-
ly requires duplicating many subassemblies to
form the final configurations and assemblies.
Using this well thought out method for replicating
and building groups of assemblies should save
an enormous amount of design time.
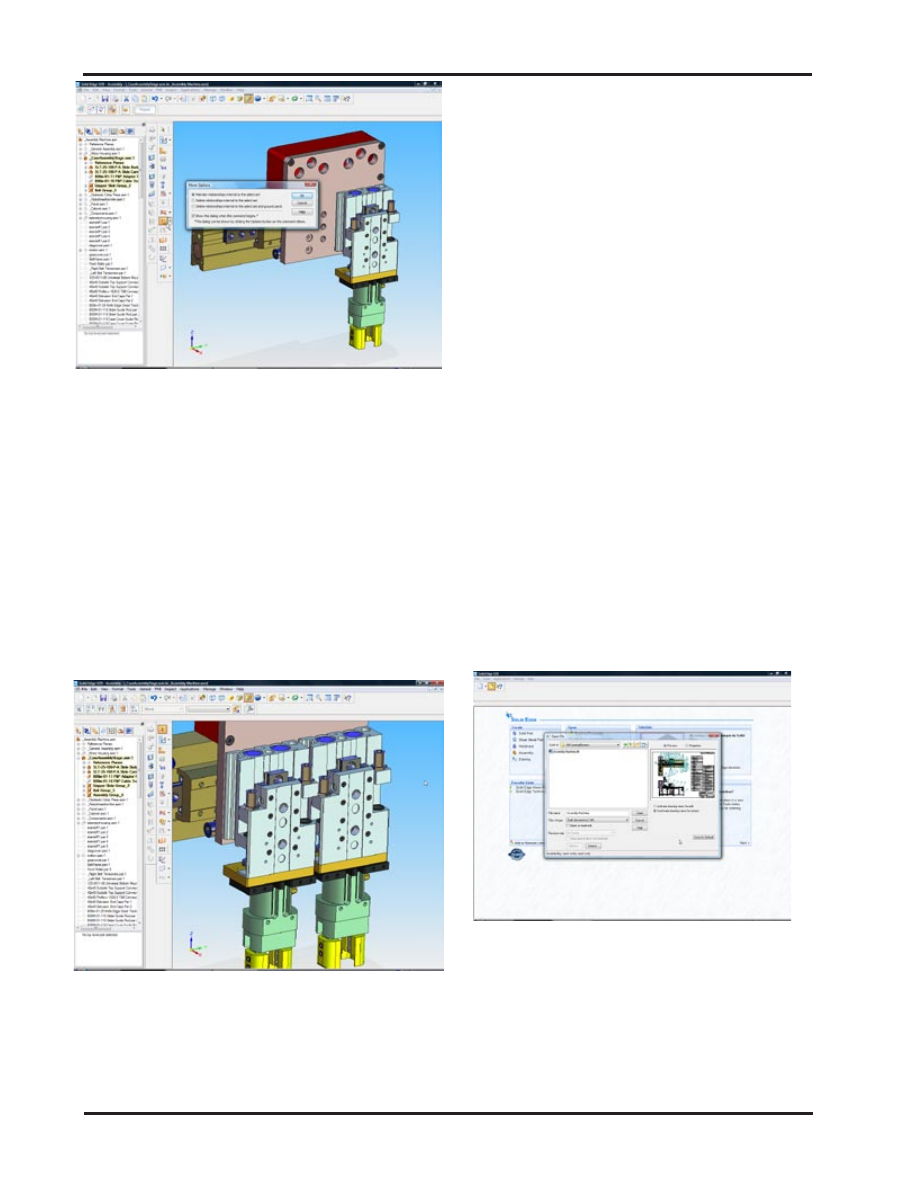
Image 14 (16.png) - This image shows creating
an Assembly Group of the Gripper components.
Assembly grouping enables us to collect a group of
parts under a single node for selection for things
like Activate, Inactivate, Show, Hide, and the new
Move Multiple Parts command. These parts might
not make sense to group into a subassembly (like
all similar bolts), yet we can collect them in a
group for selection. Groups are invisible to the
Draft environment, so the BOM structure is
unaffected. It can also simplify the feature tree
(pathfinder).
Image 15 (17.png) - This shows the result in the
Assembly Pathfinder (in the left window) after
Grouping the components.
Solid Edge
TechniCom.
Solid Edge V20
Page 8
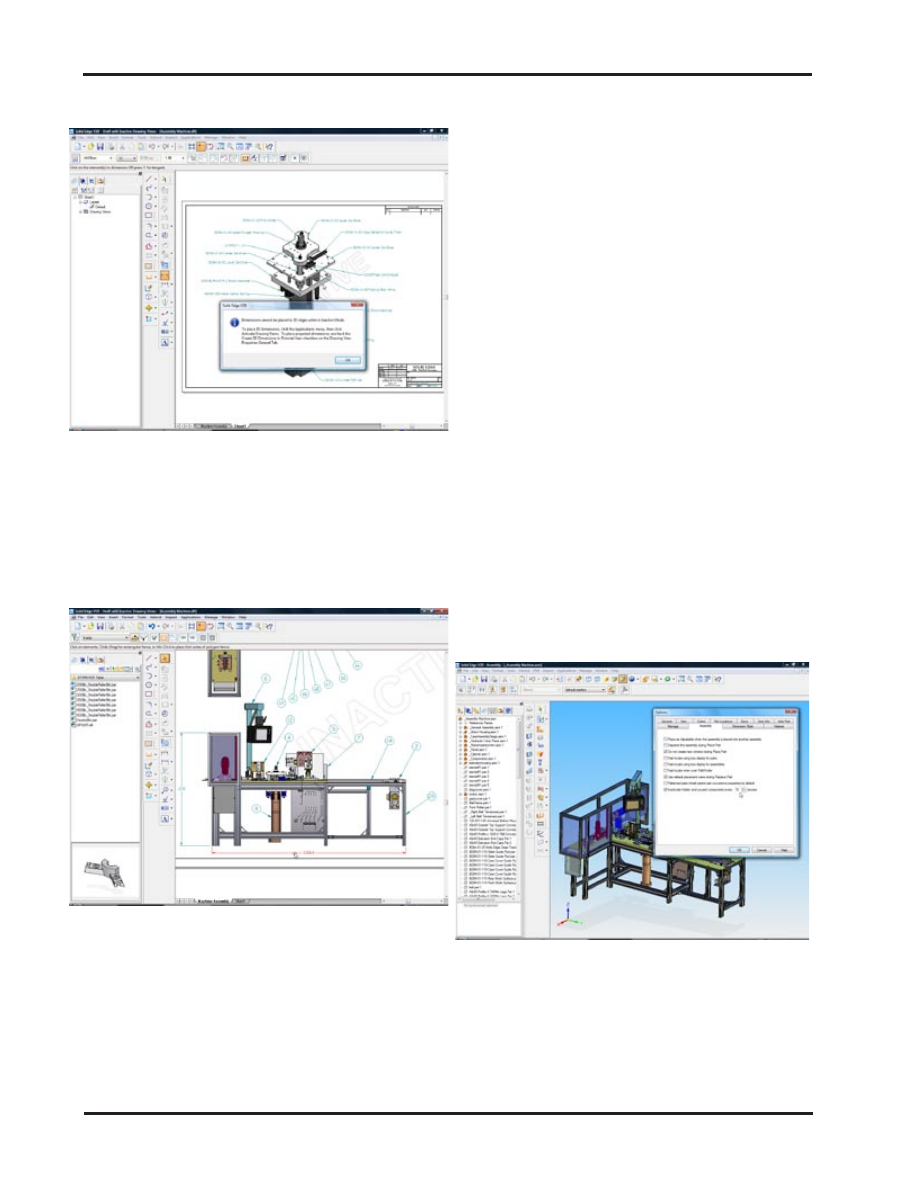
Image 16 (19.png) - For the new Move Multiple
Parts for Machine and Factory Layout, the user is
presented with the option to maintain relationships
internal to the select set. In this case we will use
this command to COPY a Group of components to a
new location. This command can be used for Copy,
Move, Rotate and Array components. Note how the
group simplifies the selection for the move.
The position of the select set can be defined by drag-
ging, Coordinates, Vectors, or by point-to-point selec-
tion. In this case we copy the Group from one center
point to another. The slide components in Assembly
Group_4 can be dragged to simulate motion because
we chose the option to maintain relationships internal
to the select set (as shown in Image 16).
Image 17 (21.png) - This image shows the resulting
Group that is created.
Drawing review mode - uses Solid Edge’s
independent (of the 3D master model)
drawing view to quickly view drawings of
large assemblies
Solid Edge 2D Drafting is architected differently than
most other systems and for some very good reasons.
The system is designed to store an independent copy
of the 2D drawing that was derived from a 3D model.
This important fact allows drawings to be retained
and opened even if the 3D model is not found or
worse, inadvertently deleted.
An additional advantage of this architecture and a
new feature in Solid Edge v20 is the ability to open
2D drawings instantly. Because the 2D geometry is
saved with the drawing, Solid Edge designers were
able to optimize the open times significantly by open-
ing drawings in inactive mode. In our test case, we
measured drawing opening times at approximately
6 seconds. This speed is expected to be about the
same, even for drawings of massive assemblies.
When comparing drawing open times of active versus
in active, it might take 20 minutes to open a drawing
of a multi-thousand part assembly in active mode as
compared to 6 seconds for opening up a drawing in
inactive mode.
Are drawings opened in inactive mode useful for
production work? Very much so. You can add dimen-
sions and annotations, add and remove balloons
associated with the bill of material, view and print.
In essence, users can print, review, annotate, and
dimension.
Image 18 (22.png) - This image shows the new
file open option for a Draft file to open the drawing
Inactive. This means the actual assembly model
does not need to be loaded into memory to open
the Draft file for review, dimensioning, annotating
(including ballooning the assembly components)
and/or printing. The result is very fast opening of a
drawing file regardless of the size of the assembly
detailed on the drawing. Drawings opened with the
Solid Edge
TechniCom.
Solid Edge V20
Page 9
file inactive show an “INACTIVE” watermark on the
drawing. This watermark does NOT print.
Image 19 (24.png) - If the user tries to do
something that requires the user to activate the
drawing, a dialog appears giving instructions for
activating the drawing views. In this case we were
trying to place a dimension on an isometric drawing
view. Drawing views can be easily activated or
inactivated by an option in the Application pull-
down menu.
Image 20 (25.png) - This image shows placing
over-all dimensions on an Inactive drawing.
Massive assemblies can automatically
unload “unused” components
Massive assemblies, as defined by the executives at
Solid Edge, are assemblies of over 100,000 parts.
Solid Edge has the capability to work with assemblies
of much larger size. Pushing the ability to work with
such large assemblies beyond that formerly thought
feasible, resulted in creative thinking on the part of
the Solid Edge software developers. Assemblies
with large parts counts are typically dependent on
the available amount of physical memory. Users can
always add more memory, but now can also set an
option in Solid Edge V20 to automatically unload
“unused” components, which turns active parts into
lightweight parts automatically, and frees precious
system resources. Unused components are those
that have not been used in any way. Should the user
need to perform an operation that requires an active
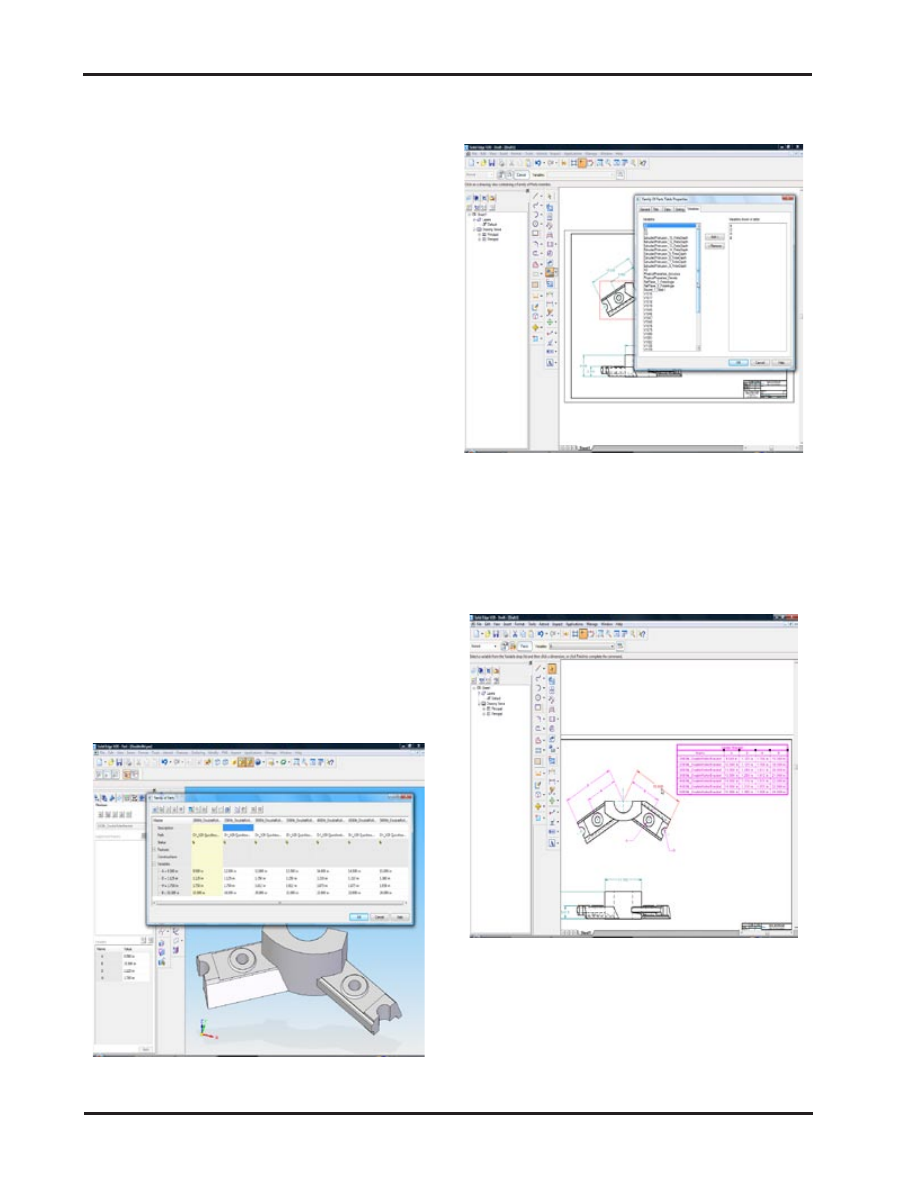
part, users can activate parts on demand. Image 21
shows the user interface of the option and how the
user can set the time duration used by the unloading
process.
Other operational alternatives also impact perfor-
mance when working with massive assembly mod-
eling. Zones improve open times by working within
design envelopes; automatic unloading restores
system resources; component grouping and position-
ing commands simplify massive assembly modeling;
opening drawings of massive assemblies, for detail-
ing, reviewing and printing all expand on Solid Edge’s
unique ability in massive assembly modeling.
Image 21 (26.png) - This image shows the option
to automatically inactivate (make lightweight) any
parts that are hidden or that have not been touched
by the user in a set increment of time.
Solid Edge
TechniCom.
Solid Edge V20
Tabulated drawings introduce a unique
ability to gather and connect master
model data to generate automatic
tabulated drawing views for families of
parts
New for V20, tabulated drawings allow the ready
placement of a family of parts table onto a drawing
as a tabulated drawing. The family of parts table that
exists on the master model facilitates this. To build a
tabulated drawing we create a drawing by selecting
the family of parts master model or any one of the
members from one of the families. Once the views
were generated, the new command “family of parts
table” stepped us through the process. The resulting
table placed on the drawing could be easily modified
in terms of size and location.
A common dimensioning scheme is to overwrite
critical dimension values with the actual variable
name. Typically dimensions would be listed as “A”,
“B”, or any convenient notation, and to facilitate this
workflow, Solid Edge has options allowing selected
dimensions to show the variable name. This tech-
nique is unique in the industry. Any other approach,
such as manually placing the table on the drawing,
would be more work and error-prone. The real value
is that the table is fully associative with the family of
parts model. Changing the family of parts table in the
master model, automatically updates the tabulation
on the drawing.
A very impressive approach to building tabulated
drawings, we particularly liked the ease of con-
necting to the master model variable table, how
the drawing dimensions become the appropriate
variable names, and the associativity with the
model.
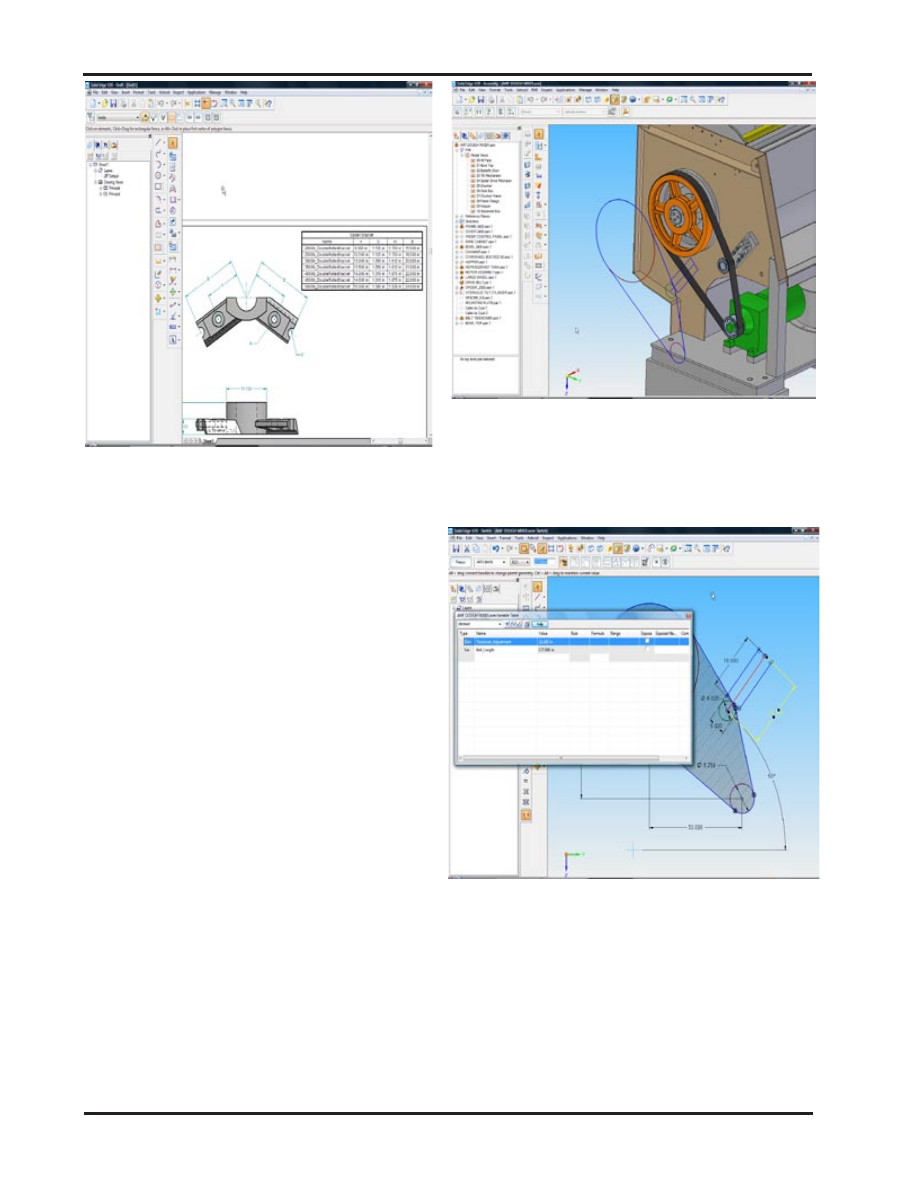
Image 22 (40.png) - This image shows the bracket
which is the master part for a Family of Parts. The
dialog shows the variables that are modified for
each family member. (A, B, D, and H)
Image 23 (42.png) - When the user selects the
command for creating a Family of Parts Table,
they are presented with this dialog to define what
variables will be displayed in the table. By default
it will automatically include all of the variables that
are varying from the variable table of the master
part. (A, B, D, and H).
Image 24 (43.png) - Once the Family of Parts table
has been placed, the user can assign the table
variables to a specified dimension, changing the
fixed dimension to the related variable name shown
in the tabulation. This completes the operation of
creating a tabulated drawing.
Page 10
Solid Edge
TechniCom.
Solid Edge V20
Image 25 (45.png) - Shows the final result of the
Family of Parts Table and the tabulated drawing
view
Goal seek, feature grouping, feature
library helpers, and the variable rule
editor all act to improve the usability
Goal seek allows performing two-dimensional what-if
engineering calculations with a combination of 2D
parametric geometry, mathematical formulas, vari-
ables and part properties. Using a sketch layout,
users can let the system compute any one of the
dimensions while varying (or Goal Seeking) another
parameter. Some common uses are to determine pul-
ley locations with fixed belt lengths, solving for areas
when varying a boundary dimension and a host of
other practical engineering scenarios. While calcula-
tions can be made by hand or done in a spreadsheet,
Solid Edge allows users to graphically layout and
solve complex scenarios. 2D sketch geometry can
be used to drive both the size and position of 3D
components. An example is shown below in Image
26, where a tensioner pulley is located according to a
specific belt length.
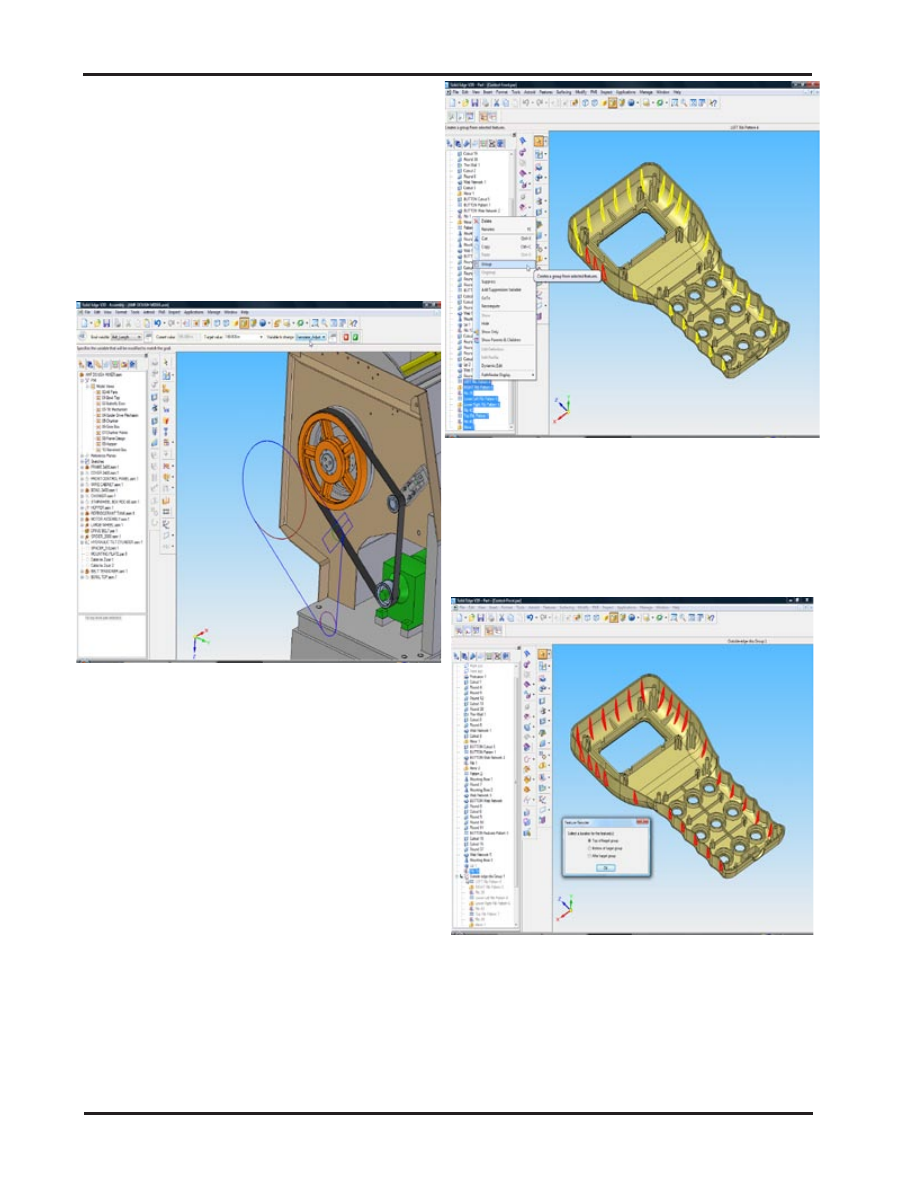
Image 26 (27.png) - This image shows the layout
of the belt and pulleys. The tensioner pulley
location is being driven by the assembly sketch.
This is Solid Edge’s existing hybrid 2D/3D method
for laying out an assembly.
Image 27 (32.png) - The area command in the
sketch view queries the area inside the belt and
adds a perimeter calculation to the Variable table.
In the variable table the Perimeter variable has
been renamed to Belt Length to present a more
easily understood name to the user. The Tensioner
Adjustment variable controls the placement of the
tensioner pulley and thus the belt length.
Page 11
Solid Edge
TechniCom.
Solid Edge V20
The Goal Seek command allows the user to select a
Goal Variable (such as Belt Length) which is a driven
dimension, and set a target value for that variable.
In the example shown here, Solid Edge adjusts a
dimension or variable to reach the target value so
that the belt length achieves a target value of 180.00
inches. To do so, the system seeks the final result by
calculating new values for the Tensioner Adjustment
dimension to achieve the belt length goal of 180.00
inches. After the pulley moves to the correct location,
the belt model adjusts to the change based on the
constraints built into the assembly sketch.
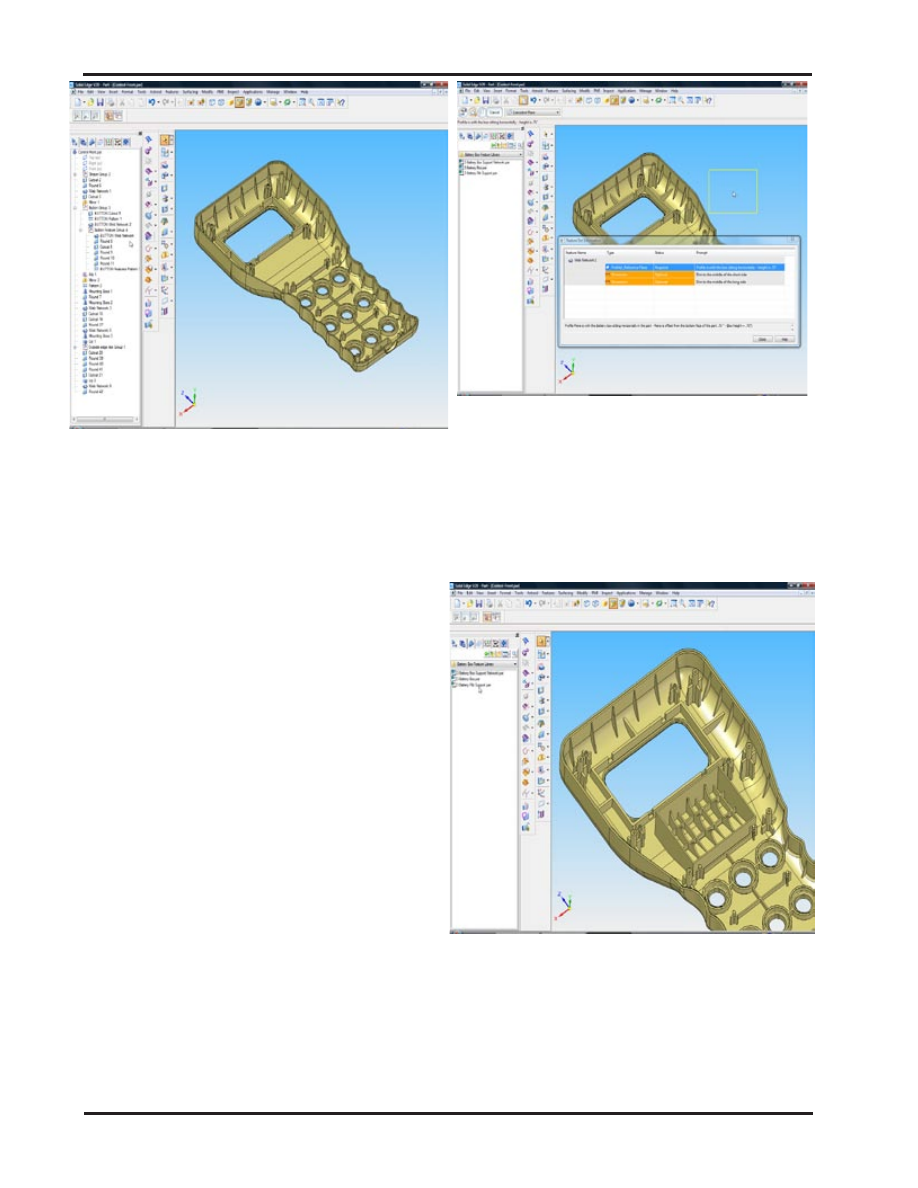
Image 28 (33.png) - Showing the final position of
the tensioner. Note the difference between this
image and Image 26.
Feature grouping allows grouping part and sheetmet-
al features together as a way to organize and simplify
a model history tree. In the history tree, each group
can be contracted into its name only (similar to a
subassembly) or expanded into its elements. Group-
ing multiple features into a feature group allows the
group to act as a single detail to speed up other com-
mands that can use multiple features as inputs. For
example, users can create a group of features and
pattern, mirror, or create a feature library from the
group. During group creation, the system does some
validation checking to assure the grouped features
maintain their child/parent rules. In the images below
(Image 29 - Image 33), note that the many ribs and
button holes are ideal candidates for feature grouping
and for creating useful feature libraries. Groups can
also be deleted, suppressed, shown or hidden.
Image 29 (34.png) - This image shows Feature
Grouping in Version 20. This enables the user to
collect similar features under a single node in the
feature tree. This can be used for a single selection
for feature reordering, feature suppression, or to
simply shorten the feature tree for clarification
purposes.
Image 30 (35.png) - In this example we are
reordering the Rib group up the feature tree. When
reordering the user must decide where the feature
is to be placed, keeping in mind the history of the
features.
Page 12
Solid Edge
TechniCom.
Solid Edge V20
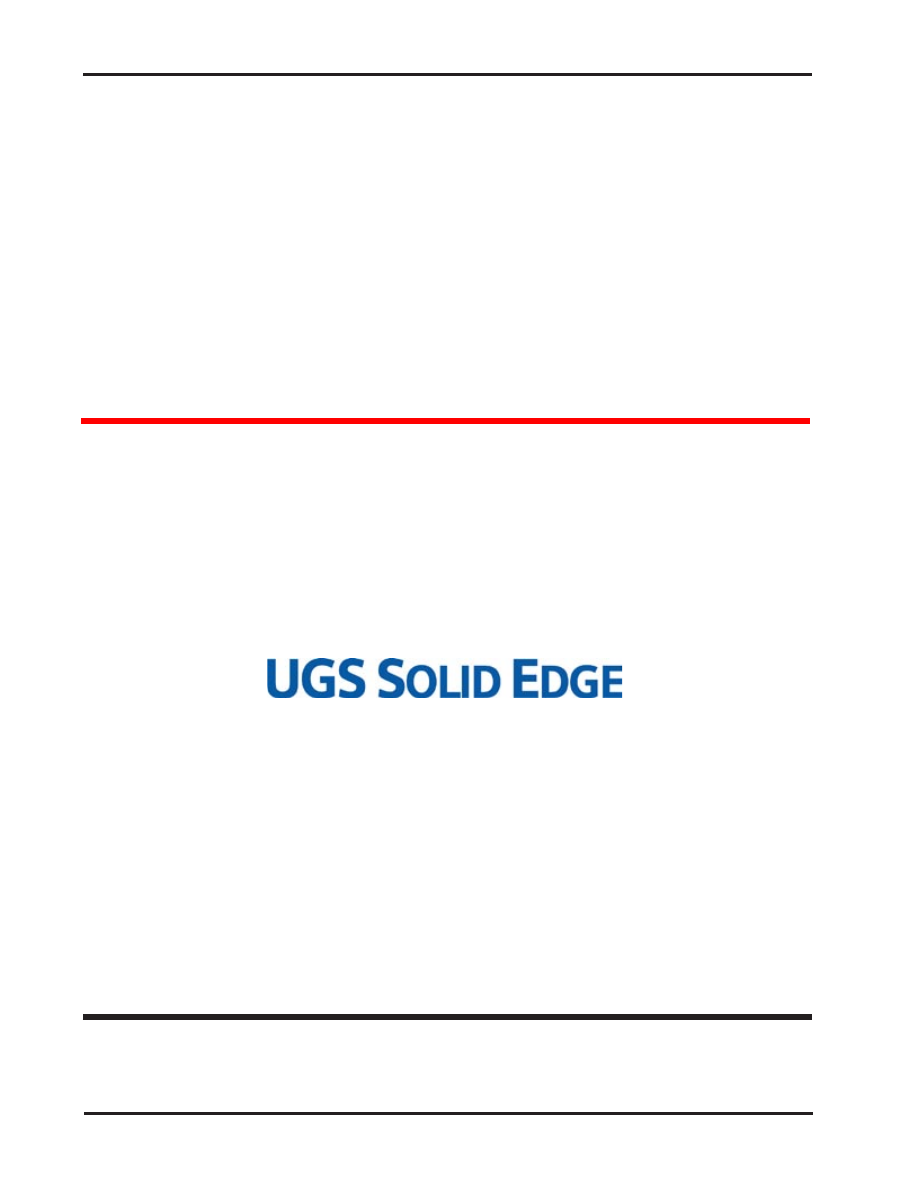
Image 31 (36.png) - This image shows nested
Feature Groups
Feature library helpers guide a user on how to place
a feature from the Feature Library, thus improving
the ability to understand what references or con-
straints a library feature needs when being placed.
During feature library creation, the author can define
the prompts used to guide users as to how to use
the library feature. After a library feature is created,
it’s easy to forget how to use it--especially complex
libraries, but the new feature helper removes the bur-
den of remembering how to place a library feature.
Images 32 through 34 clearly depict this sequence.
Such a simple enhancement should make feature
libraries many times more useful.
A new variable rule editor allows the user to set either
a range or a discrete list of valid dimensional param-
eters. Often models that are to undergo changes
have limits on hole positions, overall sizes, or unique
values. By adding ranges to the variable table Solid
Edge now limits the size a user could make a part.
Attempting to enter values outside the range prompts
a message that lists the valid range. Upon dismiss-
ing the message, the part went back to the last valid
size. Discrete values worked in a similar manner.
After establishing a list of values (10mm, 15mm, and
20mm) only those values could be used for dimen-
sional edits. To help users choose only those values,
the list was presented on the actual dimensional
value key-in field.
Image 32 (37.png) - Feature Library Helpers can
now guide a user on how to place a Feature Library.
Descriptions can be added for each placement
requirement including any dimensions used to
precisely locate the features. Note the helpful
descriptions used in the prompt, as added by the
author of the feature library item.
Image 34 (39.png) - This image shows the result
after placing the three features from the Feature
Library, greatly aided by the feature library help
text.
Page 13
Solid Edge
TechniCom.
Solid Edge V20
Conclusions
Our conclusions are in the Executive Summary at the beginning of this paper.
About this paper
This paper summarizes the most important new functions of the Solid Edge Version 20 and why they are im-
portant for prospective users. The impressions and conclusions are solely those of the author, an independent
analyst and consultant in the MCAD industry.
During the process of our review we collected many images of the software’s new functions. We have placed
those, most of which are not included in this paper because of brevity, on our web site along with explana-
tions. You can access the website at http://www.technicom.com/SEV20 .
About the author
Raymond Kurland is president of TechniCom and its principal consultant and editor. His firm specializes in
analyzing MCAD and PLM systems and has been involved in reviewing and comparing such software since
1987. Ray frequently consults with both vendors and users. He can be reached at rayk@technicom.com.
Page 14
Solid Edge is a registered trademark of UGS Corp.
Solid Edge contact information:
www.solidedge.com
Americas 800-807-2200
Europe 44 (0) 1202 243455
Asia-Pacific 852 2230 3333
TechniCom Group LLC - 179-9 Rte 46W #175 - Rockaway, NJ 07866 USA
(973) 470 9110 - http://www.technicom.com
V20-R6
Wyszukiwarka
Podobne podstrony:
Solid Edge Generator kół zębatych
podrecznik solid edge ZSFYYJQ3TDTWUH7O7J6Q4XO5UFFHOZX5H6YRL2Q
Pomiar gwintow , autoCAD, Solid edge
opis se10, Solid Edge, Solid Edge (materiały do nauki)
Solid Edge Generator kół zębatych
Solid Edge Komputerowe wspomaganie projektowania soed15
instrukcja instalacji solid edge standard partsx 429
Solid Edge 17 Podstawy 3
Solid Edge Sheet Metal
LICENCJA SOLID EDGE ST2
Basic Solid Edge v19 Tutorial
Solid Edge 2D
Solid Edge Komputerowe wspomaganie projektowania
Solid Edge
Solid Edge 17 Podstawy
Solid Edge ST5 Nowosci PL
Solid Edge Komputerowe wspomaganie projektowania soed15
Solid Edge 17 Podstawy 2
solid edge komputerowe wspomaganie projektowania soed15
więcej podobnych podstron