86
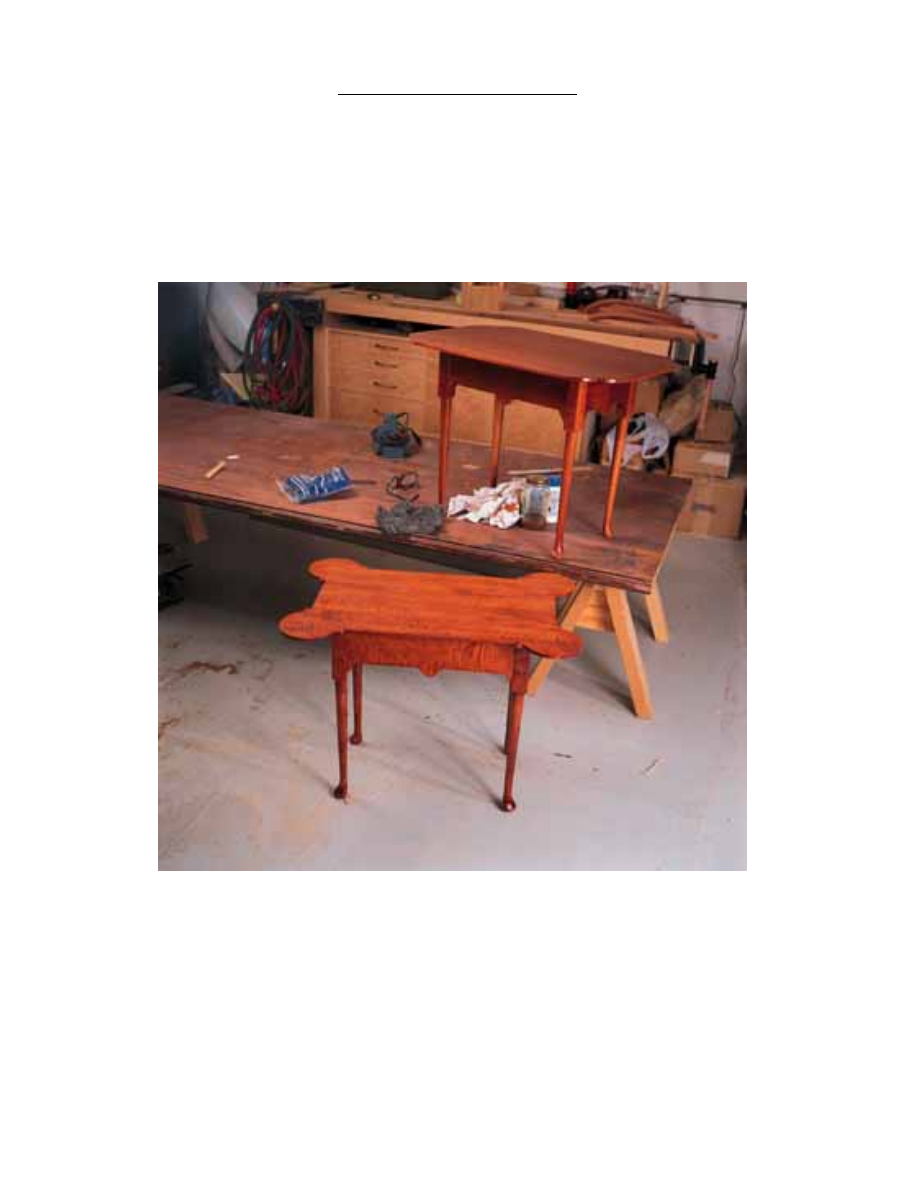
QUEEN ANN SIDE TABLES
Copyright 2004 Martian Auctions
427
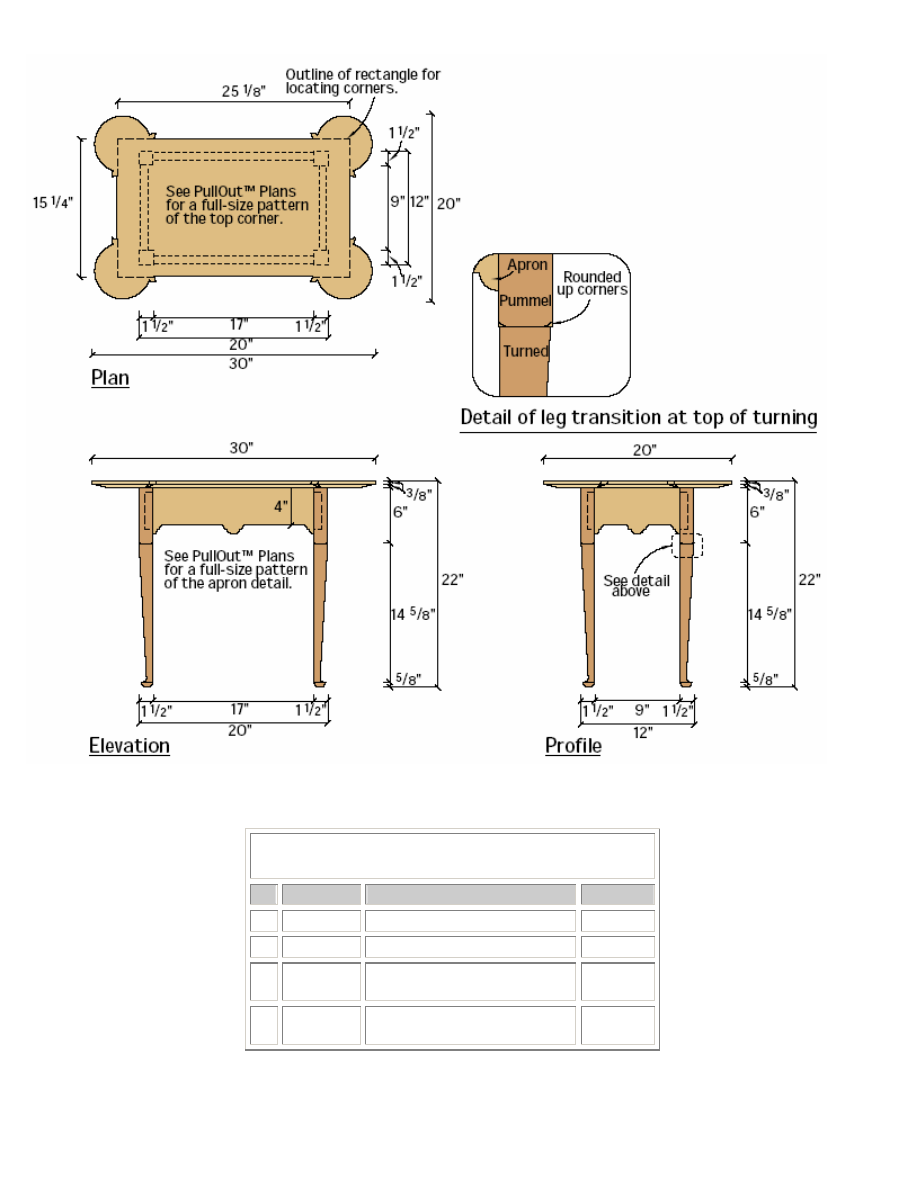
Schedule of Materials: Queen Anne Side
Tables
No. Item
Dimensions
Material
1
Top
3/4" x 20" x 30"
Maple
4
Legs
1-1/2" x 1-1/2" x 21-1/4"
Maple
2
Long
Aprons
3/4" x 5" x 18-3/4"
Maple
2
Short
Aprons
3/4" x 5" x 10-3/4"
Maple
Copyright 2004 Martian Auctions
428
Making Aprons • These tables were made with simple mortise-and-tenon
construction. Start by cutting the apron parts according to the Schedule of
Materials. Next cut the 3/8" x 4"-wide x 7/8"-long tenons on the ends of the
aprons.
Making Pockets • The last thing to do on the aprons is to drill the pocket
holes for attaching the base to the top. Do this on a drill press with a 1-1/4"
Forstner bit. Use a shop-built jig to hold the aprons in place for drilling.
Leg Blanks • Although the legs look complicated, they are not. The secret is
an offset turning technique. First cut the blanks 1/8" longer than in the
schedule. This gives you some room to work with when turning the pad on the
end of the foot.
Use a straight edge to make an "X" from corner to corner on both ends of the
blank. This will aid in finding the center as well as marking the offset. Now, on
the bottom of the legs, determine which corner will face out. On the bottom of
each leg, measure 1/2" from the center to the corner opposite the outside
corner. This is the offset for the leg. Remember, the farther away from the
center you go, the thinner the ankle (the area just above the pad) will be.
Going any farther than 1/2" is dangerously close to having a leg pop off your
lathe.
Mark a line completely around the blank 6" down from the top of the blank. To
save time roughing the blank, lay out a 1-1/2" diameter circle on the bottom of
the blank. Set your jointer to 45 degrees. Using the circle as a guide, lower
the infeed table to the point where you can take the corner off, leaving about
1/32" to the circle. Go slow and joint to within 1/8" of the line where the turning
starts. Now mount the blank in the lathe.
After mounting a blank between centers with the top towards the drive center,
cut a small kerf at the line where the turning stops. Don't cut too far or you
won't be able to remove the kerf. With a roughing gouge and skew chisel, turn
a cylindrical blank from the saw kerf to the foot. At this point use a skew chisel
round the corners of the pummel, the square part of the leg, where it meets
the turned portion. Repeat on all the legs and you're ready to do the offset
turning.
Turning the Offset • Before resetting the legs, measure up from the bottom
1/8" and from that mark another 5/8". Turn the lathe on and follow the marks
around with a pencil. Take a parting tool and set it on its side. Cut a small
incision at the 5/8" mark . This creates a shadow line from which to begin the
offset turning. Set the lathe for its lowest speed and reset the tailstock so the
leg center is mounted in the offset mark. This might look like an awkward
setup but as you remove material the leg will turn with more stability. Finish
the straight part of the leg with a skew chisel and the ankle with a roughing
gouge. Finally, turn the pad foot as shown in photo 5. Now is the time to sand
the legs. Start with 120 grit sandpaper and finish with 150 grit.
Now cut the 3/8" x 7/8" x 4" mortises in the legs, 5/16" in from the edge and
1/2" down from the top. Be careful when marking the locations of your
mortises to make sure the turned feet face out. You'll notice that the mortises
meet slightly at their bottoms. Simply plane away a little of the tenon where
they meet. Now glue the base together. Start by gluing the short ends
together and then attaching them to the long aprons.
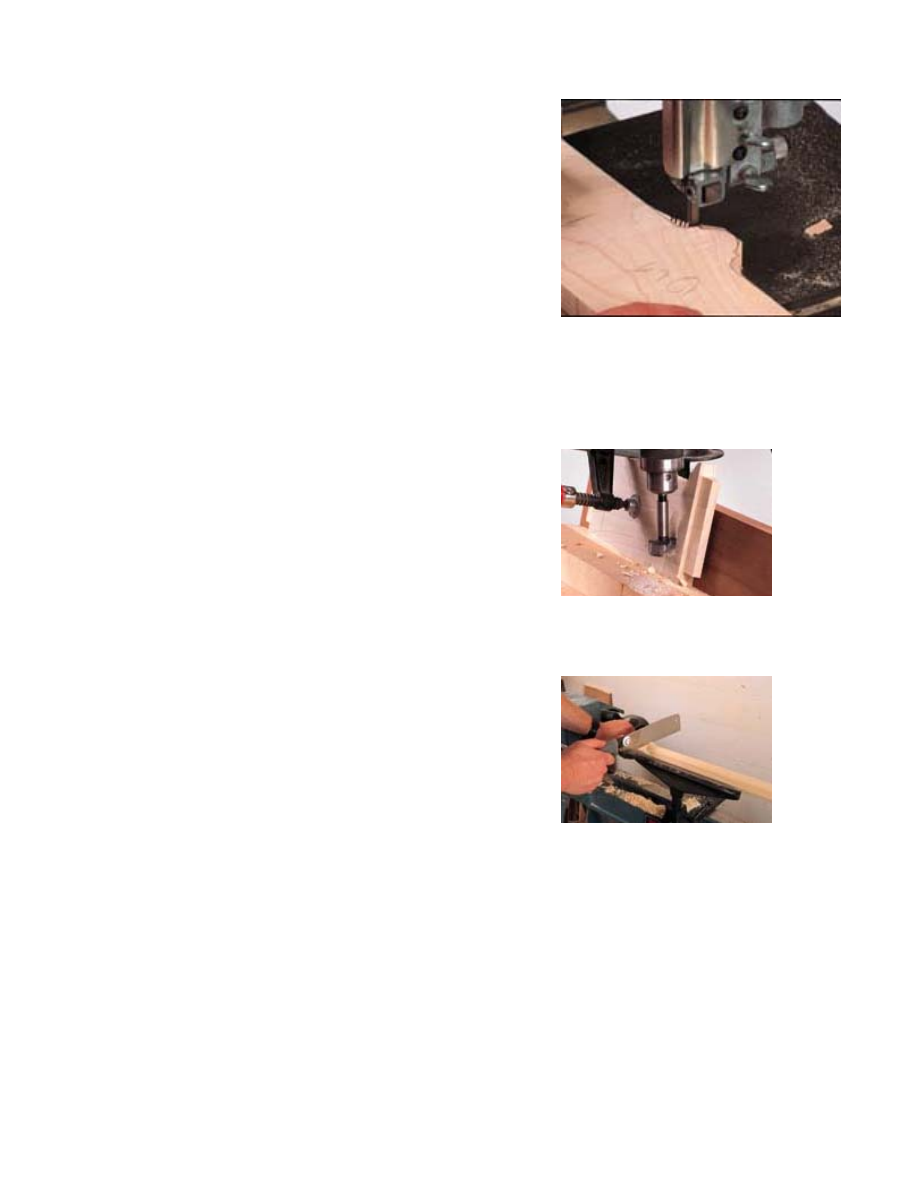
SCROLLING THE APRONS • Lay out the scrollwork on
the bottom of the aprons using the patterns supplied in
the PDF from the "Making Pockets" step. Glue the
patterns to 1/4" plywood, cut them out, trace the pattern
on your aprons and cut them out on a band saw. Make
relief cuts on the inside radii so you can scroll them out
easier.
DRILL POCKET HOLES • Make sure that the bottom of
the pocket is at least 7/8" from the top edge of the
apron to prevent the screws from poking through.
CUTTING CORNERS • First mount a blank between
centers with the top towards the drive center. Then use
a saw to cut a small kerf on each corner at the line 6"
from the top. Don't cut too far or you won't be able to
remove the kerf. With a roughing gouge and skew
chisel, turn a cylindrical blank from the saw kerf to the
foot. At this point use a skew chisel to cut a small
rounding up on the square corners of the top (see
diagram). Repeat on all the legs and you're ready to do
the offset turning.
Copyright 2004 Martian Auctions
429
After the glue is dry, finish sand the entire base, then lay out the holes for the
cherry pegs. Any dark hardwood will do for the pegs, but cherry sands smooth
and the end grain stains a dark color. Drill a 1/4" hole 1" deep. Follow suit with
3/16" and 1/8" bits, creating a tapered hole. After shaping 16 square pegs
(tapered on four sides to a point), tap one in until you feel and hear it seat.
The sound of the hammer hitting the peg makes a distinctly different sound
when it seats. No glue is required for this as you are running a peg completely
through the leg. It won't be coming out anytime soon. Cut the pegs, leaving
1/32" showing and sand until it is a rounded-over bump. Drill 1/4" holes into
the pockets from the top of the base for attaching the top.
Make and Attach the Top • The top is the easiest part, but it can make or
break the whole project. Wood selection is key. One hundred years ago, you
could get extremely wide, highly figured curly maple at a low price. Amazingly
most old porringers were one- or two-board tops. That's clear-figured wood
10- to 20-inches wide! Regrettably, those days are gone, and you will have to
make do with the painfully high-priced, narrow lumber you get today.
Poplar is easy to get in a decent width and length, but I had to try the Amish
sawmills in eastern Pennsylvania to find a retail source for decent curly maple
(see the Schedule of Materials for one such mill). I managed to find decent
4/4 that's about 7" wide and a nice piece of 8/4 for the legs (I wasn't sure how
thick the legs would be when I started so you could probably get away with
6/4 for leg stock).
The tops for both types of tables are the same size. They just require a
different edge pattern. For the porringer top, lay out a 15-1/4" x 25-1/8"
rectangle in the center of the top. Make a pattern for the top with 1/4" plywood
as you did with the aprons. When you lay the inside corner of the pattern over
the outside corner of the drawn rectangle, the outside of the radius should just
touch the edge of the top. Trace the pattern on all four corners and jigsaw the
top out.
For the "clover" shaped top, things are easier. Trace the double radius on all
four corners. When you are done cutting the shape of the top out, chamfer the
edges.
Chamfering the edges lightens the overall look of the table, and the chisel
work underneath has a very sculptural feel. Before chamfering, use a marking
gauge to mark a line that is half the thickness of the top on the entire outside
edge of the top. Next, use an adjustable square to mark a line around the
underside of the top. For the porringer the measurement is 1-1/2" and for the
clover use a 2-1/4" line.
I chamfered the edges with a power planer. It's a tool used mostly by
carpenters to remove material from doors when fitting and installing them.
And in that role, this tool is unequalled. Finish sand the top to 150 grit.
The last assembly chore is to screw the top to the base. Begin by laying the
top upside down on a blanket. Center the base on the top and screw it down
with #10 x 1-1/2" wood screws.
In finishing the clover table, I sprayed on a custom-mixed aniline dye followed
by three coats of clear finish. This turned the poplar to a mahogany-like color.
The porringer was a different story. To begin with, I hand scraped the top with
a Stanley #80 cabinet scraper. With the lack of abrasive sandpaper 250 years
ago, this is how the old tables were made ready to finish. Scraping with a
properly prepared scraper blade will show up as rows of slight depressions
(1/32" deep) with ridges about 2-1/2" apart. I stained the wood with aniline
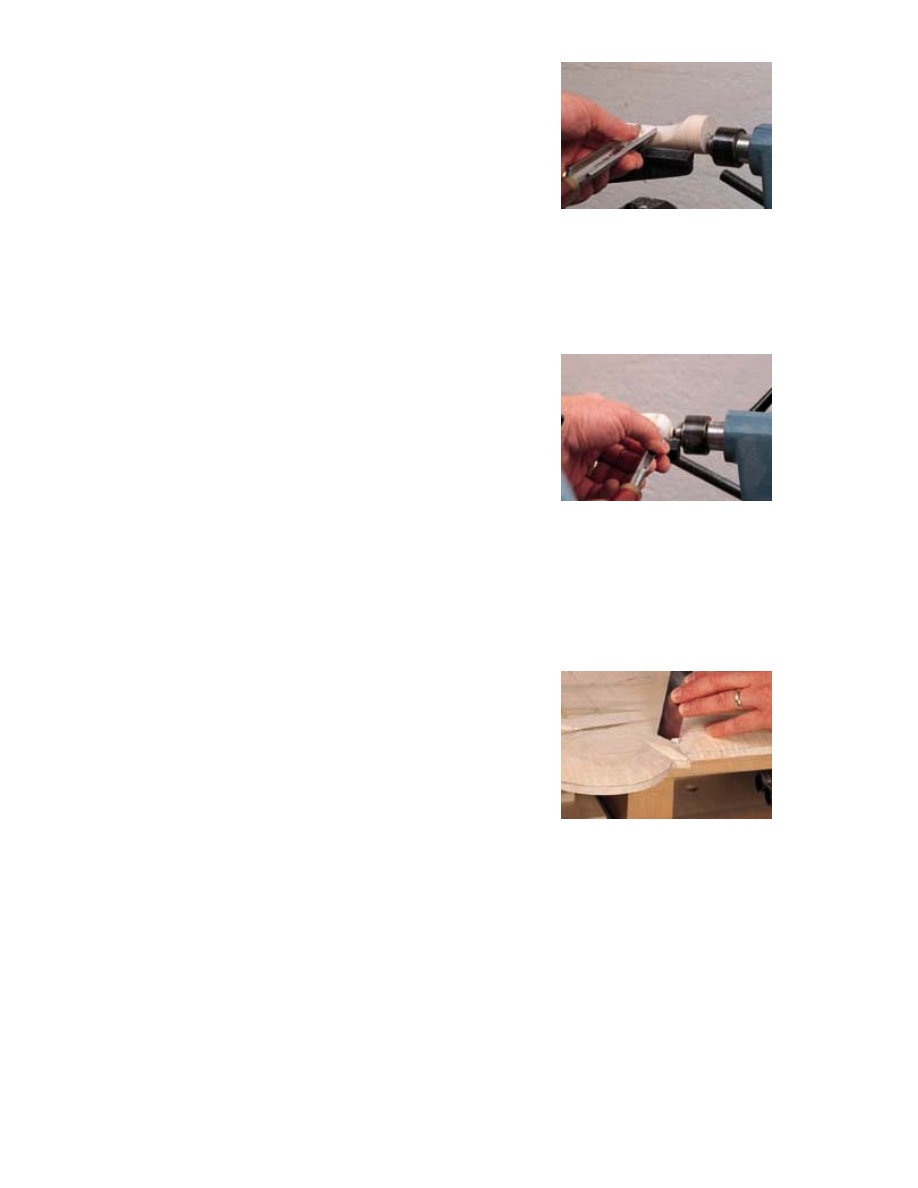
A WELL-TURNED ANKLE • When you turn the lathe
on, the leg's spinning creates a ghost image of what the
finished leg will look like. Remove that "ghost" material
with a roughing gouge. Stop at the second line that you
drew earlier. Lay the gouge on its left side at the second
line and slowly rotate the gouge clockwise as you go to
the left. Go very slowly until you get the hang of how the
wood reacts to the gouge.
TURNING THE PAD • The last thing to do on the legs is
turning the pad on the foot. You do this last, as
removing the foot material also removes the offset
center. Reset the bottom of the leg into the original
center and using a parting tool, turn away this "extra"
length until it's about 3/8" diameter. This gives you
some extra distance from the live center. Then using a
small spindle gouge, turn the pad of the foot till it meets
the 3/8" diameter. Sand the pad the same as the leg
and you're done turning.
SCULPTING UNDERNEATH • When you've done all
you can with a power plane, use chisels and planes to
remove material down to the marked line.
How thick is it anyway?
When lumber yards count up the board
footage that you buy, it's referred to as a
tally. The "tallyman" carries a special
notebook and a strange floppy stick
called a "tallystick" (go figure!) with odd
measurements on it. The lumber you buy
is sorted by how many quarters of an inch
thick it is. This system starts at 4/4 for 1"
thickness on up to 16/4 for 4" lumber
Copyright 2004 Martian Auctions
430

dye and then applied one coat of boiled linseed oil and finished the table with
four coats of dark shellac. This imparts a nice honey brown color to the curly
maple and is easy to repair. Now where did I put that drink?
Copyright 2004 Martian Auctions
431
Wyszukiwarka
Podobne podstrony:
Table Queen Anne Living Room Tables (Coffee, End)
3 Data Plotting Using Tables to Post Process Results
56 Queen we are the champions
Boot Hill Loot Tables
ALAN42 MULTI component side
Amon Amarth With Oden on Our Side
Tables Vulvar recurrences
Diaspora Tables
6 2 2 8 Lab Viewing Host Routing Tables
Kim jest drag queen
Fitzgerald This Side of Paradise
Men?nned from?coming Queen students 1
Bowstring Tables
preliminary side
QUEEN TO HAVE LUNCH WITH INSANE CRIMINAL
dancing queen
Nesting Tables
Fire and Sword Combat Tables
więcej podobnych podstron