123
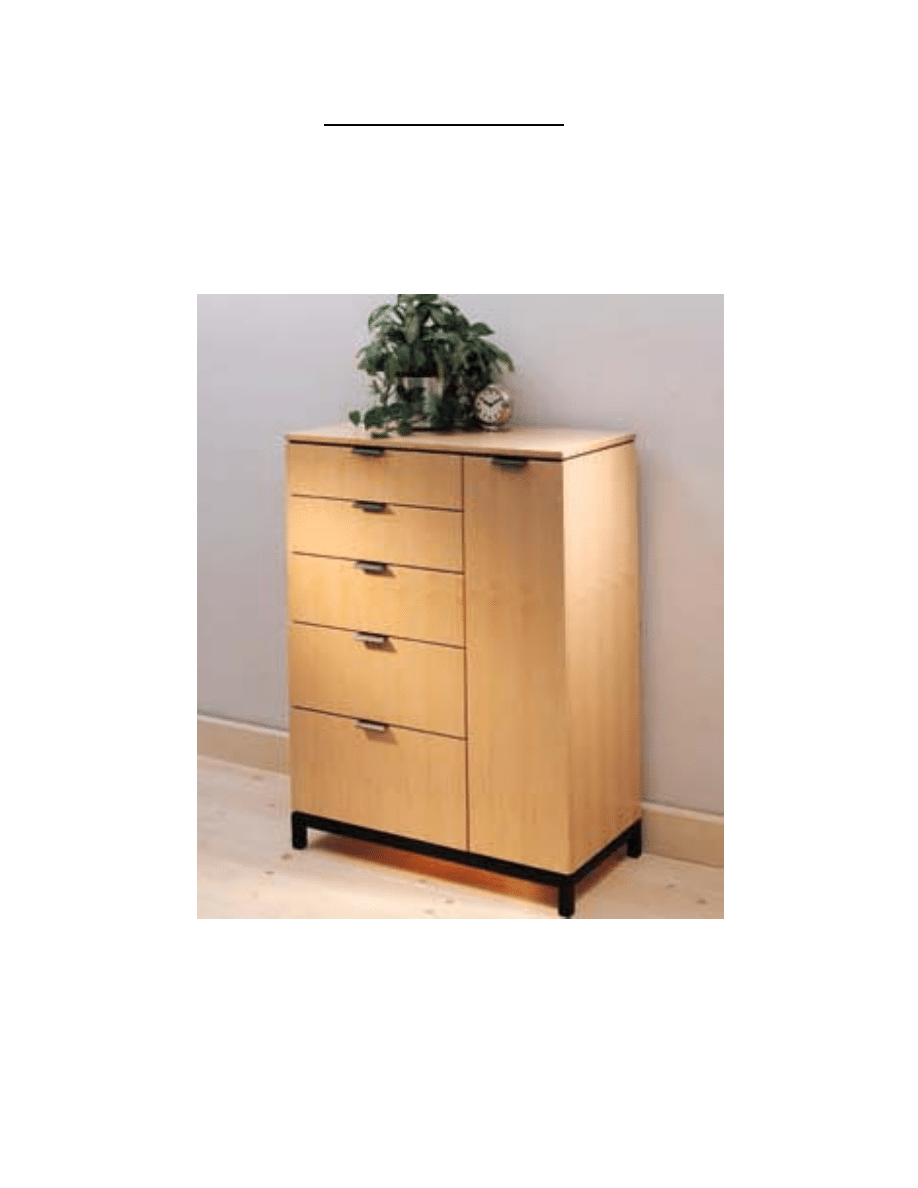
WARDROBE
Copyright 2004 Martian Auctions
552
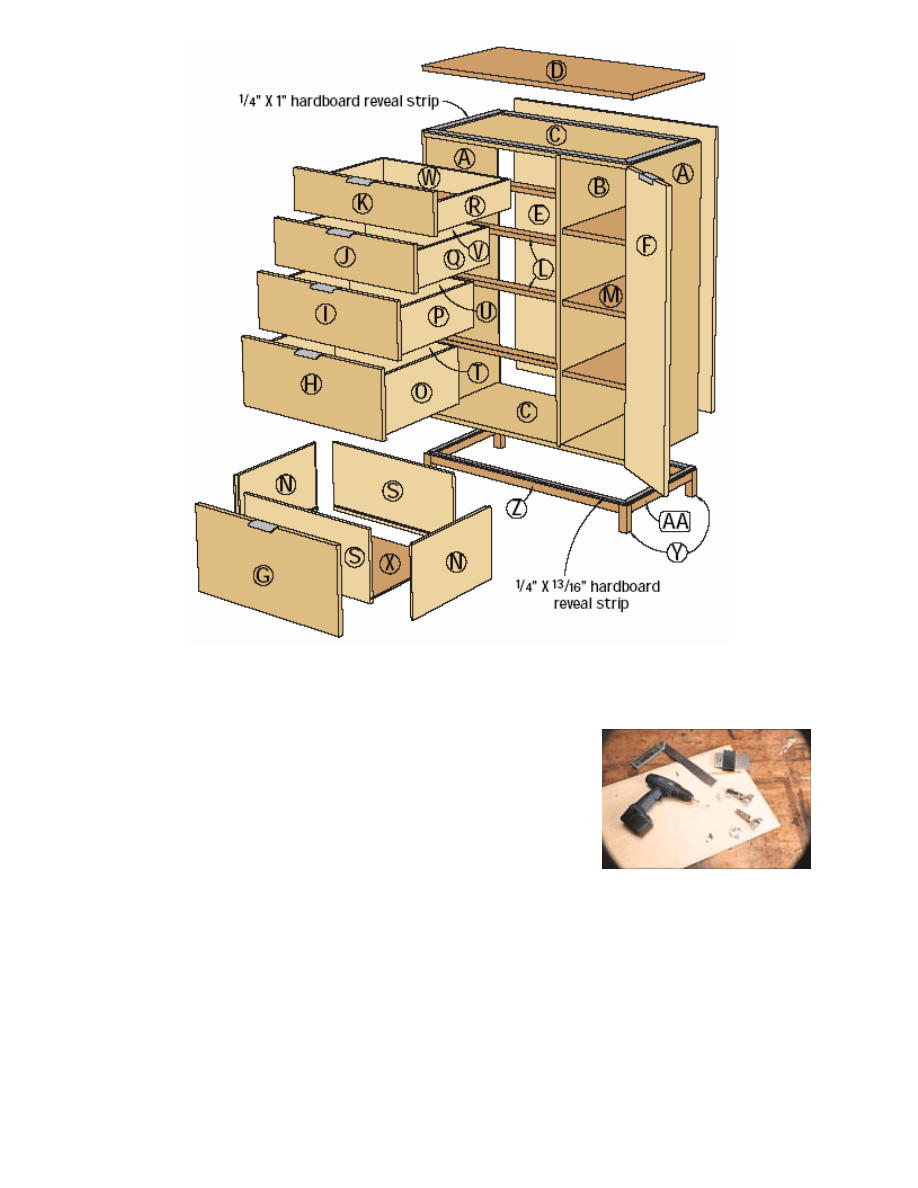
Construction begins by cutting the case pieces to size. Next, cut 3/8" x 3/4" rabbets
on the back, top and bottom of both side pieces to accept the back, top and bottom.
Also rabbet the top and bottom pieces on the back edge to hold the back. Now cut a
3/8"-deep x 3/4"-wide dado in the top and bottom pieces to leave an 11" opening
between the right side and the vertical partition.
Before rushing to assemble the case, there are a few things to do first. Cut your four
drawer dividers to size and apply veneer tape to the front edge of each. Mark the
location of the drawer dividers and decide whether you want to use biscuits or
dowels to hold the drawer dividers in place between the left side and the partition.
The drawer openings are graduated in size and should be as follows from top to
bottom: 5"; 5-7/8"; 7-1/4"; 9" and 11-1/8".
Because the door section of the wardrobe is only 11" wide, it's a good idea to pre-
drill the right side and partition for shelf pins and also for the European-style hinge
plates before assembly. One more pre-assembly task: sand the inside of the shelf
section and the part of the back that's visible. You'll be glad you did.
Now assemble the case using glue and by driving nails through the top and bottom
pieces into the sides and partition. When in place, the drawer dividers should be
proud of the front edge of the case by the thickness of the veneer tape. Lastly, nail
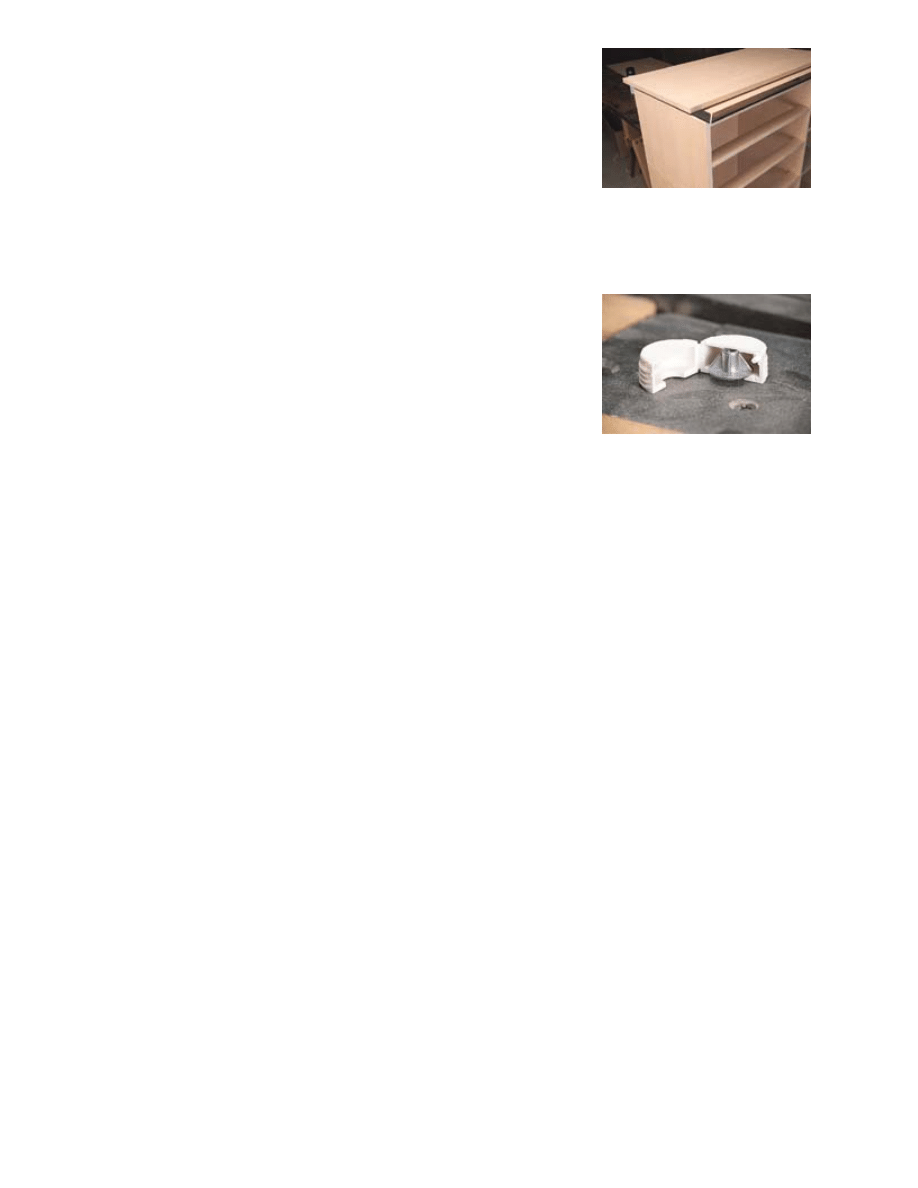
SHELF PIN SETUP • Before assembly it's
best to mark and drill the locations for the
shelf pins, and to lay out and mount the
base plates for the hinges. As always, a
little masking tape on the drill bit makes a
handy depth stop.
Copyright 2004 Martian Auctions
553
the back in place into the rabbets. This will square up the case.
With the case assembled, go nab your spouse's iron. Apply veneer tape to the front
edges of the case, and to the top of the case on the front edge and sides to hide the
rabbet joint. The 7/8"-wide tape is plenty because the reveal will only show 1/4" of
the top of the case.
The false top is simply a piece of plywood edged with veneer tape. Check the size
against the finished size of the assembled case to make sure the false top will flush
up with the sides, front and back. Remember that the false top extends over the
door and drawers and should flush up to them. The 1/4" reveal between the top and
case is created using strips of 1/4" x 1" hardboard, with one edge spray painted
black. Fit the strips to the underside of the top, allowing the 1/4" setback on the front
and sides. Add a fourth strip flush to the rear of the top to level it out. With the strips
fit, use black spray enamel paint to coat the visible edge and the underside of the
front piece, then attach the reveal strips to the underside of the top.
Now attach the false top to the case. Drill clearance holes through the case and
attach the false top using screws up through the inside of the case, again, flushing
the back edges of the case and the false top.
The base is a simple frame held together by biscuits, dowels or mortise-and-tenon
joinery, with the legs attached between the stretchers at the corners. With the base
glued and assembled, add 1/4" x 13/16" hardboard strips to the top edge as you did
to the underside of the top. Next, finish the base and strip with black paint to add
visual "weight" at the base of the chest. When dry, attach the base to the cabinet
using metal chair braces at the corners.
Now build the drawers using simple 1/4" x 1/2" rabbet joints on the sides, with the
fronts and backs captured between the sides. The bottoms slide into 1/4" x 1/4"
grooves in the sides and front that are cut 1/2" up from the bottoms of the drawer
pieces. The back is cut 1/2" shorter than the front to allow the bottoms to slide into
place. Use the bottoms to hold the drawers square while the glue dries, then
remove them to make finishing the drawers easier. I set up a 1/4" radius router bit in
a router table and ran the top edges of the drawer parts (both sides) to make them
more finger-friendly. Don't round over the front edge where the drawer face will
attach. With the drawers assembled, attach the drawer slides to the cabinet and to
the drawer sides and check for smooth operation.
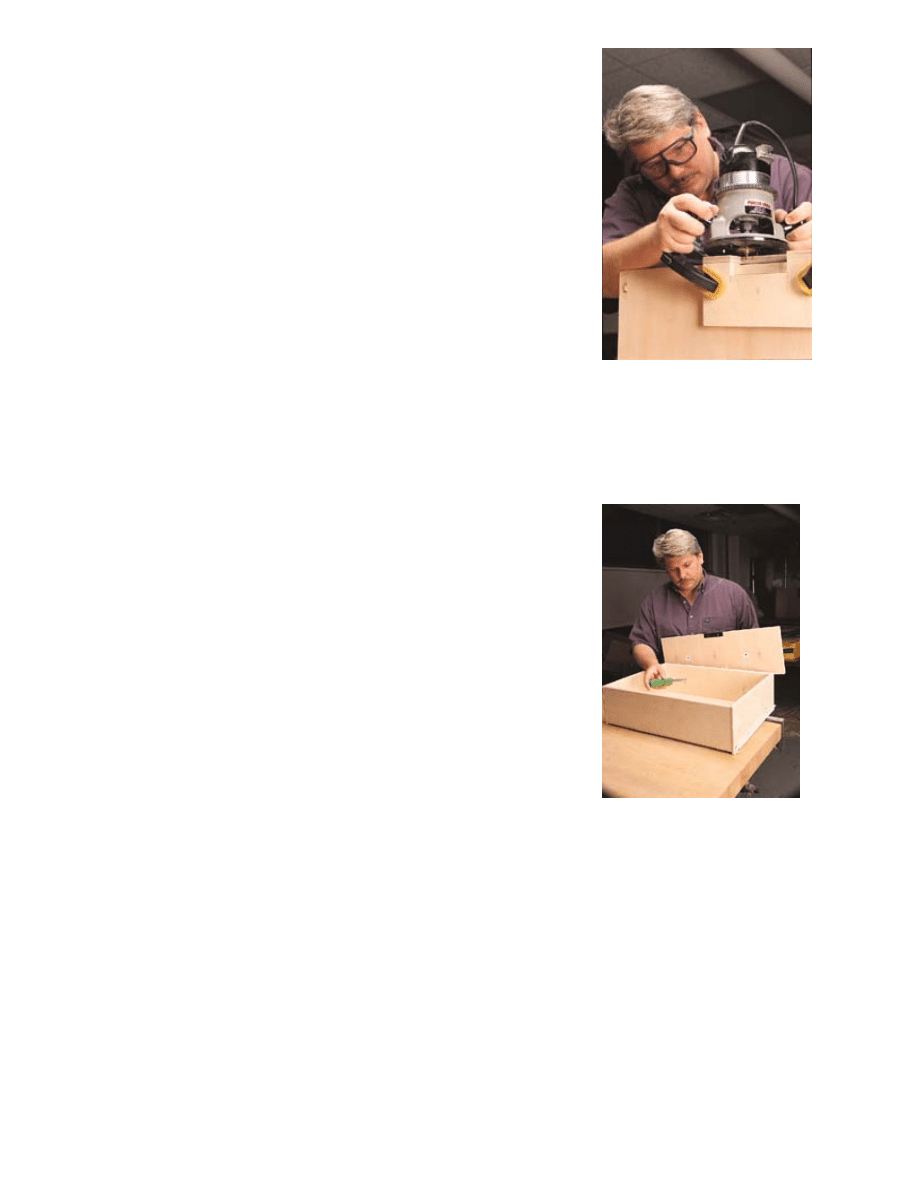
Cover the edges of the drawer faces and the door with veneer tape. Then rout the a
shallow mortise centered in the top edge of each for the pulls. Use a router with a
straight bit. See the photo above for the jig I built for this.
I want to mention that the screws provided with the pulls are round-head screws. In
an effort to keep things flush and simple I used a countersink on the clearance
holes in the pulls and then used flat-head screws to attach the pulls. Now attach the
drawer faces to the drawers using the hardware shown in the photo at right. This
allows for easy adjustment.
Now drill the door to accept the European hinges and mount them to the cabinet. If
you haven't used concealed hinges before, take a few minutes to play with the
adjustment to get a feel for the versatility of these hinges.
Lastly, cut a groove the length of both sides of the shelves and then add veneer
tape to the front edge. The shelf pins shown slip into the slots in the shelves and
provide invisible support. It's your choice whether to make the shelf locations
adjustable by adding more shelf pin holes. I preferred to use set locations to keep
the interior clean and unmarred.
The case is now ready to finish. Remove the hardware and finish sand. Use a clear
HARDBOARD REVEAL • The hardboard
reveal strip is painted black, then mitered
to extend beyond the front of the cabinet
itself. The reveal strip is recessed 1/4" in
from the edges of the top.
LEARN SOMETHING FROM THE
EUROPEANS• European hardware is a
broad term covering a number of hinges
and shelving systems. Best known for its
use in commercial furniture, I chose to use
it in this piece for a number of reasons.
The door hinges allow adjustment of the
door in three dimensions after the door is
attached, and it is invisible from the
exterior of the piece, keeping the lines
clean and simple. The hinges do require a
35mm Forstner bit ($14.99) to insert the
hinges in the side of the cabinet, and a jig
designed just for installing ³cup² hinges is
available from Rockler (800-279-4441) for
$29.99, (item #10260).
Contemporary decorative hardware can be
tricky to find, so I was pleased to find
Spokane Hardware on the Internet.
Offering a large and varied selection of
contemporary, fanciful and traditional
hardware for sale on the web, this saves a
lot of time running from store to store. The
pulls selected for this piece are
commercially available to cabinet shops,
but it's nice to find them accessible for the
home woodworker as well.
This was the first time I'd used the drawer
front adjusters, though they've been
available for years. Having fought with
adjusting drawer fronts on inset and flush-
mount drawers forever, I found these
clever plastic devices to be a big help.
Allowing 1/8" adjustment in any direction,
fine-tuning a drawer front is now a snap
rather than a chore. Though the
instructions specify a 25mm bit to mount
the adjuster in the drawer face, a 1"
Forstner works admirably with a little
shimming.
Copyright 2004 Martian Auctions
554
finish everywhere, and don't worry about coating the black accent strips. After the
finish has dried, attach the hardware and hang the door. Adjust the drawer fronts
and door to make all the spaces equal. Then step back and enjoy the clean simple
lines of your work -- until the tastes of the furniture world swing back the other way.
Then perhaps you'll have to apply some fancy moulding or something.
JIG FOR THE PULLS • I cut the top and
back recesses for the handles using the
same jig. Unfortunately I made my jig a
little short and had to move the clamps
between cuts. Make your jig the width of
the drawer and to fit your own router
template guides and you'll be in good
shape.
ADJUSTABLE DRAWERS • The drawer
face adjusters are attached by first drilling
two clearance holes in the drawer box
front. Then locate the approximate spacing
of the drawer face on the drawer front (the
closer the better) and make a mark
through the clearance hole on the back of
the face with a scratch awl. Remove the
drawer box and drill the 1" holes for the
adjusters. Then just screw the face on and
adjust.
Copyright 2004 Martian Auctions
555

Schedule of Materials: Modern Wardrobe
No. Item
Dimensions
Material
2
Sides (A)
3/4" x 17-1/4" x 42-3/4"
Maple ply
1
Partition (B)
3/4" x 16-1/2" x 42"
Maple ply
2
Top/bottom
3/4" x 17-1/4" x 35-1/2"
Maple ply
1
False top (D)
3/4" x 18" x 36"
Maple ply
1
Back (E)
3/4" x 35-1/4" x 42"
Maple ply
1
Door (F)
3/4" x 12" x 42-1/2"
Maple ply
1
Drawer face (G)
3/4" x 12" x 23-7/8"
Maple ply
1
Drawer face (H)
3/4" x 9-9/16" x 23-7/8"
Maple ply
1
Drawer face (I)
3/4" x 7-13/16" x 23-7/8"
Maple ply
1
Drawer face (J)
3/4" x 6-7/16" x 23-7/8"
Maple ply
1
Drawer face (K)
3/4" x 5-7/8" x 23-7/8"
Maple ply
4
Drawer dividers (L)
3/4" x 2" x 22-7/8"
Maple ply
3
Shelves (M)
3/4" x 16" x 10-15/16"
Maple ply
2
Drawer sides (N)
1/2" x 10-1/16" x 16"
Baltic birch
2
Drawer sides (O)
1/2" x 8-1/16" x 16"
Baltic birch
2
Drawer sides (P)
1/2" x 6-1/4" x 16"
Baltic birch
2
Drawer sides (Q)
1/2" x 5" x 16"
Baltic birch
2
Drawer sides (R)
1/2" x 4" x 16"
Baltic birch
2
Drawer frt & Back (S)* (R)
1/2" x 10-1/16" x 21-1/4"
Baltic birch
2
Drawer frt & back (T)*
1/2" x 8-1/16" x 21-1/4"
Baltic birch
2
Drawer frt & back (U)* (R)
1/2" x 6-1/4" x 21-1/4"
Baltic birch
2
Drawer frt & back (V)*
1/2" x 5" x 21-1/4"
Baltic birch
2
Drawer frt & back (W)*
1/2" x 4" x 21-1/4"
Baltic birch
5
Drawer bottoms (X)
1/4" x 21-1/4" x 15-3/4"
Luan
4
Legs (Y)
1-1/4" x 1-1/4" x 4"
Poplar
2
Base stretchers (Z)
3/4" x 1-1/4" x 33-7/16"
Poplar
2
Base stretchers (AA)
3/4" x 1-1/4" x 15-9/16"
Poplar
9 - Linear feet each of 1/4" x 1" and 1/4" x 13/16" hardboard reveal strip
75 - Linear feet of 7/8" maple veneer tape
*If using a "slide in" drawer bottom, subtract 1/2" from the height on the
drawer backs.
Copyright 2004 Martian Auctions
556
Wyszukiwarka
Podobne podstrony:
wardrobe cabinet
Cabinet modern wardrobe
Corner Buffet Cabinet(1)
cabinetmakerupho00sher
Corner Cabinet 1
Plan and Install Kitchen Cabinets
bathroom cabinet szafka lazienkowa
Brydcliffe Cabinet
Open Wardrobe
Display Cabinet 2
box taurus cabinets manual
Display Cabinet 3
Atlantic E New IP66 Cabinet id Nieznany
Mobile File Cabinet
I Ogólnopolski Kongres Naukowo Szkoleniowy CABINES Polska ~Dermatologia w kosmetyce i kosmetologii~
constitution of cabinet commitee on uidai 2009
Kitchen Base Cabinet
Corner Buffet Cabinet(1)
Cabinet Compact TV Cabinet
więcej podobnych podstron