
Fuser Service Guide
Fuser Service Guide
Fuser Service Guide
Fuser Service Guide
SAMSUNG ELECTRONICS
Service Guide
0
Service Guide
[ CLP-310 /315 / CLX-317x series ]

Fuser Service Guide
Fuser Service Guide
Fuser Service Guide
Fuser Service Guide
SAMSUNG ELECTRONICS
Service Guide
1
CONTENTS
1. Millet Fuser Error Algorithm …………………… 2
2. Defect Judgment Flow Chart …………………….. 3
3. Component SVC part & Method ……………….. 8

Fuser Service Guide
Fuser Service Guide
Fuser Service Guide
Fuser Service Guide
SAMSUNG ELECTRONICS
Service Guide
2
1) S/W Protection
1) S/W Protection
1) S/W Protection
1) S/W Protection
Over heat error : Check, always
Over heat error : Check, always
Over heat error : Check, always
Over heat error : Check, always
-. Stay more 3 min. on condition over 190℃ : Check, when Stand-by Status.
-. Stay more 30 sec. on condition over190℃ : Check, when Warm-up & Power Save
-. Stay more 20 sec. on condition over 205℃ : Check, always
-. Stay more 2 sec. on condition over 215℃
: Check, always
Low heat error :
Low heat error :
Low heat error :
Low heat error :
-. Not to reach 150 ℃ for 3 min 40 sec : When warm up
-. Stay more 20 sec. under 20℃
: When Printing & Stand-by
Open heat error : When Warm
Open heat error : When Warm
Open heat error : When Warm
Open heat error : When Warm-
-
-
-Up, Check
Up, Check
Up, Check
Up, Check
-. Stay more 20 sec, under 50℃
Abnormal ADC : When Stand
Abnormal ADC : When Stand
Abnormal ADC : When Stand
Abnormal ADC : When Stand-
-
-
-by & Printing, Check
by & Printing, Check
by & Printing, Check
by & Printing, Check
-. Stay more 10 sec, Over 50 ℃ gap with ADC value.
2) H/W Protection : Compulsorily Heater Off, when sensing over
2) H/W Protection : Compulsorily Heater Off, when sensing over
2) H/W Protection : Compulsorily Heater Off, when sensing over
2) H/W Protection : Compulsorily Heater Off, when sensing over 188
188
188
188℃
℃
℃
℃ in Thermistor
in Thermistor
in Thermistor
in Thermistor
3) Mechanical Protection : On Thermostat sensing 170
3) Mechanical Protection : On Thermostat sensing 170
3) Mechanical Protection : On Thermostat sensing 170
3) Mechanical Protection : On Thermostat sensing 170℃
℃
℃
℃, Thermostat Open
, Thermostat Open
, Thermostat Open
, Thermostat Open
1. Millet series Fuser Error Check Algorithm

Fuser Service Guide
Fuser Service Guide
Fuser Service Guide
Fuser Service Guide
SAMSUNG ELECTRONICS
Service Guide
3
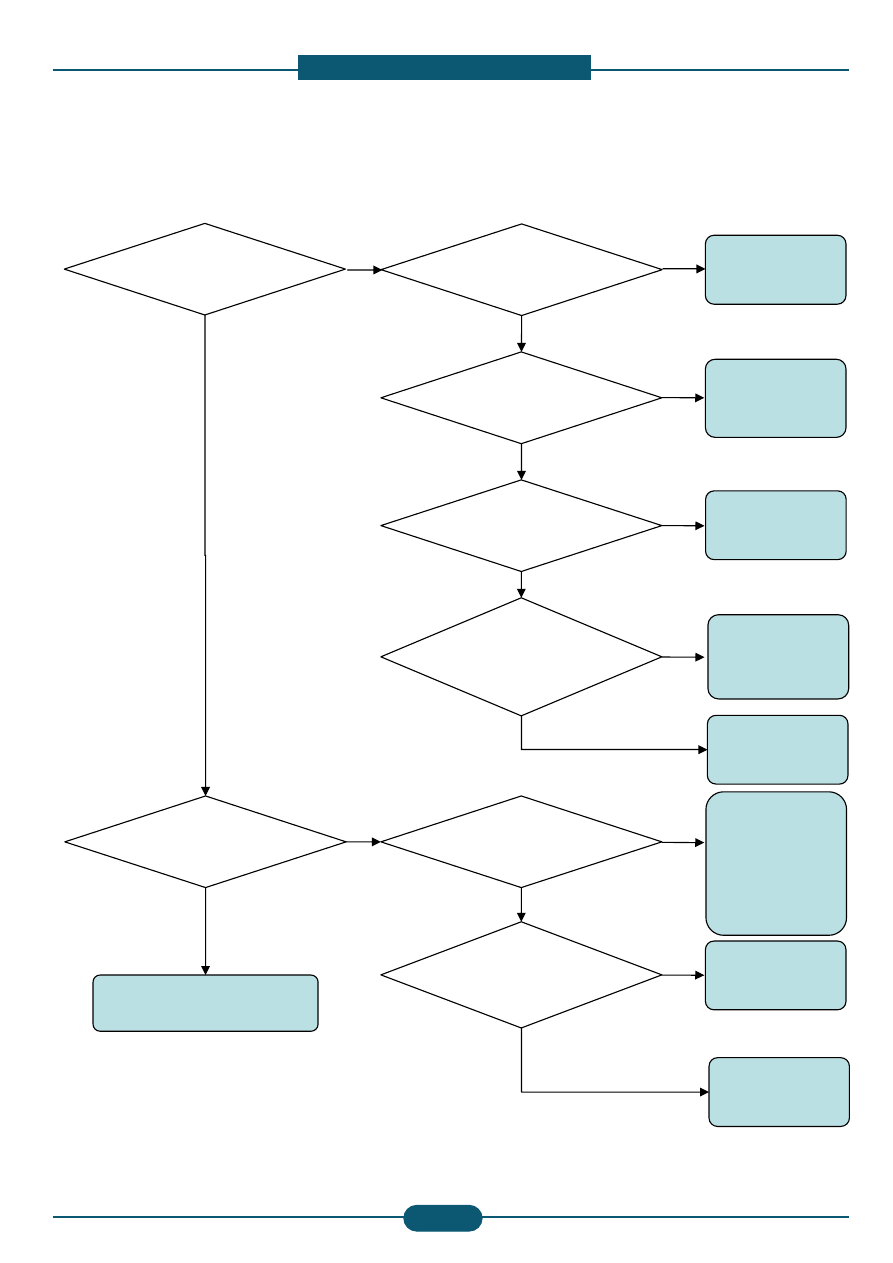
Check the leadedgeof Jam
paper.
Before Entering
Fuser?
Before,
entering Exit
Roller?
Guide-Input Fuser
Section 3.3.5
NO
YES
YES
NO
NO
Guide Input
Assembly
Defect?
Damage in
Guide Input Rib
surface?
Guide-Input Fuser
Section 3.3.5
If “NO” damage to
input guide, and if
paper is stopping
“before entering
Fuser” then why are
we replacing fuser”
Damage Guide
Output Rib
surface?
Damage or
wrong assembly
in Actuator-
Exit?
Actuator-Exit Re-
assembly or change
Guide-Output
Section 3.3.4
Damage in
Guide Rib
surface of
Upper – Fuser?
Fuser Change
Rolled in Heat-
Roller?
Remove the Paper
& Re-Check
After changing fuser
& Re-check
YES
YES
YES
YES
YES
NO
NO
NO
NO
NO
Change the Fuser
YES
1. Jam 2
1. Jam 2
1. Jam 2
1. Jam 2
2. Defect Judgment Flow Chart
Fuser Service Guide
Fuser Service Guide
Fuser Service Guide
Fuser Service Guide
SAMSUNG ELECTRONICS
Service Guide
4
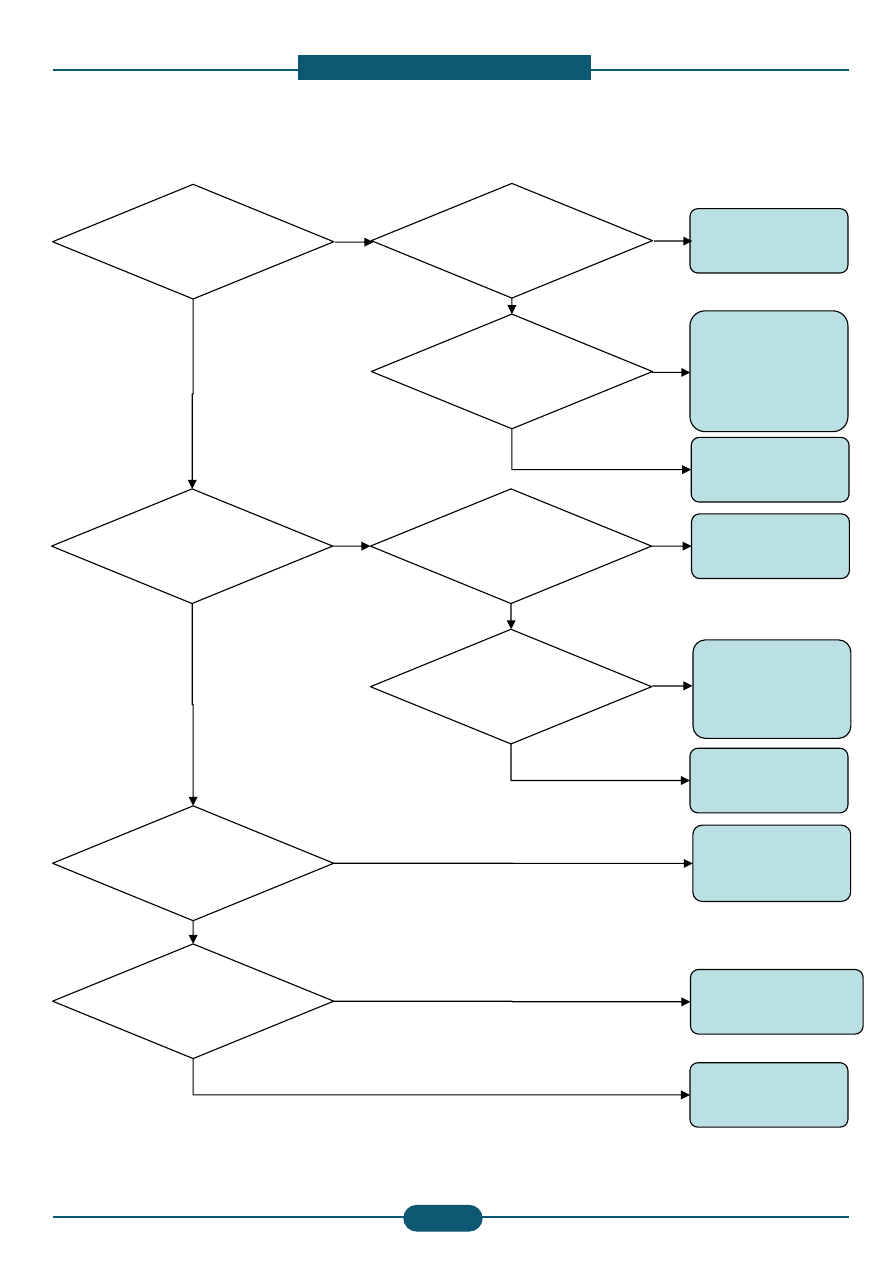
Gear Gear not
meshing?
Friction Noise?
Tighten or
change the
M4-10 screws
NO
YES
YES
NO
Fuser Mounting
screws stripped or
not tight?
Wrap Jam?
Remove wrap
paper, clean
and inspect
rollers.
Replace Fuser
& recheck
Are gear drive
parts
worn due to lack
of Grease?
Abnormal
wear of the
Fuser Gear
JC66-00669A
Replace Fuser
Gear JC66-
00669A
Add "High
Temperature
Grease" of
drive gear
parts,
replace any as
is necessary
Replace Fuser
& recheck
Replace Fuser
& recheck
YES
YES
YES
YES
YES
NO
NO
NO
NO
Damage Fuser
Drive Gear?
Replace Fuser
Gear
JC66-00669A
YES
Bushing melting
and
Heat Roller
damage?
Replace Heat
Rollers
and bushings,
then test
NO
NO
2. Abnormal Noise
2. Abnormal Noise
2. Abnormal Noise
2. Abnormal Noise
Fuser Service Guide
Fuser Service Guide
Fuser Service Guide
Fuser Service Guide
SAMSUNG ELECTRONICS
Service Guide
5
Is there the Spot
that
repeats every
86mm?
Toner not fused
wipes
off on your hand?
Clean the Heat
Roller Surface
NO
YES
YES
Is there pollution
on the Heat Roller
surface?
Heat Roller
Surface Damage?
Replace Heat
Roller
and check
Pressure
Roller and
bushings
Other Unit Check:
Transfer Unit
Follow "Low Heat
Error"
troubleshooting
Other Unit Check
YES
YES
YES
NO
NO
Is there pollution
in Pressure Roller
Surface?
Clean the
Pressure
Roller Surface
YES
Pressure Roller
Surface Damage?
Replace
Pressure Roller
and check Heat
Roller
and bushings
NO
Cyclical mark on
the backside of
the paper?
Follow "Over Heat
Error"
troubleshooting
Cyclical Ghost
Image
repeated every
86mm?
Other Unit Check:
Transfer Unit
YES
NO
NO
NO
NO
YES
3. Image Defect
3. Image Defect
3. Image Defect
3. Image Defect
Fuser Service Guide
Fuser Service Guide
Fuser Service Guide
Fuser Service Guide
SAMSUNG ELECTRONICS
Service Guide
6
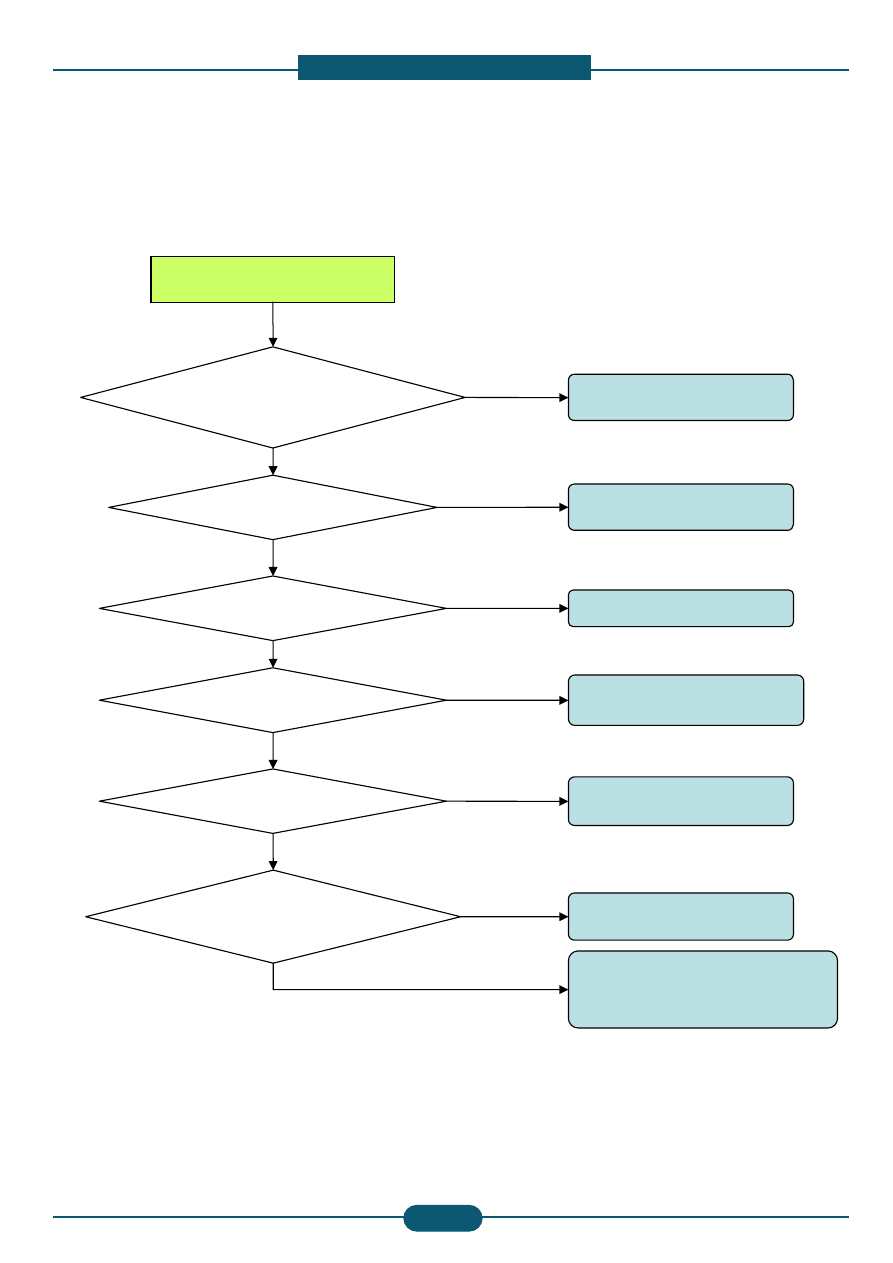
Smart Panel : Low Heat Error
Lamp open?
(110V용: 1.35±1 ohm
220V용: 4.7±1 ohm)
Lamp Short?
Change Fuser Lamp
4713-001243
NO
NO
Change Fuser Lamp
4713-001243
Replace Thermostat
4712-001031
AC-Harness Change
Replace Thermistor
1404-001447
Replace Fuser & recheck
The SMPS and Main Bd
could be suspect
YES
YES
YES
YES
YES
AC-Harness Short?
Thermostat Open?
Thermistor
Resistance Defect?
(300~450kohm @ 25℃)
Thermistor Pollution,
Bend ?
Replace Thermistor
1404-001447
YES
NO
NO
NO
NO
1) Low Heat Error
4. System Defect
4. System Defect
4. System Defect
4. System Defect

Fuser Service Guide
Fuser Service Guide
Fuser Service Guide
Fuser Service Guide
SAMSUNG ELECTRONICS
Service Guide
7
Smart Panel : Over Heat Error
Lamp open ?
(For 110V:
1.35
±
±
±
± 1 ohm
For 220V:
4.7
±
±
±
± 1 ohm
)
Change Fuser Lamp
4713-001243
NO
NO
Replace Thermistor
1404-001447
Same measures
with Low Heat Error
Replace Thermistor
Replace Thermistor
Replace Thermistor
Replace Thermistor
1404
1404
1404
1404---- 001447
001447
001447
001447
Replace Fuser & recheck
Replace Fuser & recheck
Replace Fuser & recheck
Replace Fuser & recheck
The SMPS and Main Bd
The SMPS and Main Bd
The SMPS and Main Bd
The SMPS and Main Bd
could be suspect
could be suspect
could be suspect
could be suspect
YES
YES
YES
Thermistor Resistance
Defect?
(300~450kohm @ 25
℃
℃
℃
℃)
Replace Thermistor
1404-001447
YES
NO
NO
Thermistor Resistance
Defect?
(300~450kohm @ 25
℃
℃
℃
℃)
Thermistor cannot be
cleaned and/or bent?
Smart Panel : Open Heat Error
Smart Panel : Abnormal ADC Error
Replace Fuser & recheck
The SMPS and Main Bd
could be suspect
2) Except Low Heat Error
Fuser Service Guide
Fuser Service Guide
Fuser Service Guide
Fuser Service Guide
SAMSUNG ELECTRONICS
Service Guide
8
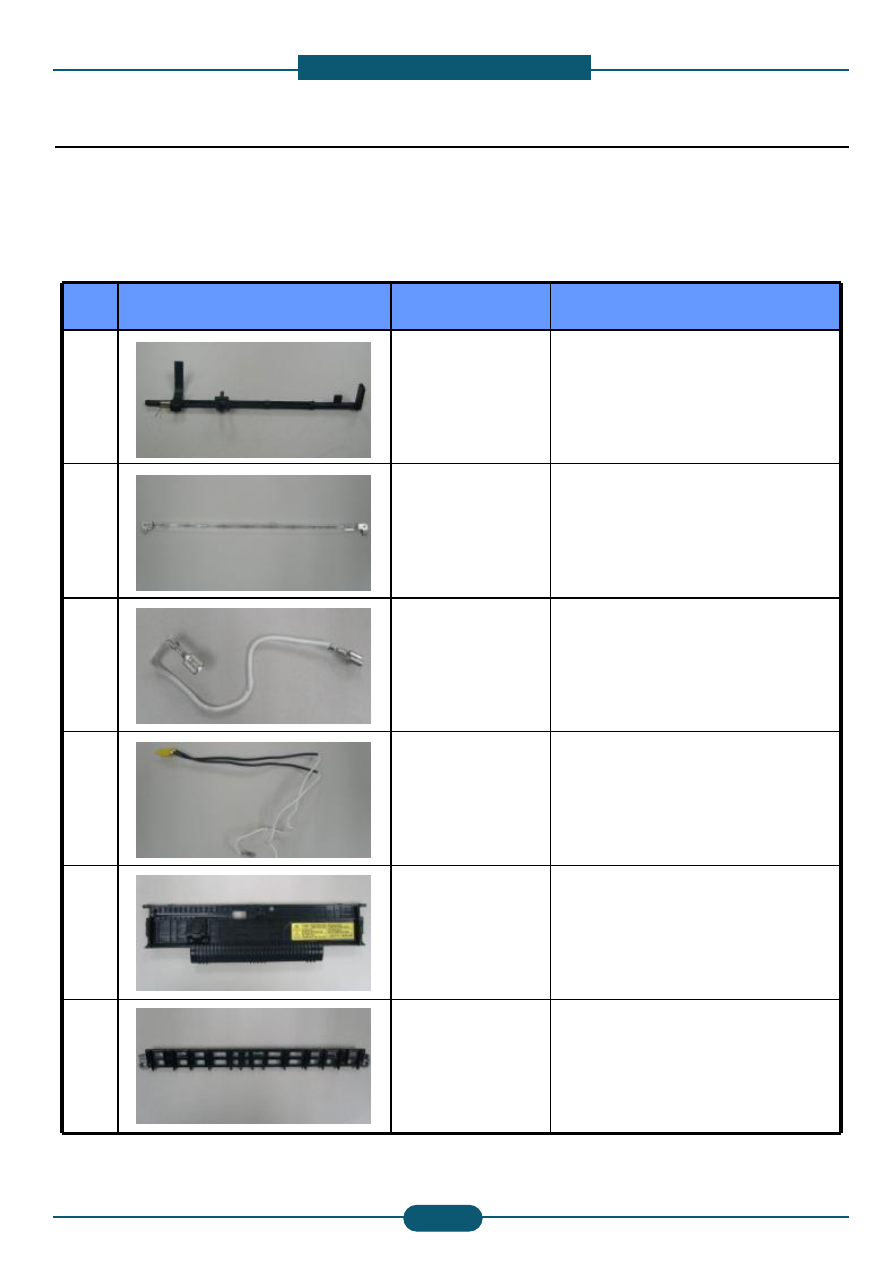
Photo
Part Code
Part name
1
JC66-01775A
ACTUATOR-EXIT FUSER
2
4713-001243
LAMP-HALOGEN
3
JC39-00501A
CBF HARNESS-FUSE_LINK1
4
JC39-00907A
HARNESS-FUSER AC
5
JC61-02364A
GUIDE-OUTPUT FUSER
6
JC61-02361A
GUIDE-INPUT FUSER
3. Component Service parts and Change method
3.1 Main component Service Parts
3.1 Main component Service Parts
3.1 Main component Service Parts
3.1 Main component Service Parts
Fuser Service Guide
Fuser Service Guide
Fuser Service Guide
Fuser Service Guide
SAMSUNG ELECTRONICS
Service Guide
9
1
2
3
2
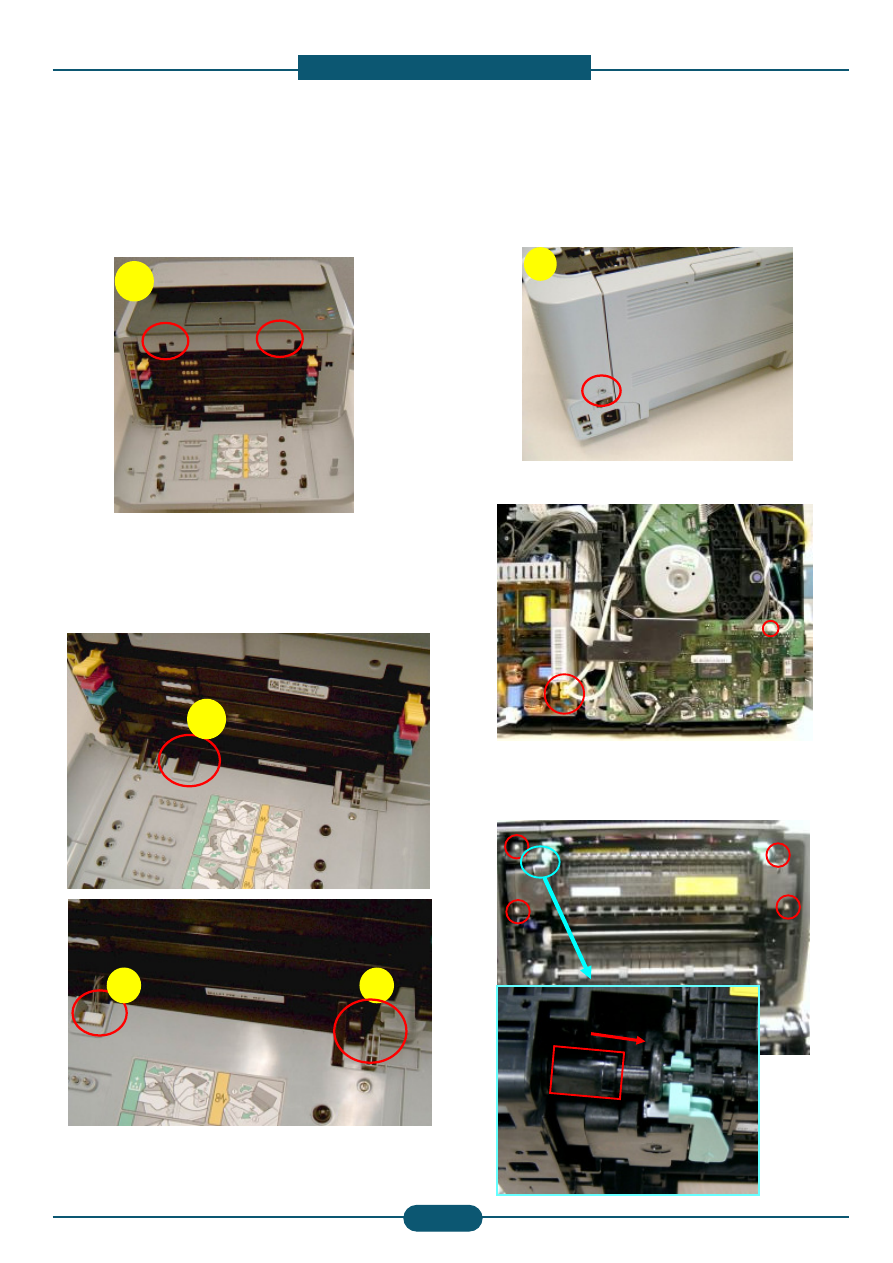
1. After open Front Cover open and loose
Two screws, disassemble Top cover
2. After separate the Cover Cable,
separate the Connector.
3. Separate Front cover as push the Hook
to inside.
4. Loosen the screw in the red circle,
separate the right side cover.
4
5. Remove the two connector in the red circle.
6. After loosen four screws in the red circle,
pushing the holder shaft fuser to the right,
and then separate the Fuser Ass'y from Printer.
3.2 Fuser Assy Disassemble method
3.2 Fuser Assy Disassemble method
3.2 Fuser Assy Disassemble method
3.2 Fuser Assy Disassemble method
Caution
Caution
Caution
Caution –––– Do not work on the Fuser Unit if it is hot, as you may get burn
Do not work on the Fuser Unit if it is hot, as you may get burn
Do not work on the Fuser Unit if it is hot, as you may get burn
Do not work on the Fuser Unit if it is hot, as you may get burnt.
t.
t.
t.
Please wait until the fuser cools down enough to safely work on
Please wait until the fuser cools down enough to safely work on
Please wait until the fuser cools down enough to safely work on
Please wait until the fuser cools down enough to safely work on it.
it.
it.
it.
Fuser Service Guide
Fuser Service Guide
Fuser Service Guide
Fuser Service Guide
SAMSUNG ELECTRONICS
Service Guide
10
3.3.1 ACTUATOR
3.3.1 ACTUATOR
3.3.1 ACTUATOR
3.3.1 ACTUATOR-
-
-
-EXIT FUSER
EXIT FUSER
EXIT FUSER
EXIT FUSER
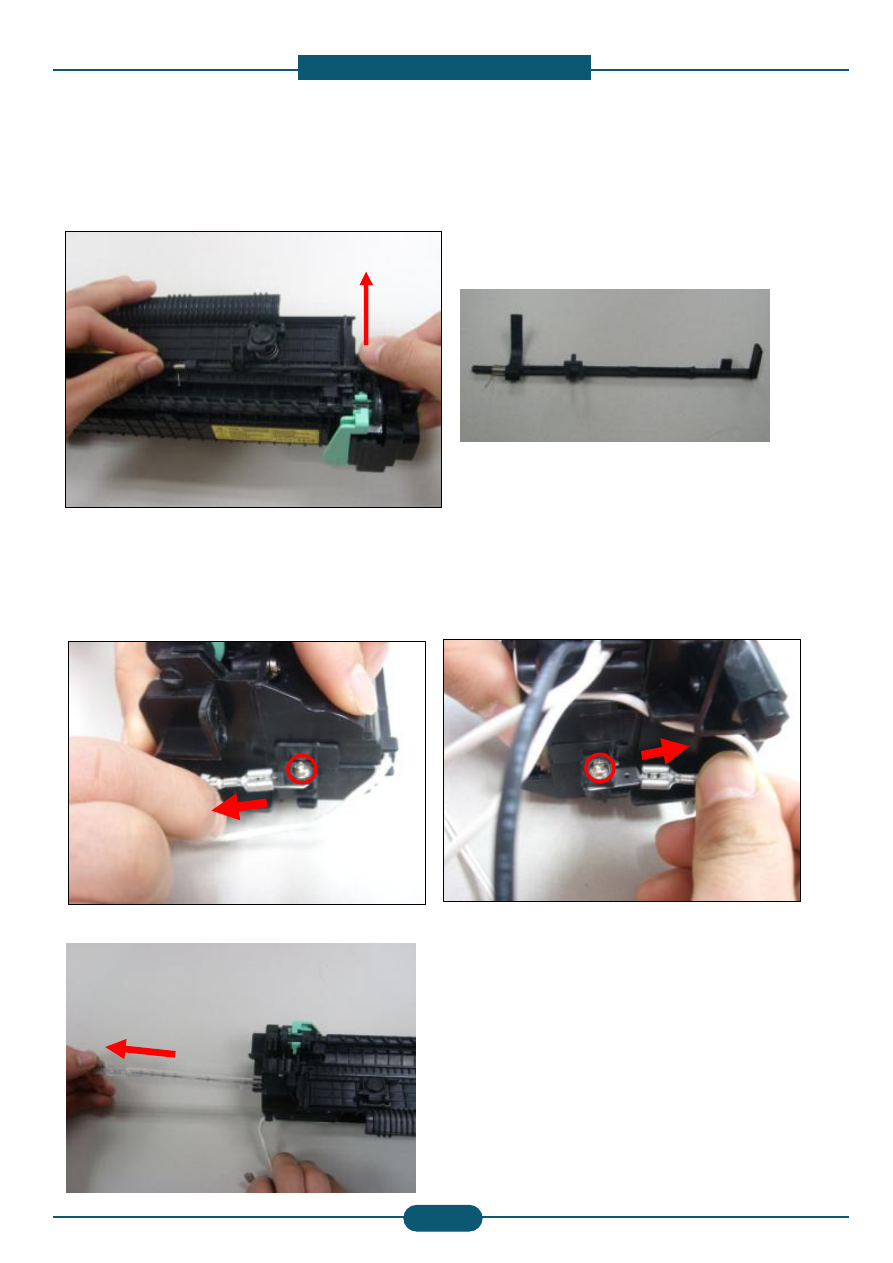
Separate it as take up right side of ACTUATOR-EXIT FUSER like the picture
3.3.2. LAMP
3.3.2. LAMP
3.3.2. LAMP
3.3.2. LAMP-
-
-
-HALOGEN
HALOGEN
HALOGEN
HALOGEN
1. Pull out the harness (CBF HARNESS-FUSE_LINK1, HARNESS-FUSER AC) which is
connected at Fuser LAMP-HALOGEN.
And loose the two screws ( Left side, Right side each one ) in the red circle.
2. Pull out the LAMP-HALOGEN like below photo.
3.3 Change method of fuser component part
3.3 Change method of fuser component part
3.3 Change method of fuser component part
3.3 Change method of fuser component part
Fuser Service Guide
Fuser Service Guide
Fuser Service Guide
Fuser Service Guide
SAMSUNG ELECTRONICS
Service Guide
11
3.3.3. CBF HARNESS
3.3.3. CBF HARNESS
3.3.3. CBF HARNESS
3.3.3. CBF HARNESS-
-
-
-FUSE_LINK1 and HARNESS
FUSE_LINK1 and HARNESS
FUSE_LINK1 and HARNESS
FUSE_LINK1 and HARNESS-
-
-
-FUSER AC
FUSER AC
FUSER AC
FUSER AC
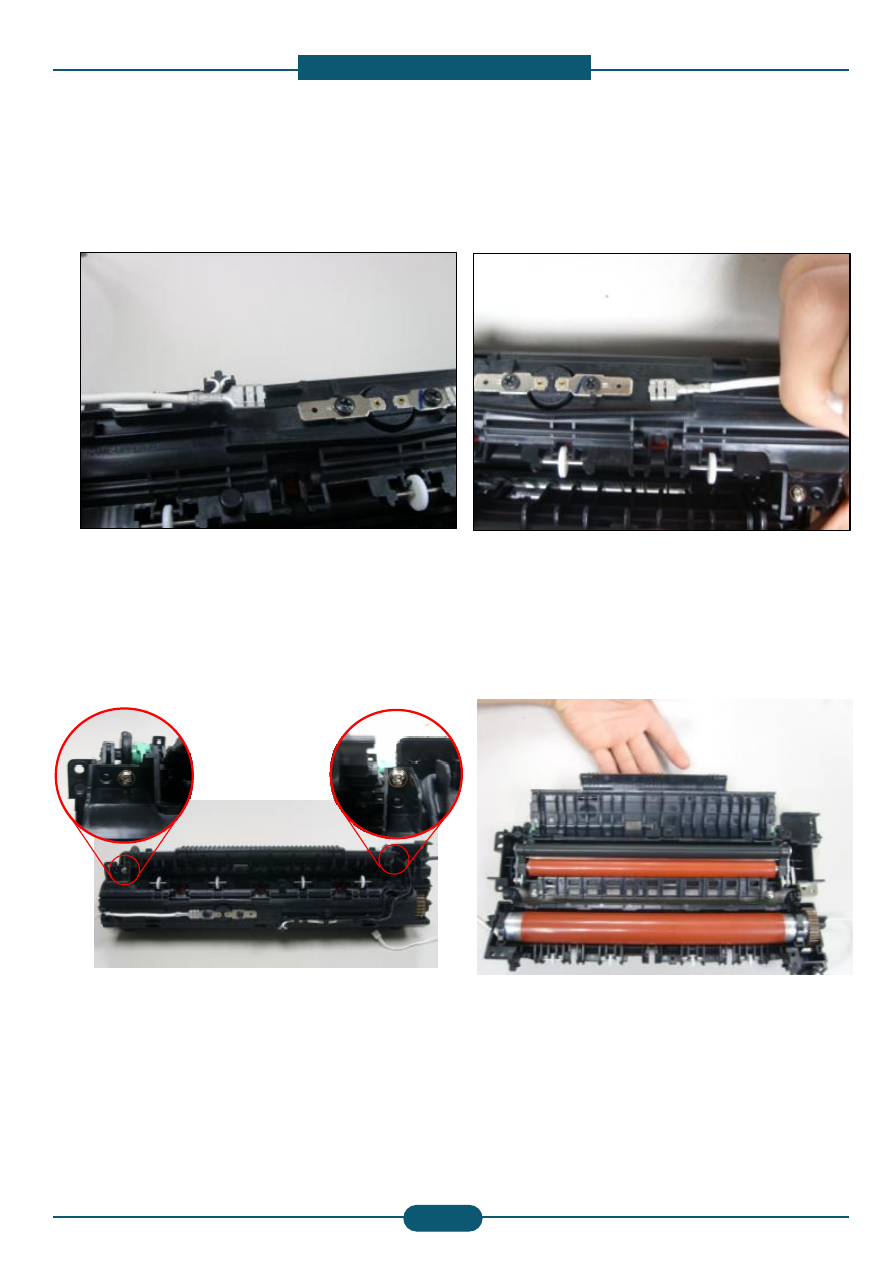
1. Pull out the connected part from LAMP-HALOGEN (Refer to 2. LAMP-HALOGEN disassemble method)
2. Pull out the connected part from THERMOSTAT. And separate the harness from the Fuser.
3.3.4. GUIDE
3.3.4. GUIDE
3.3.4. GUIDE
3.3.4. GUIDE-
-
-
-OUTPUT FUSER
OUTPUT FUSER
OUTPUT FUSER
OUTPUT FUSER
1. Loose the two screws in the red circle.
2. After Open FRAME-LOWER FUSER,
Separate the GUIDE OUT FUSER.
Caution – Do not touch the surface of the roller.
Fuser Service Guide
Fuser Service Guide
Fuser Service Guide
Fuser Service Guide
SAMSUNG ELECTRONICS
Service Guide
12
3.3.5. GUIDE
3.3.5. GUIDE
3.3.5. GUIDE
3.3.5. GUIDE-
-
-
-INPUT FUSER
INPUT FUSER
INPUT FUSER
INPUT FUSER
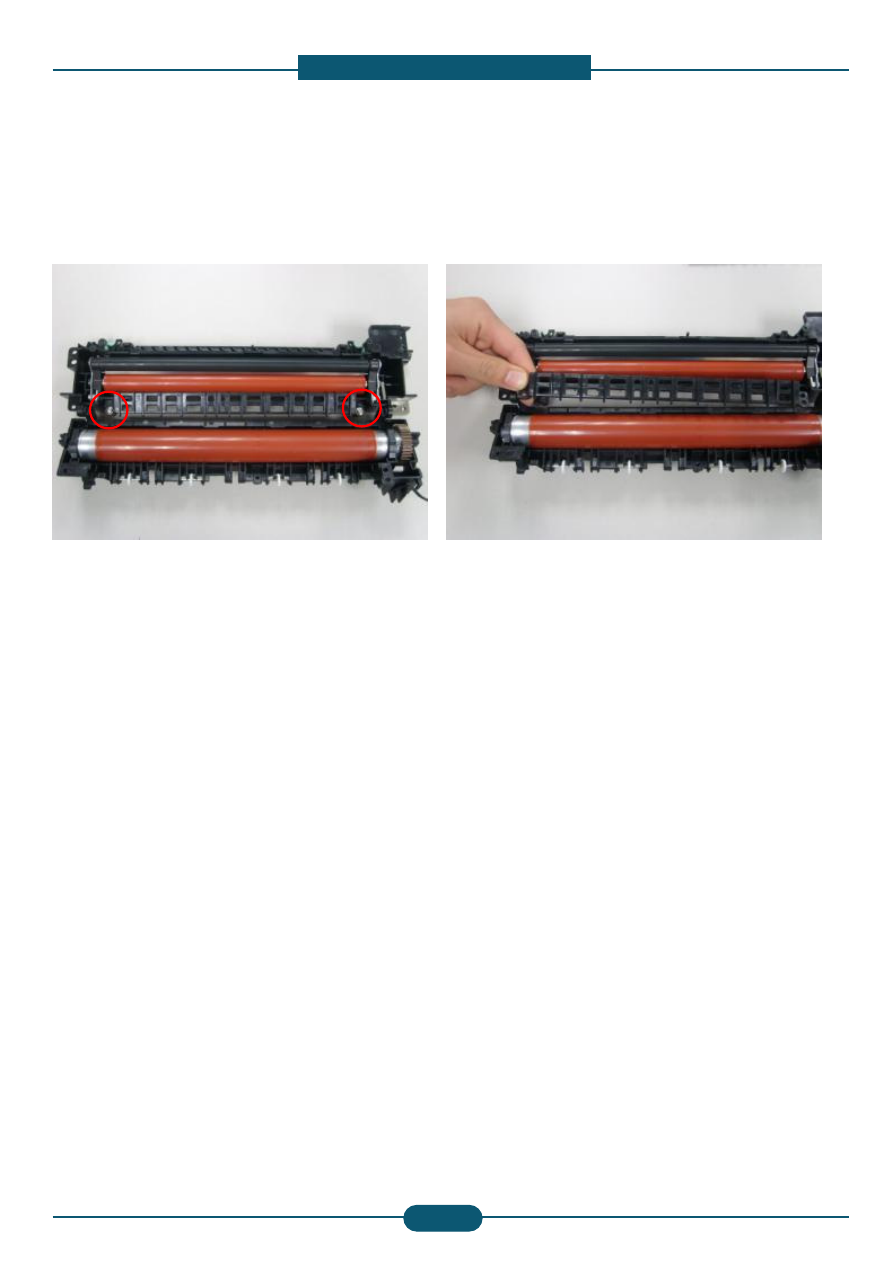
After loose the fixed two screws on GUIDE-OUTPUT FUSER, Disassemble
Caution – Do not touch the surface of the roller.
Document Outline
- Service Guide
Wyszukiwarka
Podobne podstrony:
Samsung CLP310 CLP315 CLX3170 CLX3175 v1i
Halley repair guide RF ACCO
Halley BaseBand Repair Guide OnsiteTraining
ASUS K54LY (K54HR) Repair Guide
Credit Repair Guide
Ebook Borland Delphi Component Writer Guide
Asus E502NA Repair Guide
ECC G003 Guide to Repair Flow
Great Burgundy Wines A Principal Components Analysis of La Cote vineyards guide
Symmetrical components method continued
24 G23 H19 QUALITY ASSURANCE OF BLOOD COMPONENTS popr
Popular Mechanics Repairing Power Antennas
guide camino aragones pl
Herbs for Sports Performance, Energy and Recovery Guide to Optimal Sports Nutrition
Meezan Banks Guide to Islamic Banking
NLP for Beginners An Idiot Proof Guide to Neuro Linguistic Programming
freespan spec guide
Eaton VP 33 76 Ball Guide Unit Drawing
Herbs to Relieve Headaches Keats Good Herb Guide
więcej podobnych podstron