
Motorola SC200
Corded Telephone and Digital
Cordless Handset
Warning
Charge the handset for 24 hours before use.

Welcome...
to your new Motorola SC200 Corded Telephone and Digital Cordless
Handset!
• Dialonthecordedbaseorcordlesshandset.
• EmergencymodetomakecallsonthecordedbasewithoutACpower.
• Brightbacklitdisplayonthecordedbaseandcordlesshandset.
• Cordlesshandsetforlocatinganywherewithinrange.
• 50NameandNumberphonebookinthecordlesshandset.
• Speakerphoneonthecordedbaseandcordlesshandsetforhands-freeconversations.
• CallerIDonthecordedbaseandcordlesshandsetshowsyouwho’scalling.
1
• Redialupto5ofthelastnumberscalled.
• Registerupto4handsetstothecordedbaseandregistereachhandsetwithupto4differentbases.
• Makeinternalandtransferexternalcalls.
• 3wayconferencingwithsimultaneousintercom.
• Choosefrom10differentringtonesonthecordlesshandsetforexternalcalls.
• IntelligentChargingsavingunnecessarypowerusage.
Need help?
IfyouhaveanyproblemssettinguporusingyourSC200,pleasecontactCustomerServiceson
+852 27955111.
E-mail:
forrestal@on-nets.com
Alternatively,youmayfindtheanswerinthe‘Help’sectionatthebackofthisguide.
1
Youmustsubscribetoyournetworkprovider’sCallerIDserviceforthisfeaturetowork.Asubscriptionfeemaybepayable.

This User Guide provides you with all the information you need to get
the most from your phone.
To set up your phone, follow the simple instructions in ‘Getting Started’,
on the next few pages.
IMPORTANT
Onlyusethetelephonelinecordsupplied.
Got everything?
• SC200base
• SC200cordedhandset
• SC200curlycord
• Poweradaptorforthebase
• SC200handset&charger
• 2xrechargeableNi-MHbatterycells
• Poweradaptorforthecharger
• Telephonelinecord
ECOMOTO:aconvergenceofeffortsbymarketing,design,research,engineering,andsupplychainmanagementthat
leadstobetterproductsforeveryone.Aholisticviewthatfocusesonbothsocialandenvironmentalresponsibility.Apassion
andasharedpointofview.
Therightthingtodo.
• Meetsand/orexceedsEMEAenvironmentalregulatoryrequirements.
• Ecofriendlypackagingwithaminimum20%postconsumerrecycledcontent.
• Phonehousingisbuiltwithaminimumof25%postconsumerrecycledcontentplastic.
• EnergyefficientchargerthatmeetsEUCodeofConductrequirements.
• ECOmodefunctionwhichreducesthetransmittedpowerandenergyconsumption.

4
4. Clock ................................................................ 18
5.
Caller ID and the Calls list .............................. 19
5.1 CallerID........................................................ 19
5.2 Callslist......................................................... 19
5.2.1 ViewtheCallslist................................ 19
5.2.2 DialanumberintheCallslist............. 19
5.2.3 Deleteanentry.................................... 19
5.2.4 DeletetheentireCallslist................... 19
6.1 Switchthecordlesshandseton/off............. 20
6.2 Calls.............................................................. 20
6.2.1 Makeacall.......................................... 20
6.2.2 Preparatorydialling............................. 20
6.2.3 Makeadirectmemorycall.................. 20
6.2.4 Endacall............................................ 20
6.2.5 Receiveacall...................................... 20
6.3 Adjusttheearpiecevolume........................... 20
6.4 Mute.............................................................. 20
6.5 Intercom........................................................ 20
6.5.1 Makeaninternalcall........................... 20
6.5.2 Receiveaninternalcall....................... 21
6.5.3 Transferacall..................................... 21
6.5.4 3-wayconferencecall......................... 21
6.6 Hands-freespeakerphone............................ 21
6.6.1 Makeahands-freecall........................ 22
1. Getting started .................................................. 7
2. Getting to know your phone .......................... 10
Using your corded base........................................ 16
3. Using the phone .............................................. 16
3.1 Calls.............................................................. 16
3.1.1 Makeacall.......................................... 16
3.1.2 Preparatorydialling............................. 16
3.1.3 Endacall............................................ 16
3.1.4 Receiveacall...................................... 16
3.2 Adjusttheearpiecevolume........................... 16
3.3 Mute.............................................................. 16
3.4 Intercom........................................................ 16
3.4.1 Makeaninternalcall........................... 16
3.4.2 Receiveaninternalcall....................... 16
3.4.3 Transferacall..................................... 16
3.4.4 3-wayconferencecall......................... 17
3.5 Hands-freespeakerphone............................ 17
3.5.1 Makeahands-freecall........................ 17
3.5.2 Answeracallhands-free..................... 17
3.5.3 Switchtohands-freeduringacall....... 17
3.6 Redial............................................................ 17
3.6.1 Viewordialanentry........................... 17
3.6.2 Deleteanentry.................................... 17
3.6.3 DeletetheentireRediallist................. 18
3.7 Lock/unlockthekeypad.............................. 18
3.8 Ringervolume............................................... 18

5
8.4 Autohangup................................................. 28
9. Clock & alarm .................................................. 28
9.1 Setthedateandtime.................................... 28
9.2 Tosetthetimeformat................................... 28
9.3 Tosetthedateformat................................... 29
9.4 Setthealarm................................................. 29
9.5 Tosetthealarmtone.................................... 29
9.6 Switchoffalarmring..................................... 29
10. Advanced settings .......................................... 30
10.1 ChangethePINcode................................... 30
10.2 Registration................................................... 30
10.2.1 Registeranadditionalhandset........... 30
ofhandsettoyourSC200base.......... 30
10.2.3 De-registerahandset........................ 31
10.3 Restoredefaultsettings................................ 31
10.4 Autoprefix..................................................... 31
10.4.1 Setdetectdigitnumber....................... 31
10.4.2 Setautoprefixnumber....................... 32
10.5 Defaultsettings............................................. 32
10.6 Recalltime.................................................... 33
10.7 Dialmode...................................................... 33
10.8 Firstring........................................................ 33
11. Caller ID and the Calls list .............................. 34
11.1 CallerID........................................................ 34
11.2 Callslist......................................................... 34
6.6.2 Answeracallhands-free..................... 22
6.6.3 Switchtohands-freeduringacall....... 22
6.7 Redial............................................................ 22
6.7.1 Viewordialanentry........................... 22
tothephonebook................................ 22
6.7.3 Editanentry........................................ 22
6.7.4 Deleteanentry.................................... 23
6.7.5 DeletetheentireRediallist................. 23
6.8 Lock/unlockthekeypad.............................. 23
6.9 Findahandset.............................................. 23
7. Phonebook ...................................................... 24
7.1 Storeanameandnumber............................ 24
7.2 Viewordialanentry..................................... 24
7.3 Editaphonebookentry................................. 25
7.4 Deleteanentry.............................................. 25
7.5 Deleteallentries........................................... 25
7.6 Storeadirectmemorynumber..................... 25
7.7 Editadirectmemorynumber........................ 26
7.8 Deleteadirectmemorynumber.................... 26
8. Personal settings ............................................ 26
8.1 Handsetname............................................... 26
8.2 Handsettones............................................... 26
8.2.1 Ringvolume........................................ 26
8.2.2 Ringtones............................................ 27
8.2.3 Keybeep............................................. 27
8.3 Language...................................................... 27

6
11.2.1 ViewtheCallslist................................ 34
11.2.2 DialanumberintheCallslist............. 34
thephonebook.................................... 35
11.2.4 Editanentry........................................ 35
11.2.5 Deleteanentry.................................... 35
11.2.6 DeletetheentireCallslist................... 35
12. Help .................................................................. 36
13.
General information ........................................ 37
7
Gettingstarted
SIGNAL STRENGTH
The icon on your handset indicates that you are within
range of the base. When out of range of the base, the
icon flashes. If you are on a call, you will hear a
warning beep.
The line will hang up if the handset moves out of range
of the base. Move closer to the base. The handset will
automatically reconnect to the base.
Setting up
IMPORTANT
The base station must be plugged into the mains power at
all times. Do not connect the telephone line cord into the
wall socket until the handset is fully charged. Use only the
power adaptor and telephone line cord supplied with the
product.
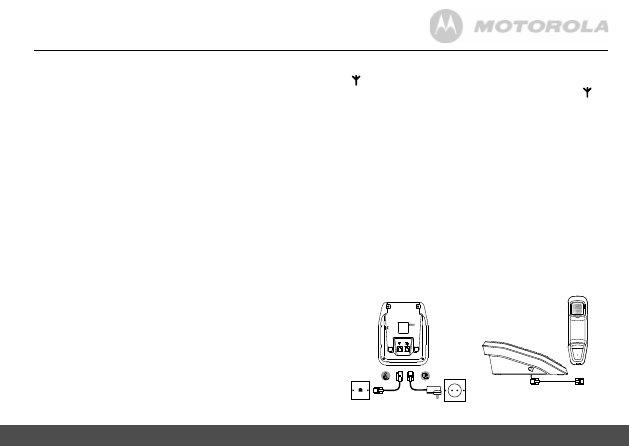
Connecting the corded base and handset
1. Getting started
IMPORTANT
Do not place your SC200 in the bathroom or other
humid areas.
Location
YouneedtoplaceyourSC200basewithin2metresofthe
mainspowerandtelephonewallsocketssothatthecables
willreach.Thesocket-outletshallbeinstallednearthe
equipmentandshallbeeasilyaccessible.
Makesurethatitisatleast1metreawayfromother
electricalappliancestoavoidinterference.YourSC200
worksbysendingradiosignalsbetweenthecordless
handsetandtelephonebase.Thestrengthofthesignal
dependsonwhereyouplacethebase.Placingitashighas
possibleensuresthebestsignal.
CORDLESS HANDSET RANGE
The unit has a range of up to 300 metres outdoors when
there is a clear line of sight between the base and handset.
Any obstruction between the base and handset will reduce
the range significantly. With the base indoors and the
handset either indoors or outdoors, the range will normally
be up to 50 metres. Thick concrete and stone walls can
severely affect the range.
8
Gettingstarted
3. Clipthebatterycoverbackintoplace.
4. Ifyouarechargingthebatteriesforthefirsttime,place
thehandsetonthechargertochargeforatleast24
hourscontinuously.
5. Thedisplaywillshowthehandsetnameandnumberto
indicatethatitisregisteredtothebase.
IMPORTANT
Warning! Use only the approved rechargeable Ni-MH
battery cells (2 x AAA Ni-MH 450mA rechargeable
batteries) supplied with your SC200.
BATTERY LOW WARNING
If you hear a warning beep every 30 seconds during a call,
you will need to recharge the handset before you can use
it again.
BATTERY PERFORMANCE
In ideal conditions, fully charged batteries should give up
to 7 hours talk time or up to 130 hours standby time on a
single charge.
1
Note that new batteries do not reach their full capacity until
they have been put to normal use for several days.
To keep your batteries in the best condition, leave the
handset off the base for a few hours at a time.
Running the batteries right down at least once a week will
help them last as long as possible.
The charge capacity of rechargeable batteries will reduce
1. Plugthetelephonelinecordintothesocketmarked
ontheundersideofthebase.
2. Plugthepoweradaptorintothesocketmarked on
theundersideofthebaseandplugtheotherendinto
themainspowerwallsocket.Switchonthe
mainspower.
3. Plugthecurlycordintothecordedhandsetandthe
telephonebase.
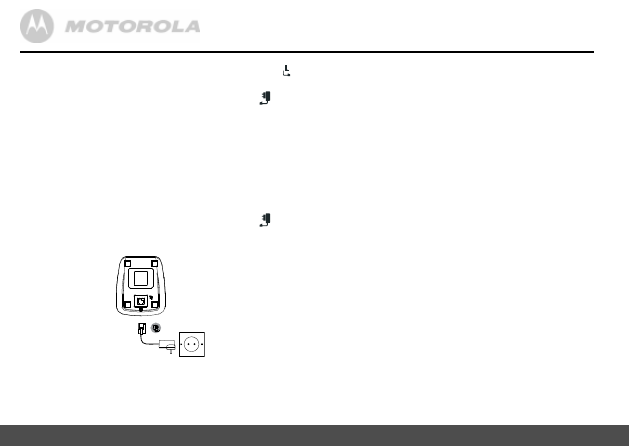
Connecting the charger and charging the
cordless handset
1. Plugthepoweradaptorintothesocketmarked on
theundersideofthechargerandplugtheotherendinto
themainspowerwallsocket.
2. Removethebatterycoverfromthebackofthehandset
andinsertthe2xAAANiMHrechargeablebatteries
supplied.Pleasenotethe‘+’and‘-’markingsinsidethe
batterycompartmentandinsertinthecorrectdirection.
9
Gettingstarted
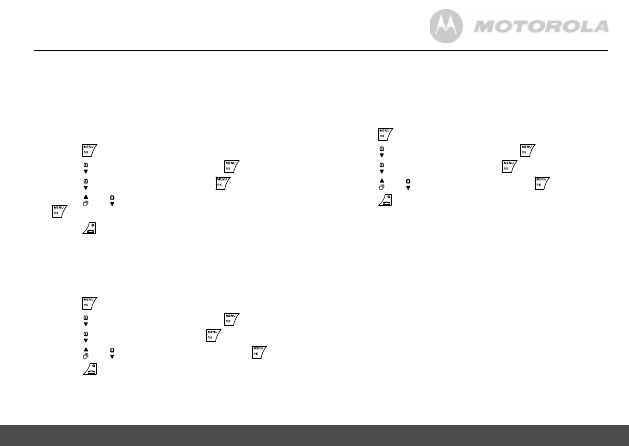
5. Enterthetime(HH:MM)andpress
.
Whenthehandsetisin12hourformatpress or
toselect
AM
or
PM
.
6. Press
toreturntostandby.
From the corded base
1. Pressandholdthe buttononthetelephonebase.
Thedisplayshows
- - : - - - - D / - - M
.
2. Enterthetime(HH:MM)anddate(DD:MM).
3. Press toconfirm.
Your SC200 is now ready for use.
with time as they wear out, giving the handset less talk /
standby time. Eventually they will need to be replaced.
After charging your handset for the first time, subsequent
charging time is about 6–8 hours a day. Batteries and
handset may become warm during charging. This is normal.
1
All talk and standby times are approximate and depend on features selected and
usage pattern.
Date and time
IfyouhavesubscribedtoaCallerIDservice,thedateand
timeissetautomaticallywhenyoureceiveyourfirstcall.
IfyoudonothaveCallerIDservice,youcansetthedate
andtimemanually.
NOTE
On the cordless handset the format for the date and time
can be changed, see pages 28 and 29. The default settings
are DD/MM for the date and 24hrs for the time.
From the cordless handset
1. Press
,thedisplayshows
PHONEBOOK
.
2. Scroll to
CLOCK&ALARM
andpress
.
3. Thedisplayshows
DATE/TIME
.Press
.
4. EnterthedateusingtheformatYYYY/MM/DDe.g.
2012/12/04for4thofDecember2012andpress
to
confirm.
10
Gettingtoknowyourphone
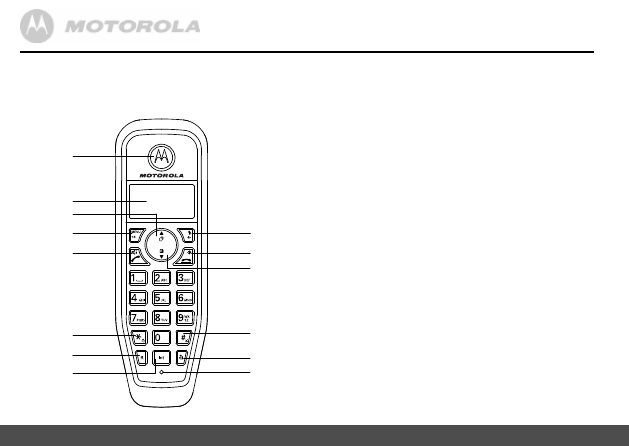
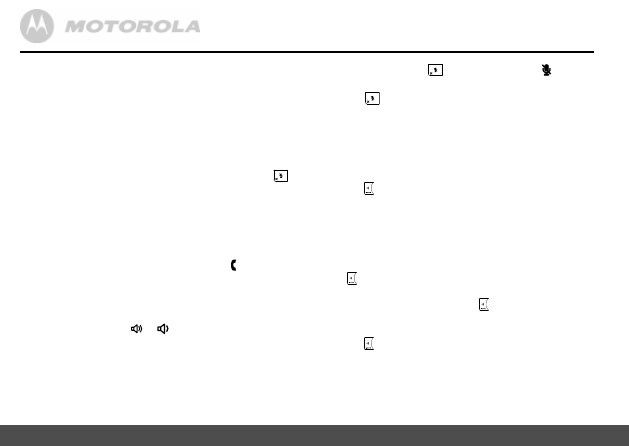
A Earpiece
B
Display
Seepage11foranoverviewofthedisplayicons.
C Volume up / Scroll up / Calls list
Duringacall,presstoincreaseearpiecevolume.
Presstoscrollthroughthemenuoptions,rediallist,
callslistandphonebookentries.
Instandbymode,presstoopenthecallslist.
D Menu / OK
PresstoopentheMenu.
Presstoselectmenuoptionsandtoconfirmadisplayed
option.
E Talk / Hands-free
Presstomakeacall.
Presstoswitchhands-freeonoroffduringacall.
F * / Keypad lock
Pressandholdtolock/unlockthekeypad.
Diala*.
G Recall
Usewithswitchboard/PABXservicesandsome
networkservices.
H Intercom
Usedtomakeinternalcallsandtransfercallstothe
cordedbaseorotherSC200handsetsregisteredtothe
base.
2. Getting to know your phone
Overview of your cordless handset
A
B
C
D
E
F
G
H
N
M
L
K
J
I
11
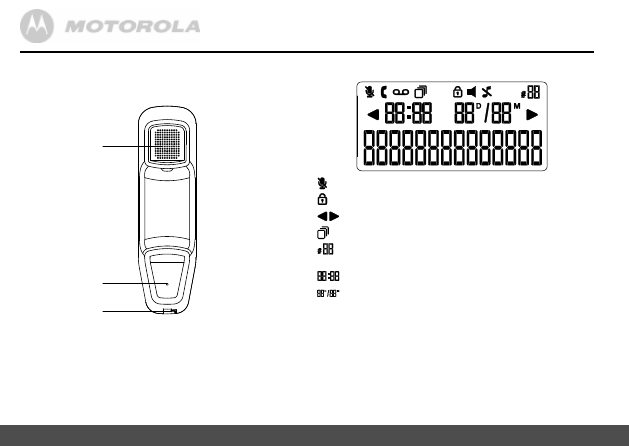
Gettingtoknowyourphone
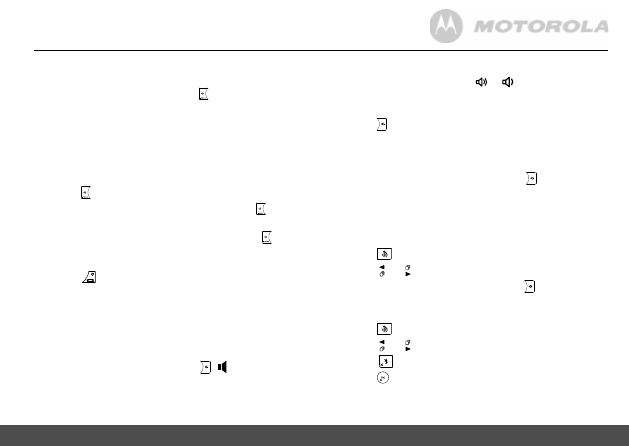
I Mute / Back
Duringacall,presstoswitchmuteon/off.
Gobacktopreviousmenulevel,
isdisplayedonthe
screen.
J End Call / Switch Handset on/off
Presstoendacall.
Pressandholdfor3secondstoswitchoff
thehandset.
K Volume down / Scroll down / Phonebook
Duringacall,presstodecreaseearpiecevolume.
Presstoscrollthroughthemenuoptions,rediallist,
callslistandphonebookentries.
Instandbymode,presstoopenthephonebookmenu.
L # / Ringer off
Diala#.
Pressandholdtoturntheringeron/off.
M Redial
Instandbymode,presstoopentherediallist.
N Microphone
Cordless handset display
Indicatesanincomingcallisconnectedorheld.
Flashestoindicateanincomingcall.
Flashestoindicatenewvoicemailmessagesreceived.
Offwhenyouhavenovoicemailmessages.
Indicatessignalstrength.
Flasheswhenhandsetisnotregisteredtothebaseor
ifyougooutofrange.
Indicatesnewcallslistentriesreceived.
1
Phonebookisopened.
Alarmison.
Hands-freemodeisON.
Ringerisswitchedoff.
1
Forthisfeaturetowork,youmustsubscribetoCallerIDServicefromyournetwork
operator.Asubscriptionfeemaybepayable.
Batteryisfullycharged
Flasheswhenthebatteryisalmostfullydischarged
12
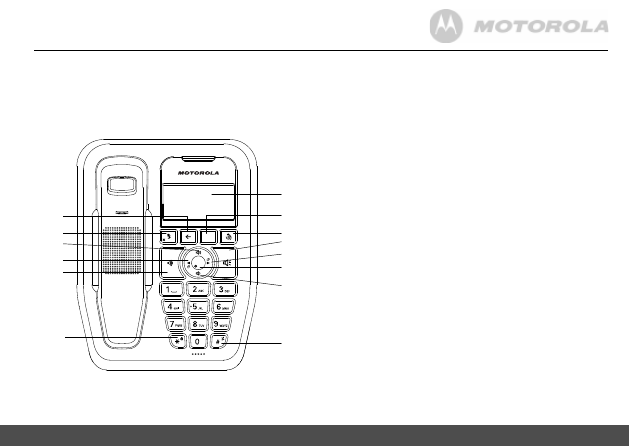
Gettingtoknowyourphone
Overview of your corded handset
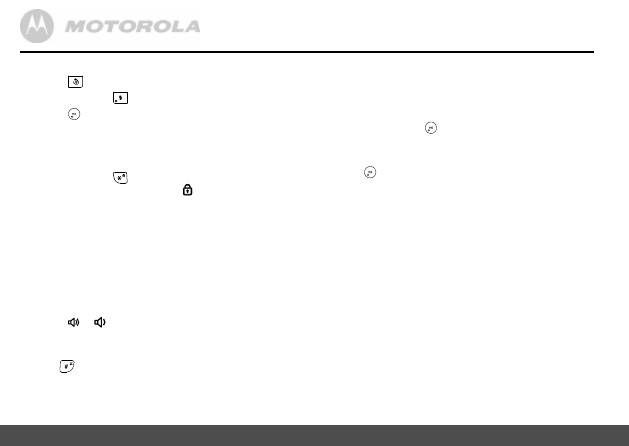
A Handset Earpiece
Tolistentoyourcaller.
B Handset Mic
Tospeaktoyourcaller.
C Curly cord socket
Whereyoupluginyourcurlycord.
Corded base display
Muteisactivated.
Keypadislocked.
Displaynumberislongerthan14digits.
Flashestoindicatenewcallslistentriesreceived.
1
Indicatesthenumberoftheentrybeingviewwhenthe
callslistisopen.
Timecanbeset.
Datecanbeset.
Allothercordedbasedisplayiconsarethesameasthe
cordlesshandsetdisplay.
1
Forthisfeaturetowork,youmustsubscribetoCallerIDServicefromyournetwork
operator.Asubscriptionfeemaybepayable.
A
B
C
13
Gettingtoknowyourphone
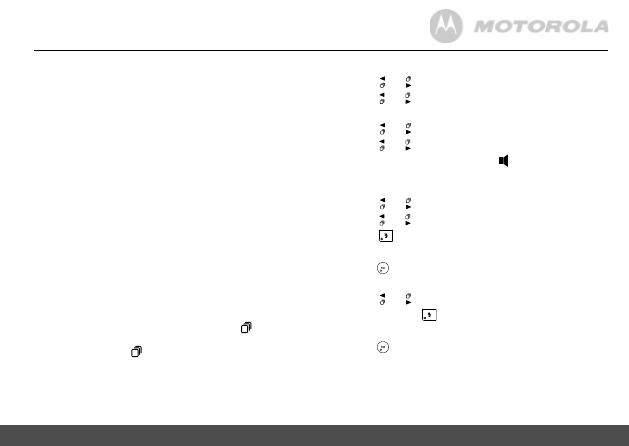
A Back
Returntostandby.
B Mute / Delete
Duringacall,presstoswitchmuteon/off.
Whenpre-diallingpresstodeleteincorrectdigits.
Whenviewingtheredial/callslist,presstodeletethe
displayedentryorpressandholdtodeleteallentries.
C Volume Up
Presstoincreasethevolumeofthebaseringer.
Whenonahands-freecallpresstoincreasethevolume
ofthecaller.
D Caller ID left
Presstoopenthecallslist.
Scrollthroughtherediallistandcallslist.
E Intercom / Page
Usedtomakeinternalcallsandtransfercalls.
Presstofindalosthandset.
Pressandholdwhenregisteringacordlesshandsetto
thecordedbase.
F * / Keypad Lock
Diala*.
Pressandholdtolock/unlockthekeypad.
G Display
Seepage12foranoverviewofthedisplayicons.
Overview of the corded base
G
H
I
J
K
L
M
N
INTERCOM
R
OK
A
B
C
D
E
F
14
Gettingtoknowyourphone
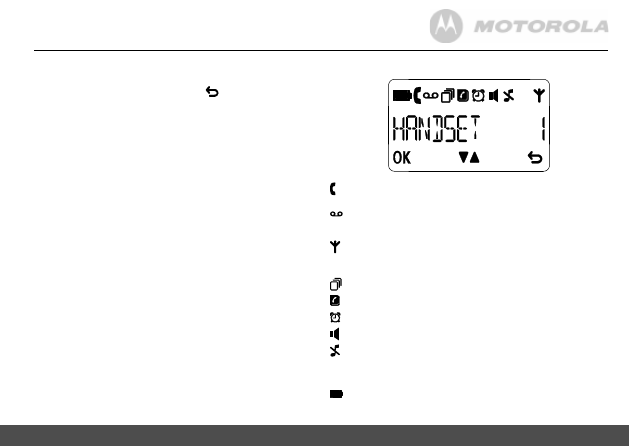
Navigating the cordless handset menu
YourSC200hasaneasytousemenusystemonthe
cordlesshandset.
Eachmenuhasalistofoptions,whichyoucanseeonthe
menumaponthefollowingpage.
Whenthehandsetisswitchedonandinstandby:
1. Press
toopenthemainmenu.
2. Thenuse or buttonstoscrollthroughtheavailable
options.
3. Softkeyoptions
OK
and
aredisplayed.Press
to
select
OK
andopenasub-menuorvalidateanoption.
Press
togobacktothepreviousmenulevel,correct
acharacterorcancelanaction.
Note
If no buttons are pressed for 15 seconds, the handset
returns to standby automatically.
H Recall
Usewithswitchboard/PABXservicesandsome
networkservices.
I Redial
Instandbymode,presstoopentherediallist.
J Hands-free
Presstomakeahands-freecall.
K Caller ID right
Presstoopenthecallslist.
Scrollthroughtherediallistandcallslist.
L OK / Clock
Presstoselectorconfirmadisplayedoption.
Pressandholdtosettheclock.
M Volume Down
Presstodecreasethevolumeofthebaseringer.
Whenonahands-freecallpresstodecreasethe
volumeofthecaller.
N # / Ringer Off
Diala#.
Pressandholdtoturntheringervolumeonandoff.

15
Gettingtoknowyourphone
Cordless handset menu map
PHONEBOOK
PERSONAL SET
CLOCK & ALARM
ADVANCED SET
NEWENTRY
LIST
EDITENTRY
DELETE
DELETEALL
DIRECTMEM.
HANDSETNAME
HANDSETTONE
LANGUAGE
AUTOHANG-UP
DATE/TIME
SETFORMAT
ALARM
ALARMTONE
CHANGEPIN
REGISTRATION
UNREGISTER
RESET
AUTOPREFIX
RECALLTIME
DIALMODE
FIRSTRING
16
Usingthephone
1. Duringacall,press
.Thedisplayshows
and
yourcallercannothearyou.
2. Press
againtoresumeyourcall.
3.4 Intercom
3.4.1 Make an internal call
Youcanmakeinternalcallsbetweenthebaseandhandset,
orifyouhavemorethanonehandsetregisteredtothe
base,youcanmakeinternalcallsbetweentwohandsets.
1. Press onthebase.Allregisteredhandsetwillring
3.4.2 Receive an internal call
1. Liftthehandsettoanswerthecall.
Note
If during an internal call you receive and an incoming call,
you will hear the alert tone on the base.
Press to put your internal caller on hold and answer the
call. When you end the external call the handset will
return to the internal call. Or press to switch between the
internal and external caller.
3.4.3 Transfer a call
1. Press onthebase.Allregisteredhandsetwillring.
2. Whentheinternalcallisanswered,placethecorded
handsetonthecordedbasetocompletethetransfer.
Using your corded base
3. Using the phone
3.1 Calls
3.1.1 Make a call
1. Liftthehandsetanddialthenumber.
3.1.2 Preparatory dialling
1. Dialthenumberfirst.Ifyoumakeamistakepress
todeletethelastdigit.
2. Liftthehandsettodial.
3.1.3 End a call
1. Placethecordedhandsetbackonthetelephonebase.
3.1.4 Receive a call
Whenyoureceiveacall,thebaseringsand flasheson
thedisplay.
1. Simplyliftthecordedhandsettoanswerthecall.
3.2 Adjust the earpiece volume
1. Duringacall,press or toincreaseordecreasethe
volume.Thereare5levelstochoosefrom.
3.3 Mute
Youcanmuteyourbasesothatyoucantalktosomeone
nearbywithoutyourcallerhearing.
17
Usingthephone
NOTE
During a hands-free call, press or to adjust the
volume. There are 5 levels to choose from.
3.5.2 Answer a call hands-free
1. Press toanswerthecallinhands-freemode.
3.5.3 Switch to hands-free during a call
Onceonahands-freecallonthebaseifyouwanttolisten
toyourcallerviatheearpiecesimplyliftthehandset.Ifyou
thenwanttogobacktohands-free,press andreplace
thehandset.
3.6 Redial
Thelast5entriesdialledarestoredintherediallist.
3.6.1 View or dial an entry
1. Press
toopentheRediallist.
2. Scroll or totheentryyouwant.
3. Eitherliftthecordedhandsetorpress to
automaticallydialtheselectednumber.
3.6.2 Delete an entry
1. Press
toopentheRediallist.
2. Scroll or totheentryyouwant.
3. Press
.Thedisplayshows
----
.
4. Press toconfirm.
NOTE
If there is no answer from the handset and you wish to
return to your external caller, press . Your external call
resumes automatically after 60 seconds if there is no
answer.
3.4.4 3-way conference call
Youcanholda3-wayconferencecallbetween2internal
callersand1externalcaller.
Duringacallwithanexternalcaller:
1. Press onthebase.Allregisteredhandsetwillring.
2. Whenthehandsetanswers,pressandhold to
connectallthreecallersandbegintheconferencecall.
3. Ifthereisnoanswerfromthehandset,press to
returntoyourexternalcaller.
4. Placethecordedhandsetbackonthecordedbaseand
press
onthecordlesshandsettoendthecall.
3.5 Hands-free
speakerphone
Hands-freeletsyoutalktoyourcallerwithoutholdingthe
handset.Italsoenablesotherpeopleintheroomtolisten
totheconversationovertheloudspeaker.
3.5.1 Make a hands-free call
1. Dialthenumberandthenpress , isdisplayedand
youwillhearthecalloverthebaseloudspeaker.
18
Clock
4.
Clock
IfyouhavesubscribedtoCallerIDService,thedateand
timewillbesetonyourbasewheneveracallisreceived.
Youcanalsomanuallysetthedateandtime.
1. Pressandholdthe buttononthetelephonebase.
Thedisplayshows
- - : - - - - D / - - M.
2. Enterthetime(HH:MM)anddate(DD:MM).
3. Press toconfirm.
3.6.3 Delete the entire Redial list
1. Press
toopentheRediallist.
2. Pressandhold
.Thedisplayshows
--------
.
3. Press toconfirm.
3.7 Lock / unlock the keypad
Youcanlockthekeypadsothatitcannotbeoperated
accidentally.
1. Pressandhold
for2secondstolockandunlock
thekeypad,thedisplayshows whenthekeypadis
locked.
NOTE
When the keypad is locked, you can still answer incoming
calls. When the call ends, the keypad lock comes
on again.
3.8 Ringer
volume
Youcanadjusttheringvolumeonyourbase.Choosefrom
5volumelevelsoroff.
1. Press or toadjustthevolume.
Note
You can also turn the base ringer on or off by pressing and
holding
on the base.
19
CallerIDandtheCallslist
5.2.1 View the Calls list
1. Press or toopentheCallslist.
2. Scroll or throughthelist.
5.2.2 Dial a number in the Calls list
1. Press or toopentheCallslist.
2. Scroll or totheentryyouwanttodial.
3. Liftthecordedhandsetorpress todialthedisplayed
entry.
5.2.3 Delete an entry
1. Press or toopentheCallslist.
2. Scroll or totheentryyouwanttodelete.
3. Press
todeletethedisplayedentry.
4. Thedisplayshows
----
.
5. Press toconfirm.
5.2.4 Delete the entire Calls list
1. Press or toopentheCallslist.
2. Pressandhold
todeleteallentries.
3. Thedisplayshows
--------
.
4. Press toconfirm.
5.
Caller ID and the Calls list
IMPORTANT
To use Caller ID, you must first subscribe to the service
from your network provider. A subscription fee may be
payable.
5.1 Caller
ID
IfyouhavesubscribedtoaCallerIDService,youwillbe
abletoseeyourcaller’snumberonyourbase(providedit
isnotwithheld)priortoansweringthecall.Thedisplaycan
showthefirst14digitsofthephonenumbers.
5.2 Calls
list
TheCallsliststoresdetailsofupto20callers,includingthe
phonenumberanddateandtimeofthecall.
Thecaller’sdetailsarestoredintheCallslistwhetherornot
youhaveansweredthecall.Thelistissharedbythebase
andallhandsetsregisteredtothebase.Whenthelistisfull,
andanewcallisreceived,theoldestentrywillbedeleted
automatically.
WhenanewcallisreceivedintheCallslist, willflashon
thedisplayinstandbymodetoalertyou.Whenyouhave
viewedthenewcall, disappears.
20
Usingthephone
6.2.5 Receive a call
Whenyoureceiveacall,thehandsetringsand flashes
onthedisplay.
1. Ifthehandsetisoffthechargerthenpress
to
answerthecall,orifthehandsetisonthechargerlift
thehandsetandpress
toanswerthecall.
6.3 Adjust the earpiece volume
1. Duringacall,press or toincreaseordecreasethe
volume.Thereare3levelstochoosefrom.
6.4 Mute
Youcanmuteyourhandsetsothatyoucantalkto
someonenearbywithoutyourcallerhearing.
1. Duringacall,press
.Thedisplayshows
MUTE ON
andyourcallercannothearyou.
2. Press
againtoresumeyourcall.
6.5 Intercom
6.5.1 Make an internal call
Youcanmakeinternalcallsbetweenthebaseandhandset,
orifyouhavemorethanonehandsetregisteredtothe
base,youcanmakeinternalcallsbetweentwohandsets.
1. Press
onthehandset.Thedisplaywillshow
INT
.
• Ifyouhaveonlyonecordlesshandsetthebaseis
calledautomatically,
HANDSET
0
isdisplayedforthe
cordedbase.
Using your cordless handset
6. Using the phone
6.1 Switch the cordless handset on / off
Pressandhold
wheninstandbymodetoswitchthe
handsetonoroff.
6.2 Calls
6.2.1 Make a call
1. Press
.
2. Whenyouhearthedialtone,dialthenumber.
6.2.2 Preparatory dialling
1. Dialthenumberfirst.Ifyoumakeamistakepress
to
deletethelastdigit.
2. Press
todial.
6.2.3 Make a direct memory call
1. Pressandholdtherelevantkeypadnumbertodialthe
pre-storednumberdirectly.
NOTE
To store a direct memory number, see page 25.
6.2.4 End a call
1. Press
,orifAutohang-upissetto
ON
placethe
handsetbackonthecharger.
21
Usingthephone
3. Whentheinternalcallisanswered,press
to
completethetransfer.
NOTE
If there is no answer from the other handset / base and you
wish to return to your external caller, press
.
6.5.4 3-way conference call
Youcanholda3-wayconferencecallbetween2internal
callersand1externalcaller.
Duringacallwithanexternalcaller:
1. Press
toputtheexternalcalleronhold.
• Ifyouhaveonlyonecordlesshandsetthebaseiscalled
automatically,
HANDSET 0
isdisplayedforthecorded
base.
• Ifmorethantwohandsetsareregisteredtothebase,
therelevantnumbersaredisplayed,e.g.
INT
0234*
.
2. Whenthehandsetanswers,pressandhold
to
connectallthreecallersandbegintheconferencecall.
3. Ifthereisnoanswerfromthebase/handset,press
toreturntoyourexternalcaller.
4. Press
toendthecall.
6.6 Hands-free
speakerphone
Hands-freeletsyoutalktoyourcallerwithoutholdingthe
handset.Italsoenablesotherpeopleintheroomtolisten
totheconversationovertheloudspeaker.
• Ifmorethantwohandsetsareregisteredtothebase,
therelevantnumbersaredisplayed,e.g.
INT
0234*
.
2. Enterthenumberofthehandsetyouwanttocallor
press
toringthebaseandallhandsets.
6.5.2 Receive an internal call
Whenyoureceiveaninternalcall,thedisplayshows
HANDSET
andthehandsetnumberthatiscallingyou.
1. Press
toanswerthecall.
Note
If during an internal call you receive and an incoming call,
you will hear the alert tone on the handset.
Press
to answer the call.
6.5.3 Transfer a call
Youcantransferanexternalcalltothebaseoranother
handsetregisteredtothebase.
Duringanexternalcall:
1. Press
onthehandset.Thedisplaywillshow
INT
.
• Ifyouhaveonlyonecordlesshandsetthebaseis
calledautomatically,
HANDSET
0
isdisplayedforthe
cordedbase.
• Ifmorethantwohandsetsareregisteredtothebase,
therelevantnumbersaredisplayed,e.g.
INT
0234*
.
2. Enterthenumberofthehandsetyouwanttotransfer
thecalltoorpress*toringthebaseandallhandsets.
22
Usingthephone
3. Press
todialthedisplayedentryorpress
to
returntostandby.
NOTE
If the called number exactly matches an entry stored in the
phonebook, the name is displayed. Press
to see the
called number.
6.7.2 Copy a Redial list number to the phonebook
1. Press toopentheRediallist.
2. Scroll or totheentryyouwant.
3. Press
.Thedisplayshows
SAVE NUMBER
.
4. Press
.Thedisplayshows
ENTER NAME
.
5. Enterthenameandpress
toconfirm.
6. Thedisplayshows
SAVED
.
7. Press
toreturntostandby.
NOTE
See “ENTERING NAMES” and “WRITING TIPS” on
page 24.
6.7.3 Edit an entry
1. Press toopentheRediallist.
2. Scroll or totheentryyouwanttoedit.
3. Press
.Thedisplayshows
SAVE NUMBER
.
4. Scroll to
EDIT ENTRY,
press
.
5. Thedisplayshowsthenumber.
6.6.1 Make a hands-free call
1. Dialthenumberandthenpress
twice.
iconisdisplayedandyouwillhearthecalloverthe
handsetloudspeaker.
2. Press
toswitchthecallbetweentheearpieceand
theloudspeaker.
3. Press
toendthecall.
NOTE
During a hands-free call, press or to adjust the
volume. There are 5 levels to choose from.
6.6.2 Answer a call hands-free
1. Ifthehandsetisoffthechargerthenpress
twiceto
answerthecall,orifthehandsetisonthechargerlift
thehandsetandpress
twicetoanswerthecall.
6.6.3 Switch to hands-free during a call
Duringacall,press
toputthecallon
theloudspeaker.
Toswitchhands-freeoffandreturnthecalltotheearpiece,
press
again.
6.7 Redial
Thelast5entriesdialledarestoredintherediallist.
6.7.1 View or dial an entry
1. Press toopentheRediallist.
2. Scroll or totheentryyouwant.
23
Usingthephone
NOTE
When the keypad is locked, you can still answer incoming
calls. When the call ends, the keypad lock comes on again.
6.9 Find a handset
Youcanalertahandsetuserthattheyarewantedorlocate
amissinghandset.
1. Press onthebase.Allhandsetsregisteredtothe
basewillring.
2. Tostoptheringing,press onthebaseagain,orpress
onanycordlesshandsettostartaninternalcall.
6. Editthenumberandpress
toconfirm.
7. Press
toreturntostandby.
6.7.4 Delete an entry
1. Press toopentheRediallist.
2. Scroll or totheentryyouwant.
3. Press
.Thedisplayshows
SAVE NUMBER
.
4. Scroll to
DELETE,
press
.
5. Thedisplayshows
DELETE?
.Press
toconfirm.
6. Press
toreturntostandby.
6.7.5 Delete the entire Redial list
1. Press toopentheRediallist.
2. Press
.Thedisplayshows
SAVE NUMBER
.
3. Scroll to
DELETE ALL,
press
.
4. Thedisplayshows
DELETE?
.Press
toconfirm.
5. Press
toreturntostandby.
6.8 Lock / unlock the keypad
Youcanlockthekeypadsothatitcannotbeoperated
accidentallywhilecarryingitaround.
1. Pressandhold
for2secondstolockandunlock
thekeypad.
2. Whenthekeypadislockedthedisplayshows
KEYS LOCKED
.
24
Phonebook
Press
once to enter T.
Press
three times to enter O.
Press
once to enter M.
WRITING TIPS
Press
to delete the last character or digit.
Press
on the handset to insert a space.
7.2 View or dial an entry
Either:
1. Press toenterthephonebook.
2. Scroll or totheentryyouwant.
OR
Enterthefirstletterofthenametosearchalphabetically.
Thefirstnamethatstartswiththisletterorthenearest
letterinthealphabetwillbedisplayed.Scroll or to
theentryyouwant.
3. Press
todialor
toreturntostandby.
NOTE
When the name is displayed, you can switch between the
name and number by pressing
.
Or:
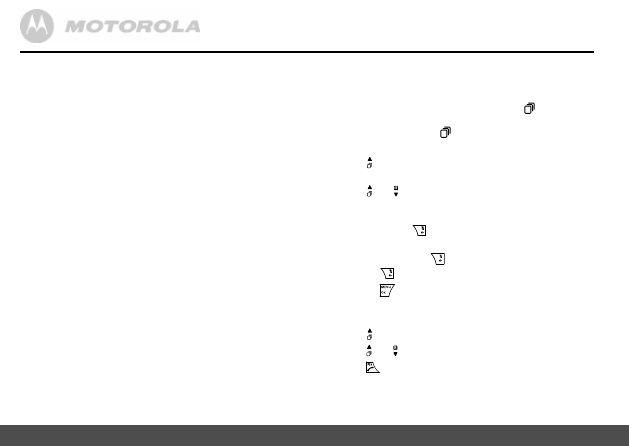
1. Press
.Thedisplayshows
PHONEBOOK
.
2. Press
.Scroll to
LIST
andpress
.
3. Scroll or totheentryyouwant.
7. Phonebook
Youcanstoreupto50namesandnumbersinthecordless
handset.Namescanbeupto12characterslongand
numbersupto24digits.
7.1 Store a name and number
IfyouhavesubscribedtoCallerIDserviceandwishthe
nameandnumbertoflashalternatelyonthedisplayinstead
ofjustthenumber,savethefulltelephonenumberincluding
theareacodetoyourphonebook.
Youcanstoremultipleentrieswiththesamenumber.
However,topreventunnecessaryduplicatedentries,you
canonlystorethesamenameonce.
1. Press
.Thedisplayshows
PHONEBOOK.
2. Press
.Thedisplayshows
NEW ENTRY
.
3. Press
toselect.Thedisplayshows
ENTER NAME
.
4. Enterthenameandpress
.
5. Thedisplayshows
ENTER NUMBER
.
6. Enterthenumberandpress
.
7. Thedisplayshows
NEW ENTRY
.
8. Enterthenextnameandnumberthatyouwishtostore
inyourphonebookorpress
toreturntostandby.
ENTERING NAMES
Use the keypad letters to enter names, e.g. to store TOM:
25
Phonebook
3. Scroll or totheentryyouwanttodelete,or
searchalphabeticallyandpress
.
4. Thedisplayshows
DELETE?
.Press
toconfirm.
5. Press
toreturntostandby.
7.5 Delete all entries
1. Press
,thedisplayshows
PHONEBOOK
.
2. Press
,scroll to
DELETE ALL
.
3. Press
,thedisplayshows
DELETE?
.
4. Press
toconfirm.
5. Press
toreturntostandby.
7.6 Store a direct memory number
1. Press
,thedisplayshows
PHONEBOOK
.
2. Press
,scroll to
DIRECT MEM.
andpress
.
3. Scroll or to
KEY 1
or
KEY 2
.
4. Press
,thedisplayshows
NO NUMBER
.
5. Press
,thedisplayshows
EDIT NUMBER
.
6. Press
,thedisplayshows
ENTER NAME
.
7. Enterthenameandpress
.
8. Thedisplayshows
ENTER NUMBER
.
9. Enterthenumberandpress
toconfirm.
10.Press
toreturntostandby.
OR
Enterthefirstletterofthenametosearchalphabetically.
Thefirstnamethatstartswiththisletterorthenearest
letterinthealphabetwillbedisplayed.Scroll or to
theentryyouwant.
4. Press
todialor
toreturntostandby.
NOTE
When the name is displayed, you can switch between the
name and number by pressing
.
7.3 Edit a phonebook entry
1. Press
,thedisplayshows
PHONEBOOK
.
2. Press
,scroll to
EDIT ENTRY
andpress
.
3. Scroll or totheentryyouwanttoedit,orsearch
alphabeticallyandpress
.
4. Thedisplayshowstheexistingname.
5. Editthenameandpress
.
6. Thedisplayshowstheexistingnumber.
7. Editthenumberandpress
.
8. Press
toreturntostandby.
7.4 Delete an entry
1. Press
,thedisplayshows
PHONEBOOK
.
2. Press
,scroll to
DELETE
andpress
.
26
Personalsettings
8. Personal settings
8.1 Handset
name
Ifyouareusingmorethanonecordlesshandsetwithyour
SC200base,youcansetapersonalizednameforeach
handsettoeasilydistinguishbetweenthem.
Anamecanbeupto10characterslong.
1. Press
,thedisplayshows
PHONEBOOK
.
2. Scroll to
PERSONAL SET
andpress
.
3. Thedisplayshows
HANDSET NAME.
Press
.
4. Thedisplayshowsthecurrentname.
5. Editthenameandpress
toconfirm.
6. Press
toreturntostandby.
See“ENTERINGNAMES”and“WRITINGTIPS”on
page24.
NOTE
Thehandsetnamewillonlybedisplayedforapproximately
15secondswhennobuttonispressed.Ifyoumakea
mistake,press
todeletethelastcharacterordigit.
8.2 Handset
tones
8.2.1 Ring volume
Youcanadjusttheringvolumeonyourhandset.Choose
from4volumelevelsoroff.
1. Press
,thedisplayshows
PHONEBOOK
.
NOTE
To dial a direct memory number see page 20.
7.7 Edit a direct memory number
1. Press
,thedisplayshows
PHONEBOOK
.
2. Press
,scroll to
DIRECT MEM.
andpress
.
3. Scroll or to
KEY 1
or
KEY 2
andpress
.
4. Thedisplayshowsthecurrentstoredname.
5. Press
,thedisplayshows
EDIT NUMBER
.
6. Press
,thedisplayshowsthecurrentname.
7. Editthenameandpress
.
8. Thedisplayshowsthecurrentnumber.
9. Editthenumberandpress
toconfirm.
10.Press
toreturntostandby.
7.8 Delete a direct memory number
1. Press
,thedisplayshows
PHONEBOOK
.
2. Press
,scroll to
DIRECT MEM.
andpress
.
3. Scroll or to
KEY 1
or
KEY 2
andpress
.
4. Thedisplayshowsthecurrentstoredname.
5. Press
,scroll to
DELETE
.
6. Press
,thedisplayshows
DELETE?
press
toconfirm.
7. Press
toreturntostandby.

27
Personalsettings
8.2.3 Key beep
Whenyoupressabuttononthehandsetkeypad,youwill
hearabeep.Youcanswitchthesebeepsonoroff.
1. Press
,thedisplayshows
PHONEBOOK
.
2. Scroll to
PERSONAL SET
andpress
.
3. Scroll or to
HANDSET TONE
andpress
.
4. Scroll or to
KEY BEEP
andpress
.
5. Scroll or toselect
ON
or
OFF
andpress
toconfirm.
6. Press
toreturntostandby.
8.3 Language
Youcanchangethedisplaylanguageforyourhandset,
thereare16tochoosefrom.English,German,Turkish,
French,Italian,Portuguese,Greek,Spanish,Dutch,
Denmark,Russian,Brazilian,Romanian,Polish,Czech,
Hungarian.
1. Press
,thedisplayshows
PHONEBOOK
.
2. Scroll to
PERSONAL SET
andpress
.
3. Scroll or to
LANGUAGE
andpress
.
4. Scroll or toselectthelanguageandpress
to
confirm.
5. Press
toreturntostandby.
2. Scroll to
PERSONAL SET
andpress
.
3. Scroll or to
HANDSET TONE
andpress
.
4. Thedisplayshows
RING VOLUME
.Press
.
5. Scroll or toselectthevolume(
1
-
4
or
OFF
)and
press
toconfirm.
6. Press
toreturntostandby.
NOTE
You can also turn the handset ringer on or off by pressing
and holding the
button on the handset.
8.2.2 Ringtones
Onthecordlesshandsetyoucansetdifferentringer
melodiesforyourexternalcalls.Choosefrom10different
ringermelodies.
Youwillhearasampleringasyouscrolltoeachring
melody.
1. Press
,thedisplayshows
PHONEBOOK
.
2. Scroll to
PERSONAL SET
andpress
.
3. Scroll or to
HANDSET TONE
andpress
.
4. Scroll or to
RING TONES
andpress
.
5. Scroll or toselectthemelodyandpress
toconfirm.
6. Press
toreturntostandby.
28
Clock&Alarm
9.
Clock & alarm
IfyouhavesubscribedtoCallerIDService,thedateand
timewillbesetonallyourhandsetswheneveracallis
received.Youcanalsomanuallysetthedateandtimeon
theindividualhandsets.
9.1 Set the date and time
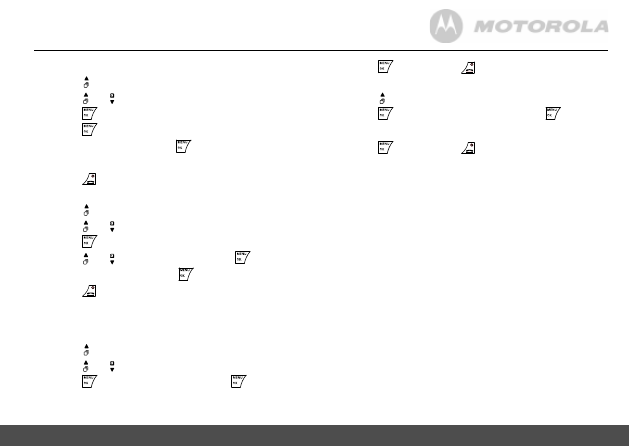
1. Press
,thedisplayshows
PHONEBOOK
.
2. Scroll to
CLOCK&ALARM
andpress
.
3. Thedisplayshows
DATE/TIME
.Press
.
4. EnterthedateusingtheformatYYYY/MM/DDe.g.
2012/12/04for4thofDecember2012andpress
to
confirm.Enterthetime(HH:MM)andpress
.
5. Whenthehandsetisin12hourformatpress or
toselect
AM
or
PM
andpress
.
6. Press
toreturntostandby.
9.2 To set the time format
1. Press
,thedisplayshows
PHONEBOOK
.
2. Scroll to
CLOCK&ALARM
andpress
.
3. Scroll to
SET FORMAT
andpress
.
4. Thedisplayshows
TIME FORMAT
,press
.
5. Scroll or to
12 HOURS
or
24 HOURS
andpress
.
6. Press
toreturntostandby.
8.4 Auto hang up
1. Press
,thedisplayshows
PHONEBOOK
.
2. Scroll to
PERSONAL SET
andpress
.
3. Scroll or to
AUTO HANG-UP
andpress
.
4. Scroll or toselect
ON
or
OFF
andpress
toconfirm.
5. Press
toreturntostandby.
29
Clock&Alarm
9.5 To set the alarm tone
Youcanadjustthealarmringermelody.Thereare3
melodiestochoosefrom.
1. Press
,thedisplayshows
PHONEBOOK
.
2. Scroll to
CLOCK&ALARM
andpress
.
3. Scroll to
ALARM TONE
andpress
.
4. Scroll or toselectthemelodyandpress
toconfirm.
5. Press
toreturntostandby.
9.6 Switch off alarm ring
Whenthealarmsounds,pressanybuttontoswitchitoff.
NOTE
If you are using the handset to make a call when the alarm
ring is due, you will hear a beep in the earpiece.
9.3 To set the date format
1. Press
,thedisplayshows
PHONEBOOK
.
2. Scroll to
CLOCK&ALARM
andpress
.
3. Scroll to
SET FORMAT
andpress
.
4. Scroll to
DATE FORMAT
andpress
.
5. Scroll or to
DD/MM
or
MM/DD
andpress
.
6. Press
toreturntostandby.
9.4 Set the alarm
Eachhandsetcanhaveadifferentalarmsetting.
1. Press
,thedisplayshows
PHONEBOOK
.
2. Scroll to
CLOCK&ALARM
andpress
.
3. Scroll to
ALARM
andpress
.
4. Press or toselect
ON ONCE
,
ON DAILY
or
OFF
and
press
toconfirm.
5. Ifyouselect
ON ONCE
or
ON DAILY
,enterthetimein24
hourformat(e.g.07--30for7:30am)andpress
to
confirm.
Whenthehandsetisin12hourformatpress or to
selectAMorPM.
6. Press
toreturntostandby.
30
Advancedsettings
Ifyouhavepurchasedanadditionalhandsetseparately,
youmustregisterittoyourSC200basebeforeitcan
beused.
10.2.1 Register an additional handset
Onthebase:
1. Pressandhold for5secondsuntilyouheara
continuousbeep.Thebasewillremaininregistration
modefor60seconds.
Onthehandset:
1. Press
,thedisplayshows
PHONEBOOK
.
2. Scroll to
ADVANCED SET
andpress
.
3. Scroll to
REGISTRATION
andpress
.
4. EnterthePINcodeandpress
.
5. Thedisplayshows
WAITING
,youwillhearabeepifthe
registrationissuccessful.Thehandsetisautomatically
assignedanavailablehandsetnumber.Usethis
numberwhenmakinginternalcalls.
10.2.2 Register a different make of handset to your
SC200 base
IMPORTANT
DECT GAP Profile only guarantees that basic calling
functions will work correctly between different makes / types
of handset and base. There is a possibility that certain
devices such as Caller ID will not work correctly.
10.
Advanced settings
10.1 Change the PIN code
Somefunctionsareprotectedbya4digitPINcodewhich
mustbeenteredifyouwanttochangethesettings.The
defaultPINis0000.Youcanchangethistoyourown
preferrednumber,themaximumlengthis8digits.
WhenyouenteraPIN,thedigitsareshownas
****
.
1. Press
,thedisplayshows
PHONEBOOK
.
2. Scroll to
ADVANCED SET
andpress
.
3. Thedisplayshows
CHANGE PIN
.Press
.
4. Enterthecurrent4digitPINcodeandpress
.
5. EnterthenewPINandpress
.
6. Press
toreturntostandby.
Note
If you forget your PIN you can reset the handset to take it
back to the default setting.
10.2 Registration
Youcanregisterupto4cordlesshandsetstoyourSC200
cordedbasetoextendyourphonesystemwithouthavingto
installextensionsocketsforeachnewphone.
EachSC200cordlesshandsetcanberegisteredwithupto
fourbases.Youcanthenselectthebaseyouprefertouse.
TheSC200cordlesshandsetcomespre-registeredtothebase.
31
Advancedsettings
6. Press
toreturntostandby.
10.3 Restore default settings
YoucanrestoreyourSC200toitsdefault(original)settings.
Allthehandsetsthatareregisteredtothebasewillbe
retained.
IMPORTANT
Resetting your phone to its default settings will delete all
entries in the Redial list and Calls list. All handset and base
settings will also be reset.
1. Press
,thedisplayshows
PHONEBOOK
.
2. Scroll to
ADVANCED SET
andpress
.
3. Scroll to
RESET
andpress
.
4. Thedisplayshows
CONFIRM?
.Press
.
5. Press
toreturntostandby.
10.4 Auto prefix
Thisfeaturechecksandformatsapre-dialledoutgoing
numberbeforeitisdialledout.
10.4.1 Set detect digit number
Youcansetadetectnumberthatcanbeupto5digits,
oncethisnumberhasbeensetthephonewillcheckthe
firstfewdigitsoftheanypre-diallednumberandifthey
matchthedetectnumberwillbereplacedthemwiththe
prefixnumber.
Onthebase:
1. Pressandhold for5secondsuntilyouheara
continuousbeep.Thebasewillremaininregistration
modefor60seconds.
Onthehandset:
1. Followtheregistrationinstructionsgiveninyour
handset’suserguide.
NOTE
If registration is not successful the first time, please repeat
the process again in case the base registration period ran
out of time. If the base is not found after a few seconds, the
handset returns to standby. Try registering again.
If there are already 4 handsets registered to the base, the
registration will fail. You must de-register another handset
before you can register a new one.
10.2.3 De-register a handset
Useonehandsettode-registeranother.Youcannotde-
registerthehandsetthatyouareusing.
1. Press
,thedisplayshows
PHONEBOOK
.
2. Scroll to
ADVANCED SET
andpress
.
3. Scroll to
UNREGISTER
andpress
.
4. Enterthe4digitPINcodeandpress
.
5. Scroll or tothehandsetnumberthatyouwantto
un-registerandpress
.
32
Advancedsettings
10.5 Default settings
Keybeep
On
Autohang-up
On
Cordlesshandsetringermelody
Melody1
Cordlesshandsetringervolume
3
Cordlesshandsetearvolume
3
Phonebook
NoNumber
Callslist
NoNumber
Rediallist
NoNumber
Baseringervolume
3
Basespeakervolume
3
Basetimeformat
24Hours
Basedateformat
DD/MM
PINcode
0000
Dialmode
Tone
Recalltime
Long
Keypadlock
Off
1. Press
,thedisplayshows
PHONEBOOK
.
2. Scroll to
ADVANCED SET
andpress
.
3. Scroll to
AUTO PREFIX
andpress
.
4. Thedisplayshows
DETECT DIGIT
andpress
.
5. Enterthenumberandpress
.
6. Press
toreturntostandby.
10.4.2 Set auto prefix number
Youcandefineaprefixnumber(maximumof10digits)to
beaddedtothebeginningofanypre-diallednumber.
1. Press
,thedisplayshows
PHONEBOOK
.
2. Scroll to
ADVANCED SET
andpress
.
3. Scroll to
AUTO PREFIX
andpress
.
4. Scroll or to
PREFIX
andpress
.
5. Enterthenumberandpress
.
6. Press
toreturntostandby.
NOTE
If no detect number is set the prefix number will be added
to all pre-dialled numbers.
33
Advancedsettings
10.8 First ring
YourSC200willautomaticallydetecttheCallerID
(subscriptiondependent).Ifyoudonotwishtohearthe
ringbeforetheCallerIDisdisplayedyoucanmanuallyset
FIRSTRINGto
OFF
.Thedefaultsettingis
ON
.
1. Press
,thedisplayshows
PHONEBOOK
.
2. Scroll to
ADVANCED SET
andpress
.
3. Scroll to
FIRST RING
andpress
.
4. Scroll or toselect
ON
or
OFF
press
.
5. Press
toreturntostandby.
10.6 Recall time
ThissettingisusefultoaccesscertainnetworkandPABX/
switchboardservices.
ThedefaultSC200recalltimeissuitableforyourcountry
andnetworkoperator.Itisunlikelythatyoushouldneedto
changethissettingunlessadvisedtodoso.
1. Press
,thedisplayshows
PHONEBOOK
.
2. Scroll to
ADVANCED SET
andpress
.
3. Scroll to
RECALL TIME
andpress
.
4. Scroll or to
SHORT,
MEDIUM
or
LONG
andpress
.
5. Press
toreturntostandby.
10.7 Dial mode
YourSC200issettotonedialling.Youshouldonlyneedto
changethisifconnectedtoanoldertypeofswitchboard/
PABXwhichrequiresPulsedialling.
1. Press
,thedisplayshows
PHONEBOOK
.
2. Scroll to
ADVANCED SET
andpress
.
3. Scroll to
DIAL MODE
andpress
.
4. Scroll or to
TONE
or
PULSE
andpress
.
5. Press
toreturntostandby.
34
CallerIDandtheCallslist
andallhandsetsregisteredtothebase.Whenthelistisfull,
andanewcallisreceived,theoldestentrywillbedeleted
automatically.
WhenanewcallisreceivedintheCallslist, willappear
onthedisplayinstandbymodetoalertyou.Whenyou
haveviewedthenewcall, disappears.
11.2.1 View the Calls list
1. Press toopentheCallslist.Iftherearenocallsin
thelist,thedisplayshows
NO NUMBER
.
2. Press or toscrollthroughthelist.
• Ifthecaller’snumberexactlymatchesanentry
storedinthephonebook,thedisplaywillshowthe
name.Press
toseethecaller’snumber.
• Ifthetelephonenumberislongerthan12digits,--is
displayed.Press
toseetheremainingdigits.
• Press
againtoseethetimeanddateofthecall.
• Press
againtoaccesstheoptiontostorethe
entryinyourphonebook.
11.2.2 Dial a number in the Calls list
1. Press toopentheCallslist.
2. Scroll or totheentryyouwant.
3. Press
todialthedisplayedentry.
11.
Caller ID and the Calls list
IMPORTANT
To use Caller ID, you must first subscribe to the service
from your network provider. A subscription fee may be
payable.
To ensure that the caller’s name is displayed, make sure
you have stored the full telephone number, including the
area code in the phonebook.
If the caller’s number is stored in the phonebook, the name
assigned to it will be displayed.
11.1 Caller ID
IfyouhavesubscribedtoaCallerIDService,youwillbe
abletoseeyourcaller’snumberonyourhandset(provided
itisnotwithheld)priortoansweringthecall.Ifthecaller’s
numberis12digits,thedisplaywillshowallthedigitsofthe
number.Ifthenumberislongerthan12digits,thedisplay
willshowthefirst11digitsand--.
Ifyourcaller’snameandnumberarestoredinthe
phonebookandanumbermatchisfound,thecaller’sname
andnumberwillflashalternatelyonthedisplay.
11.2 Calls list
TheCallsliststoresdetailsofupto10callers,includingthe
phonenumberanddateandtimeofthecall.
Thecaller’sdetailsarestoredintheCallslistwhetherornot
youhaveansweredthecall.Thelistissharedbythebase
35
CallerIDandtheCallslist
5. Press
toconfirmor
tocancel.
11.2.6 Delete the entire Calls list
1. Press toopentheCallslist.
2. Press
andscrollto
DELETE ALL
.Press
.
3. Thedisplayshows
DELETE?
.
4. Press
toconfirmor
tocancel.
11.2.3 Copy a Calls list number to the phonebook
1. Press toopentheCallslist.
2. Scroll or totheentryyouwant.
3. Press
thedisplayshows
SAVE NUMBER
.
4. Press
again.Thedisplayshows
ENTER NAME
.
5. Enterthenameandpress
.
6. Thedisplayshows
SAVED
andthenumberisstored.
7. Press
toreturntostandby.
11.2.4 Edit an entry
1. Press toopentheCallslist.
2. Scroll or totheentryyouwant.
3. Press
thedisplayshows
SAVE NUMBER
.
4. Scroll or to
EDIT ENTRY
andpress
.
5. Editthenumberandpress
.
6. Press
toreturntostandby.
See “ENTERING NAMES” and “WRITING TIPS” on
page 24.
11.2.5 Delete an entry
1. Press toopentheCallslist.
2. Scroll or totheentryyouwanttodelete.
3. Press
andscrollto
DELETE
.Press
.
4. Thedisplayshows
DELETE?
.
36
Help
icon flashes
• Handsetisoutofrange.Moveclosertothebase.
• Makesurethatthehandsetisregisteredtothebase,
seepage30.
• Checkthatthemainspowerisconnectedproperlyand
switchedon.
Keypad does not seem to work
• Checkthatthekeypadlockisnoton,seepages18
and23.
icon is not flashing during charge
• Adjustthehandsetslightlyonthebase.
• Cleanthechargingcontactswithaclothmoistenedwith
alcohol.
• Checkthatthemainspowerisconnectedproperlyand
switchedon.
• Thebatteryisfull.Whenthehandsetisfullycharged,
willappearsteadyonthedisplay.
No Caller ID
• Checkyoursubscriptionwithyournetworkoperator,see
pages19and34.
• Thecallermayhavewithheldtheirnumber.
• Therecordcannotbefoundinyourphonebook.Check
thatyouhavethecorrectname/numberstoredinyour
phonebook,withthefullareacode.
12.
Help
No dial tone
• Useonlythetelephonelinecordsupplied.
• Checkthatthetelephonelinecordis
connectedproperly.
• Checkthatthemainspowerisconnectedproperlyand
switchedon.
No display on the corded base
• Checkthatthemainspowerisconnectedproperlyand
switchedon.
• Resetthebasebydisconnectingthemainspower.
• Leaveforafewsecondsandreconnect.
No display on the cordless handset
• Checkthatthebatteriesareinsertedcorrectlyandfully
charged.Useonlyapprovedrechargeablebatteries
supplied.
• Checkthatthehandsetisswitchedon.Pressandhold
.
• Resetthebasebyremovingthebatteriesand
disconnectingthemainspower.Waitforaround15
secondsbeforeconnectingitagain.Allowuptoone
minuteforthehandsetandbasetosynchronize.

37
Generalinformation
13.
General information
This product is intended for connection to analogue public
switched telephone networks and private switchboards in
Europe.
Important safety instructions
Followthesesafetyprecautionswhenusingyourphoneto
reducetheriskoffire,electricshock,andinjurytopersons
orproperty:
1. Keepallslitsandopeningsofthephoneunblocked.
Donotsetthephoneonaheatingregisterorovera
radiator.Ensurethatproperventilationisprovidedatthe
installationsite.
2. Donotusewhilewetorwhilestandinginwater.
3. Donotusethisproductnearwater(forexample,neara
bathtub,kitchensink,orswimmingpool).
4. Donotallowanythingtorestonthepowercord.Place
thepowercordsothatitwillnotbewalkedon.
5. Neverinsertobjectsofanykindintotheproductvents
asthatmayresultinfireorelectricshock.
6. Unplugthisproductfromthewalloutletbeforecleaning.
Donotuseliquidcleanersoraerosolcleaners.Usea
dampclothforcleaning.
7. Donotdisassemblethisproduct.Ifserviceorrepair
workisrequired,contactthecustomerservicehelpline
foundinthisuser’sGuide.
I have forgotten my PIN!
• RestoreyourSC200toitsdefaultsettings,see,
page32.
Cannot register a handset to the base
Youcanregisteruptoamaximumof4handsetstoa
SC200base.Youmustde-registerahandsetinorderto
registeranewone,seepage31.
• CheckthatyouhaveenteredthecorrectPINcode
(default=0000).
• Checkthatyouareatleastonemetreawayfromother
electricalequipmenttoavoidinterference
whenregistering.
Handset does not ring
• ThehandsetringervolumemaybesettoOff,seepage
26.
Base unit does not ring
• ThebaseringervolumemaybesettoOff,see
page18.
Noise interference on my phone or on other
electrical equipment nearby
• PlaceyourSC200atleastonemetreawayfrom
electricalappliancesoranymetalobstructionstoavoid
anyriskofinterference.

38
Generalinformation
orshower.
4. Operatethisphoneusingonlythepowersourcethatis
indicatedonthemarkinglabel.Ifyouareunsureofthe
powersupplytoyourhome,consultwithyourdealeror
localpowercompany.
5. Donotplacethisproductonanunstablecart,stand,or
table.Thisproductmayfall,causingseriousdamageto
theproduct.
6. Adjustonlythosecontrolsthatarecoveredbythe
operatinginstructions.Improperadjustmentofother
controlsmayresultindamageandwilloftenrequire
extensiveworktorestoretheproductto
normaloperation.
7. Cleanthisproductwithasoft,dampcloth.Donotuse
chemicalsorcleaningagentstocleanthisphone.
8. Useonlythepowersupplythatcamewiththisunit.
Usingotherpowersuppliesmaydamagetheunit.
9. Becausethisphoneoperatesonelectricity,youshould
haveatleastonephoneinyourhomethatcould
operatewithoutelectricityinthecasethepowerinyour
homegoesout
10.Toavoidinterferencetonearbyappliances,donotplace
thebaseofthephoneonornearaTV,microwaveoven,
orVCR.
8. Donotoverloadwalloutletsandextensioncords.
9. Avoidusingduringanelectricalstorm.Useasurge
protectortoprotecttheequipment.
10.Donotusethisphonetoreportagasleak,especiallyif
youareinthevicinityofthegasline.
CAUTION
To reduce the risk of fire, use only the supplied
power adaptor.
Unplug this phone immediately from an outlet if:
• Thepowercordorplugisdamagedorfrayed.
• Liquidhasbeenspilledontheproduct.
• Theproducthasbeenexposedtorainorwater.Do
notretrievethehandsetorbaseuntilafteryouhave
unpluggedthepowerandphonefromthewall.Then
retrievetheunitbytheunpluggedcords.
• Theproducthasbeendroppedorthecabinethasbeen
damaged.
• Theproductexhibitsadistinctchangeinperformance.
Installation guidelines
1. Readandunderstandallinstructionsandsavethemfor
futurereference.
2. Followallwarningsandinstructionsmarkedon
theproduct.
3. Donotinstallthisproductnearabathtub,sink,

39
Generalinformation
Environmental
• Donotexposetodirectsunlight.
• Thehandsetmaybecomewarmwhenthebatteries
arebeingchargedorduringprolongedperiodsofuse.
Thisisnormal.However,werecommendthattoavoid
damage,donotplacetheproductonantique/veneered
wood.
• Donotplaceyourproductoncarpetsorothersurfaces
whichgeneratefibres,orplaceitinlocationspreventing
thefreeflowofairoveritssurfaces.
• Donotsubmergeanypartofyourproductinwater
anddonotuseitindamporhumidconditions,suchas
bathrooms.
• Donotexposeyourproducttofire,explosivesorother
hazardousconditions.
• Thereisaslightchancethatyourphonecouldbe
damagedbyanelectricalstorm.Werecommendthat
youunplugthepowerandtelephonelinecordduringan
electricalstorm.
Product disposal instructions
Product disposal instructions for residential users
Whenyouhavenofurtheruseforit,pleaseremoveany
batteriesanddisposeofthemandtheproductaccording
toyourlocalauthority’srecyclingprocesses.Formore
information,pleasecontactyourlocalauthorityorthe
retailerwheretheproductwaspurchased.
Battery safety instructions
• Donotburn,disassemble,mutilate,orpuncturethe
battery.Thebatterycontainstoxicmaterialsthatcould
bereleased,resultingininjury.
CAUTION
There is a risk of explosion if you replace the battery
with an incorrect battery type. Use only the battery pack
that came with your phone or an authorized replacement
recommended by the manufacturer.
• Keepbatterypacksoutofthereachofchildren.
• Removebatterypacksifstoringover30days.
• Donotdisposeofbatterypacksinfire,whichcould
resultinexplosion.
• Therechargeablebatterypacksthatpowerthisproduct
mustbedisposedofproperlyandmayneedtobe
recycled.Refertoyourbattery’slabelforbatterytype.
Contactyourlocalrecyclingcentreforproperdisposal
methods.
SAVE THESE INSTRUCTIONS
Cleaning
• Cleanthehandsetandbase(orcharger)withadamp
(notwet)cloth,orananti-staticwipe.
• Neverusehouseholdpolishasthiswilldamagethe
product.Neveruseadryclothasthismaycausestatic
shock.

40
Generalinformation
withinacommerciallyreasonabletime,willatnocharge
repairorreplaceanyProductsorAccessoriesthatdoesnot
conformtothislimitedwarranty.Wemayusefunctionally
equivalentreconditioned/refurbished/pre-ownedornew
Products,Accessoriesorparts.
What Other Limitations Are There?
ANYIMPLIEDWARRANTIES,INCLUDINGWITHOUT
LIMITATIONTHEIMPLIEDWARRANTIESOF
MERCHANTABILITYANDFITNESSFORAPARTICULAR
PURPOSE,SHALLBELIMITEDTOTHEDURATIONOF
THISLIMITEDWARRANTY,OTHERWISETHEREPAIR
ORREPLACEMENTPROVIDEDUNDERTHISEXPRESS
LIMITEDWARRANTYISTHEEXCLUSIVEREMEDYOF
THECONSUMER,ANDISPROVIDEDINLIEUOFALL
OTHERWARRANTIES,EXPRESSOFIMPLIED.INNO
EVENTSHALLMOTOROLAORSUNCORPBELIABLE,
WHETHERINCONTRACTORTORT(INCLUDING
NEGLIGENCE)FORDAMAGESINEXCESSOFTHE
PURCHASEPRICEOFTHEPRODUCTORACCESSORY,
ORFORANYINDIRECT,INCIDENTAL,SPECIALOR
CONSEQUENTIALDAMAGESOFANYKIND,ORLOSS
OFREVENUEORPROFITS,LOSSOFBUSINESS,
LOSSOFINFORMATIONOROTHERFINANCIAL
LOSSARISINGOUTOFORINCONNECTIONWITH
THEABILITYORINABILITYTOUSETHEPRODUCTS
ORACCESSORIESTOTHEFULLEXTENTTHESE
DAMAGESMAYBEDISCLAIMEDBYLAW.
Somejurisdictionsdonotallowthelimitationorexclusion
Product disposal instructions for business users
Businessusersshouldcontacttheirsuppliersandcheck
thetermsandconditionsofthepurchasecontractand
ensurethatthisproductisnotmixedwithothercommercial
wastefordisposal.
Consumer Products and Accessories
Warranty
ThankyouforpurchasingthisMotorolabrandedproduct
manufacturedunderlicensebySuncorpTechnologies
Limited,3001-3005ChinaResourcesBuilding,26Harbour
Road,WanChai,HongKong.(“SUNCORP”)
What Does this Warranty Cover?
Subjecttotheexclusionscontainedbelow,SUNCORP
warrantsthatthisMotorolabrandedproduct(“Product”)
orcertifiedaccessory(“Accessory”)soldforusewiththis
productthatitmanufacturedtobefreefromdefectsin
materialsandworkmanshipundernormalconsumerusage
fortheperiodoutlinedbelow.ThisLimitedWarrantyisyour
exclusivewarrantyandis
nottransferable.
Who is Covered?
Thiswarrantyextendsonlytothefirstconsumerpurchaser,
andisnottransferable.
WhatwillSUNCORPdo?
SUNCORPoritsauthorizeddistributoratitsoptionand
41
Generalinformation
Exclusions
Normal Wear and Tear.Periodicmaintenance,repair
andreplacementofpartsduetonormalwearandtearare
excludedfromcoverage.
Batteries.Onlybatterieswhosefullychargedcapacityfalls
below80%oftheirratedcapacityandbatteriesthatleak
arecoveredbythislimitedwarranty.
Abuse & Misuse.Defectsordamagethatresultfrom:(a)
improperoperation,storage,misuseorabuse,accident
orneglect,suchasphysicaldamage(cracks,scratches,
etc.)tothesurfaceoftheproductresultingfrommisuse;
(b)contactwithliquid,water,rain,extremehumidityor
heavyperspiration,sand,dirtorthelike,extremeheat,or
food;(c)useoftheProductsorAccessoriesforcommercial
purposesorsubjectingtheProductorAccessoryto
abnormalusageorconditions;or(d)otheractswhichare
notthefaultofMotorolaorSUNCORPareexcludedfrom
coverage.
Use of Non-Motorola Branded Products and
Accessories.Defectsordamagethatresultfromtheuseof
Non-MotorolabrandedorcertifiedProductsorAccessories
orotherperipheralequipmentareexcludedfromcoverage.
Unauthorized Service or Modification.Defectsor
damagesresultingfromservice,testing,adjustment,
installation,maintenance,alteration,ormodificationinany
waybysomeoneotherthanMotorola,SUNCORPorits
authorizedservicecentres,areexcludedfromcoverage.
ofincidentalorconsequentialdamages,orlimitationonthe
lengthofanimpliedwarranty,sotheabovelimitationsor
exclusionsmaynotapplytoyou.Thiswarrantygivesyou
specificlegalrights,andyoumayalsohaveotherrights
thatvaryfromonejurisdictiontoanother.
ProductsCovered
LengthofCoverage
ConsumerProducts
One (1) yearfromthedate
oftheproductsoriginal
purchasebythefirst
consumerpurchaserofthe
product.
ConsumerAccessories
(battery,powersupply(s)
andlinecords)
Ninety (90) daysfromthe
dateoftheaccessories
originalpurchasebythe
firstconsumerpurchaserof
theproduct.
ConsumerProductsand
Accessoriesthatare
RepairedorReplaced
The balance of the
original warranty or for
ninety (90) days from
thedatereturnedtothe
consumer,whicheveris
longer.

42
Generalinformation
Technical information
How many telephones can I have?
AllitemsoftelephoneequipmenthaveaRinger
EquivalenceNumber(REN),whichisusedtocalculate
thenumberofitemswhichmaybeconnectedtoanyone
telephoneline.YourSC200hasaRENof1.AtotalREN
of4isallowed.IfthetotalRENof4isexceeded,the
telephonesmaynotring.Withdifferenttelephonetypes,
thereisnoguaranteeofringing,evenwhentheRENisless
than4.
Anyadditionalhandsetsandchargersthatyouregister
haveaRENof0.
Connecting to a switchboard
ThisproductisintendedforusewithinEuropefor
connectiontothepublictelephonenetwork.
Recall
Youmayneedtousetherecallfunctionifyouare
connectedtoaswitch.ContactyourPABXsupplierfor
furtherinformation.
Altered Products.ProductsorAccessorieswith(a)serial
numbersordatetagsthathavebeenremoved,altered
orobliterated;(b)brokensealsorthatshowevidenceof
tampering;(c)mismatchedboardserialnumbers;or(d)
nonconformingornon-Motorolabrandedhousings,orparts,
areexcludedfromcoverage.
Communication Services.Defects,damages,or
thefailureofProductsorAccessoriesduetoany
communicationserviceorsignalyoumaysubscribeto
orusewiththeProductsorAccessoriesisexcludedfrom
coverage.
How to Obtain Warranty Service or Other Information?
Toobtainserviceorinformation,pleasecall:
+852
27955111.
E-mail:
forrestal@on-nets.com
YouwillreceiveinstructionsonhowtoshiptheProducts
orAccessoriesatyourexpenseandrisk,toaSUNCORP
AuthorizedRepairCentre.
Toobtainservice,youmustinclude:(a)theProductor
Accessory;(b)theoriginalproofofpurchase(receipt)
whichincludesthedate,placeandselleroftheProduct;(c)
ifawarrantycardwasincludedinyourbox,acompleted
warrantycardshowingtheserialnumberoftheProduct;(d)
awrittendescriptionoftheproblem;and,mostimportantly;
(e)youraddressandtelephonenumber.

Declaration of Conformity (DoC)
Suncorp
declare
s that the fol
lowing product
s:
B
ra
nd
na
m
e:
M
oto
ro
la
Type:
SC200, SC202, SC203, SC204
Descriptions:
DECT
phone without telepho
ne answering machine (SC20x) and their
multi-handset versions.
to which this declaratio
n related is in conformi
ty with the essential requ
irement
s of the following
directi
ves of the Council
of the European Communities:
-
R
&
TT
E
D
ire
ctiv
e (
19
99
/5
/E
C
)
-
Ecodesign Directive (2009/125/EC)
Th
e p
ro
du
cts
a
re
c
om
plia
nt w
ith
th
e f
ollo
w
in
g s
ta
nd
ard
s:
Safety:
EN60950-1:2006+A1
1:2009+
A1:2010+A12:201
1
EMC:
EN
30
14
89
-1
v
1.
9.2
a
nd
E
N
30
14
89
-6
v
1.3
.1
RF
Spectrum
:
EN301406
v2.1.1
Ecodesign
:
EC No 278/2009, 6
April 2009
For and on behalf of Suncorp
Te
chnologies Limited,
S
ig
na
tu
re
:
______________________
P
rin
te
d n
am
e &
P
os
itio
n:
C
W
C
heung – Chief
Te
chnical Of
ficer
Date:
Ja
nu
ary
1
6, 2
01
3
Place:
3001-3005 China Res
ources Buil
ding, 26 Harbour Road,
W
an Chai
, Hong Kong
CW Cheung
2013.01.16
12:14:24
+08'00'

Manufactured,distributedorsoldbySuncorp
TechnologiesLtd.,officiallicenseeforthis
product.MOTOROLAandtheStylizedMLogo
aretrademarksorregisteredtrademarksof
MotorolaTrademarkHoldings,LLC.andare
usedunderlicense.Allothertrademarksare
thepropertyoftheirrespectiveowners.©2013
MotorolaMobilityLLC.Allrightsreserved.
Version1(HK)
Document Outline
- 1. Getting started
- 2. Getting to know your phone
- Using your corded base
- 3. Using the phone
- 4. Clock
- 5. Caller ID and the Calls list
- Using your cordless handset
- 6. Using the phone
- 7. Phonebook
- 8. Personal settings
- 9. Clock & alarm
- 10. Advanced settings
- 11. Caller ID and the Calls list
- 12. Help
- 13. General information
Wyszukiwarka
Podobne podstrony:
AC PG USBASP UG V1 229
8579 genband product sheet UG G6 V1
Wallman Spiral Web v1 rtf
tab m10 fhd plus ug en v1 0 20200429
lenovo p2a42 ug v1 0 pl 20161213
lenovo a5500 ug pl v1 0 20140221
WEB Griffin Presidential Agent 04 Shooters v1 0
PO wyk07 v1
D ug celny(2)
s10 v1
Lęk i samoocena na podstawie Kościelak R Integracja społeczna umysłowo UG, Gdańsk 1995 ppt
s7 4 v1
s9 3a v1
CW2006EX Mill Turn data sheet web
Prezentacja v1
więcej podobnych podstron