Basic shuttle tatting instructions
The First Half of a stitch.
These instructions are for right handed tatting.
If you are left handed and want to see left handed instructions,
click here.
To start:
Hold the shuttle in your right hand and grab the end of the thread with the left.
Wind the thread around your hand, behind your fingers, in the direction of the arrows.
Catch the thread again between your left thumb and index finger.
Holding the thread in the left hand.
This is the basic position for all shuttle tatting.
Now to make your first stitch.Hold your hands in front of you with the thread in the basic position on the left hand and the shuttle held loosely in the right hand.
Tuck your right hand under the thread allowing the thread to drape over the back of your right hand.
Pass the shuttle under the thread between your index and middle fingers on your left hand.
Pull the shuttle through the loop over the back of your right hand.
Now relax the tension on your left middle finger, just enought to give a little slack, not so much the loop comes off the left hand.
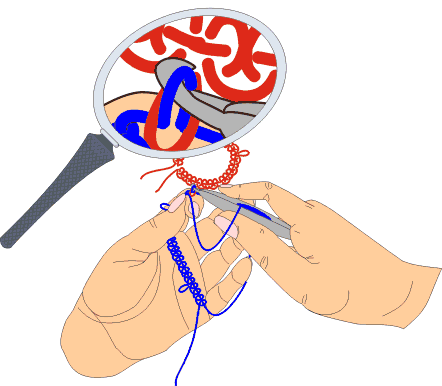
Gently pull with the right hand until the loop is transfered to the thread on the left hand.
The magnifying glass shows close ups of the important knot transfer.
Like this:
You have completed half of a stitch.
This is part two of the tatting instructions.
These instructions are for right handed tatting.
If you are left handed and want to see left handed instructions, go to the ltat2.html document.
The second half is similar, but you pass the shuttle over the thread between your left index and middle fingers.
Do not drape the thread over the back of your right hand this time.
Pass the shuttle over and then under the thread between your left index and middle fingers.
Pull the shuttle back through the loop that naturally falls in front of your left hand.
Pull the shuttle thread taut slowly while lesening the tension on your left middle finger to get the knot to transfer.
Like this:
You have now completed a basic tatting stitch
Making Picots
This is for right handed tatting. To see Picots for left handed tatting, go to the lpicots.html document.
You need to be familiar with making the basic tatting knot before going on to picots. Refer back to the begining pages if you need a refresher.
Picots are a staple of tatting. They give it the lacy look. They also are used to join rings together.
Here is how to form a picot.
First make one complete stitch. Then, go on as if doing the first half of a regular sitch.
Leave a space between the new stitch and the previous stitch.
The amount of space you leave will determine how big the final picot will be.
Slide the completed stitch over to the previous one.
Practicing is the way to get picots to be even.
Closing the Ring
Once you have completed the number of stitches in the ring it is time to close the ring.
These are right handed directions, click here to go to the left handed directions.
Refer back to the begining pages if you need a refresher.
Right handed or Left handed
Refer back to the picot pages for a refresher on picots.
Right handed Picots or Left handed Picots
This practice ring has 2 stitches, a picot, 5 stitches another picot, 5 more stitches another picot and then 2 final stitches.
Losen the tension on your left pinky. With your right hand, pull the shuttle thread gently while holding the last stitch between your left thumb and forefinger.
Do not pull too tightly. It will not come apart once you have pulled it into a ring. As a matter of fact, if you make a mistake and want to start over, it is easier to cut off the partially closed ring than to try and pick out the stitches.
I had to get out the big magnifying glass for this.
Here is the finished ring.
Joining Rings.
These instructions are for right handed tatting.
If you are left handed and want to see left handed instructions,
click here.
Make a ring with picots and close it.
Start another ring. At the point in the pattern where the join is pull the working thread up through the picot on the finished ring. Use the hook on the shuttle or a small crochet hook.
В
Pull the working thread up just enough to pass the shuttle through.
В
As you pull through the shuttle thread, pull the working thread also, not tight, just snug. The stitches have to be able to slide along the working thread and allow you to close the ring when finished.
The closeup in the magnifying glass shows the working thread and the shuttle thread both remain on the outside of the picot when the stich is snug.
Now make a complete the stitch, going first under then over the working thread exactly like a regular stitch.
This stitch will be the first stitch counted in the next part of the pattern.
You have completed a join. Continue the pattern of the ring you are working. Close as you normally would.
Here are two finished rings with joins.
Back
Front
Making Chains
These instructions are for right handed tatting.
If you are left handed and want to see left handed instructions,
click here.
To make the chains used to join motifs in tatting you need a shuttle loaded with thread and a ball of thread. In my diagrams I have used two different colors to make the stitches easier to see.
Hold the ball of thread on your left hand and begin to wrap it around as if shuttle tatting. Instead of bringing it back up to your thumb, wrap once around your pinkey. The pinkey will control the tension. Use your ring finger or the middle one or even the pinkey and ring fingers together if it is more comfortable. The finger used is not the important thing, controlling the tension is.
Now, alongside the ball thread, place the shuttle thread in between your thumb and index finger. Play out a little shuttle thread and start your first half of a stitch. Keep the ball thread tense so it doesn't slip off your hand.
В
Pass the shuttle under the ball thread, then back over and through the loop over the back of your right hand. Again this is just like the first half of a stitch in a ring. Now pull the excess thread up with your shuttle hand and slightly loosen the tension on the ball thread.
The loop will "jump" to the ball thread as you pull up the excess shuttle thread. This is the knot transfer. The knot transfer lets the stitches slide on the shuttle thread.
Now start the second half of the stitch by passing the shuttle over the ball thread.
As you pull up the excess thread, the knot will again "jump" to the ball thread. Once again the knot transfer.
You have completed a sitch of chaining.
Wyszukiwarka
Podobne podstrony:
Kurs wykonania krokusГіw
Kurs wykonania krokusД‚Е‚w
Kurs wykonania krokusГіw
Kurs wykonania słoneczników z bibuły
MAMO i babciu, Księga życzeń--zrób sam, instrukcja-jak wykonać
Instrukcja o sporzД…dzaniu przez kapЕ‚ana testamentu i o jego wykonaniu, WokГіЕ‚ Teologii
Pytanie Nr 3, Konspekty Instruktorskie, Instruktor kat C+E, KURS NA OPERATORA KOPARKO-ЕЃADOWARKI (pit
mater biaЕ‚ka instrukcja wykonania doЕ›wiadczenia
Instrukcja wykonania Д‡w HP2
[lekcja 13] Instrukcja warunkowa if else Kurs C++ В» Poziom 1
Instrucja wykonania wiatraczka
LAB 2 Instrukcja wykonania cwiczenia
Jazda pasem ruchu oraz po Е‚uku do przodu i do tyЕ‚u, Kurs Instruktora Prawa Jazdy, Egzamin praktyczny
Wypadek drogowy, Kurs Instruktora Prawa Jazdy, Konspekty, Konspekty, 17 Wypadek bez ofiar i z ofiara
INSTRUKCJA wykonanie analizy sieciowej
Karta instrukcyjna wykonania rdzenia itp
Instrukcja obsЕ‚ugi niereformowalnego portalu edukacyjnego, I rok, Kurs bhp
wiД™cej podobnych podstron