LOTUS
|
|
|
|
|
1 |
|
2 |
|
3 |
Valley fold the opposite corners together, in turn, to mark the diagonal fold lines, and open them up. Then, turn the paper over. |
|
Valley fold the opposite sides together in both directions, and open them up. |
|
Bring the sides together and down towards you. Press the paper down neatly, thereby making a shape that, in origami, is called the preliminary fold. |
|
|
|
|
|
4 |
|
5 |
|
6 |
Valley fold the model in half and unfold it. |
|
Valley fold the corners into the middle and unfold them. |
|
Make the creases through the points of intersections of the fold-lines made in step 5 and the diagonals, as shown. |
7
8
9
Sink the top point: Open out the model slightly, unfold the paper on the top corner, crease the four sides of the inner square into mountain folds. Push down on the middle of the square and collapse the sides toward the middle, thereby completing the sink. This should be the result.
Turn the model around.
Pull down the corner, at the same time fold one "page" to the right, as shown.
10
11
12 This should be the result.
Turn the paper over. Pull down the corner, at the same time fold one "page" to the right, as shown. On the front layer: Valley fold the top corner down and then valley fold the lower sloping edges along the existing forl-lines, as shown.
13
14
15 Valley fold the top edge over to meet the bottom. Open out the little pockets at the bottom and squash them into triangles as shown in the next step. Lift the front flap up to the top.
16
17
18 This should be the result.
Turn the paper over. Repeat steps 12-15. Bring the right- and left-hand sides together and up. At the same time, move the top points down in the direction shown by the arrows. Then turn the model into the position shown in the next step.
|
|
|
|
|
19 |
|
20 |
|
21 |
Valley fold the top corner down along the existing fold-line. |
|
Valley fold the lower sloping edges as shown and cover them with the top edge. |
|
Open out the little pockets at the bottom and squash them into triangles. |
|
|
|
|
|
22 |
|
23 |
|
24 |
Repeat steps 19-21 behind. |
|
This should be the result. |
|
Top view. Hold the opposite corners at marked places and pull them out slightly. |
25
26
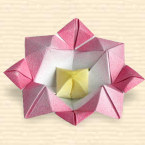
Accurately stretch and squash the middle creases to make the flower's core, and then bend edges of petals slightly. Here is the completed Lotus.
12
Wyszukiwarka
Podobne podstrony:
Lotus 750 EC
Lotus Seven rysunek techniczny ramy id 2732
pd wykl pr 91011, STMS - sprawa statku Lotus (1927) - „Reguły prawa wiążące państwa (
Lotus Notes 6 5
Scorpio Engine Data 2.9, LOTUS 7 (locost)
Lotus Notes istalacja091117 id Nieznany
Lotus 750 EC
Poczta Lotus Notes 8 5 PL Niezbednik uzytkownika polopu
Lotus Notes i Domino Leksykon lodolk
Poczta Lotus Notes 8 5 PL Niezbednik uzytkownika polopu
Lotus Notes i Domino Leksykon
Viruses and Lotus Notes Have the Virus Writers Finally Met Their Match
Lotus of the Temple Rowe
Poczta Lotus Notes 8 5 PL Niezbednik uzytkownika polopu
Poczta Lotus Notes 8 5 PL Niezbednik uzytkownika polopu
Poczta Lotus Notes 8 5 PL Niezbednik uzytkownika
O P O L S C E Lotus Yin Hand
Przeznaczenie Lotus Yin Hand
LOTUS
więcej podobnych podstron