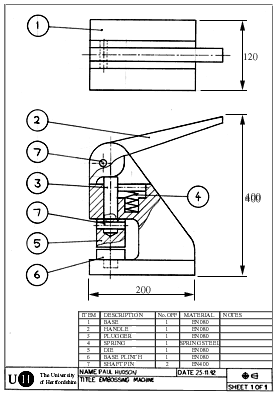
Assembly Drawings
The previous chapters covered the general aspects of engineering drawing and how to produce a detailed drawing of a single part with all the necessary information to make the part. The assembly of these parts is shown in an assembly drawing also known as a general arrangement

Features of an assembly drawing
Dimensions
Detailed dimensions required for manufacture are excluded from assembly drawings. But overall dimensions of the assembled object are usually indicated.
If the spatial relationship between parts if important for the product to function correctly then these should also be indicated on the drawing. For example idicating the maximum and minimum clearance between two parts.
Internal Parts
If there are internal assemblies, sectional views should be used.
Parts list
Each part is given a unique number, indicated on the drawing by a circle with the number in it and a leader line pointing to the part. The leader line terminates in an arrow if the line touches the edge of the component, or in a circle if the line terminates inside the part.
A table of parts should be added to the drawing to identify each part, an example of a parts list is shown below:
Item No. |
Description |
Qty |
Material |
Remarks |
|
|
|
|
|
|
|
|
|
|
The first three items; Item No., Description, and Quantity should be completed for every distint part on your drawing. (i.e. the number of duplicate parts are recorded in the quantity). The material is used for components that are being made within the company. The Remarks column is useful for specifying a manufacturers part number when using bough-in parts.
The layout of an engineering drawing
It is important that you follow some simple rules when producing an engineering drawing which although may not be useful now, will be useful when working in industry.
All engineering drawings should feature an information box. An example is shown below.
Common information recorded on an engineering drawing
TITLE
The title of the drawing.
NAME
The name of the person who produced the drawing. This is important for quality control so that problems with the drawing can be traced back to their origin.
CHECKED
In many engineering firms, drawings are checked by a second person before they are sent to manufacture, so that any potential problems can be identified early.
VERSION
Many drawings will get amended over the period of the parts life. Giving each drawing a version number helps people identify if they are using the most recent version of the drawing.
DATE
The date the drawing was created or amended on.
SCALE
The scale of the drawing. Large parts won't fit on paper so the scale provides a quick guide to the final size of the product.
PROJECTION SYSTEM
The projection system used to create the drawing should be identified to help people read the drawing. (Projection systems will be covered later).
COMPANY NAME
Many CAD drawings may be distributed outside the company so the company name is usually added to identify the source.
Wyszukiwarka
Podobne podstrony:
T 38 Park Jet Plans (Assembly Drawing)
lws 6%20assembly%20drawings
Polaris Assembly Drawing (Nontiled)
F 14 Park Jet (Assembly Drawing)
assembler
Assembler ENG
Eaton VP 33 76 Ball Guide Unit Drawing
Assembly Language for Kids Commodore 64 Addendum
Fashion Artist Drawing Techniques to Portfolio Presentation
P000718 A Eng Vertical shaft assembly
M001882 B Eng Lower assembly
Molecular Self Assembly
arm assembly
bushwarbler assembly
Ch18 Assemble Complex Models
Anime drawing tutorials [ENG]
P000724 A Eng Lower assembly
assembler model, Programowanie
ARTICLE BRAKES PEDAL ASSEMBLY SERVICE
więcej podobnych podstron