A6 1 9 tdi (90 koni)

Audi A6 (94-97) 1,9D TDI 1994-97 Engine codę: 1Z/AHU
Impoitant notę
Replocement lnteiv<il Guide
Check Foi Engine D.image
Rep.iii Times - his
Speciol Tools
Special Piecnutions
Removal i nsta i i ati on
IMPORTANT: DO NOT reuse old helt if width is lessthan 22 mm.
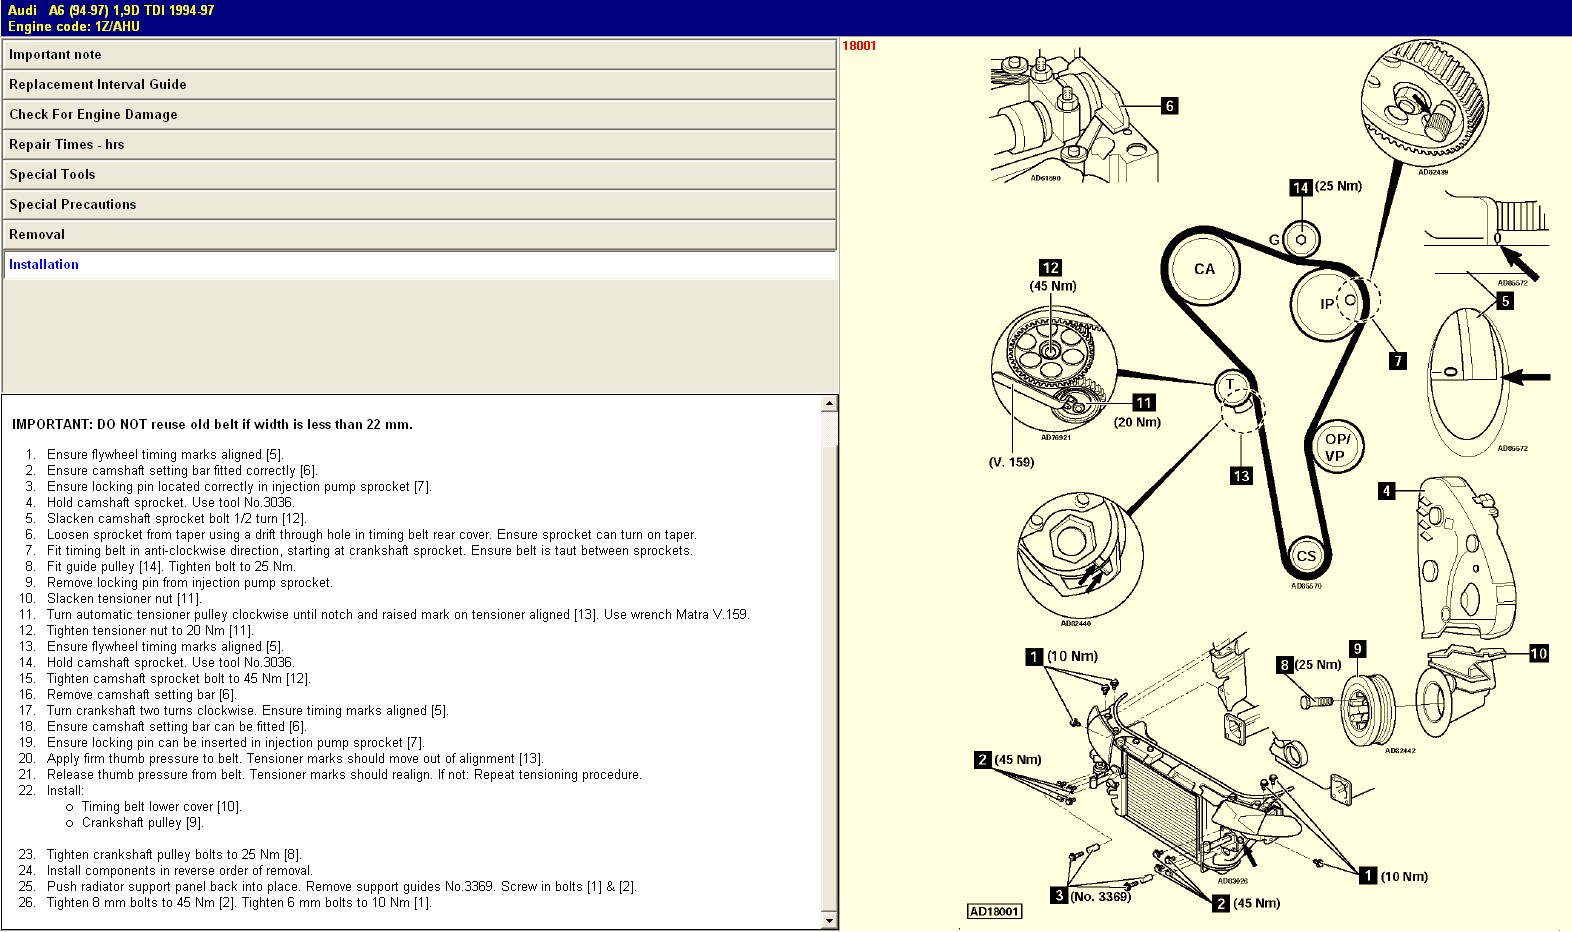
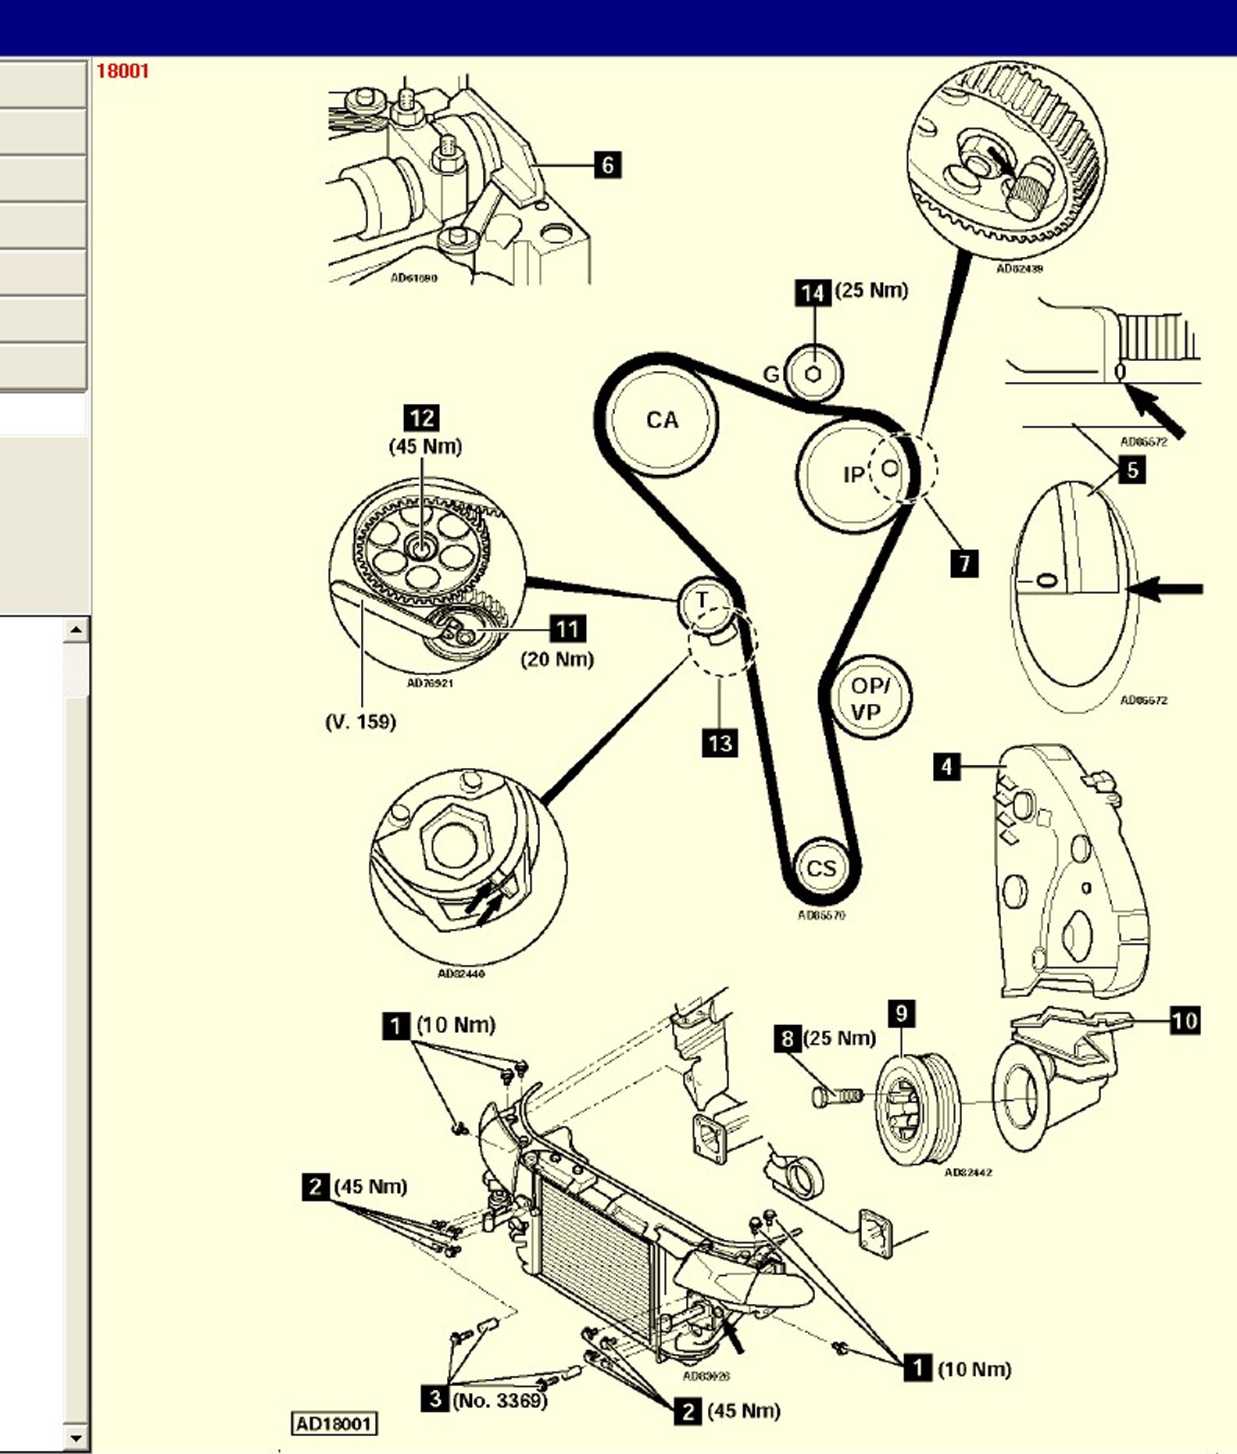
1. Ensure flywheel timing marks aligned (5).
2. Ensure camshaft setting bar fitted correctly (6).
3. Ensure locking pin located correctly in injection pump sprocket (7).
4. Hołd camshaft sprocket. Use tool No.3036.
5. Slacken camshaft sprocket bolt 1/2 tum (12).
6. Loosen sprocket from taper using a drift through hole in timing belt rear cover. Ensure sprocket can tum on taper.
7. Fit timing belt in anti-clockwise direction, starting at crankshaft sprocket. Ensure belt is taut between sprockets.
8. Fit guide pulley (14). Tighten bolt to 25 Nm.
9. Remove locking pin from injection pump sprocket.
10. Slacken tensioner nut (11).
11. Tum automatic tensioner pulley clockwise until notch and raised mark on tensioner aligned (13). Use wrench Matra V.159.
12. Tighten tensioner nut to 20 Nm (11 ].
13. Ensure flywheel timing marks aligned (5).
14. Hołd camshaft sprocket. Use tool No.3036.
15. Tighten camshaft sprocket bolt to 45 Nm (12).
16. Remove camshaft setting bar (6).
17. Tum crankshaft two turns clockwise. Ensure timing marks aligned (5).
18. Ensure camshaft setting bar can be fitted (6).
19. Ensure locking pin can be inserted in injection pump sprocket (7).
20. Apply firm thumb pressure to belt. Tensioner marks should move out of alignment (13).
21. Release thumb pressure from belt. Tensioner marks should realign. If not: Repeat tensioning procedurę.
22. Install:
o Timing belt lower cover (10). o Crankshaft pulley (9).
23. Tighten crankshaft pulley bolts to 25 Nm (8).
24. Install components in reverse order of removal.
25. Push radiator support panel back into place. Remove support guides No.3369. Screw in bolts (1) & (2).
26. Tighten 8 mm bolts to 45 Nm (2). Tighten 6 mm bolts to 10 Nm (1).

Wyszukiwarka
Podobne podstrony:
A4 1 9tdi (90 koni) Audi A4 (94-01) 1,9D TDI 1995-01 Engine codę: 1Z/AHU Impoitant notę Replacement
A4 1 9tdi (90 koni) Audi A4 (94-01) 1,9D TDI 1995-01 Engine codę: 1Z/AHU Impoitont notę Replacement
VOLVOD0 1 8 (90 konie) Volvo 440 1,8 1991-97 Engine codę: B18U-103 Impoitant notę Replacement lntei
A3 1 9 TDI (90 koni) Audi A3 (97-03) 1,9D TDI 1996-03 Engine codę: AGR Impoitnnt notę Replacement ln
A6 2 8 (193 koni) APR Audi A6 (97-05) 2,8 1997-02 Engine codę: APR Impoitant notę Replacement lnte
A6 2 8 (193 koni) ALG Audi A6 (97-05) 2,8 1997-02 Engine codę: ALG Impoitont notę Rephicemeut lnte
A6 2 8 (193 koni) APR Audi A6 (97-05) 2,8 1997-02 Engine codę: APR Impoitant notę Rephicement lnte
A4 1 6 (101 koni) Audi A4 (94-01) 1,6 1995-97 Engine codę: ADP Impoitant notę Replacement lnteiv<
A3 1 8 (125 koni) pasek Audi A3 (97-03) 1,8 19964)3 Engine codę: AGN Impoitant notę Replacement ln
S6 4 2 (290 koni) Audi SG 4,2 1994-96 Engine codę: AEC Impoitant notę Replacement lnteiv<il Guide
VOLVOD0 1 8 (90 konie) Volvo 440 1,8 1991-97 Engine codę: B18U-103 Impoitant notę Replacement Intei
A2 1 6 FSI (110 KONI) Audi A2 1,6 FSI 2002-06 Engine codę: BAD Impoitant notę Replacement lnteiv<
A2 1 4 (75 koni) 18008 Audi A2 1,4 2001-06 Engine codę: BBY Impoitant notę Replacement lnteiv<il
A6 2 4 (136 koni) Audi A6 (974)5) 2,4 1997-05 Engine codę: ALW Impoitant notę Replacement inteiv<
więcej podobnych podstron