11377 Instr 8
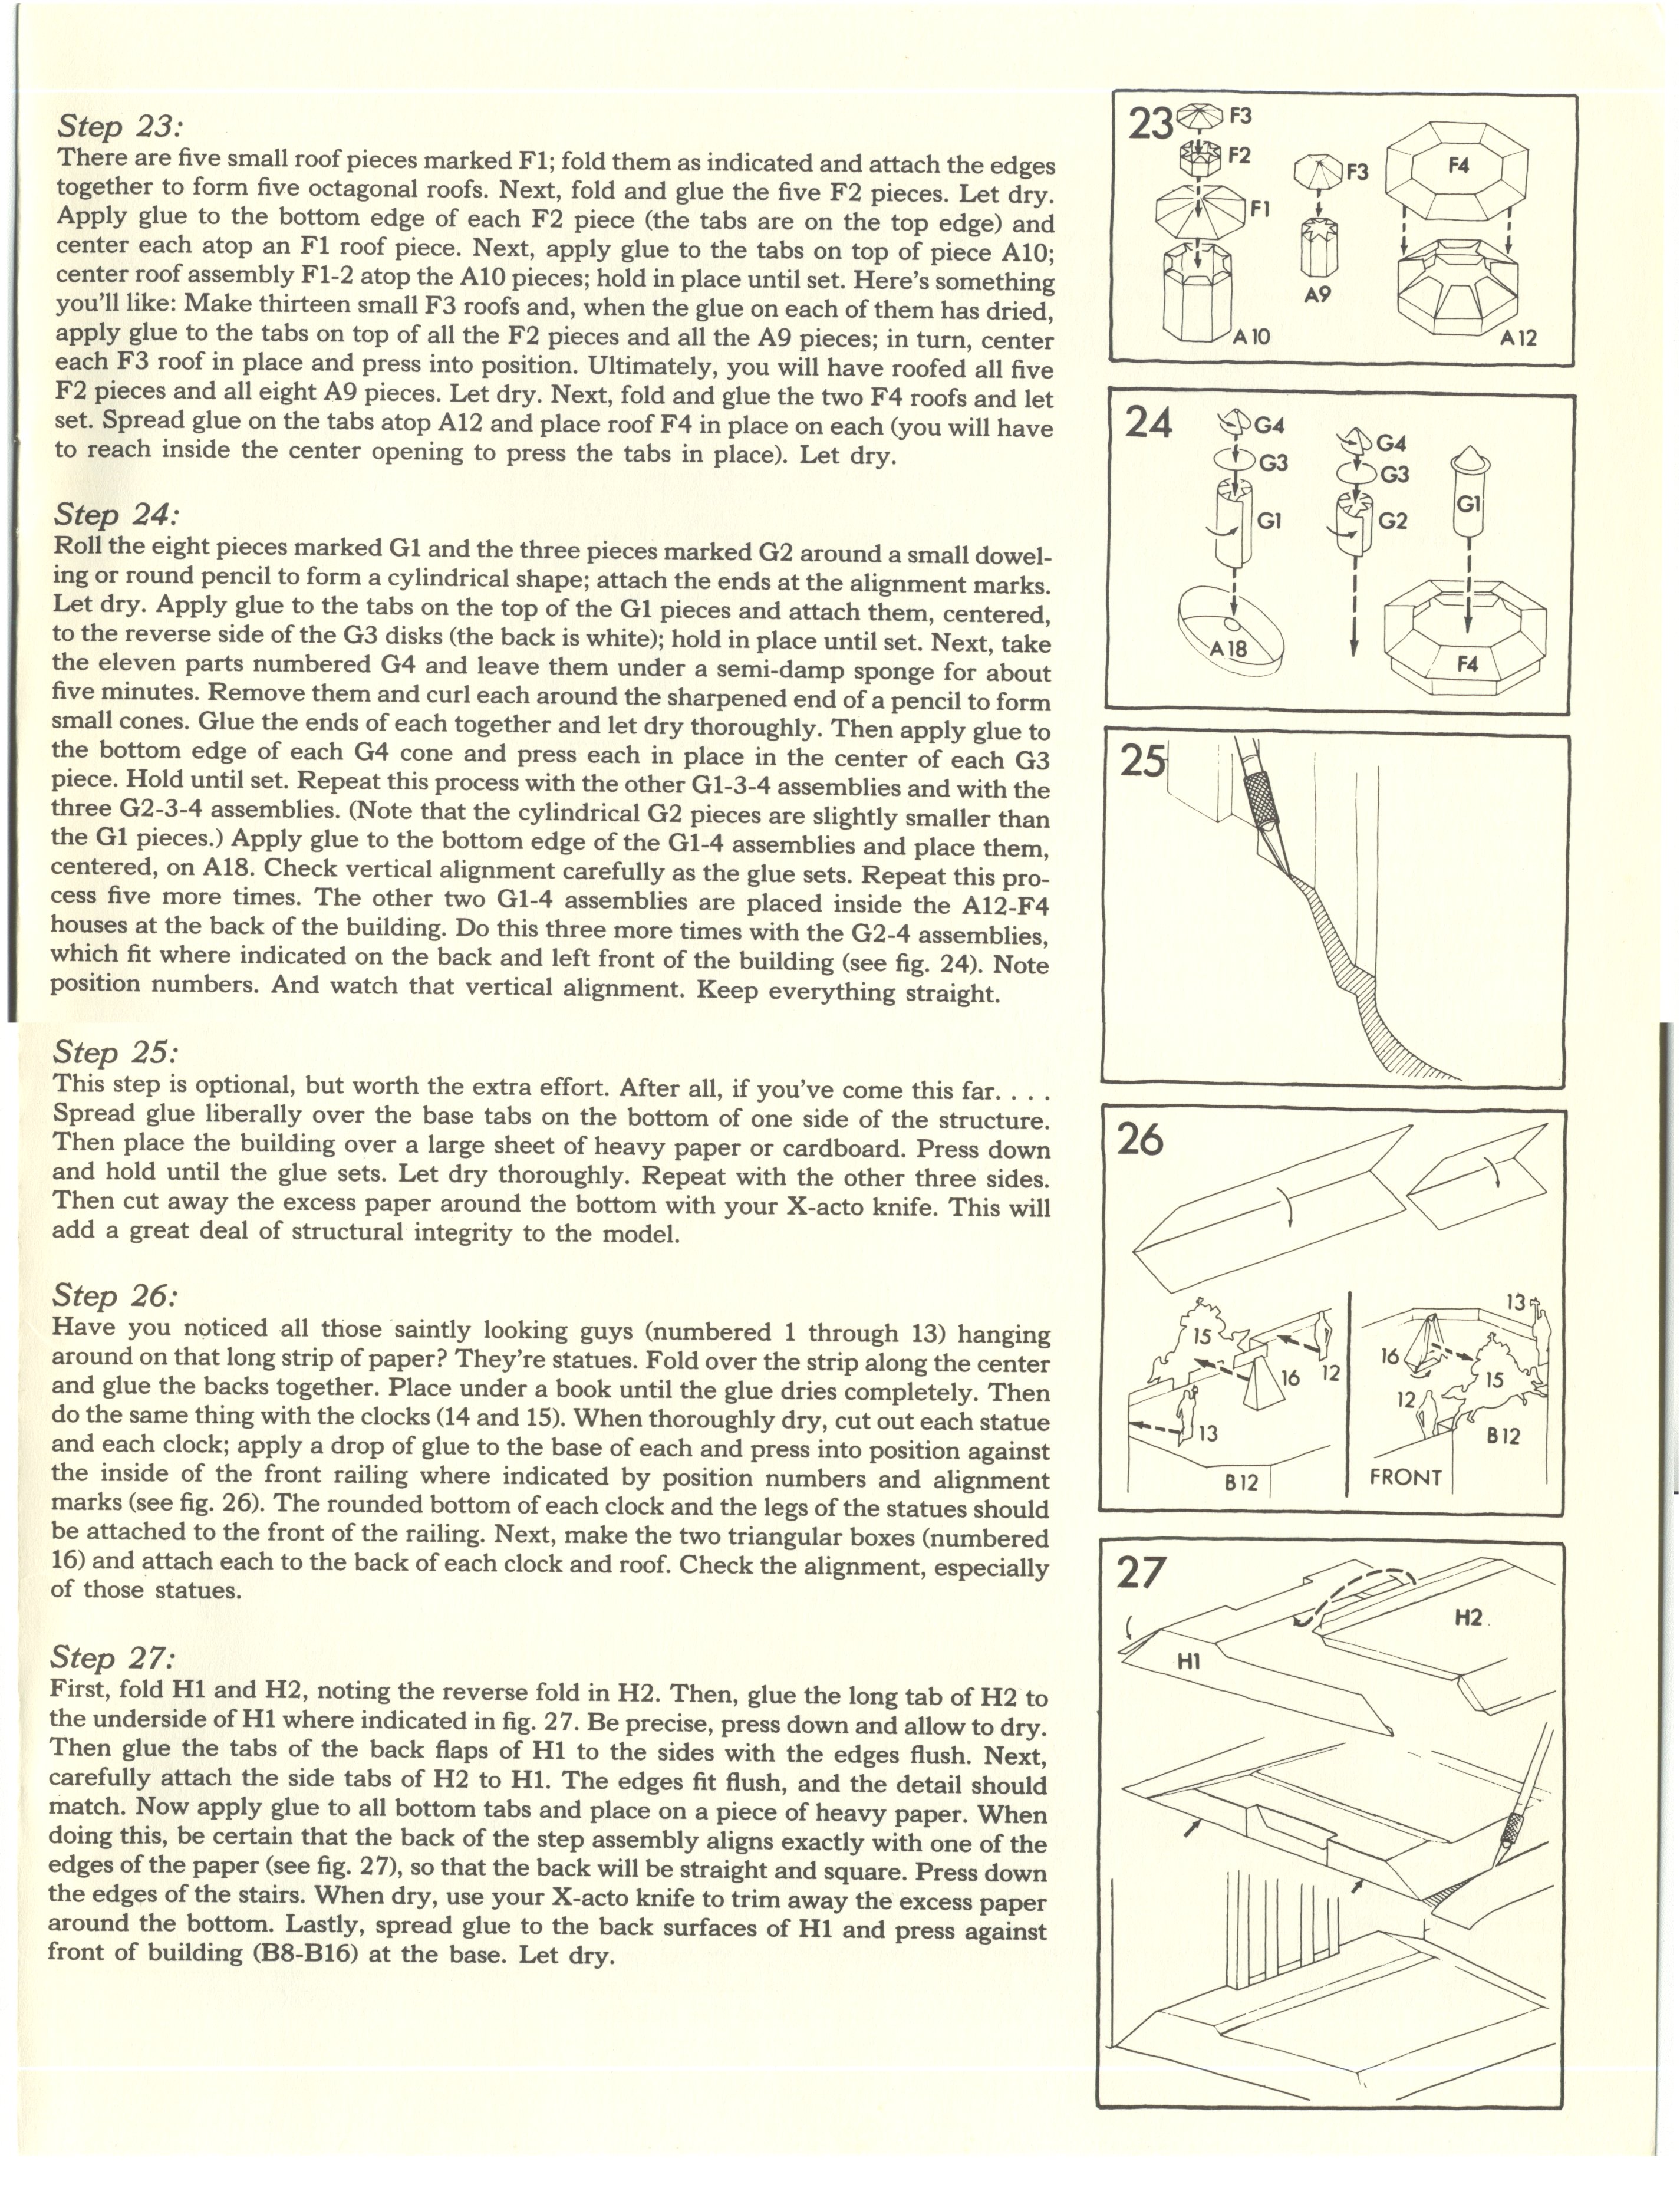
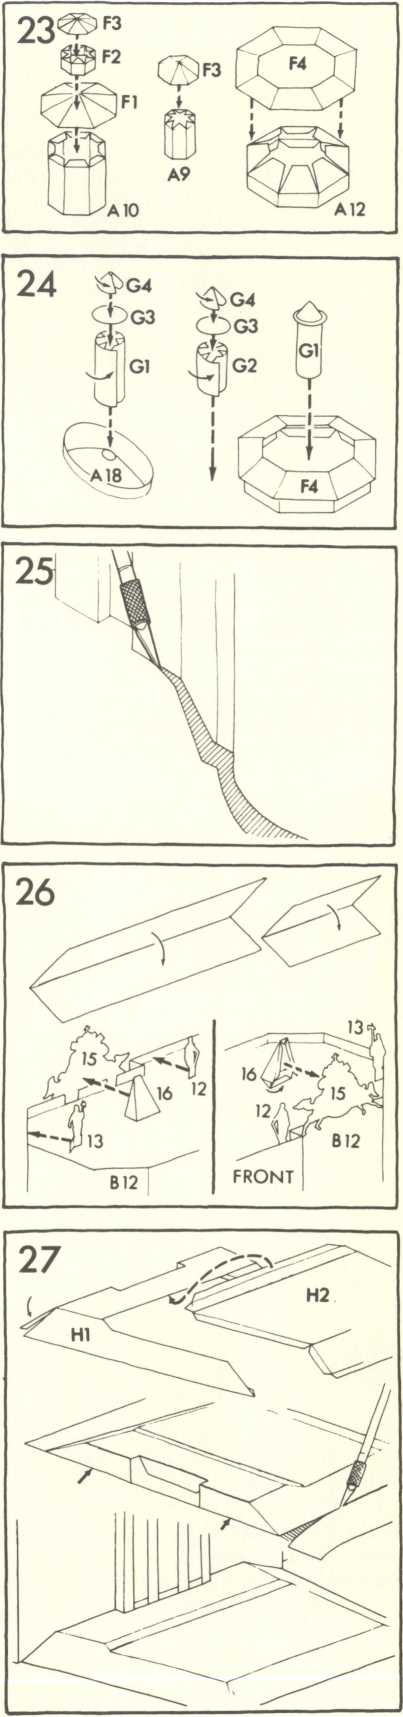
Step 23:
There are five smali roof pieces marked FI; fold them as indicated and attach the edges together to form five octagonal roofs. Next, fold and glue the five F2 pieces. Let dry. Apply glue to the bottom edge of each F2 piece (the tabs are on the top edge) and center each atop an FI roof piece. Next, apply glue to the tabs on top of piece A10; center roof assembly Fl-2 atop the A10 pieces; hołd in place until set. Here’s something you’ll like: Make thirteen smali F3 roofs and, when the glue on each of them has dried, apply glue to the tabs on top of all the F2 pieces and all the A9 pieces; in tum, center each F3 roof in place and press into position. Ultimately, you will have roofed all five F2 pieces and all eight A9 pieces. Let dry. Next, fold and glue the two F4 roofs and let set. Spread glue on the tabs atop A12 and place roof F4 in place on each (you will have to reach inside the center opening to press the tabs in place). Let dry.
Step 24:
Roli the eight pieces marked G1 and the three pieces marked G2 around a smali dowel-ing or round pencil to form a cylindrical shape; attach the ends at the alignment marks. Let dry. Apply glue to the tabs on the top of the G1 pieces and attach them, centered, to the reverse side of the G3 disks (the back is white); hołd in place until set. Next, take the eleven parts numbered G4 and leave them under a semi-damp sponge for about five minutes. Remove them and curl each around the sharpened end of a pencil to form smali cones. Glue the ends of each together and let dry thoroughly. Then apply glue to the bottom edge of each G4 cone and press each in place in the center of each G3 piece. Hołd until set. Repeat this process with the other Gl-3-4 assemblies and with the three G2-3-4 assemblies. (Notę that the cylindrical G2 pieces are slightly smaller than the G1 pieces.) Apply glue to the bottom edge of the Gl-4 assemblies and place them, centered, on A18. Check vertical alignment carefully as the glue sets. Repeat this process five morę times. The other two Gl-4 assemblies are placed inside the A12-F4 houses at the back of the building. Do this three morę times with the G2-4 assemblies, which fit where indicated on the back and left front of the building (see fig. 24). Notę position numbers. And watch that vertical alignment. Keep everything straight.
Step 25:
This step is optional, but worth the extra effort. After all, if you’ve come this far. . . . Spread glue liberally over the base tabs on the bottom of one side of the structure. Then place the building over a large sheet of heavy paper or cardboard. Press down and hołd until the glue sets. Let dry thoroughly. Repeat with the other three sides. Then cut away the excess paper around the bottom with your X-acto knife. This will add a great deal of structural integrity to the model.
Step 26:
Have you noticed all those saintly looking guys (numbered 1 through 13) hanging around on that long strip of paper? They’re statues. Fold over the strip along the center and glue the backs together. Place under a book until the glue dries completely. Then do the same thing with the clocks (14 and 15). When thoroughly dry, cut out each statuę and each clock; apply a drop of glue to the base of each and press into position against the inside of the front railing where indicated by position numbers and alignment marks (see fig. 26). The rounded bottom of each clock and the legs of the statues should be attached to the front of the railing. Next, make the two triangular boxes (numbered 16) and attach each to the back of each clock and roof. Check the alignment, especially of those statues.
Step 27:
First, fold HI and H2, noting the reverse fold in H2. Then, glue the long tab of H2 to the underside of HI where indicated in fig. 27. Be precise, press down and allow to dry. Then glue the tabs of the back flaps of HI to the sides with the edges flush. Next, carefully attach the side tabs of H2 to HI. The edges fit flush, and the detail should match. Now apply glue to all bottom tabs and place on a piece of heavy paper. When doing this, be certain that the back of the step assembly aligns exactly with one of the edges of the paper (see fig. 27), so that the back will be straight and sąuare. Press down the edges of the stairs. When dry, use your X-acto knife to trim away the excess paper around the bottom. Lastly, spread glue to the back surfaces of HI and press against front of building (B8-B16) at the base. Let dry.
Wyszukiwarka
Podobne podstrony:
cthulu08 1. ) Cut out the shape and all slits (thin-outlined rectangles, there are five) 2. ) Fold a
There are five basie questions that you should ask as you evaluate an opportunity. • &nb
find differences1 NAME:_THERE ARE 10 DIFFERENCES BETWEEN THOSE TWO PICTURES. FIND THEM AND MARK THEM
There are three basie configurations of ultrafiltration membranes: fiat disc, hollow fiber and spira
And I love you so1 AUGMENTED CHORDS There are four basie types of chord:- MAJOR (e.g. C), MINOR (e.g
118 T. Wilgat et al. Although the amount of circulating water is smali, there are nunerous lakes — n
c Page& Dear Friends, There are two issuesplannedfor 2008, Ml 5 & 16. Lace ofBeads #75 will incl
Step Four STEP FOURPost YourJob While there are a couple of different Online sites to hire V.A.s, on
81696 Instr 5 Step 9: Fold over the railings on pieces B2 and B3; place therii under a weight until
errors1 Errors and Wamings W Info W Warning W Error There are 0 error(s), 1 waming(s), and 0 Informa
więcej podobnych podstron