Quilling paper is rolled with either a needle tool or a slotted tool. The needle tool
consists of a long needle that is set into a handle. Rolls and scrolls are made by
rolling paper around the needle. The slotted tool has a slot in its end and,
because the slot catches and holds the end of the paper, learning to roll with this
tool couldn’t be any easier. Many beginners prefer the slotted tool because it is
easier to use. However, others choose the needle tool because it won’t leave as
large a hole in the center of a rolled shape and won’t bend the very end of the
paper, as the slotted tool does.
Standard width paper (1/8” or 3 mm) is used in designs unless another width is
specified. The size of the quilled roll depends on the length of paper used. The
instructions for each design will specify the length for each roll.
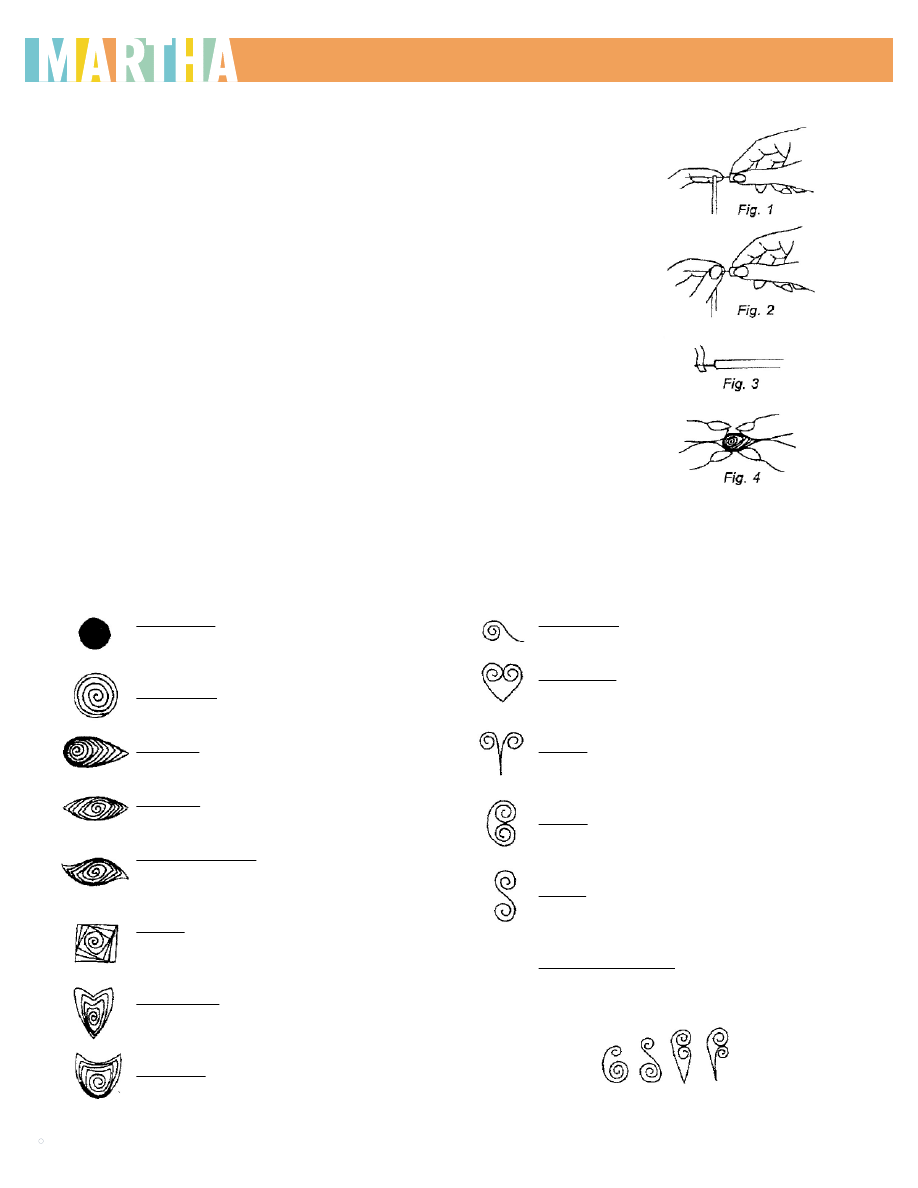
Begin by tearing off a strip of paper to a length specified in the instructions. To
roll paper with a needle tool, moisten one end of the strip slightly and place that
end against your index finger. Position the tool on the end of the paper (figure
1), press the end of the paper around the tool with your thumb (figure 2). Roll
the paper without turning the tool, keeping the strip’s edges as even as possible.
To make a roll with the slotted tool, first thread the paper into the tool’s slot.
Slide the tool to near the end of the strip, and then turn the tool so that the
paper wraps around it in a circular motion.
Tight circle: Roll, remove tool without letting it
unwind, and glue the loose end of the paper
to the side of the roll.
Loose circle: Roll, remove from tool and allow
the coil to loosen. Glue the loose end.
Teardrop: Roll and glue a loose circle. Pinch
one side of the circle to a point (figure 4).
Marquise: Roll and glue a loose circle, and
then pinch it on opposite sides.
Shaped marquise: Make a marquise, and the
curl its two pinched pints in opposite
directions.
Square: Make a marquise. Then turn it ninety
degrees and pinch it again on two opposite
sides.
Rolled heart: Roll and glue a loose circle. Pinch
a point on one side. Then make a sharp
indentation on the opposite side.
Bunny ear: Roll and glue a loose circle. Make a
rounded indentation on one side.
Loose scroll: Roll one end, leaving the other
end loose.
Open heart: Crease the strip at its center. Roll
each end in toward the crease.
V scroll: Crease the strip at its center. Roll
each end toward the outside.
C scroll: Roll both ends of the strip towards
the strip’s center.
S scroll: Roll one end to center. Turn strip
over and roll other end toward the center.
Variations on scrolls: These are made by
rolling one end of the strip to a point that is
off center.
Supplies needed for quilling include a needle or slotted tool, quilling paper, clear-drying white craft glue, straight
pins, a ruler, sharp scissors and tweezers. A quilling workboard made of cork with a plastic cover is available, or
one may be made by wrapping waxed paper around a piece of corrugated cardboard.
BASIC QUILLING INSTRUCTIONS: PAGE 1 OF 2
2008 MARTHA STEWART LIVING OMNIMEDIA
C
www.marthastewart.com
ROLLS:
SCROLLS:
quilling instructions courtesy of Lake City Craft Company: www.quilling.com
This template is for personal use only, not for commercial use.
Wyszukiwarka
Podobne podstrony:
Basic Quilling Instructions
wykład 6 instrukcje i informacje zwrotne
Instrumenty rynku kapitałowego VIII
05 Instrukcje warunkoweid 5533 ppt
Instrukcja Konwojowa
2 Instrumenty marketingu mix
Promocja jako instrument marketingowy 1
Promocja jako instrument marketingowy
Instrukcja do zad proj 13 Uklad sterowania schodow ruchom
Instrukca 6 2
instrukcja bhp przy magazynowaniu i stosowaniu chloru w oczyszczalni sciekow i stacji uzdatniania wo
więcej podobnych podstron