
8.6.1a
8.6.1a Drawing Basic
Shapes (LiveMotion)
1-2
Fundamentals of Web Design 1.2—-Lab 8.6.1a
Copyright
2002, Adobe Systems, Inc.
8.6.1a Drawing Basic Shapes (LiveMotion)
Creating a shape
In this lab, you’ll learn how to create basic shapes and how to combine multiple
shapes to create a single logo. The first part of the logo is a circle with a globe
on top of it. To make the circle, you will create a simple shape, change it, and
add color and different effects
1. Open Adobe LiveMotion and create a new file by choosing File> New
Composition. Click OK in the Composition Settings window.
Drawing the basic shape
Although the logo uses a circle, you’ll start the logo by making a square. You’ll
then use the Properties palette to change the object’s shape.
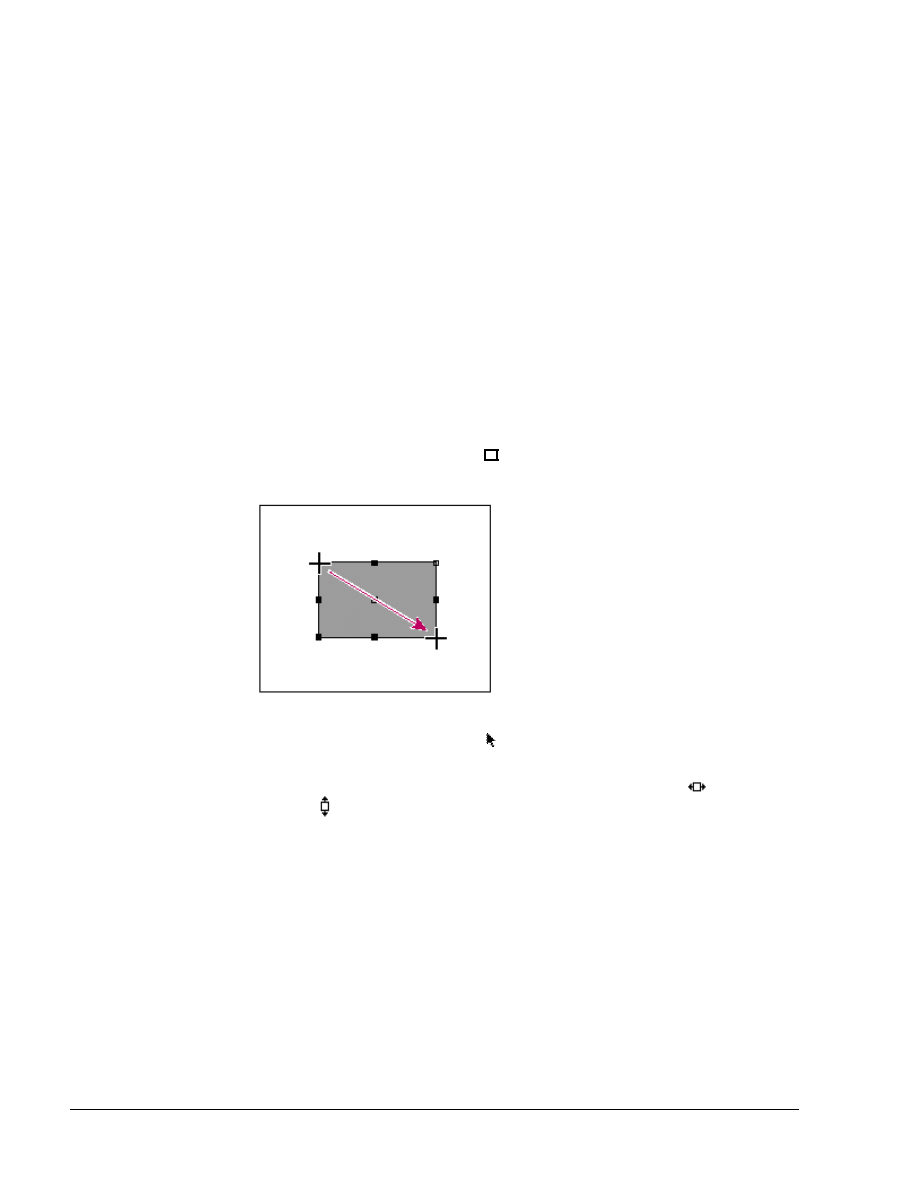
1. Select the rectangle tool
(
)
in the toolbox. In the Composition
window, drag the pointer to draw a rectangle.
2. Select the selection tool (
) in the toolbox.
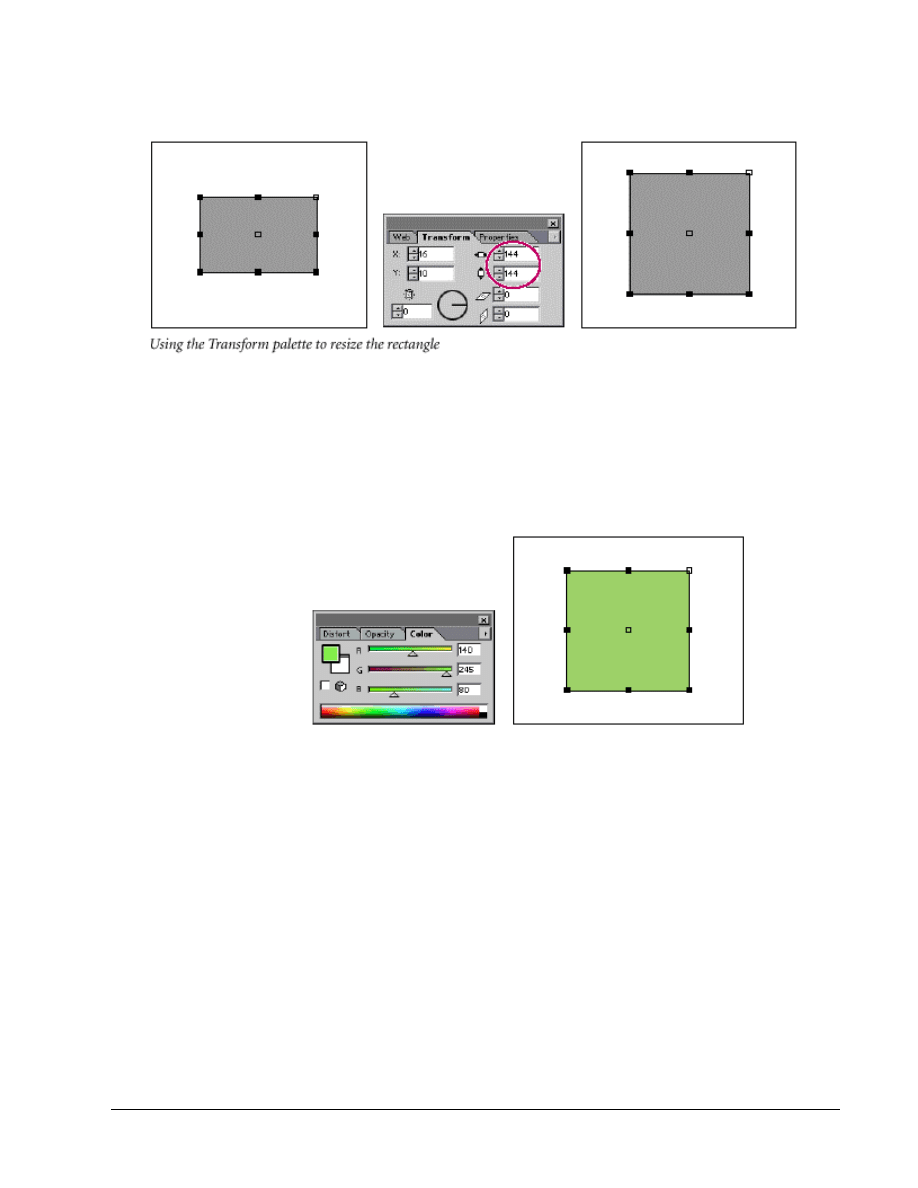
3. Choose Window > Transform, or click the palette’s tab to display the
Transform palette. In the palette, enter 144 in the width
(
)
and height
(
)
text boxes to make a square. Press Enter (Windows) or return (Mac
OS) to close the slider and complete the action.
Copyright
2002, Adobe Systems, Inc.
Fundamentals of Web Design 1.2—Lab 8.6.1a
1-3
4. Choose Window > Color, or click the palette’s tab to display the Color
palette. You can choose a green for the square by selecting a color from
the palette with the eyedropper tool, or by dragging the sliders. If you
want to use the same color we’ve used, choose RGB View from the
Color palette menu, and enter an R value of 140, a G value of 245, and a
B value of 80.
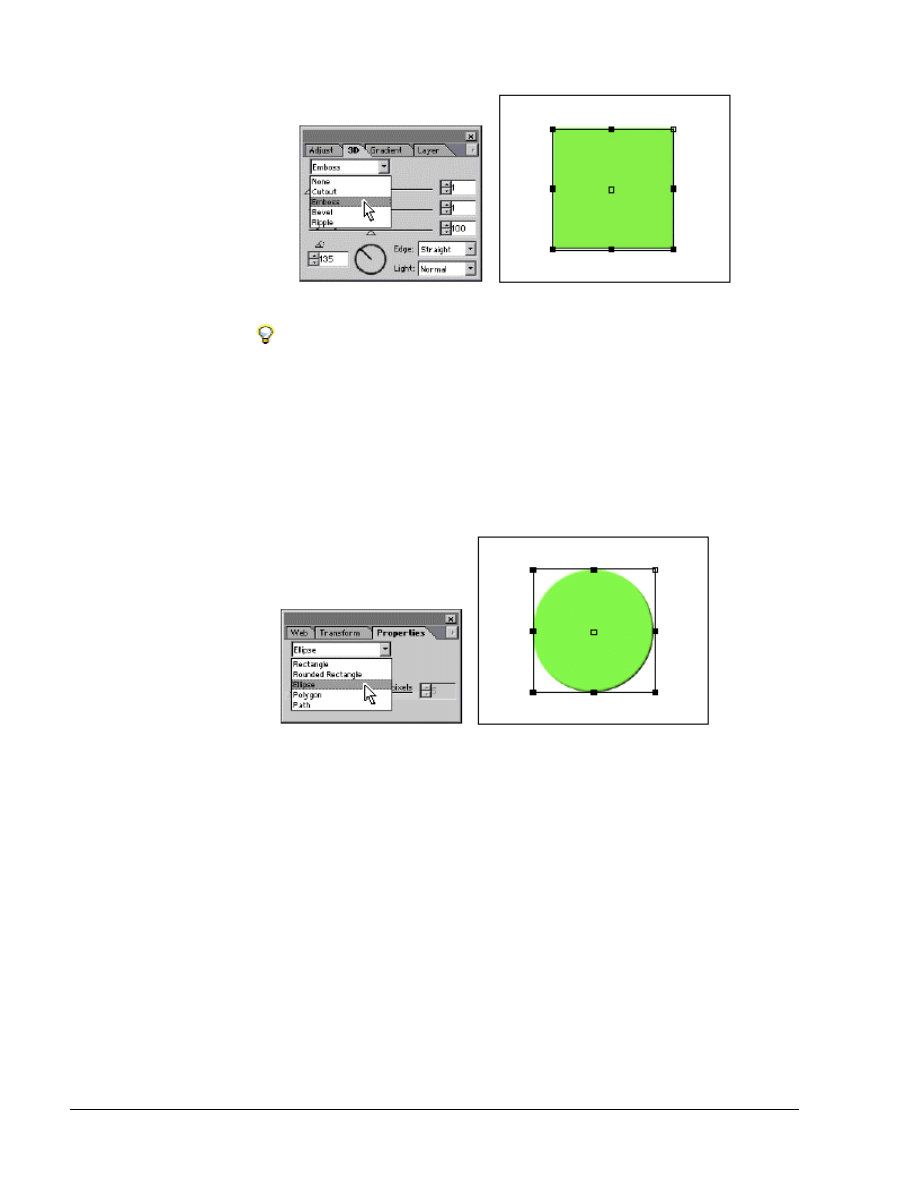
The 3D palette lets you apply 3D effects to your objects, and adjust the effects.
5. Choose Window > 3D, or click the palette’s tab to display the 3D
palette. Choose Emboss from the pull-down menu to make your square
look like it’s raised slightly from the canvas. Keep the default values of
1 for Depth and 1 for Softness.
1-4
Fundamentals of Web Design 1.2—-Lab 8.6.1a
Copyright
2002, Adobe Systems, Inc.
You can add other interesting effects to your objects using the Distort palette.
To open the Distort palette, choose Window > Distort.
6. Choose Window > Properties, or click the palette’s tab to display the
Properties palette.
7. Choose Ellipse from the menu to turn the square into a circle. This
feature is useful for modifying shapes even after you have made changes
to them.
Now you have a green, embossed circle.
8. Choose File > Save to save your work. Save the file as BasicShapes in
the folder 8_6_1/a.
Placing an object into the composition
Here, you’ll use the Place command to add an Illustrator file to the logo.
The Place command adds new files to your composition. It is especially
useful for incorporating Adobe Photoshop and Illustrator files into your
compositions, because these files can be added and still retain all their
original layers, as well as be edited in their original programs without
having to be replaced in LiveMotion.
1. Choose File > Place. Navigate to the globe.ai file in the 8_6_1/a folder,
and click Open.
A blue globe is placed in the middle of the Composition window.
Copyright
2002, Adobe Systems, Inc.
Fundamentals of Web Design 1.2—Lab 8.6.1a
1-5
2. Shift-click the green circle to select it as well as the globe.
3. Choose Object > Align > Centers to line up the centers.
Adding layers and texture
In this section, you’ll join the two objects into a single object, and then apply
layers and texture.
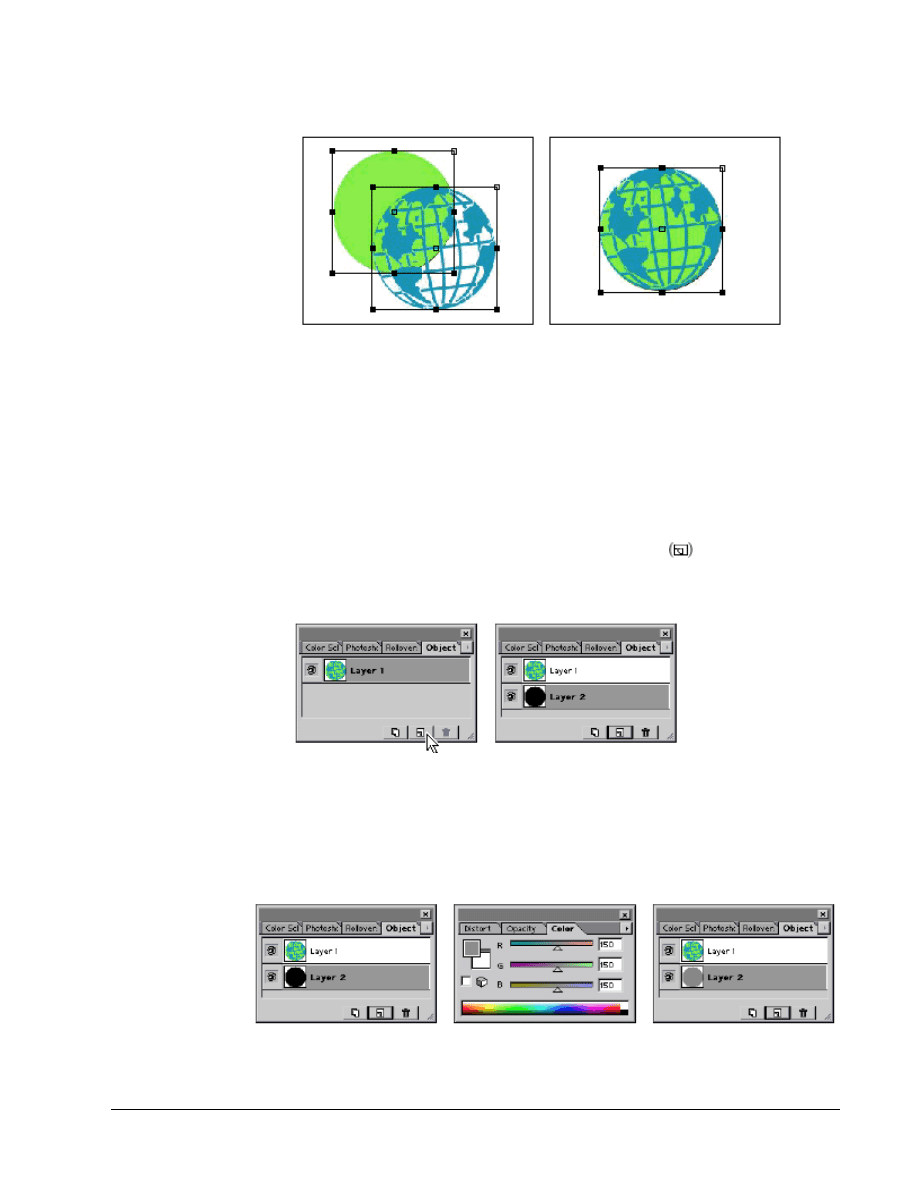
1. With the globe and the green circle still selected, choose Object > Combine
> Unite with Color. The two objects are combined into one object, but each
retains its own color.
2. Choose Window > Object Layers, or click the palette’s tab to display the
Object Layers palette. Click the New Layer button
to create a second
layer for the newly combined object.
3. Make sure the second layer is selected in the Object Layers palette. Then,
go to the color palette and change the layer’s color to gray. The gray we
used has R, G, and B values of 150. Press Enter (Windows) or Return (Mac
OS) to close the slider and complete the action.
1-6
Fundamentals of Web Design 1.2—-Lab 8.6.1a
Copyright
2002, Adobe Systems, Inc.
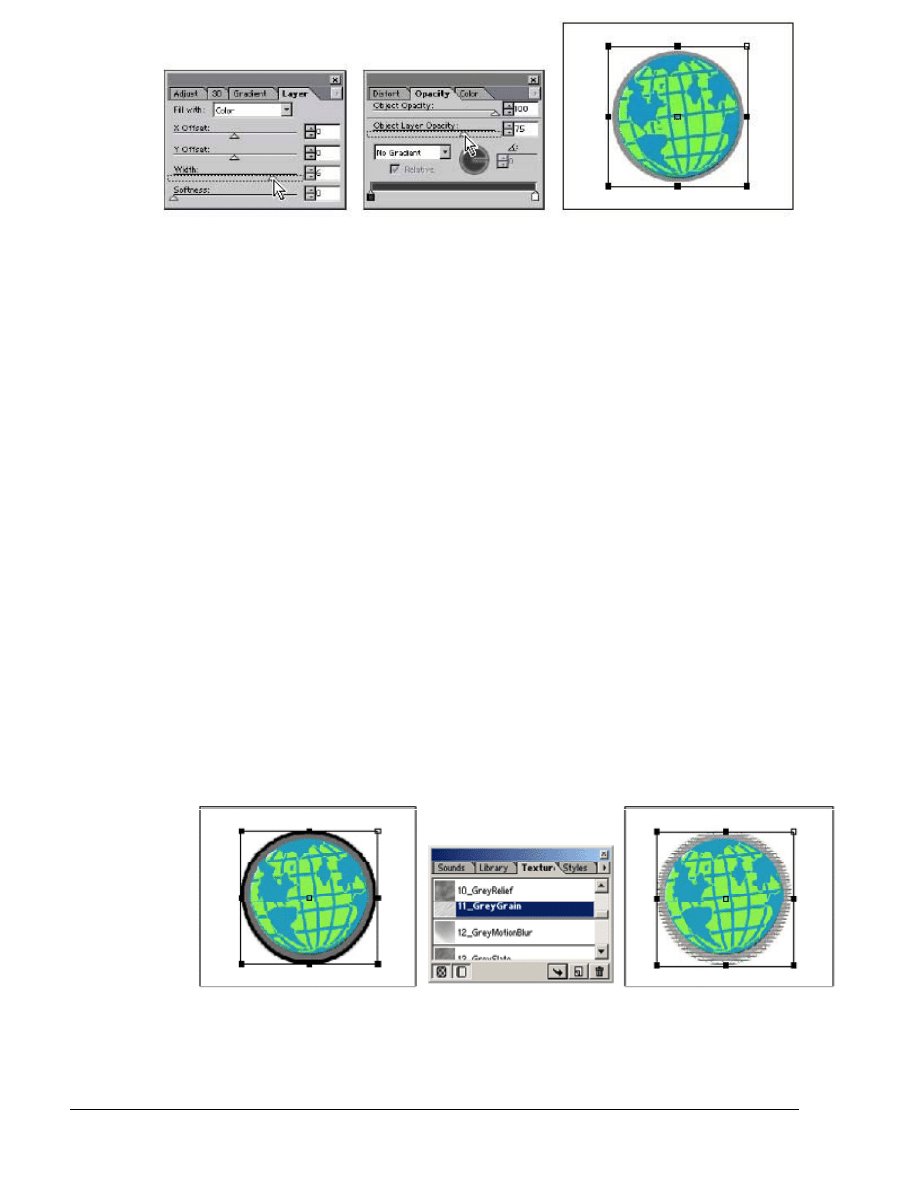
4. Choose Window > Layer, or click the palette’s tab to display the Layer
palette. Change the layer’s width to 6 using the slider or text box. Press
Enter (Windows) or Return (Mac OS) to close the slider and complete the
action.
You will see the edge of the second layer emerge from behind the first.
Currently, both layers have 100% opacity, which means they are completely
opaque.
5. Choose Window > Opacity, or click the palette’s tab to display the Opacity
palette. Change the Object Layer Opacity to 75 using the slider or text box
to make the second layer more transparent.
6. Click the New Layer button in the Object Layers palette to add a third layer
to the object. With Layer 3 still selected in the Object Layers palette, go to
the Layer palette and enter 10 for the width of the third layer.
7. Choose Window > Textures or click the palette’s tab to display the Textures
palette.
Textures are repeated patterns that can be used in LiveMotion compositions as
backgrounds or fills. The Textures palette provides a range of textures, and you
can add your own.
8. Select Name View from the palette menu at the top right of the Textures
palette. Click the GreyGrain texture, and click the Apply Texture button to
apply it to the third layer. You can also apply a texture by double-clicking
the texture in the Texture palette.
9. Select Layer 1 in the Object Layers palette.
10. In the Opacity palette, change the Object Layer Opacity to 75. You can see
the texture on the bottom layer showing faintly through the top two layers.
Copyright
2002, Adobe Systems, Inc.
Fundamentals of Web Design 1.2—Lab 8.6.1a
1-7
11. Choose File > Save.
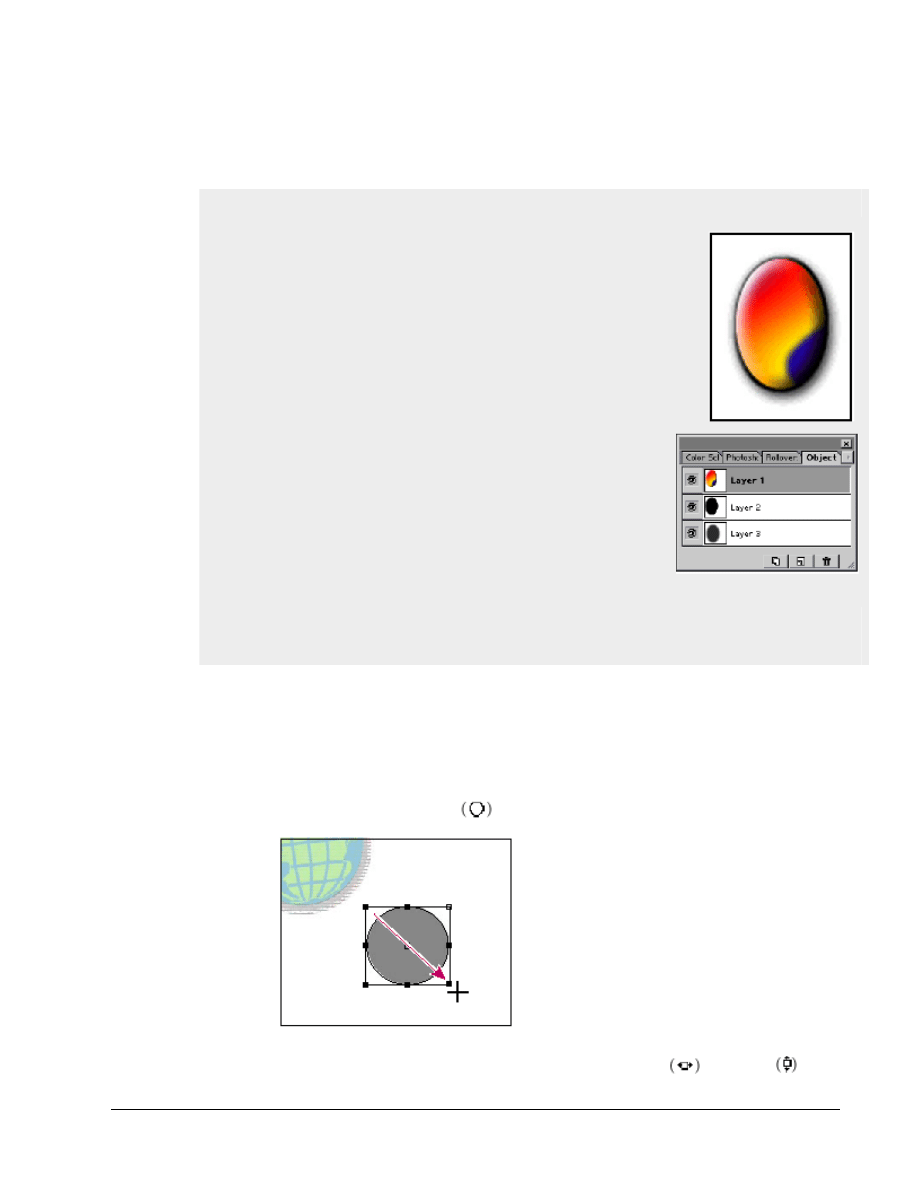
Object Layers
Layers in LiveMotion are parts of individual objects, not the entire
composition. An object is made up of 1 to 99 layers, with each layer
the shape of that object.
When you first create an object, it has just a single layer. You can
then add, delete, reorder, and offset object layers at any time. For
example, a layer can be added to an object, and then offset to
simulate a shadow for the object.
Attributes can be applied to any layer individually. Attributes
include color, opacity, gradients, and 3D and distortion effects. You
can even apply an image to texturize a layer.
By applying different attributes to each layer, you can create a
variety of effects and create complex objects. For example, to create
a button out of a simple geometric object, you might give it three
layers, and apply different effects to each layer. You could emboss
the top layer and fill it with a texture. You could make the second
layer wider and fill it with a color to give the effect of an outline
around the button. And you could offset the third layer, and fill it
with semitransparent gray to simulate a shadow for the button.
Object layers can also be animated just like any other object attribute.
You can make layers grow, disappear, and change over time in an animation.
Adding an outline
Any shape you make can have a fill or just an outline. A filled object is solid. It
can be filled with a color, an image, or a texture. An outlined object is
transparent, except for a strip of color, image, or texture that defines its shape.
To emphasize the globe, you will add a simple black outline around it.
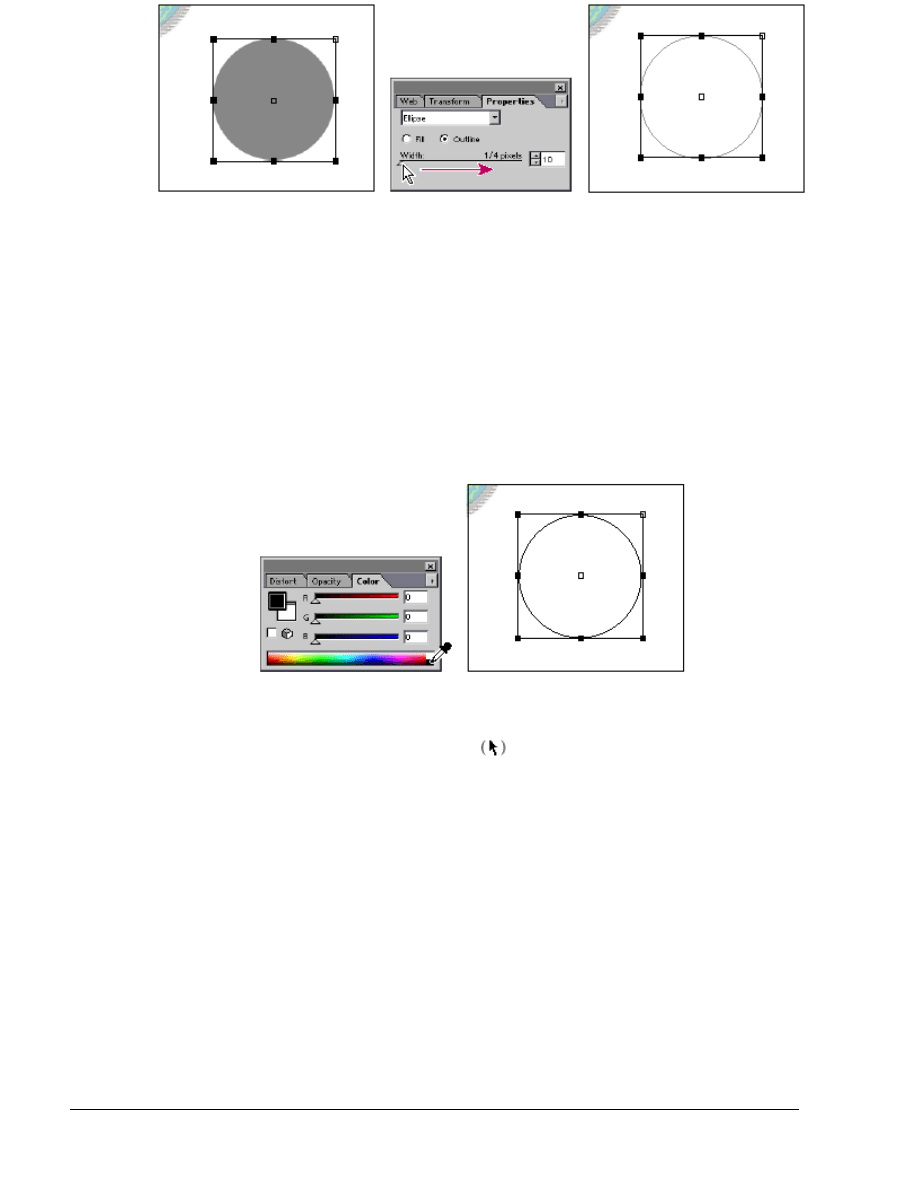
1. Select the ellipse tooltool from the toolbox, and drag to create an ellipse.
1-8
Fundamentals of Web Design 1.2—-Lab 8.6.1a
Copyright
2002, Adobe Systems, Inc.
2. In the Transform palette, enter 144 in the width and height text
boxes to make a circle of the same size as the globe.
3. With the new circle still selected, select Outline in the Properties palette.
4. Enter
10 for the width of the outline. The width is measured in quarter-
pixels to allow for very fine lines, so your line will be 2.5 pixels wide.
5. In the Color palette, change the outline’s color to black.
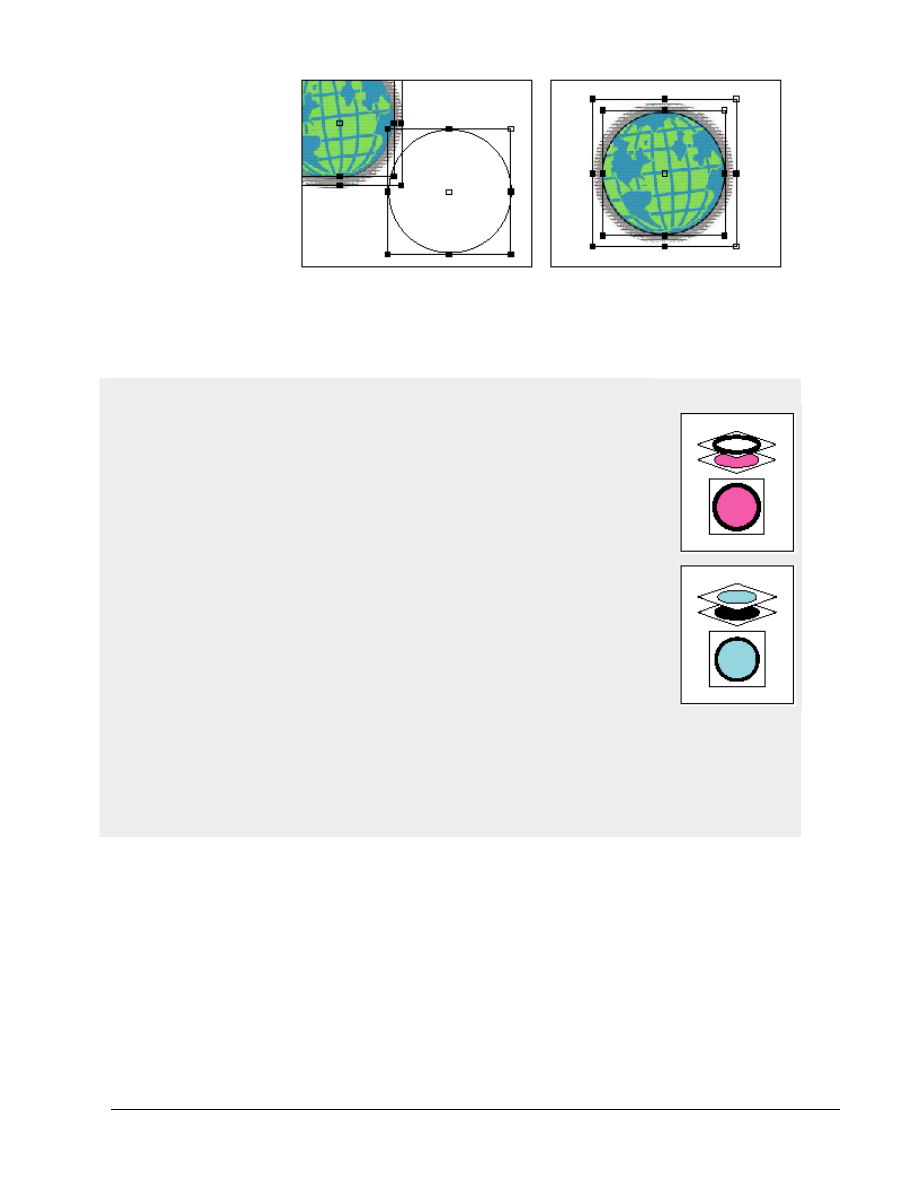
6. Select the selection tool from the toolbox.
7. Shift-click to select the globe and the outline, and choose Object > Align
> Centers. The globe now has a thin black outline.
8. Choose Object > Group to group the globe and the outline.
Copyright
2002, Adobe Systems, Inc.
Fundamentals of Web Design 1.2—Lab 8.6.1a
1-9
9. Choose File > Save.
You’ve finished making the first part of the logo. Next, you’ll create the house
shape that completes it.
Stroke and Fill
By adding a lower object layer that is wider than the top layer, you can
create a stroke and fill effect similar to the Adobe Illustrator stroke and fill
effect. LiveMotion provides three other ways to achieve this effect. You can
create a solid object, and another that is the same size, and choose the
Outline option in the Properties palette for the second object. Place the
outline object over the solid one so that it looks like the stroke of the object.
Then choose Object > Combine > Unite with Color to combine the two
objects into one.
You can also create a filled object that is the size you want the final object to be,
then another one that is slightly smaller. Arrange the smaller object on top of the
larger one so that it becomes the fill, then choose Object > Combine > Unite with
Color to combine the two objects into one.
Objects with more than one layer, and objects that are combined using a
Combine command, are exported as bitmaps. You can create a stroke and fill
effect but have your objects export as vector objects. To do this, create a solid
object and an outline object, and choose Object > Group to create the stroke and fill effect.
Creating the house
To make the circle, you drew a new shape and then added elements to it. To
make the house, you will draw a new shape, add a premade shape from the
LiveMotion Library to it, and then save the modified shape to the Library. You
will also use a different combine command to cut a window out of the house.
Making the house shape
The house is formed from two shapes, one of which comes with LiveMotion. In
this section, you will create the house using the two shapes.
1-10
Fundamentals of Web Design 1.2—-Lab 8.6.1a
Copyright
2002, Adobe Systems, Inc.
1. Select the rectangle tool
(
), and draw a rectangle in the Composition
window. Select the selection tool
(
).
2. In the Transform palette, enter a width
(
)
of 125 and a height
(
)
of
115 for the rectangle. In the Properties palette, select Fill to make the
rectangle solid.
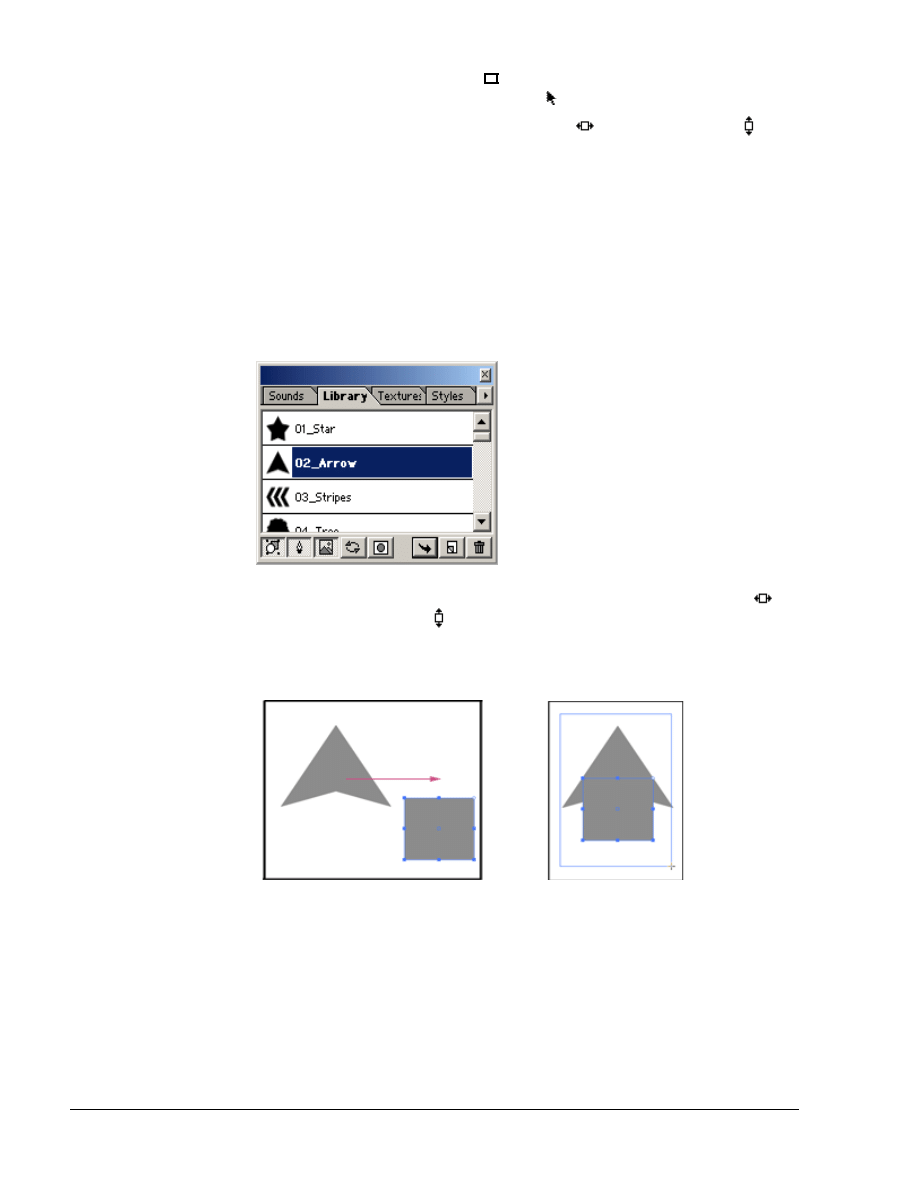
3. Choose Window > Library, or click the palette’s tab to display the
Library palette.
The Library palette contains useful shapes that you can add to your compositions
without spending time making them yourself.
4. From the menu in the top right corner of the palette, choose Name View.
5. Select the Arrow and click the Place Object button
to place the arrow in
the composition. Another way to add a library object is by dragging it
from the palette onto the Composition window.
6. In the Transform palette, increase the size of the arrow to a width
(
)
of
195 and a height
(
)
of 150.
7. Drag the arrow on top of the rectangle so that the arrowhead makes a
roof above the rectangle.
8. Select both objects, and choose Object > Combine > Unite. Just like the
globe and the circle, the two shapes are now a single shape.
9. Choose File > Save.
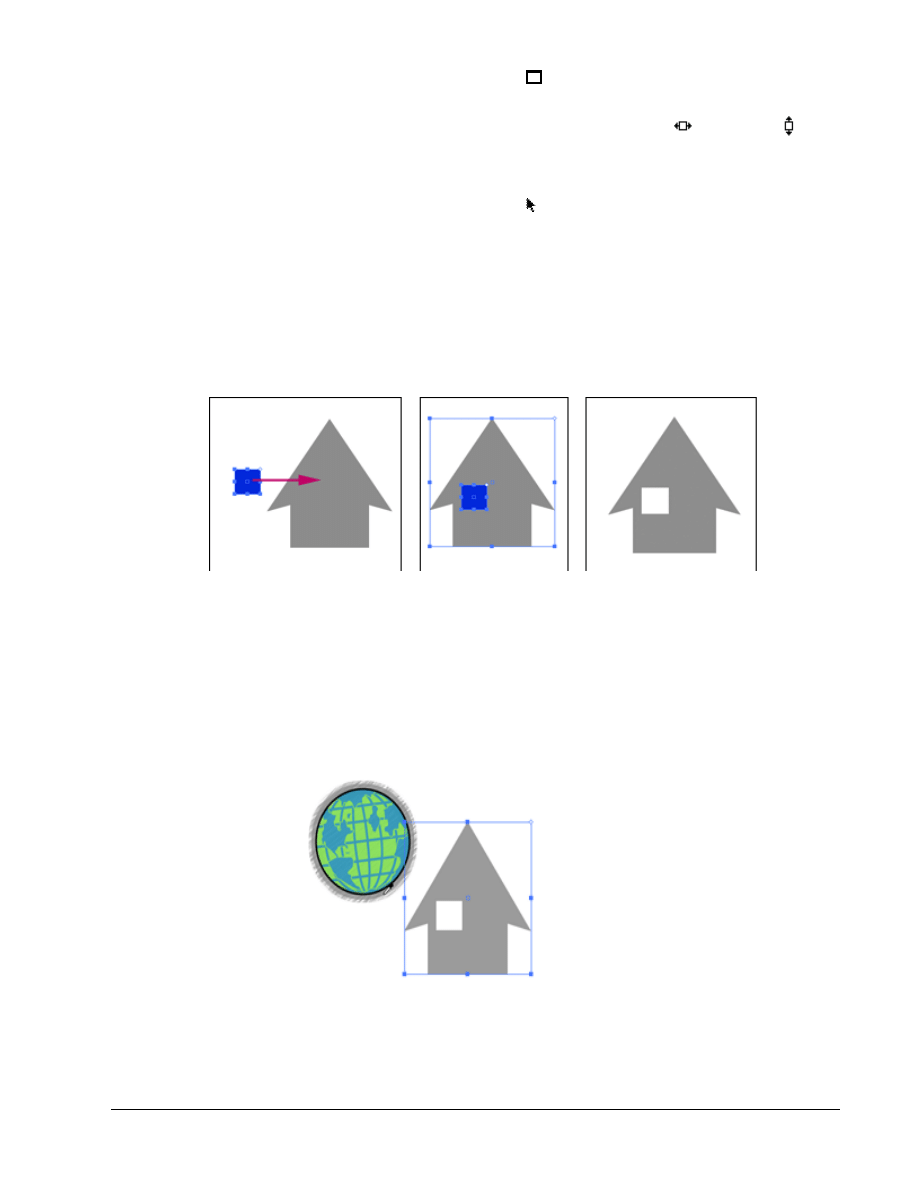
Add a window and effects
Now you’ll create a window in the house. When the house is positioned later, the
globe will show through the window.
Copyright
2002, Adobe Systems, Inc.
Fundamentals of Web Design 1.2—Lab 8.6.1a
1-11
1. Select the rectangle tool
(
), and draw a rectangle in the Composition
window.
2. In the Transform palette, enter 40 for the width
(
)
and height
(
).
3. Choose a new color for the window from the Color palette, so you can
see the window as you position it.
4. Select the selection tool
(
). Place the square in the upper left corner
of the house.
5. Shift-click to select the square and the house, and choose Object >
Combine > Minus Front.
This action combines the two objects into a new one and makes an empty space
in the new object where the top object was. In this case, it creates a small open
area where the square was, causing a window effect. You can see through this
space to the area beneath.
Now you’ll practice a different way of selecting color while changing the color
of the house. The eyedropper tool lets you select a color from anywhere in
LiveMotion, and even on your screen outside of LiveMotion, and apply it to a
selected object.
6. Use the selection tool to select the house. Use the color palette and
choose a gray (an R value of 150, a G value of 150, and a B value of
150).
7. In the 3D palette, choose Cutout from the menu. Enter 5 for Depth and 7
for Softness.
8. Choose File > Save.
1-12
Fundamentals of Web Design 1.2—-Lab 8.6.1a
Copyright
2002, Adobe Systems, Inc.
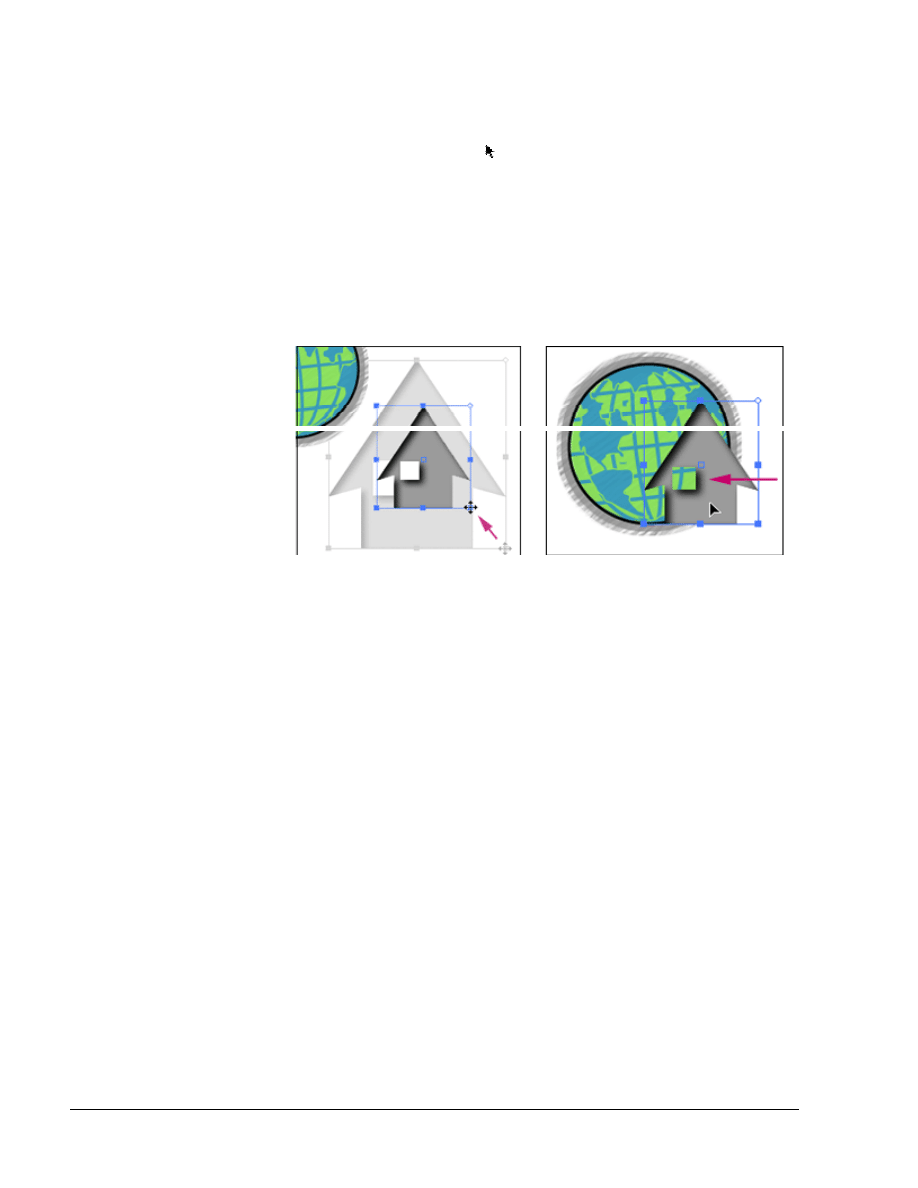
Resize and align the house
In the final steps of making the logo, you’ll make the house smaller and drag it
into its final position.
1. Select the selection tool
(
).
2. Hold down the Shift key and drag the house inward toward its center
until the width is 104 (you can see the width in the Transform palette).
By holding the Shift key down as you drag, the house’s proportions stay
the same.
3. Drag the house so that it overlaps the globe, and the left tip of the roof is
just to the right of the middle of the globe.
4. Shift-click to select the house and the globe. Then choose Object>
Group, so that the two items become one item.
5. Choose File > Save.
You’ve now completed the logo.
Document Outline
Wyszukiwarka
Podobne podstrony:
ZARZ SRODOWISKIEM wyklad 1a
Audyt personalny 1a stud
1a wz2id 18643
II, rzis analityczny 1A Likpol
L1-1a, Ratownictwo Medyczne, Materiały ze studiów, Medycyna Ratunkowa
praca-magisterska-7092, 1a, prace magisterskie Politechnika Krakowska im. Tadeusza Kościuszki
praca-magisterska-7091, 1a, prace magisterskie Politechnika Krakowska im. Tadeusza Kościuszki
2 1a
BLOK 1a 2 3 id 90304 Nieznany
04 1a LICZNIKI XBK KATALOGid 4946
Cwiczenia z ochrony gleby cz 1a Nieznany
praca-magisterska-6927, 1a, prace magisterskie Politechnika Krakowska im. Tadeusza Kościuszki
praca-magisterska-6888, 1a, prace magisterskie Politechnika Krakowska im. Tadeusza Kościuszki
1a-.Starożytność, PRAWO UŁ, I rok, Prawo rzymskie
algebra lista 1a rozszerzona
więcej podobnych podstron