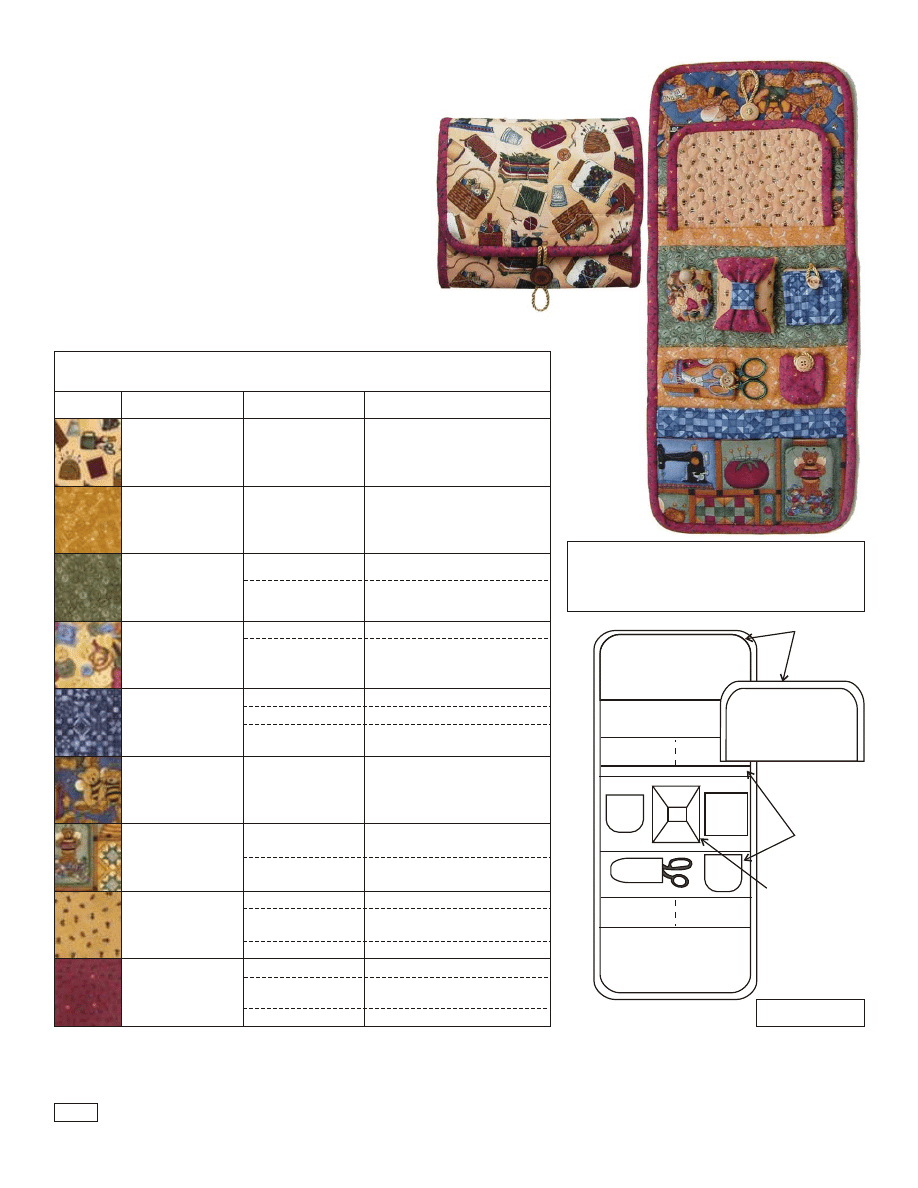
Making this sewing caddy has the added fun of using the
Quilting Bees fabric designed by Teresa Kogut for South Sea
Imports. The caddy design includes enough pockets to tote
miscellaneous tools like a measuring tape, 1” x 6” ruler,
marking pencil, thread and more. The special pockets are
designed for thimbles, scissors and a needle book while the
pin cushion forms a sweet little bow tie. Embellish with
buttons and cording. The 9 fat quarters will produce up to 2
caddies. Make one for you to use and one as a gift for a friend!
Just use one of the leftover fabrics for the bias binding. There
may be enough of the red Hearts and Flowers fabric used in
the first one, but it will be close! Enjoy using and giving this
fun project.
NOTE: Please read the entire pattern carefully. Every effort has been made to ensure the accuracy of this pattern. Use a 1/4” seam
allowance unless otherwise stated. Fabric images used in the presentation of this pattern are given as placement guides. They are not
necessarily true to the scale of the original fabrics. Thank you for choosing ConnectingThreads.com for your quilting needs.
© Copyright
Connecting Threads ®. All rights reserved.
For private, non-commercial use only. Please see our Web site for terms of use.
Created by Debbie Beaves for
Connecting Threads ®
Collage
104418
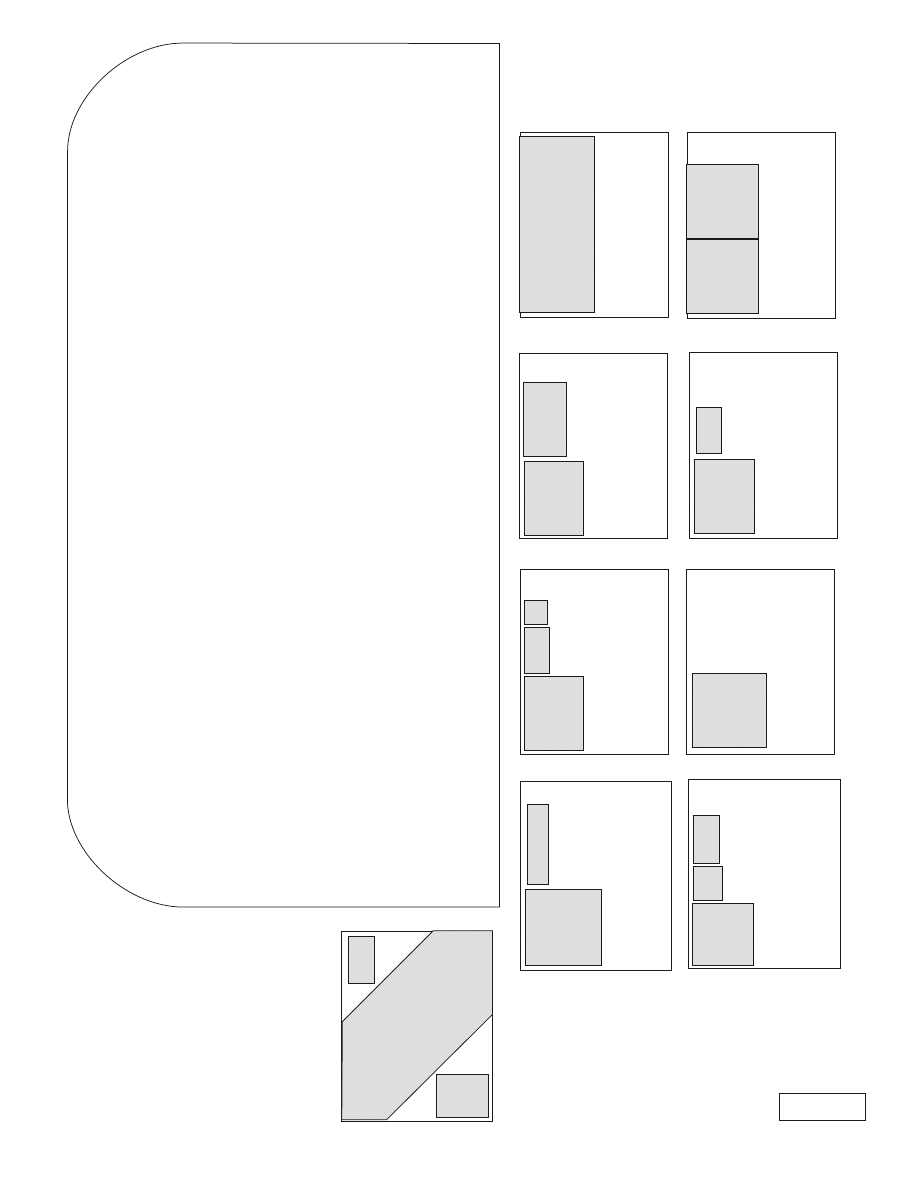
Fabric 1
Fat Quarter
Cover
One 8” x 19”
& ONE OF BATTING
Buttons, Yellow
104421
Fabric 2
Fat Quarter
Liner
Two 7-3/4” x 8”
Buttons, Green
104422
Fabric 3
Fat Quarter
Center Base
Pocket 2a
One 4-1/2” x 8”
One 6-1/2” x 8”
Buttons & Bees
104426
Fabric 4
Fat Quarter
Pocket 1
Thimble Bag #1
One 6-1/2” x 8”
One 2-3/4” x 5”
ONE 2-1/2” x 2-1/4” of
BATTING
Patchwork, Tonal
104423
Fabric 5
Fat Quarter
Pocket 2b
Pincushion Tie
Needle Book
Cover
One 6-1/2” x 8”
One 2-1/2” square
One 2-3/4” x 5” & ONE
2-1/4” x 4-3/4” of BATTING
Quilting Bears
104419
Fabric 6
Fat Quarter
Pocket 3a
One 8” square
ONE 4” x 8”of BATTING
Patchwork
104417
Fabric 7
Fat Quarter
Pocket 3b
Scissor Holder
One 8” square
ONE 4” x 8”of BATTING
One 2-1/4” x 6-1/2”
One 2” x 3” of BATTING
Bees, Honey
104424
Fabric 8
Fat Quarter
Pincushion
Button Down Flap
Needle Book
Two 3” x 3-1/2”
One 6-1/2” x 8-1/2” & One
6-1/2” x 4-1/4” of BATTING
One 2-3/4” x 5”
Hearts & Flowers
104425
Fabric 9
Fat Quarter
Pincushion Bow
Thimble Bag #2
Binding
One 4” x 5” square
One 2-3/4” x 5” & ONE
2-1/2” x 2-1/4” of BATTING
70” of 2-1/2” wide bias strips
FABRIC REQUIREMENTS & CUTTING FOR ONE SEWING
CADDY~ Double Cutting Amounts for Two Caddies
Fabric
Placement
Yardage
Cutting Amounts
ASC v1
Item #991102
QUILTING BEE SEWING CADDY
Finished size: approx. 8” x 19” open & 6-3/4” x 8” closed
Center Base
Pocket 3a
Pocket 3b
Pocket 2a
Pocket 2b
Pocket 1
Liner
Pincushion
Needle
Book
Thimble
Bag 1
Tie
Bow B
as
e
Binding
Scissor
Holder
Thimble
Bag 2
Pocket Flap
Please refer to the Yardage Cutting Suggestions
on page 5 before cutting any fabric. This will
help in yielding 2 sewing caddies (especially
fabric 9).
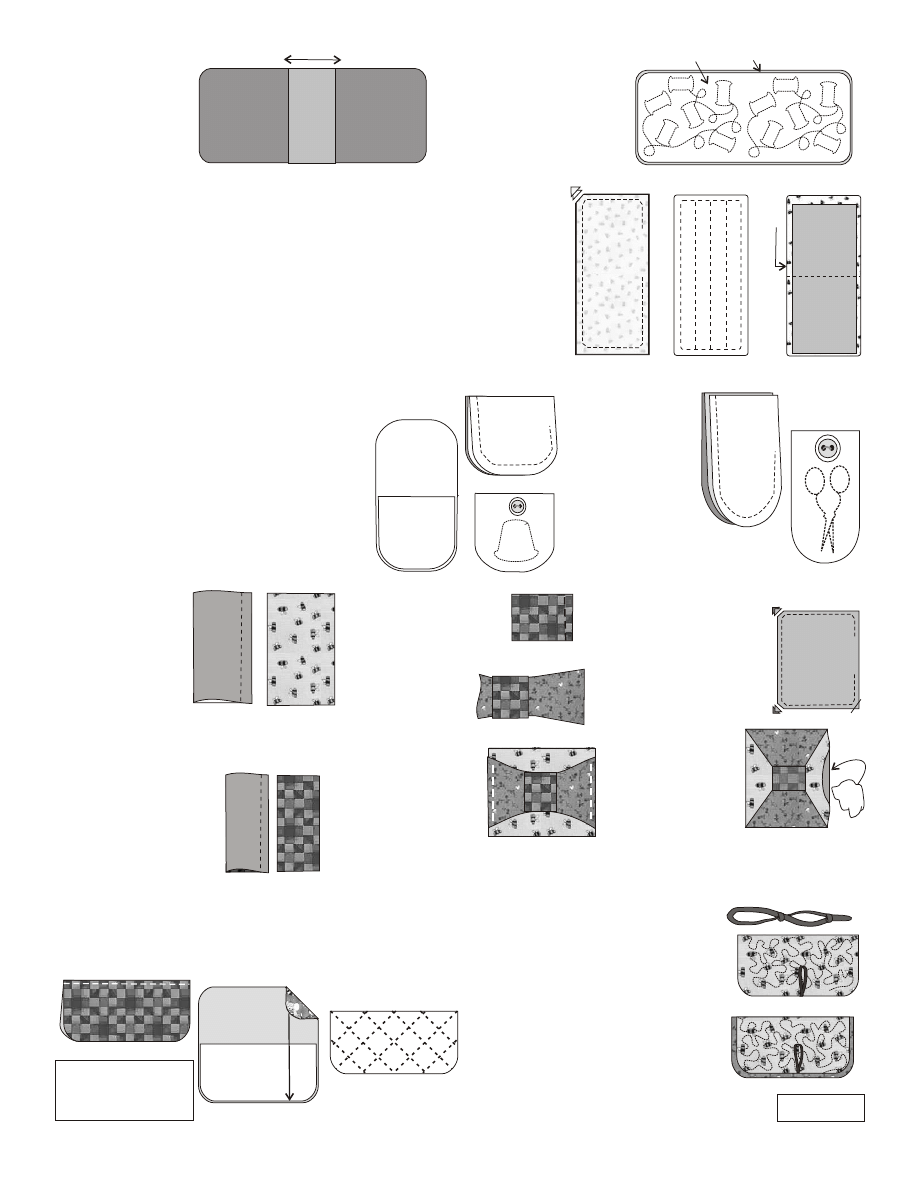
3- NEEDLE BOOK: Place the two fabrics right sides together (RST). Place the
batting piece against the wrong side of the cover fabric. Sew together leaving an
approx. 2” opening. Slightly square off your stitches at the corners. Trim the
seam allowances at the corners and the batting. Turn the layers right side out and
quilt in straight rows.
4- Place one 2” x 4” piece of boiled wool or two 2” x 4” pieces of felt in the center of
the liner fabric.
5- Sew through all layers slightly less than center. This will allow the layers, when
folded in half, to match at the ends. Sew a button on the front, center of the larger
side. Set aside.
1- Sew the liner
2- Place the cover’s batting on the
pieces to the
wrong side of the cover
center base. Press
fabric. Pin or thread baste.
the seam
Quilt the two layers. Trim
allowances in the
the batting, if necessary,
direction of the
even with the fabric.
arrows.
6- THIMBLE BAGS 1 & 2: 7-
SCISSOR HOLDER:
Fold the thimble bag fabric right sides together. Place the
Sew the scissor
batting against one side of the fabric. Sew
holder using the
around the shape leaving an approx. 1-1/2”
same process as
opening.
the thimble bag.
Turn the thimble bag right sides out. Turn the
Once quilted, sew
raw edges to the inside. Close the opening with
a 5/8” button to
tiny stitches.
the top, center of
Quilt using the thimble shape from page 4.
the fabric piece.
Slightly gather the bottom with a simple running
stitch. Repeat the process for Thimble Bag 2.
8- BOW TIE PIN
in the center back.
top and bottom of the
CUSHION:
Fold the tie in half with
bow fabric.
BOW: Fold the
the seam side facing
Place the remaining base
bow fabric in half
out. Sew a seam at the
piece on top of the bow
along the 4” side.
raw edges. Turn
tie, right sides together.
Sew a seam down
right side out
Sew around the entire
the long side, turn
again.
perimeter, squaring at
piece right side
the corners. Leave an
out. Position the seam
approx. 2” opening.
allowance in the center back
Thread the bow
and finger press the
piece through the tie
Turn pieces right
sides.
loop.
side out. Stuff
lightly with polyfil
Sew the tie fabric
Position the tie’s
or tiny, leftover
in half as you did the
seam allowance in
pieces of batting.
bow. Turn right side
the center back. Sew
Turn the raw edges inside the
out, position the seam
a row of basting stitches at the
pin cushion and close the
ASSEMBLY:
TIE:
Batting
LINER
LINER
CENTER
BASE
Press
9- POCKETS 1, 2a & 2b: 10- POCKETS 3a & 3b: (Both 11-
POCKET FLAP: Prepare this flap
Fold the fabric piece in
are sewn in the same manner.)
in the same manner as 3a and 3b.
half along the 8” side.
Place a piece of batting on the
Fold a 6-1/2” long piece of cording in
Topstitch 1/4” in from
wrong side of the fabric. Fold
half. Wrap thread around the raw
the fold on each pocket.
in half, wrong sides together.
edges and knot off to secure. Wrap
Quilt each pocket.
thread around the cording 1-1/2” away
from the looped end. Knot securely.
Baste it to the center, lower edge of the
flap facing into the flap. Bind the raw
edges of the flap. Use a 3/8” seam
allowance since the strips were cut 2-
1/2” wide. (If this pattern was
downloaded from the Web, there is a
separate download for bias instructions.)
Batting
Wrong side
of 3a or 3b
F
o
ld
in
½
C
en
te
r
Turn right side
out & quilt
Button on right side
on this end.
COVER + batting ONLY!
991102-2
Batting
12- POCKET 1: Position the folded edge of pocket
1 6-1/4” from the liner’s left end. Pin to secure and
sew down the bottom edge of the pocket. Sew a seam
4” in from the sides. This will partition the fabric into
two pockets.
13- POCKETS 2a & 2b: Position pocket 2a’s folded edge 5” from
the liner’s left end. Pin to secure and sew down the bottom edge
of the pocket. Position pocket 2b’s folded edge 5” from the liner’s
right end. Pin to secure and sew down the raw edges. Sew a seam
4” in from the sides. This will partition the fabric into two
2a
2b
4
”
L
ef
t
E
n
d
o
f
L
in
er
R
ig
h
t E
n
d
o
f L
in
er
5”
5”
1
4
”
6-1/4”
L
ef
t
E
n
d
o
f
L
in
er
R
ig
h
t E
n
d
o
f L
in
er
L
in
er
L
in
er
Center
Base
14- POCKETS 3a & 3b: Pin 3a to
15- PINCUSHION: Position in the
16- SCISSOR HOLDER, THIMBLE BAGS &
the left end of the liner and 3b to
center of the base section. Tiny,
NEEDLE BOOK: Sew a loop of cording to
the right end of the liner. Sew the
firm stitches at each of the four
each of the positions diagramed below. Sew
bottom edge of each to the liner.
corners will hold it in place.
the corresponding holder in place, over the
loops.
FLUSH
L
ef
t
E
n
d
o
f
L
in
er
R
ig
h
t E
n
d
o
f L
in
er
3a
3b
FLUSH
17- BUTTON DOWN FLAP: Place the finished flap right side
down with the fold approx. 1/4” away from pocket 1 (fold). Sew
a seam 1/8” away from the folded edge of the flap. This will
secure it to the liner and be hidden when the flap folds over.
18- Fold a 6-1/2” length of cording. Wrap thread around the raw edges and
knot off to secure. Wrap thread around the cording 1-1/2” away from the
looped end. Knot securely. Baste the loop to the front, center at the outer
edge (behind pocket 3a.
With wrong sides together, bind the edges of the sewing caddy’s cover and
liner. The binding has been cut in 2-1/2” wide strips so use a 3/8” wide
seam to sew the binding to the layers.
19- Add final touches to your new little sewing caddy with the addition of buttons for
closing the flap and for closing the actual caddy. Sew a button to the front of the
caddy 3” away from the end with pocket 3b on the other side and 4” in from the sides.
T
o
p
o
f
p
o
ck
et
1
r
es
ts
h
er
e
#1
#2
1-7/8”
2-1/4”
2-1/2”
1”
3-1/4”
1-3/4”
2-1/4”
T
o
p
o
f p
o
ck
et
2
b
r
es
ts
h
er
e
2-1/2”
Optional Embellishment:
Quilt a running stitch on each
side of the center base. Be sure
the stitches only go through the
liner fabric and the batting. This
will add stability to the base.
99110-3
Secure cording
with wrapped
thread and knots.
F
O
L
D
S
C
IS
S
O
R
H
O
L
D
E
R
F
o
ld
a
2
-1
/4
”
x
6
-1
/2
”
p
ie
ce
o
f
fa
b
ri
c
in
h
al
f
an
d
t
ri
m
co
rn
er
s
to
f
it
t
h
is
te
m
p
la
te
.
991102-4
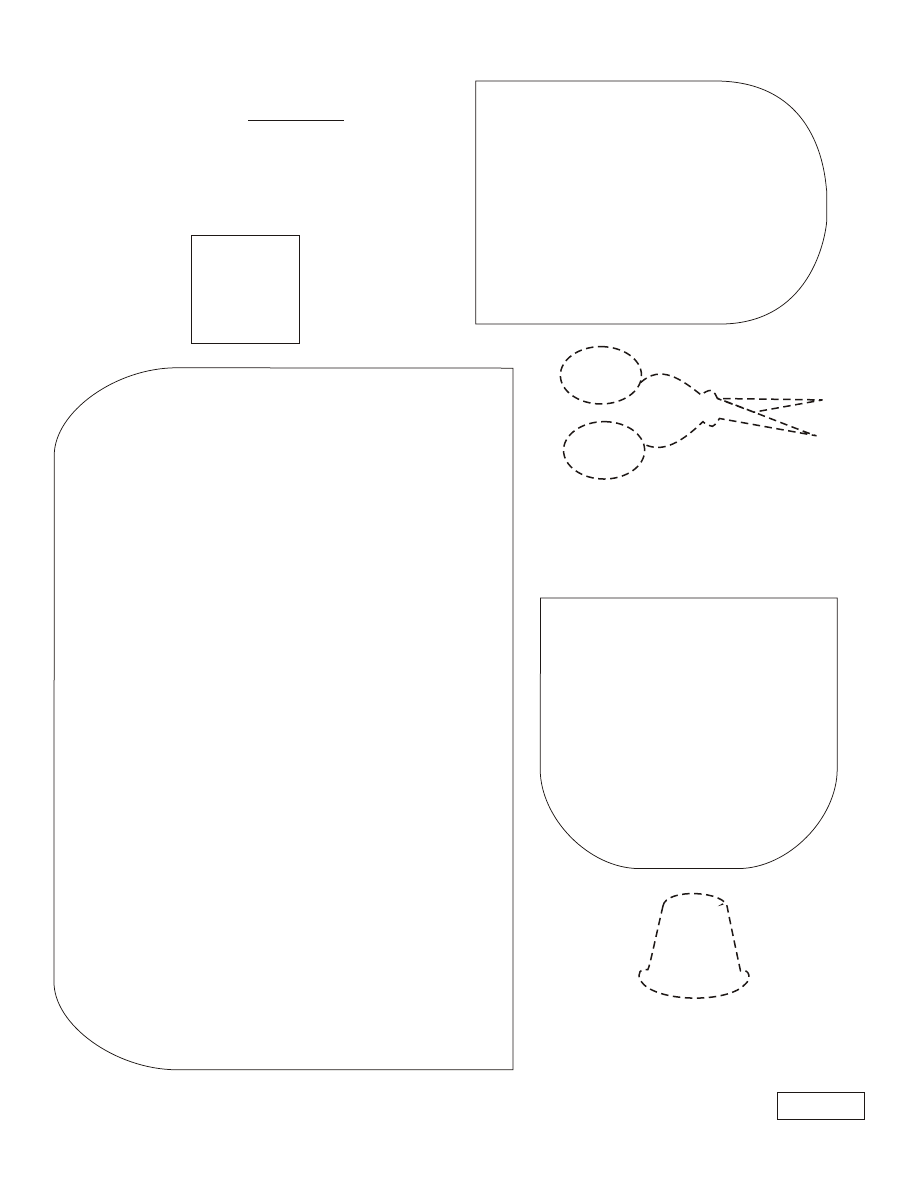
BUTTON DOWN FLAP
Fold the
in half and trim corners to fit
this template.
6-1/2” x 8-1/2” piece
F
O
L
D
THIMBLE BAG
Fold a 2-3/4” x 5”
piece of fabric
in half and trim
corners to fit this
template.
FOLD
Please measure the square below.
It should measure 1” square. If it does
not, the “Fit to Page” option may be
clicked on in your printer dialog box.
Simply click it off and print the template
pages again. Better safe than sorry!
Continuous Line quilting
option for Scissor Holder
Continuous Line quilting
option for Thimble Bags.
Measure
Me!
YARDAGE CUTTING
SUGGESTIONS
991102-5
F
O
L
D
POCKET 3A & 3B
Fold the 6-1/2” squares in half
and trim corners to fit
this template.
Liner
Two 7-3/4” x 8”
Cover
One 8” x 19”
FABRIC 1
FABRIC 2
Pocket 1
One 6-1/2” x 8”
Thimble Bag
2-3/4” x 5”
FABRIC 4
Pocket 2b
One 6-1/2” x 8”
Needle Book Cover
One 2-3/4” x 5”
Pincushion Tie
One 2-1/2” square
FABRIC 5
Center Base
One 4-1/2” x 8”
Pocket 2a
One 6-1/2” x 8”
FABRIC 3
Pocket 3a
One 8” square
FABRIC 6
Pocket 3b
One 8” square
Scissor Holder
One 2-1/4” s 6-1/2”
FABRIC 7
Needle Book Lining
One 2-3/4” x 5”
Button Down Flap
One 6-1/2” square
Pincushion Base
Two 3” x 3-1/2”
FABRIC 8
Pincushion Bow
One 4” x 5”
FABRIC 9
Thimble Bag
2-3/4” x 5”
Bias Binding
Approx. 75” continuous
length of 2-1/2” wide
strips per caddy
B
eg
in
H
er
e
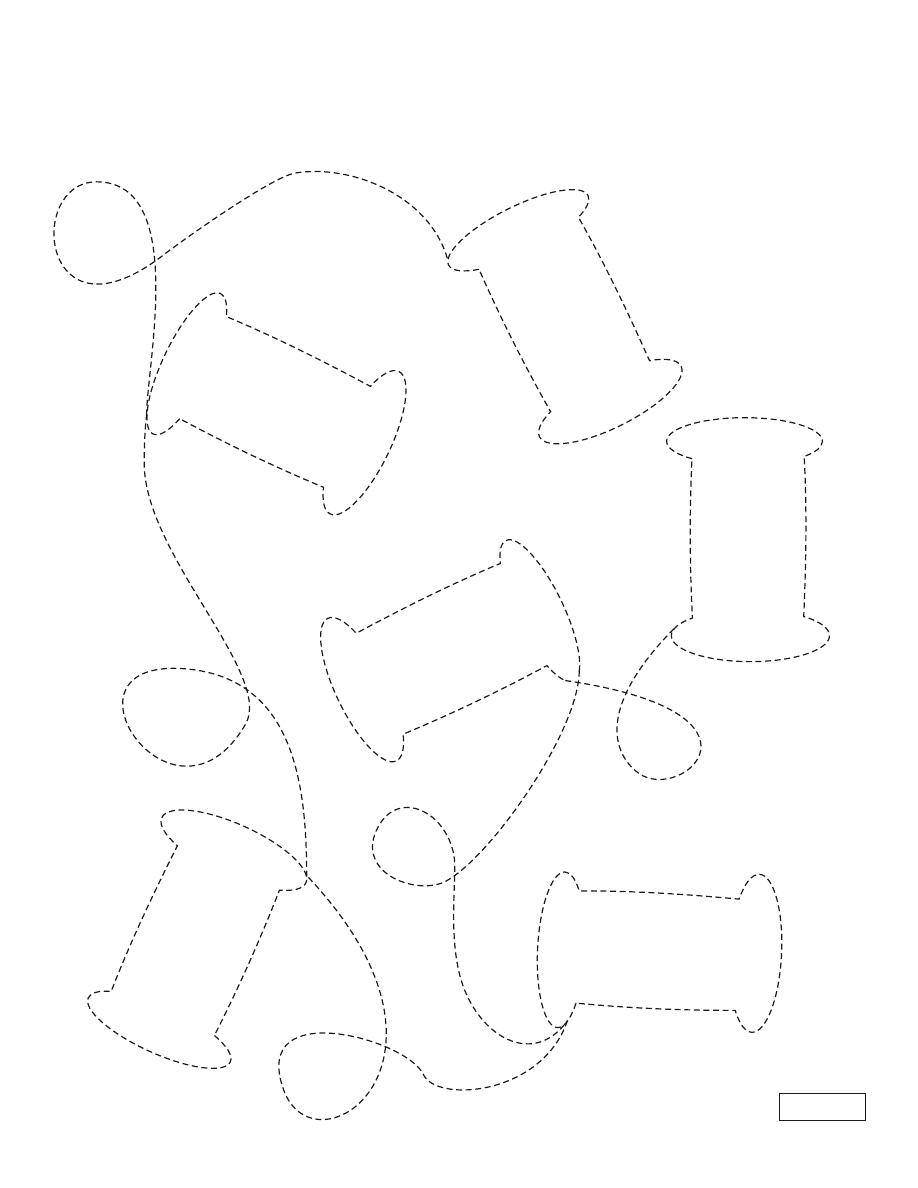
CONTINUOUS LINE QUILTING OPTION FOR THE
SEWING CADDY COVER.
For ease in quilting, copy this design on vellum or tracing paper. Pin the designs to the fabric side of
the layers. Machine quilt following the design. Tear the paper away from the fabric and batting layers.
991102-6
Wyszukiwarka
Podobne podstrony:
Patchwork Quilting falling leaves table runner
Patchwork Quilting Snowflakes
patchworkhose
Cz15, materiały do studiowania Biblii, BEE International, Dogmatyka , Ryrie Podstawy teologii, Podst
ESAB Caddy Arc 151 201
Krewetka Black bee i jej gradacje
Cz08, materiały do studiowania Biblii, BEE International, Dogmatyka , Ryrie Podstawy teologii, Podst
Cz04, materiały do studiowania Biblii, BEE International, Dogmatyka , Ryrie Podstawy teologii, Podst
H. Bee rozdział 9, psychologia rozwojowa i osobowości
Bee Icons
Bee Gees You win again
IBE BEE 7 szesciolatek jak sie uczy
Patchwork Tulip Garden Quilt
IBE BEE 5 szesciolatek
122 Dress cutting and sewing instructions original
9302 Franzi Vest cutting and sewing instructions original
psychologia+helen+bee+592-604
Rozdział 15 - Rozwój fizyczny i poznawczy w wieku średnim, Psychologia rozwojowa, Helen Bee
więcej podobnych podstron