

GUITAR BUILDER’S FAQ
Version 2.5
i
NOTICE
This document is freeware.
However, if you find it useful, helpful, enjoyable, or entertaining,
drop me an email message and let me know.
Version 2.5
10 February 2000
Copyright
1995-2000 Bill Wyza
All Rights Reserved
DISCLAIMER
The information contained in this FAQ (Frequently Asked Questions) document comes from many months
of trial, error, and experience. Specific individuals are credited with their contributions. This FAQ is
provided as-is, with no expressed or implied warranty as to its contents. While every effort has been made
to ensure that the information contained herein is accurate, all authors and contributors assume no
responsibility for errors, omissions, or damages that result from the use of the information contained herein.
Furthermore, the author disclaims any and all liability for the procedures and descriptions herein. The
reader assumes all responsibility.
GUITAR BUILDER’S FAQ
Version 2.5
ii
TABLE OF CONTENTS
A. Purpose............................................................................................................................................................. 1
B. What should I know about this FAQ? ............................................................................................................... 1
C. Where can I find information on this FAQ? ..................................................................................................... 1
D. Contributions. .................................................................................................................................................. 1
E. Updates............................................................................................................................................................. 2
F. Version History................................................................................................................................................. 2
G. What’s New In This Version?........................................................................................................................... 2
H. Freeware Description ...................................................................................................................................... 2
A. Why build a guitar? .......................................................................................................................................... 4
B. Is building a guitar cheaper than buying one? ................................................................................................. 4
C. How much will it cost? ..................................................................................................................................... 4
D. How long will it take? ...................................................................................................................................... 5
E. What will I need to get started? ........................................................................................................................ 5
A. What types of wood are commonly used? ......................................................................................................... 5
B. What's all this "quarter" talk? .......................................................................................................................... 6
C. Does the type of wood affect the sound? .......................................................................................................... 6
D. What are their properties? ............................................................................................................................... 6
E. How much does wood cost?.............................................................................................................................. 8
F. Where can I get the wood? ............................................................................................................................... 8
G. How do I choose a wood? ................................................................................................................................ 8
A. What tools do I need? ....................................................................................................................................... 8
B. How much will they cost? ................................................................................................................................. 8
C. Where can I buy them? ..................................................................................................................................... 9
A. What is scale length and what does it mean? ................................................................................................. 12
B. How do I determine fret spacing? .................................................................................................................. 12
C. What kind of frets should I use? ..................................................................................................................... 12
D. What type of nut should I use? ....................................................................................................................... 13
E. What type of tuners should I use?................................................................................................................... 14
F. What types of neck joints are there? ............................................................................................................... 14
G. How do I put on a decal? ............................................................................................................................... 15
H. Do I need a neck angle?................................................................................................................................. 15
I. Can I buy pre-slotted fingerboards?................................................................................................................ 16
J. Can I buy pre-assembled necks? ..................................................................................................................... 16

GUITAR BUILDER’S FAQ
Version 2.5
iii
A. What are the capacitors doing?...................................................................................................................... 16
B. How do I shield cavities to prevent that humming sound? ............................................................................. 16
C. What is that annoying scraping sound in the potentiometers? ....................................................................... 17
D. How does a pickup work? .............................................................................................................................. 17
E. How does a humbucker work?....................................................................................................................... 17
F. What is the difference between series and parallel wiring? ........................................................................... 18
G. What is a four wire pickup? ........................................................................................................................... 18
A. How do I stain a guitar?................................................................................................................................. 19
B. What kind of paint should I use for colors?.................................................................................................... 19
C. What is a sample finishing schedule?............................................................................................................. 20
D. How do I remove a finish? ............................................................................................................................. 21
A. How often should I replace my strings? ......................................................................................................... 23
B. When should I reset my intonation? ............................................................................................................... 23
C. What is the best way to polish the frets? ........................................................................................................ 23
D. How do I pull a fret? ...................................................................................................................................... 23
E. What is a fret job? .......................................................................................................................................... 24
F. How do I clean the gunk off the fretboard? .................................................................................................... 24
A. Pre-drill humbucker corners before routing. ................................................................................................. 25
B. Routing. .......................................................................................................................................................... 25
C. Bridge Location (for a fixed bridge)............................................................................................................... 25
D. Bridge pickup location ................................................................................................................................... 25
E. Centerline ....................................................................................................................................................... 26
F. Sandpaper....................................................................................................................................................... 26
G. Strengthen a floating tremolo mounting......................................................................................................... 26
H. More tips on routing....................................................................................................................................... 26
I. Make a scale body image for free!................................................................................................................... 26
J. Another take on routing and parts................................................................................................................... 27
K. More tips on getting started ........................................................................................................................... 27
L. Cutting, finishing, and buying wood. .............................................................................................................. 28
A. Bandsaw too small.......................................................................................................................................... 28
B. Drill press too small. ...................................................................................................................................... 29
C. Trouble with painting area............................................................................................................................. 29
D. Paint build-up. ............................................................................................................................................... 29

GUITAR BUILDER’S FAQ
Version 2.5
iv

GUITAR BUILDER’S FAQ
Version 2.5
1
PART I - BEFORE YOU BEGIN
I. General Information.
A. Purpose.
The purpose of this FAQ (Frequently Asked Questions) is to discuss some of the procedures, pitfalls, and
materials used in building electric guitars. While the subject of guitar building and woodworking in
general can (and has) filled many volumes, the goal of this FAQ is to touch on some of the major topics in
a level of detail that can get the beginner started, as well as inform the more experienced builder. It is NOT
the goal of this FAQ to be a textbook on building guitars. See Appendix E for such books.
B. What should I know about this FAQ?
This FAQ is and always will be a work in progress. Not all sections are complete and you may find some
areas only have a letter as a placeholder where information will go in a future issue. New information is
added often and older areas are rewritten from time to time.
IMPORTANT
This FAQ may be shared freely by email or disk, but not posted on any web sites for download. The only
posting allowed is a link to the Guitar Builder’s Home Page. This is to maintain configuration and version
control.
C. Where can I find information on this FAQ?
A FAQ release notification message is posted periodically to the following newsgroups (as time permits):
•
rec.music.makers.builders
•
rec.music.guitar
•
rec.music.makers.guitar
Do not rely on posting notices. The only reliable way of learning if the FAQ has been updated is to check
the web page or contact the author.
The latest version of the FAQ can be ordered by email from the author. The author can be reached at:
wyza@aol.com
The primary home of the FAQ for information and download is the Guitar Builder’s FAQ Home Page,
found on the World Wide Web at:
http://members.aol.com/wyza/gtrbuild.htm
D. Contributions.
Comments (of a constructive nature) and contributions to the FAQ are always welcome.
The author reserves the right to edit any contributions for grammar, spelling, readability, etc., but credit
will be given to the contributing author.
Refer to Appendix K for a listing of individuals who have contributed to this FAQ. Paragraphs marked
with a superscript reference number (like the one at the end of this paragraph) are contributions to the
FAQ.
0

GUITAR BUILDER’S FAQ
Version 2.5
2
E. Updates.
This FAQ is updated periodically as time permits. Check the Web site for information on new releases.
F. Version History.
The following table is a listing of the version history of this document.
Version
Release Date
2.5
02/10/2000
2.4
08/15/1999
2.3
01/28/1999
2.2
03/12/1998
2.1
12/01/1997
2.0
05/15/1997
1.8
11/21/1996
1.7
03/25/1996
1.6
10/19/1995
1.5
09/29/1995
1.4
07/10/1995
1.3
06/12/1995
1.2
05/25/1995
1.1
04/27/1995
1.0
03/25/1995
G. What’s New In This Version?
Editorial rewrites.
Added PDF Bookmarks.
Updated Parts Suppliers
Updated Organizations
Updated Schools
H. Freeware Description
This document is freeware. Although the information in this document took many months (even years) to
compile, create, and maintain, I have decided to make it freely available to the public. Also, if you find it
useful and enjoyable, please let me know by dropping me an email.
This document remains copyright as described in the NOTICE page and cannot be reproduced in whole or
in part without the expressed written consent of the author. Please contact the author by email for any such
requests
wyza@aol.com

GUITAR BUILDER’S FAQ
Version 2.5
3

GUITAR BUILDER’S FAQ
Version 2.5
4
II. So You Want To Build A Guitar...
A. Why build a guitar?
Why do you want to build a guitar? Why not just buy one? Do you really believe you can build an electric
guitar from scratch? Have you built anything from scratch in the past? The fact that you are reading this at
all indicates that you have your own answer for that question already so I won’t try to explore your reasons
for undertaking such a complex project.
Some people build guitars because they enjoy woodworking, others because they love the instrument, and
still others because the commercially available guitars do not meet their personal or professional instrument
needs.
Some people actually think that it would be cheaper than buying one (see below for more on that subject).
These are just some of the possible answers, and odds are that you fit into one of those categories.
If you want to build a guitar for the love of the instrument and the challenge of the task, you will most
certainly be satisfied with the adventure. At times you will love it (when you start to see the body take
shape), and at times you will hate it (when you carelessly lift the router from the pickup cavity and gouge
the body surface). But, be assured there will never be a dull moment.
B. Is building a guitar cheaper than buying one?
Well, Yes and No. How’s that for a non-committal answer?
Let me explain further...
Building your own guitar could be cheaper than buying one, if one or more of the following conditions are
met:
•
You are related to the president of Fender guitars and you are allowed exclusive use of the
manufacturing facility.
•
You own a music store and have access to wholesale parts and supplies.
•
You own a woodworking shop and have every imaginable tool for cutting, shaping, and sanding wood.
•
You build from the cheapest possible parts and materials.
Get the idea? But, if you are like the rest of us starting out, and don't have the files, saws, and sanders, etc.
needed to build the guitar, then there is a substantial upfront investment to be made on tools and supplies.
What about those $159 dollar specials I have seen? How can I build one cheaper than that when a pickup
alone costs more the $40 or $50 dollars?
Well, you can’t. How can they do it you ask? Companies like Fender guitars have tremendous buying
power and can purchase truckloads of wholesale parts at extreme discounts. You simply can’t do that.
Furthermore, they have access to very inexpensive labor so the labor component of the cost is held to a
minimum. Also, these guitars are not built to the exacting standards of the higher-end models.
What does this all mean? What it means is that lower cost should not be the reason you are building a
guitar. With that said…
C. How much will it cost?
Many factors affect the cost of building a guitar. Primarily, there is the cost of tools, parts, and supplies.
Whenever possible, beg and borrow whatever tools you can to keep your initial costs to a minimum. Don't
run out and buy the newest "WhizBang" bandsaw unless you really can afford it.
I have found a kind of Catch-22 exists when you are first starting out...

GUITAR BUILDER’S FAQ
Version 2.5
5
If you use the simplest tools, you will spend more time and effort finishing your instrument, but you will
also save some money.
For example, you can spend 8 hours hand sanding the body with sandpaper and a wood block (building
some pretty strong arms in the process), or you could purchase a small hand-held detail sander and finish it
in 2 hours. You have to decide what is best for you.
But, if you do decide to invest in some professional power and hand tools, at least they are a one-time
investment and should recoup their value over time.
Refer the Appendices for samples of the costs of building a guitar.
D. How long will it take?
This will vary for everyone, and depends on many factors, such as:
Woodworking experience
Experienced woodworkers probably have the tools and knowledge to avoid many of the pitfalls that
novices encounter along the way. Working with wood is both a skill and an art. It can often be shaped
much the same way you can shape clay, only using different tools and techniques. You are only limited by
you imagination and the physical requirements of the body.
Tools available
High speed tools, and specialized tools simplify and speed up many of the mundane and time-consuming
processes, such as sanding. There is a vast amount of specialized tools used to build guitars. These include
files, gauges, templates, and many others.
Refer to the Appendices for more information on tools.
Desired results
If your desired results are a simple instrument for your own entertainment, or a professional instrument for
resale, you will spend your time and effort accordingly.
Time available
You can only work on your guitar when you have the free time. What may normally take a few weeks
could easily stretch into months depending on the availability of free time at your disposal.
E. What will I need to get started?
An almost fanatical "If I build it, it will play..." attitude.
The instrument will call to you. The farther along you get, and the more it takes shape, the more you will
be driven to complete it and realize your vision.
All holistic theories aside, what you will really need is a minimum set of tools (See Appendix C), some
wood, some paint, a lot of guitar parts, a clean (temporarily) and dry workspace, a work table, and a lot of
time and patience.
III. Wood.
A. What types of wood are commonly used?
"Hardwoods" are the most commonly used woods for guitar building. Below is a list of some of the types
of hardwoods commonly used to build guitars:

GUITAR BUILDER’S FAQ
Version 2.5
6
Table 1. Commonly Used Woods
COMMON
EXOTIC/IMPORTED
Alder
Bois De Rose (from Madagascar)
Ash
Bubinga (from Africa)
Basswood
Cocobolo** (from Mexico)
Cherry
Koa (from Hawaii)
Ebony
Pau Ferro* (from Bolivia)
Mahogany
Satinwood (from Sri Lanka)
Maple
Zebrawood (from Africa)
Oak
Poplar
Rosewood*
Walnut
* There have reported cases of allergic reactions to this wood, so be cautious.
** Cocobolo can also be toxic.
*** Yes I know there are others, but this is a start
B. What's all this "quarter" talk?
Commercial lumber is measured in terms of a "quarter" of an inch. Therefore, a plank of any particular
length and width, with a thickness of 1 inch, would be referred to as "Four-quarter" wood. Five-quarter
wood is 1 1/4" thick, etc.
As always, there is a catch. The thickness of the wood is measured in its rough, undried state. An 8-quarter
board was 2 inches thick when it came out of the sawmill. Usually, when you buy wood at your local
lumberyard, it has been dried and the two surfaces have been planned smooth.
So, that piece of 8-quarter ash will be closer to 1-3/4 inch thick than two inches.
Which works out well since most guitars are about 1-3/4 inch thick anyway!
C. Does the type of wood affect the sound?
Yes and no, but mostly no. Although the acoustical properties of maple are different than that of
mahogany, the sound contribution of the maple (which is much harder and denser) to the overall sound is
very small (to the average person) when compared to the contribution of the strings/pickups chosen for the
guitar.
You will find that a heavier, denser wood may improve sustain, which is a desirable quality, but there is
some debate on whether this is entirely true or not. I do not wish to enter into a debate on the subject,
decide for yourself when you have compared the woods on similar instruments.
D. What are their properties?
Here is a brief description of some of the more popular hardwoods.
Alder
Alder is a lightweight, closed grain wood. Its natural color is light tan and has little or no distinct grain
lines. It is easy to finish. Alder is suitable for opaque finishes and sunbursts.
Alder is VERY porous, and will soak up tremendous amounts of oil (if you use tung/linseed oil) or solvents
(from nitrocellulose lacquer). If you lacquer over it you MUST seal it, or the trapped solvents will leach out
leading to milky-cloudy or bubbled finish. Fender uses a yellow substance called fullerplast to seal and fill
the alder, and to fill ash. They literally dunk bodies in the stuff, and it makes that yellow color that you can
barely see grain through in the center of a 2 or 3 color sunburst, under a couple coats of clear lacquer.
4

GUITAR BUILDER’S FAQ
Version 2.5
7
Ash
Ash is lightweight and has a good texture. It is particularly good for clear/transparent finishes. Ash is
often used for expensive guitars. It is often mistaken for oak. Ash has smaller pores and a less pronounced
grain than oak.
Basswood
Fine straight grain material with an even texture. It is creamy-white in color and fairly soft. It is not
recommended for clear finishes. Basswood has a nice warm tone.
Cherry
Hard straight-grain with firm texture. Reddish-brown to deep red, with brown flecks, and will naturally
darken with age. Works well with hand and machine tools and finishes well.
Ebony
Ebony, one the heaviest of the hardwoods, is very dense, machines well, and resists warping and cracking.
Ebony is a popular wood for fingerboards due to its stability and strength. It holds frets extremely well and
has a striking appearance. Ebony is also an expensive choice.
Mahogany
Mahogany is a porous, but strong wood that is easy to machine and finish. It has a spiraling and
interlocking grain pattern that makes it a very stable wood. Honduras mahogany is the favorite choice of
instrument builders, but is very hard to find. African and Spanish mahoganies are often used as a
replacement for Honduras mahogany.
Maple
Maple usually comes from 2 sub-families: red maple and sugar maple. The common designation of "curly"
and "birds-eye" are natural phenomena of the wood and not a species of their own. Maple is a strong, very
heavy wood, which is light (blond) in color. Maple finishes well and can be steamed and bent. Maple is
used in both bodies and necks. If used in necks, it is advisable to laminate the neck from two or three
pieces for increased stability. Maple also has very tight pores, a feature that simplifies finishing.
Oak
Oak is heavier than maple and has larger pores. Oak has a desirable grain pattern that makes it a good
choice for visual impact.
Poplar
Poplar is similar to Maple in visible grain structure. It is often blond in color, but can also have a green tint
to it. It is lightweight and very soft. It is often used as an alternative to pine, since clear poplar is cheaper
than clear pine.
Rosewood
Rosewood, like ebony, is a popular choice for fingerboards. Rosewood, however, is oilier than ebony,
making finishing more difficult. Brazilian rosewood is the most sought after type of rosewood and
therefore the most expensive. Indian rosewood is often used a replacement for Brazilian rosewood.
Walnut
Walnut is a beautiful, rich, brown wood. Walnut is similar to mahogany, but with larger pores and less
stability. It is also much more expensive. Walnut has a very appealing grain pattern.

GUITAR BUILDER’S FAQ
Version 2.5
8
Cocobolo
I can't say enough wonderful things about this wood. Once seasoned (be careful!) it is very stable and
makes IMHO the BEST fretless fingerboards I've ever seen. I have some several years old that have fewer
chatter lines in them than brand new Fenders with Ebony boards do out of the box.
4
E. How much does wood cost?
Wood prices vary for each type of wood depending primarily on the availability and quality of the piece.
The "common" woods listed above are available in most specialty lumberyards for a reasonable price. Take
the time to shop around and call each source for a quote. The higher the quality of the wood the higher the
price. Also, the more rare a wood is, the more expensive it will be. Price some koa from Hawaii and you'll
begin to understand. Some sample prices for woods are given in Appendix G, Sample Cost of A Guitar.
F. Where can I get the wood?
The woods listed above are available in most specialty lumberyards. Look in your local yellow pages
under Lumber, or Hardwoods. Also, contact the wood suppliers listed in Appendix A. Most hardware
superstores, Home Depot, etc., will not have the type of woods in the sizes and qualities necessary for
guitar building.
G. How do I choose a wood?
This depends on many factors, including: availability of wood, budget, desired look and feel, desired
weight of instrument, etc. Some of the things to look for in choosing a wood are:
•
Close-grained
•
No knots
•
No checks or cracks.
Rap the wood lightly on the floor and listen for "clunking" sounds. If you hear this, the wood may be
cracked internally. Also, look at the visual appeal of the grain. This is especially important if you will use
a see-through stain finish that will accent the grain pattern.
When choosing a wood from a local supplier, you will very likely be unable to find a single piece with
sufficient width for the body (usually about 13" or so wide). What this means is that you will have to select
a plank that is some other width, say 7 inches wide. You will then have to cut the plank to the desired
length and laminate (glue) the pieces together to get the needed width. This complicates matters since the
glue joint needs to be as "square" as possible. Clamping the pieces together takes some practice.
If you can find a plank that is wide enough and has no flaws, grab it, you'll thank yourself later.
IV. Tools and Materials
This section describes some of the tools and materials needed to build a solid body electric guitar. Every
possible tool is not discussed here.
A. What tools do I need?
There are a great number of tools that can be used in guitar building. You won't need them all to start out.
Unfortunately, having the proper tools to do a job invariably makes that job easier, quicker, and more
successful, but you will have to decide what meets your building needs. Refer to Appendix C for a list and
description of many of the tools used in guitar building.
B. How much will they cost?
Purchasing all the tools necessary for guitar building can be a very expensive venture. Just the common
tools alone can add up if you are starting from scratch. In many cases, used tools work just as well as new

GUITAR BUILDER’S FAQ
Version 2.5
9
ones, and at a fraction of the cost. Specialized tools such as fret files, etc., are more expensive and would
be difficult to find used. Check the suppliers in Appendix B for prices and availability of the tools.
C. Where can I buy them?
The common tools can be found at almost any hardware store or department store. Your cost will vary, so
shop around. The specialized tools are more difficult to find and you will most likely have to resort to a
specialty store or mail-order house. Check the listings in Appendix B for sources of tools.
V. Safety
This section describes some of the safety issues involved when building an electric guitar.
A. Use a dust mask when sanding
Wear a dust mask and goggles whenever sanding or routing your wood. Try it once without them and I
won’t have to tell you why.
B. Basic Shop safety
This should be self-explanatory. Guitar building requires the use of many power tools, chemicals, solvents,
paints, and scary sharp objects. Please use caution when working with any of these items. Have a clean,
well-ventilated work area, especially if you are doing finishing work. Keep your tools clean and in good
working order. Watch out for those curious kids who might pick up one of those sharp objects or knock
over that newly finished neck.

GUITAR BUILDER’S FAQ
Version 2.5
10
PART 2 - BUILDING A GUITAR
V. Initial Considerations
A. What parameters do I need to consider before I start?
You have to consider many factors when deciding to build a custom guitar. For example, do you want to
design and cut your own body and neck, or purchase ready made parts from another supplier, and install
your own selection of hardware? This is one viable option, and will drastically reduce the amount of tools
you need. If you decide to do everything from scratch, your initial list of factors will be much greater.
Listed below are some of the things you need to decide on before you get started on your dream guitar:
•
Wood selection for body, neck, and fingerboard
•
Scale length (24 3/4 in. or 25 1/2 in., or some other length)
•
Frets (number of frets and size of fret wire)
•
Neck width at body and nut
•
Neck radius (simple or compound)
•
Fingerboard radius (simple, compound, or offset)
•
Body shape, thickness, and contouring
•
Neck-to-body joint (bolt-on, set-in, neck-through)
•
Neck angle and bridge height
•
Head angle and shape
•
Pickups and controls (numbers and style)
•
Bridge style (fixed, fixed-tremolo, floating-tremolo)
•
Nut style (width, string spacing, material, locking nut)
•
Truss rod (type and adjustment position)
•
Binding
•
Inlays (size, shape, and material)
•
Tuning machines (type: 3-3, 4-2, or 6 in-line, color, manufacturer, locking)
•
Electronics mounting style (rear, front pickguard, shielding)
•
Hardware (knobs, cover plates, potentiometers, switches, wires, pickups, etc.)
•
Finish (stain, see-through or opaque, colors)
All of these factors and more effect the construction of the guitar. You should have thought out all these
items before you begin your project, and understand the implications of each choice. Proper planning will
save you time and effort and probably prevent errors that could ruin the project.
B. Can I say I built it from scratch?
The following is an editorial response and your opinions may vary:

GUITAR BUILDER’S FAQ
Version 2.5
11
I've heard many arguments on this subject and I think they are all a waste of time. Many people will say
that if you purchase pre-formed parts like necks and bodies, that you are only "putting it together", not
building it from scratch. OK, maybe in a perfect world that is true. But that essentially is what all
manufacturers are doing. Are you going to say that they are not guitar builders? They use pre-built parts
from other companies, too. Pickups, tremolos, tuning machines, etc., are built by other companies and then
used by the guitar manufacturers.
Some very respectable builders like Taylor and Gibson use Computer Numeric Controlled (CNC) machines
that cut their necks and bodies to tolerances of a thousandth of an inch. That can hardly be called
handmade, but I really don't see a difference between that and the guy who buys a neck from Warmoth.
If you really want say you built it completely from scratch, then you had better grow the trees, mine the ore
for the parts, forge the tools, down the trees, cut the wood, carve the shape, wind the pickups, mold the
plastic, machine the hardware, and chemically mix the paints (ridiculous, but you get the picture).
Building a guitar using other parts is a respectable hobby and business. Just do what you see fit for your
own needs. If you prefer to design the body shape and cut it by hand, then great. If you'd rather buy a body
and concentrate on wiring, that's great too. Just enjoy the project and respect others that also build guitars.
And, yes, say you built it from scratch.
My apologies for the rather sarcastic tone.
VI. The Body
A. What size should I make the body?
The size of the body should be large enough to hold all the hardware and electronics and also small enough
so as to not be too heavy. The thickness of the body has to be enough to accommodate the hardware and
electronics, also. A thickness of 1 3/4" is common for many guitars, but you can go smaller or larger if you
so desire. The length of the body blank can be up to 20" and the width about 13-14". This will allow you
sufficient material to cut just about any body shape. Use larger or smaller sizes if your needs dictate.
Another factor is the weight of the wood. A very heavy maple may become a burden during those long
three-hour sets.
B. What shape should I make the body?
The shape of the body should be able to support all the electronics and hardware components. It should
also be visually appealing. Many variations of body styles have been tried throughout the years, with the
standard being a Fender style or Gibson style. Other body shapes take variations on those two. The more
"unusual" body styles, although interesting at times, generally do not appeal to the wider audiences.
However, since this is your guitar, you can use any style that meets the minimum needs and appeals to you.
If you are really ambitious, and/or a woodworking pro, try carving designs directly into the body. This
would make your instrument truly unique.
C. Should I laminate the body? How?
If you can find a piece of wood with the right dimensions, use it. Often, you can order a "body blank" from
the suppliers listed in the appendix, for about $50 and up depending on size, wood type, and quality. This
is considerably more expensive than buying a piece and laminating it your self, but you will have a known
good piece of wood to start with. If this option is not possible, you can laminate two pieces together to
achieve the right width.
When you purchase wood for the body, look for a board with the least amount of flaws (cracks, knots, etc.).
The board should be 8 quarter (sanded down to 1 3/4" thickness), and about 7 inches wide. It could be as
long as 6-10 feet. This would give you enough pieces for several bodies. Have the shop cut the board into
about 18 inch lengths (or whatever length you need for your blank).

GUITAR BUILDER’S FAQ
Version 2.5
12
You should then square all sides of the boards, either by hand (ugh!) or with a planer. You want a square
edge for gluing. You can buy some small shop planers for around $300 to $400.
It is also a good idea to use dowels or some other kind of joint to secure the pieces together. This will add
strength and keep the wood from shifting during gluing. I recommend using a dowel jig to ensure proper
alignment of the holes. The jigs are relatively inexpensive and will save you a lot of headaches.
Next, liberally fill the dowel holes (joints) and the surface of the wood with a strong wood glue (Titebond
is a good choice). Align the edges and use as many long clamps as you have to squeeze the wood together.
Some glue will run out of the joint. Just wipe it off the wood.
Let the pieces sit clamped together for about 24-48 hours. You can now remove the clamps and continue.
VII. The Neck
A. What is scale length and what does it mean?
Scale length is defined as the "length of the string". This is measured as the distance between two points:
one at the 12
th
fret and one at the nut. The scale length is then calculated as 2 times this distance. The
overall string length from the nut to the saddle will vary for each string and is dependant on string gauge
and action.
A longer scale will, to a point, give more sustain. The reason for this is that the tighter a string is stretched,
the longer it will sustain, and for a string of any given thickness, the string at the longer scale will have to
be tensioned higher than the string at the shorter scale to reach the same pitch. However, a longer scale
will make the fret distances longer and make it more difficult to reach the frets.
Most guitar scale lengths are between 24 and 26 inches, with the most common being 24 3/4 in. (Les Paul
style) and 25 1/2 in. (Fender style).
B. How do I determine fret spacing?
Fret spacing is determined by the "18 rule" (actually, it is more like 17.817). The fret spacing is in
calculated as follows:
The distance to the first fret from the nut is calculated by dividing the total scale length by 17.817. For a 25
1/2 in. scale...
25.5 / 17.817 = 1.431273 (or 1.431)
That result is then subtracted from the total scale length...
25.5 - 1.431 = 24.069
That result is divided by 17.817 to get the distance from the first fret to the second...
24.069 / 17.817 = 1.351
and so on.
Refer to Appendix D for pre-calculated fret distances for some common scale lengths.
What can you do with this information? Most guitars are either 25 ½ in or 24 ¾ in scale length. There are
already preslotted fretboards that you can buy for those two scale lengths which saves lots of time and
error-prone effort. But if you want to make a guitar with some other scale length, say a child’s guitar for
example, you can use this rule to determine the necessary fret spacing.
If you are just starting out I strongly recommend using standard scale lengths.
C. What kind of frets should I use?
Fret wire is available in three shapes: rounded, squared, and triangular. The most popular shape is rounded,
or "bead". Fret wire is also measured in three ways: 1) The height of the wire, 2) the width of the bead,

GUITAR BUILDER’S FAQ
Version 2.5
13
and 3) the height of the bead. Therefore, you can choose from fret wire that is "wide and medium", or
"wide and low", or "narrow and tall" and so on. I think you get the picture.
Let's compare fret wire by height.
TALL
Tall fretwire, although not commonly used, has some advantages:
•
Easier for string bends since finger tip has less contact with fingerboard
•
More sustain due to greater mass and because string is not damped by fingerboard contact
•
Faster hammer-on and pull-off techniques, similar to scalloped fingerboards, but not as radical
•
Long life and able withstand more fret dressings between re-frets
...and some disadvantages:
•
Poor intonation could result from pressing too hard
•
Neck may feel "thicker" or rough when sliding your hand along the fretboard
MEDIUM
Medium fretwire is the standard size, regardless of the width of the bead. The familiar "Jumbo" fret refers
to the width of the bead not the height. Some of the advantages of medium fret wire are:
•
More accurate intonation (with an accurate "touch")
•
Barre chords and slides are relatively easy
•
Tone is "softer"
...and some disadvantages:
•
Careful fret work is required to ensure the height is not lost during dressing
•
Wears out sooner
•
Less dressing between re-frets
LOW
Low fret wire is not commonly found on commercial instruments and is not recommended.
WIDTH
The fret width, regardless of height, effects the playability and tone. Wide frets (Jumbo) offer more sustain
than narrow frets, but must be dressed more accurately to achieve proper intonation. Narrow frets have a
unique sustain quality due to the smaller string/fret contact point, and offer more accurate intonation. The
triangular fretwire has not achieved widespread acceptance and is not recommended unless you wish to
experiment. It does offer the most accurate intonation, however.
You will have to decide on the size and shape of the frets you use after some experimentation. The safest
bet is a medium/Jumbo fret, but your mileage may vary.
D. What type of nut should I use?
The first decision in choosing a nut is decide if you will use what I refer to as a "natural" nut. A natural nut
is one that is not mechanical, such as a locking nut or a "roller" nut, for example. A natural nut can be
made of nearly any material, such as:

GUITAR BUILDER’S FAQ
Version 2.5
14
Bone
Currently the material of choice in high quality instruments. It is very hard and offers superior tone,
polishes well, and allows precise slot filing.
Corion
Corion is a new material with comparable hardness and appearance to that of bone. It offers excellent tone
and also polishes well. This is the same material found in kitchen and bathroom counter tops.
Micarta
Micarta is a synthetic ivory/bone substitute. Ivory in color and softer than bone, it files and sands very
easily.
Graphite
Graphite is a self-lubricating material excellent for non-locking tremolo systems.
Mother-Of-Pearl
Mother-of-pearl is very dense and is known for tonal brilliance and beauty.
TUSQ
TUSQ is a man made ivory substitute aimed at acoustic and vintage guitars. I see no reason it can't be used
on electric guitars as well. TUSQ has improved sustain and clarity.
Any one of the above materials would work well for a natural nut. Your choice of material and nut style
will depend, to a degree, on the bridge and tuners you select. It is possible to use locking tuners and a
natural nut in place of a locking nut. The choice is yours.
E. What type of tuners should I use?
Essentially, the choice of tuners depends on several factors:
•
Budget, appearance
•
Bridge/tremolo choice
•
Headstock construction.
There are many excellent tuner manufacturers that provide a wide range of tuner styles. They usually come
in chrome, black, or gold. There are special tuners for inline headstock installation, and there are also
locking tuners for use with floating tremolo systems (in place of the locking nut).
Choose the tuner that best fits your needs and meets your budget. As always, shop around and compare.
F. What types of neck joints are there?
The three most common neck joints are:
•
Bolt-on
•
Set-in
•
Neck-thru.
Bolt-on
Bolt-on neck joints are extremely common and used very successfully in commercial electric instruments.
The neck is attached to the body with a series of screws or nut/bolt combinations. A metal neck plate is
usually mounted on the back of the body to support the screws or bolts.

GUITAR BUILDER’S FAQ
Version 2.5
15
Set-in
A set-in neck is where a flat neck heel is glued to the body front and the overhanging fretboard is glued to
the body surface. Set-in necks are most common in acoustic guitars and are used in some electric guitars.
Neck-thru
A neck-thru is where the neck wood is extended into and through the body. The body is divided into two
sides, which are laminated on either side of the extended neck wood. After the laminations are secure, the
body is carved into shape. Neck-thru construction often gives the best access to the upper fretboard range.
Neck-thru construction is often used in high-end guitars.
G. How do I put on a decal?
There are several options for placing a logo on the headstock of the guitar. Some common methods are
described below:
Inlay
You could use abalone/mother-of-pearl etc. and create an inlay of your logo. You must then carve out the
headstock to fit the logo and glue it in place. This requires very accurate, precision routing, and I would
not consider this option unless you are experienced with inlay work.
Airbrush
You could have your logo done by an airbrush artist. Again, this could be an expensive option for a small
number of guitars.
Mylar
There is a pressure-sensitive paper on which you can print your logo and stick to the headstock. Call print
shops for information on mylar.
Decal
Some hobby stores sell decal film that can run through a laser copier or printer and create a water soluble
decal like those used on model cars. You have to experiment to see if the printing will adhere to the paper
and not smudge.
Transfer
You can also make a silk-screen transfer that involves screening your logo onto a clear background that’s
on a paper that is water-soluble. The image is then transferred to the headstock and lacquered over with
clear lacquer. Do not use too much lacquer thinner or the image may dissolve.
I believe the transfer method is used most often, but can be expensive.
H. Do I need a neck angle?
Some guitars, most notably, Gibson Les Pauls, have a slight downward angle on their necks. This ensures
a close action along the fret boards. The neck could drop as much as 3/16 of an inch from the body joint to
the front of the nut.
Often, a guitar that uses a Floyd Rose tremolo bridge will require a neck angle to achieve a desired action.
You could avoid a neck angle if you route a recess into the body so that the tremolo is set closer to the
wood. This recess may also be useful for increased upward pull of the bar.
You could make the neck angle by sanding the neck joint cavity at a slope or you could shim the rear of the
cavity with a thin piece of wood. The sanded cavity will be cleaner and more professional looking, but the
shim could work just as well. A shim of 1/16” should be more than enough, but you will have to test will
your instrument.

GUITAR BUILDER’S FAQ
Version 2.5
16
I. Can I buy pre-slotted fingerboards?
Yes. Check the suppliers listed in the Appendix. Many suppliers sell pre-slotted fingerboards ready for
final shaping, sanding, and sizing. You can get the standard 22 and 24 fret fingerboards without too much
difficulty, and special orders are also possible. The most common wood types are maple, rosewood, and
ebony. They may or may not have the nut slot ready also. Check your supplier for info.
J. Can I buy pre-assembled necks?
Yes. Also check the Appendix. You can easily get Strat or Gibson style replacement necks. There are also
Jackson and Telecaster styles available. They usually come with a choice of fingerboards, and are pre-
fretted with a medium fret wire. The tuner’s holes will also be drilled. You will have to drill the neck plate
holes yourself, and may also have to file the nut hole. This is an excellent way to get started in guitar
building.
K. What is the easiest (cheapest) way to clamp frets?
One thing you can do to clamp them is to find a piece of thick rubber, maybe an inch or so thick (could be
thinner), and about as wide as the neck. Long enough to cover about 1/4 the length of the neck. Then get a
piece of wood about the same size. Place the rubber on the frets, then the wood on the rubber. Clamp this
combination down on the neck with an inexpensive wood clamp or two. The rubber will conform to the
neck curve and hold several frets in place. Make sure to protect the underside of the neck. You could also
sand out the underside side of the wood to follow the curve of the neck as well.
L. How do I repair a nut slot that is cut too low?
Here is one way to repair a nut slot that has been cut too low. File or sand a piece of the same material that
the nut is made out of to produce some “nut” dust. This dust can be mixed with some cyano-acetate (don’t
get worried – it’s just crazy glue or super glue). Use a toothpick or some other applicator to apply the
mixture to the bottom of the nut slot. Allow this to dry and harden. Use a nut file or, at worst, some 400
grit sandpaper (folded to make and edge) to sand the slot down to the desired height.
M. How do I measure for proper nut height?
Fret each string behind the second fret and check the string clearance at the first fret. If the string touches
the first fret the slot is to low. Proper height is about paper thickness between the fret and the plain strings
(G B &E), and about twice that for the wound strings (E A &D).
VIII. The Electronics
A. What are the capacitors doing?
Capacitors are often added to control circuitry to affect the tone of the guitar. A capacitor is used to "roll-
off" or “reduce” the high (treble) frequencies. Most single coil pickups use a 0.05uf capacitor, while
humbuckers use a 0.02uf capacitor. The usual value is 0.02uf. The capacitors are usually soldered on the
potentiometer to form a tone circuit, and can also be used with resistors to change to effective resistance of
the control potentiometer. Volumes could be written on this subject so refer to the books in Appendix E for
more information.
B. How do I shield cavities to prevent that humming sound?
You can shield the guitar cavities by either using conductive paint (the preferred method) or foil or metal
inside the cavities. Since conductive paint is easier and very effective, use that method for the cavities.
Foil can be used to shield the underside of the pick guards or cavity covers. Also, using shielded wiring
will help to reduce the hum.

GUITAR BUILDER’S FAQ
Version 2.5
17
Completely paint the inside of the cavities (2 coats) and make sure to include the recessed areas (if
necessary) for the cover plates. Let some paint get into the screw holes. Use foil tape or paint to cover the
underside of the plastic cavity cover so that it contacts the screw holes and recessed areas. Make sure that a
ground wire reaches the shielded areas, and use a multimeter to check the continuity to ground.
Also, be sure to connect a ground wire to the tremolo claw. This will ground the strings when your hands
are not touching the bridge. (I'm sure you've all heard the buzzing that disappears when you touch the
strings.
C. What is that annoying scraping sound in the potentiometers?
Potentiometers can, with time, build up a carbon-based substance on their contacts. This will create a high
frequency noise when the pot is adjusted. There are ways to clean the pots and reduce the annoying
scraping sound.
Use a contact cleaner spray (also known as tuner cleaner) to clean the potentiometers. Get the sprays from
any radio/TV repair shop or electronics store. If possible, spray the cleaner directly into the hole in the
potentiometer casing using the plastic hose that comes with the spray. If that is not possible, you can spray
into the shaft opening and let the fluid work its way into the pot. A couple of sprayings should clean the
carbon build-up and remove the noise.
These products are petroleum and/or alcohol based and will evaporate fairly quickly. Some contain a
silicon additive for lubrication. The additive remains after the chemical has evaporated.
D. How does a pickup work?
In simplified terms, a pickup consists of a coil of wire around a set of magnetic pole pieces held in a frame
or bobbin. If a wire, such as a guitar string, is passed (vibrated) through a magnetic field such as that
created by the pole pieces, a small electrical current is "induced". This current is sent through the wire that
surrounds the pole pieces to the amplifier that magnifies the sound.
E. How does a humbucker work?
A humbucking pickup is made up of two pickups (or coils) under one cover. The two coils are wired
together in series and out-of-phase. This is to eliminate humming. They are also magnetically opposite by
turning the magnet around in one coil. One set of magnets wrapped with wire makes a "single-coil"
pickup.
Single-coil pickups tend to hum since they receive interference from AC currents. It was discovered that
two single-coil pickups could be connected together in a special way and with a common ground to cancel
out the hum produced by both pickups.
This method of connecting the pickups is called "in-series". In-series means that the end wrap of one coil
in connected to the end wrap of the second coil. The resistance of the coils is combined and this gives the
humbucking power. This end-wrap to end-wrap technique gives the out-of-phase characteristic of the
pickup. Also, note that the coils are wound in the same direction on the bobbins.
Because the coils are magnetically opposite, the wires induce the current in opposite directions. This
cancels out the hum and returns the out-of-phase coils to electrically in-phase after all.
Also, a humbucking pickup does not have to be under the same cover. Any two single coil pickups can be
wired to perform as a humbucking pickup.

GUITAR BUILDER’S FAQ
Version 2.5
18
HUMBUCKING PICKUP LAYOUT
Coil 1 Coil 2
N S <------- Magnetic Pole directions
- / -
| | / | |
| | End / | |
| | / Wrap | | <-- The "ends" of the coils meet
| | / | |
- -
^ ^
| | <-Both coils wrap counterclockwise
| |
^ ^
Wire Wire
Path Path
F. What is the difference between series and parallel wiring?
Series linkage combines the coils end-to-end. When two equal resistances are linked in series, the result is
the sum of the two. The series sound is powerful and bassy.
Parallel linkage combines the coils side-by-side. When two equal resistances are combined in parallel, the
result is one quarter of their combined value. The parallel sound is weaker but bright and clean.
G. What is a four wire pickup?
A traditional humbucking pickup has only two wires exposed: the hot and the ground. A modern four wire
pickup exposes the start and finish ends of each coil into a four-wire coaxial cable with a separate ground
wire. When used with the appropriate switches, the pickup can be wired as :
1. In series/out-of-phase
2. In-parallel/in-phase
3. In-series/in-phase
4. In-parallel/in-phase
5. Either coil alone (split).
A three-position mini switch (on/on/on) can be used to wire a humbucker in three ways: parallel, split,
series. This switch often comes with the pickup.

GUITAR BUILDER’S FAQ
Version 2.5
19
PICKUP DPDT Switch Position
- - --------
| | | | | Parallel
| | | WIRES | 1 2 |
| | | ----- White | |
| | | | | 3 4 | Split (middle)
- - |----- Red | |
| | | 5 6 |
|_______|----- Green | | Series
| | --------
= ----- Black
GND
Connections:
-------------------------------
White
3
Red
4
Green
5
Black
6
3
2
5
GND
6
Output to Controls
Switch Case
GND
IX. Pre-Assembly
A. What should I do now?
Now would be a good time to assemble the guitar to check all your routes and screw holes. You should
check them as you go along, but this would be the last chance to make any adjustments before the finish is
applied.
Even if you don't wire the electronics, install the neck and the bridge and check the adjustments to be sure
you can achieve the desired action. Also, install the pickups to make sure you can adjust them to and away
from the strings.
Even install the cover plates to make sure your routes are clean and square.
X. The Finish
A. How do I stain a guitar?
Staining the guitar is a complex issue. Refer to the books and videos in the Appendix for more information
on staining.
B. What kind of paint should I use for colors?
You can use an acrylic automotive lacquer or a nitrocellulose lacquer. Check your local automotive or
furniture paint shops, or the parts suppliers in the appendix for colors and availability.
WARNING
Do NOT mix the two types of lacquer on a single paint job (acrylic & nitrocellulose).
Also, some materials may be illegal to use in your area, so take to care to be aware of any environmental
and legal factors.
GUITAR BUILDER’S FAQ
Version 2.5
20
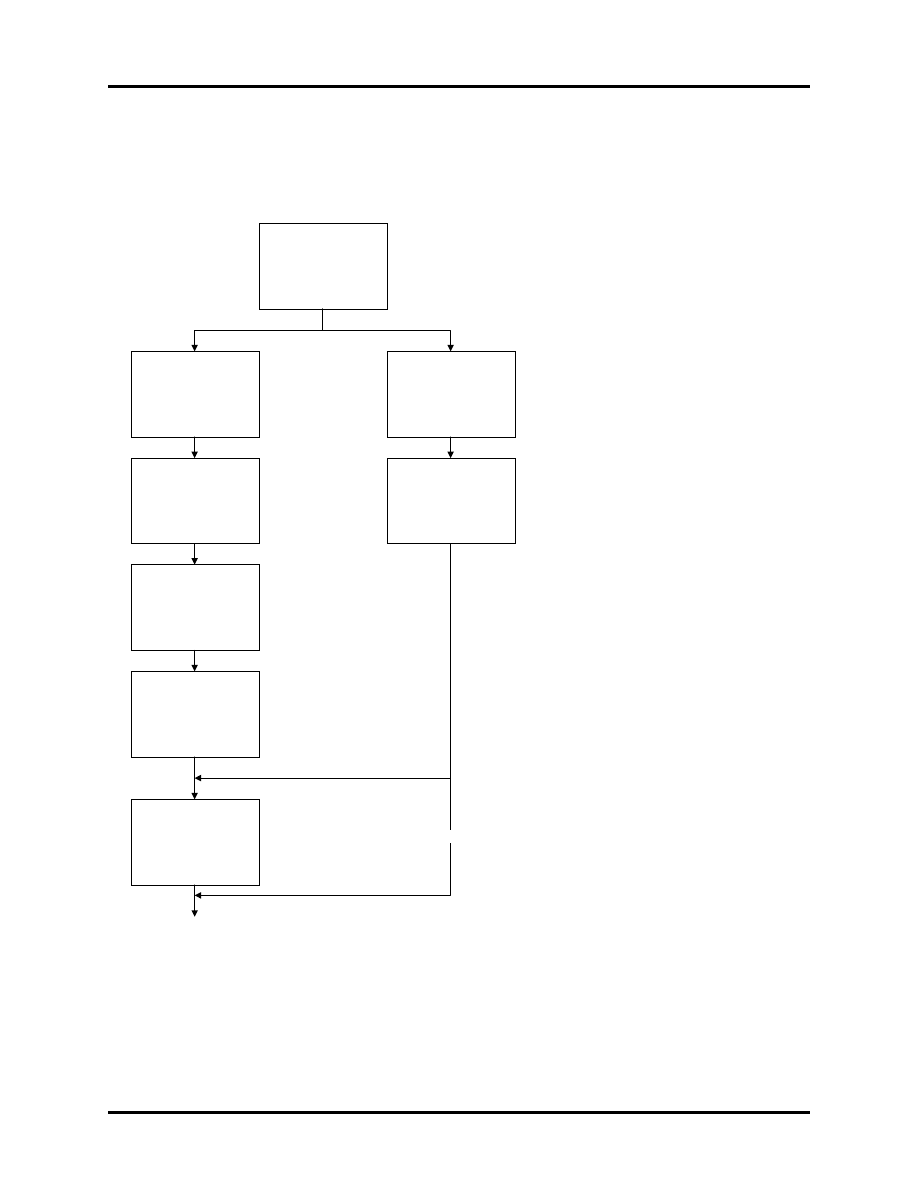
C. What is a sample finishing schedule?
The following is an example of a finishing schedule similar to the one in Stewart-MacDonald's catalog.
This is only one sample and there may be many other ways of doing the finish. There are several books
written on the subject of guitar finishing. Please refer to those for more information.
This schedule is for nitrocellulose lacquer and should not be used with other finishing media.
WOOD PREPARATON
Sand surface down to #220
or #320 grit smoothness
POROUS WOOD
(Rosewood, mahaogony,
ash, basswood, walut,
paduak)
NONPOROUS WOOD
(Maple, spruce, poplar,
alder, ebony)
STAIN (OPTIONAL)
(Water based anilines, color
tone stains)
WASH COAT (OPTIONAL)
(lacquer, sanding sealer, or
shellac)
PASTE WOOD FILLER
(Natural for light woods,
medium for dark woods)
STAIN (OPTIONAL)
(Water based anilines, color
tone stains)
SEALER PRIMER
(OPTIONAL)
(lacquer, sanding sealer, or
shellac)
OPTIONAL
GUITAR BUILDER’S FAQ
Version 2.5
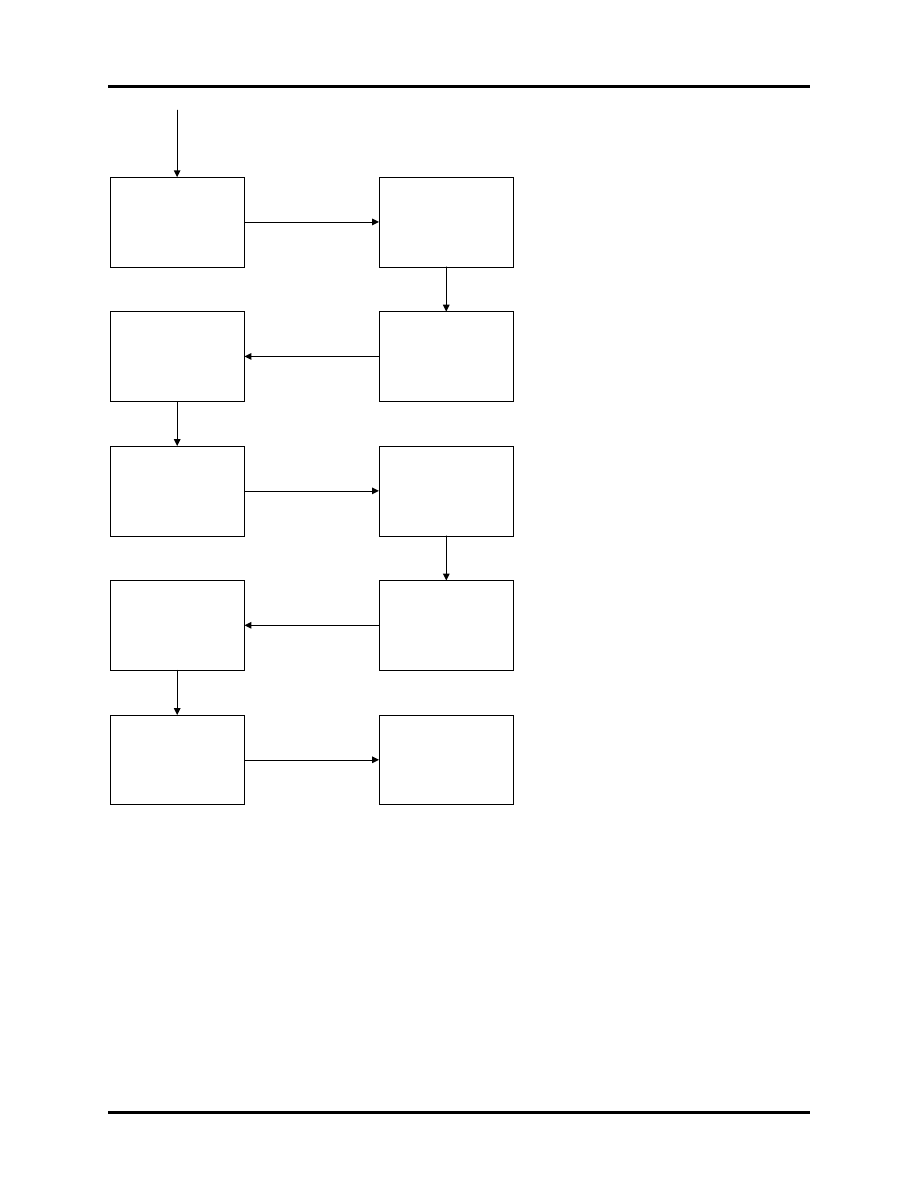
21
COLOR COATS
(OPTIONAL)
(Tinted clear lacquer,
shaded
lacquers, opaque lacquers,
6 coats)
WET SAND #320 GRIT
COLOR COATS
(OPTIONAL)
(Tinted clear lacquer,
shaded
lacquers, opaque lacquers,
3 coats)
WET SAND #400 GRIT
COLOR COATS
(Tinted clear lacquer,
shaded
lacquers, opaque lacquers,
3 coats)
WET SAND #600 GRIT
CLEAR COATS
(Clear lacquer, 4-10 coats)
WET SAND #1000 GRIT
POLISH WITH SOFT
CLOTH
AND POLISHING
COMPOUND
(Use circular motion)
POLISH WITH WAX
POLISH
D. How do I remove a finish?
One way guitar builders strip paint is with a heat lamp bulb. Use a good lamp that is suited for at least a
100 to 150 watt bulb. Heat the paint or lacquer up a bit. This process will not take long at all. The paint
should slightly bubble when heated. When this happens use a small, dull, thin blade (like a putty knife) to
get under the paint and peel the paint off. It is a lot cleaner and produces no mess. You will have to adjust
how close to put the lamp so you don't burn the paint. BE CAREFUL.

GUITAR BUILDER’S FAQ
Version 2.5
22
PART 3 - THE FINAL STEPS
XI. Assembly
A. Why did my paint chip when I installed the parts?
Sometimes the paint will build up around the edges of the holes in the guitar during finishing. There will
then be some overhang of dried paint. When you force the screws or parts into the holes this can cause the
overhang to break off and chip the paint.
The best things you can do to prevent this is to either plug the holes with dowels of different sizes and
make sure that the paint does not enter the holes. Don’t let the paint dry onto the dowels.
You could fill the holes with wax or putty also.
You can also re-drill the holes (very carefully!) before inserting the parts. Be very cautious here or you
could make a bad situation worse.
B. To be supplied
XII. Setup
A. How do I adjust intonation?
This is a somewhat magical and mystical process. Keep in mind that the nature of the guitar is such that
perfect intonation along the entire fretboard is all but impossible to achieve. It is a compromise of sorts.
Proper intonation is achieved by adjusting the length of the string and checking the tuning at different frets.
This is called "string length compensation". Adjustable bridge saddles make this possible without too
much difficulty (except on Floyd Rose tremolos, where a special tool makes the job much simpler).
Here is one way to adjust the intonation:
•
Tune the string to pitch using normal methods
•
Check the tuning at the 12th fret
•
If the string is sharp, move the saddle back, if the string is flat, move the saddle forward
•
Retune to pitch and check the tuning at the 12th fret
•
Repeat until the tuning at the 12th fret is identical to the open tuning
B. How should I vertically adjust my bridge saddles?
Aside from adjusting the bridge saddles forward or backward to adjust for intonation, you should also
adjust them vertically to allow for a lower playing action.
Most modern day guitars have a curved radius fingerboard. Some common radii are 10", 12", and 15".
Other, more expensive fingerboards have a compound radius, which is about 10" at the nut, and flattens to
15" at the 22nd or 24th fret. Let's assume you have a fixed radius.
If your bridge saddles have vertical adjustment capabilities, you want their height to approximate the
fingerboard radius. Some tremolos, like Floyd Rose, have different saddle heights to accommodate this
feature. Other tremolos, such as many by Fender, have a pair of hex-screws you can turn to raise or lower
each saddle.
Fixed bridges have a pair a screws at each end of the bridge that are used to tilt the bridge. There isn't as
much flexibility in this method, but is should be possible to get some adjustment.

GUITAR BUILDER’S FAQ
Version 2.5
23
The idea is to position the bridge height to match the fingerboard radius. The height will increase for the E,
A, and D (bass) strings, and then decrease for the G, B, and E (treble) strings. But that's not all...
Since the bass strings are much thicker than the treble strings, you cannot set both E strings to the same
height. You must raise the bass strings a little to compensate for their thickness, or buzzing will occur.
You need to experiment with the overall bridge height and the saddle height the get the lowest possible
action.
Fingerboard straightness and fret height also comes into play. If the fingerboard and frets are properly
setup, you should be able to adjust the saddles to achieve a low playing action with no buzzing.
Experiment to see how it works.
XIII. Maintenance
A. How often should I replace my strings?
String wear will vary depending on the strings themselves, the amount of playing, and the type of playing.
If you play every day, or if you play hard and sweat a lot (like during a performance), your strings will
wear more quickly. The easiest way to slow down the process is to have clean hands when you start to play
and thoroughly wipe the strings clean after each session. Actually, you should wipe down the body and
neck after every session whether it is a performance or not. The oils from your body will build up cloud
the appearance of the guitar and dull the strings.
The loss of brightness is, however, inevitable. You can slow the process, but eventually, the strings will
sound dull and lifeless.
If you play every day, but only for yourself, replace the strings every 3-4 weeks or when you feel they have
lost their brilliance past what you can stand.
If you are performing for an audience put new strings on before each show. Remember to stretch them out
thoroughly so they stay in tune!
There's nothing quite as pleasant to the ears as a fresh set of strings.
B. When should I reset my intonation?
Once the intonation has been properly set you shouldn't have to set it again. However, if you decide to
mess around with the bridge, you have to be careful that you return it to the properly set position.
You should reset the intonation whenever you switch string sizes (light, extra-light, medium, etc.). Another
possibility, if you play a lot and your guitar gets a good workout, about once a year should also do the trick.
C. What is the best way to polish the frets?
One way to polish the frets follows this schedule:
•
Use the black wet/dry sandpaper (dry) starting at about 600 grit. Work the top layer of buildup off
with 600 and then move to 1000 and repeat. You might want to use up to 1500 grit. Also, mask the
fret board with tape to prevent damage.
•
Next, use the synthetic steel wool (equivalent) to about 000 or 0000 grade steel wool. Use the
synthetic type so that the steel wool "filings" don't get into the pickups, etc.
•
Finally, use a buffing compound and preferably a Dremel Moto tool to polish the frets to a shine.
Check your local hardware supply store for appropriate compounds.
D. How do I pull a fret?
This is one of those cases where the proper tool is a must. You can purchase fret pullers from Stewart-
MacDonald's. Be aware though, that there is a fret puller tool and a fret nipper tool. The fret puller tool is

GUITAR BUILDER’S FAQ
Version 2.5
24
optimized for pulling frets (hence the name). It has smaller jaws that allow for more accurate grabbing
under the frets. The nipper will do the job too, but be aware of the difference.
Basically, to pull a fret, work the tool underneath the fret at one end and rock it back and forth slowly until
the fret starts to come out of the fingerboard. Move to the opposite end of the fret and do the same. Switch
from end to end and work your way to the middle of the fret. Take your time with this process, the
fingerboard will easily chip if you rush.
Here's some tips on making this process easier:
•
Use a very sharp exacto knife to score the fingerboard along the fret edges. This will provide a limit
for the fingerboard in case in starts to chip. This will reduce the amount of damage.
•
If the frets are glued in, you need to heat the fret to loosen the glue. A soldering iron is good for this
purpose. Press the iron to the fret and allow the fret to heat up. This will in turn loosen the glue. Pull
the fret out while the glue is hot. Then use a knife or needle file to clean out the glue residue.
E. What is a fret job?
A fret job, usually needed when the frets have worn out unevenly and start to cause buzzing, consists of the
following procedures:
•
Level frets - this involves using a fret-leveling plane and some sandpaper to get all the frets an equal
height.
•
Crown frets - after leveling, you need to "re-crown" the frets to their original shape. This involves
using a fret-crowning file on each fret to round the surface.
•
Polish frets - see step XII.C for a description of fret polishing.
•
Practice fret jobs on garage-sale specials before you work on your most prized vintage guitar.
F. How do I clean the gunk off the fretboard?
Here are a few takes on the subject from the newsgroups:
Use a very fine steel wool (0000) along with fretboard oil. Apply a light coat of oil and then lightly rub in
the direction of the wood grain with the steel wool. Use an old toothbrush to clean around the frets. Cover
or mask the rest of the guitar to keep the steel wool shavings from getting into the electronics or pickups.
After a thorough cleaning, apply another light coat of oil, wait for it to dry and polish it. Stewart-
McDonalds has a fret board oil that works well for this.
On unfinished boards, there is nothing better than a light coat of lemon oil wiped on, and then worked off
with 0000 steel wool. Follow that with carnuba wax to seal the board and make future cleanings easier. On
finished boards, watered down Meguiar's #7 on a paper towel works. Naphtha works well too. Avoid the
steel wool, though, unless you want to rub the finish back to gloss.
For a maple fingerboard, try a barely moistened cloth. I mean barely moistened! If that doesn't work, try
scraping with a plastic scraper of some kind, then try the moistened cloth. Don't use any type of solvents
on a maple fingerboard. Better to be safe than sorry, especially if it's vintage. Even more so if you own it.
Try not to use any solvent other than naphtha. And try to use very little of that. Also, if you use any lemon
oil, use it sparingly. Once clean, you shouldn't need more than a drop of lemon oil ever six months to a
year. Try to use a damp cloth the rest of the time.
PART 4 – TIPS AND TRICKS
This section is for tips and tricks from readers who have encountered some aspect of guitar building they
wish to share.

GUITAR BUILDER’S FAQ
Version 2.5
25
A. Pre-drill humbucker corners before routing.
If you are using routing template, like the ones from Stewart-McDonalds, it is helpful to drill the rounded
corners of the template before routing the cavity into the body. These corners are 1/4-inch diameter and
you can use a 1/4-inch drill bit to get a smooth edge. Just position the bit to drill the individual corner and
you'll get a very smooth edge that would much more difficult with the standard router bits.
Also, you can use larger bits to remove some wood before routing the remaining cavity. Just watch your
depth.
B. Routing.
[Contribution by: Mike Rejsa]
The best way to use a router is to get/make a clear plastic template. Then use the kind of router bits that
can be guided around the hole in this template. I use a 'bearing bit' from Stewart-MacDonald’s and it
worked great, (once I learned how to do it!)
•
Make sure the bearing is turning freely - my first one was stuck and nearly started a fire.
•
Be sure you adjust the height of the bit to cut clear through the surface of the wood. Yes, this means it
looks like the bit may cut the template... in practice, it doesn't. If you set the bit too far into the wood
you 'undermine' the surface of the wood and things get hot and tough to do. I set the line between my
bearing and the cutting edge about halfway through the template.
•
DO NOT plan on making your first cut all the way around the perimeter of the template! If you make a
long bit-width cut like this, the track becomes clogged with wood, and the bit gets hot, and is hard to
move. Instead, start in the middle of the area to be removed, and move around in a little circle. Make
short passes along the edge and then swing back to widen the removed area. This has two advantages:
it lets the wood chips get blown out, and the bearing is not riding the edge all the time and so does not
get as hot.
C. Bridge Location (for a fixed bridge).
[Contribution by: Mike Rejsa]
If possible, construct the guitar to the point of having the neck and tailpiece bolted on before positioning
the bridge. Make yourself a pencil mark in the measured position where the bridge should be. Adjust all
intonation saddles to center. Then string it up, and set the intonation as close as possible by sliding the
bridge back and forth. Once you have it as good as you can get it, mark the position and install the bridge
there. (It may even end up at a slant. This is ok, if its what the guitar needs.)
NOTE
If you are using a Strat or Tele bridge, usually measuring is good enough. Go measure a real one and put
your bridge in the same place.
D. Bridge pickup location
[Contribution by: Mike Rejsa]
If you are using Strat parts, borrow a standard Strat pickguard and use it to trace the pickup locations onto
your guitar body.
If you are using humbuckers, wait until after your bridge is installed, and then locate the pickup a certain
distance from the bridge, based on measuring guitars whose sound you like. For example, from the
intonation center of the bridge to the closest edge of the pickup frame is about 5/8" on an SG, about 3/4" on
a Les Paul Custom, about 9/16" on a Les Paul Standard, and over 1" on an Epiphone Flying V I've
measured. This has an effect on the sound your bridge pickup gives!

GUITAR BUILDER’S FAQ
Version 2.5
26
E. Centerline
[Contribution by: Mike Rejsa]
Always work off of a pencil line down the center of your guitar body. Center pickups, bridges, neck
routings, etc. along this line.
A good way to line up your neck is to tape a piece of string to the top of the neck so it crosses the center
where the nut will be. Run the string down to the centerline by where the tailpiece will be. By lining up this
string down the position dots on the neck, you can tell when the neck is lined up with your centerline. I do
this to locate the neck route and also when marking the screw holes in the neck.
F. Sandpaper.
[Contribution by: Mike Rejsa]
Sanding goes *lots* faster when you use lots of grades. Start with coarse, sand a few minutes, and move on
down a step at a time until you are using the finest paper. Be careful when using belt sanders - they remove
a lot of guitar very quickly!
G. Strengthen a floating tremolo mounting.
[Contributed by: Steve Hawley]
Here's a trick I learned from my local luthier for mounting floating bridges in bodies with pre-routed pickup
chambers:
Remove as much finish as you can in the tremolo cavity and drill the holes for the posts. Saturate the
exposed wood with cyanoacrylate (Krazy Glue - the really watery stuff). I mean SOAK. Leave the body to
set for a day. You have now turned the wood in that area effectively into stone. As such it will improve
sustain and prevent the wood in front of the bridge pins from collapsing into the pickup cavity.
H. More tips on routing.
[Contributed by: Marty Sasaki]
•
Each pass of the router should only remove a small amount of material. Doing a full depth cut is
asking for trouble.
•
Use other tools to remove large quantities of wood. If you have a drill press, remove the bulk of the
wood using a large bit. Chisels work well too.
•
If the hole goes all of the way through, you can drill a hole and use a jig saw to cut most of the wood
away.
•
Once you are close, use a router to finish off the edges.
•
If the router is your only tool to make holes, then make many passes with the router, each about 1/8
inch greater than the pass before.
I. Make a scale body image for free!
[Contributed by: Ed Zentner]
The procedure that follows mentions specific software applications, which you may or may not have.
Substitute your favorite image editing programs as necessary. Ed.
I've found a much easier way to make a scale body image for use as a template and it's absolutely free!

GUITAR BUILDER’S FAQ
Version 2.5
27
•
Either download (from the net, etc.) or scan a picture of the guitar you want into your computer. Use
Adobe Photodeluxe to change the file extension to .BMP.
•
Make sure you edit out all things that are not to be part of the guitar (background).
•
Using the photo size option on the top of the screen, change the width to whatever you want (usually
about 13''). The height is scaled to match automatically. Save it in black and white (takes less hard
drive).
•
Open up Microsoft Paint. Load up your image. It appears at the right size, but unfortunately will not
print at the right size. What you do now is stick a sheet of paper and trace as much of the image onto
the paper as you can, then try to line up another sheet and continue the process until you are finished.
•
Tape your sheets together so they match up as closely as possible. If you did a good job, you can just
freehand in the spaces where it doesn't match up perfectly. Cut out the shape and re-trace it onto a nice
big sheet that doesn't require taping.
J. Another take on routing and parts.
[Contributed by: Ed Zentner]
The best way that I've found to route out cavities in the body is the following:
•
Draw the shape of whatever cavity you wish to cut out on a thin piece of plywood. (about a quarter
inch thick)
•
Measure the distance between the extreme edge of your router bit and the outermost edge of your
router. On mine, this is exactly 7 cm., yours may be different.
•
Measure the distance found in step #2 AWAY from the shape. Screw a piece of wood about 1'x1'
down at this spot.
•
Continue this process until you have wood around the entire shape.
•
Put your router inside the frame and push it against each wood block, going around until your shape is
routed out.
You now have a template that you can simply clamp to your body that will provide perfect results every
time.
This process provides naturally curved edges. The disadvantage is that it only works with square shapes.
I've done this for pickup cavities, neck slots and pick guards. It works like a charm!
Also, another way to obtain hardware that you didn't mention in your FAQ is to ask music stores, friends,
friends of friends, etc. for their old beater guitars. They might sell it to you cheap if they've quit playing. A
friend of mine once purchased a guitar that had a beat up body for $50, and it had a Floyd Rose in it, a good
neck and some really good active pickups!
K. More tips on getting started
[Contributed by: Tim Ard]
I have found the method described below to get excellent results with a minimal investment in tools and
time. To get your guitar to final shape, try the following:
Throw your bandsaw out the window (optional). Instead of trying to make a perfect cut with a saw, use a
pattern and a router. Tools you will need:
•
A jigsaw
•
A router

GUITAR BUILDER’S FAQ
Version 2.5
28
A pattern bit with a cutting length slightly longer than your body material is thick.
Start by getting some 1/4" "Masonite" (also called hardboard) at your local lumberyard. Cut this out with a
jigsaw (saber saw) and sand it to desired shape. Spend some time here. Get it as close to perfect as possible.
The router will follow the edge exactly, so get out all the lumps and bumps. The edge will sand quickly, so
be careful. You may want to make this pattern just a touch bigger than your design, to allow for final
sanding. NOT TOO MUCH!
Pencil the pattern onto the body stock. Cut out your body stock to approximate the shape of the guitar.
Leave the body about 1/8"-1/4" bigger than the pattern. Don't leave too much, or the router may hang up.
Now, attach the pattern to the body material, You can use screws in areas that you will route out later, such
as pickup locations, and two way carpet tape in other areas. This is usually available at a hardware store.
Make sure the rough cut overhangs equally on all sides.
Using the router and pattern cutting bit, follow the pattern. The bit has a bearing which will guide you
along any shape you made the pattern.
When done correctly, this method will produce a near perfect cut that is similar to a final plane, and is
ready for finish sanding. The only place you cannot use this is inside angles. For those, cut with the jigsaw,
and sand. It will do an inside radius as tight as the bit itself.
Advantages here are reduced tool cost, and you have a pattern to keep if you ever want to make another.
Another tip: someone makes the comment in your FAQ that a centerline is a good way to lay out the guitar.
I agree. But make sure you establish it BEFORE you do any cutting. Once it's cut, you will have a tough
time determining where 'Center' is, especially if you have a radical body design. In fact, I would
recommend roughly laying out the entire guitar in light pencil lines. This will help you determine where to
put screws in the above outlined process. BE CAREFUL, too heavy a pencil mark in the wrong wood will
require a lot of sanding.
L. Cutting, finishing, and buying wood.
[Contributed by: Killian Nance]
When cutting the body, I used a hand held jigsaw while clamping the blank firmly to my work bench. All
you have to do is just work on a section at a time, preferably divide the blank into four parts and only cut
out a 1/4th at a time. This reduces the risk on a small band saw. However, a band saw should still be used
when shaping the neck.
When you are ready for finishing, I have found that by plugging the screw holes with silicone caulk will
keep the paint or other finish from clogging the holes. Be sure not to use the 25 year caulk, as it will take
25 years for it to dry out thus making it harder to remove the caulk from the holes. Just ordinary silicone
cheap caulk will do the trick. Also don’t go hay wire with the caulk because if any strays, the finish will
not take to where you didn’t want it.
Also, when you purchase the wood for your body blank, the store you purchase it from not only will cut it
down to length for you, but in most cases will plane and joint the edges for you thus saving hours of work
with a hand held block plane. Also the cost is rather inexpensive, normally about $.25 to as much as $1.00
per edge or side. Depends upon who owns the store and how bad he/she/it needs money.
PART 5 – PITFALLS AND PROBLEMS
This section is for pitfalls and problems from readers who have encountered some pitfalls of guitar building
they wish to share. Maybe reading these will help you avoid the same problems.
A. Bandsaw too small.
When I first started out, I had no tools to speak of, so I bought a Sears' special 10-in. bandsaw. Seemed
like it would do the job, and the price was right. Here's what happened to me:

GUITAR BUILDER’S FAQ
Version 2.5
29
At first everything was OK, until I bought some Eastern Hard Maple. This wood was just a little too hard
for the small bandsaw. The blade kept binding and catching in the channel, and I spent half my time prying
the wood apart and getting the blade free. I broke several blades and had very poor cuts.
Also, this size bandsaw has a small tray table on which to lay the wood. Well, my blank was 13" wide and
20" long and was an 8 quarter piece. This is one heavy chunk of wood. I used the tray to support the wood
while I cut. After struggling with the blades I finally cut the shape completely out. Then I stood the wood
up on its side to view the profile and guess what? It leaned to the side.
The wood was so heavy and the tray table was too weak to support it properly. None of my cuts were
square since the table leaned down under the weight of the wood blank. I spent the next 2 hours trying to
sand it square with a belt sander.
I have since used some small pieces of 2x4 cut to fit under the tray to add support while cutting. It helps,
but it's still not ideal.
B. Drill press too small.
I had a similar problem with a Sears 8 inch drill press. It simply wasn't powerful enough to make good
clean holes through such hard wood. The bit often got jammed in the wood.
Also, the distance from the center of the bit to the edge of the support post was too short to reach some of
the inner holes of the body. For example, the bit wouldn't reach the holes necessary for the bridge pickup
cover. I had to freehand two of them.
C. Trouble with painting area.
I discovered one problem with my work area right away when finishing my first guitar. Like many, I used
my garage to build my guitars. Well, you can imagine the dust and debris that flies around after sawing,
sanding, and routing all day.
Even after waiting for the dust to settle, there's the problem of ventilation and the smell. Also, if you have
a freshly painted guitar in the garage, where are you going to work on the next one? I had to stop building
for weeks while this guitar cured.
I have since farmed out the painting process to a friend so I can just build.
D. Paint build-up.
When finishing a guitar you must take care to prevent paint build-up around the screw holes. What can
happen is, if there is enough paint overhanging into the hole, the paint may chip when you assemble the
guitar (I saw this first hand unfortunately).
One way to prevent this is to plug the holes before spraying. A clay or putty or some other soft material
that is easily removed could be used.
If the problem already exists you could re-drill the hole to clean out the paint or scrape it away, but this
only works to a small degree. You would rather prevent the problem by plugging the holes or cleaning
them out after each set of coats to limit the build up.
It is also important to use a sealer of some kind to prevent moisture from getting into the wood and causing
it to expand and then crack the paint.

GUITAR BUILDER’S FAQ
Version 2.5
30
Appendix A. Wood Suppliers
The following is a partial list of wood suppliers:
EXOTIC WOODS COMPANY, INC.
PO Box 532
Sicklerville, NJ 08081
800.443.9296
609.728.5555
609.728.6262 (fax)
COMMENTS: Wide selection of fingerboards, backs, sides, neck blanks. Carries many exotic woods.
See also LUTHIER'S MERCANTILE INTERNATIONAL, INC. in Appendix B.
PACIFIC RIM TONEWOODS
420 16th St.
Bellingham, WA 98225
206.826.6101
206.826.6046 (fax)
COMMENTS: Minimum order is $200 exclusive of shipping.
See also STEWART-MACDONALD in Appendix B.
SUNDANCE TONEWOODS
341 W. Broadway, Suite 329
San Diego, CA 92101-3882
619.726.0610
See also WARMOTH in Appendix B.

GUITAR BUILDER’S FAQ
Version 2.5
31
Appendix B. Parts Suppliers
The following is a partial list of guitar parts suppliers:
NOTE: If you know someone who should be listed here please let me know.
ALL-PARTS
PO Box 1318
Katy, TX 77492
Toll Free: 800.327.8942
Direct: 281.391.0637
Fax: 281.391.7922
Email:
allparts@allparts.com
Web:
www.allparts.com
COMMENTS: $4.00 for full color catalog and price list
ART SPECIALTIES INTERNATIONAL, INC
PO Box 215
Depew, NY 14043
Toll Free: 800.724.1002
Direct: 716.684.3695
COMMENTS: Supplier of Corion (used for nuts).
not verified
CHANDLER MUSICAL INSTRUMENTS
PO Box 4476
Burlingham, CA 94011
Direct: 530.899.1503
Fax: 530.899.1603
Email:
info@chandler-usa.com
Web:
www.chandler-usa.com
COMMENTS:
THE LUTHIERIE
2449 W. Saugerties Rd.
Saugerties, NY 12477
xxx.xxx.xxxx
COMMENTS: not verified
LUTHIER'S MERCANTILE INTERNATIONAL, INC
Box 774
412 Moore Lane
Healdsburg, CA 95448
Toll Free: 800.477.4437
Direct: 707.433.1823
Fax: 707.433.8802
Email:
lmi@lmii.com
Web:
www.lmii.com
Catalog: $19.95, but is well worth the price.
COMMENTS: The catalog is much more of a handbook than just a catalog. It is about 200 pages long and is filled
with articles, information, and products. It is three-holed drilled for binding. In my opinion, a must have.
MANNMADE USA, INC.
PO Box 550

GUITAR BUILDER’S FAQ
Version 2.5
32
Franklin, NH 03235-0550 USA
Direct: 603.934.1912
Fax: 603.934.1950
Email:
jmann@mannmadeusa.com
Web:
www.mannmadeusa.com
COMMENTS:
MUSICIAN'S FRIEND DISCOUNT CATALOG
Box 4520
Medford, OR 97501
Toll Free: 800.776.5173
Direct: 541.772.5173
Fax: 541.776.1370 (Technical Support)
Fax: 541.772.1482 (Human Resources)
Email:
service@musiciansfriend.com
Web:
www.musiciansfriend.com
Catalog : Free. Once you order and get on the mailing list, the catalogs will come for free.
COMMENTS: Good service. You can get tremolos, pickups, strings, tuners, and a few novelty tools, but that's
about it for builders.
MUSIKRAFT, INC.
PO Box 532
Sicklerville, NJ, 08081
Toll Free: 800.443.9264
Direct: 856.728.5555
Fax:
Email:
gulab@musikraft.com
Web:
www.musikraft.com
Catalog :
COMMENTS:
STEWART-MACDONALD GUITAR SHOP SUPPLY
Box 900
Athens, OH 45701
Toll Free: 800.848.2273 (US and Canada)
Direct: 614.592.3021
Fax: 614.593.7922
Email:
Web:
www.stewmac.com
Hours: 9-7 weekdays, U.S. Eastern Time
Catalog: Free. They send you a catalog with every order. If you order a lot, you'll have so many you can't keep
track of them.
COMMENTS: Excellent service, great prices, excellent quality parts and tools. Carries every replacement part and
tool, plus books and videos, and replacement bodies and necks. Carries acoustic and solid body kits.
WARMOTH GUITAR PRODUCTS
6424 112th St. E.
Puyallup, WA 98373
253.845.0403
253.848.2415 (fax)
Email:
sales@warmoth.com
Web:
www.warmoth.com
Catalog : $2.00
COMMENTS: Superb quality, higher prices, smaller selection of parts, and fewer tools. Tremendous selection of
neck and body and words. Specializes in ready-to-finish/assemble bodies and necks.

GUITAR BUILDER’S FAQ
Version 2.5
33
WD MUSIC PRODUCTS
261-D Suburban Ave.
Deer Park, NY 11719
813.337.7575
813.337.4585 (fax)
COMMENTS: not verified
WOODWORKER'S DREAM
Box 329
10 W. North St.
Nazareth, PA 18064
xxx.xxx.xxxx
COMMENTS: Not verified
WOOD 'N' GUITARS
PO Box 328
Honesdale, PA 18431
717.253.1620
717.253.4941 (fax)
COMMENTS: Replacement bodies and body blanks.
Not verified
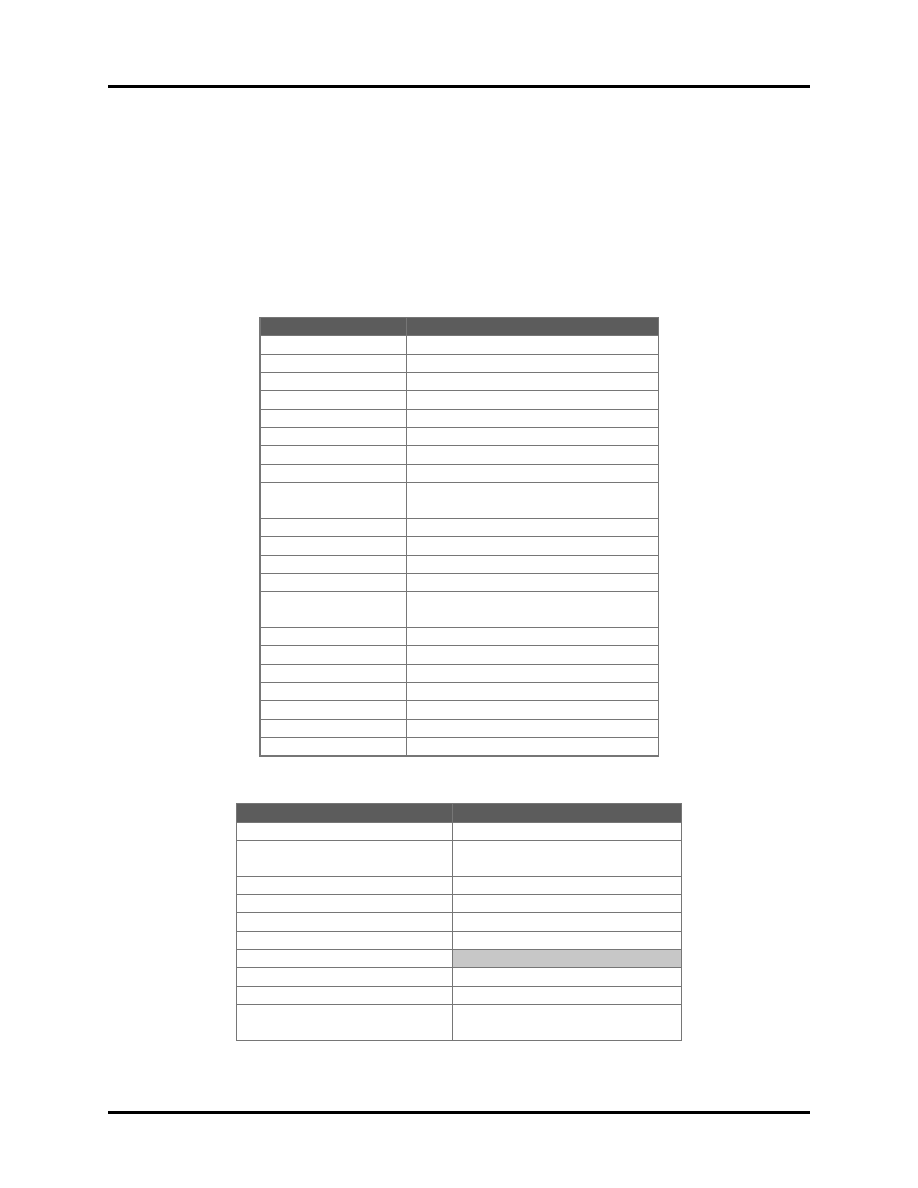
GUITAR BUILDER’S FAQ
Version 2.5
34
Appendix C. Tools and Materials
There are many common and specialized tools used in the craft of guitar building. They range from the
simplest files to CNC machines that can almost all of the work for you. The list that follows includes some
of the tools, and some of their uses, for guitar builders. It is in no particular order. You can select from the
list as you see fit for your specific project. The cost of each tool will vary depending on the retailer from
where it is purchased.
Table 2. Basic Tools
TOOL
USE
Straight edge, 18 in.
Checking fingerboard straightness
Steel ruler
Measuring fret spacing
Pencils
Marking wood layouts/measurements
Square
Squaring lines on drawings, wood
Clamps (various)
Holding laminations
Spokeshaves
Shaping neck
Wood rasps
Shaping neck and body contours
Chisels
Removing excess wood from cavities
Files (various)
Shaping wood, beveling frets, detail
filing
Coping saw
Various cutting jobs
Hack saw
Various cutting jobs
Dovetail saw
Cutting fret slots
Screwdrivers
Mounting hardware
Pliers
Bending fret wire, holding parts,
tightening bolts
Socket set
Mounting hardware
Masking tape
Covering parts during finish
Double stick tape
Holding router templates
Titebond glue
Laminating wood, installing inlays
Lacquers
Painting, finishing
Stains
Staining, finishing
Soldering iron
Installing electronics
Table 3. Power Tools
TOOL
USE
Band Saw (10 in. minimum)
Cutting body and neck shapes
Drill, drill press (+bits)
Drilling screw holes, removing
wood
Router (+bits)
Cutting cavities
Detail sander
Sanding difficult areas
Hand sander
Basic sanding jobs
Small belt sander
Larger sanding jobs
Sand paper (see grits below)
60, 80, 120, 150, 220
Rough to final sanding
320, 400, 600, 100 (wet/dry)
Finish sanding
Dremel Moto-tool (+bits)
Inlay routing, detail routing,
polishing

GUITAR BUILDER’S FAQ
Version 2.5
35
Table 4. Special Tools
TOOLS
USE
Fretboard radius sanding
blocks
Sanding the fretboard to a specific
radius
Fret file
Reshaping frets
Fret nippers
Cutting fret wire
Fret puller
Pulling frets
Fret hammer
Installing frets
Fret planes (w/paper)
Leveling fingerboard, frets
Fret slotting saw
Cutting fret slots
Fret dressing file
Crowning and shaping frets
Router templates
Accurate cavity routing (pickup,
tremolo, electronics cavities)
Precision nut files (set)
Filing string slots in nut
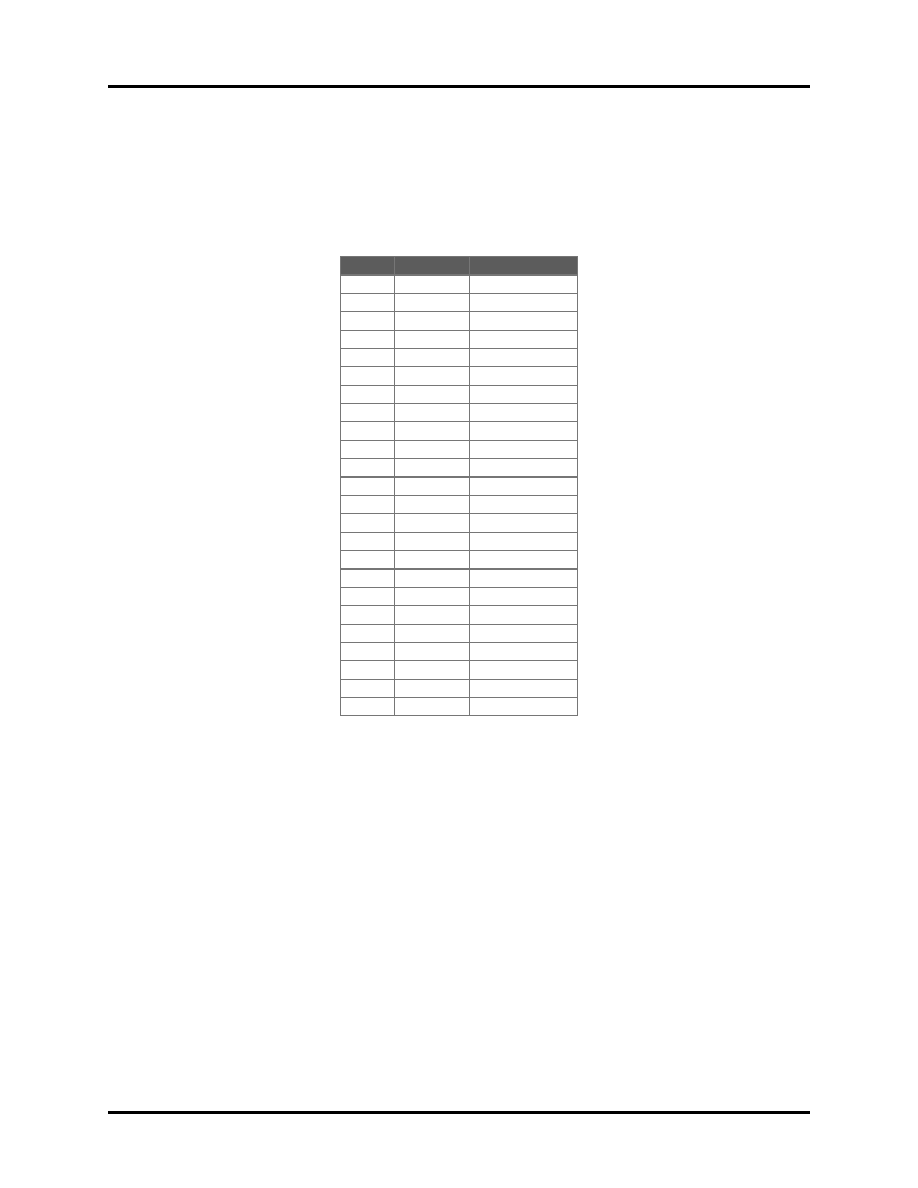
GUITAR BUILDER’S FAQ
Version 2.5
36
Appendix D. Fret Spacing Tables
Here are the fret locations for a 25 1/2-in. scale guitar:
Table 5. 25 1/2 in Fret Spacing
Fret
Interval
To Bridge
1
1.431
-
2
1.351
-
3
1.275
-
4
1.203
-
5
1.136
-
6
1.072
-
7
1.012
-
8
0.955
-
9
0.901
-
10
0.851
-
11
0.803
-
12
0.758
12.750
13
0.715
12.034
14
0.675
11.359
15
0.637
10.721
16
0.602
10.119
17
0.567
9.552
18
0.536
9.015
19
0.506
8.509
20
0.478
8.031
21
0.451
7.581
22
0.425
7.156
23
0.402
6.754
24
0.379
6.375

GUITAR BUILDER’S FAQ
Version 2.5
37
Here are the fret locations for a 24 3/4-in. scale guitar:
Table 6. 24 3/4 in Fret Spacing
Fret
Interval
To Bridge
1
1.389
-
2
1.311
-
3
1.237
-
4
1.168
-
5
1.102
-
6
1.040
-
7
0.982
-
8
0.927
-
9
0.875
-
10
0.826
-
11
0.779
-
12
0.736
12.375
13
0.694
11.680
14
0.655
11.024
15
0.618
10.406
16
0.584
9.821
17
0.551
9.271
18
0.520
8.750
19
0.491
8.295
20
0.463
7.796
21
0.437
7.385
22
0.413
6.945
23
0.389
6.555
24
0.368
6.187

GUITAR BUILDER’S FAQ
Version 2.5
38
Appendix E. Books
There are numerous books that cover all the aspects of guitar building. The list below contains some of the
more popular books. Most are available from Stewart-MacDonald’s Guitar Shop Supply, and the
descriptions and prices shown are from their catalog, unless otherwise listed.
This list is not exhaustive and I will not attempt to make it so. If you have an internet connection please
use the larger online bookstores and guitar related web sites to locate these and other books.
NOTE: If you a book should be listed here please let me know.
Construction
BUILD YOUR OWN ELECTRIC GUITAR
by Bill Foley
"Written to help you assemble guitars from pre-finished
parts. Includes helpful suggestions for choosing pickups,
tips on Khaler and Floyd Rose tremolo installations, wiring
diagrams, fret and string nut preparation, intonation
adjustment and general set-up techniques." [99 pages, soft
cover, $19.95]
COMMENTS:
CONSTRUCTING A SOLID BODY GUITAR
by Roger H. Siminoff
"Instructions for making and finishing the wooden parts of
an electric guitar with a bolt-on neck are extensively
illustrated. Includes full sized working drawings with a
special full-color illustrated section on staining and
finishing. Covers everything from raw wood selection to
final hardware installation and wiring." [60 pages, soft
cover, $16.95]
COMMENTS: Good step-by-step instructions and illustrations.
Easy to follow and read.
CUSTOMIZING YOUR ELECTRIC GUITAR
by Adrian Legg
"Covers basic set-up (action, nut and intonation adjustment)
and fret dressing. Explore Gibson and fender pickups and
wiring arrangements, custom coil tapping, phase reversal,
series/parallel and stereo wiring, active (on-board)
electronics, shielding and switching. Numerous wiring
diagrams and photos included." [64 pages, soft cover,
$10.95]
COMMENTS:
MAKE YOUR OWN ELECTRIC GUITAR
by Melvin Hiscock
"Instructions on using hand and power tools, with basic
woodworking skills to create custom solid body guitars.
Construction and jig-making for glue-in, bolt-on, and
straight-thru necks are discussed and illustrated, with all
the steps from wood selection to lacquering to custom

GUITAR BUILDER’S FAQ
Version 2.5
39
wiring." [160 pages, soft cover, $16.95]
COMMENTS: Very thorough book with 3 examples: A
Telecaster-type, a Gibson type, and a bass guitar (neck
through).
MAKING AN ARCH TOP GUITAR
by Robert Benedetto
"The definitive book and constructing an acoustic arch top
guitar. Wood selection, tap tuning, bracing finishing,
marketing." [280 pages, 8.5 x 11 in. format, $39.95]
COMMENTS: Order with check or money order payable to Robert
Benedetto, from Robert Benedetto
RR 1 Box 1347
E. Stroudsburg, PA 18301
Phone: 717.223.0883
Tax: PA residents add 6% sales tax
Shipping: $5.00 USA, $8.50 Canada, $20.00 Overseas
Repair/Setup
COMPLETE GUITAR REPAIR
by Hideo Kamimoto
"A useful and popular illustrated guide to the repair,
adjustment, and maintenance of acoustic and electric
guitars. Explains re-fretting, neck and truss rod
adjustment, bridge re-gluing, crack repairs, refinishing and
more. A helpful series of fret scale charts in included."
[160 pages, soft cover], $16.95]
COMMENTS:
DO-IT-YOURSELF GUITAR REPAIR
by Pieter Fillet
"A compact book written for the musician or dealer who
requires basic practical instruction on guitar setup and
adjustment procedures. Features over 170 photographs and
diagrams with concise explanations of shop procedures to
make a guitar play accurately. Covers the fundamentals of
fret, neck, string action, nut and bridge adjustments, and
provides helpful tips on buying a guitar." [63 pages, soft
cover, $4.95]
COMMENTS:
ELECTRIC GUITAR SETUPS
by Hideo Kamimoto
"A guide to essential set-up work, focusing on action,
pickups, intonation adjustment for guitars and basses.
Includes set-up tips for Fender, Gibson, and other models;
fret leveling, tuning methods, locking tremolo tips, and an
extensive look at bridge design." [84 pages, soft cover,
$16.95]
COMMENTS:
GUITAR PLAYER REPAIR GUIDE

GUITAR BUILDER’S FAQ
Version 2.5
40
by Dan Erlewine
"The most complete and thorough manual on guitar repairs and
adjustments. Includes: Evaluating the instrument, truss-
rod, action, and intonation adjustment, electric and
acoustic bridge saddles, nut replacement, fret dressing and
replacement, installing tuners and tremolos, finishing &
touch-ups, fixing cracks, braces, peg heads, and bridges,
neck resetting, guitar electronics, replacing and repairing
pickups, switches, pots, and wiring." [309 pages, soft
cover, $22.95]
COMMENTS: Superb in quality, content, and readability.
*** Technology: ***
MANUAL OF GUITAR TECHNOLOGY
by Franz Jahnel
"The result of a lifetime of study with European masters,
with a large 229 page format and a price aimed squarely at
the serious builders. Extremely detailed scientific
information on acoustic principles in traditional guitar
making, including chemical properties of finishing
materials, string making, formulas for vibration and scale
properties, a 24 page technical chart of over 300 wood
species, construction plans for classical guitars, steel
string and carved top jazz guitars and more." [229 pages,
tbd cover, $139.50]
COMMENTS: A techno's dream book.
Wood/Wood Finishing
The following are available from Stewart-MacDonald's Guitar Shop Supply.
ENCYCLOPEDIA OF WOOD
by Aidan Walker
"A directory of more than 150 of the world's most popular
and beautiful timbers. Samples of each species are shown in
color, with information on geographical distribution,
physical properties (including density, stiffness,
workability, and bending strength) and uses. Filled with
beautiful color photography and wood lore." [192 pages,
hard cover, $29.95]
COMMENTS:
THE WOOD FINISHING BOOK
by Michael Dresdner
"A design engineer at Martin Guitars and a contributor to
Fine Woodworking magazine, Dresdner also has over 20 years
of experience in finishing trades. He offers practical
solutions to wood finishing problems, and reveals what's
actually inside brand name finish formulations.
Preparation, coloring, application, and finish repairs
are also discussed." [213 pages, soft cover, $24.95]
COMMENTS:
UNDERSTANDING WOOD FINISHING

GUITAR BUILDER’S FAQ
Version 2.5
41
by Bob Flexner
"Exceptionally well organized and illustrated, this book
will help you solve most finishing problems. Based on an
extensive knowledge of the chemistry of finishing materials,
it features comprehensive coverage of traditional finishes
and touch-ups, and new water-based finishes too. Highly
recommended." [310 pages, hard cover, $27.95]
COMMENTS:
UNDERSTANDING WOOD
by Bruce Hoadley
"A wealth of scientific knowledge about wood, written for
the individual woodworker. Essential for the serious
luthier. Explain species identification and
characteristics; the effects of moisture; drying your own
wood; strength properties; effects of machining, joining,
bending, and finishing; lumber grading; processing and
terminology." [256 pages, hard cover, $31.95]
COMMENTS:
WOOD FINISHER'S HANDBOOK
by Sam Allen
"A guide to the preparation and finishing of new wood, and
the repair of previously finished wood surfaces. Over 150
photographs and drawings demonstrate modern and traditional
techniques. Allen explains the use of finishing tools
(brushes, spray equipment, papers and scrapers), staining
and filling, topcoats, colors, rubbing and antiquing."
[160 pages, soft cover, $12.95]
COMMENTS:
WOOD FINISHING WITH GEORGE FRANK
by George Frank
"A step-by-step guide covering every aspect of wood
finishing, from stains, dyes and chemical treatments and
waxes, varnishes, and oils. Over 80 color photos illustrate
the effects of various finishing media and techniques. An
extensive section on French polishing is featured." [144
pages, soft cover, $14.95]

GUITAR BUILDER’S FAQ
Version 2.5
42
Appendix F. Videos
DAN ERLEWINE'S VIDEO GUITAR REPAIR COURSE (8 volumes)
(See Stewart-MacDonald Guitar Shop Supply)
1. Bread and Butter Jobs - Set-ups, part installation & customer service
2. Yard Sale Specials -
3. Bellyaches - Correcting problems with acoustic tops and bridges
4. Broken Pegheads
5. Cracking Up - Fixing crack and punctures
6. Acoustic Net Resets
7. Guitar Maintenance and Setup - Basic inspection, set-up and cleaning.
8. Don't Fret - Complete professional fretting methods.
Each video is $49.95, all 8 is $349.00.
MAKING A SOLID BODY GUITAR
with Dan Erlewine
"Complete details for each step of the project. Plans,
layouts, and materials. Squaring up the wood, constructing
the neck and body, Shaping and sanding, pre-fitting the
hardware, final sanding and finishing, final assembly.
[2 hours, $49.95]]
(See Stewart-MacDonald Guitar Shop Supply)
SPRAY FINISHING BASICS
with Dan Erlewine
"Wood preparation, sanding & scraping techniques, grain
filling, spray techniques, sealer coats, spray guns, air
brushes, sanding, rubbing, and polishing and more..." [90
minutes, $39.95]
(See Stewart-MacDonald Guitar Shop Supply)
SPRAY FINISHING WITH COLORS
with Dan Erlewine
"Lacquer colorants, mixing anilines, choosing a stain,
wiping versus spraying, sunburst finishes, transparent color
finishes, and much more..." [105 minutes, $39.95}
(See Stewart-MacDonald Guitar Shop Supply)
TREMOLO INSTALLATIONS
with Dan Erlewine
"Intensive, fast paced 90 minute video guides you through
the placement, routing, and installation of today's most
popular whammies. You'll learn how to use templates for
cleaner results and you'll see dozens of trick to make the
job easy. Includes: retrofitting a Floyd Rose, installing
a Floyd Rose on a non-tremolo guitar, installing a locking

GUITAR BUILDER’S FAQ
Version 2.5
43
nut, installing a Khaler and Ibanez tremolo, recessing the
tremolo, tips for adjustment and maintenance." [90 minutes,
$39.95]
(See Stewart-MacDonald Guitar Shop Supply)

GUITAR BUILDER’S FAQ
Version 2.5
44
Appendix G. Organizations
The following are organizations dedicated to guitar building and repairing:
This list is not exhaustive and I will not attempt to make it so. If you have an internet connection please
use the larger online search sites to locate these and other organizations.
NOTE: If you know an organization that should be listed here please let me know.
ASSOCIATION OF STRINGED INSTRUMENT ARTISANS (ASIA)
1394 Stage Road
Richmond, VT 05477 USA
Direct: 802.434.5657
Fax: 802.434.5657
Email:
Web:
http://www.guitarmaker.org/
GUILD OF AMERICAN LUTHIERS (GAL)
South Park Ave.
Tacoma, WA 98408
Email:
Web:
http://www.luth.org/

GUITAR BUILDER’S FAQ
Version 2.5
45
Appendix H. Schools
The following is a list of schools that teach guitar building.
This list is not exhaustive and I will not attempt to make it so. If you have an internet connection please
use the larger online search sites to locate these and other schools.
NOTE: If you know a school that should be listed here please let me know.
AMERICAN SCHOOL OF LUTHERIE
420 Moore Lane
Healdsburg, CA 95448
Toll Free: 800-477-4437
Direct:
Fax: 707-433-8802
Email:
asl@lmii.com
Web:
http://www.lmii.com/asl.htm
COMMENTS: Fee schedule depends on number of days, 1 week is $1200.
APPRENTICE SHOP
PO Box 267
Spring Hill, TN 37174
Not verified
BRYAN GALLUP'S GUITAR REPAIR AND CONSTRUCTION SCHOOL
10495 Northland Dr.
Big Rapids, MI 49307
Toll Free: 800.278.0089
Direct: 616.796.5611
Email:
bryan@galloupguitars.com
Web:
http://www.galloupguitars.com/
COMMENTS: 6 day course $1000.
RED WING AREA VOCATIONAL TECHNICAL INSTITUTE
Pioneer Rd. at Hwy. 58
Red Wing, MN 55066
Not verified
RENTON VOCATIONAL TECHNICAL INSTITUTE
3000 NE 4th ST.
Renton, WA 98056
Not verified
ROBERTO-VENN SCHOOL OF LUTHIER
Phoenix AZ
Direct: 602.243.1179
Email:
rvschool1@aol.com
.
Web:
http://www.roberto-venn.com/

GUITAR BUILDER’S FAQ
Version 2.5
46
Appendix I. Sample Cost
Below is a sample cost list for a simple guitar. Remember that this list does not include any tools, glues,
sandpaper, or finishing materials! In many cases, the lower priced items are chosen, for example, a
rosewood fingerboard instead of ebony. The prices are from Stewart-MacDonald's Guitar Shop Supply
catalog. Your prices may vary.
Table 7. Sample Cost of a Guitar
Item/Part
Cost (US $)
Body wood (Alder)
*shop around
57.50
Neck Wood (maple 2x5x30 inches)
*can make two 1-piece necks
64.20
Fret wire (6 feet of Jumbo wire)
10.26
Nut (graph-tech)
4.48
Fingerboard (rosewood, 12 in radius)
17.48
Trussrod
10.99
Trussrod cover
1.54
Trussrod cover screws
0.54
Side dot material
2.97
Pearl inlays (6mm diameter)
4.20
Schaller bridge pickup
34.95
Schaller neck pickup
34.95
Pickup mounting rings (2) (w/screws and springs)
6.50
Control pots (4)
12.88
Pickup selector switch (5-way)
7.88
Capacitors
3.60
Circuit wire (2 feet)
0.31
Control knobs (4)
7.32
Strap locks
9.70
Neck plate (w/screws)
4.86
Jack plate (w/screws)
6.32
Output jack, mono
1.99
Electronics cavity cover plate
8.95
Tremolo cover plate
2.64
Cover plate screws (10)
2.30
Strat tremolo/bridge
39.79
Sperzel Locking tuners (6 inline black)
63.90
GHS Boomers
4.89
TOTAL COST
$427.89
Assuming the neck blank is cut and laminated to make one neck, not two.
This price is not too bad when you don't count tools etc. Also, figure in for sandpaper and paint, which is
fairly small.

GUITAR BUILDER’S FAQ
Version 2.5
47
Appendix J. Wood Reactions
The following chart appeared in _American Woodturner_ June 1990,
Originally posted to rec.woodworking by Bruce Taylor
taylor@tpwosf.tay1.dec.com
------------------------------------------------------------------------
Wood
ReactionSite
Potency Source Incidence
----
--------
----
-------
------
---------
Bald Cypress
S
R
+
D
R
Balsam Fir
S
E,S
+
LB
C
Beech
S,C
E,S,R
++
LB,D
C
Birch
S
R
++
W,D
C
Black Locust
I,N
E,S
+++
LB
C
Blackwood
S
E,S
++
W,D
C
Boxwood
S
E,S
++
W,D
C
Cashew
S
E,S
+
W,D
R
Cocobolo
I,S
E,S,R
+++
W,D
C
Dahoma
I
E,S
++
W,D
C
Ebony
I,S
E,S
++
W,D
C
Elm
I
E,S
+
D
R
Goncalo Alves
S
E,S
++
W,D
R
Greenheart
S
E,S
+++
W,D
C
Hemlock
C
R
?
D
U
Iroko
I,S,P
E,S,R
+++
W,D
C
Mahogany
S,P
S,R
+
D
U
Mansonia
I,S
E,S
+++
W,D
C
N
+
D
Maple (Spalted) S,P
R
+++
D
C
Mimosa
N
?
LB
U
Myrtle
S
R
++
LB,D
C
Oak
S
E,S
++
LB,D
R
C
?
D
U
Obeche
I,S
E,S,R
+++
W,D
C
Oleander
DT
N,C
++++
D,W,LB C
Olivewood
I,S
E,S,R
+++
W,D
C
Opepe
S
R
+
D
R
Padauk
S
E,S,R
+
W,D
R
Pau Ferro
S
E,S
+
W,D
R
Peroba Rosa
I
R,N
++
W,D
U
Purpleheart
N
++
W,D
C
Quebracho
I
R,N
++
LB,D
C
C
?
D
U
Redwood
S,P
E,S,R
++
D
R
C
?
D
U
Rosewoods
I,S
E,S,R
++++
W,D
U
Satinwood
I
E,S,R
+++
W,D
C
Sassafras
S
R
+
D
C
DT
N
+
D,W,LB R
C
?
D
U
Sequoia
I
R
+
D
R
Snakewood
I
R
++
W,D
R
Spruce
S
R
+
W,D
R
Walnut, Black
S
E,S
++
W,D
C
Wenge
S
E,S,R
+
W,D
C
Willow
S
R,N
+
D,W,LB U

GUITAR BUILDER’S FAQ
Version 2.5
48
West. Red Cedar S
R
+++
D,LB
C
Teak
S,P
E,S,R
++
D
C
Yew
I
E,S
++
D
C
DT
N,C
++++
W,D
C
Zebrawood
S
E,S
++
W,D
------------------------------------------------------------------------
REACTION:
SITE:
SOURCE:
INCIDENCE:
I - irritant
S - skin
D - dust
R - rare
S - sensitizer
E - eyes
LB - leaves,bark C - common
C - nasopharyngeal
R - respiratory
W - wood
U - uncommon
cancer
P - pheumonitis,
C - cardiac
alveolitis
(hypersensitivity
pneumonia)
DT - direct toxin N - nausea, malaise
------------------------------------------------------------------------
Reference:
1. _Woods Toxic to Man_, author unknown
2. Woods, B., Calnan, C.D., "Toxic Woods." _Br. Journal of Dermatology_ 1976
3. _ILO Encyclopedia of Occupational Health and Safety_ 1983
4. Lame, K., McAnn, M., _AMA Handbook of Poisonous and Injurious Plants_,AMA 1985
6. Poisondex_, Micromedix Inc. 1990

GUITAR BUILDER’S FAQ
Version 2.5
49
Appendix K. Contributors
The following individuals contributed in part to this FAQ:
Reference
NAME
1
Unknown
2
Steve Hawley
3
Mike Rejsa
4
Ranger Bob
5
Ed Zentner
6
Tim Ard
7
Killian Nance

GUITAR BUILDER’S FAQ
Version 2.5
50
Appendix L. Web Resources
I am reluctant to even mention this here. In the short time since the inception of this FAQ, the quantity and
quality of web resources has grown by leaps and bounds. If I attempted to list them here it would be an
insurmountable task to maintain. There are many web sites already dedicated to this task and I wish them
luck. I only choose to mention that, with a little careful searching, it is possible to find mountains of
information related to guitar building on the web. Much of this information will be found on the web sights
of luthiers both professional and amateur. Often these sites give insight into their building materials or
techniques. Even the major manufacturers such as Gibson, Fender, Paul Reed Smith etc. might have some
of this data.
Careful use of the major search engines and the newsgroup related web sites should provide you with a
wealth of knowledge and guidance.
As for sites that provide step by step instructions, I do not know of any (doesn’t mean they aren’t there).
The best bet is to get one of the books and get started that way. Happy building.
The End
Document Outline
- PART I - BEFORE YOU BEGIN
- I. General Information.
- II. So You Want To Build A Guitar...
- III. Wood.
- IV. Tools and Materials
- V. Safety
- PART 2 - BUILDING A GUITAR
- V. Initial Considerations
- VI. The Body
- VII. The Neck
- A. What is scale length and what does it mean?
- B. How do I determine fret spacing?
- C. What kind of frets should I use?
- D. What type of nut should I use?
- E. What type of tuners should I use?
- F. What types of neck joints are there?
- G. How do I put on a decal?
- H. Do I need a neck angle?
- I. Can I buy pre-slotted fingerboards?
- J. Can I buy pre-assembled necks?
- K. What is the easiest (cheapest) way to clamp frets?
- L. How do I repair a nut slot that is cut too low?
- M. How do I measure for proper nut height?
- VIII. The Electronics
- A. What are the capacitors doing?
- B. How do I shield cavities to prevent that humming sound?
- C. What is that annoying scraping sound in the potentiometers?
- D. How does a pickup work?
- E. How does a humbucker work?
- F. What is the difference between series and parallel wiring?
- G. What is a four wire pickup?
- IX. Pre-Assembly
- X. The Finish
- PART 3 - THE FINAL STEPS
- PART 4 – TIPS AND TRICKS
-
- A. Pre-drill humbucker corners before routing.
- B. Routing.
- C. Bridge Location (for a fixed bridge).
- D. Bridge pickup location
- E. Centerline
- F. Sandpaper.
- G. Strengthen a floating tremolo mounting.
- H. More tips on routing.
- I. Make a scale body image for free!
- J. Another take on routing and parts.
- K. More tips on getting started
- L. Cutting, finishing, and buying wood.
-
- PART 5 – PITFALLS AND PROBLEMS
- Appendix A. Wood Suppliers
- Appendix B. Parts Suppliers
- Appendix C. Tools and Materials
- Appendix D. Fret Spacing Tables
- Appendix E. Books
- Appendix F. Videos
- Appendix G. Organizations
- Appendix H. Schools
- Appendix I. Sample Cost
- Appendix J. Wood Reactions
- Appendix K. Contributors
- Appendix L. Web Resources
Wyszukiwarka
Podobne podstrony:
Instalacja pluginow FAQ id 215 Nieznany
Faq 1 2 id 167978 Nieznany
borland cpp builder cw1 id 9202 Nieznany
borland cpp builder cw11 id 920 Nieznany (2)
Guitar Builders FAQ
borland cpp builder id 92024 Nieznany
Abolicja podatkowa id 50334 Nieznany (2)
4 LIDER MENEDZER id 37733 Nieznany (2)
katechezy MB id 233498 Nieznany
metro sciaga id 296943 Nieznany
perf id 354744 Nieznany
interbase id 92028 Nieznany
Mbaku id 289860 Nieznany
Probiotyki antybiotyki id 66316 Nieznany
miedziowanie cz 2 id 113259 Nieznany
LTC1729 id 273494 Nieznany
D11B7AOver0400 id 130434 Nieznany
analiza ryzyka bio id 61320 Nieznany
więcej podobnych podstron