Plane Stress Bracket
Introduction
This tutorial is the second of three basic tutorials created to illustrate commom features in ANSYS. The plane
stress bracket tutorial builds upon techniques covered in the first tutorial (3D Bicycle Space Frame), it is
therefore essential that you have completed that tutorial prior to beginning this one.
The 2D Plane Stress Bracket will introduce boolean operations, plane stress, and uniform pressure loading.
Problem Description
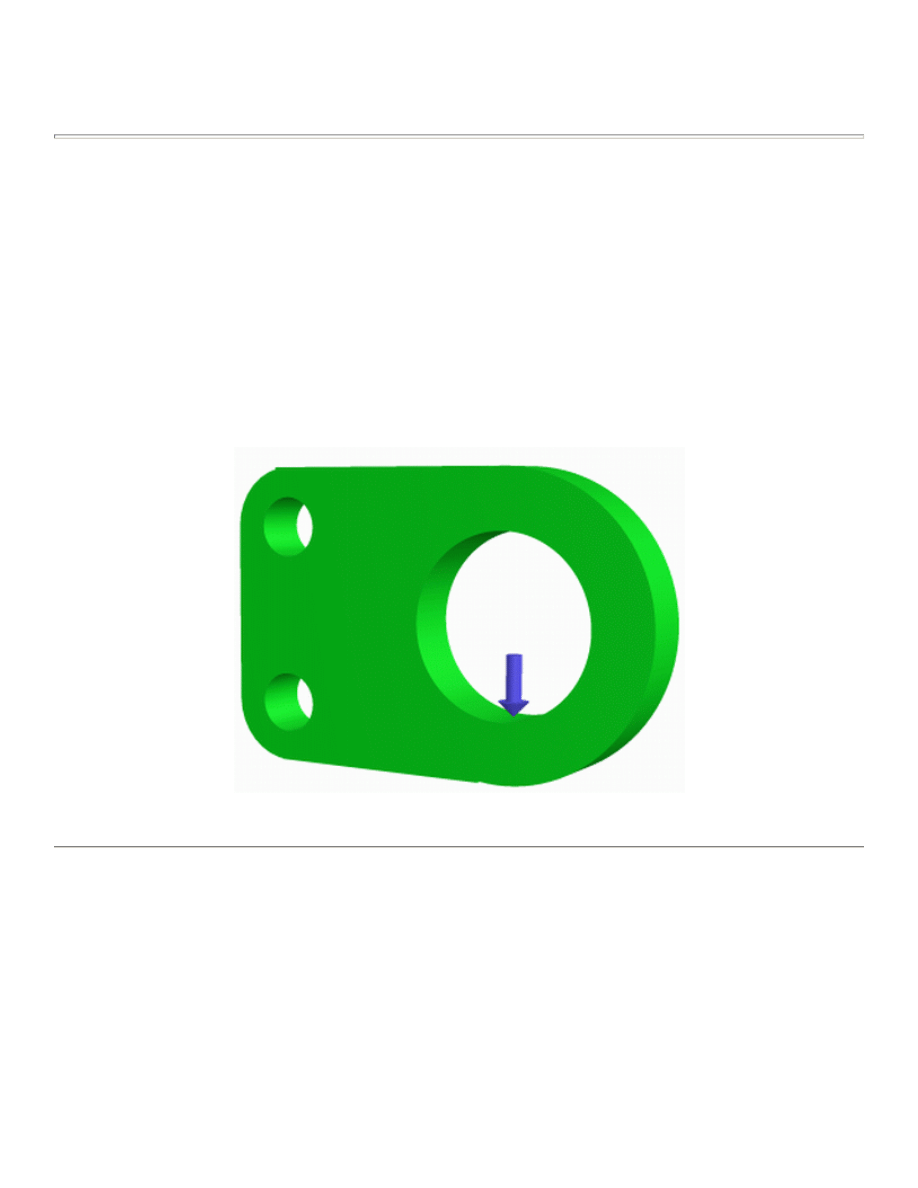
The problem to be modeled in this example is a simple bracket shown in the following figure. This bracket is to
be built from a 20 mm thick steel plate. A figure of the plate is shown below.
This plate will be fixed at the two small holes on the left and have a load applied to the larger hole on the right.
Verification Example
The first step is to simplify the problem. Whenever you are trying out a new analysis type, you need something
(ie analytical solution or experimental data) to compare the results to. This way you can be sure that you've
gotten the correct analysis type, units, scale factors, etc.
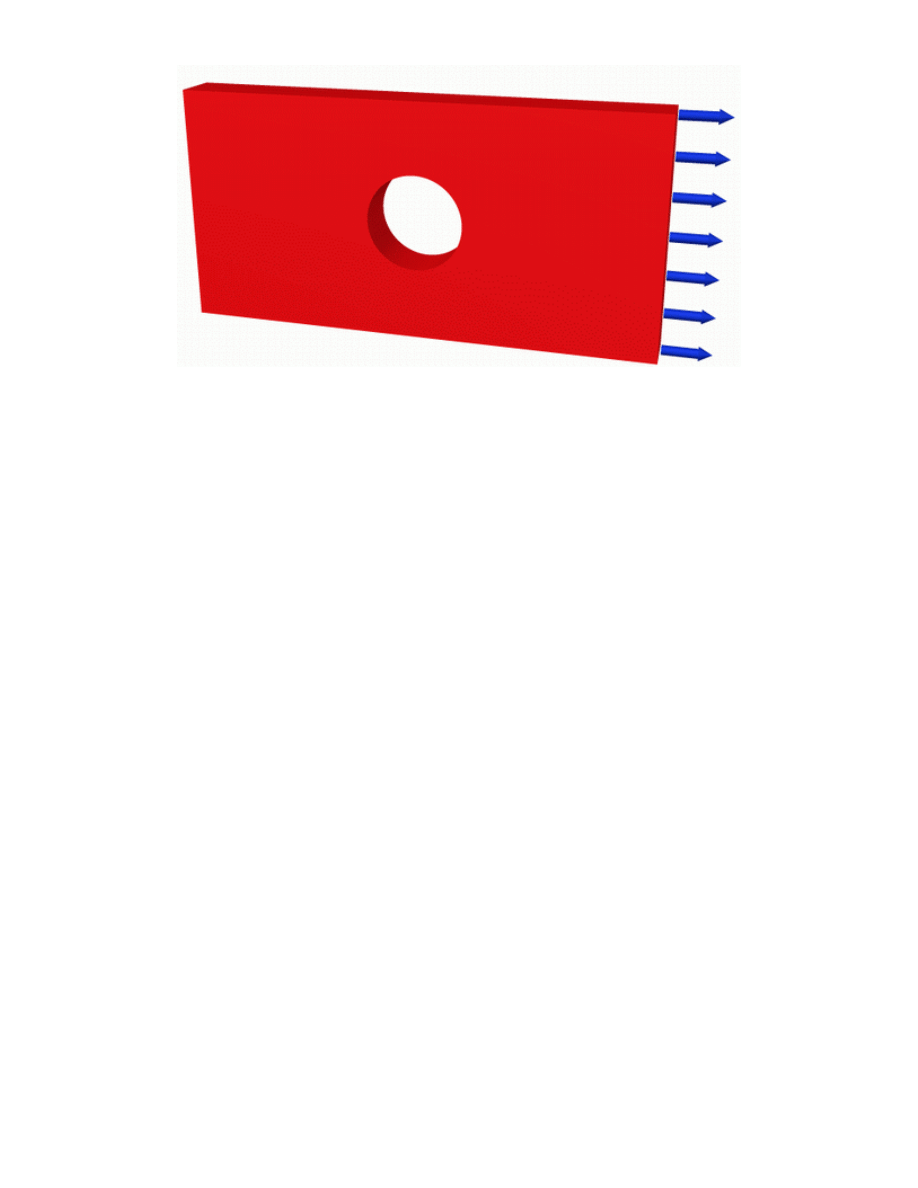
The simplified version that will be used for this problem is that of a flat rectangular plate with a hole shown in
the following figure:
University of Alberta ANSYS Tutorials - www.mece.ualberta.ca/tutorials/ansys/BT/Bracket/Bracket.html
Copyright © 2001 University of Alberta
Preprocessing: Defining the Problem
1. Give the Simplified Version a Title
Utility Menu > File > Change Title
2. Form Geometry
Boolean operations provide a means to create complicated solid models. These procedures make it easy to
combine simple geometric entities to create more complex bodies. Subtraction will used to create this
model, however, many other Boolean operations can be used in ANSYS.
a. Create the main rectangular shape
Instead of creating the geometry using keypoints, we will create an area (using GUI)
Preprocessor > Create > (-Areas-) Rectangle > By 2 Corners
University of Alberta ANSYS Tutorials - www.mece.ualberta.ca/tutorials/ansys/BT/Bracket/Bracket.html
Copyright © 2001 University of Alberta
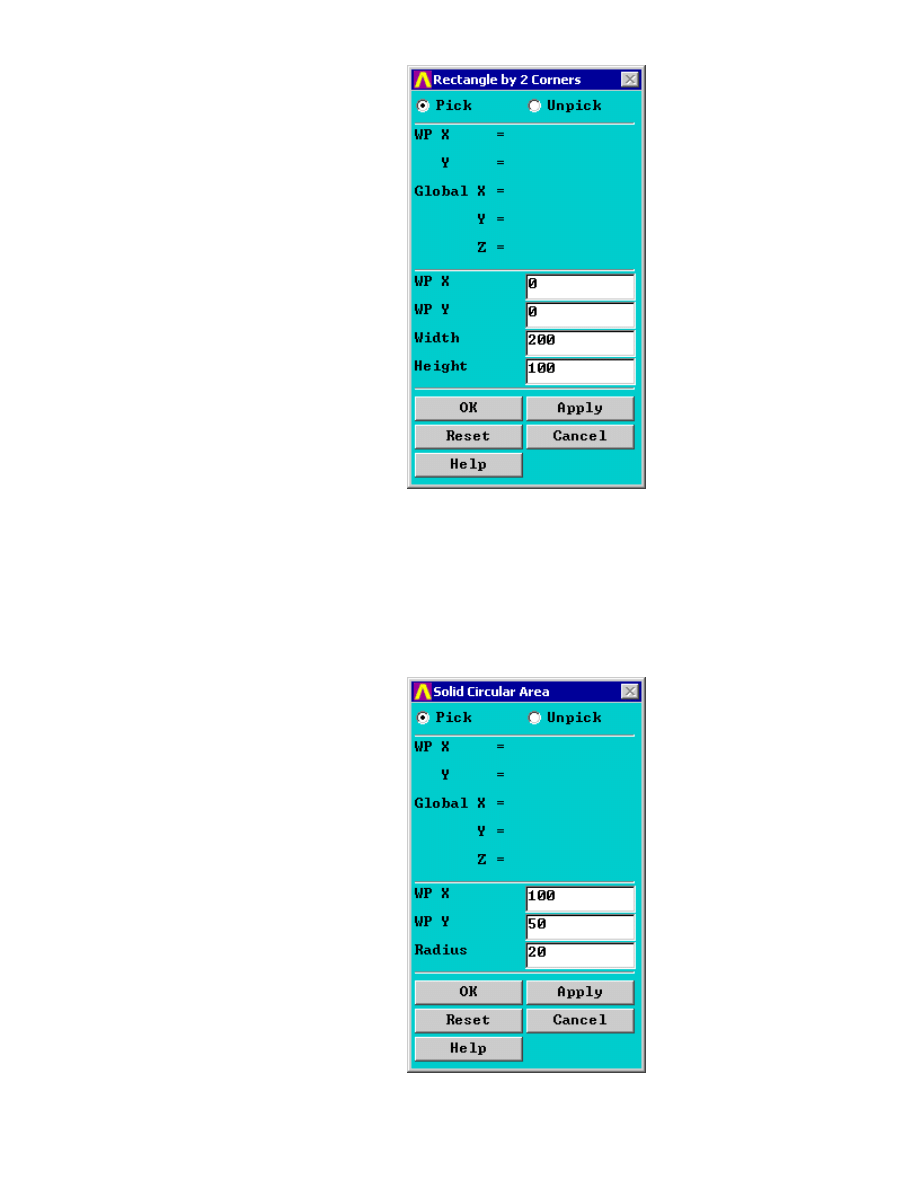
Fill in the window as shown above. This will create a rectangle where the bottom left corner
has the coordinates 0,0,0 and the top right corner has the coordinates 200,100,0.
(Alternatively, the command line code for the above command is
BLC4,0,0,200,100
)
b. Create the circle
Preprocessor > Create > (-Areas-) Circle > Solid Circle
Fill in the window as shown above. This will create a circle where the center has the
University of Alberta ANSYS Tutorials - www.mece.ualberta.ca/tutorials/ansys/BT/Bracket/Bracket.html
Copyright © 2001 University of Alberta
coordinates 100,50,0 (the center of the rectangle) and the radius of the circle is 20 mm.
(Alternatively, the command line code for the above command is
CYL4,100,50,20
)
c. Subtraction
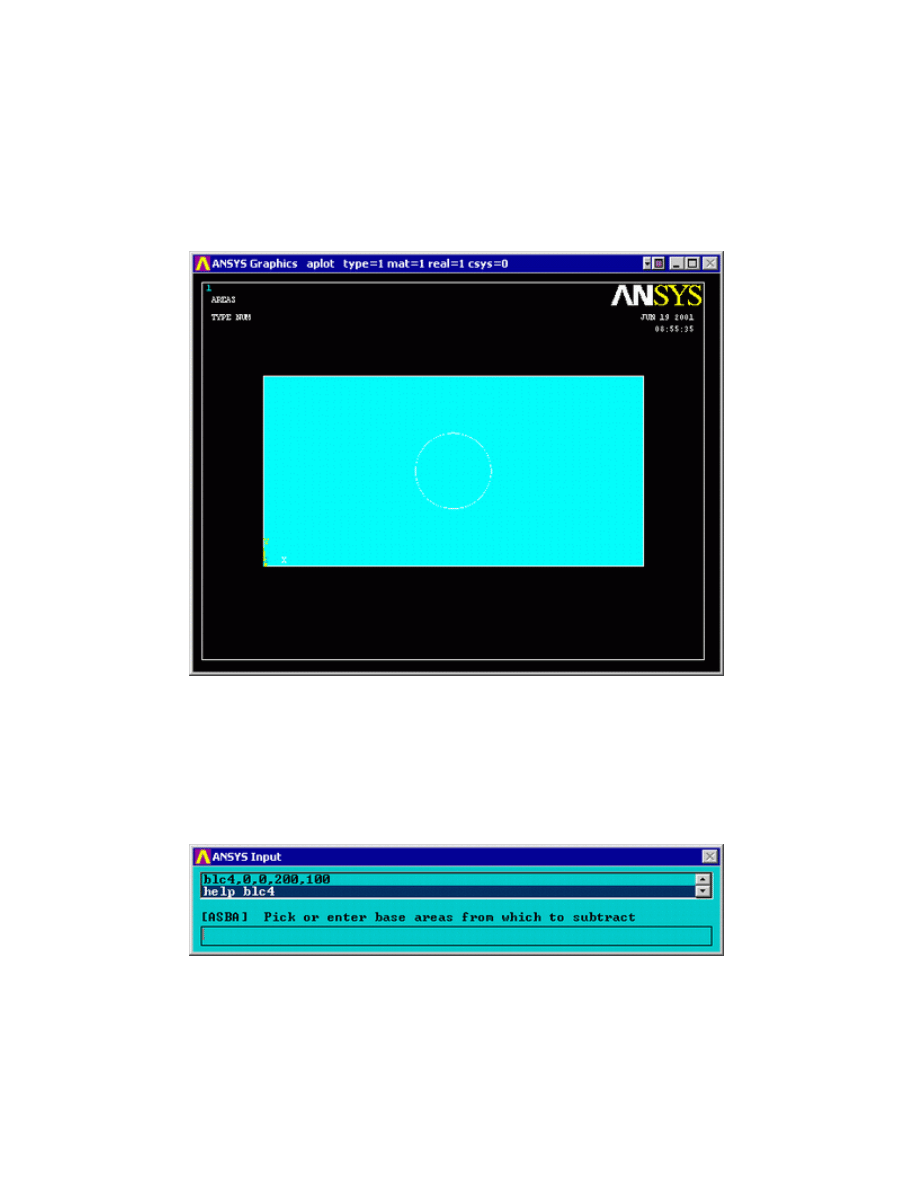
Now we want to subtract the circle from the rectangle. Prior to this operation, your image
should resemble the following:
To perform the Boolean operation, from the Preprocessor menu select:
(-Modeling-) Operate > (-Booleans-) Subtract > Areas >
At this point a 'Subtract Areas' window will pop up and the ANSYS Input window will
display the following message:
[ASBA] Pick or enter base areas from which to
subtract
(as shown below)
Therefore, select the base area (the rectangle) by clicking on it. Note: The selected area will
turn pink once it is selected.
The following window may appear because there are 2 areas at the location you clicked.
University of Alberta ANSYS Tutorials - www.mece.ualberta.ca/tutorials/ansys/BT/Bracket/Bracket.html
Copyright © 2001 University of Alberta
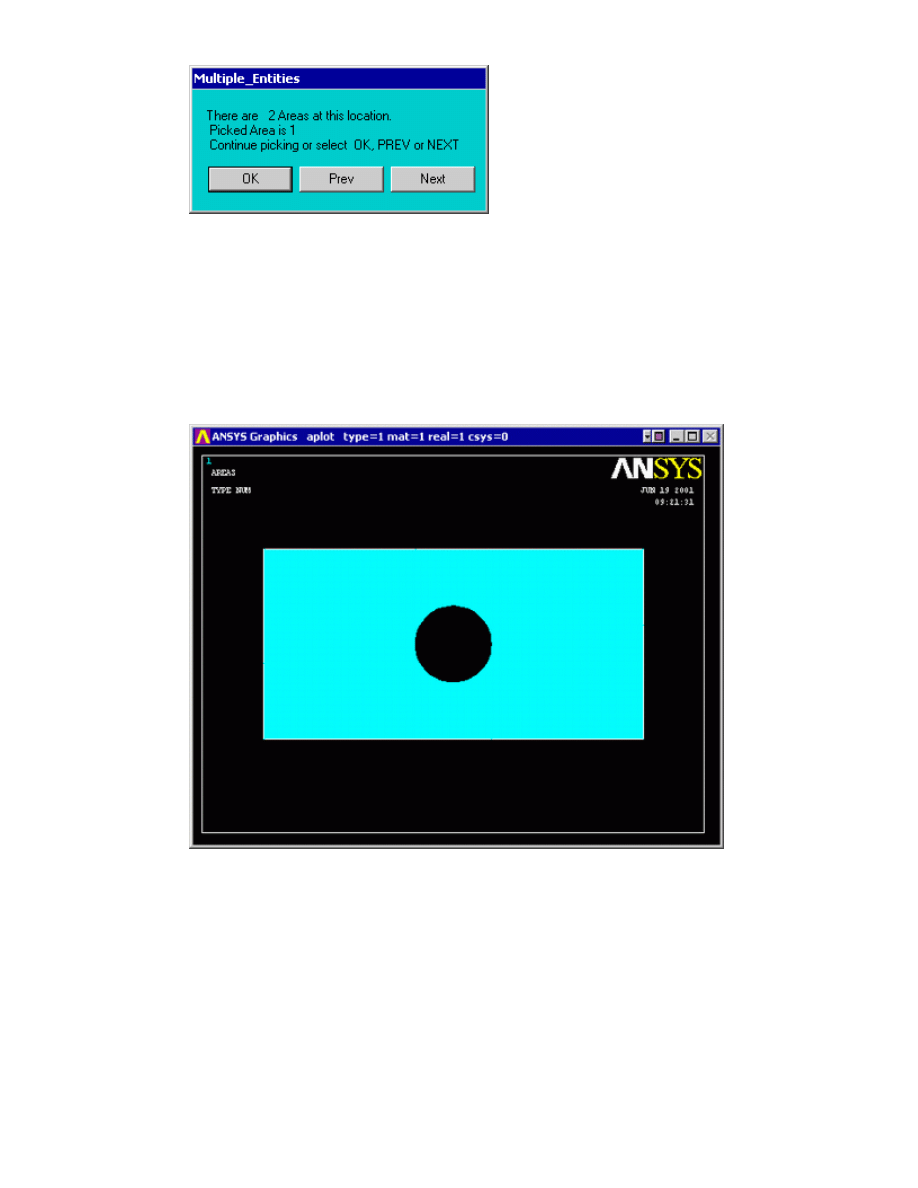
Ensure that the entire rectangular area is selected (otherwise click 'Next') and then click 'OK'.
Click 'OK' on the 'Subtract Areas' window.
Now you will be prompted to select the areas to be subtracted, select the circle by clicking on
it and then click 'OK'.
You should now have the following model:
(Alternatively, the command line code for the above step is
ASBA,1,2
)
3. Define the Type of Element
It is now necessary to define the type of element to use for our problem:
Preprocessor Menu > Element Type > Add/Edit/Delete
{
Add the following type of element: Solid (under the Structural heading) and the Quad 82 element,
as shown in the above figure.
University of Alberta ANSYS Tutorials - www.mece.ualberta.ca/tutorials/ansys/BT/Bracket/Bracket.html
Copyright © 2001 University of Alberta
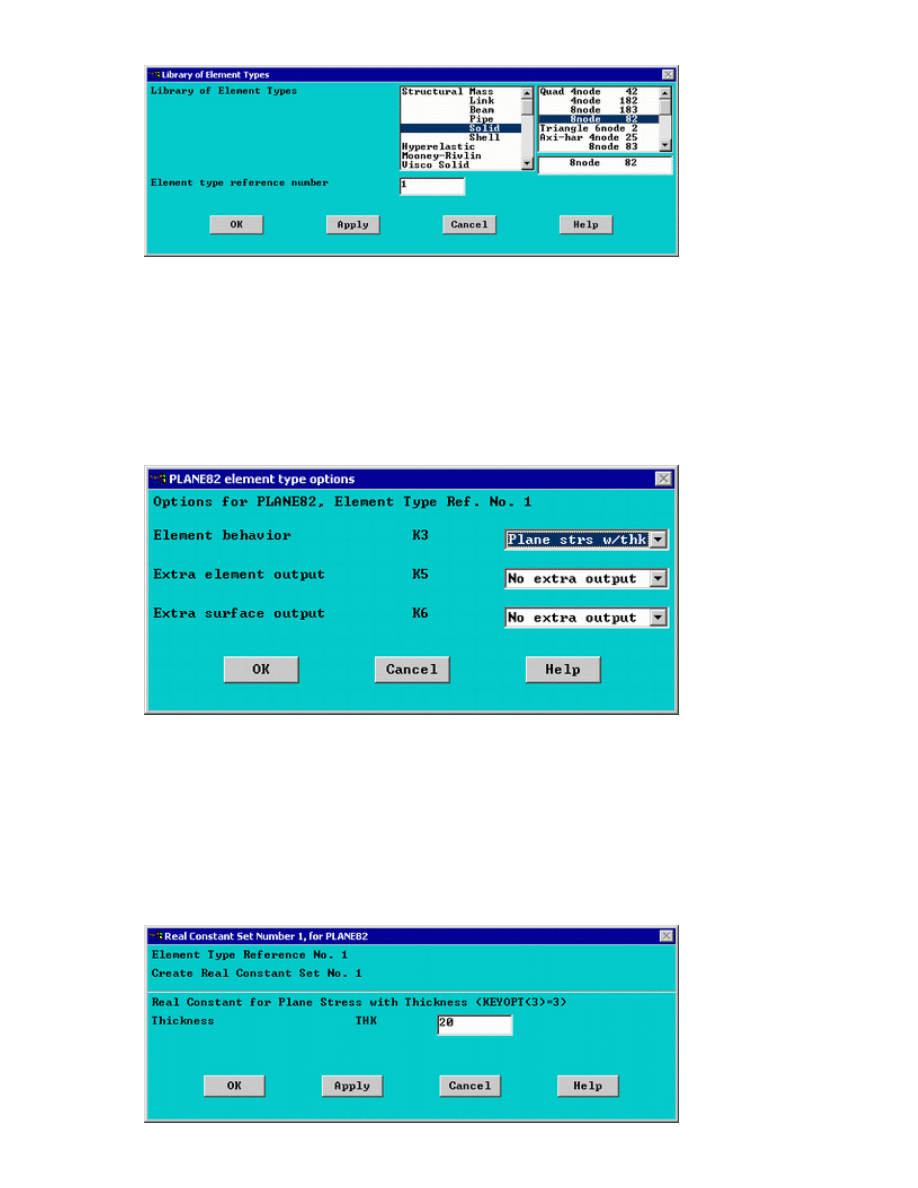
PLANE82 is a higher order version of the two-dimensional, four-node element (PLANE42).
PLANE82 is an eight noded quadrilateral element which is better suited to model curved
boundaries.
For this example, we need a plane stress element with thickness, therefore
{
Click on the 'Options...' button. Click and hold the K3 button, and select 'Plane strs w/thk', as
shown below.
(Alternatively, the command line code for the above step is
ET,1,PLANE82
followed by
KEYOPT,1,3,3
)
4. Define Geometric Properties
{
As in previous examples Preprocessor menu > Real Constants > Add/Edit/Delete
{
Enter a thickness of 20 as shown in the figure below. This defines a plate thickness of 20mm)
University of Alberta ANSYS Tutorials - www.mece.ualberta.ca/tutorials/ansys/BT/Bracket/Bracket.html
Copyright © 2001 University of Alberta
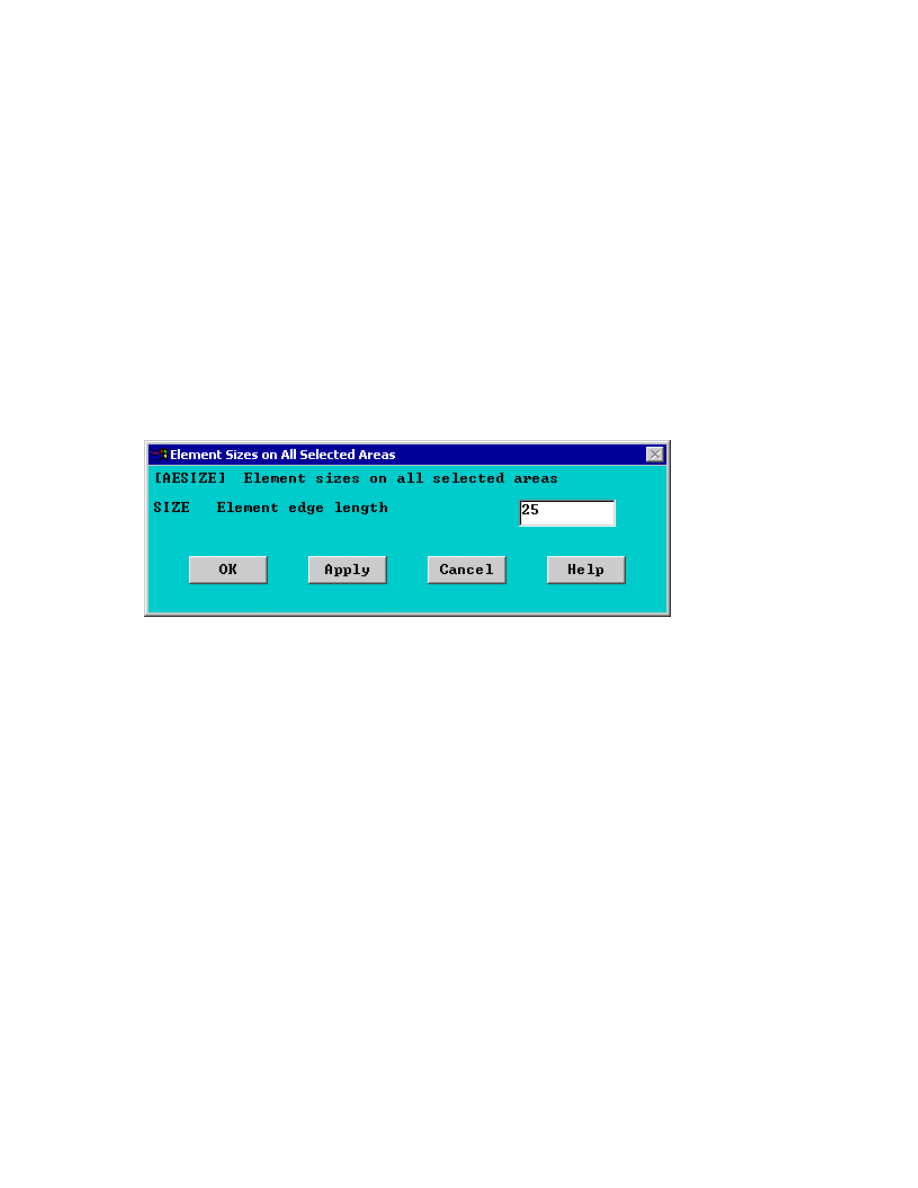
(Alternatively, the command line code for the above step is
R,1,20
)
5. Element Material Properties
{
As shown in previous examples, select Preprocessor > Material Props > Material models >
Structural > Linear > Elastic > Isotropic
We are going to give the properties of Steel. Enter the following when prompted:
(Alternatively, the command line code for the above step is
MP,EX,1,200000
followed by
MP,PRXY,1,0.3
)
6. Mesh Size
To tell ANSYS how big the elements should be, Preprocessor > (-Meshing-) Size Cntrls > (-Areas-)
All Areas
{
Select an element edge length of 25. We will return later to determine if this was adequate for the
problem.
(Alternatively, the command line code for the above step is
AESIZE,ALL,25,
)
7. Mesh
Now the frame can be meshed.
{
In the 'Preprocessor' menu select Mesh > (-Areas-) Free and select the area when prompted
(Alternatively, the command line code for the above step is
AMESH,ALL
)
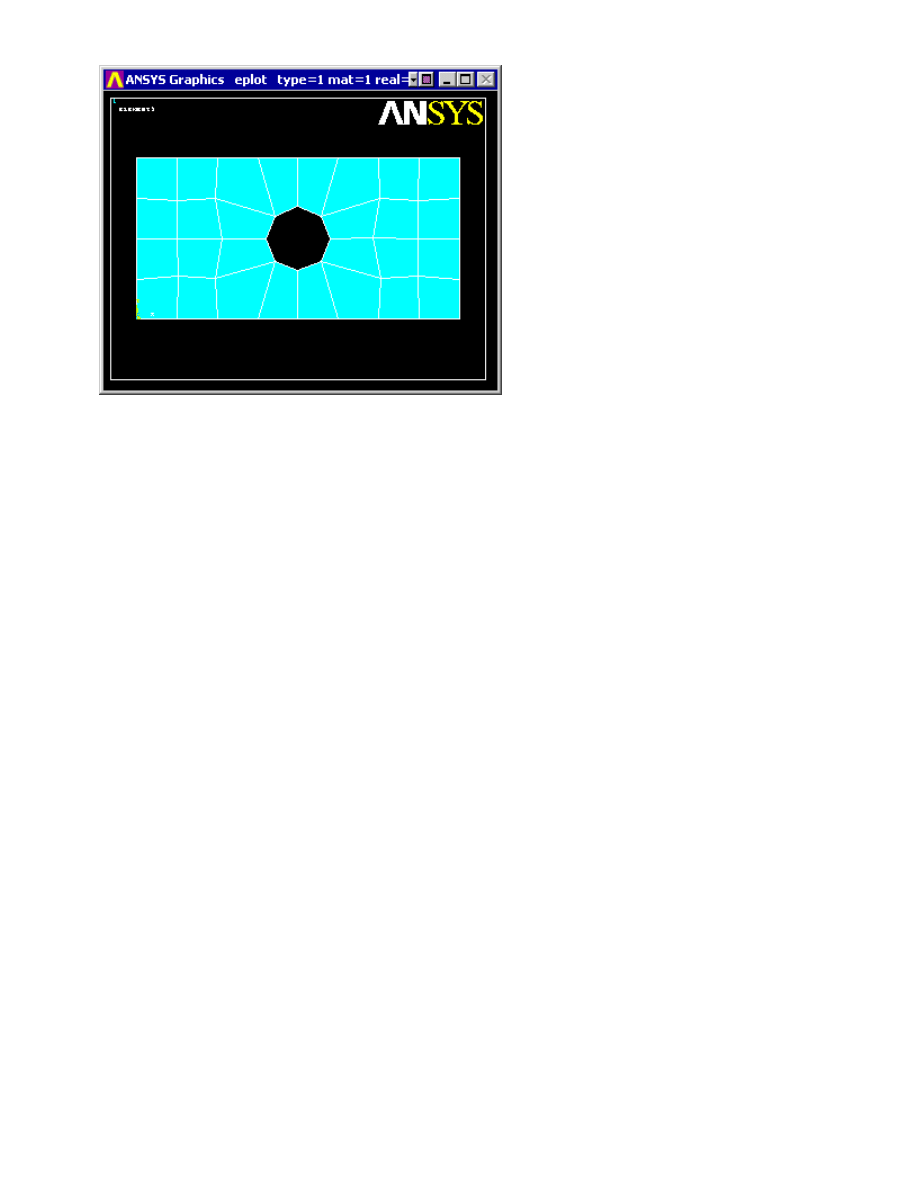
You should now have the following:
EX 200000
PRXY 0.3
University of Alberta ANSYS Tutorials - www.mece.ualberta.ca/tutorials/ansys/BT/Bracket/Bracket.html
Copyright © 2001 University of Alberta
Saving Your Job
Utility Menu > File > Save as...
Solution Phase: Assigning Loads and Solving
You have now defined your model. It is now time to apply the load(s) and constraint(s) and solve the the
resulting system of equations.
1. Define Analysis Type
{
Ensure that a Static Analysis will be performed (Solution > New Analysis).
(Alternatively, the command line code for the above step is
ANTYPE,0
)
2. Apply Constraints
As shown previously, the left end of the plate is fixed.
{
In the Solution > (-Loads-) Apply > (-Structural-) Displacement > 'On Lines'
{
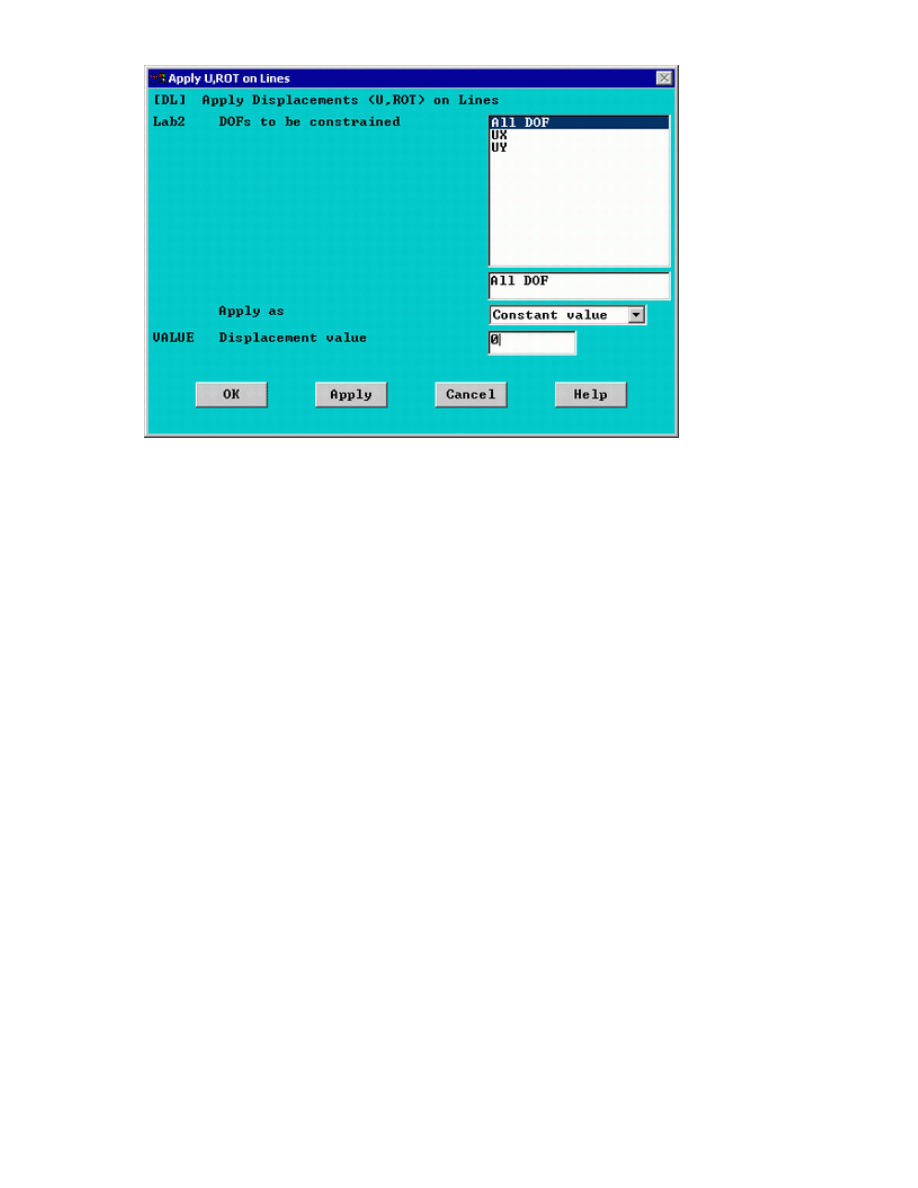
Select the left end of the plate and click on 'Apply' in the 'Apply U,ROT on Lines' window.
{
Fill in the window as shown below.
University of Alberta ANSYS Tutorials - www.mece.ualberta.ca/tutorials/ansys/BT/Bracket/Bracket.html
Copyright © 2001 University of Alberta
{
This location is fixed which means that all DOF's are constrained. Therefore, select 'All DOF' by
clicking on it and enter '0' in the Value field as shown above.
You will see some blue triangles in the graphics window indicating the displacement contraints.
(Alternatively, the command line code for the above step is
DL,4,,ALL,0
)
3. Apply Loads
{
As shown in the diagram, there is a load of 20N/mm distributed on the right hand side of the plate.
To apply this load:
Solution > (-Loads-) Apply > (-Structural-) Pressure > On Lines
{
When the window appears, select the line along the right hand edge of the plate and click 'OK'
{
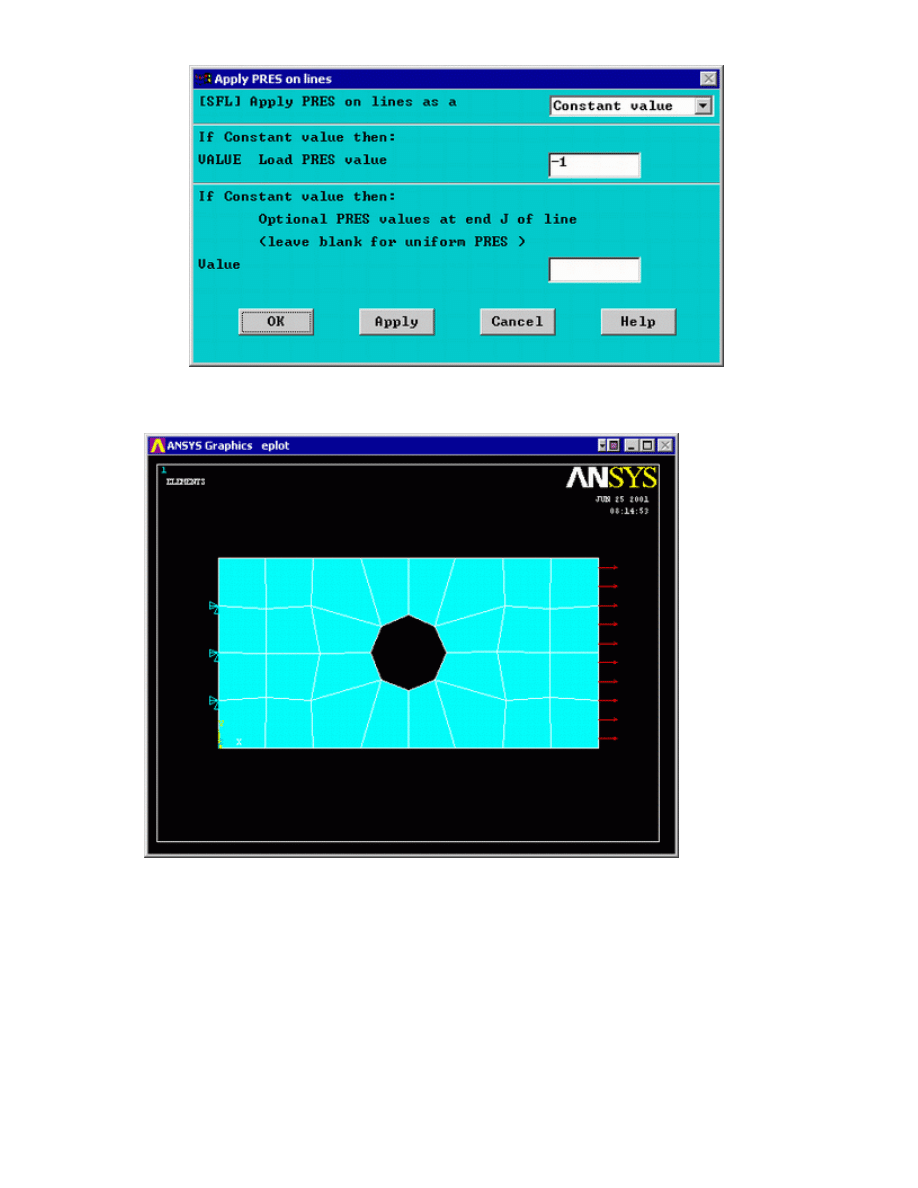
Calculate the pressure on the plate end by dividing the distributed load by the thickness of the plate
(1 MPa).
{
Fill in the "Apply PRES on lines" window as shown below. NOTE:
The pressure is uniform along the surface of the plate, therefore the last field is left blank.
The pressure is acting away from the surface of the plate, and is therefore defined as a
negative pressure.
University of Alberta ANSYS Tutorials - www.mece.ualberta.ca/tutorials/ansys/BT/Bracket/Bracket.html
Copyright © 2001 University of Alberta
The applied loads and constraints should now appear as shown below.
4. Solving the System
Solution > (-Solve-) Current LS
Postprocessing: Viewing the Results
1. Hand Calculations
Now, since the purpose of this exercise was to verify the results - we need to calculate what we should
find.
Deflection: The maximum deflection occurs on the right hand side of the plate and was calculated to be
0.001 mm - neglecting the effects of the hole in the plate (ie - just a flat plate). The actual deflection of
University of Alberta ANSYS Tutorials - www.mece.ualberta.ca/tutorials/ansys/BT/Bracket/Bracket.html
Copyright © 2001 University of Alberta
the plate is therefore expected to be greater but in the same range of magnitude.
Stress: The maximum stress occurs at the top and bottom of the hole in the plate and was found to be 3.9
MPa.
2. Convergence using ANSYS
At this point we need to find whether or not the final result has converged. We will do this by looking at
the deflection and stress at particular nodes while changing the size of the meshing element.
Since we have an analytical solution for the maximum stress point, we will check the stress at this
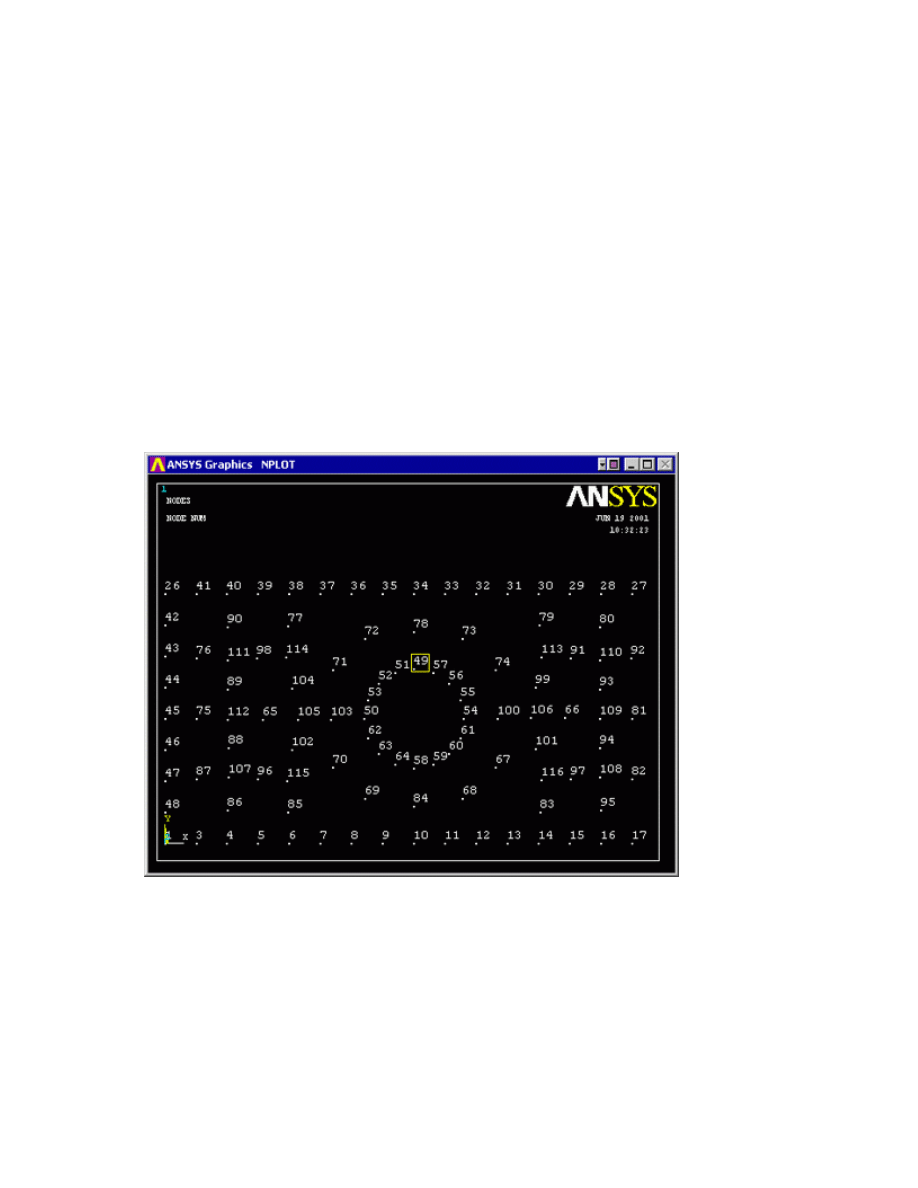
point. First we need to find the node corresponding to the top of the hole in the plate. First plot and
number the nodes
Utility Menu > Plot > Nodes
Utility Menu > PlotCtrls > Numbering...
{
The plot should look similar to the one shown below. Make a note of the node closest to the top of
the circle (ie. #49)
{
List the stresses (General Postproc > List Results > Nodal Solution > Stress, Principals SPRIN)
and check the SEQV (Equivalent Stress / von Mises Stress) for the node in question. (as shown
below in red)
University of Alberta ANSYS Tutorials - www.mece.ualberta.ca/tutorials/ansys/BT/Bracket/Bracket.html
Copyright © 2001 University of Alberta
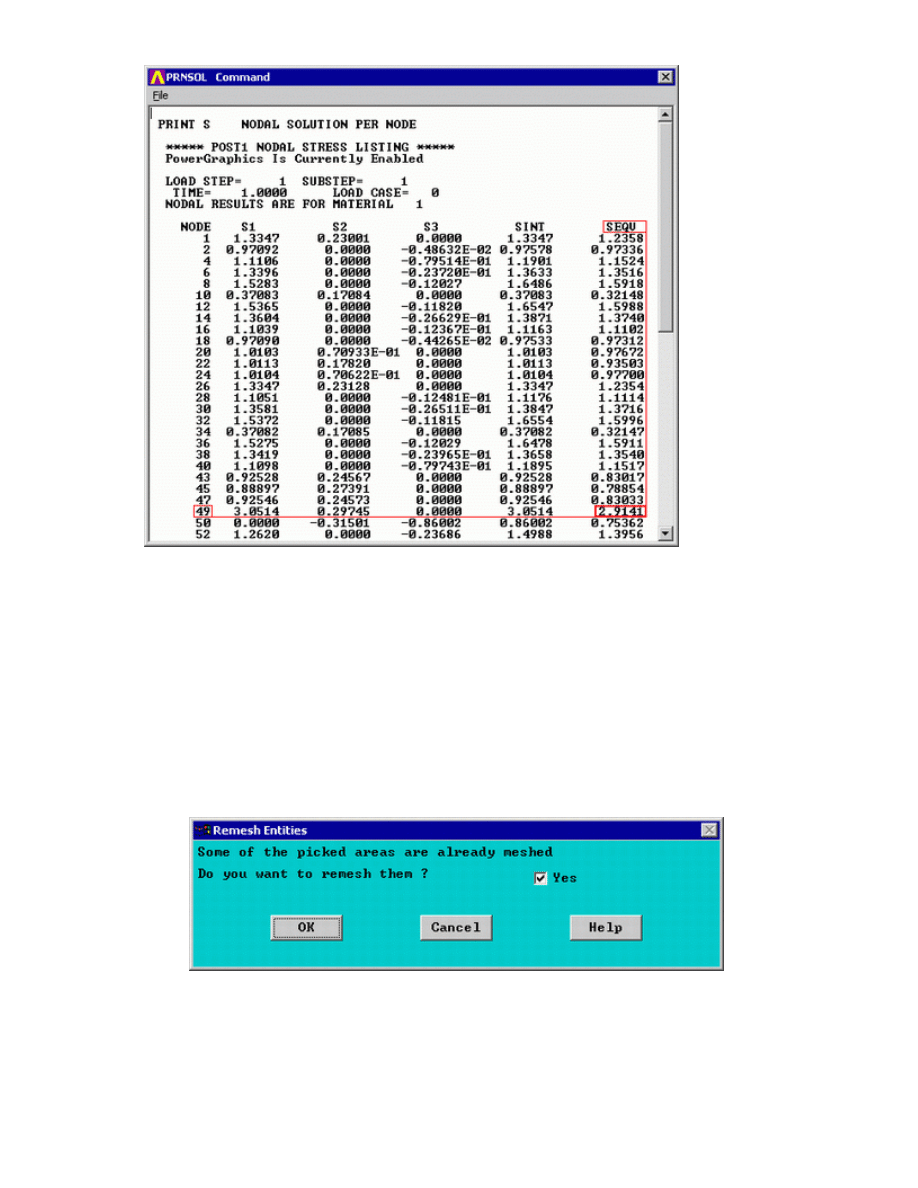
The equivalent stress was found to be
2.9141 MPa
at this point. We will use smaller elements to try
to get a more accurate solution.
{
Resize Elements
a. To change the element size, we need to go back to the Preprocessor Menu
Preprocessor > (-Meshing-) Size Cntrls > All Areas
now decrease the element edge length (ie 20)
b. Now remesh the model (Preprocessor > Mesh > (-Areas-) Free). Once you have selected
the area and clicked 'OK' the following window will appear:
c. Click 'OK'. This will remesh the model using the new element edge length.
d. Solve the system again (note that the constraints need not be reapplied). ( Solution Menu >
Current LS )
{
Repeat steps 'a' through 'd' until the model has converged. (note - the number of the node at the top
University of Alberta ANSYS Tutorials - www.mece.ualberta.ca/tutorials/ansys/BT/Bracket/Bracket.html
Copyright © 2001 University of Alberta
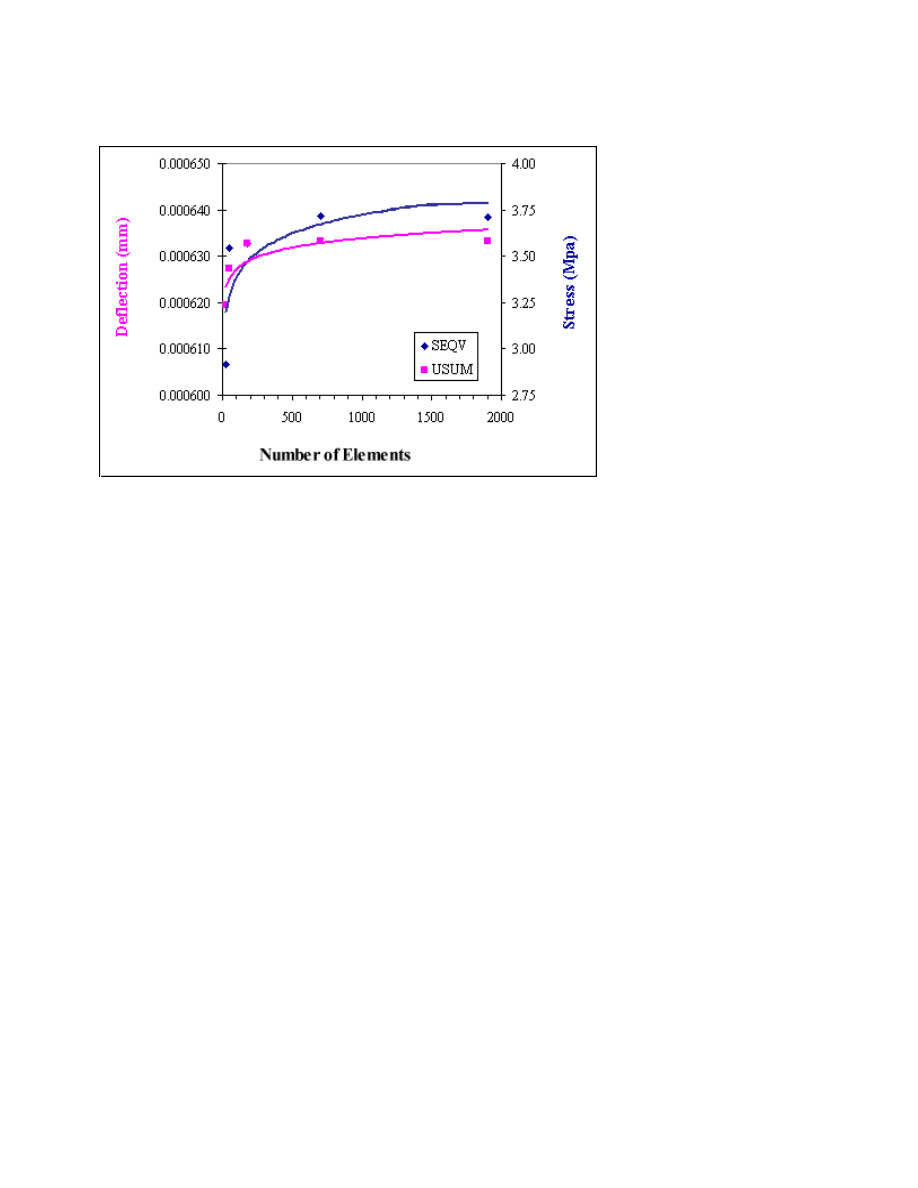
of the hole has most likely changed. It is essential that you plot the nodes again to select the
appropriate node). Plot the stress/deflection at varying mesh sizes as shown below to confirm that
convergence has occured.
Note the shapes of both the deflection and stress curves. As the number of elements in the mesh increases
(ie - the element edge length decreases), the values converge towards a final solution.
The von Mises stress at the top of the hole in the plate was found to be approximatly 3.8 MPa. This is a
mere 2.5% difference between the analytical solution and the solution found using ANSYS.
The approximate maximum displacement was found to be 0.0012 mm, this is 20% greater than the
analytical solution. However, the analytical solution does not account for the large hole in the center of
the plate which was expected to significantly increase the deflection at the end of the plate.
Therefore, the results using ANSYS were determined to be appropriate for the verification model.
3. Deformation
{
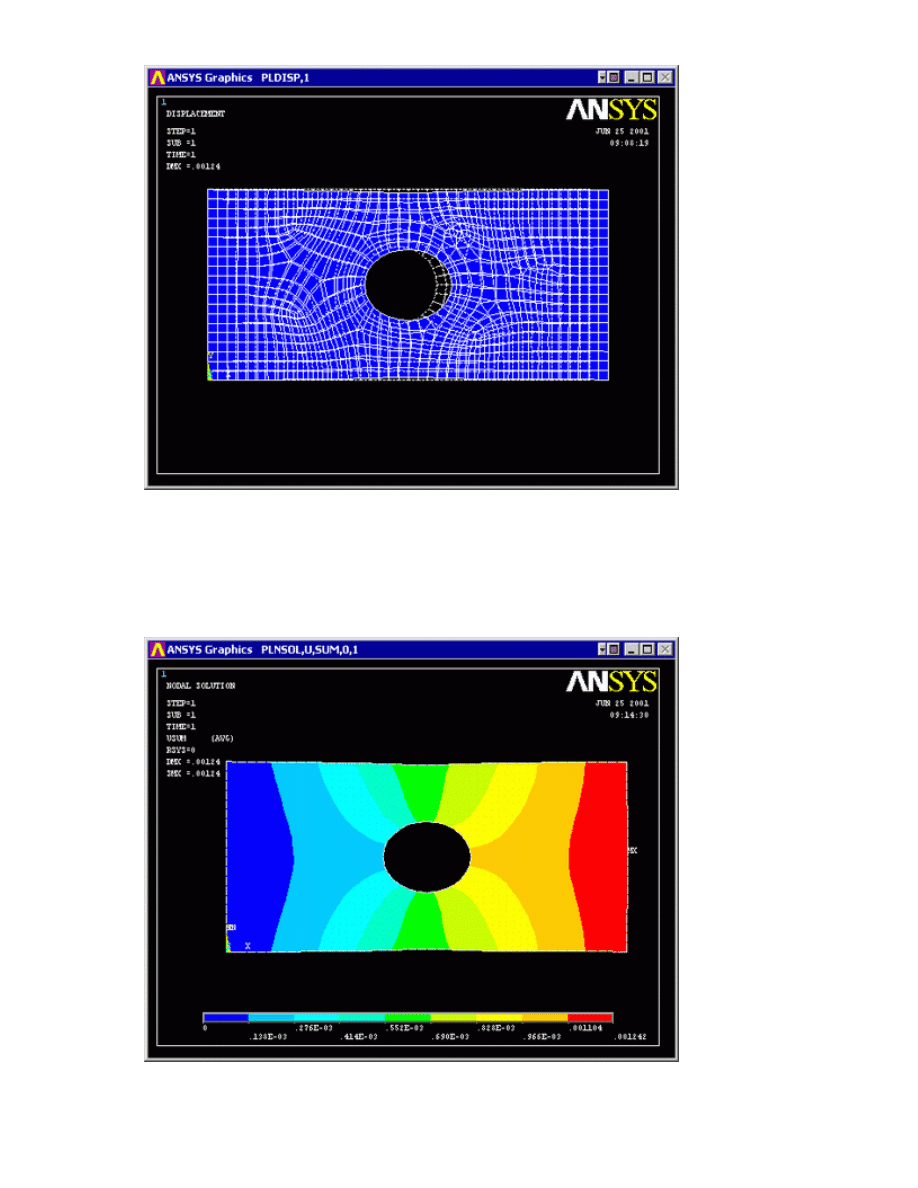
General Postproc > Plot Results > Deformed Shape > Def + undeformd to view both the
deformed and the undeformed object.
University of Alberta ANSYS Tutorials - www.mece.ualberta.ca/tutorials/ansys/BT/Bracket/Bracket.html
Copyright © 2001 University of Alberta
{
Observe the locations of deflection.
4. Deflection
{
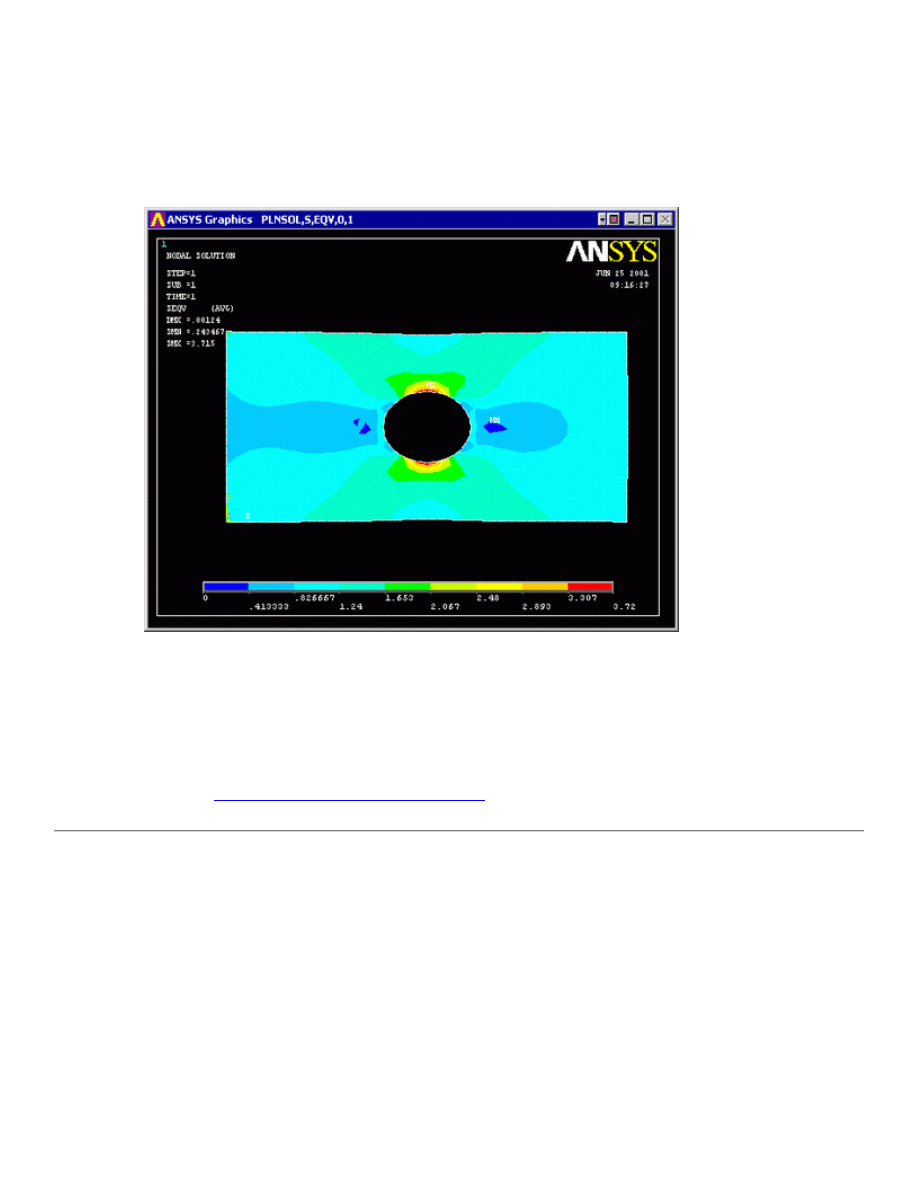
General Postproc > Plot Results > Nodal Solution... Then select DOF solution, USUM in the
window.
{
Alternatively, obtain these results as a list. (General Postproc > List Results > Nodal Solution...)
University of Alberta ANSYS Tutorials - www.mece.ualberta.ca/tutorials/ansys/BT/Bracket/Bracket.html
Copyright © 2001 University of Alberta
{
Are these results what you expected? Note that all translational degrees of freedom were
constrained to zero at the left end of the plate.
5. Stresses
{
General Postproc > Plot Results > Nodal Solution... Then select Stress, von Mises in the
window.
{
You can list the von Mises stresses to verify the results at certain nodes
General Postproc > List Results. Select Stress, Principals SPRIN
Command File Mode of Solution
The above example was solved using the Graphical User Interface (or GUI) of ANSYS. This problem has also
been solved using the
ANSYS command language interface
that you may want to browse. Open the file and
save it to your computer. Now go to File > Read input from... and select the file.
Bracket Example
Now we will return to the analysis of the bracket. A combination of GUI and the Command line will be used for
this example.
The problem to be modeled in this example is a simple bracket shown in the following figure. This bracket is to
be built from a 20 mm thick steel plate. A figure of the plate is shown below.
University of Alberta ANSYS Tutorials - www.mece.ualberta.ca/tutorials/ansys/BT/Bracket/Bracket.html
Copyright © 2001 University of Alberta
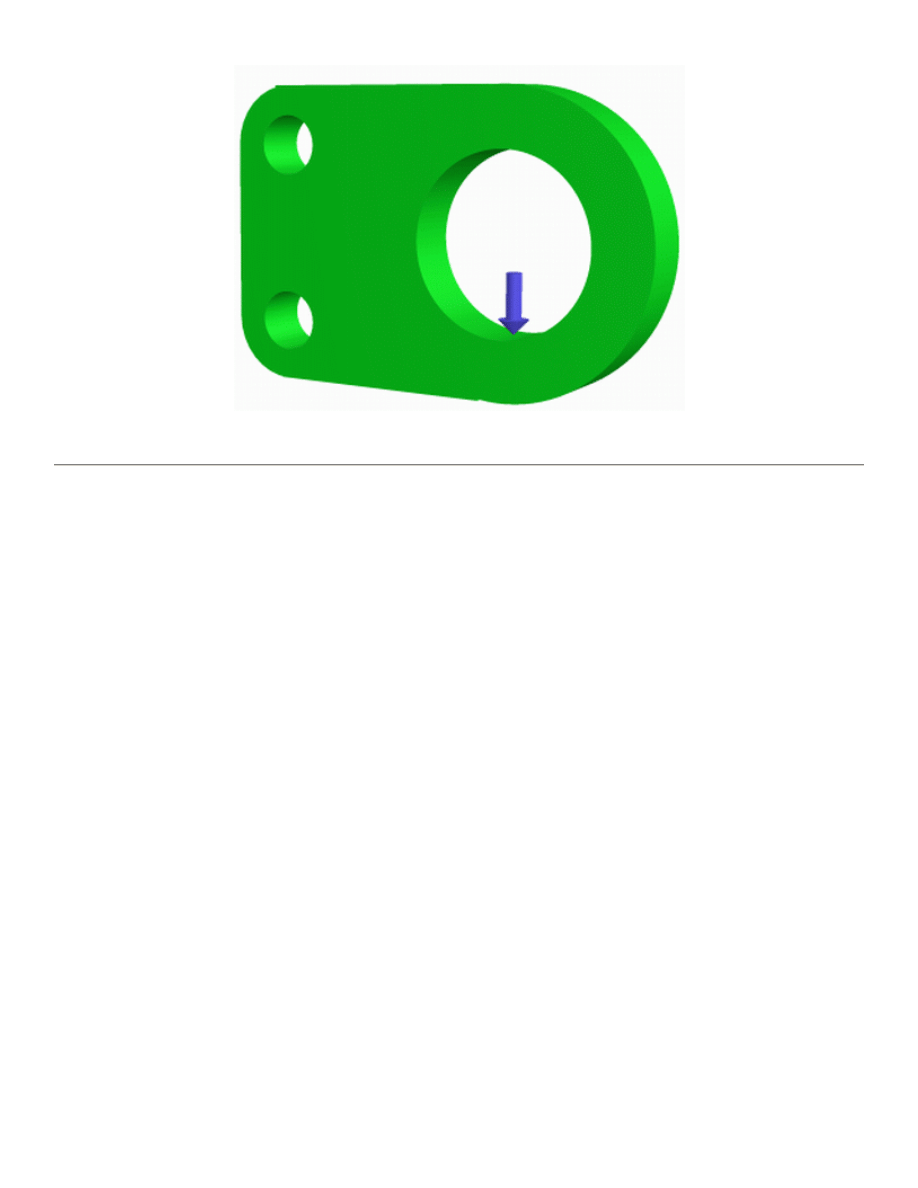
This plate will be fixed at the two small holes on the left and have a load applied to the larger hole on the right.
Preprocessing: Defining the Problem
1. Give the Bracket example a Title
Utility Menu > File > Change Title
2. Form Geometry
Again, Boolean operations will be used to create the basic geometry of the Bracket.
a. Create the main rectangular shape
The main rectangular shape has a width of 80 mm, a height of 100mm and the bottom left corner is
located at coordinates (0,0)
Ensure that the Preprocessor menu is open. (Alternatively type
/PREP7
into the command
line window)
Now instead of using the GUI window we are going to enter code into the 'command line'.
Now I will explain the line required to create a rectangle:
BLC4, XCORNER, YCORNER, WIDTH, HEIGHT
BLC4, X coord (bottom left), Y coord (bottom left), width, height
Therefore, the command line for this rectangle is
BLC4,0,0,80,100
b. Create the circular end on the right hand side
The center of the circle is located at (80,50) and has a radius of 50 mm
The following code is used to create a circular area:
University of Alberta ANSYS Tutorials - www.mece.ualberta.ca/tutorials/ansys/BT/Bracket/Bracket.html
Copyright © 2001 University of Alberta
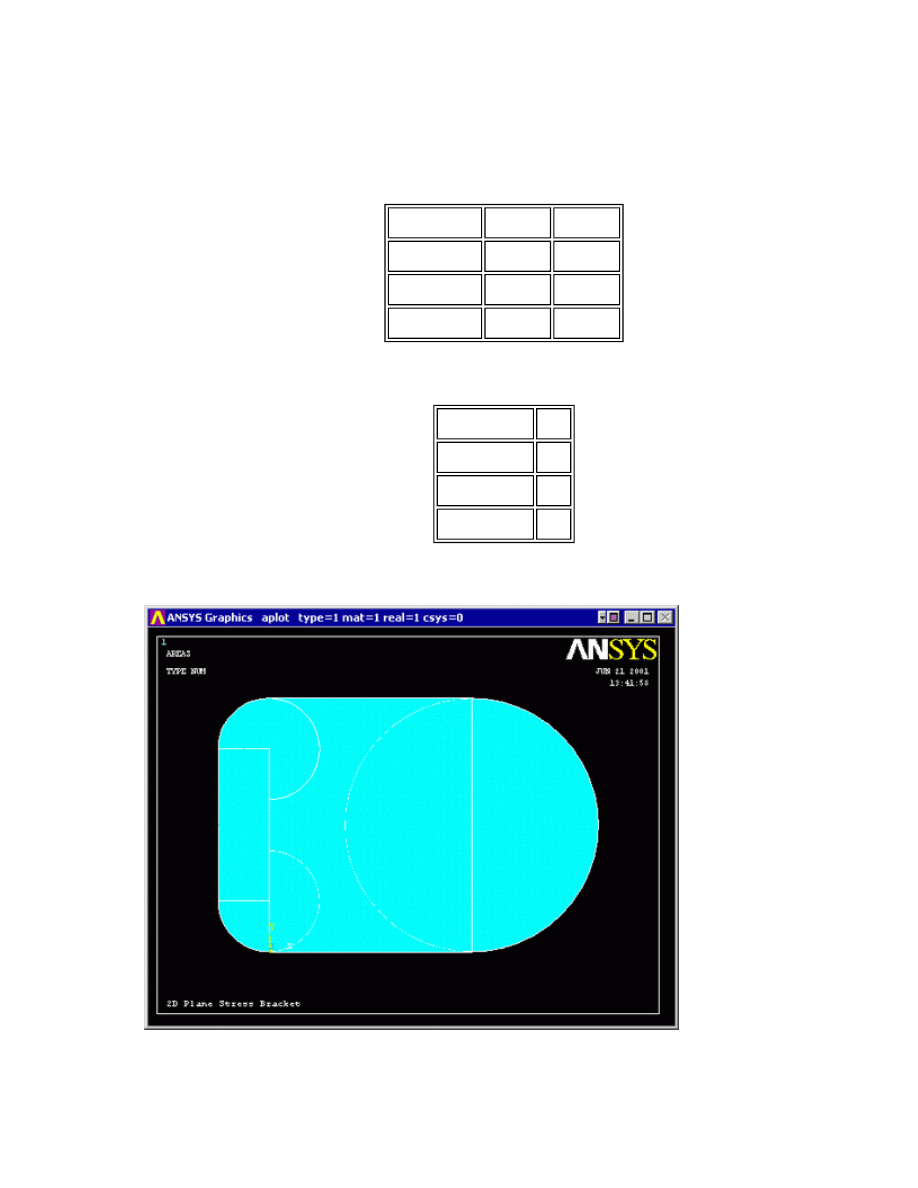
CYL4, XCENTER, YCENTER, RAD1
CYL4, X coord for the center, Y coord for the center, radius
Therefore, the command line for this circle is
CYL4,80,50,50
c. Now create a second and third circle for the left hand side using the following dimensions:
d. Create a rectangle on the left hand end to fill the gap between the two small circles.
Your screen should now look like the following...
e. Boolean Operations - Addition
We now want to add these five discrete areas together to form one area.
parameter circle 2 circle 3
XCENTER 0
0
YCENTER 20
80
RADIUS
20
20
XCORNER -20
YCORNER 20
WIDTH
20
HEIGHT
60
University of Alberta ANSYS Tutorials - www.mece.ualberta.ca/tutorials/ansys/BT/Bracket/Bracket.html
Copyright © 2001 University of Alberta
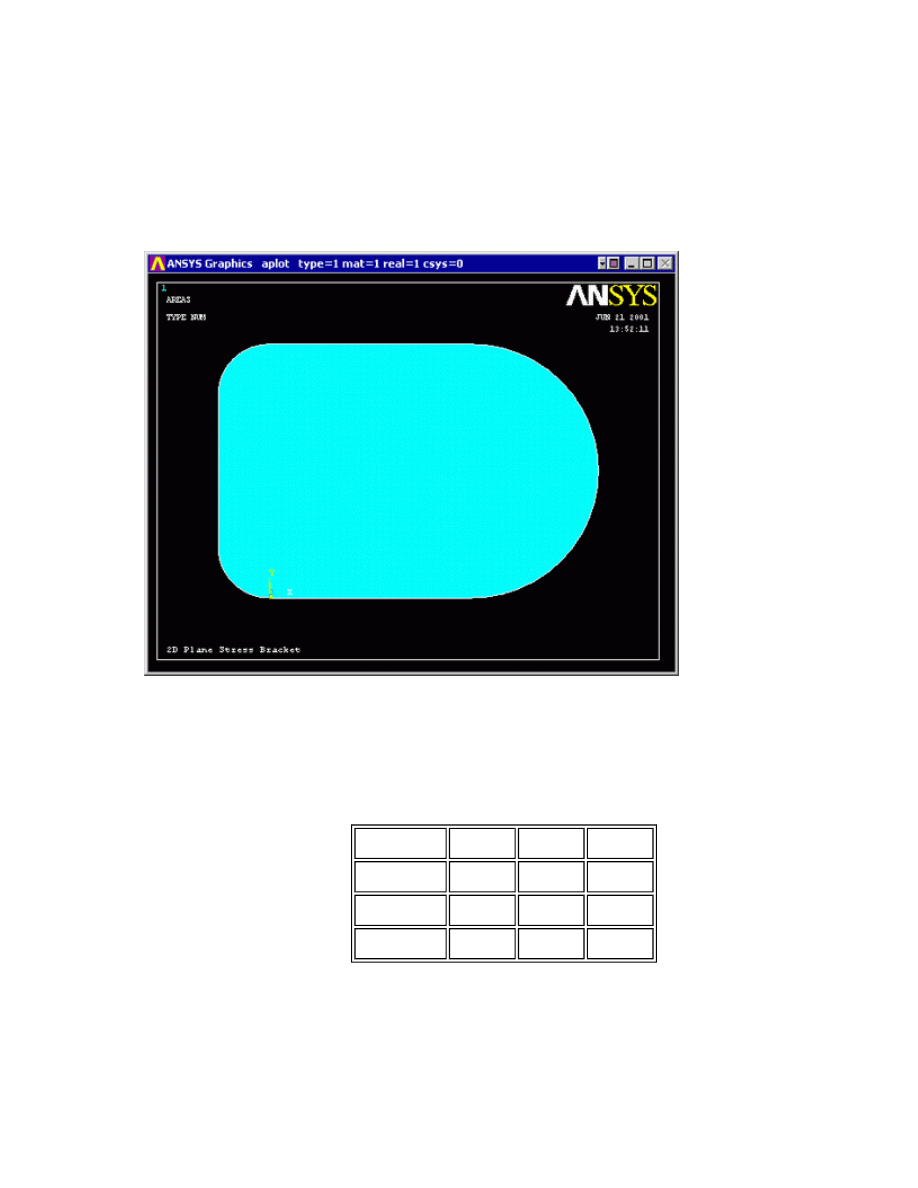
To perform the Boolean operation, from the Preprocessor menu select:
Operate > -Booleans- Add > Areas >
In the 'Add Areas' window, click on 'Pick All'
(Alternatively, the command line code for the above step is
AADD,ALL
)
You should now have the following model:
f. Create the Bolt Holes
We now want to remove the bolt holes from this plate.
Create the three circles with the parameters given below:
Now select
Preprocessor > (-Modeling-) Operate > (-Booleans-) Subtract > Areas
.
Select the base areas from which to subract (the large plate that was created)
Next select the three circles that we just created. Click on the three circles that you just
parameter circle 1 circle 2 circle 3
WP X
80
0
0
WP Y
50
20
80
radius
30
10
10
University of Alberta ANSYS Tutorials - www.mece.ualberta.ca/tutorials/ansys/BT/Bracket/Bracket.html
Copyright © 2001 University of Alberta
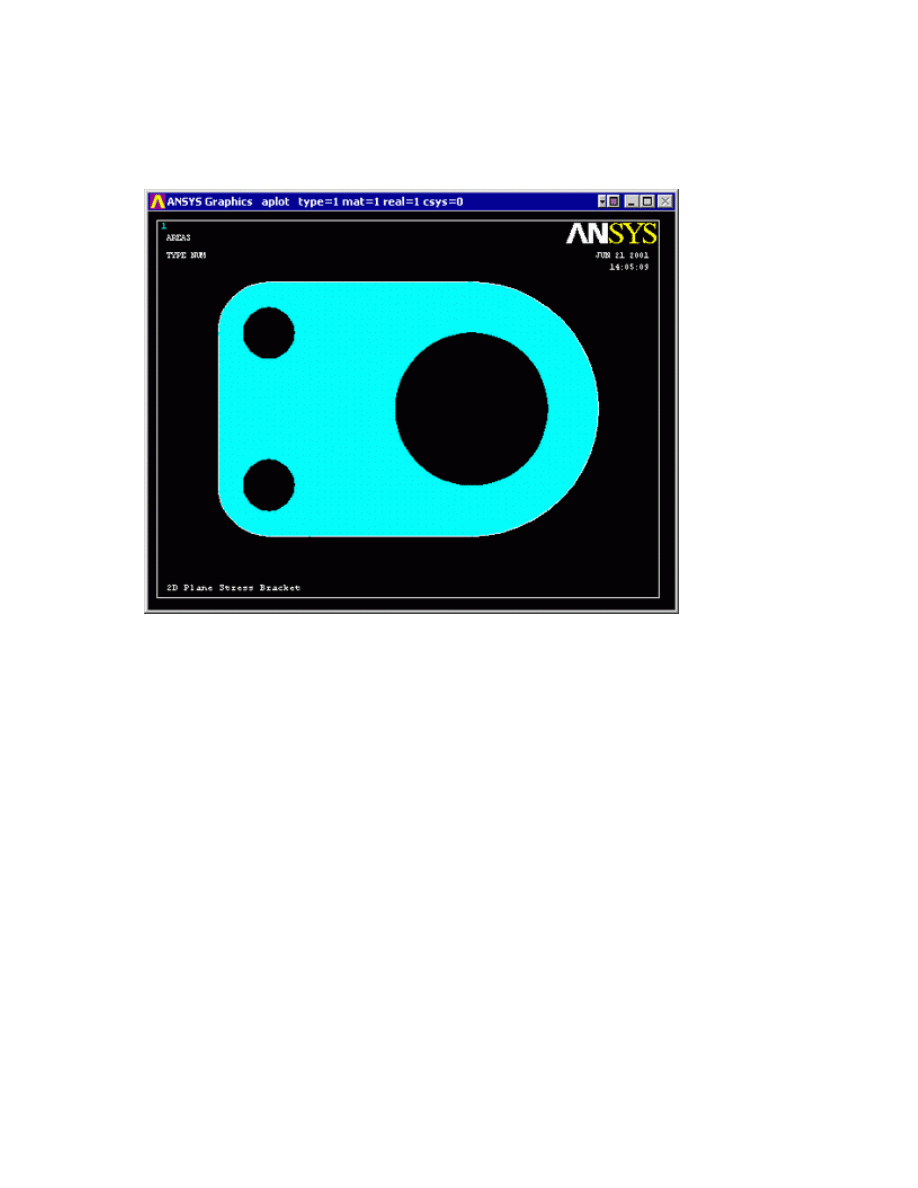
created and click 'OK'.
(Alternatively, the command line code for the above step is
ASBA,6,ALL
)
Now you should have the following:
3. Define the Type of Element
As in the verification model, PLANE82 will be used for this example
{
Preprocessor > Element Type > Add/Edit/Delete
{
Use the 'Options...' button to get a plane stress element with thickness
(Alternatively, the command line code for the above step is
ET,1,PLANE82
followed by
KEYOPT,1,3,3
)
{
Under the
Extra Element Output K5
select
nodal stress
.
4. Define Geometric Contants
{
Preprocessor > Real Constants > Add/Edit/Delete
{
Enter a thickness of 20mm.
(Alternatively, the command line code for the above step is
R,1,20
)
5. Element Material Properties
University of Alberta ANSYS Tutorials - www.mece.ualberta.ca/tutorials/ansys/BT/Bracket/Bracket.html
Copyright © 2001 University of Alberta
{
Preprocessor > Material Props > Material Library > Structural > Linear > Elastic > Isotropic
We are going to give the properties of Steel. Enter the following when prompted:
(The command line code for the above step is
MP,EX,1,200000
followed by
MP,PRXY,1,0.3
)
6. Mesh Size
{
Preprocessor > (-Meshing-) Size Cntrls > (-Areas-) All Areas
{
Select an element edge length of 5. Again, we will need to make sure the model has converged.
(Alternatively, the command line code for the above step is
AESIZE,ALL,5,
)
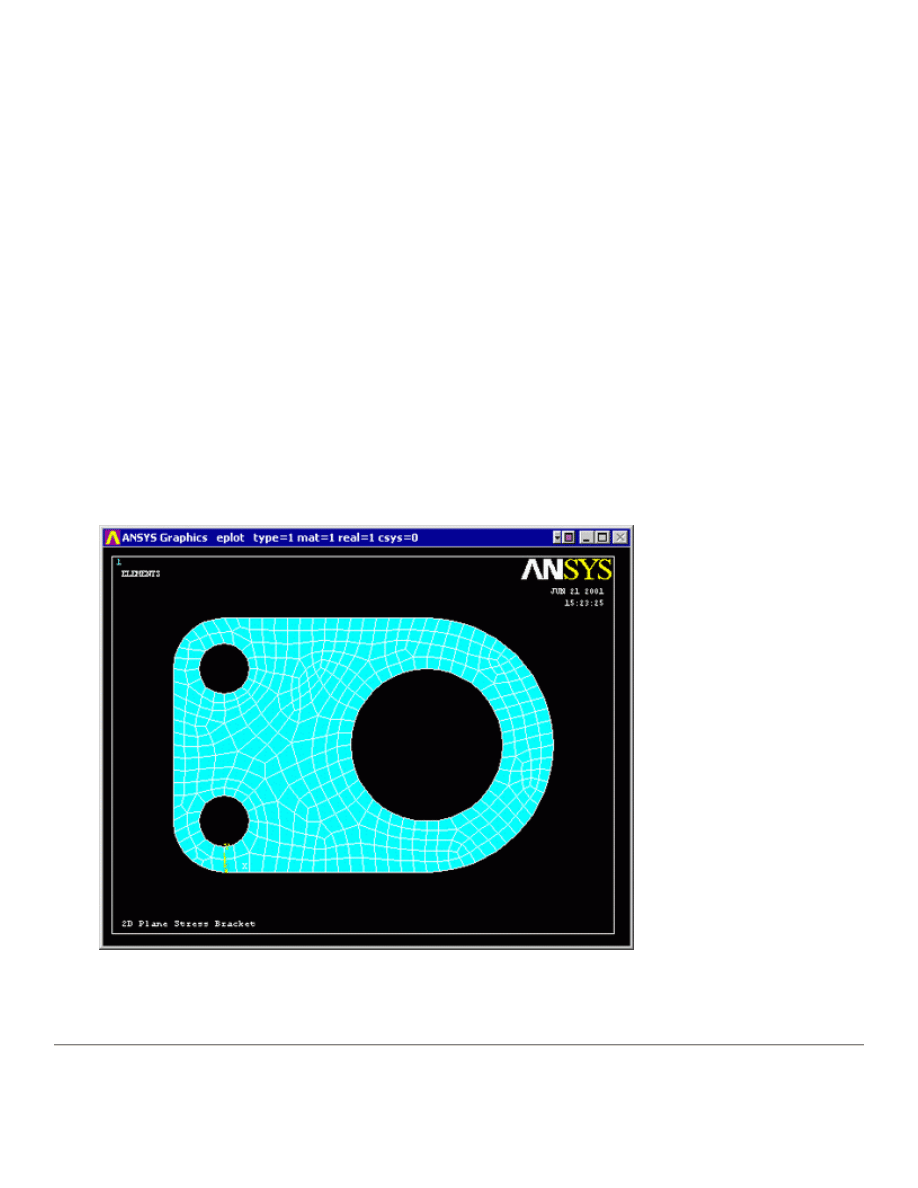
7. Mesh
{
'Preprocessor' > 'Mesh' > (-Areas-) 'Free' and select the area when prompted
(Alternatively, the command line code for the above step is
AMESH,ALL
)
Saving Your Job
Utility Menu > File > Save as...
Solution Phase: Assigning Loads and Solving
EX 200000
PRXY 0.3
University of Alberta ANSYS Tutorials - www.mece.ualberta.ca/tutorials/ansys/BT/Bracket/Bracket.html
Copyright © 2001 University of Alberta
You have now defined your model. It is now time to apply the load(s) and constraint(s) and solve the the
resulting system of equations.
1. Define Analysis Type
{
'Solution' > 'New Analysis' and select 'Static'.
(Alternatively, the command line code for the above step is
ANTYPE,0
)
2. Apply Constraints
As illustrated, the plate is fixed at both of the smaller holes on the left hand side.
{
Solution > (-Loads-) Apply > (-Structural-) Displacement > On Nodes
{
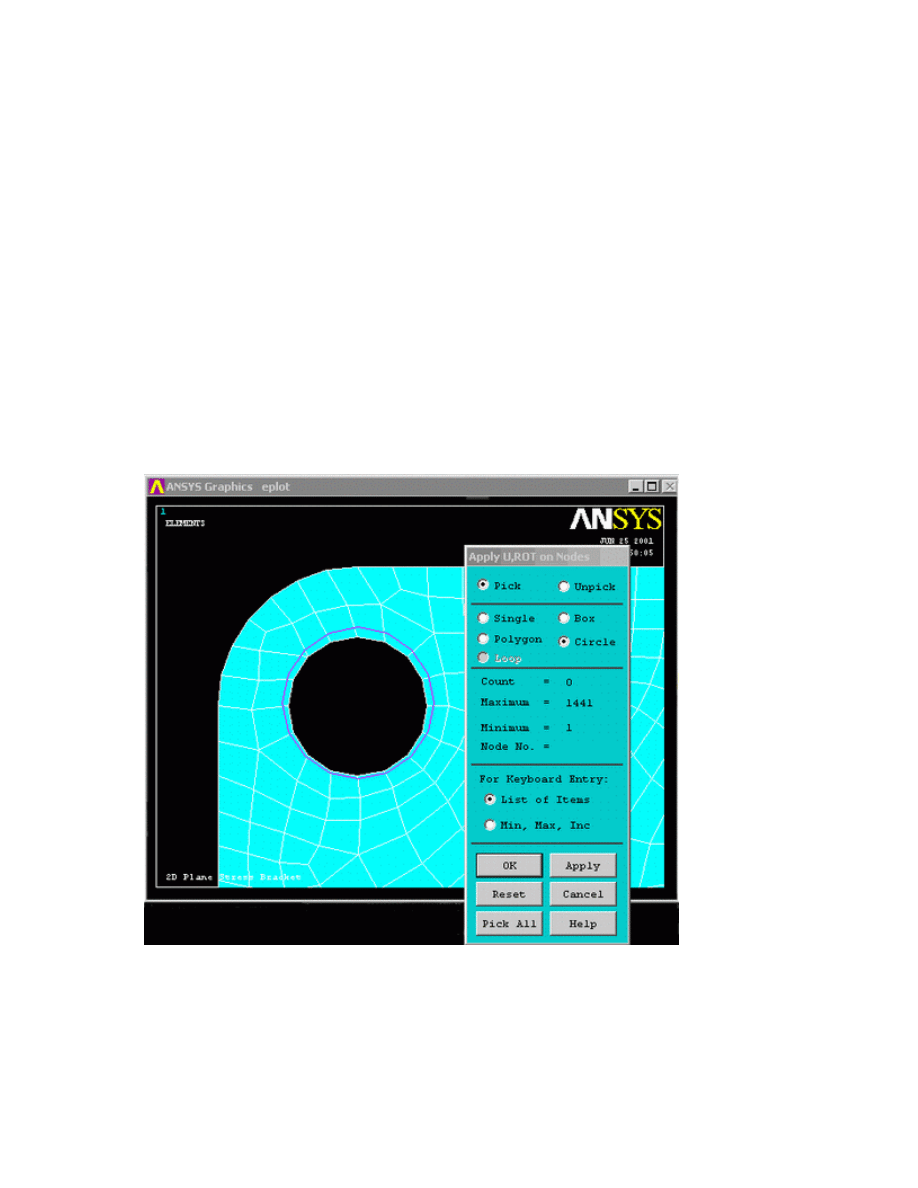
Instead of selecting one node at a time, you have the option of creating a box, polygon, or circle of
which all the nodes in that area will be selected. For this case, select 'circle' as shown in the window
below. (You may want to zoom in to select the points Utilty Menu / PlotCtrls / Pan, Zoom,
Rotate...) Click at the center of the bolt hole and drag the circle out so that it touches all of the
nodes on the border of the hole.
{
Click on 'Apply' in the 'Apply U,ROT on Lines' window and constrain all DOF's in the 'Apply
U,ROT on Nodes' window.
{
Repeat for the second bolt hole.
3. Apply Loads
University of Alberta ANSYS Tutorials - www.mece.ualberta.ca/tutorials/ansys/BT/Bracket/Bracket.html
Copyright © 2001 University of Alberta
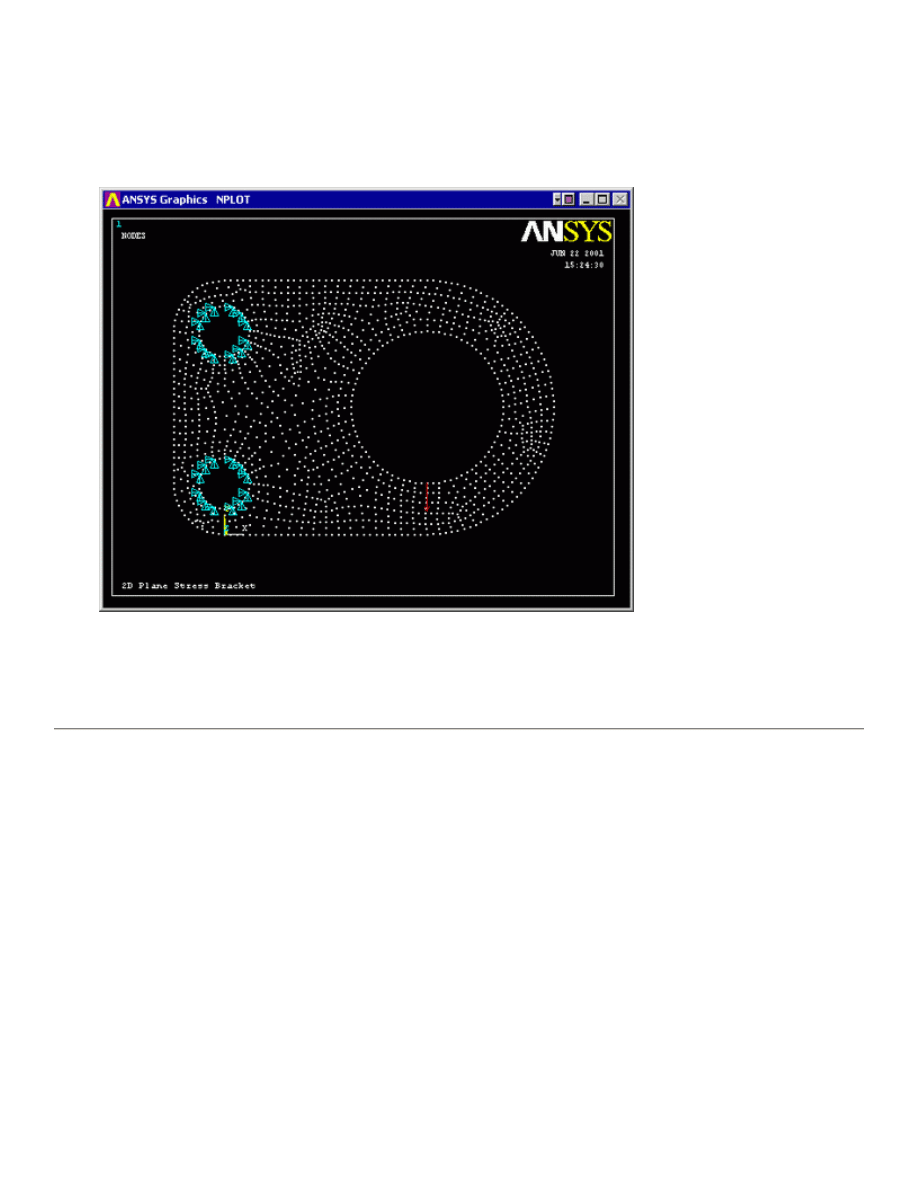
As shown in the diagram, there is a single vertical load of 1000N, at the bottom of the large bolt hole.
Apply this force to the respective keypoint ( Solution > (-Loads-) Apply > (-Structural-)
Force/Moment > On Keypoints Select a force in the y direction of -1000)
The applied loads and constraints should now appear as shown below.
4. Solving the System
Solution > (-Solve-) Current LS
Post-Processing: Viewing the Results
We are now ready to view the results. We will take a look at the deflected shape and the stress contours once we
determine convergence has occured.
1. Convergence using ANSYS
At this point we need to find whether or not the final result has converged. Because we cannot
solve for a solution analytically, we must try to
2. Deformation
{
General Postproc > Plot Results > Def + undeformed to view both the deformed and the
undeformed object.
The graphic should be similar to the following
University of Alberta ANSYS Tutorials - www.mece.ualberta.ca/tutorials/ansys/BT/Bracket/Bracket.html
Copyright © 2001 University of Alberta
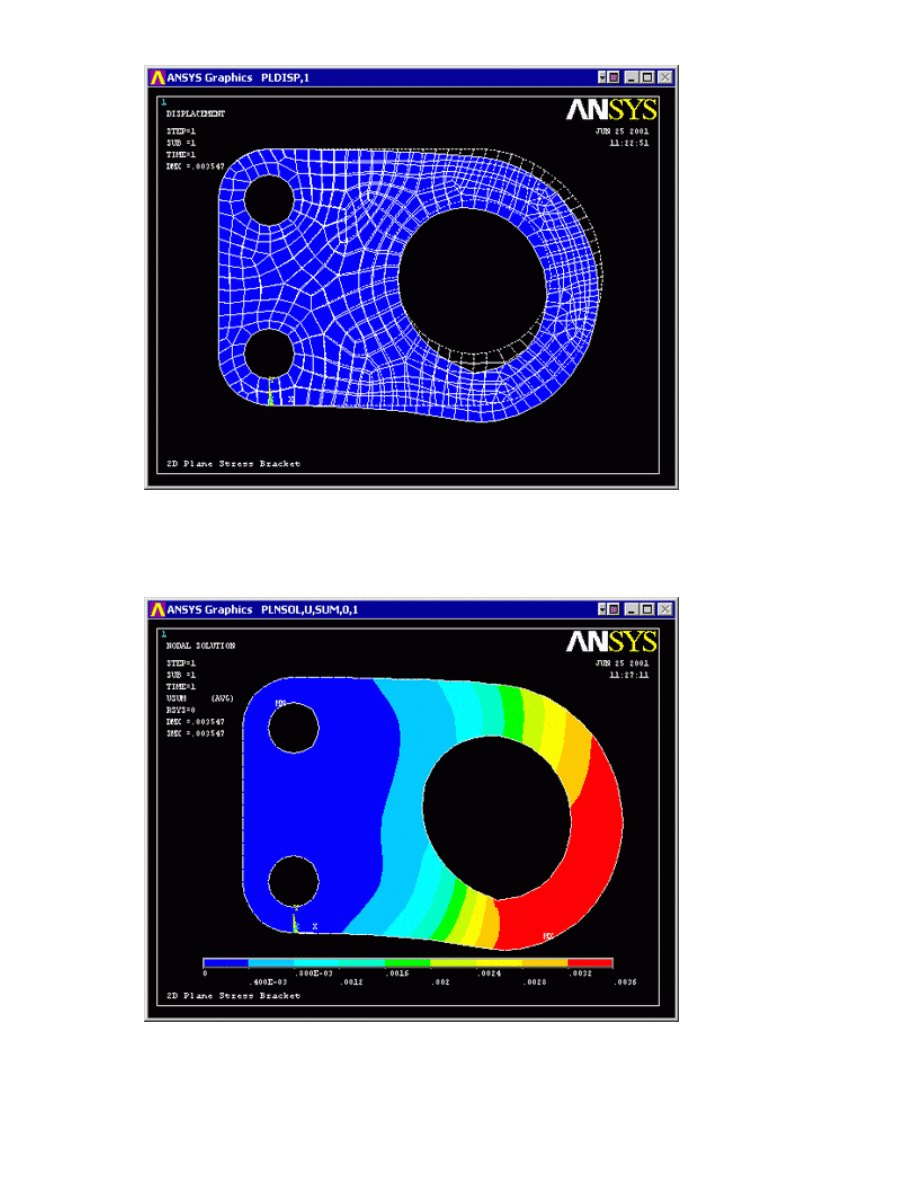
{
Observe the locations of deflection. Ensure that the deflection at the bolt hole is indeed 0.
3. Deflection
{
Alternatively, obtain these results as a list. (General Postproc > List Results > Nodal Solution...)
{
Are these results what you expected? Note that all translational degrees of freedom were
constrained to zero at the bolt holes.
University of Alberta ANSYS Tutorials - www.mece.ualberta.ca/tutorials/ansys/BT/Bracket/Bracket.html
Copyright © 2001 University of Alberta
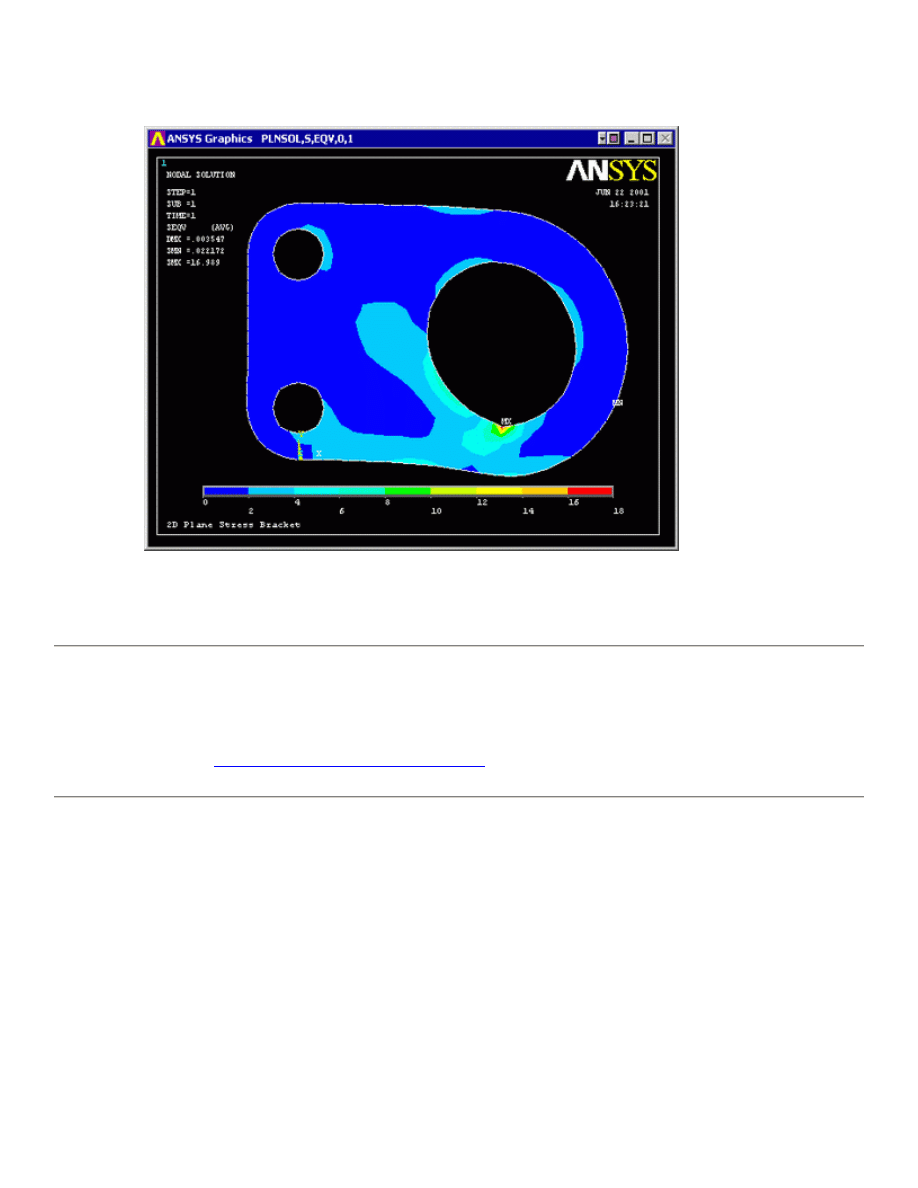
4. Stresses
{
General Postproc > Plot Results > Nodal Solution... Then select von Mises Stress in the window.
{
You can list the von Mises stresses to verify the results at certain nodes
General Postproc > List Results. Select Stress, Principals SPRIN
Command File Mode of Solution
The above example was solved using the Graphical User Interface (or GUI) of ANSYS. This problem has also
been solved using the
ANSYS command language interface
that you may want to browse. Open the file and
save it to your computer. Now go to 'File > Read input from...' and select the file.
Quitting ANSYS
To quit ANSYS, click 'QUIT' on the ANSYS Toolbar or select Utility Menu > File > Exit... In the window that
appears, select 'Save Everything' (assuming that you want to) and then click 'OK'.
University of Alberta ANSYS Tutorials - www.mece.ualberta.ca/tutorials/ansys/BT/Bracket/Bracket.html
Copyright © 2001 University of Alberta
Wyszukiwarka
Podobne podstrony:
3 Plane Stress Bracket
Ch18 Stress Calculations
Funkcja PLANE
Akin, Iskender (2011) Internet addiction and depression, anxiety and stress
rozprawka stress
Stress
111003105109 stress
STRESS LETTER 2005
Almost everybody suffers from stress in everyday life rozprawka
2D Analysis of an Aluminum Bracket
FM 6 22 5 Combat Stress
stress
STRESS a ZACHOWANIE
Lumiste Betweenness plane geometry and its relationship with convex linear and projective plane geo
Genetics of Posttraumatic Stress Disorder
PLANES tube Plane
L7 Stress constitutive relation
Stress USA
więcej podobnych podstron