W
henever clients want cabinets to look original
to a late-19th- or early-20th-century-style
home, I use this finish. I have borrowed
techniques from two well-known finishers to
create a period look. While the five steps to
this Arts and Crafts finish may seem daunting,
the execution is actually quite painless.
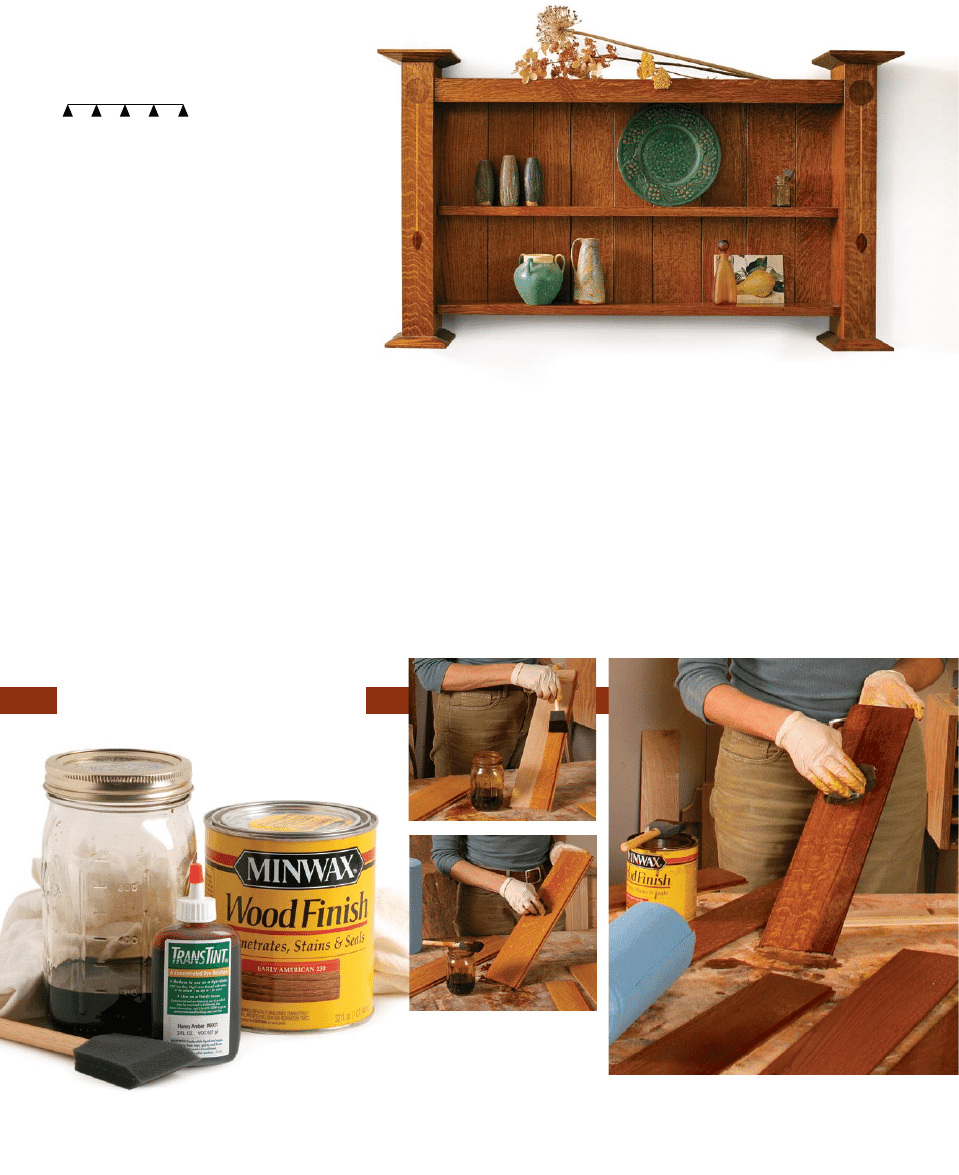
Dye and stain increase color and contrast
Before applying any finish, sand all parts to P180-grit, then use
water to raise the grain and gently sand again with P180-grit.
Jeff Jewitt introduced me to using dyes under oil-based stains
to bring out the contrast between the basic grain and the ray-
fleck patterns of quartersawn oak (“Safe and Simple Arts and
Crafts Finish,” FWW #157, pp. 42-45).
First, dye the oak with a water-based dye solution (I use
TransTint’s honey amber, dissolved in water at the ratio of
1 oz. to 1 qt.), applying it quickly and liberally with a foam
brush and wiping off the excess with a lint-free cloth. During
this step and the next (depending on the woods used), it may
be necessary to block out and/or stain the inlay to maintain
contrast. In this case, I carefully placed a sealer coat of clear
shellac over the inlay after it had been glued in place and
sanded, but before applying the amber dye. To knock back any
raised grain, lightly sand with P320-grit paper.
Next, use an oil-based stain (in this case, Minwax’s Early
American) to bring out the wood’s full figure. Apply the stain
generously using a foam brush and leave it on for 5 to 10
minutes. Wipe off any excess stain using a clean, lint-free
cloth and allow the piece to dry overnight. Make sure to check
Color the wood. Dyeing the wood
adds color without accentuating
the grain. Wipe off the excess
dye. The wood is dry enough for
the next step when a rag remains
clean and dry after rubbing.
Pop the grain. Brush on and then wipe off a stain
to enhance the grain and figure of the wood.
Apply the dye and stain
Original
Arts & Crafts
B Y N A N C Y H I L L E R
finish line
F I N E W o o D W o r k I N g
106
COPYRIGHT 2007 by The Taunton Press, Inc. Copying and distribution of this article is not permitted.
Imitate dirt buildup. Gel stain,
applied with a rag and allowed to set
10 minutes, ages the finish easily.
Wipe off excess gel stain. If
the stain sets too long, a rag with
paint thinner will return the stain
to a workable state.
Safeguard all the steps. Two coats of polyurethane seal and protect
the piece. Rub out the topcoat with steel wool and wax.
Seal in the dye and stain. With a fine-bristle brush, apply amber
shellac quickly in long strokes to avoid lap marks.
Seal, age, and topcoat
periodically for stain weeping out of the oak’s open pores,
removing any you find.
Seal in the previous steps with shellac
A professional floor finisher once advised me that I could get
an old look on pine floors by adding amber shellac. So once
the stain has dried, I brush on a thin coat of Zinsser’s premixed
amber shellac to achieve a look similar to the shellac-based
varnish that was used in many older houses. The shellac also
seals the piece before the aging steps. When the shellac has
dried, scuff-sand with P320-grit paper and wipe off the dust
with a tack cloth. Now you can judge the final tone of the finish
and fill any holes with matching wood putty. Scuff-sand again.
Simulate signs of aging
Teri Masaschi’s suggestion to use gel stain for shading (“Three
Finishes for Bird’s-Eye Maple,” FWW #163, pp. 44-47) enables
me to mimic signs of age without heavy-handed distressing, and
make built-ins look like part of the original fabric of the home.
Apply gel stain in a compatible color (for this application,
I used old Masters’ dark walnut) to areas where dirt would
typically have built up, such as joints, crevices, and around
hardware. Let the gel stain set for 10 minutes or so, then with a
lint-free cloth, gently rub and feather out the shading to create
a natural-looking patina. Allow the gel stain to dry overnight.
Two coats of oil-based polyurethane finish the piece. You can
follow it with a generous application of paste wax, applied with
0000 steel wool and buffed out with a soft, lint-free cloth.
•
COPYRIGHT 2007 by The Taunton Press, Inc. Copying and distribution of this article is not permitted.
Wyszukiwarka
Podobne podstrony:
Build an Arts and Crafts Bookcase
Arts and Crafts Chair
słowka 1, agricultural- rolniczy, arts and crafts- rękodzięło artystyczne, aspect- dziedzina, assemb
Arts and Crafts
Microteaching Katarzyna Piotrowska Arts and Crafts
an essay?out this and that 4N3M6QTFCETLGHNHFCD7NMYUIU5DWJRSCGSGEJY
Language Arts and Minifigs
WAHT DO INETROLCKS DO AN ANALYSIS CRITIQUE AND ASSESSMENT OF RESEARCH ON INTEROCKING DIRECTORATES
the massage an erotic massage and sex erotica story
An End Once and For All
Anshumana And Kalay Can Splits Create Market Liquidity Theory And Evidence
The story of an hour summary and analisisdocx
An Effective Architecture and Algorithm for Detecting Worms with Various Scan Techniques
integration and radiality measuring the extent of an individuals connectedness and reachability in a
Assessment of balance and risk for falls in a sample of community dwelling adults aged 65 and older
An Introduction to USA 7 American Culture and Arts
(CRAFTS) An Insider Look at Jewelry Making and Beading Chapter 1
54 Shooting and Finishing Progression 3 – A Variety of An
więcej podobnych podstron