
Jodi Biddle
Zac Dover
Red Hat Enterprise Virtualization
3.2
User Portal Guide
Accessing and Using Virtual Machines from the User Portal
Edition 1

Red Hat Enterprise Virtualization 3.2 User Portal Guide
Accessing and Using Virtual Machines from the User Portal
Edition 1
Jo di Biddle
jbiddle@redhat.co m
Zac Do ver
zdo ver@redhat.co m

Legal Notice
Copyright © 2013 Red Hat, Inc.
This document is licensed by Red Hat under the
Creative Commons Attribution-ShareAlike 3.0 Unported
. If you distribute this document, or a modified version of it, you must provide attribution to Red
Hat, Inc. and provide a link to the original. If the document is modified, all Red Hat trademarks must be
removed.
Red Hat, as the licensor of this document, waives the right to enforce, and agrees not to assert, Section
4d of CC-BY-SA to the fullest extent permitted by applicable law.
Red Hat, Red Hat Enterprise Linux, the Shadowman logo, JBoss, MetaMatrix, Fedora, the Infinity Logo,
and RHCE are trademarks of Red Hat, Inc., registered in the United States and other countries.
Linux ® is the registered trademark of Linus Torvalds in the United States and other countries.
Java ® is a registered trademark of Oracle and/or its affiliates.
XFS ® is a trademark of Silicon Graphics International Corp. or its subsidiaries in the United States
and/or other countries.
MySQL ® is a registered trademark of MySQL AB in the United States, the European Union and other
countries.
Node.js ® is an official trademark of Joyent. Red Hat Software Collections is not formally related to or
endorsed by the official Joyent Node.js open source or commercial project.
The OpenStack ® Word Mark and OpenStack Logo are either registered trademarks/service marks or
trademarks/service marks of the OpenStack Foundation, in the United States and other countries and
are used with the OpenStack Foundation's permission. We are not affiliated with, endorsed or
sponsored by the OpenStack Foundation, or the OpenStack community.
All other trademarks are the property of their respective owners.
Abstract
This document shows you how to use virtual machines from the Red Hat Enterprise Virtualization User
Portal.

. . . . . . . . . . . . . . . . . . . . . . . . . . . . . . . . . . . . . . . . . . . . . . . . . . . . . . . . . . . . . . . . . . . . . . . . . . . . . . . . . . . . . . . . . . . . . . . . . . . . . . . . . . . . . . . . . . . . . . . . . . . . . . . . . . . . . . . . . . . . . . . . . . . . . . . . . . . . . . . . . . . . . . . . . . . . . . . . . . . . . . . . . . . . . . . . . . . . . . . . . . . . . . . . . . . . . . . . . . . . . . . . . . . . . . . . . . . . . . . . . . . . . . . . . . . . . . . . . . . . . . . . . . . . . . . . . . . . . . . .
. . . . . . . . . . . . . . . . . . . . . . . . . . . . . . . . . . . . . . . . . . . . . . . . . . . . . . . . . . . . . . . . . . . . . . . . . . . . . . . . . . . . . . . . . . . . . . . . . . . . . . . . . . . . . . . . . . . . . . . . . . . . . . . . . . . . . . . . . . . . . . . . . . . . . . . . . . . . . . . . . . . . . . . . . . . . . . . . . . . . . . . . . . . . . . . . . . . . . . . . . . . . . . . . . . . . . . . . . . . . . . . . . . . . . . . . . . . . . . . . . . . . . . . . . . . . . . . . . . . . . . . . . . . . . . . . . . . . . . . .
. . . . . . . . . . . . . . . . . . . . . . . . . . . . . . . . . . . . . . . . . . . . . . . . . . . . . . . . . . . . . . . . . . . . . . . . . . . . . . . . . . . . . . . . . . . . . . . . . . . . . . . . . . . . . . . . . . . . . . . . . . . . . . . . . . . . . . . . . . . . . . . . . . . . . . . . . . . . . . . . . . . . . . . . . . . . . . . . . . . . . . . . . . . . . . . . . . . . . . . . . . . . . . . . . . . . . . . . . . . . . . . . . . . . . . . . . . . . . . . . . . . . . . . . . . . . . . . . . . . . . . . . . . . . . . . . . . . . . . . .
. . . . . . . . . . . . . . . . . . . . . . . . . . . . . . . . . . . . . . . . . . . . . . . . . . . . . . . . . . . . . . . . . . . . . . . . . . . . . . . . . . . . . . . . . . . . . . . . . . . . . . . . . . . . . . . . . . . . . . . . . . . . . . . . . . . . . . . . . . . . . . . . . . . . . . . . . . . . . . . . . . . . . . . . . . . . . . . . . . . . . . . . . . . . . . . . . . . . . . . . . . . . . . . . . . . . . . . . . . . . . . . . . . . . . . . . . . . . . . . . . . . . . . . . . . . . . . . . . . . . . . . . . . . . . . . . . . . . . . . .
. . . . . . . . . . . . . . . . . . . . . . . . . . . . . . . . . . . . . . . . . . . . . . . . . . . . . . . . . . . . . . . . . . . . . . . . . . . . . . . . . . . . . . . . . . . . . . . . . . . . . . . . . . . . . . . . . . . . . . . . . . . . . . . . . . . . . . . . . . . . . . . . . . . . . . . . . . . . . . . . . . . . . . . . . . . . . . . . . . . . . . . . . . . . . . . . . . . . . . . . . . . . . . . . . . . . . . . . . . . . . . . . . . . . . . . . . . . . . . . . . . . . . . . . . . . . . . . . . . . . . . . . . . . . . . . . . . . . . . . .
. . . . . . . . . . . . . . . . . . . . . . . . . . . . . . . . . . . . . . . . . . . . . . . . . . . . . . . . . . . . . . . . . . . . . . . . . . . . . . . . . . . . . . . . . . . . . . . . . . . . . . . . . . . . . . . . . . . . . . . . . . . . . . . . . . . . . . . . . . . . . . . . . . . . . . . . . . . . . . . . . . . . . . . . . . . . . . . . . . . . . . . . . . . . . . . . . . . . . . . . . . . . . . . . . . . . . . . . . . . . . . . . . . . . . . . . . . . . . . . . . . . . . . . . . . . . . . . . . . . . . . . . . . . . . . . . . . . . . . . .
Table of Contents
1.1. Typographic Conventions
1.2. Pull-quote Conventions
1.3. Notes and Warnings
2. Getting Help and Giving Feedback
2.1. Do You Need Help?
2.2. We Need Feedback!
2.1. Logging in to the User Portal
2.2. Logging out of the User Portal
2.3. Logging in for the First Time
2.4. Installing the SPICE plug-in for Mozilla Firefox on Linux
2.5. Installing the SPICE ActiveX component for Internet Explorer on Windows
2.6. User Portal Graphical Interface
Chapter 3. Running Virtual Machines
3.1. Running Virtual Machines - Overview
3.2. Turning On a Virtual Machine
3.3. Connecting to a Powered-on Virtual Machine
3.4. Logging Out of a Virtual Machine
3.5. What To Do When You Exceed Your Quota
Chapter 4 . Using Virtual Machines: Advanced
4.1. Introduction to Connection Protocols
4.2. Configuring SPICE Console Options
4.3. Using SPICE Connection Options
4.4. SPICE Proxy
4.5. Enabling SPICE Proxy in the User Portal
4.6. Using USB Devices on Virtual Machines
4.7. Using USB Devices on Virtual Machines - Legacy Mode
4.8. Configuring a Linux Client to Use USB Redirection in Legacy Mode
4.9. Configuring a Windows Client to Use USB Redirection in Legacy Mode
3
3
3
4
5
5
5
6
7
7
8
8
10
10
11
11
12
14
14
14
16
16
17
19
19
19
21
23
23
23
24
25
26
28
Table of Contents
1

Red Hat Enterprise Virtualization 3.2 User Portal Guide
2

Preface
1. Document Conventions
This manual uses several conventions to highlight certain words and phrases and draw attention to
specific pieces of information.
In PDF and paper editions, this manual uses typefaces drawn from the
set. The
Liberation Fonts set is also used in HTML editions if the set is installed on your system. If not, alternative
but equivalent typefaces are displayed. Note: Red Hat Enterprise Linux 5 and later include the Liberation
Fonts set by default.
1.1. Typographic Conventions
Four typographic conventions are used to call attention to specific words and phrases. These
conventions, and the circumstances they apply to, are as follows.
Mono-spaced Bold
Used to highlight system input, including shell commands, file names and paths. Also used to highlight
keys and key combinations. For example:
To see the contents of the file my_next_bestselling_novel in your current working
directory, enter the cat my_next_bestselling_novel command at the shell prompt
and press Enter to execute the command.
The above includes a file name, a shell command and a key, all presented in mono-spaced bold and all
distinguishable thanks to context.
Key combinations can be distinguished from an individual key by the plus sign that connects each part of
a key combination. For example:
Press Enter to execute the command.
Press Ctrl+Alt+F2 to switch to a virtual terminal.
The first example highlights a particular key to press. The second example highlights a key combination:
a set of three keys pressed simultaneously.
If source code is discussed, class names, methods, functions, variable names and returned values
mentioned within a paragraph will be presented as above, in mono-spaced bold. For example:
File-related classes include filesystem for file systems, file for files, and dir for
directories. Each class has its own associated set of permissions.
Proportional Bold
This denotes words or phrases encountered on a system, including application names; dialog box text;
labeled buttons; check-box and radio button labels; menu titles and sub-menu titles. For example:
Choose System → Preferences → Mouse from the main menu bar to launch Mouse
Preferences. In the Buttons tab, select the Left-handed mouse check box and click
Close to switch the primary mouse button from the left to the right (making the mouse
suitable for use in the left hand).
To insert a special character into a gedit file, choose Applications → Accessories →
Preface
3

Character Map from the main menu bar. Next, choose Search → Find… from the
Character Map menu bar, type the name of the character in the Search field and click
Next. The character you sought will be highlighted in the Character T able. Double-click
this highlighted character to place it in the Text to copy field and then click the Copy
button. Now switch back to your document and choose Edit → Paste from the gedit menu
bar.
The above text includes application names; system-wide menu names and items; application-specific
menu names; and buttons and text found within a GUI interface, all presented in proportional bold and all
distinguishable by context.
Mono-spaced Bold Italic or Proportional Bold Italic
Whether mono-spaced bold or proportional bold, the addition of italics indicates replaceable or variable
text. Italics denotes text you do not input literally or displayed text that changes depending on
circumstance. For example:
To connect to a remote machine using ssh, type ssh username@domain.name at a shell
prompt. If the remote machine is example.com and your username on that machine is
john, type ssh john@example.com.
The mount -o remount file-system command remounts the named file system. For
example, to remount the /home file system, the command is mount -o remount /home.
To see the version of a currently installed package, use the rpm -q package command. It
will return a result as follows: package-version-release.
Note the words in bold italics above — username, domain.name, file-system, package, version and
release. Each word is a placeholder, either for text you enter when issuing a command or for text
displayed by the system.
Aside from standard usage for presenting the title of a work, italics denotes the first use of a new and
important term. For example:
Publican is a DocBook publishing system.
1.2. Pull-quote Conventions
Terminal output and source code listings are set off visually from the surrounding text.
Output sent to a terminal is set in mono-spaced roman and presented thus:
books Desktop documentation drafts mss photos stuff svn
books_tests Desktop1 downloads images notes scripts svgs
Source-code listings are also set in mono-spaced roman but add syntax highlighting as follows:
Red Hat Enterprise Virtualization 3.2 User Portal Guide
4
static
int
kvm_vm_ioctl_deassign_device(
struct
kvm *kvm,
struct
kvm_assigned_pci_dev *assigned_dev)
{
int
r = 0;
struct
kvm_assigned_dev_kernel *match;
mutex_lock(&kvm->lock);
match = kvm_find_assigned_dev(&kvm->arch.assigned_dev_head,
assigned_dev->assigned_dev_id);
if
(!match) {
printk(KERN_INFO
"%s: device hasn't been assigned before, "
"so cannot be deassigned
\n
"
, __func__);
r = -EINVAL;
goto
out;
}
kvm_deassign_device(kvm, match);
kvm_free_assigned_device(kvm, match);
out:
mutex_unlock(&kvm->lock);
return
r;
}
1.3. Notes and Warnings
Finally, we use three visual styles to draw attention to information that might otherwise be overlooked.
Note
Notes are tips, shortcuts or alternative approaches to the task at hand. Ignoring a note should
have no negative consequences, but you might miss out on a trick that makes your life easier.
Important
Important boxes detail things that are easily missed: configuration changes that only apply to the
current session, or services that need restarting before an update will apply. Ignoring a box
labeled 'Important' will not cause data loss but may cause irritation and frustration.
Warning
Warnings should not be ignored. Ignoring warnings will most likely cause data loss.
2. Getting Help and Giving Feedback
2.1. Do You Need Help?
If you experience difficulty with a procedure described in this documentation, visit the Red Hat Customer
Preface
5

. Through the customer portal, you can:
search or browse through a knowledgebase of technical support articles about Red Hat products.
submit a support case to Red Hat Global Support Services (GSS).
access other product documentation.
Red Hat also hosts a large number of electronic mailing lists for discussion of Red Hat software and
technology. You can find a list of publicly available mailing lists at
https://www.redhat.com/mailman/listinfo
.
Click on the name of any mailing list to subscribe to that list or to access the list archives.
2.2. We Need Feedback!
If you find a typographical error in this manual, or if you have thought of a way to make this manual
better, we would love to hear from you! Please submit a report in Bugzilla:
against the product Red Hat Enterprise Virtualization Manager.
When submitting a bug report, be sure to mention the manual's identifier: Guides-User Portal
If you have a suggestion for improving the documentation, try to be as specific as possible when
describing it. If you have found an error, please include the section number and some of the surrounding
text so we can find it easily.
Red Hat Enterprise Virtualization 3.2 User Portal Guide
6
Chapter 1. Preface
1.1. User Portal Preface
The Red Hat Enterprise Virtualization platform is a virtualization management solution based on the
leading open source virtualization platform.
About this Guide
This guide describes how users can access and use virtual desktops from the Red Hat Enterprise
Virtualization User Portal.
Audience
This document is for end users of Red Hat Enterprise Virtualization virtual machines. No special skills or
knowledge is required.
Overview
This guide helps you to use virtual machines from the Red Hat Enterprise Virtualization User Portal as
follows:
Figure 1.1. Using Virtual Machines
Install the required SPICE plug-ins if you are logging in for the first time. Log in to the User Portal with
your server address, user name and password. Select a virtual machine and turn it on. Connect to the
virtual machine. After you have finished using the virtual machine, log out from the machine.
Chapter 1. Preface
7
Chapter 2. Getting Started
2.1. Logging in to the User Portal
Log in to the Red Hat Enterprise Virtualization User Portal directly from your web browser.
To log in to the User Portal
1. Enter the provided User Portal URL in the address bar of your web browser. The address
should be in the format of https://server.example.com/UserPortal. The login screen
displays.
Alternately, enter the provided server address into the web browser, to access the welcome
screen. Click User Portal to be directed to the User Portal.
Red Hat Enterprise Virtualization 3.2 User Portal Guide
8
Figure 2.1. The User Portal Login Selection Screen
2. Enter your User Name and Password. Use the Domain drop-down menu to select the correct
domain.
Figure 2.2. The User Portal Login Screen
If you have only one running virtual machine in use, select the Connect Automatically
checkbox and connect directly to your virtual machine.
If you have more than one running virtual machine or do not wish to automatically connect to a
virtual machine, do not select the Connect Automatically checkbox.
Select the language in which the User Portal is presented by using the drop-down menu at the
lower-right of the login window.
3. Click Login. The list of virtual machines assigned to you displays.
Chapter 2. Getting Started
9
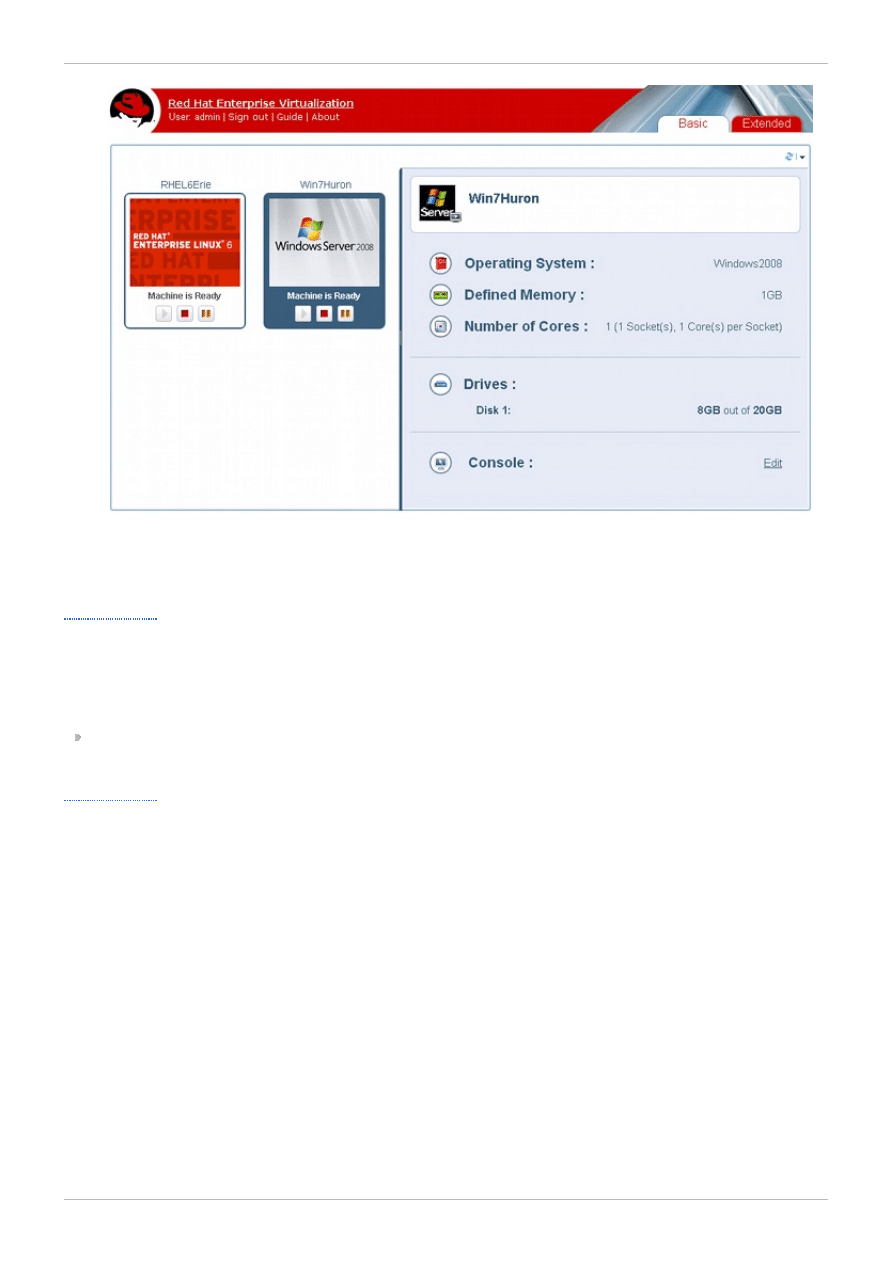
Figure 2.3. User Portal
2.2. Logging out of the User Portal
Logging out of the User Portal:
At the title bar of the User Portal, click Sign out. You are logged out and the User Portal login screen
displays.
2.3. Logging in for the First Time
Because Red Hat Enterprise Virtualization requires a secure connection to log in to the User Portal, Red
Hat Enterprise Virtualization requires that you trust the site's identity the first time you log in. Confirm a
security exception for the website or add the website to your browser's list of trusted sites, and your
web browser displays the login screen.
If you plan to use the SPICE protocol for connecting to virtual machines, install the appropriate plugins
for your browser. You need to do this only once.
On a Linux client machine with Mozilla Firefox, install the SPICE Firefox plugin to access the User Portal.
On a Windows client machine with Internet Explorer, add the SPICE ActiveX component to your web
browser.
Mozilla Firefox on Windows does not support SPICE. Use Internet Explorer on Windows.
Red Hat Enterprise Virtualization 3.2 User Portal Guide
10
Note
Add the URL for the Red Hat Enterprise Virtualization Manager to your list of trusted sites.
If Red Hat Enterprise Virtualization Manager is not in the list of trusted sites of Internet Explorer 8
and Internet Explorer 9, the SPICE Client window changes from full-screen to windowed-screen.
If Red Hat Enterprise Virtualization Manager is a Trusted Site, a full-screen SPICE window
remains open.
2.4. Installing the SPICE plug-in for Mozilla Firefox on Linux
The SPICE plug-in is required to run the remote-viewer application, which opens a graphical console
for connecting to virtual machines. remote-viewer is a SPICE client which is provided by the virt-viewer
package available on Red Hat Enterprise Linux channels.
1. Open a terminal and run the following command as root:
# yum install spice-xpi
2. Check that the virt-viewer package has already been installed on your system.
# rpm -q virt-viewer
virt-viewer-0.5.2-18.el6_4.2.x86_64
If it has not been installed, run the following command as root:
# yum install virt-viewer
3. Restart Mozilla Firefox for your changes to take effect.
4. The SPICE plug-in is now installed. You can now connect to your virtual machines using SPICE.
2.5. Installing the SPICE ActiveX component for Internet Explorer
on Windows
The SPICE ActiveX component is required to run the remote-viewer application, which opens a
graphical console for connecting to virtual machines. remote-viewer is a SPICE client installed together
with the SPICE ActiveX component; both are provided in the spice.cab file.
1. The first time you attempt to connect to a virtual machine, an add-on notification bar displays in the
browser prompting you to install the SPICE ActiveX component. This will download a spice.cab
file which, when launched, automatically installs the SPICE ActiveX component and the remote-
viewer application.
2. When you accept the prompt to install the SPICE ActiveX component, Internet Explorer will issue a
security warning. Confirm that you wish to proceed.
3. Restart Internet Explorer for your changes to take effect. You can now use SPICE to connect to
virtual machines.
Chapter 2. Getting Started
11
Important
If you installed the SPICE ActiveX component without administrative permissions, you will receive
a message stating that the usbclerk package was not installed. This means that you will be able
to connect to a virtual machine using SPICE, however you will not be able to use USB devices on
your virtual machine. Contact your systems administrator to install usbclerk if required.
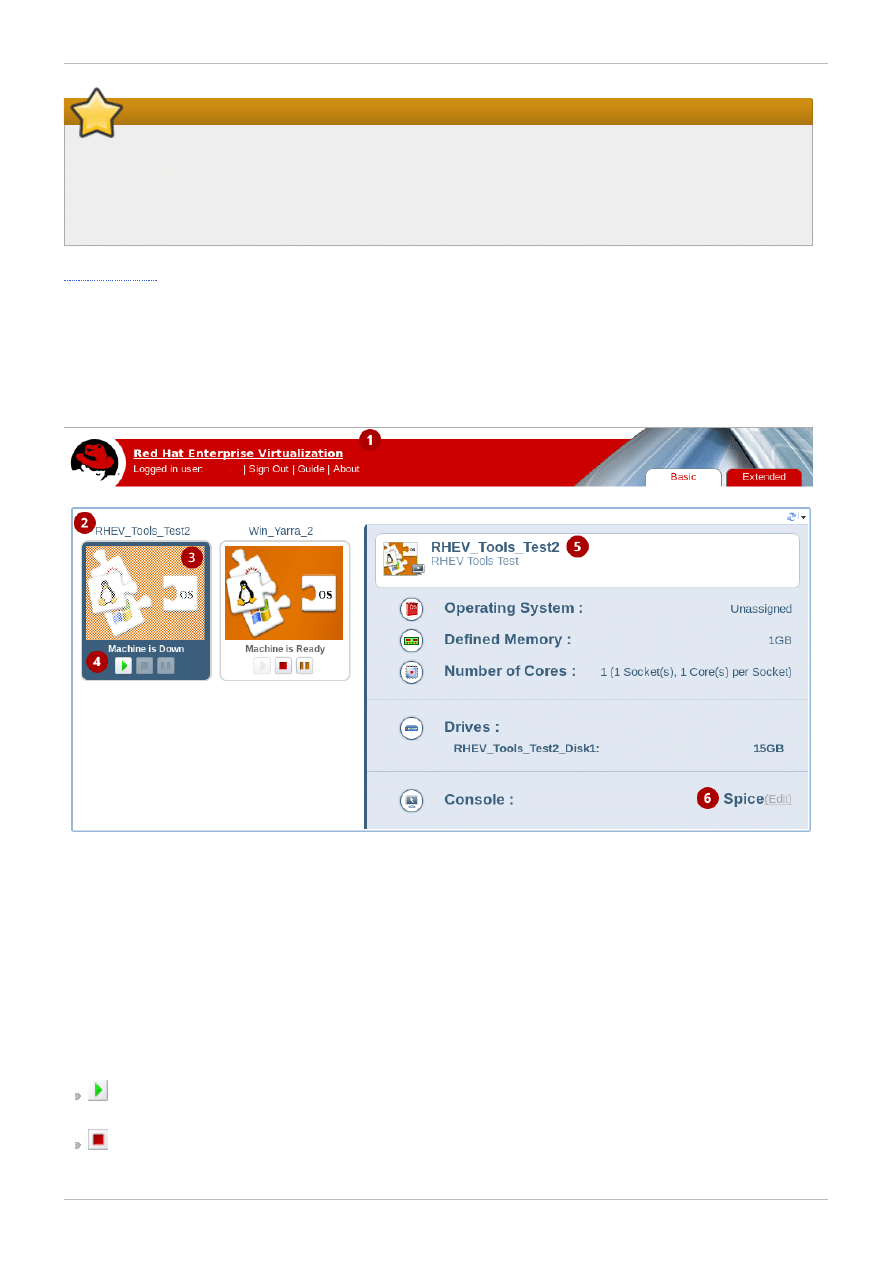
2.6. User Portal Graphical Interface
The User Portal Graphical Interface enables you to view and use all the virtual machines that are
available to you. The screen consists of three areas: the title bar, a virtual machines area, and a details
pane. A number of control buttons allow you to work with the virtual machines.
Figure 2.4 . The User Portal
The title bar (1) includes the name of the User logged in to the portal and the Sign out button .
In the virtual machines area, the names of the virtual machines or desktop pools assigned to you display
(2). The logo of the virtual machine's operating system also displays (3). When a virtual machine is
powered up, you can connect to it by double-clicking on the virtual machine's logo.
On each virtual machine's icon, buttons allow you to play, stop or pause a virtual machine. The buttons
perform the same functions as buttons on a media player (4).
The green play button starts up the virtual machine. It is available when the virtual machine is
paused, stopped or powered off.
The red stop button stops the virtual machine. It is available when the virtual machine is running.
Red Hat Enterprise Virtualization 3.2 User Portal Guide
12

The orange pause button temporarily halts the virtual machine. To restart it, press the green play
button.
The status of the virtual machine is indicated by the text below the virtual machine's icon - Machine is
Ready or Machine is Down.
Clicking on a virtual machine displays the statistics of the selected virtual machine on the details pane to
the right (5), including the operating system, defined memory, number of cores and size of virtual drives.
You can also configure connection protocol options (6) such as enabling the use of USB devices or local
drives.
Chapter 2. Getting Started
13
Chapter 3. Running Virtual Machines
3.1. Running Virtual Machines - Overview
On the User Portal, virtual machines are represented by icons that indicate both type and status. These
icons indicate whether a virtual machine is part of a desktop pool, or is a stand-alone Windows or Linux
virtual machine. They also reflect whether the virtual machine is running or stopped.
The User Portal displays a list of the virtual machines assigned to you. You can then turn on one or
more virtual machines, connect, and log in. You can have access to virtual machines that are running
different operating systems, and you can use multiple virtual machines simultaneously.
In contrast, if you have only one running virtual machine and have enabled automatic connection, you
can bypass the User Portal and log in directly to the virtual machine, similar to how you log in to a
physical machine.
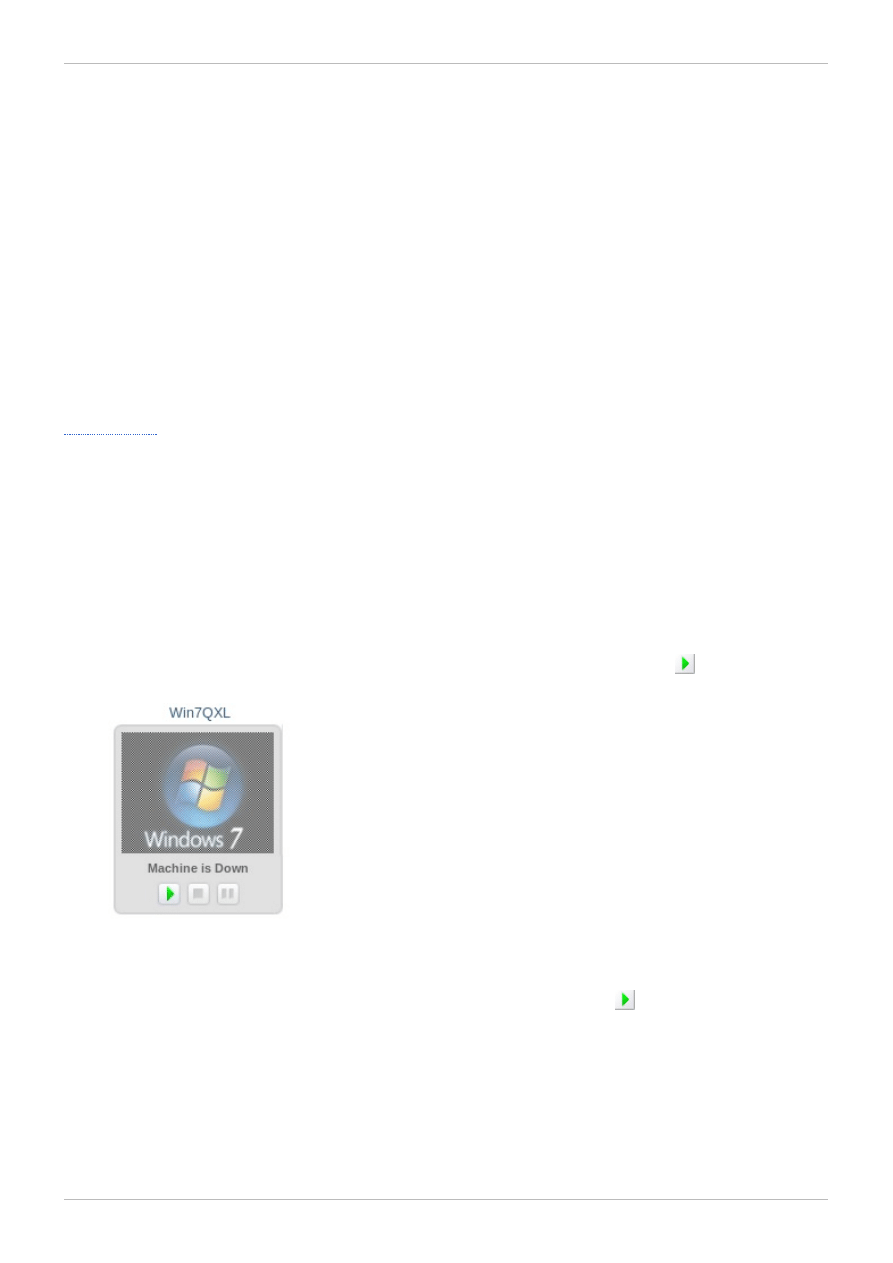
3.2. Turning On a Virtual Machine
To use a virtual machine in the User Portal, you must turn it on and then connect to it. If a virtual machine
is turned off, it is grayed out and displays Machine is Down.
You can be assigned an individual virtual machine or a machine that is part of a virtual machine pool.
Virtual machines in a pool have the same operating system and installed applications.
To turn on a virtual machine
1. If you are using a stand-alone virtual machine, select the machine and click the
button to turn it
on.
Figure 3.1. Turn on virtual machine
2. To use a virtual machine from a pool, select the pool icon and click the
button.
Red Hat Enterprise Virtualization 3.2 User Portal Guide
14
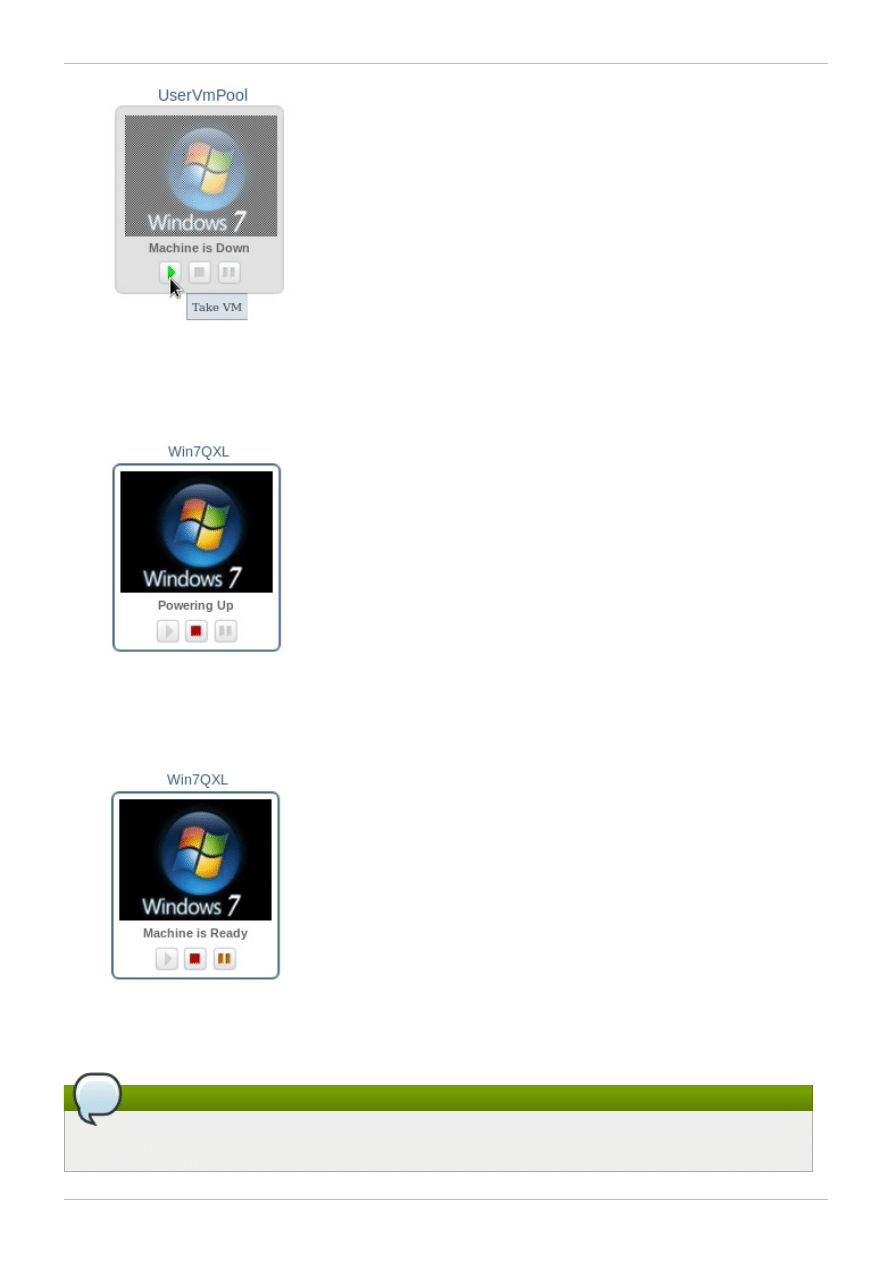
Figure 3.2. Take virtual machine from a pool
A powered on virtual machine from the pool will be assigned to you.
3. The virtual machine powers up.
Figure 3.3. Virtual machine powering up
4. When the virtual machine is powered up, the icon is no longer grayed out. The text displays as
Machine is Ready. You are now ready to connect.
Figure 3.4 . Virtual machine turned on
Note
You can only connect to a virtual machine after it has powered up.
Chapter 3. Running Virtual Machines
15
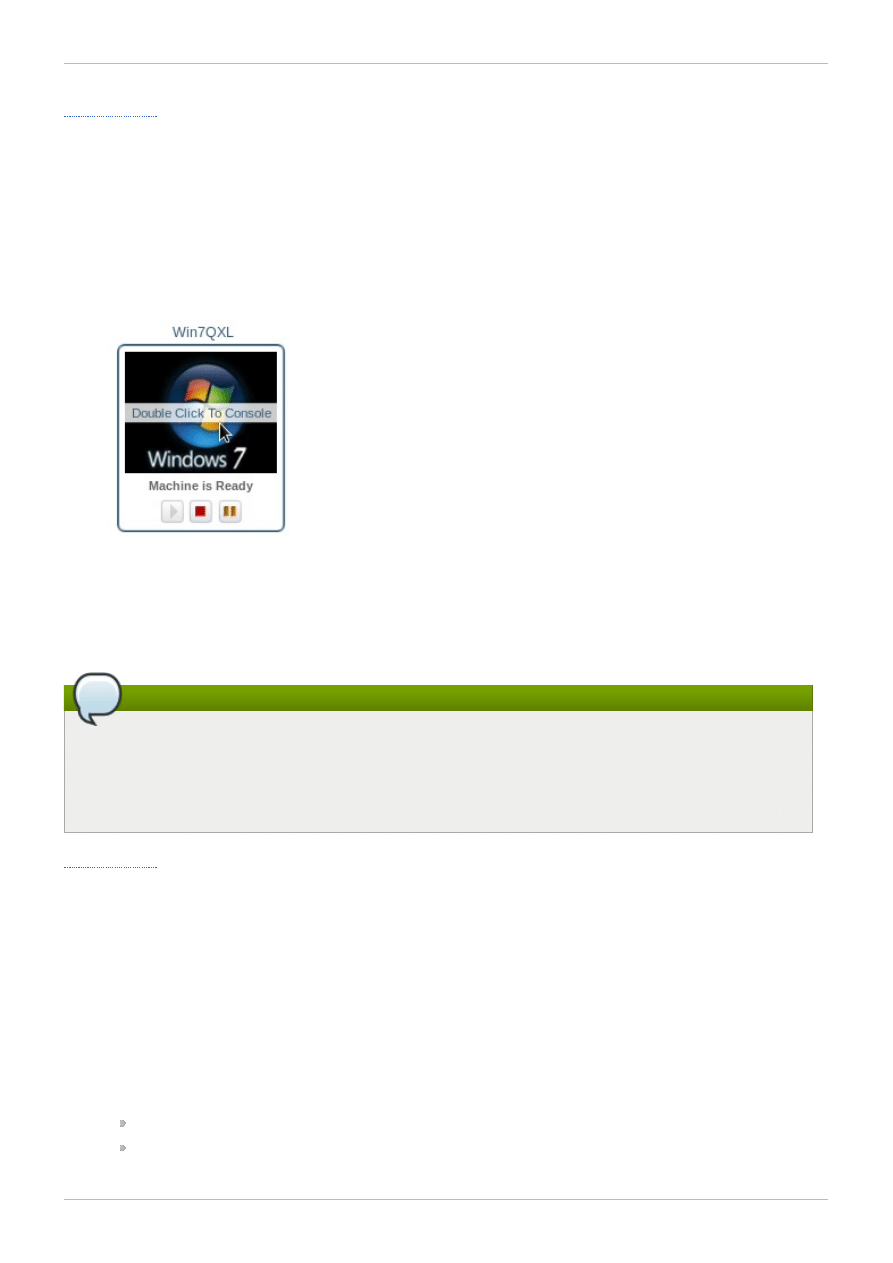
3.3. Connecting to a Powered-on Virtual Machine
After a virtual machine has been turned on, you can connect to it, log in, and start work in the same way
as you would with a physical machine. The text "Machine is Ready" displays on virtual machines that are
powered up.
To Connect to a Powered on Virtual Machine
1. Double click on the selected virtual machine to connect.
Figure 3.5. Connect to Virtual Machine
2. A console window of the virtual machine displays. You can now use the virtual machine in the
same way that you would use a physical desktop.
Note
If it is the first time you are connecting with SPICE, you will be prompted to install the appropriate
SPICE component or plugin. If it is the first time you are connecting from a Red Hat Enterprise
Linux computer, install the SPICE plugin for Mozilla Firefox. If you are connecting from a Windows
computer, install the ActiveX plugin.
3.4. Logging Out of a Virtual Machine
It is recommended that you log out from a virtual machine before shutting it down, to minimize the risk of
data loss. If you attempt to forcefully shut down a virtual machine from the User Portal without logging out
of it beforehand, its status will be frozen at "Powering Down". To gracefully turn off a virtual machine,
use the following steps.
To shut down a virtual machine
1. Once you have finished using a virtual machine, log out according to the instructions specific to
the operating system.
To log out from Windows, click Start → Log Off.
To log out from Red Hat Enterprise Linux, click System → Log Out.
Red Hat Enterprise Virtualization 3.2 User Portal Guide
16

2. If you were using your virtual machine in full screen mode, press Shift+F11 to exit full screen
mode, and close the virtual machine's console window. You are now returned to the User Portal.
To shut down the virtual machine, click the
button. The text below the virtual machine displays
as "Powering Down".
Figure 3.6. Shut down virtual machine
The virtual machine is grayed out and displays as "Machine is Down" when it has been turned off.
3. When you have finished using the User Portal, you can log out as instructed in
3.5. What To Do When You Exceed Your Quota
Red Hat Enterprise Virtualization provides a resource-limitation tool called quota, which allows system
administrators to limit the amount of CPU and storage each user can consume. Quota compares the
amount of virtual resources consumed when you use the virtual machine to the storage allowance and
the run-time allowance set by the system administrator.
When you exceed your quota, a pop-up window informs you that you have exceeded your quota, and
you will no longer have access to virtual resources. For example, this can happen if you have too many
concurrently running virtual machines in your environment.
Chapter 3. Running Virtual Machines
17
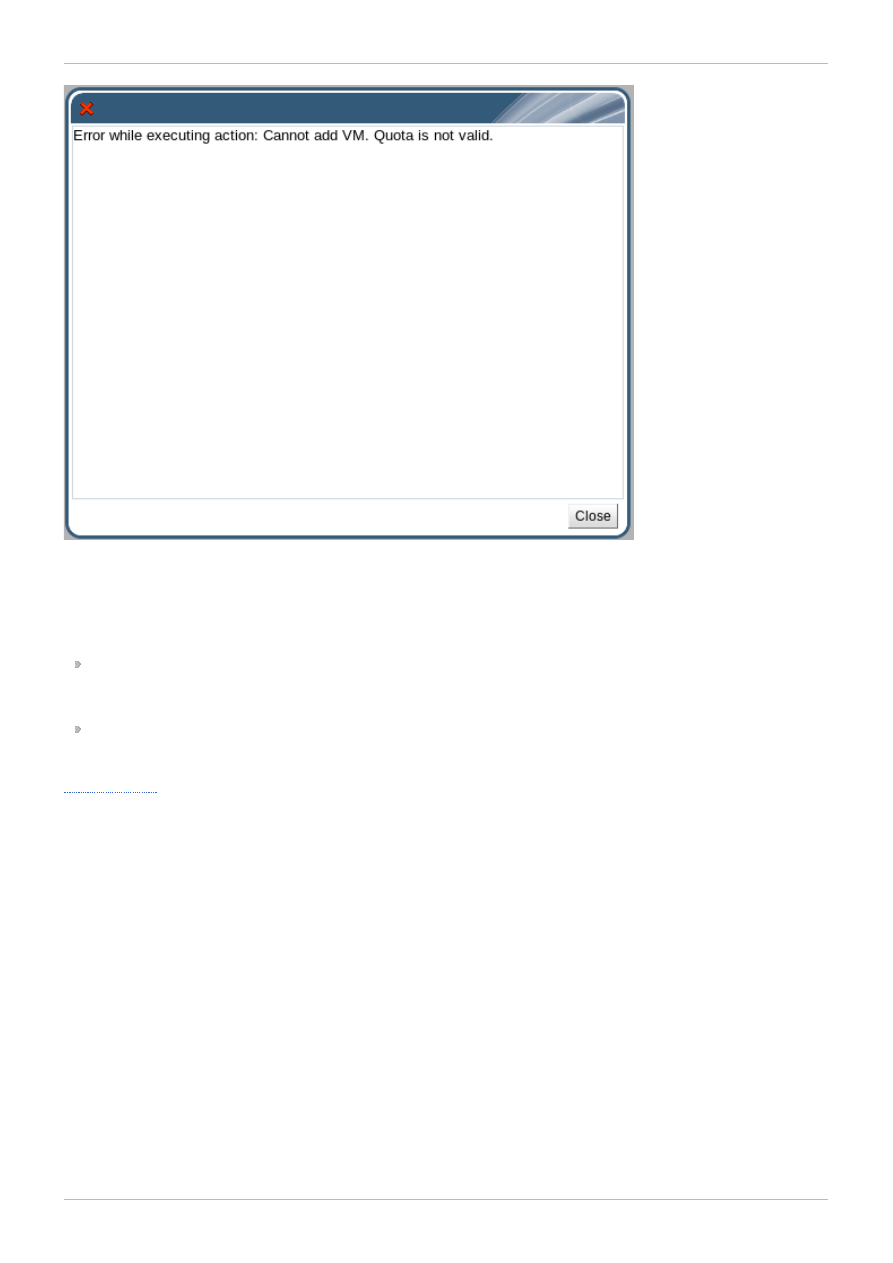
Figure 3.7. Quota exceeded error message
To regain access to your virtual machines, do one of the following:
Shut down the virtual machines that you do not need. This will bring your resource consumption
down to a level at which it is not in excess of the quota, and you will be able to run virtual machines
again.
If you cannot shut down any existing virtual machines, contact your system administrator to extend
your quota allowance or remove any unused virtual machines.
Red Hat Enterprise Virtualization 3.2 User Portal Guide
18

Chapter 4. Using Virtual Machines: Advanced
4.1. Introduction to Connection Protocols
Connection protocols facilitate the flow of information between virtual machines and Red Hat Enterprise
Virtualization's underlying architecture. They also provide an interface for accessing virtual machines
quickly and easily.
The Simple Protocol for Independent Computing Environments (SPICE) protocol is the recommended
connection protocol for Red Hat Enterprise Virtualization. SPICE is installed and executed on the client
for connecting to virtual machines. It provides features including USB redirection and multiple monitor
support.
In addition to SPICE, Red Hat Enterprise Virtualization Manager also supports the VNC and RDP
protocols.
Remote Desktop Protocol (RDP) can be used for Windows virtual machines, however remote sharing
must first be enabled on the virtual machine before users can connect to it via the User Portal. SPICE is
currently not supported on virtual machines running Windows 8. If a Windows 8 guest is configured to
use the SPICE protocol, it will detect the absence of the required SPICE drivers and automatically fall
back to using RDP.
Virtual Network Computing (VNC) can be used for Red Hat Enterprise Linux virtual machines. If a virtual
machine is configured to use VNC as its default protocol, you have to use a VNC client to connect to it.
Connecting to a virtual machine using VNC is not possible from the User Portal.
4.2. Configuring SPICE Console Options
A connection protocol enables you to see and interact with a virtual machine. The SPICE connection
protocol is recommended for Red Hat Enterprise Linux and Windows virtual machines. You can enable
additional SPICE console options for your virtual machine including USB redirection and keyboard
shortcuts.
To configure SPICE connection protocol options
1. Select a running virtual machine. On the details pane, for the Console option click Edit.
Chapter 4. Using Virtual Machines: Advanced
19
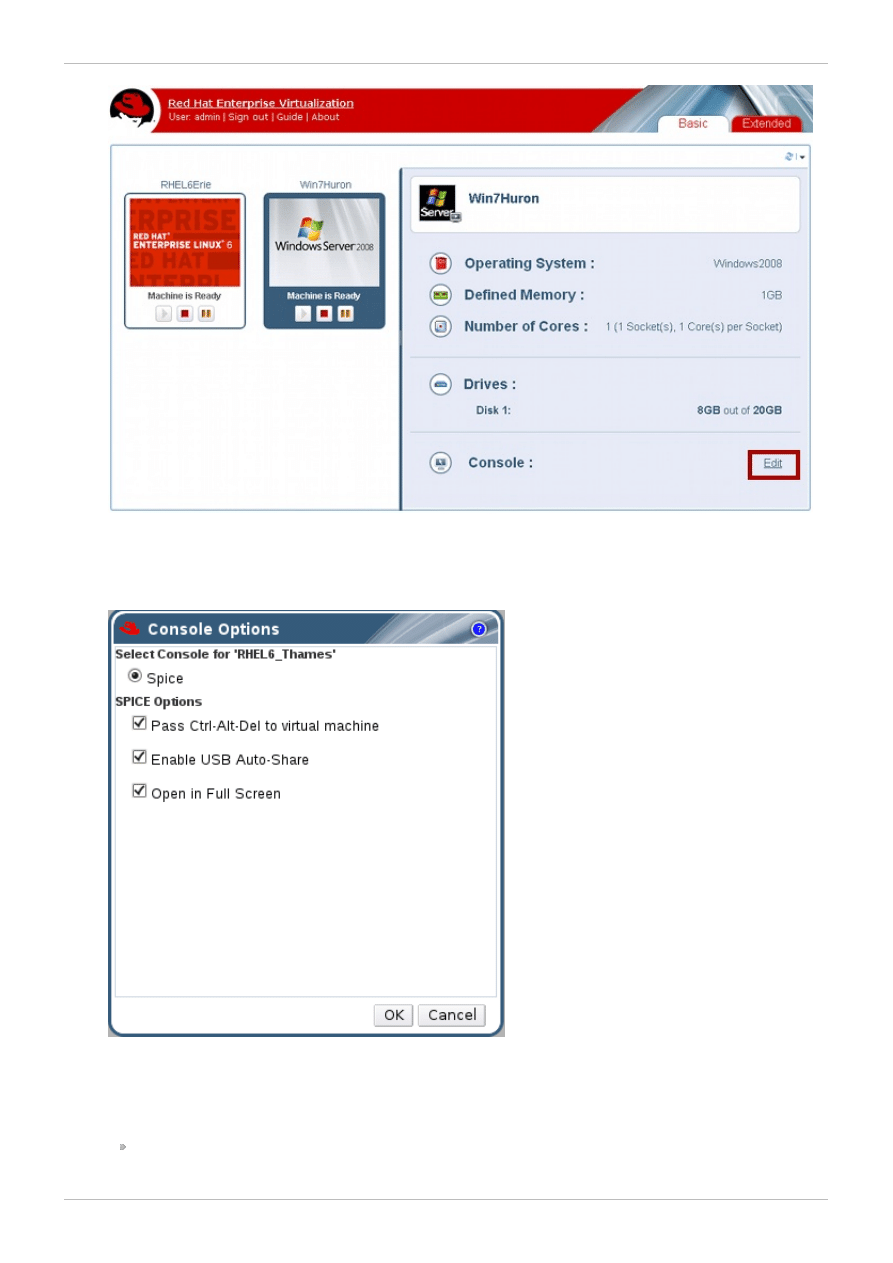
Figure 4 .1. Select connection protocol
2. The Console Options dialog displays.
Figure 4 .2. Configure Console Options
3. The SPICE Options display.
Pass Ctrl-Alt-Del to virtual m achine: Tick this checkbox for this keystroke to be
intercepted on the virtual guest. The use of this command depends on the operating system:
Red Hat Enterprise Virtualization 3.2 User Portal Guide
20

on Red Hat Enterprise Linux, it sends a signal to reboot the computer; and on Windows, it
displays the task manager or Windows Security dialog.
Enable USB Auto-Share: Tick this checkbox to automatically redirect USB devices to the
virtual machine. If this option is not selected, the USB device will display on the client machine
instead, and to use the USB device on the guest you have to manually enable it using the
SPICE client menu.
Open in Full Screen: Tick this checkbox for the virtual machine console to automatically
open in full screen when you connect to the virtual machine. Press SHIFTF11 to toggle full
screen mode on or off.
4. Click OK. You are returned to the User Portal. Double click on your selected virtual machine to
connect to it.
4.3. Using SPICE Connection Options
When using Windows clients to connect to virtual machines, remote-viewer provides a number of
SPICE options to send keystrokes and commands to the virtual machine.
Figure 4 .3. SPICE Connection menu
Chapter 4. Using Virtual Machines: Advanced
21
Table 4 .1. SPICE Console Options
Option
Hotkey
File
Screenshot: Takes a screenshot of the
active window and saves it in a location of
your specification.
USB device selection: If USB redirection
has been enabled on your virtual machine, the
USB device plugged into your client machine
can be accessed from this menu.
Quit: Closes the console. The hot key for this
option is Shift+Ctrl+Q.
View
Full screen: Toggles full screen mode on
or off. When enabled, full screen mode
expands the virtual machine to fill the entire
screen. When disabled, the virtual machine is
displayed as a window. The hot key for
enabling or disabling full screen is
SHIFT +F11.
Zoom : Zooms in and out of the console
window. Ctrl++ zooms in, Ctrl+- zooms
out, and Ctrl+0 returns the screen to its
original size.
Autom atically resize: Tick to enable the
guest resolution to automatically scale
according to the size of the console window.
Displays: If you have multiple monitors
enabled on your virtual machine, this option
allows you to toggle between your different
monitors.
Send key
Ctrl+Alt+Del: Sends the Ctrl+Alt+Del key
combination to the virtual machine. On a Red
Hat Enterprise Linux virtual machine, it sends
a signal to reboot the machine. On a Windows
virtual machine, it displays the task manager
or Windows Security dialog.
Ctrl+Alt+Backspace: Reboots virtual
machine console to regain control of the
virtual machine.
Ctrl+Alt+F1
Ctrl+Alt+F2
Ctrl+Alt+F3
Ctrl+Alt+F4
Ctrl+Alt+F5
Ctrl+Alt+F6
Ctrl+Alt+F7
Ctrl+Alt+F8
Red Hat Enterprise Virtualization 3.2 User Portal Guide
22

Ctrl+Alt+F9
Ctrl+Alt+F10
Ctrl+Alt+F11
Ctrl+Alt+F12
Printscreen: Passes the Printscreen
keyboard option to the virtual machine.
Help
The About entry displays the version details of
Virtual Machine Viewer that you are using.
Release Cursor from Virtual Machine
SHIFT +F12
4.4. SPICE Proxy
It is possible to use a SPICE Proxy to connect SPICE Clients to guests when the SPICE clients are
outside the network that connects the hypervisors.
See the Red Hat Enterprise Virtualization Installation Guide for more information about SPICE Proxy.
4.5. Enabling SPICE Proxy in the User Portal
Summary
This procedure explains how to set up a virtual machine to connect to the SPICE Proxy. This procedure
assumes that your system administrator has configured a SPICE Proxy as described in Red Hat
Enterprise Virtualization Installation Guide
1. In the navigation pane, select the ... (ellipsis) button to the right of the Console button.
2. Select the Enable SPICE Proxy check box.
3. Click OK.
Result
You have configured a virtual machine to connect to the SPICE proxy.
4.6. Using USB Devices on Virtual Machines
A virtual machine that is connected with the SPICE protocol can be configured to connect USB devices.
To do so, the USB device has to be plugged into the client machine, which is the hardware you use to
access a guest. The device is then redirected to appear on the guest machine, which is the virtual
desktop or virtual server you access through the User Portal.
Native mode for USB redirection enables native KVM/ SPICE USB redirection for Red Hat Enterprise
Linux and Windows virtual machines. Virtual machines do not require any in-guest agents or drivers for
native USB. This option is used for virtual machines compatible with Red Hat Enterprise Virtualization 3.1
and higher. Native USB mode is supported on the following clients and guests:
Chapter 4. Using Virtual Machines: Advanced
23

Client
Red Hat Enterprise Linux 6.0 and higher
Red Hat Enterprise Linux 5.5 and higher
Windows XP
Windows 7
Windows 2008
Guest
Red Hat Enterprise Linux 6.0 and higher
Red Hat Enterprise Linux 5.5 and higher
Windows XP
Windows 7
Procedure 4 .1. Using USB devices on a Windows client
1. A. If the SPICE ActiveX component was installed by a user with administrative privileges, the
usbclerk service has been automatically installed.
B. If the SPICE ActiveX component was installed by a user without administrative privileges, the
usbclerk service must be manually installed by a user with administrative privileges.
The usbclerk setup file can be found in the directory where virt-viewer was installed, for
example: C:\Users\username\AppData\Local\virt-viewer\bin\usbclerk-
setup.exe.
Double click on the usbclerk-setup.exe file to launch the installer, and follow the prompts
to install usbclerk.
2. When the usbclerk service is installed and running, select a virtual machine which has been
configured to use the SPICE protocol, and turn it on.
3. Click the Edit button on the details pane to open the Console Options window, and tick the
Enable USB Auto-Share check box.
4. Double click on the running virtual machine to connect to it. When you plug your USB device into
the client machine, it will automatically be redirected to appear on your guest machine.
Procedure 4 .2. Using USB devices on a Red Hat Enterprise Linux client
1. Select a virtual machine which has been configured to use the SPICE protocol, and turn it on.
2. Click the Edit button on the details pane to open the Console Options window, and tick the
Enable USB Auto-Share check box.
3. Double click on the running virtual machine to connect to it. When you plug your USB device into
the client machine, it will automatically be redirected to appear on your guest machine.
4.7. Using USB Devices on Virtual Machines - Legacy Mode
Legacy mode for USB redirection enables the SPICE USB redirection policy used in Red Hat Enterprise
Virtualization 3.0. This option will not be supported in future versions of Red Hat Enterprise
Virtualization. Legacy USB mode is supported on the following clients and guests:
Client
Red Hat Enterprise Linux 6.0 and higher
Red Hat Enterprise Linux 5.5 and higher
Windows XP
Red Hat Enterprise Virtualization 3.2 User Portal Guide
24
Windows 7
Windows 2008
Guest
Windows XP
Windows 7
If your virtual machine is configured to use legacy USB redirection, you have to manually install several
packages before you can use USB devices on your virtual machine.
4.8. Configuring a Linux Client to Use USB Redirection in Legacy
Mode
If you connect to a virtual guest from a Red Hat Enterprise Linux client machine, you have to install
several SPICE packages before you can share USB devices between the client and the guest.
To use USB devices on Red Hat Enterprise Linux clients
1. Install SPICE packages on client
On your Linux client machine, install the following packages:
spice-usb-share
kmod-kspiceusb-rhel60 for Red Hat Enterprise Linux 6 or
kmod-kspiceusb-rhel5u6 for Red Hat Enterprise Linux 5
These packages are available on the
, from the Red Hat Enterprise Linux
Supplementary Software channel for your version of Red Hat Enterprise Linux. To install the
packages, run:
# yum install spice-usb-share kmod-kspiceusb
2. Run SPICE USB services
Start the spiceusbsrvd service and load the kspiceusb module. Run:
# service spiceusbsrvd start
# modprobe kspiceusb
3. Install RHEV-Tools on guest
Locate the CD drive to access the contents of the Guest Tools ISO, and launch RHEV-
T oolsSetup.exe. If the Guest Tools ISO is not available in your CD drive, contact your system
administrator. After the tools have been installed, you will be prompted to restart the machine for
changes to be applied.
4. Open firewall ports
Allow connections on TCP port 32023 on any firewalls between the guest machine and the client
machine.
5. Enable USB Auto-Share
On the User Portal, select your guest machine. Ensure that you have enabled SPICE USB Auto-
Share on the guest machine.
6. Attach USB device
Connect to your guest machine. Place the SPICE console window of your guest desktop in focus,
then attach a USB device to the client. The USB device displays in your guest desktop.
Chapter 4. Using Virtual Machines: Advanced
25

When you close the SPICE session the USB device will no longer be shared with the guest.
4.9. Configuring a Windows Client to Use USB Redirection in
Legacy Mode
If you are connecting from a Windows client machine, and wish to use USB devices on your guest, you
have to enable SPICE USB redirection.
Note
Refer to the Red Hat Enterprise Virtualization Manager Release Notes for specific channel names
current to your system.
To enable USB redirection on Windows:
1. Install USB redirector package on client
On a Windows client machine, install the RHEV-USB-Client.exe. This package can be obtained
from the Red Hat Enterprise Virtualization Manager (version.number x86_64)
channel on the Red Hat Network, under the Downloads list.
2. Install RHEV-Tools on guest
Locate the CD drive to access the contents of the Guest Tools ISO, and launch RHEV-
T oolsSetup.exe. If the Guest Tools ISO is not available in your CD drive, contact your system
administrator. After the tools have been installed, you will be prompted to restart the machine for
changes to be applied.
3. Open firewall ports
Allow connections on TCP port 32023 on any firewalls between the guest machine and the client
machine.
4. Enable USB sharing
On the User Portal, select your guest machine. Ensure that you have enabled SPICE USB sharing
on the guest machine.
5. Attach USB device
Connect to your guest machine and attach a USB device to the client. If the required USB device
does not appear directly on the guest desktop, right click on the SPICE frame and select USB
Devices. Choose your device from the list displayed.
Red Hat Enterprise Virtualization 3.2 User Portal Guide
26
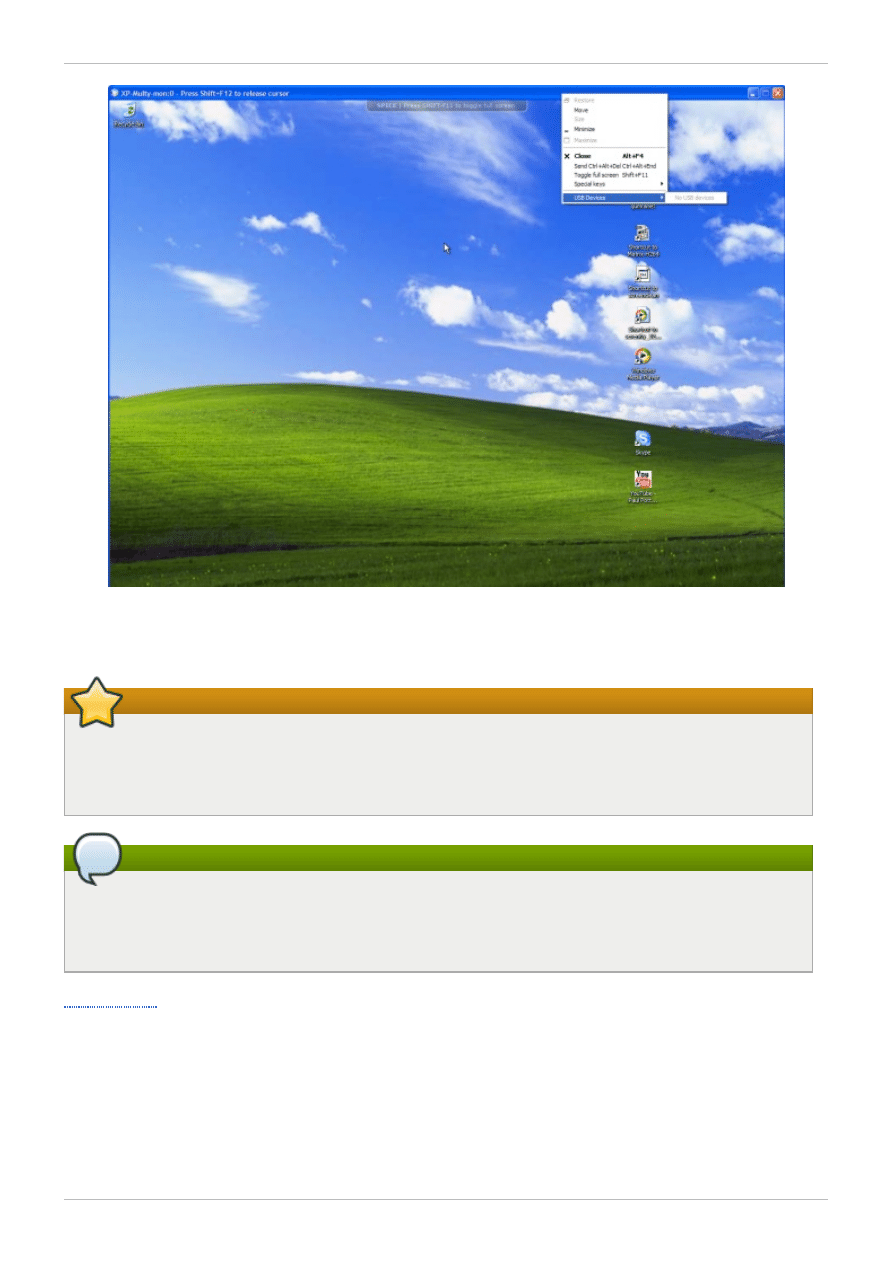
Figure 4 .4 . List of connected USB devices
Important
When some USB devices are connected on Windows clients, the autoplay window will appear and
the client will take control of the device, making it unavailable to the guest. To avoid this issue,
disable USB autoplay on your Windows clients.
Note
You can also define additional USB policies for Windows clients, to allow or block access to
certain USB devices. For details, see the sections on USB Filter Editor in the Red Hat Enterprise
Virtualization Administration Guide.
Chapter 4. Using Virtual Machines: Advanced
27

Revision History
Revision 3.2-10.4 00
2013-10-31
Rüdiger Landmann
Rebuild with publican 4.0.0
Revision 3.2-10
Fri Aug 16 2013
Zac Dover
BZ#978806 - improved the section on SPICE Proxy again
Revision 3.2-08
Mon Aug 12 2013
Zac Dover
BZ#978806 - added a section on SPICE Proxy
Revision 3.2-07
Wed Apr 10 2013
Jodi Biddle
Re-brewed due to an XML error.
Revision 3.2-06
Wed Apr 10 2013
Jodi Biddle
Updated screenshots for 3.2. Updated some SPICE content according to technical review.
Revision 3.2-05
Wed Apr 03 2013
Jodi Biddle
Updated outdated SPICE content.
Revision 3.2-04
Mon Mar 25 2013
Jodi Biddle
No major changes; re-brewing for Beta release just in case.
Revision 3.2-03
Fri Mar 01 2013
Andrew Burden
Brewing for beta
Revision 3.2-02
Thu Feb 28 2013
Jodi Biddle
Fixed topic error, removed USB legacy mode as per BZ#916411
Revision 3.2-01
Wed Feb 27 2013
Jodi Biddle
Staging for 3.2
Branched from 3.1 docs
Red Hat Enterprise Virtualization 3.2 User Portal Guide
28
Document Outline
- Table of Contents
- Preface
- Chapter 1. Preface
- Chapter 2. Getting Started
- Chapter 3. Running Virtual Machines
- Chapter 4. Using Virtual Machines: Advanced
- 4.1. Introduction to Connection Protocols
- 4.2. Configuring SPICE Console Options
- 4.3. Using SPICE Connection Options
- 4.4. SPICE Proxy
- 4.5. Enabling SPICE Proxy in the User Portal
- 4.6. Using USB Devices on Virtual Machines
- 4.7. Using USB Devices on Virtual Machines - Legacy Mode
- 4.8. Configuring a Linux Client to Use USB Redirection in Legacy Mode
- 4.9. Configuring a Windows Client to Use USB Redirection in Legacy Mode
- Revision History
Wyszukiwarka
Podobne podstrony:
Red Hat Enterprise Virtualization 3 1 User Portal Guide en US
Red Hat Enterprise Virtualization 3 0 User Portal Guide en US
Red Hat Enterprise Virtualization 3 0 Hypervisor Deployment Guide en US
Red Hat Enterprise Virtualization 3 2 Manager Release Notes en US
Red Hat Enterprise Linux 6 Performance Tuning Guide en US
Red Hat Enterprise Linux 6 Migration Planning Guide en US
Red Hat Enterprise Linux 6 Migration Planning Guide en US
Red Hat Enterprise Linux 6 Global File System 2 en US
Red Hat Enterprise Linux 6 Security Enhanced Linux en US
Red Hat Enterprise Linux 6 Beta 6 6 Release Notes en US
Red Hat Enterprise Linux 6 Managing Confined Services en US
Red Hat Enterprise Linux 4 Global File System en US
Red Hat Enterprise Virtualization 3 2 Command Line Shell Guide en US
Red Hat Enterprise Linux 6 Beta Virtualization Getting Started Guide en US
Red Hat Enterprise Virtualization 3 3 Command Line Shell Guide en US
Red Hat Enterprise Linux 6 Virtualization Getting Started Guide en US
red hat enterprise linux 5 io tuning guide
Red Hat Enterprise MRG 2 Tuna User Guide en US
Red Hat Enterprise Linux 6 Virtualization Tuning and Optimization Guide en US
więcej podobnych podstron