Cold-connection techniques replace soldering
in this quick and easy necklace.
by Wendy Witchner
E
ditor’s Note: Wendy Witchner embraces a motor-home lifestyle so she can travel
around the country selling her wire and metal jewelry at shows. Because she lives and
works in the same space, she uses cold-connection techniques that require a limited
number of tools. Witchner shares some of her secrets with you in this project, so if you
have limited workspace or just want to work with cold connections, you’ll benefit from
her experience.
—Dori Olmesdahl
A r t J e w e l r y • M a y 2 0 0 5
1
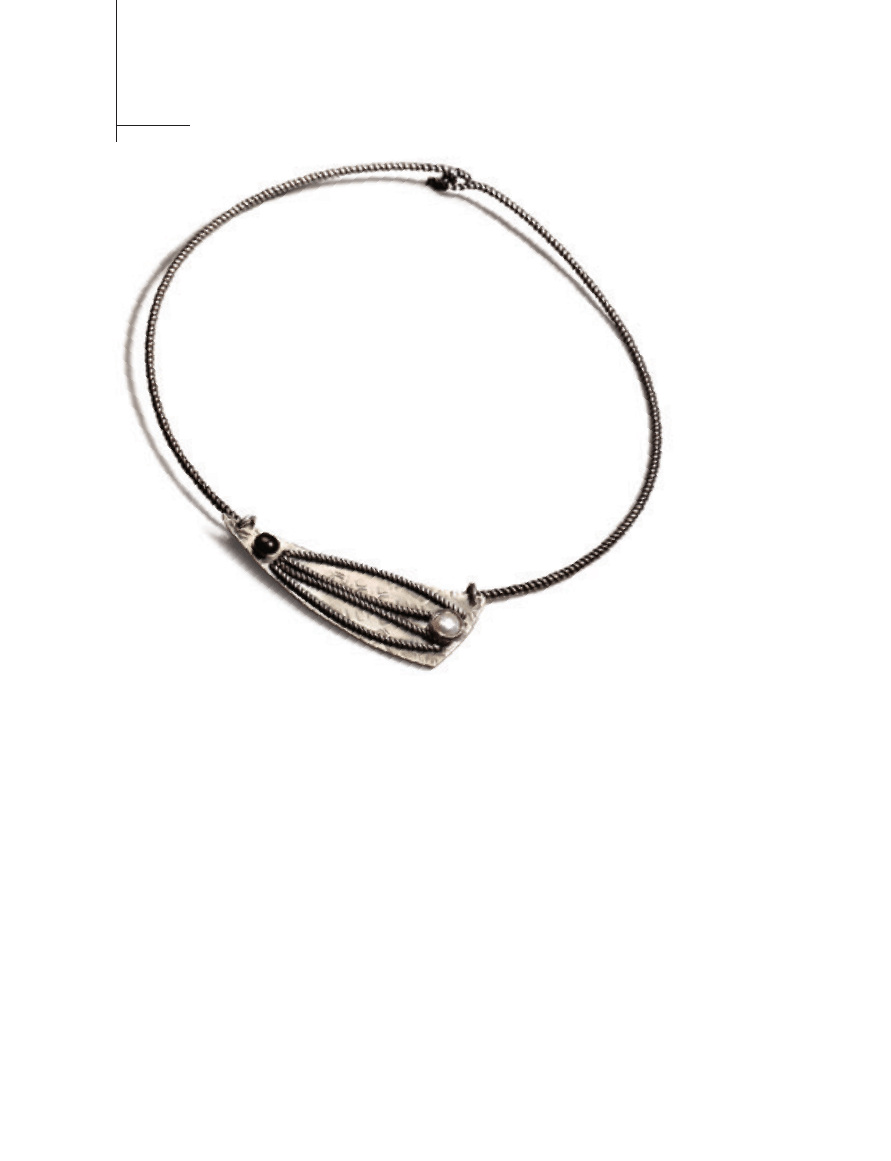
metal
beginner
Twisted
glory
Trace the template. Place a piece of Glad® Press ’n Seal™ over the
template on page 4 and trace the shape and the dots. Position the
Press ’n Seal template on the silver sheet and gently press it so it
adheres to the silver.
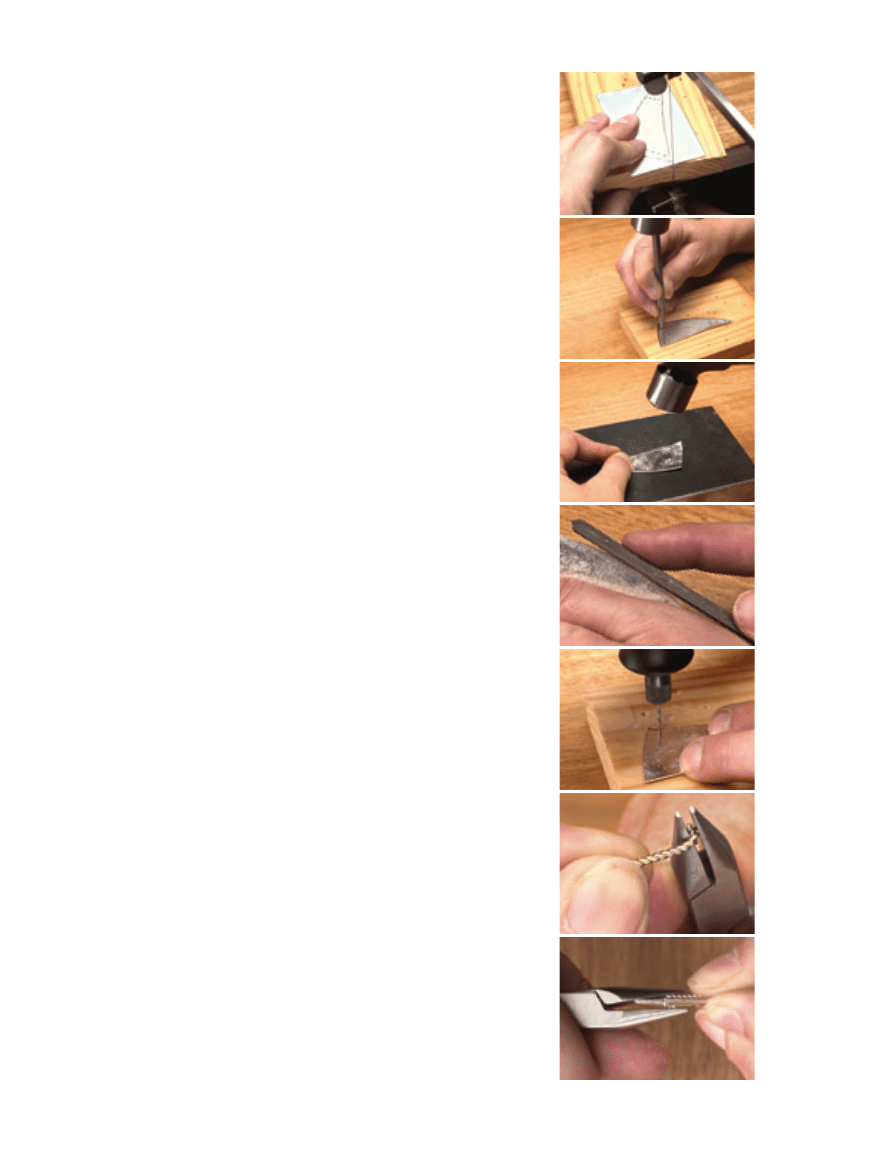
[1] Cut out the shape. Rest the silver sheet against a bench pin and
use a jeweler’s saw fitted with a 2/0 blade to cut around the outside
edge of the shape. Hold the saw frame and blade perpendicular to the
plane of the silver sheet and use a gentle up-and-down motion to
guide the saw. The blade only cuts metal on the down stroke; do not
apply too much pressure or the blade will jam or break. Think of using
a pressure so light that the weight of the saw pulls the blade through
the silver—your hand just keeps the saw perpendicular and moves it
upward at the end of each stroke.
[2] Mark the drill holes. Place the pendant right side up on a steel
bench block. Position a center punch on mark A and hold it
perpendicular to the metal. Strike the top of the punch with a hammer
to make a slight indentation. If you use too much pressure, the metal
sheet will start to curl upward. Repeat with marks B–M.
[3] Apply texture. Remove the Press ’n Seal from the metal shape.
Place the metal face up on a steel block. Use a hammer with a pattern
incised into the head (see “Make a Texture Hammer,” page 4) or use
another tool to texture the front of the pendant.
[4] File the edges. Use a flat or half-round file to file the edges
smooth. Push the file away from you so it glides along the edge of the
piece and lift off on the return stroke. Do not file using a back-and-
forth motion.
Add a patina. If desired, apply liver of sulfur to the silver elements,
including all the parts of the pendant, the neckwire, and the wire used
to join the elements. Follow the manufacturer’s directions. Rinse, dry,
and use a lathe with a buffing wheel or bristle disks to buff the
pendant. Buff the wire by running it through a rouged polishing cloth.
Never try to buff wire on a polishing wheel.
[5] Drill the holes. Start drilling a hole in the dent you made with
the center punch. Use a drill press or power drill with a #63 drill bit to
make holes I–K. Use a #51 drill bit to make all the other holes.
[6–7] Attach the twisted wire. Use a wire cutter to cut a piece of
twisted wire that is 2
1
⁄
4
inches (5.7cm) long. Use chainnose pliers to
grasp the wire about
1
⁄
8
inch (3.18mm) from one end. Use your fingers
to bend the long end of the wire so it forms a right angle.
Working from the textured side of the pendant, press the short end
of the wire through hole A. Use chainnose pliers to simultaneously
apply pressure from both sides to press the wire flat against the silver
sheet. Grasp the opposite end of the wire with chainnose pliers across
from hole B and bend it at a right angle. Press the wire through the
hole. If needed, trim the end to
1
⁄
16
inch (1.59mm). As you did before,
use the pliers to press the wire against the metal. Repeat with holes
C–D, E–F, and G–H.
A r t J e w e l r y • M a y 2 0 0 5
2
2
3
4
1
5
6
7
[8] Position the wires. Working from the front of the pendant,
use a finger to separate a set of wires so they curve away from
each other near the center of the pendant. Place the pendant face
up on a steel bench block. Hold the wires apart and use a hammer
to strike the two wires near one end of the pendant and then at
the other end. This keeps the wires in place. Repeat with the
remaining wires.
[9–10] Add the pearl. Slide about 3 inches (7.6cm) of 22-gauge
wire through the hole in the pearl. While holding one end, wrap the
other end around the pearl two or three times. Working from the
front of the pendant, slide the longer tail through hole I and then
slide it through hole J so both tails are on the front of the pendant.
Pull this tail so the pearl sits tightly on the pendant. Use wire cutters
to trim the wires and press them in toward the face of the pendant.
[11–13] Attach the bezel. Place the bezel cup on a steel bench
block with the bezel’s lip facing up. Use a center punch and
hammer to make a slight indentation in its center. Use a drill press
or power drill to make a hole with a #63 bit.
Use a flat jeweler’s file to level off one end of the 20-gauge
round wire. Use flush-cut wire cutters to trim the other end to
1
⁄
8
inch (3.18cm). This piece will be used as a rivet. Align the hole in
the bezel cap over hole K on the pendant. Press the rivet through
the holes so a little wire extends from each side [11]. Place the
pendant on a steel bench block, and flatten the rivet with a
hammer and nail set [12].
Place the cabochon in the bezel and use a bezel pusher to press
the sides of the bezel against the cabochon [13]. After the first
press, work from the alternate side. Using a clock analogy, if your
first press was at 9:00, the second would be at 3:00, the third at
12:00, and the fourth at 6:00. Continue in this manner until the
bezel is smooth and securely holds the cabochon.
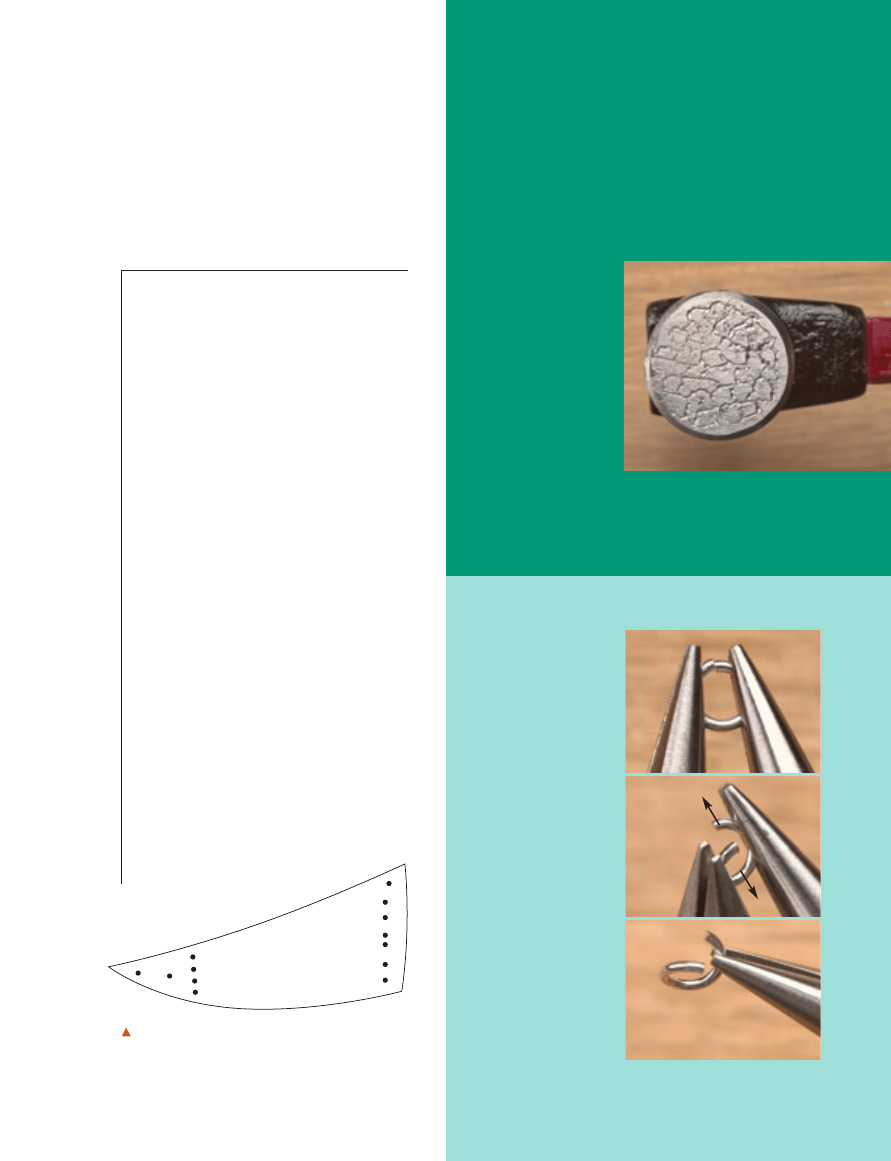
[14] Shape the neck wire. Use a roundnose pliers to grasp one
end of the 16-gauge wire about
1
⁄
2
inch (1.3cm) from the tip. Use
nylon-coated pliers to bend the wire around the jaw of the
roundnose to form a U shape. Repeat at the other end of the wire,
but once you make the U shape, use nylon-coated pliers to press
the short end toward the neck wire. Use the same pliers to twist
one end so it is almost perpendicular to the other. Use a metal file
to smooth the tips of both.
A r t J e w e l r y • M a y 2 0 0 5
3
9
10
11
8
12
13
14
note
Twisted wire is made by twisting two round
wires together. The gauge of the wire is
usually described by the gauge of the
individual wires and not the diameter of the
resulting piece. Sixteen-gauge twisted wire
is fabricated from two 16-gauge round
wires, which form a strand with a diameter
equivalent to that of 10-gauge round wire.
on twisted wire
A
M
L
K
J
I
H
G
F
E
D
C
B
Opening
and closing
jump rings
[1] Hold the jump
ring with two pairs
of chainnose pliers.
[2] To open the ring,
bring one pair of
pliers toward you
and push the other
away in a rotating
motion.
[3] Grasp the open
jump ring with one
pliers for ease of
maneuvering.
Reverse the steps to
close the ring.
To make your own texture hammer, use a 1–2mm
diamond-tipped drill bit to incise a random pattern onto
the head of a steel utility hammer. For another option, use
a hacksaw or other saw to score grooves onto the head’s
surface. Whatever tool you have that will fashion metal
may be used to make specific textures.
If you do not want to texture the head of a hammer,
you can make random dents in the silver sheet with a
regular utility hammer
or another type of
texture tool such as a
metal stamp.
materials
■
Utility hammer
tools
■
Power drill with
1–2mm diamond-
tipped drill bit
Make a texture hammer
A r t J e w e l r y • M a y 2 0 0 5
4
■
Sterling-silver sheet: 1
×3 inches (2.5×7.6cm)
■
Sterling-silver wire: 10 inches (25.4cm),
20-gauge, twisted, dead-soft
■
Sterling-silver wire: 6 inches (15.2cm),
22-gauge, round
■
Pearl, 8mm, flat-sided
■
Sterling-silver bezel cup, 6mm round
■
Sterling-silver wire; 1 inch (2.5cm),
20-gauge, round
■
Cabochon, 6mm round, calibrated
■
Sterling-silver wire: 19 inches (48.3cm),
16-gauge, twisted, half hard
■
2 sterling-silver jump rings: 5mm round,
16-gauge
■
Liver of sulfur (optional)
tools & supplies
■
Bench pin
■
Jeweler’s saw frame, 2/0 blade
■
Steel bench block
■
Center punch
■
Hammer
■
Texture hammer, metal stamp, or other
metal-texturing tool
■
Flat or half-round metal file
■
Buffing wheel or bristle disks (optional)
■
Polishing cloth with rouge
■
Drill press or power drill, #51 and #63 bits
■
Ring clamp
■
Flush wire cutters
■
Chain-, round-, and flatnose pliers
■
Nail set
■
Bezel pusher
■
Nylon-coated flatnose pliers
■
Glad® Press ’n Seal™
materials
2
3
1
When the ends are complete, shape the wire
into a circle by pressing it around a necklace
mandrel or coffee can.
Connect the pendant to the neck wire. Open a
jump ring (see the sidebar “Opening and Closing
Jump Rings,” page 4). Slide the open ring through
hole L, and then over the neck wire. Close the jump
ring. Repeat with another jump ring and hole M.
Z
Witchner’s pattern template is marked with letters
that correspond to specific points, as indicated in the
project’s instructions.
Make jewelry
that makes a
statement . . .
your statement
Looking for projects that use different
materials such as metalwork, wirework,
stone, glass, polymer, and enamel? Then
Art Jewelry
is the magazine for you!
Discover the secrets you need to create
breathtaking pieces that express your own
distinctive style like never before! Whether
you want to learn a new technique, try a
different material, or get ideas for your
own jewelry projects, there’s something for
you in
Art Jewelry!
Order online at
Enter code: I4XZ1
or call 800-533-6644
Monday-Friday, 8:30 a.m. - 5:00 p.m. Central Time.
Outside the U.S. and Canada, call 262-796-8776, ext. 661.
I4XZ1
Subscribe
Today!
05X1017
Wyszukiwarka
Podobne podstrony:
connections pre intermediate minimock test 0 4 b
Pryda Timber Connectors Catalogue March 2007
Toys The The Cold Gun
23 299 318 Optimizing Microstructure for High Toughness Cold Work Steels
Ch17 Screw Connections
Artistic Wire Green or Magenta Single Spiral Bead Necklace & Earrings
ar 156 connect 60360892 05 2004
Field of Glory Errata
fiat multipla Nawigator connect nav 60360855 09 2004
Butterworth Finite element analysis of Structural Steelwork Beam to Column Bolted Connections (2)
deer connectdot august5
kawa cold, Kobiece różnosci- przepisy, zbiory przepisów
Portal of Glory
ar 147 connect nav 60389170 05 2008
connection
sprawko tworzywa cold box
Kill The Cold
4 2 4 5 Packet Tracer Connecting a Wired and Wireless LAN Instructions
więcej podobnych podstron