
Project 20391EZ:
Shop-Made Lathe
Chuck
Spigot chucks support blanks for a variety of turning projects, but many facilities
don’t have enough spigot chucks for all the students. One way to fix this problem
is to have students make their own. It’s easy to make, and the only cost involved
other than the wood is the hose clamp.
Shop-Made Lathe Chuck Step-by-Step
Instructions
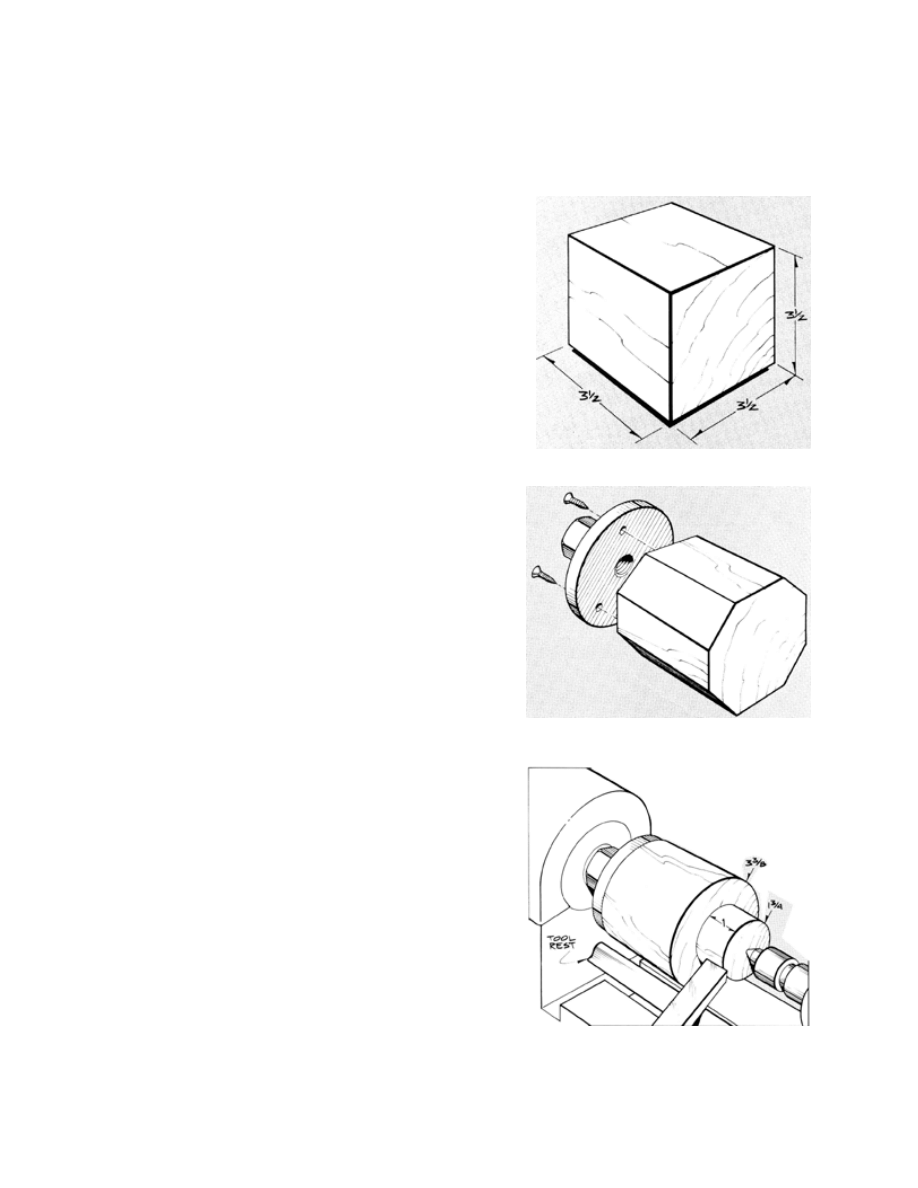
1. Start with a 3-1/2" x 3-1/2" x 3-1/2"
block of hard maple (Figure 1).
2. Use a band saw to cut the corners off,
thereby producing a rough cylinder 3-
1/2" in diameter with the grain run-
ning end to end.
3. Drill pilot holes and use #12 sheet
metal screws about 1-1/4" long (Fig-
ure 2) to attach the block to your
faceplate (the smaller the faceplate,
the better).
4. Mount the piece on the lathe.
5. Bring the tailstock with a live center
up for extra support.
6. Position the tool rest parallel to the
workpieces.
7. Use a roughing gouge to true the
block.
8. Use a square scraper to reduce the
right end of the cylinder to 1-3/4"
diameter and approximately 1" long
(Figure 3).
9. Remove the tailstock.
10. Reposition the tool rest in the front of
the blank at a right angle to the axis
of the lathe.
11. Use a 3/8" spindle gouge to true up
the face of the blank with a light,
shearing cut.
12. Place the point of the spindle gouge
at the center of the blank to begin
hollowing the center.
13. Push the gouge in to produce a hole
1" deep.
14. Withdraw the tool.
Figure 1
Figure 2
Figure 3
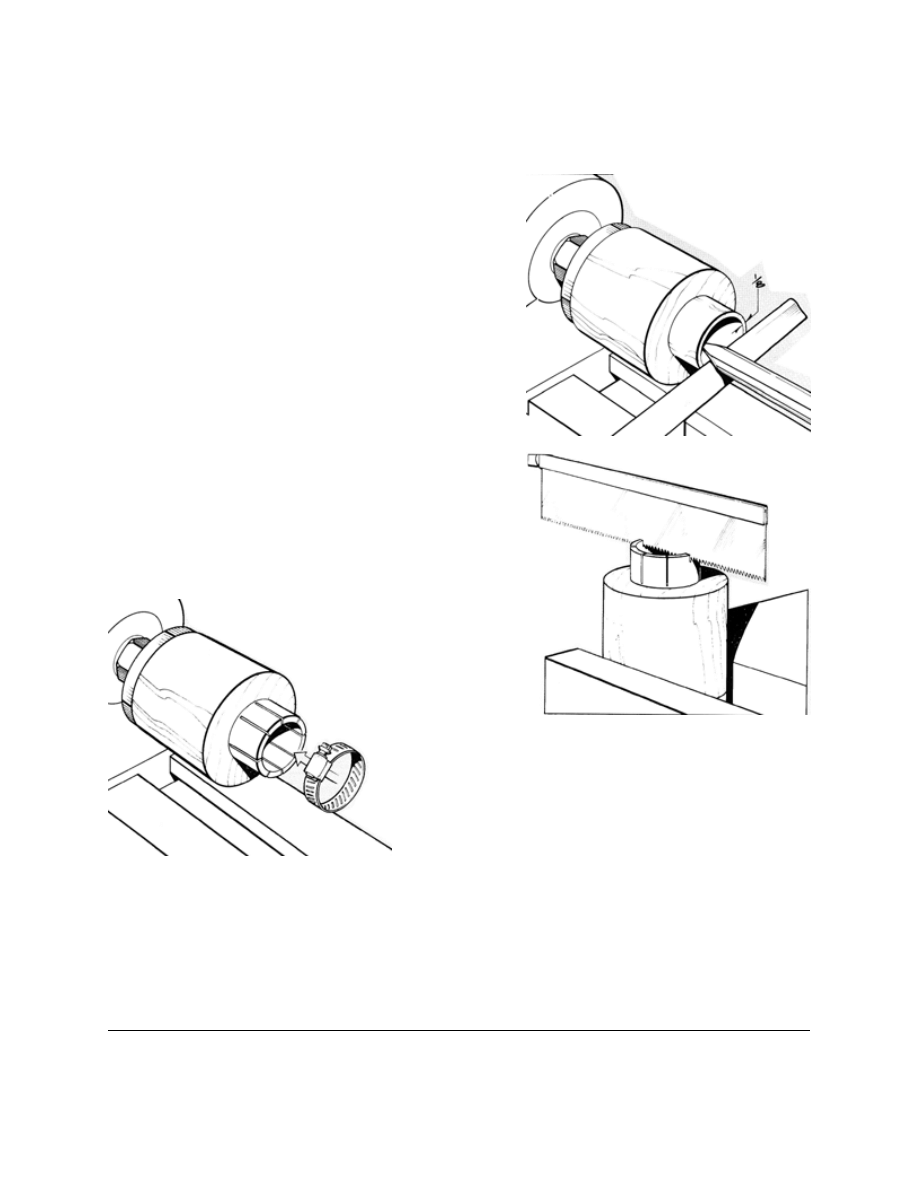
Figure 4
15. Proceed to hollow the opening with the same gouge, being sure to leave the
walls about 1/8" thick and parallel to the outside (Figure 4).
16. Use a scraper to true up.
17. Remove the piece from the lathe.
18. Clamp it upright in a bench vise.
19. Use dividers to make eight equal
segments on the top of the rim.
20. Use a backsaw and, being sure to stay
straight up and down, make a cut
down each mark to the shoulder of
your chuck, creating flexible fingers
(Figure 5).
21. Use 80-grit sandpaper to clean up the
interior.
22. Slide on the hose clamp.
23. Cut the excess metal from the hose
clamp.
24. Position the clamp so it will not catch
on anything.
Figure 5
The tenons on your turning pieces should be
approximately 1/2" long and sized accu-
rately to fit your chuck. If they are too large,
you could break the flexible fingers; too
small and you will not be able to grip the
tenon and hold your stock for turning. Tighten the clamp and test the fit before
turning. If you can still twist the blank in the chuck, remove it and rub chalk
around the tenon to provide enough friction to keep it from spinning.
For added safety, once the turning piece is mounted, you can wrap several layers
of duct tape around the hose clamp to avoid catch your knuckles.
These plans were originally published in Volume 15, Issue 4 of The Woodworker’s
Journal (July/Aug. 1991, pages 40-41).
Figure 6
Wyszukiwarka
Podobne podstrony:
Man Made Wood
Cabinet Shop Made Drawer Pulls
Wood Working Plans for 6 inch Turret Lathe
Diy Workshop Woodwork Plans Drawings For Homemade Wood Lathe
Inspection Guide lathe buy
Cnc Lathe Machining
Fixing to lathe & plaster
Knurling Tool Attachment for Taig Lathe
Lathe Turning Tips
lathe millingattachment plans
Camlock for a Lathe Tailstock by Gareth Bellringer
Lathe foot lathe & drilling stand
Lathe Carriage Stop by Gareth Bellringer
Lathe Coffee Mills
DIY Woodwork Homemade Woodturning Lathe
Grizzly G0602 Lathe Carriage Stop
Camlock for a Lathe Tailstock by Gareth Bellringer
więcej podobnych podstron