
Printer Friendly Version
A Chairmaker's Foot Lathe &
Drilling Stand
A simple foot-powered lathe to build
simple post-and-rung chairs.
The post-and-rung chair is a simple
affair with a super-structure consisting
of spokes with round tenons fashioned
on their ends. Holes drilled into the legs
receive these tenons. Arms, slats
and/or rockers can be added to this
frame. To accommodate this simple and
repetitive joinery, I developed a design
based on two very old woodworking
devices: the foot-powered reciprocating
lathe, and the peg-and-wedge vice. This
easily built machine does take some
practice and acquired skill to use, but it
Here you can see what my lathe
looks like from the side that
contains the drilling shelf.
Page 1 of 6
Popular Woodworking Magazine
2/11/2006
file://C:\---wood projects\Popular Woodworking Magazine6.htm

also overcomes many woodshop
shortcomings if you’re an avid post-
and-rung chairmaker.
Throughout the years I’ve tried cutting
round tenons on the end of chair
spokes many different ways. The foot
lathe is, by far, my favorite. Being that it
is a lathe, both tenons always line up
with each other and a reciprocating
lathe allows work to be done right at the
end of the stock without the possibility
of a spinning “live center” catching the
cutting edge of the tool. Pumping the
foot pedal really isn’t that much work.
Plus, it frees my hands and gives me
greater control of the motion. It also
doesn’t require much work to cut a
tenon on the end of a chair spoke. In
fact, I usually can accomplish the task
in about the same amount of time that it
takes to put the spoke on the lathe and
then take it off.
The peg-and-wedge vice is one of the
most universally adaptable holding
devices available to the woodworker.
These vices are quick and easy to use,
and can be built with scrap lumber in
about as much time as it takes to read
this article.
The pictures that accompany this article
offer some different views of my lathe. I
also show you some of the steps
involved in making a post-and-rung
chair while working on my lathe and
drilling stand.
Building a Lathe
For simplicity and to reduce vibration, I
built my machine running from the floor
to ceiling – 32" is a good working width.
It’s important to position the machine so
that there will be at least 3' of clear
working area on each side, enough
room for the foot lathe side to
accommodate the pedal, and the
drilling shelf side to open into the
assembly area of your shop.
To make a 32"-wide machine, cut your
top and bottom 29" long. Nail the
bottom to the floor and the top to the
ceiling. These two pieces must be plum
and in line with each other.
Cut your side pieces to fit snuggly
between the floor and the ceiling. On
your side pieces, cut notches to receive
the crosspieces. The top of these
notches should be about 36" up from
Here you can see the spoke set up
and ready for turning some tenons.
Eyeball the center of the chair leg
and mark it before you drill the
hole.
Here you can see I'm drilling a hole
in the chair leg.
Page 2 of 6
Popular Woodworking Magazine
2/11/2006
file://C:\---wood projects\Popular Woodworking Magazine6.htm

the floor. (It is important that the
crosspieces that will fit into these
notches be level and square to the
uprights.) Toenail the uprights into
place.
Cut your two crosspieces, your shelf
and the shelf back 32" long. Attach a
29" strip of angle iron or small strip of
wood to one side of each crosspiece.
Attach the strip as close to the bottom
edges as you can and still have it
strong, leaving room at the ends for the
notches. Place these two crosspieces
in the notches with the strips of angle
iron on the inside bottom edge. Drill and
install the four 7-½" lag bolts with their
ends countersunk flush.
Now it's time to make the puppet end
block and the puppet end point. The
puppet end point is a short piece of
threaded rod or bolt that has been
ground to a point on one end and
mounted through the puppet end block.
It would be in the same place as the
dead or moveable center on a standard
power lathe. Out of a scrap of 2 x 6,
make the puppet end block so that it
slides easily between the two
crosspieces. Cut notches to
accommodate the angle iron.
The puppet end point is installed in the
top center of the puppet end block so
that it sits about 1" above the top of the
crosspieces. Before installing the short
lag bolt, grind a point a little less than
45° on its end.
If you’re right handed, drill a hole in the
center of the right-hand (facing the
machine from the foot-lathe side)
upright for the long carriage bolt to slip
through. This hole should line up at the
same height as the puppet-point end.
Grind a point on the end of the carriage
bolt, use a stick of wood for the handle,
and put together the screw-end
assembly with a wing nut and washer
on each side of the upright.
From 1" stock, cut the spacer boards.
These boards should have a width so
that when they are resting on the angle
iron their top edge is at the same height
as the two end points. For each size
spoke I use in my chairs, I have a pair
of spacer boards that are two inches
longer then the length of the spoke. The
end cuts on the boards are beveled to
This is a close look at my drill bit
going into the drill leg while
secured on my drilling shelf.
Now I'm measuring the angle for
the holes located in the sides of the
chair legs.
Here you can see I'm chopping out
a slat mortise for my chair.
This is the proper stance when
turning on the foot lathe.
Page 3 of 6
Popular Woodworking Magazine
2/11/2006
file://C:\---wood projects\Popular Woodworking Magazine6.htm
help them stay in place.
With the spacer boards and puppet end
blocks in place, drill a 1" hole through
the crosspieces behind the puppet end
block, leaving a small space for the
wedge. This 1" hole should go through
both crosspieces and be nearer to the
top. A long, removable hardwood dowel
goes in this hole. (Other holes for
different size spokes can be added
later.)
Install the hook in the center of the
short 2 x 8 nailed to the ceiling. Mount
the foot pedal to the floor with the door
hinge. Attach the bungee cord to the
hook. Tie a length of the nylon rope
between the end of the bungee cord
and the end of the foot pedal. Make a
wooden wedge to secure the puppet
end block and the spacer boards. And
there you have it – a working foot lathe.
Helpful hint: Many different things can
be used for a return spring (in my first
lathe I used the spring off of the screen
door). The spring and the rope will wear
out eventually and you will probably
need to experiment some before you
find out what works best for you. If you
use a heavier return spring you can
counter weight the foot pedal for more
torque and momentum.
Wedges with a more acute angle hold
better. A little wedge between the
puppet end block and a crosspiece
helps keep things tight.
The Drilling Shelf
Cut three shelf supports 7" long. Cut 1-
½"-long tenons with ¼" shoulders all
the way around on one end of each
piece. Glue and clamp these shelf
supports cross ways to the shelf. One
of the shelf supports should be in the
center of the shelf. The other two
should be recessed 1-½" from each end
of the shelf. The ends of the shelf
supports should be flush with an edge
of the shelf and the shoulders of the
tenons should be flush with the other
edge.
Cut through-mortises in the shelf back
to accept the three tenons. These
mortises should be centered on the line
3-¾" down from the edge of the shelf
back.
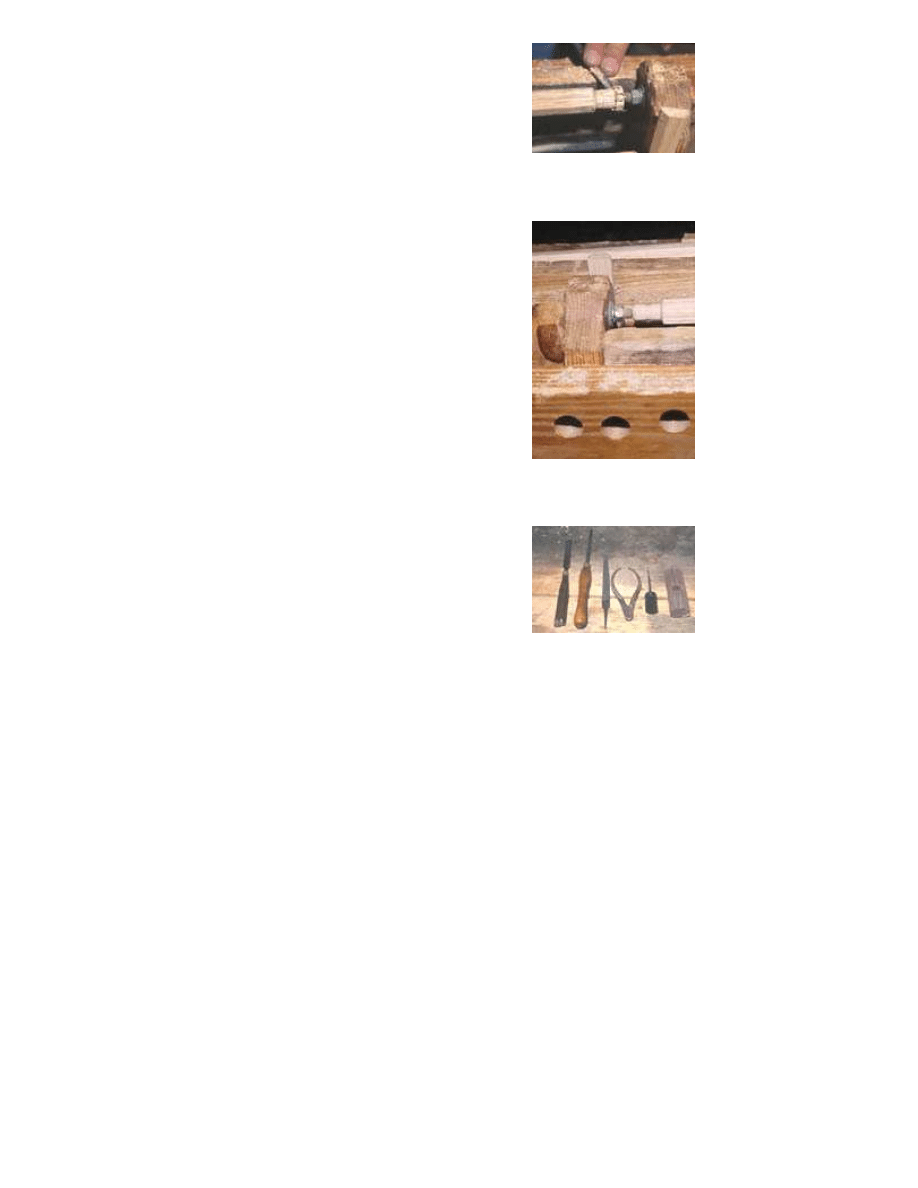
After the glue has set, saw a kerf all the
Here's a close look at what a tenon
looks like while being turned.
This is what a finished tenon looks
like.
Here's a peek at a few of my
turning tools.
Page 4 of 6
Popular Woodworking Magazine
2/11/2006
file://C:\---wood projects\Popular Woodworking Magazine6.htm

way down to the shoulder ½" in from
each edge of each tenon. Make
wedges to fit the kerfs for spreading the
tenons.
Glue the mortises and the inside edge
of the shelf. Assemble and clamp
carefully so that the shelf is square with
the back. Drive the wedges to tighten
the tenons. From the back, drill for and
install four of the 3" lag screws through
the back and into the shelf. Countersink
their heads flush with the back.
Mount the drilling shelf to the uprights
with the other two 3" lag screws.
Countersink these screws well below
the surface of the backstop. Make sure
the shelf is level and square with the
uprights.
Cut two shelf braces that will fit
between the outer corners of the shelf
and the bottom of the uprights. Nail the
supports in place along with angle
bracing between the uprights and the
bottom of the inner cross piece.
Drill three 1" holes in the surface of the
shelf centered over the short shelf
supports. Put a 3/8"-diameter wooden
dowel on either side of these holes to
help keep the shelf and the shelf
supports together.
I like to make the 1" pegs out of
hardwood. I chop the wedges out of 2 x
4 pine stock.
Using Your Machine
The foot lathe is very simple to operate.
It doesn’t take long to get the
coordination of cutting only on the down
stroke. The top of the stock should spin
towards you as you step on the pedal.
The direction of the spin is determined
by which way you wrap the rope around
the stock. The spacer boards act as the
tool rest, and sometimes when turning
big stock or a spoke with a pronounced
crock, I’ll chop away some of the inside
top corner of the spacer boards to
make room.
I wouldn’t want to do a lot of big work
on this kind of lathe, but for turning
tenons on the ends of chair spokes, I
find it quick and efficient.
Not only does the drilling shelf hold the
leg securely while I drill my holes, it is
Page 5 of 6
Popular Woodworking Magazine
2/11/2006
file://C:\---wood projects\Popular Woodworking Magazine6.htm

also used to get the holes in proper
alignment and angle. I always drill
horizontally. I use a Band-Aid wrapped
around the drill bit as my depth stop to
the outer edge of the shelf.
Perpendiculars or measured angles can
be drawn on the shelf. The angles for
which the holes for the side spokes are
to be drilled can be measured by using
the surface of the shelf and the edge of
the upright as an imaginary square.
Also, the shelf holds the legs for my
chairs while I chop out the slat mortises
with the chisel.
The squareness of the back and front
chair panels can be checked against
the edge of the cross pieces and the
sides of the uprights.
I even flip the frames upside down and
clamp them to the shelf when I make
the joints for the rocker.
There are many different ways this
machine can be used to drill holes at
their proper angle and hold pieces of
wood in a convenient manner.
Maintenance
Some parts of the machine will wear
out over time. A good rope will last a
dozen chairs or more. High-quality
bungee cords will last maybe two years.
And about every 100 chairs or so I
need to replace the drilling shelf. Wear
and tear, and the heat from friction can
mess up the threads on the carriage
bolt in the screw-end assembly. I’ve
replaced this carriage bolt maybe three
times in the last 15 years.PW
Owen Rein is a renowned chairmaker residing in
Mountain View, Ark.
Return to Free Projects Plans
© Popular Woodworking •
F+W Publications Inc.
Customer Service FAQs
Page 6 of 6
Popular Woodworking Magazine
2/11/2006
file://C:\---wood projects\Popular Woodworking Magazine6.htm
Wyszukiwarka
Podobne podstrony:
Inspection Guide lathe buy
Cnc Lathe Machining
Fixing to lathe & plaster
Knurling Tool Attachment for Taig Lathe
Lathe Turning Tips
lathe millingattachment plans
Camlock for a Lathe Tailstock by Gareth Bellringer
Wood Working Plans for 6 inch Turret Lathe
Lathe Carriage Stop by Gareth Bellringer
Lathe Coffee Mills
Diy Workshop Woodwork Plans Drawings For Homemade Wood Lathe
DIY Woodwork Homemade Woodturning Lathe
Grizzly G0602 Lathe Carriage Stop
Lathe Shop Made Wood Lathe Chuck
Camlock for a Lathe Tailstock by Gareth Bellringer
LeGuin, Ursula K The Lathe of Heaven
więcej podobnych podstron