
Shaker 4-posted design Bed
The bed presented here is a variation of a Shaker 4-posted design, often called a
pencil-post bed because of the thin octagonal posts. The bed looks good in
contemporary homes, but its origins are in the Middle Ages, when canopied beds
came into use. At that time, woven tapestries were often draped over a heavy
frame for both decorative and practical effect because they kept the occupants
warm in the absence of efficient heating systems.
Our plans accommodate a queen-size mattress without needing a box spring. If
you want to use a box spring, position the framework to yield the proper bed
height.

Materials List
Pencil-post bed
Key No.
Size and Description (use)
A
4
2 3/4 x 2 3/4 x 80" cherry (post)
B
1
1 x 16 x 60 3/4" cherry (headboard)
C
2
1 1/4 x 6 1/2 x 60 3/4" cherry (end rail)
D
2
1 1/4 x 6 1/2 x 80 3/4" cherry (side rail)
E
2
1 x 5 x 58 1/4" poplar (end support rail)
F
2
1 x 5 x 79" poplar (side support rail)
G
2
1 3/8 x 4 x 80 3/4" poplar (side support)
H
14
3/4 x 5 x 60 3/4" maple (slat)
Misc:
8 No. 6021 bed bolt covers
8 no. 6010 bed bolts
1 No. 6012 wrench from
Paxton Hardware
7818 Bradshaw Rd.
PO Box 256
Upper Falls, MD 21156
4 No. 31823 cross dowels from
Woodworker's Store
21801 Industrial Blvd.
Rogers, MN 55374
4 1/4-20 flat head screws
1 1/4" No. 8 flat head screws
2" No. 8 flat head screws
Watco Danish Oil Finish
4/0 Steel wool
varnish
The Posts
Begin by preparing the blanks for the bedposts.
Glue up stock if necessary, then joint, rip and
crosscut the blanks to 2 3/4 in. wide
€ 80 in. long.
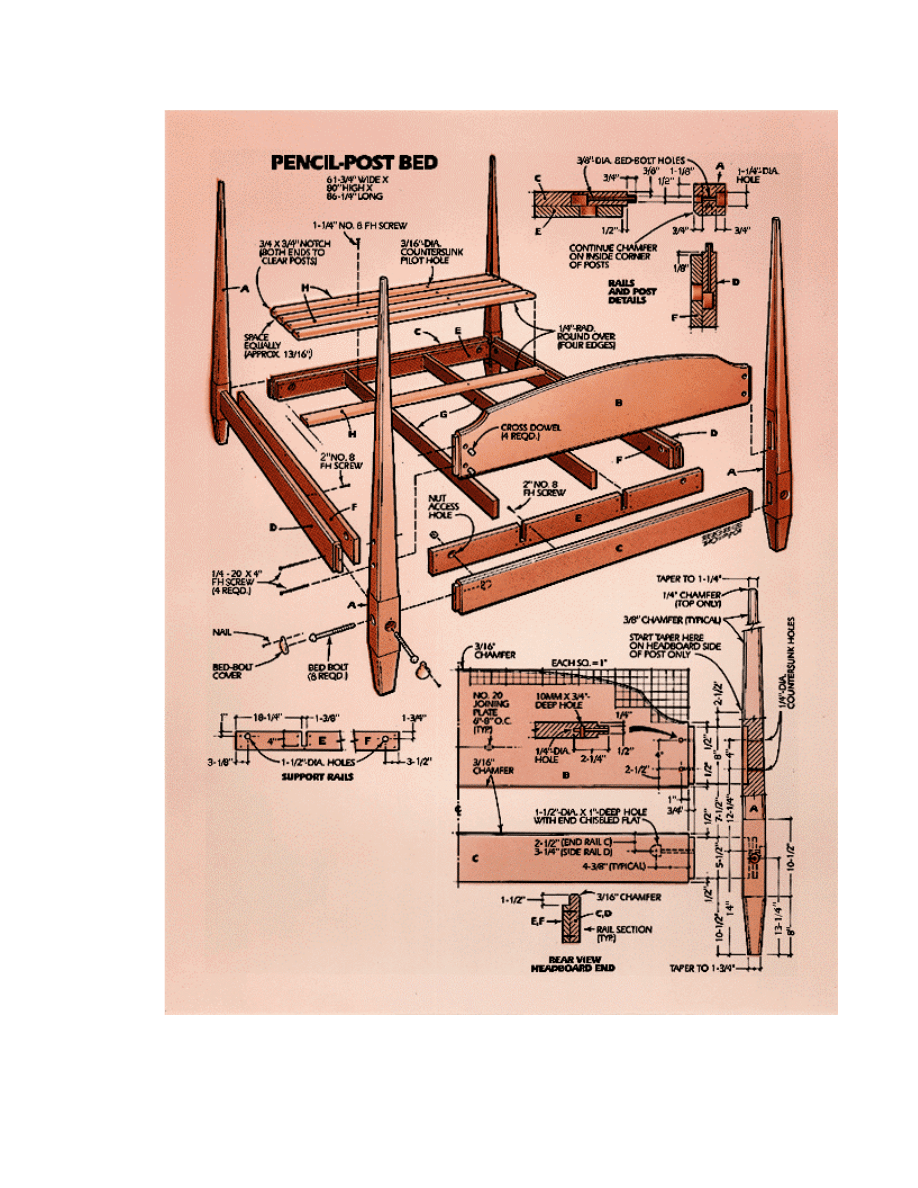
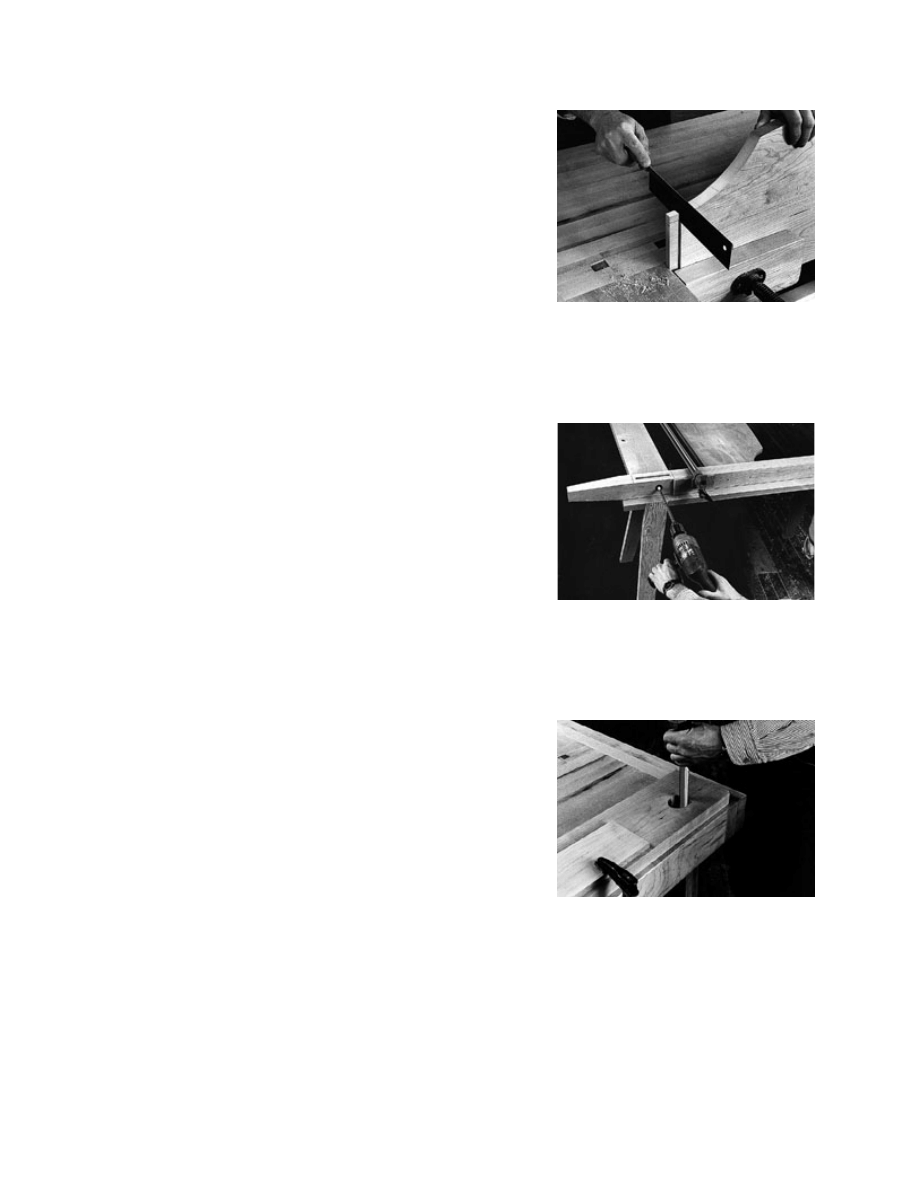
Use a long straightedge to lay out the tapers on
each side of the posts (Photo 1). The taper on
the inside edge of the headboard posts begins
15 in. higher than the other tapers. This allows
for a square joint with the headboard.
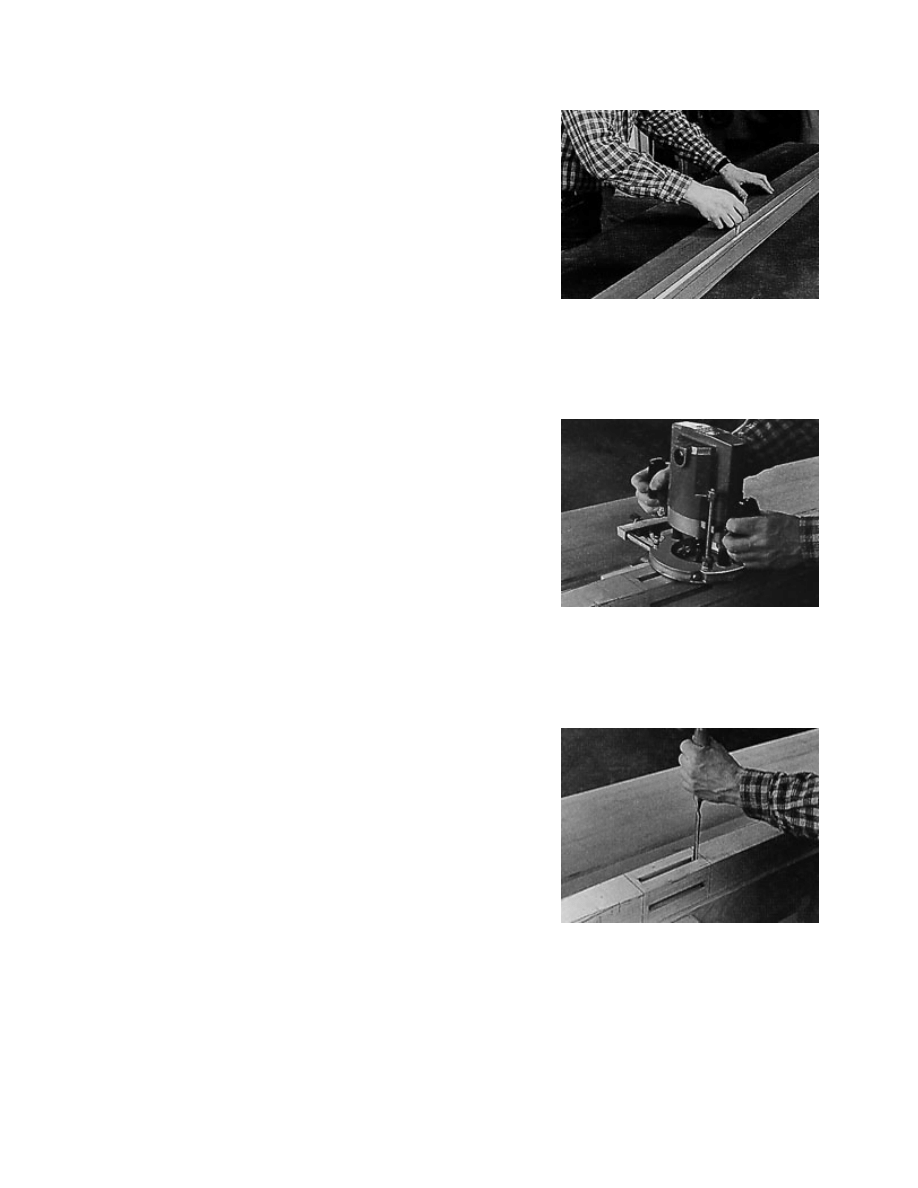
Lay out and cut the mortises in each post at this
point -- it's easier to do this now, while the posts
are straight, than after the tapers are cut. The
quickest way to cut the post mortises is by using
a plunge router with a 1/2-in.-dia. straight bit.
Clamp the workpiece between bench dogs, and
use an edge guide on the router to make the cut
(Photo 2). Cut each mortise in two or three
passes to avoid overloading the router. After
making each cut, use a sharp chisel to chop the
mortise square (Photo 3).
To make the bed easier to move, its joints are
bolted together rather than glued. This
construction requires that you bore a hole
through the mortise bottoms and bore a matching
hole into the tenons on the rails and headboard.
Use the drill press to bore the 3/8-in.-dia. holes
through the rail mortises and the 1/4-in.-dia.
holes through the post mortises for the
headboard.
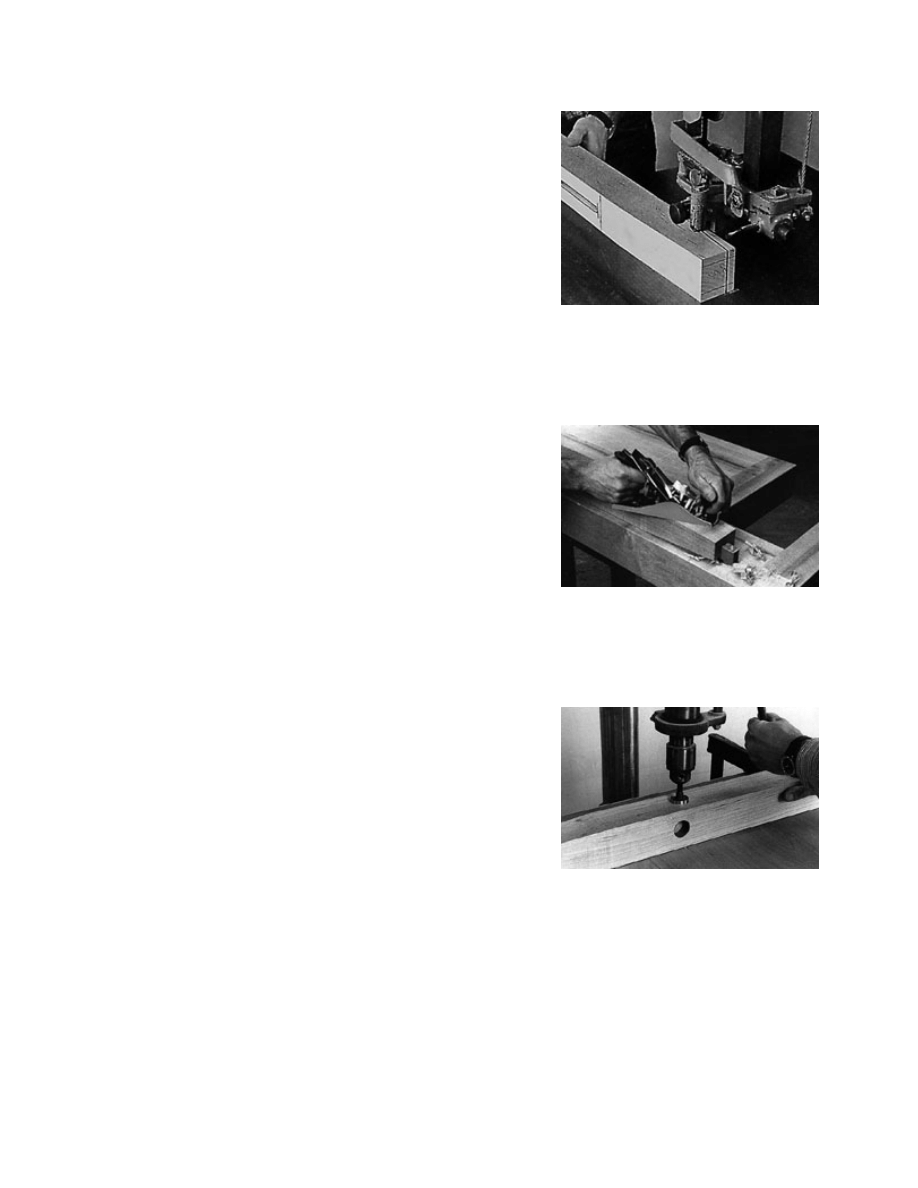
Use the band saw to cut the tapers on each post.
Note that the tapers are also marked on the
posts' ends (Photo 4). Cut two tapers, then use
the marks on the ends of the posts to draw the
tapers on the newly sawed surfaces. Also, use a
roller stand or have a second person help you
when sawing the tapers. The posts are simply
too long to saw without support. Use a sharp and
finely set hand plane to smooth the cut surfaces
and to refine the tapers (Photo 5).
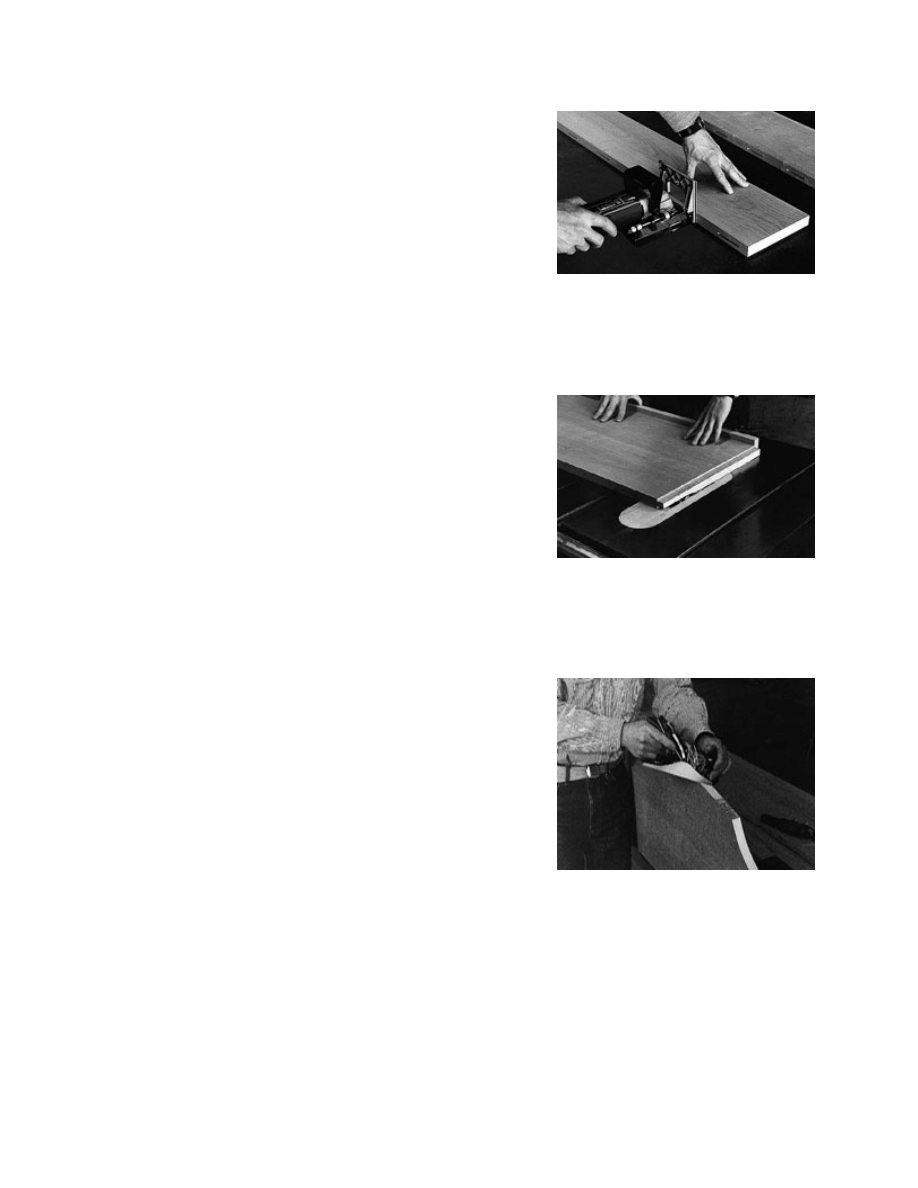
Next, use a Forstner or multispur bit to
counterbore the bolt holes on the outside surface
of each post (Photo 6). Then use a countersink
to recess the holes for the headboard screws.
1 Rip and crosscut the post blanks, and
use a long straightedge to mark the taper.
Also mark the mortise positions.
2 Cut the post mortises before sawing the
tapers. Use a plunge router or bore out
the mortises on the drill press.
3 Clamp the posts firmly to the bench,
and chop the ends of the post mortises
square using a sharp chisel.
of each post (Photo 6). Then use a countersink
to recess the holes for the headboard screws.
Cut the 3/8-in.-wide chamfers along the tapered
edges of each post using a chamfer bit in the
router. The chamfers on the inside post corners
run the length of the post, while the remaining
chamfers are stopped just above the point where
the rails join the post. Use a sharp plane or chisel
to cut the chamfers at the top of each post.
4 Saw two tapers, then use the marks on
the ends of the posts to redraw the tapers
on the sawed surfaces.
5 Smooth the sawed surfaces and refine
the taper with a hand plane. Set the plane
to take a fine shaving.
6 Counterbore the bed bolt holes and
headboard screwholes in the posts. Use
a Forstner bit in the drill press.
The Headboard and Rails
Rip, crosscut and joint the stock for the
headboard so it forms an oversize blank. Also
rip, crosscut and joint the stock for the bed rails
and the support rails.
Position the headboard stock so it forms a blank
with the grain positioned attractively, then mark it
for joining plate slots 6 in. to 8 in. on center
along the mating board edges. Don't position a
plate too close to the blank edge -- you might
expose the plate when cutting the headboard to
shape. Hold the headboard pieces firmly to a
flat, clean worksurface, center the plate joiner on
the mark and make the plunge cut (Photo 7).
Apply glue to the board edges, slots and the
biscuits. Clamp the assembly, and when the
glue sets, plane and scrape it smooth.
The headboard joins the two front posts with two
tenons that run nearly the width of the
headboard. To ensure tight-fitting joints, it's
important that the headboard be perfectly
rectangular. Crosscut the headboard blank on
the radial-arm saw or table saw. With either
machine, be sure you are making a square cut.
Cut the tenons on the ends of the headboard
and on the bed rails using the dado blade in the
table saw (Photo 8). The headboard and rails
have shoulders on the top and bottom of the
tenon. To cut the shoulders on the rails, readjust
the blade height on the table saw, stand the rail
on edge and cut the shoulder. The headboard
shoulders are cut later with a handsaw.
Lay out the curved shape of the headboard, and
make the cut with a sabre saw just to the outside
of the line. Clamp the workpiece in a vise, and
use a sharp and finely set plane and
spokeshave to smooth the cut surfaces and
work down to the line (Photo 9). Then mark the
shoulders on the top and bottom edges of the
headboard tenon, and make the cuts using a
dovetail saw (Photo 10).
7 Rip and crosscut the headboard stock
oversize. Cut joining plate slots in the
stock, then glue and clamp the stock.
8 Saw the headboard tenons using a
dado head on the table saw. The tenon
width here requires great accuracy.
9 Saw the headboard to shape. Smooth
away saw marks and refine the shape
using a smooth plane and spokeshave.
dovetail saw (Photo 10).
Next, using a router and chamfer bit, cut
chamfers on the top edges of the bed rails and
the top and bottom edges of the headboard.
Dry assemble the headboard and head rail to
the posts. Clamp the subassembly, and use a
long 3/8-in.-dia. bit to bore slowly through the
post into the end of the rail tenons (Photo 11).
Use a 1/4-in.-dia. bit for the headboard joints.
Bore the other holes for each bolted joint.
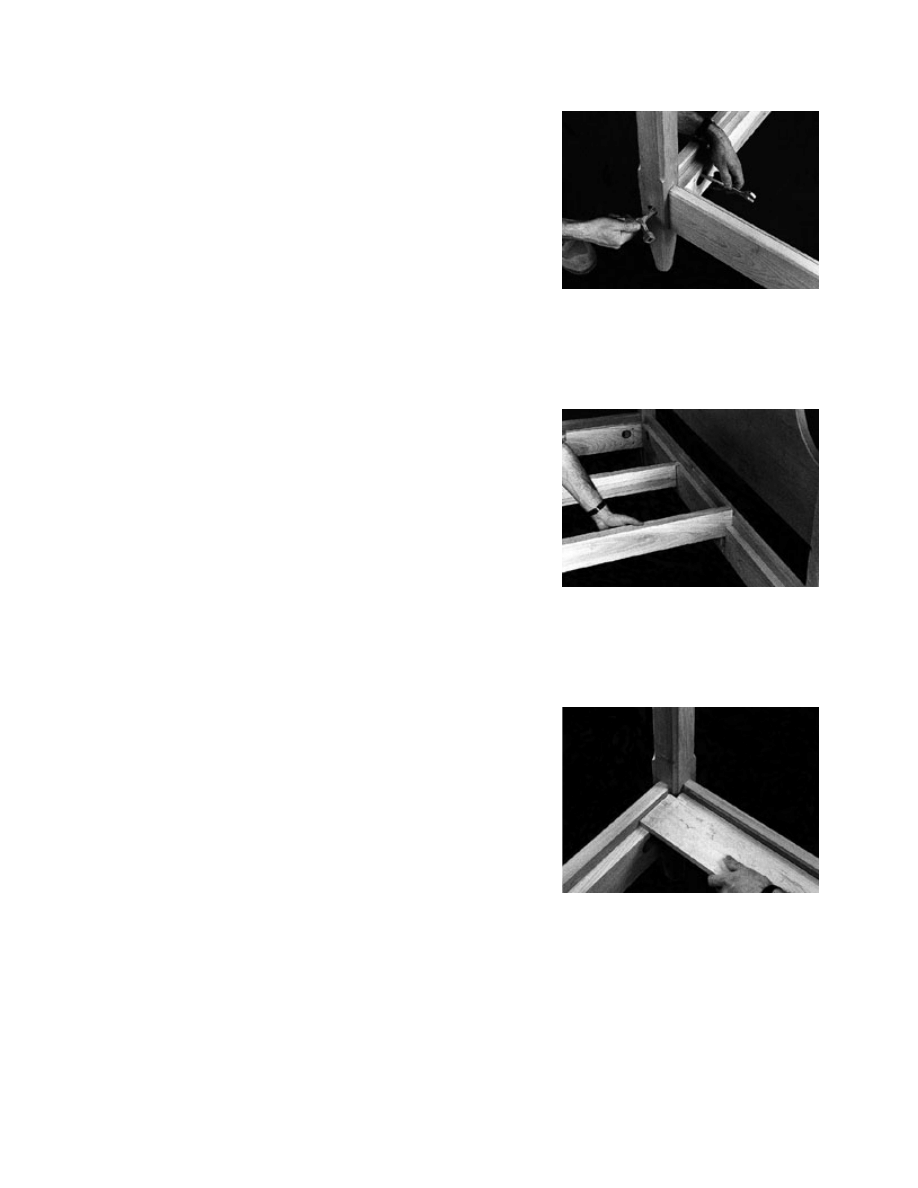
Now, lay out and bore the pocket holes for the
bed bolt nuts on the inside of the bed rails. Use
a Forstner bit in the drill press to bore the holes,
then use a chisel to square the sides of each
hole, forming a flat surface on which the nut can
bear (Photo 12).
Using the drill press, bore the 10mm-dia. holes
for the cross dowels in the back of the
headboard. To get the hole in a cross dowel
aligned with the hole in the end of a tenon, poke
a screw into the tenon and twist the cross dowel
with a screwdriver so you can thread the screw
into the cross dowel (Photo 13).
Rip and crosscut the poplar stock for the end
support rails. Then, bore the access holes for
the rail bolts. Remember to bore the holes so
they are offset from those in the outer rails.
When the two rails are joined, this allows better
access to the rail nuts than if the holes were
aligned.
Cut the notches in the end support rails with a
handsaw (Photo 14), and then chop the notches
square with a chisel.
10 With the headboard edges smoothed,
mark and cut the shoulders at the top and
bottom of the tenon.
11 Use a long bit to bore slowly through
the post holes and into the headboard
and rail tenons.
12 Use a chisel to cut a flat surface into
the hole on the side rails. The bed bolt
nut bears on the flat surface.
13 Bore 10mm holes for cross dowels in
the back of the headboard. Turn the
dowel to align its hole with the screw.
14 Clamp the end support rails firmly
together, and cut the cross support
notches in them using a handsaw.
Assembly
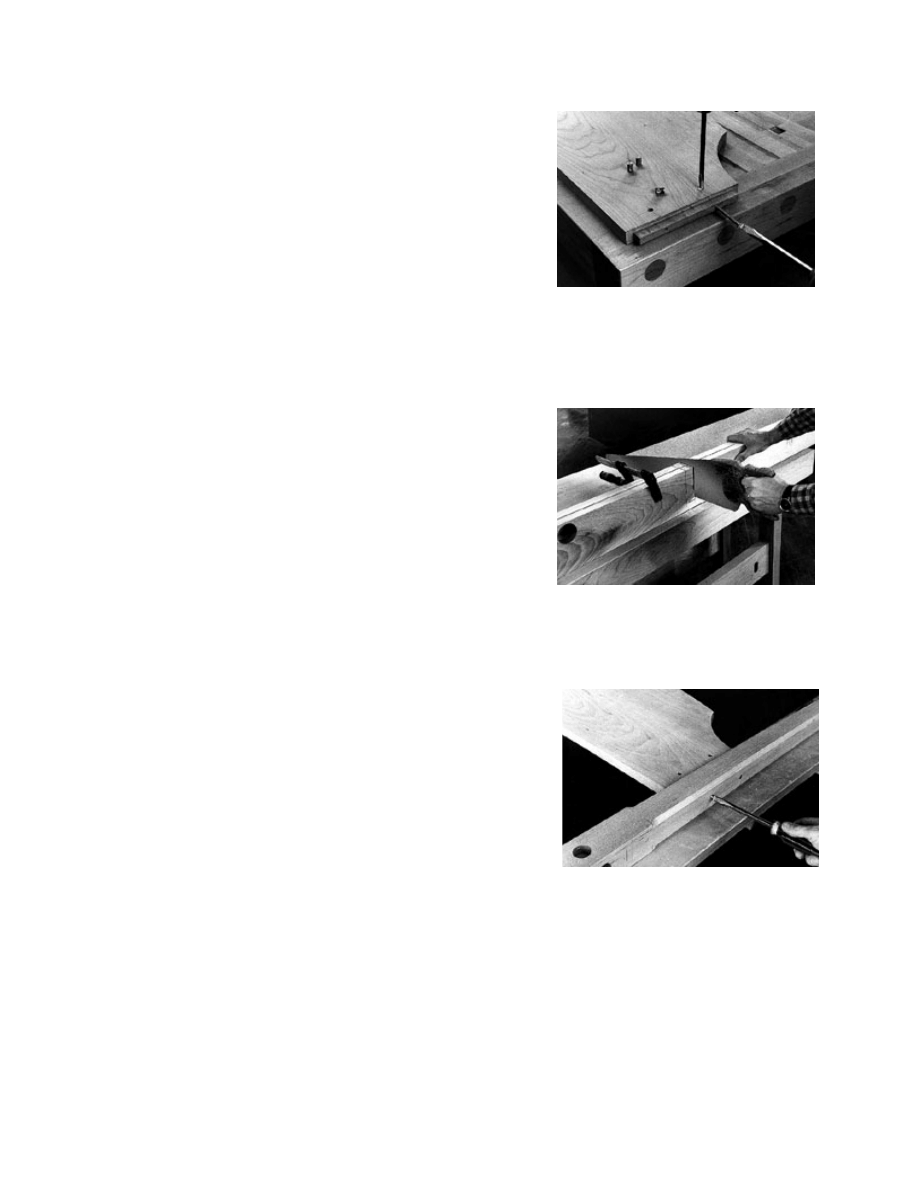
Bore and counterbore pilot holes through the
poplar rails to screw them to the cherry rails.
Bore a screwhole below the notches in the head
and foot rails. Clamp the rails together, and drive
screws through the holes. Screw the headboard
to the posts (Photo 15), and use bed bolts to
attach the head rail to the posts. Follow the same
procedure for the foot rail and posts. Have an
assistant help you bolt together the head and
foot assemblies with the side rails. Tighten the
bolts using a bed bolt wrench (Photo 16).
After the frame is assembled, install the cross
supports by sliding each into its notches (Photo
17).
Rip and crosscut the maple bed slats, then cut
the notches in the slats at the head and foot of
the bed to fit around the posts (Photo 18). Bore
and counterbore pilot holes in the slats, then use
a 1/4-in.-rad. rounding-over bit mounted in a
router table to cut the slats' edges. Screw the
slats to the cross supports using 13/16-in. spacer
blocks between each (Photo 19).
Disassemble the bed, and sand all parts with
220-grit sandpaper followed by 320-grit paper.
Apply four coats of Watco Danish Oil Finish
using a brush or rag, and let it soak in for 20 to
30 minutes, then wipe it off. Let the piece dry
overnight between coats. After the final coat has
dried, rub it smooth with 4/0 steel wool. The
maple slats need no finish, but a coat of varnish
seals them.
Reassemble the bed and nail the bed bolt covers
in place. Each cover should be loose enough to
swivel.
16 Use a bed bolt wrench and an open-
end wrench to tighten the connection
between the rails and posts.
17 Prepare for installing the slats by fitting
the cross supports into the notches that
are cut in the end support rails.
18 Cut the slat stock. Cut notches in the
slats at the foot and at the head of the
bed so they fit around the posts.
19 Position 13/16-in.-wide spacer blocks
between the slats, and screw the slats to
the cross supports.
Wyszukiwarka
Podobne podstrony:
4 Poster Bed(1)
Bed faux poster bed
4 Poster Bed(2)
Bed Shaker Style Bed
poster 040
Posterior Capsular Contracture of the Shoulder
PERI Trio 330 poster
poster sorbenty mineralne
Postery 14
Posterior Diaphragm KT method
BPMN2 0 Poster EN id 92566 Nieznany (2)
The Four Preliminary Contemplations
The Culture of Great Britain The Four Nations Scotland
BPMN Poster PL id 92560 Nieznany (2)
insektycydy2009 IRAC MoA poster Nieznany
wanted poster filled in
Shaker
Summaries of the Four Arab Israeli Conflicts in the th?n
FLEXI BAR poster2
więcej podobnych podstron