T
he Shakers lived their lives
apart from the “world,” what
they called life outside their religious
communities. They did a lot of things
differently from the “world,” including
sleep. Because the Shakers were celi-
bate, they had little need for double
beds and used them only to save
space. Two men, women, or children
would sleep together in these.
Many Shaker-designed single beds
did not break down. The side rails
were tenoned into the legs just like
the headboards and footboards.
Almost all of the beds had casters on
the legs. This made it easy to move
the bed out of the way when sweeping
the floors. The beds were also relative-
ly high off the ground to keep out of
the cold drafts near the floor.
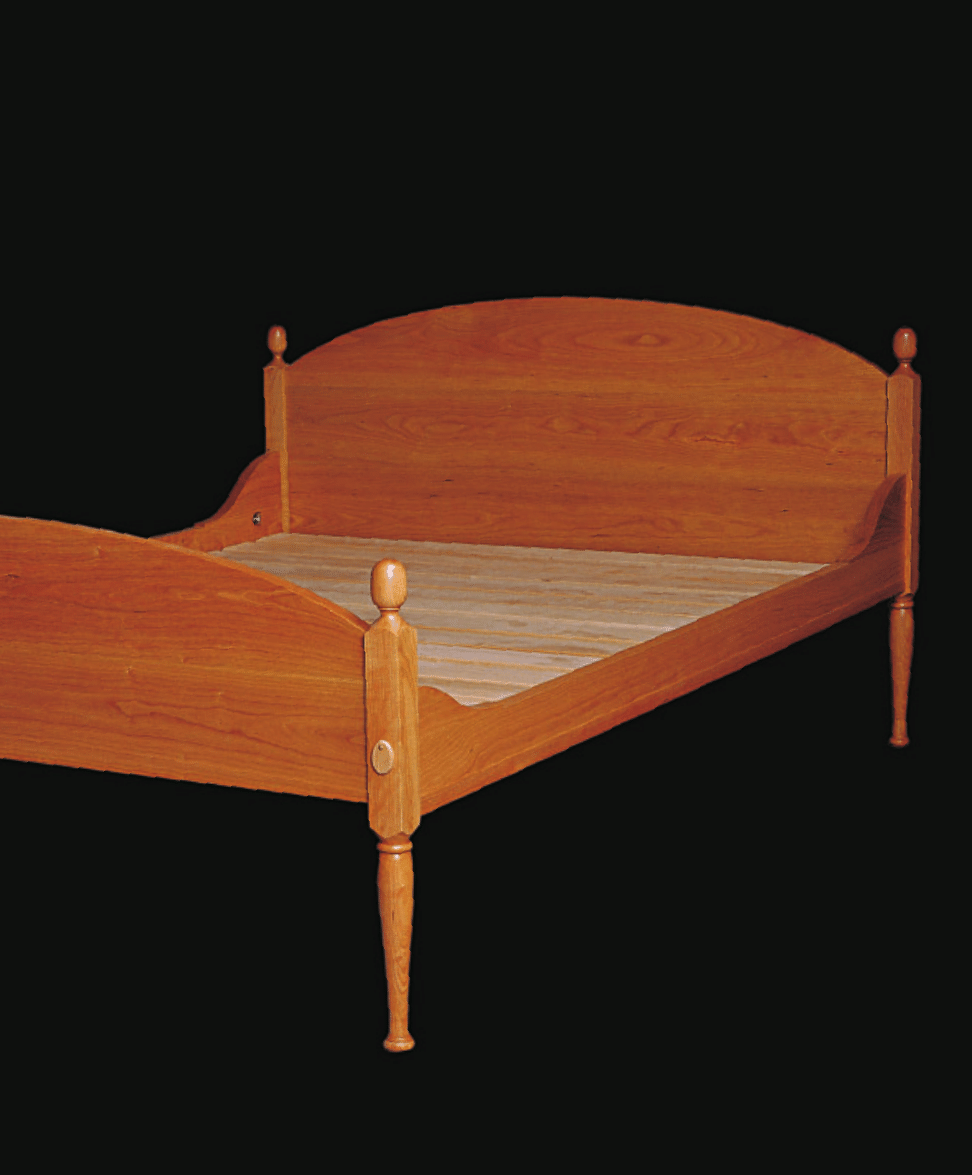
This bed is not a copy of a particular
Shaker bed. Instead, I have borrowed
elements from a number of Shaker beds
I have seen. Some of my construction
details remain faithful to traditional
Shaker construction. But I have made
concessions to modern living and to
contemporary woodworking techniques.
I chose to make this a full-size bed,
which is more useful than the 28-in.-
to 34-in.-wide and 70-in.- to 72-in.-
long originals. I also omitted the
casters. I hesitate to say that these
changes make the bed better, but they
certainly make it more familiar and
comfortable for us today.
Shaker-Style Bed
3 7
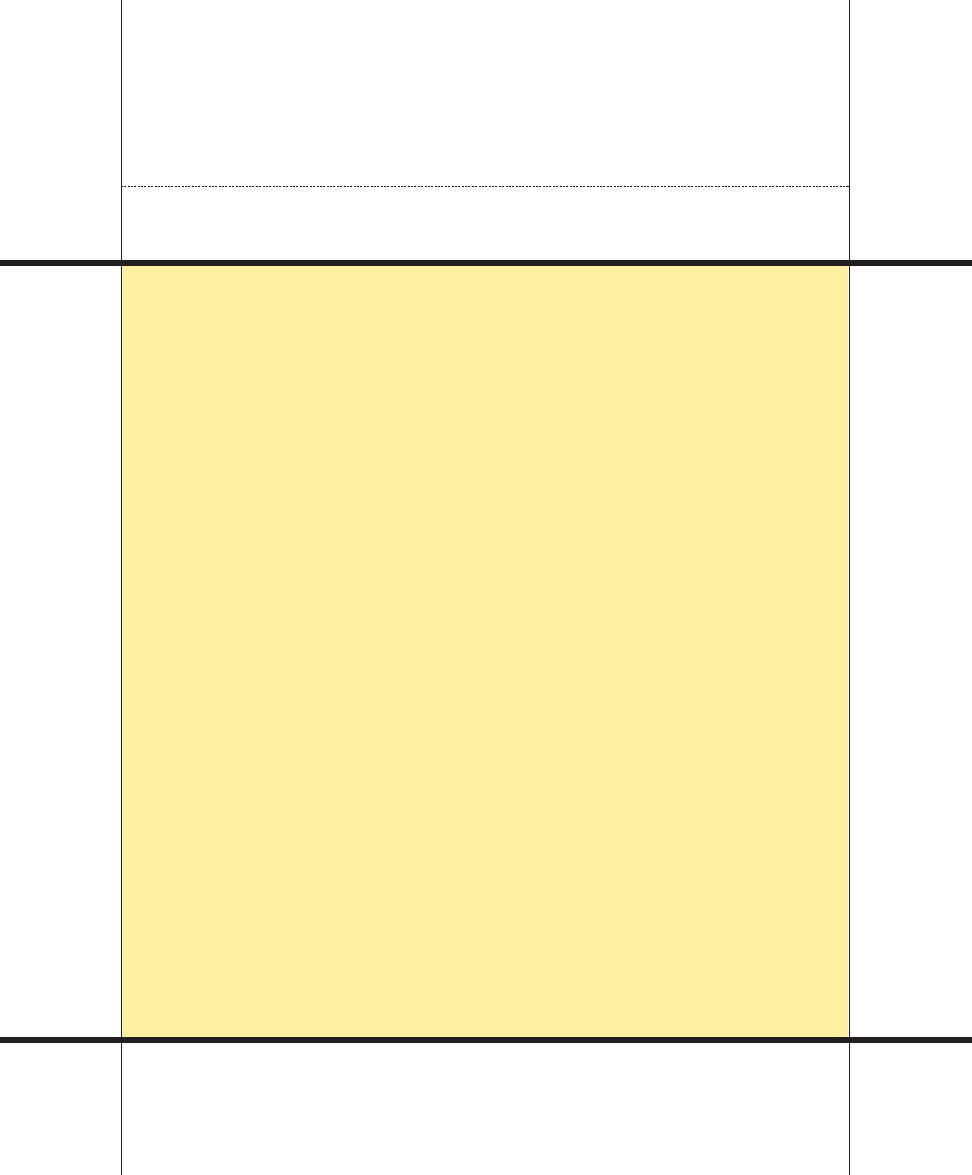
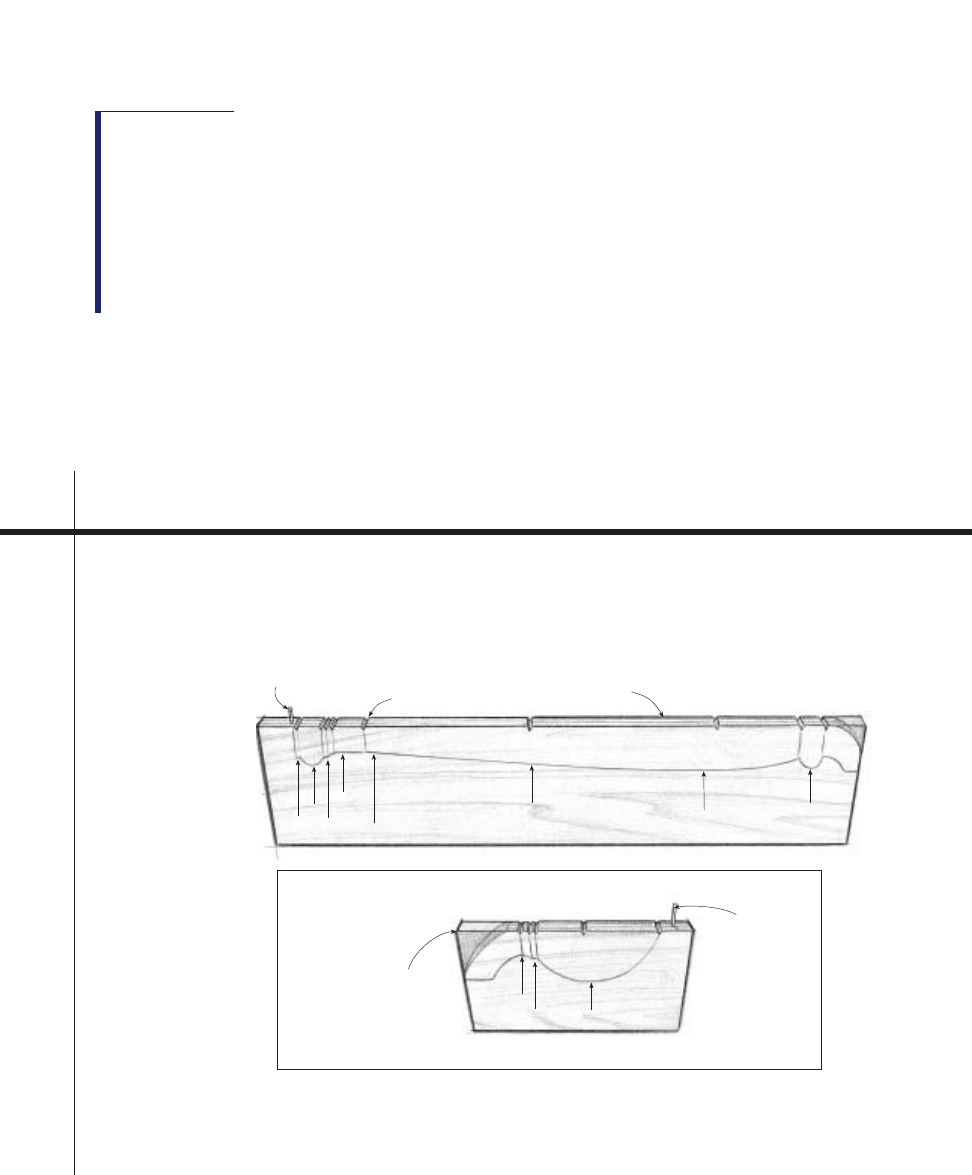
THE BASIC STRUCTURE of the Shaker-Style Bed
is similar to the First Bed. However, the legs are
turned, the headboard and footboard planks do
double duty as structural rails, and the cleats are
integral with the side rail design.
Shaker-Style Bed
3 8
S
H A K E R
-
S
T Y L E
B
E D
Twin*
18
1
⁄
2
”
12
3
⁄
4
”
Queen
22”
14
1
⁄
4
”
* For a twin bed, shorten the headboard square
section to 14
1
⁄
2
” and make the height of the
headboard 13
1
⁄
4
” where it meets the leg.
Note: A king-size Shaker-Style Bed is not recommended.
OTHER BED SIZES
Side rail
Headboard
Rail
Cleat
Footboard
height in center
Headboard
height in center
Square
section
Slats
Bolt hole
cover
S
H A K E R
-
S
T Y L E
B
E D
3 9
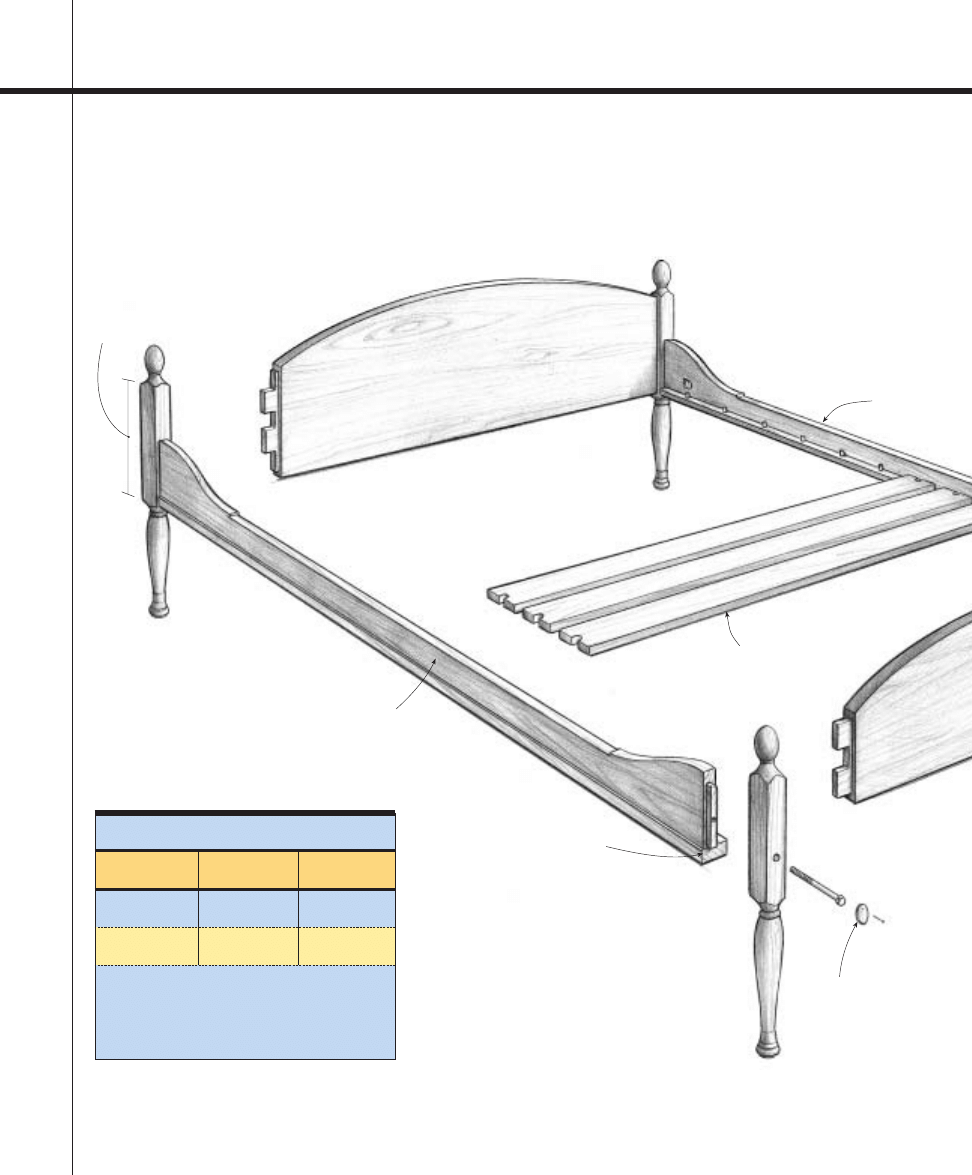
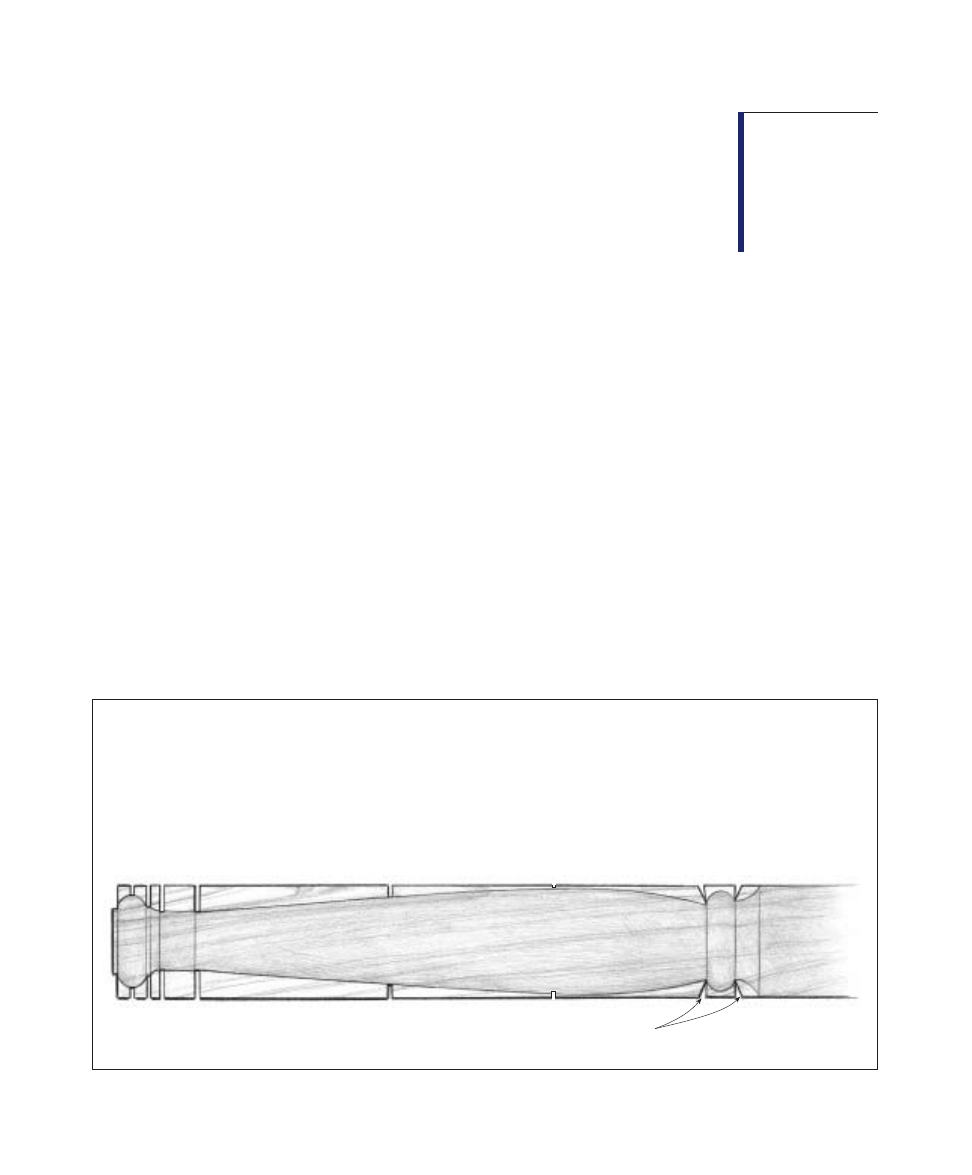
Footboard
HEADBOARD END OF SIDE RAIL
6
3
⁄
4
”
FOOTBOARD END OF SIDE RAIL
1
1
⁄
4
”
Headboard leg
Rails are
1
1
⁄
16
” thick.
The overall length of the headboard and
footboard planks (including tenons) is 56
3
⁄
8
”.
HEADBOARD DETAILS
53
3
⁄
16
” to opposite leg
Headboard (1
1
⁄
16
” thick)
FOOTBOARD DETAILS
Footboard leg
This curve is a section of an
ellipse with a minor diameter of
18” and a major diameter of 58”.
Footboard (1
1
⁄
16
” thick)
WOODEN BOLT HOLE COVER
2”
32”
Chamfer
13
5
⁄
8
”
53
3
⁄
16
” to opposite leg
8
3
⁄
4
”
26”
12”
1
3
⁄
4
”
3”
3”
10”
4
3
⁄
8
”
1”
Cleat
Shallow
mortise
3
⁄
8
” bolt
hole
14
3
⁄
4
”
20
3
⁄
4
”
15
5
⁄
8
”
3”
5”
12”
1”
2
1
⁄
2
”
1
1
⁄
8
”
1
1
⁄
4
”
1
1
⁄
8
”
A
LTHOUGH THIS BED looks very dif-
ferent from the First Bed on pp. 18-35,
the overall approach to building it is the
same. To start, you work on the headboard
and footboard together. Then move on to the
side rails and finally the mattress support. The
turned legs are not essential to the construc-
tion, but they are to the design. You can make
the bed with straight or tapered legs, but it
won’t look as nice.
Making the
Headboard and
Footboard
Milling the headboard and
footboard planks
1. Mill up the pieces for the headboard and
footboard planks.
2. If you’re not working with a single board
plank, glue the pieces into slightly oversize
planks.
3. Cut the planks to size, making sure the
edges are parallel and the ends square.
Cutting the tenons
This bed doesn’t have a separate headboard
and footboard rail to provide structural
strength, so the planks themselves need struc-
tural tenons. However, 8-in.- to 14-in.-wide
mortise-and-tenon joints would break apart
due to seasonal wood movement. The tradi-
tional solution is to make a divided tenon (see
“Headboard and Footboard Joinery” on p. 42).
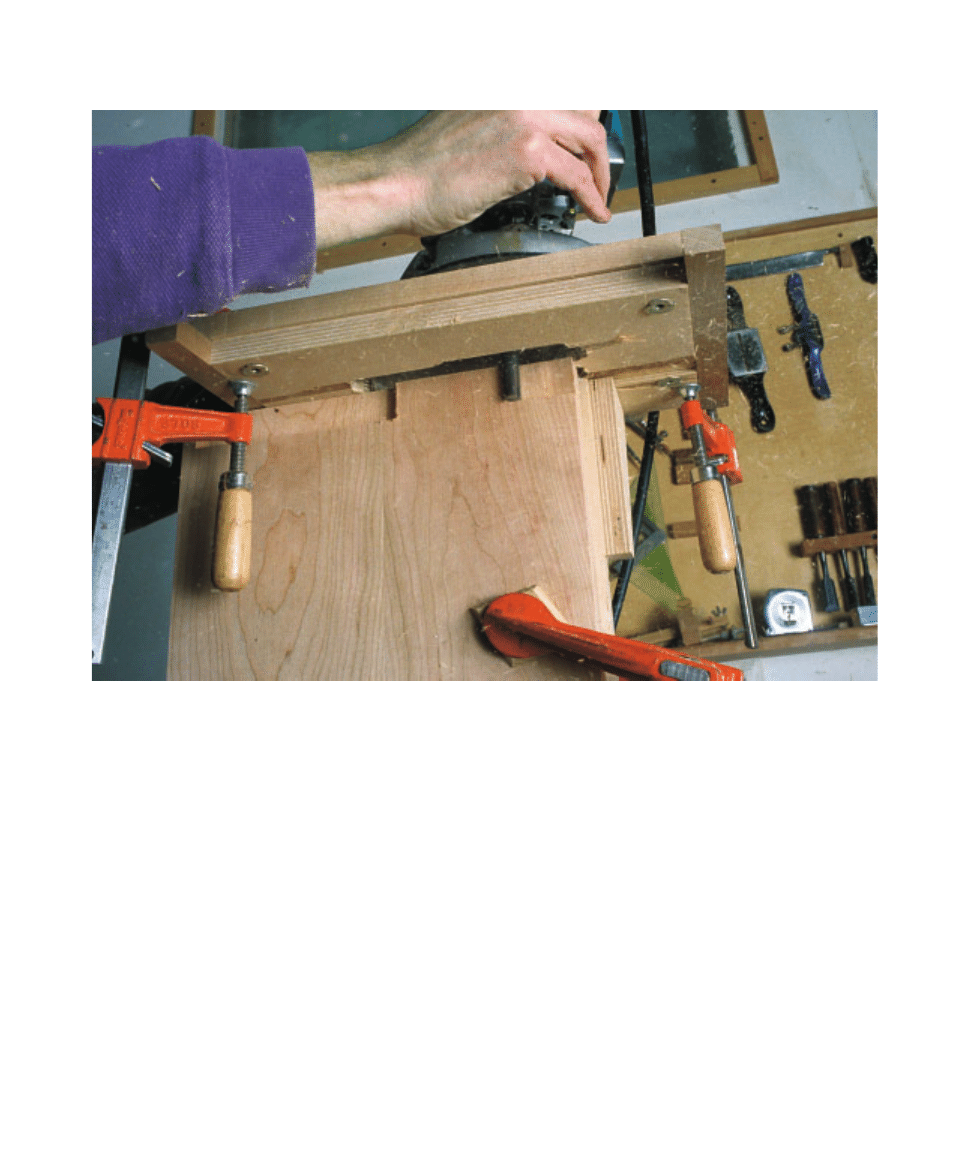
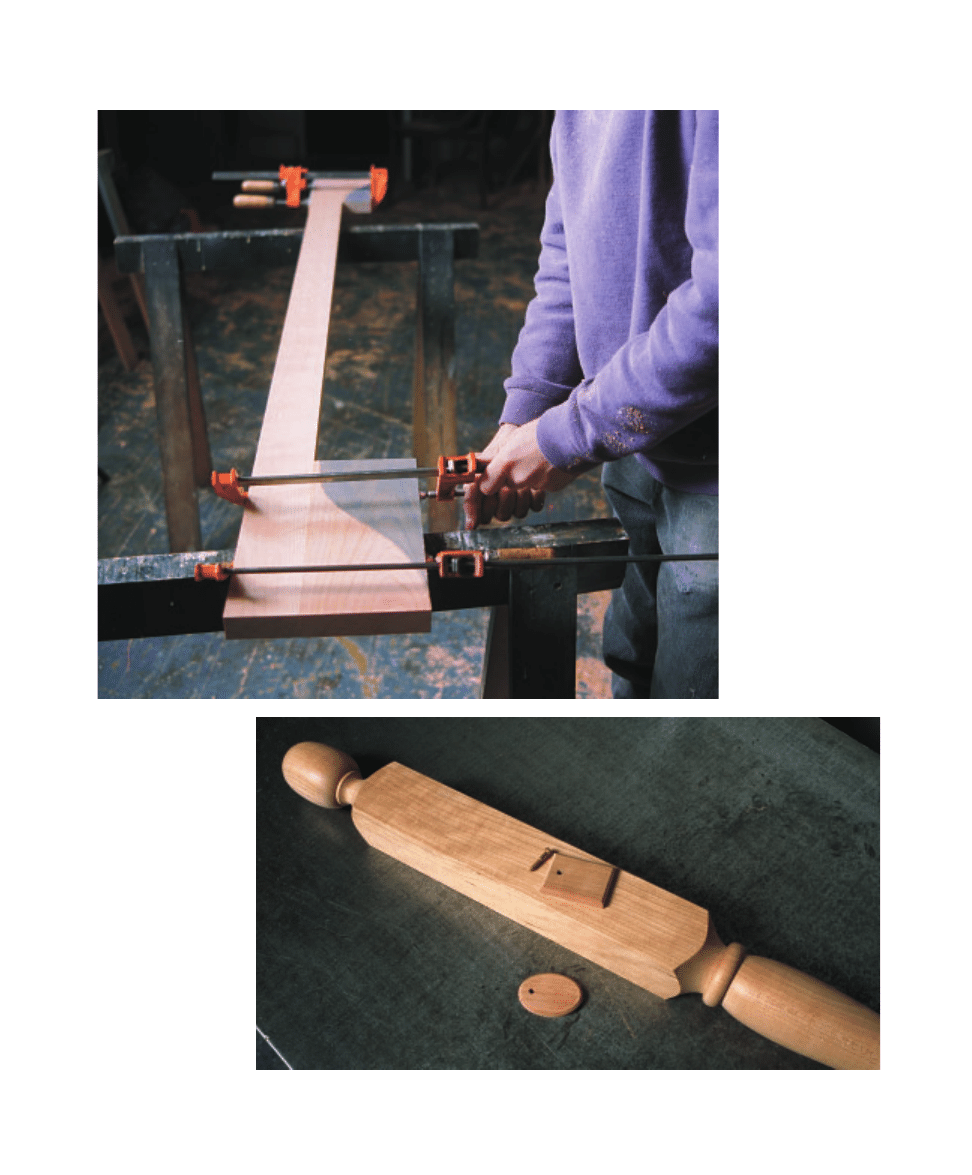
1. Cut the headboard and footboard plank
tenon shoulders with the tenoning jig
described in “A Tenoning Jig” on p. 24 and a
4-in.-long straight bit. To use the jig with the
wide headboard, remove the vertical fence
from the workpiece support. You’ll have to cut
the tenons a portion at a time (see photo A).
4 0
S
H A K E R
-
S
T Y L E
B
E D
CUT LIST FOR SHAKER BED
H e a d b o a r d a n d F o o t b o a r d
1
Headboard plank
1
1
⁄
16
in. x 20
3
⁄
4
in. x 56
3
⁄
8
in.
1
Footboard plank
1
1
⁄
16
in. x 13
5
⁄
8
in. x 56
3
⁄
8
in.
2
Headboard posts
2 in. x 2 in. x 32
1
⁄
4
in.
2
Footboard posts
2 in. x 2 in. x 26
1
⁄
4
in.
S i d e R a i l s
2 Side
rails
1
1
⁄
16
in. x 3 in. x 76
1
⁄
2
in.
2
Ogees for headboard ends
1
1
⁄
16
in. x 5 in. x 12 in.
2
Ogees for footboard ends
1
1
⁄
16
in. x 3 in. x 10 in.
2
Cleats
1 in. x 2
5
⁄
16
in. x 76 in.
15 Slats
3
⁄
4
in. x 4 in. x 54
1
⁄
8
in.
H a r d w a r e
30
Dowels (for slat pins)
5
⁄
16
in. x 1
1
⁄
2
in.
4
Hex-head bolts with nuts and washers
4
Bolt hole covers
1
1
⁄
4
in. x 1
3
⁄
4
in. x
1
⁄
4
in. thick
#6 x 1
5
⁄
8
-in. screws, as needed
#6 x
3
⁄
4
-in. roundhead brass screws, as needed
These dimensions are for a full-size bed with a mattress up to 8 in. thick. You
may have to adjust your dimensions to suit the bed size, the mattress size, or
any differences in wood dimensions.
Building the Bed Step-by-Step
Tip:
The moisture in yellow glue
swells wood slightly along joint edges.
Wait 24 hours before smoothing the
surfaces to give the moisture a chance
to evaporate and the wood to settle
back down.
S
H A K E R
-
S
T Y L E
B
E D
4 1
2. Lay out the sections of tenon that will stay
full length and the short
1
⁄
4
-in. haunches.
3. Cut away the waste on the bandsaw and
then pare away all of the haunch tenon on the
very top and bottom to leave shoulders.
Laying out and cutting the
curve on top of the planks
The headboard and footboard on this bed
have elliptical curves. If you’re unfamiliar
with ellipse layout, see “An Ellipse Layout Jig”
on p. 117. You can also use a simple curve as
for the First Bed.
1. Lay out either a simple curve or an ellipse
along the top edge of the board.
2. Cut the curve out on the bandsaw, keeping
to the outside of the line.
3. Clean up the sawn edge with a plane or
sandpaper.
Cutting the leg joinery
1. Mill up the leg blanks. The cut list dimen-
sions are
1
⁄
4
in. longer than finished. The extra
1
⁄
4
in. on the top of the legs is for the turning
centers on the lathe—you’ll cut it off and
smooth it to shape later.
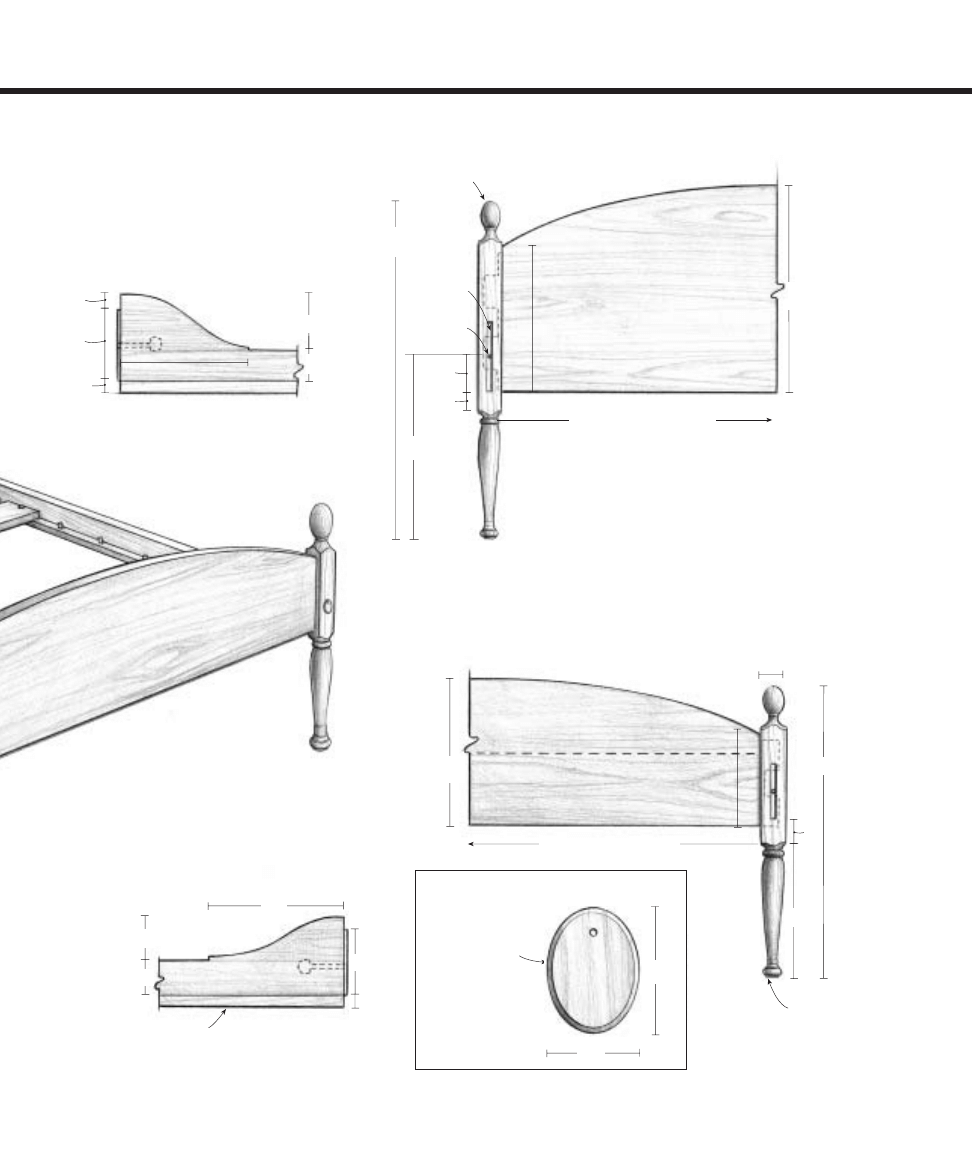
2. Lay out the mortises for the headboard,
footboard, and side rails as shown in
“Headboard and Footboard Joinery” on p. 42.
Remember that the left and right legs are not
identical, though they are symmetrical.
3. Mark lines that indicate the end of the sec-
tions that remain square all the way across the
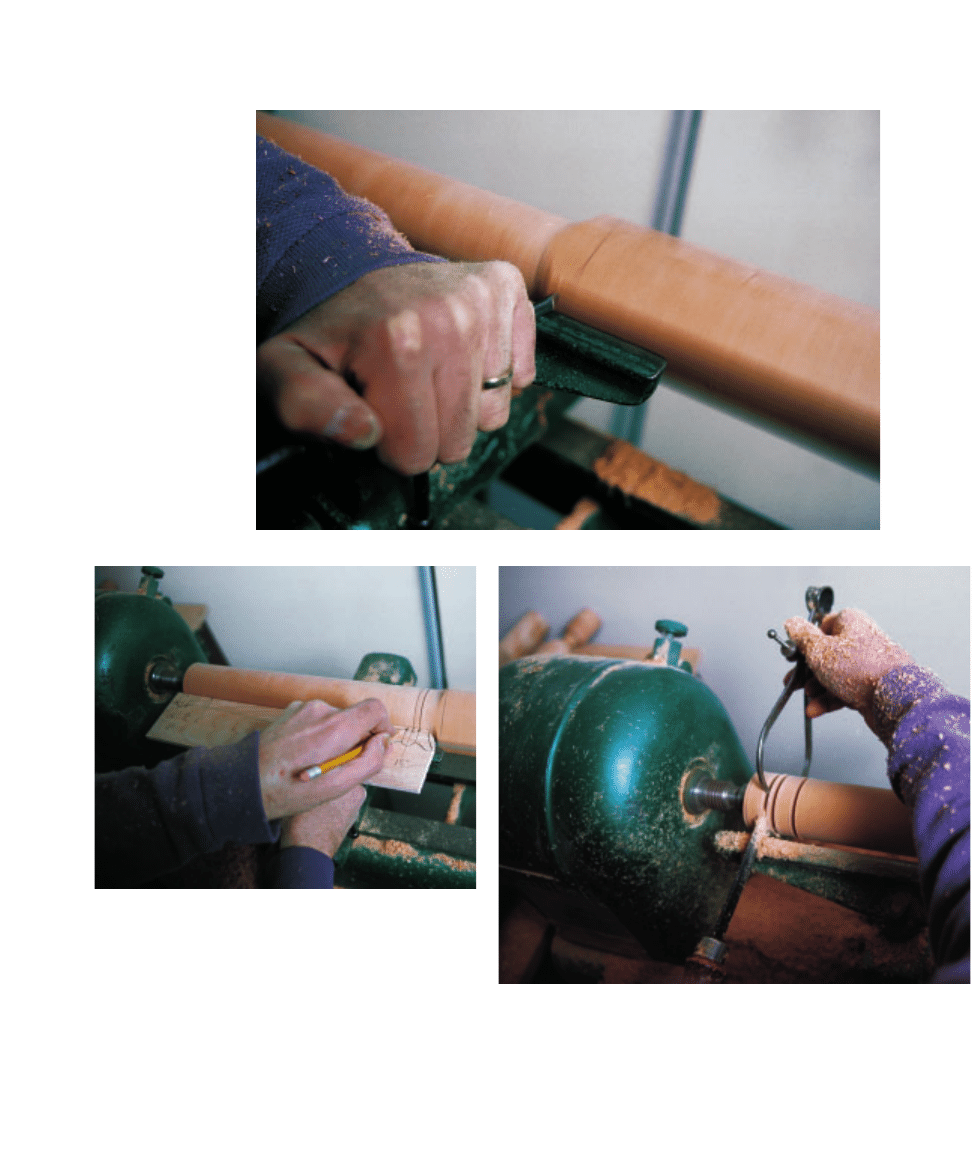
Photo A:
One good
way to cut the full-
width tenons on the
headboard and foot-
board is with the
tenoning jig on
p. 24 and a 4-in.-
long router bit.
4 2
S
H A K E R
-
S
T Y L E
B
E D
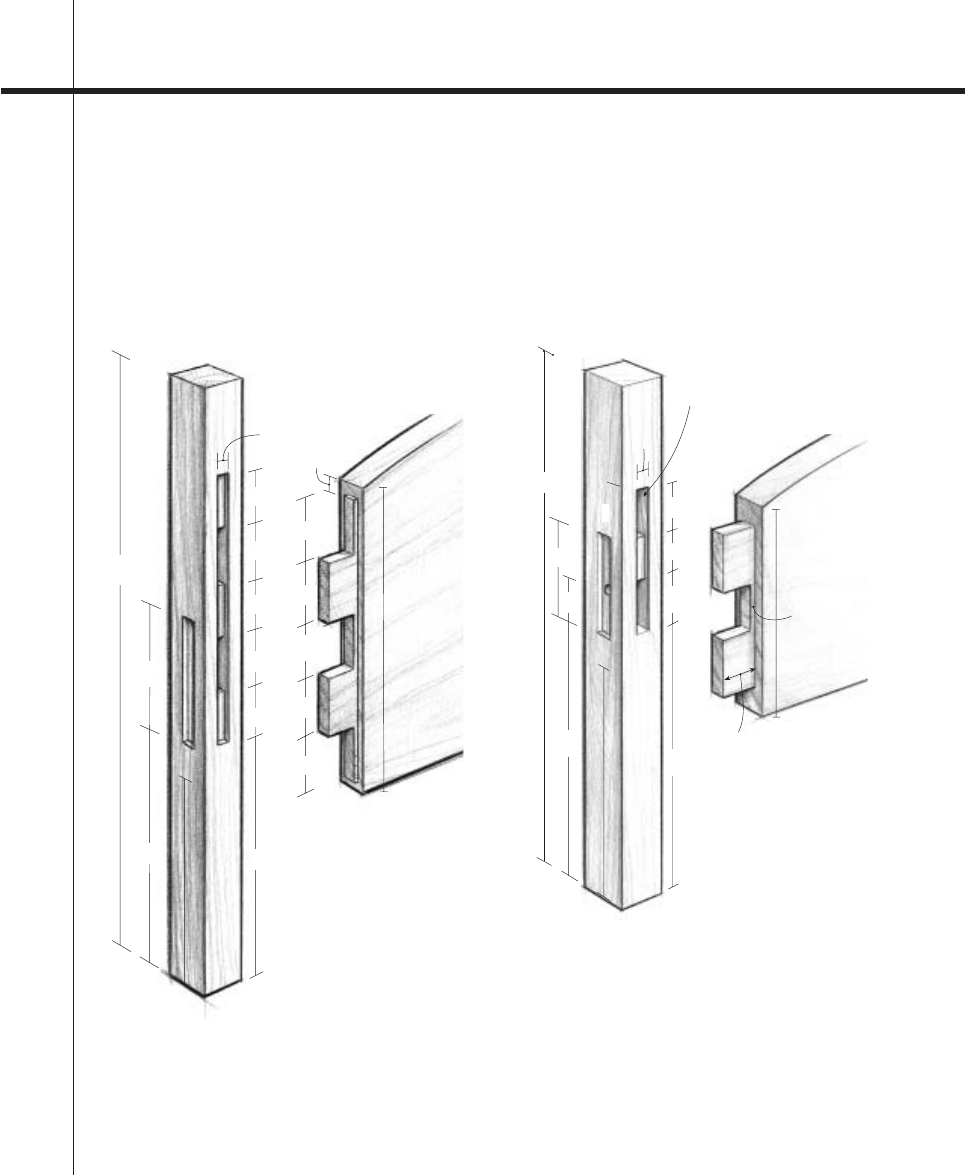
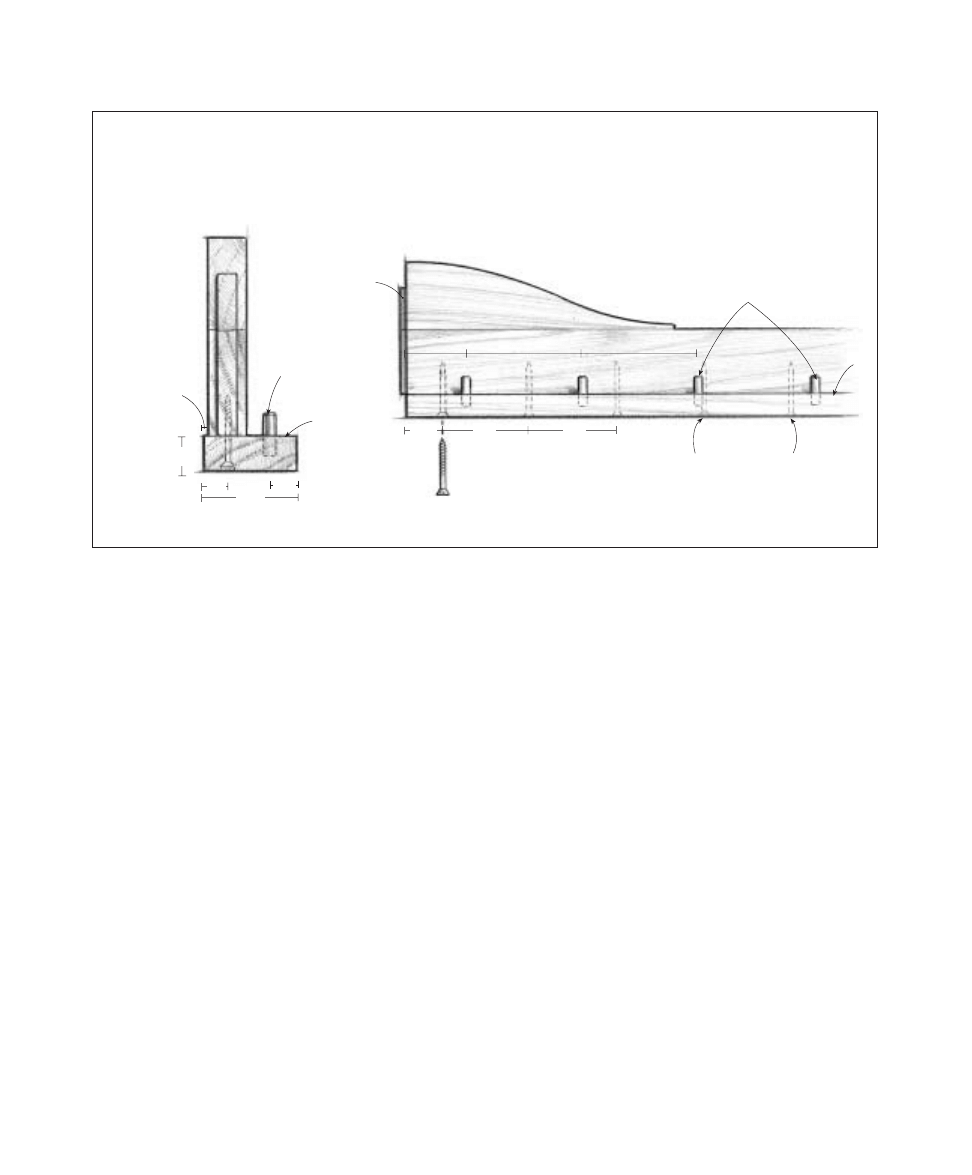
Double tenons are the traditional way to join a wide headboard to legs. Wood movement may
still cause cracking because the overall movement of the plank is still constrained. But the
joints should remain structurally sound. To minimize cracking, make sure the wood is very dry.
The haunches are not glued and help keep the headboard from warping.
Headboard and Footboard Joinery
FOOTBOARD LEG BLANK AND TENON
Footboard
1
19
⁄
32
”
5”
26
1
⁄
4
”
1
⁄
2
”
1
5
⁄
8
” deep
mortise
2
1
⁄
2
”
2”
2
1
⁄
2
”
13
1
⁄
2
”
13
1
⁄
8
”
12”
8
3
⁄
4
”
2
1
⁄
2
”
1
⁄
4
”
HEADBOARD LEG BLANK AND TENON
5
⁄
8
”
Headboard
1
⁄
2
”
32
1
⁄
4
”
7”
13
1
⁄
8
”
13
1
⁄
2
”
2
3
⁄
4
”
3”
2
1
⁄
2
”
3”
2
3
⁄
4
”
2
1
⁄
2
”
3”
2
1
⁄
2
”
3”
2
1
⁄
2
”
14
3
⁄
4
”
12”
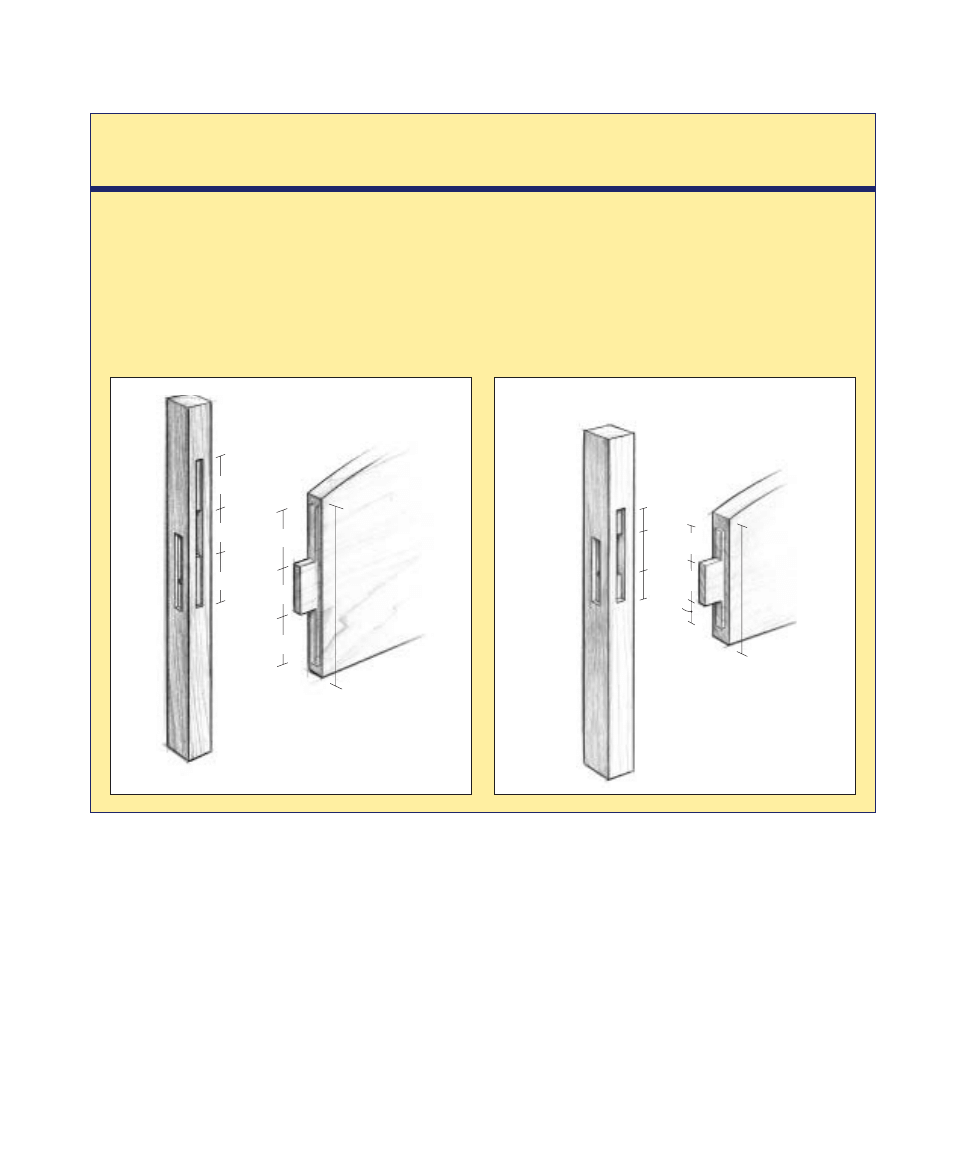
Alternative Joinery
For Headboard And Footboard
The headboard and footboard planks are structural on
this bed. While the traditional construction method is a
divided tenon, wood movement may cause cracking
because the overall movement of the plank is still con-
strained. An alternative method is to use a single tenon
in the center. This design allows for unconstrained move-
ment and little chance of cracking.
The disadvantage of this technique is that the joint
may not keep the headboard plank as tight against the
legs. It also offers less glue surface (and strength) than
the divided tenons. Using fat haunches (shallow tenons,
really) without glue to either side of the tenon helps keep
the headboard from warping.
blank at the top and bottom. You need these
marks when turning.
4. Cut the side rail mortises
9
⁄
32
in. deep, just
deep enough to keep the rail from twisting
or moving down. The best tools for the job
are a plunge router and the mortising block
described in “Mortising Jig for Routing Small
Workpieces” on p. 23.
S
H A K E R
-
S
T Y L E
B
E D
4 3
5. Also cut the headboard and footboard mor-
tises
9
⁄
32
in. deep over their full length. Then
go back and cut the two full-depth mortises
1
5
⁄
8
in. deep.
6. Drill the
3
⁄
4
-in.-diameter,
3
⁄
8
-in.-deep coun-
terbore for the bed bolts on the outside of
each leg.
8
3
⁄
4
”
8
3
⁄
4
”
Footboard
FOOTBOARD
2”
3”
2”
1
3
⁄
4
”
3”
1
3
⁄
4
”
8
3
⁄
4
”
HEADBOARD
Headboard
5”
4”
5”
4
3
⁄
4
”
4”
4
3
⁄
4
”
14
3
⁄
4
”
Making the Turning Pattern
7. Drill the
5
⁄
16
-in. holes for the 5
1
⁄
2
-in. hex-
head bed bolts through the legs, centered in
the counterbore. To ensure that the bolt hole
is straight, drill in from both sides and meet
in the middle. It’s the long way around to do
it, but it ensures a good result.
Turning the legs
1. Make up full-scale patterns of the upper
and lower parts of the turnings on pieces of
1
⁄
4
-in. plywood, 2
1
⁄
2
in. wide and as long as the
section involved (see “Making the Turning
Pattern”).
2. Set up the blank in the lathe.
3. Set the tool rest in position for roughing
out the cylindrical lower leg. Rotate the leg
blank by hand to check that the tool rest
won’t interfere with the blank when it’s
spinning.
4 4
S
H A K E R
-
S
T Y L E
B
E D
MAKING THE
PATTERN
1. Draw the profiles of
the turning on the
plywood. Either
sketch it out by hand
or trace an enlarged
photocopy.
2. Draw perpendicular
lines out to one
edge of the pattern.
These will later serve
as depth-of-cut and
turning-detail guides.
3. At each of these
lines, cut a shallow
notch with a knife or
a saw, just big
enough to hold a
pencil point.
4. Mark the diameter
of the leg at each of
the indicated points
on the pattern.
1
1
⁄
4
”
1
9
⁄
16
”
1
1
⁄
4
”
1 ”
Notches for point
of pencil
1
7
⁄
8
”
Tip:
Use wood with
straight, even grain
for the legs. You
don’t want much
grain runout on the
relatively long and
thin legs because it
will weaken them
considerably.
4. Rough out the top and bottom of the
blank into cylinders with a roughing gouge,
staying about
1
⁄
2
in. away from the edges of
the square section.
5. Clean up the transition between cylinder
and square section using a gouge, working
slowly to the line. Start the cut with the tool
up on edge, then roll the gouge flatter toward
the bottom of the cut, keeping the bevel rub-
bing against the spinning leg (see photo B on
p. 46). If you just present the tool flat (like a
scraping tool), you’re likely to tear a chunk
off the edges of the square section.
6. Using a pencil, transfer the notch locations
from the pattern to the spinning blank (see
photo C on p. 46).
7. Using a parting tool, turn notches in the
blank where you have marked it to the vari-
ous diameters (see “Leg Turning Strategy”).
Note that you don’t do this on every line you
1
1
⁄
32
”
1
1
⁄
8
”
1
13
⁄
16
”
FOR BELOW THE SQUARE SECTION
Brad to register
from the top of
the turning blank
Plywood patterns with notches to hold the tip of a pencil help you
mark the turning blank accurately while it’s spinning in the lathe.
Cut away the corner
to prevent tearout on
the square section
when the pattern is in
use.
Brad to register
bottom of turning
blank
FOR ABOVE THE SQUARE SECTION
1
⁄
4
” plywood
1
1
⁄
32
”
1
7
⁄
8
”
1
1
⁄
2
”
marked. Some of the lines indicate the loca-
tion of a change from one detail to another,
and you’ll have to turn next to them. On
others, such as the sides of the bead below
the square section, you can’t get a parting
tool or calipers into the small space. Size
these by eye.
8. Where you can, set your calipers for each
desired diameter and reduce the blank with
the parting tool until the calipers just fit over
the leg at that point (see photo D on p. 46).
9. Connect the grooves with the parting tool,
following the shape on the pattern. Use what-
ever turning tools you prefer (see photo E on
p. 47). Watch the flow of the curves and the
overall shape of the leg to make sure you are
doing what you want. Correct any problems
with a gentle touch.
10. Leave a little pad of wood under the bot-
tom bead for the tailstock to bite into. You
can remove the pad later and replace it with a
furniture glide, or you can just leave it.
11. Add definition to the turning by touching
the sharp tip of a skew chisel to the transition
points. Just a touch will do it.
12. Sand the spinning blank with the coarsest
grit necessary, working your way up through
400 grit. Be careful not to sand away the crisp
S
H A K E R
-
S
T Y L E
B
E D
4 5
Use the patterns to reduce the diameter of the turning blank to the desired dimension
in a few select places. This will allow you to envision the final leg shape as you turn by “connecting the dots,”
and help you make duplicates accurately.
LEG TURNING STRATEGY
edges of the transition between square section
and turning. A good technique is to wrap a
1-in. dowel with sandpaper and work it over
the transition while holding on with two
hands (see photo F on p. 47).
13. Burnish the smooth turning with a hand-
ful of clean shavings (see photo G on p. 48).
14. Saw off the waste at the very top of the
leg above the finial. Then sand to complete
the shape.
15. Smooth the faces of the square sections.
Because it’s important to keep the faces per-
fectly flat, use a well-tuned handplane. A
sanding block that doesn't overhang the edges
will also do a good job, though it’s more likely
to round over the edges.
Assembling the headboard
and footboard
1. Fit the headboard joints using a shoulder
plane to trim the tenons to size (see photo H
on p. 48). Strive for a snug fit. The joint
should go together with some effort, but
heavy hammering should not be necessary.
2. Glue up the headboard and footboard.
Spread glue only in the deep mortises; the
haunches get no glue at all. You’ll need at
least two clamps to get the legs tight to the
Tip:
The marks you
put on the ends of
the pommel should
be easily visible
when the blank is
spinning.
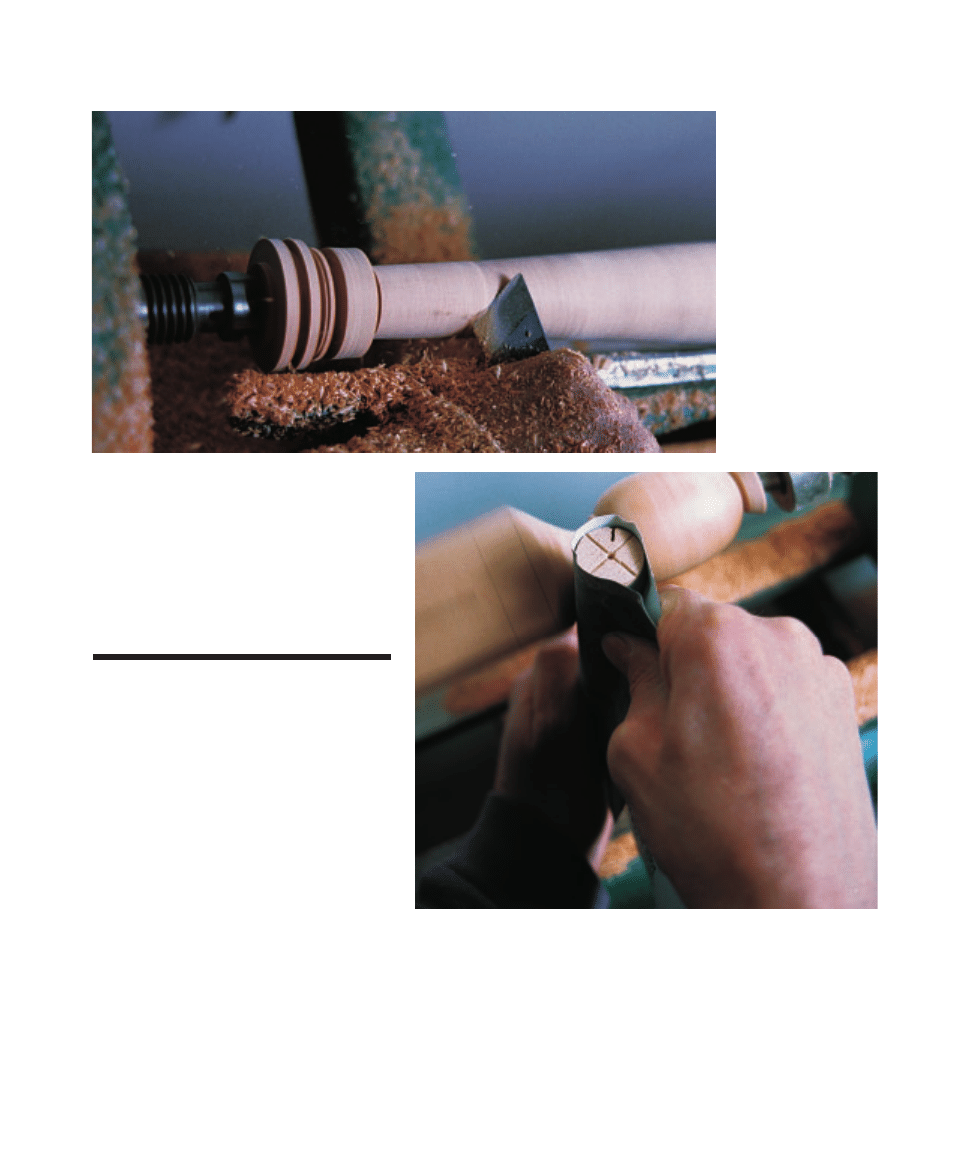
Cut in with a skew chisel. (No room for parting tool.)
Cut the notches with a parting tool.
4 6
S
H A K E R
-
S
T Y L E
B
E D
Photo D:
Hold the calipers with one hand and the parting
tool with the other hand. The calipers will drop over the
sized notch when you turn to the correct diameter.
Photo C:
Touching a pencil point lightly in each of
the notches on the turning pattern leaves an easily
visible mark on the round leg blank. These marks will
guide your cuts.
Photo B:
After
roughing out the
cylinder below the
joinery block, you
have to cut the tran-
sition from square
to round carefully.
The gouge should
be up on edge as
you start the cut at
the line.
S
H A K E R
-
S
T Y L E
B
E D
4 7
Photo E:
After
roughing out the
shape of this part
of the leg with a
gouge, finish up
the cut with a skew
chisel.
Photo F:
Sand the transition from square to round using a sanding
dowel so you don’t blur the edges sanding by hand.
tenon shoulders. Check that the tenons
are not too long for their mortises. They
should be about
1
⁄
32
in. short. Otherwise
when you glue up, the joint may not come
fully together.
Making the Side
Rails and Slats
1. Mill up the 3-in.-wide rails, getting a flat
and smooth surface on both edges because
you’ll have glue joints on both.
2. Crosscut to 77
1
⁄
2
in. long, which leaves
1 in. of extra length.
3. Smooth the top edge of the rail with a
handplane now so you won’t have to do this
with the blocks attached. You can do this later
with a scraper and sandpaper, if you prefer (or
if you forget, as I did).
Adding ogee blocks
to the side rails
1. Rip the four ogee blocks to width, 5 in. for
the headboard blocks and 3 in. for the foot-
board blocks. Find boards that match well in
color and grain so the joint between the
blocks and the rail isn’t obvious. Also make
sure the end grain of the block matches that
of the rail (see “Grain Orientation on the Side
Rails” on p. 49).

2. Joint the bottom edge of the stock straight
and smooth.
3. Cut the headboard blocks to 12
1
⁄
2
in. long
and the footboard blocks to 10
1
⁄
2
in. long.
This leaves
1
⁄
2
in. extra:
1
⁄
4
in. for waste and
1
⁄
4
in. for the tenon.
4. Lay out the ogee shape on each block and
bandsaw to shape. Smooth the rough edges
with spokeshaves, scrapers, and sandpaper.
5. Line up the blocks with the ends of the
rails and glue them in place using cauls made
from the cutoffs (see photo I on p. 50).
6. Cut the rail ends square and to their fin-
ished length of 76
1
⁄
2
in. after the glue dries.
Cutting the stub tenons
The side rails use a short tenon instead of two
dowels to align and reinforce the rail-to-leg
joint against twist and shear forces.
4 8
S
H A K E R
-
S
T Y L E
B
E D
Photo H:
Trimming
the cheeks of the
tenons to fit the
mortises is easy with
a shoulder plane.
Note that you cut
across the grain.
Photo G:
Burnish the leg with a handful of clean shavings after all the
sanding is done.

1. Rout the stub tenon shoulder. Either use
the jig shown in “A Tenoning Jig” on p. 24,
or just rout rabbets on both sides of each end
with the base of the router running on the
face of the rail.
2. Cut away some of the tenon to create the
top shoulder. Don’t do this on the bottom
because the added cleat will create the shoul-
der on that side. Chisel the remainder flush
with the shoulder surface.
Drilling for the bed bolts
and making recesses
for the nuts
1. Locate the bed bolt holes 2
1
⁄
2
in. up from
the bottom of the rail (not including the
cleat). This puts the nut in the full length por-
tion of the rail and not in the ogee blocks.
2. Drill in from the end of the rail for the bolt
holes with a
3
⁄
8
-in. drill bit using a doweling
jig for accuracy.
3. If you need to extend the hole deeper than
the jig will allow, drill the rest by hand—it
will follow the existing hole well.
4. Rout or drill and chisel a recess for the nut,
as described in “A Template for Routing Nut
Recesses” on p. 32. The only difference is the
location for the recess. The flat side of the
recess should be 3
1
⁄
4
in. from the shoulder of
the rail and centered on the bolt hole.
Making and adding the
cleats to the rails
The cleats that support the slats on this bed
are screwed to the bottoms of the rails instead
of to the sides. Try to use boards that match
the color and grain of the rails.
1. Cut cleats exactly to the length of the side
rails between the tenons.
2. Plane or sand the outside edge of the cleats
smooth.
3. Drill a series of pilot holes for # 6 by
1
5
⁄
8
-in. screws to attach the cleat to the side
rail. Drill from the bottom,
5
⁄
8
in. from the
outside edge of the cleat and every 4 in. If you
start 1
1
⁄
2
in. from each end, you should wind
up with 19 screw holes (see “Cleat Details” on
p. 51).
S
H A K E R
-
S
T Y L E
B
E D
4 9
Tip:
To pare the
very top edge of the
tenon shoulder
flush, tap down
with a
3
⁄
4
-in. chisel,
flat side against the
shoulder. The
shoulders of the
tenon will keep the
chisel aligned.
4. Drill the holes on the top face of the cleat
for the dowel pins that hold the slats in place.
These are
5
⁄
16
-in. holes,
3
⁄
4
in. deep. Locate
the holes
5
⁄
8
in. from the inside edge of the
cleat, spaced every 5 in. starting 2
1
⁄
2
in. from
each end.
5. Squirt a little glue into each hole, then
pound in a
5
⁄
16
-in. by 1
1
⁄
2
-in. dowel.
6. Scribe a line with a marking gauge
1
⁄
16
in.
from the outside edge of the cleat. This is the
reference line along which you glue the rail.
7. Spread a light film of glue on the bottom of
the side rail, keeping glue away from the out-
side edge to minimize the squeeze-out.
8. Place the rail on the cleat along the scribed
line and flush with the ends of the cleat.
Clamp in place.
Ideally, the grain on the different parts of the side rail should
run in the same basic direction.
GRAIN ORIENTATION ON THE SIDE RAILS
Boards with grain running in same direction
Boards with mixed grain
1
⁄
16
”
overhang
5 0
S
H A K E R
-
S
T Y L E
B
E D
Photo J:
Both of
these wooden bolt
hole covers look
good with the bed.
Choose for yourself.
Photo I:
It’s easy to
clamp the shaped
blocks to the side
rails if you use cauls
made from cutoffs
left over from mak-
ing the blocks
(painted darker for
better visibility).
S
H A K E R
-
S
T Y L E
B
E D
5 1
9. Drive screws into the holes one at a time,
checking to be sure the rail and cleat stay
properly aligned.
Making the bolt hole
covers
You can purchase bolt hole covers for this
bed, or you can make your own out of wood.
The wood ones are simple to make and are
more traditional. You can either make 1
3
⁄
16
-in.
by 1
11
⁄
16
-in. rectangles of
1
⁄
4
-in.-thick stock, or
cut out ovals (see photo J).
1. To make either square or round bolt hole
covers, cut them to size, sand the edges
smooth, then chamfer the outside face with a
plane or sandpaper.
2. Drill
9
⁄
64
-in.-diameter holes in the tops
and
1
⁄
16
-in. or
5
⁄
64
-in. pilot holes in the legs,
about
3
⁄
8
in. above the top of the counterbored
bolt hole.
3. Secure the covers with #6 by
3
⁄
4
-in. round-
head brass screws.
Making the slats
All that remains is making the bed slats and
finishing the bed.
1. Make the
3
⁄
4
-in.-thick, 4-in.-wide bed slats
out of maple. To get the exact length, you
should assemble the bed first and measure the
distance inside the rails.
2. Notch the ends on the bandsaw with a
router or upright on the table saw, as
described in “A Jig for Notching Bed Slats” on
p. 34. Drop each slat into place over the
dowel pins, then lift the mattress into place.
The screws holding the cleat to the bottom of the rail should be spaced 4” apart.
The dowel pins should be spaced 5” apart.
CLEAT DETAILS
Cleat
Dowel pins
END VIEW
Cleat
Dowel pin,
5
⁄
16
”x 1
1
⁄
2
”
1
⁄
16
” overhang
SIDE VIEW
Pilot holes for
screws
1
⁄
4
”
5”
2
1
⁄
2
”
5”
4”
4”
1
1
⁄
2
”
5
⁄
8
”
5
⁄
8
”
2
5
⁄
16
”
1”
Wyszukiwarka
Podobne podstrony:
Cabinet Shaker Style Vanity
CD Holder Shaker Style
Bed Scandinavian Style Single Bed
Shaker Four Poster Bed
Bed Cottage Style Bunk Beds
HONDA 2006 2007 Ridgeline Bed Extender User's Information
Module 5 A bed rest patient Part 2
200104 bunk bed
Instrukcja skanera E Flat bed A4 96EPP
Combined Radiant and Conductive Vacuum Drying in a Vibrated Bed (Shek Atiqure Rahman, Arun Mujumdar)
Child's Bed
Niech pokarmy będ± twoimi lekami, a
Bed Anl URC 289 S
89 Bed Of Roses
Pencil Bed
Murphy Bed
Anthology In Bed with the Boss
Bed Twin Bed
Energy and Fuels 2006, 20, 155 158, Novel Process for Recycling Waste Plastics To Fuel Gas Using a M
więcej podobnych podstron