By Jackie Clay
Y
ou’ve decided that you’re
g o i n g t o p u t a t l e a s t a
year’s worth of food away
for your family just in
case. Great!
Everyone should do that. We store
enough to feed friends, extended fam-
ily, and neighbors from time to time,
as well. We could not turn down any-
one who came to us saying, “I’m
hungry.” So I stock up more than
most people do.
Flours and grains
Man may not live by bread alone,
but grains form the base for many
meals, especially during a period of
hard times. With flours and whole
grains stored, you have the main
ingredient for homemade pastas,
breads, rolls, biscuits, pancakes, waf-
fles, tortillas and other flat breads, pie
crusts, cookies, cakes, and more.
I store unbleached (who needs
bleaching compounds in their diet?)
flour, at least 200 pounds, in 25-
pound store bags, wrapped in plastic
bags and duct tape, in Rubbermaid
garbage cans with locking lids in my
pantry. This will feed three of us, plus
extra for friends and family, for over
a year, coupled with other flour prod-
ucts and whole grains.
You can add any specialty flours
your family likes, such as rye, ama-
ranth, or Durham (for specialty pas-
tas).
In addition to this flour, I like at
l e a s t 1 0 0 p o u n d s o f h a r d w h e a t
(sometimes called “wheat berries”).
As ground whole wheat goes rancid
fairly quickly, I like this wheat on
hand to grind for all of my whole
wheat recipes. In addition, whole
wheat grain will grow when planted,
making wheat growing on a fairly
small plot possible to restock my sup-
ply. As little as a 50x50-foot plot will
grow enough wheat for a small fami-
ly’s needs.
I also stock about 20 pounds of
corn meal, 20 pounds of masa harina
de maize (corn flour) which I use to
make tamales and corn tortillas, along
with 25 pounds of popcorn (grinds
nicely for cornmeal, as well as pop-
ping for treats), and 25 pounds of
hominy corn (makes hominy and also
masa harina de maize).
January/February 2002 Backwoods Home Magazine
42
Long-term
food storage
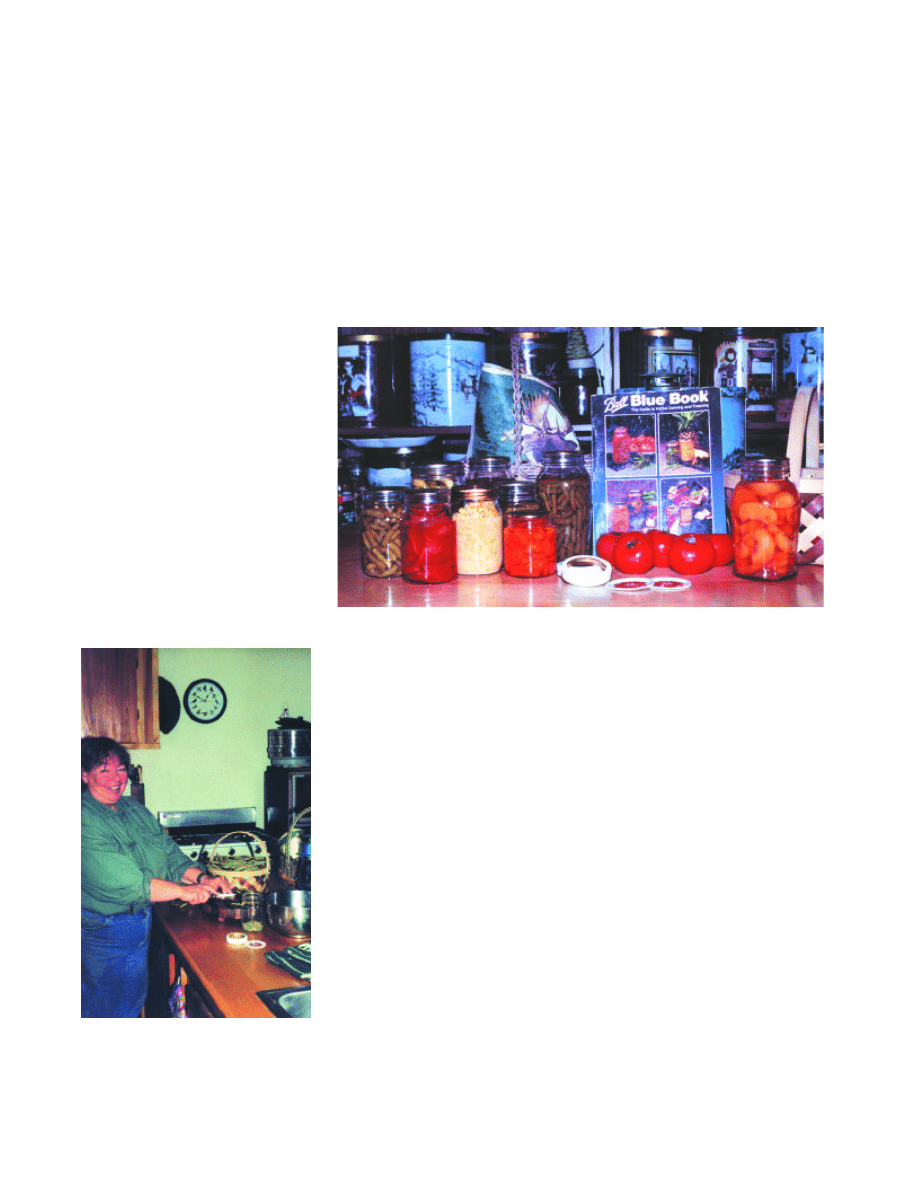
Home canning helps fill the pantry. Note decorative
popcorn tins in the background, filled with dry foods.
The author prepares green beans for
canning and dehydrating.
Rice, both brown and white, fit
nicely in our storage pantry. We also
store about 25 pounds of a combina-
tion of white and brown rice with a
few pounds of wild rice mixed in.
And don’t forget rolled oats. They
are much more versatile than just
using them for oatmeal. I include
them in several multi-grain breads,
breakfast cake, bars, meat loaf, gra-
nola, and cookies. And as for oat -
meal, we like it cooked up with
peaches, strawberries, and apples,
with cinnamon for a treat.
Any grains that are ground, espe -
cially corn meal, masa harina de
maize, and whole wheat will get ran-
cid quicker than do whole grains,
which usually stay good for many
years. Even so, flours (except whole
wheat flour) will stay perfectly good
for five years or more if kept dry and
stored in air tight and bug and rodent-
proof containers.
I buy my white flour, cornmeal, etc.
on sale at local supermarkets, usually
just before Thanksgiving, as it is
cheaper then. Otherwise, I pick it up
at Sam’s Club or other restaurant sup-
ply houses.
I pick up whole grains from local
grain farmers. Sometimes the wheat
needs a bit more cleaning if dusty, but
a few pours from one basket to anoth-
er on a windy day ensures very clean
wheat. (And my wheat is
not
treated
with toxic fumigants in storage bins
before being ground into flour, as is
most wheat sold to flour mills.)
When buying flour to store, be
absolutely sure the bags are com-
pletely sealed, with no flour leaking
out, to prevent flour weevil problems.
In areas where there is a weevil prob-
lem (webs and “bugs” in unsealed
cornmeal and flour), some folks
freeze each bag of flour for several
days before wrapping and storing it in
completely bug-proof containers. I
have not done this, but I am excep-
tionally careful not to store any flour
products that were not very well
sealed from the processing plant, and
I keep them in insect proof contain-
ers. Remember that these moths are
very small and squeeze through very
tiny openings.
It is not necessary to buy flours and
grains from long-term storage compa-
nies unless you fear flooding. In this
case, sealed tins or buckets of flours
would be a good idea. I’ve had plain
white flour stored for over five years,
which is just as good today as it was
when I bought it.
Beans and other legumes
When one thinks of long-term stor-
age, usually dried beans come first to
mind. I guess this is because they
remain good for so long, are nutri-
tious, and taste pretty darned good to
boot. But, for heaven’s sake, don’t
just buy a hundred pounds of navy
beans and say you’re all set for what-
ever may come your way. All beans
do not taste the same. There’s a big,
big difference between a large white
lima and a Jacob’s cattle bean, for
instance. Some taste nutty, some
bland. Some cook up quickly, some
require hours of cooking. Some
remain firm after cooking, others get
mushy and soft. Experiment with a
wide variety of beans before commit-
ting to a choice.
We store about 50 pounds of com-
bined legumes, which include pintos,
Cherokee mixed cornfield beans,
Jacob’s cattle, Hopi black bush,
navies, red kidney, and a dozen old
Native American varieties, along with
lentils, soup peas, blackeyed peas,
and garbanzos.
Beans are a great protein source and
combine well in many different dish-
es. Refried beans, fried dry pea pat-
ties, stews, soups, chiles, baked
beans, and casseroles are just a few
uses for these versatile legumes.
You can buy your beans in local
markets, health food stores, and co-
ops, or you can do like we do, and
grow your own.
All beans store a long, long time in
an airtight and bug and rodent-proof
container. I keep mine in gallon glass
jars and in decorative popcorn tins,
right on handy shelves in the kitchen.
While old beans do take longer to
cook up tender, they last indefinitely;
I’ve grown beans from 500-year-old
seeds. And if you can grow plants
from seed, you can certainly eat
them.
January/February 2002 Backwoods Home Magazine
43
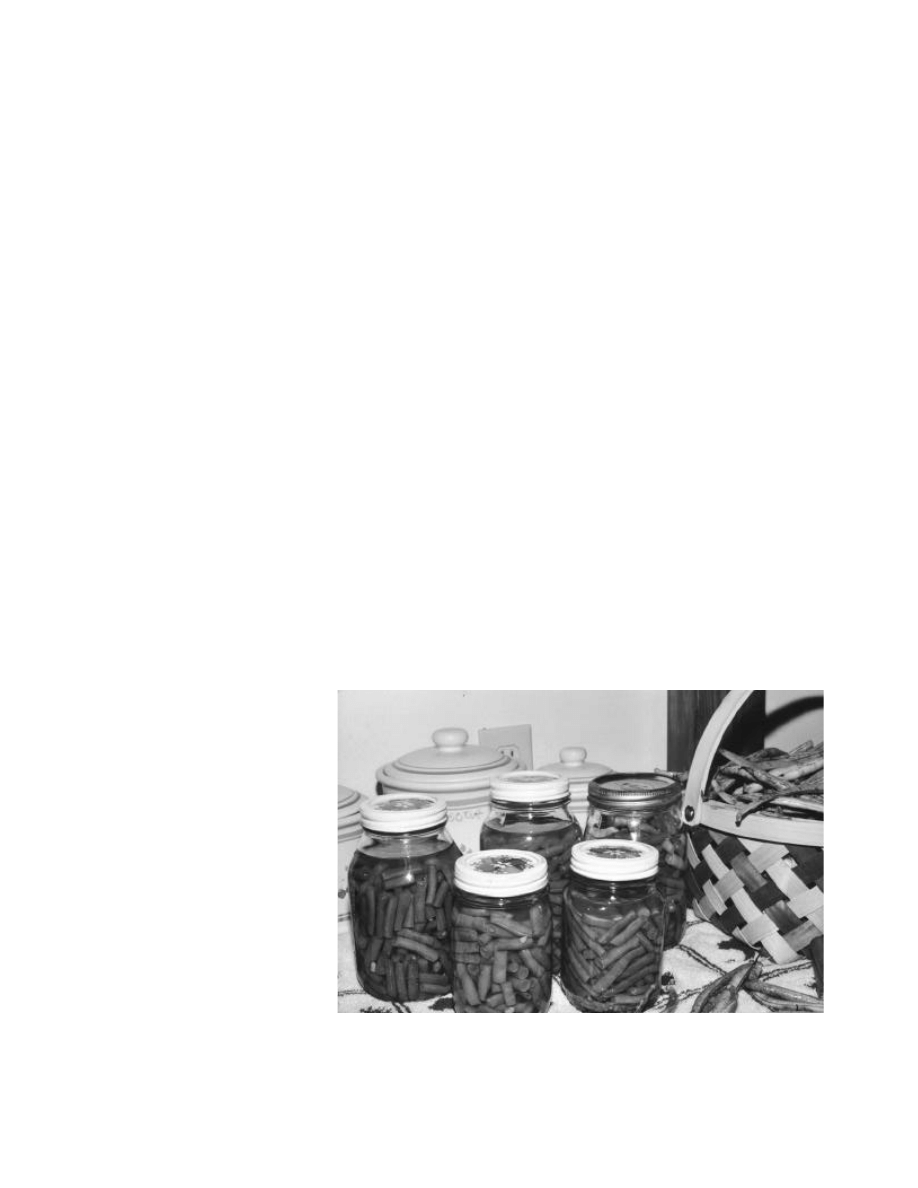
Home canned foods are more tasty and nutritious,
and it takes only minutes to get between the garden and the jar.
Dried pasta
While I make a lot of homemade
pasta, I still keep quite a bit in our
storage pantry. When you’re busy
with a survival situation, you may not
have time to make pasta. So I’ve put
away 10 pounds of long spaghetti, 10
pounds of lasagna noodles, 10 pounds
of wide egg noodles, 5 pounds of
alphabet macaroni, 15 pounds of
elbow macaroni, and a few pounds of
assorted pasta noodles.
This dry pasta keeps indefinitely
when stored in a dry, bug and rodent-
proof container. As with my beans
and other legumes, I use decorative
popcorn tins and gallon glass jars.
After several years, the elbow maca-
roni smells a bit rancid, but it is still
good when cooked with cheese or
other sauces.
Sugar and honey
You will probably agree with me
that we all eat too much sugar. And
although honey is natural and better
for us than refined sugar, it’s still
sugar. But in bad times, we usually
feel better with “treats” from time to
time. And these treats often include
sugar. Also, much fruit is home
canned with a sugar syrup, and if
you’re going to can to keep your
pantry from running out in bad times,
you’ll need quite a bit for fruits, pick-
les, jams, jellies, preserves, etc.
Although my husband Bob is a dia-
betic, we do include sugar in our stor-
age pantry. I keep a 25-pound sack in
a plastic garbage can, along with
assorted other dry foods. Much of
this sugar is used in canning and
desserts for my son, David, and
myself. Bob needs a sugar substitute.
Sugar stores indefinitely if kept dry.
If it should get damp and harden, you
can still save it. Beat the bag with a
hammer, being careful not to split the
sack. (I would put the paper bag in a
heavy plastic bag, just in case.) Soon
the hard lump will be many smaller
ones, easy to crumble with your hand.
Honey is a good long-term storage
bet. Honey may crystallize if it gets
too cool, but it is still good and will
re-liquify if warmed up by sitting the
jar in a saucepan of boiling water.
Raw honey only needs to be put into
quart or larger jars and sealed. I have
15-year-old honey that’s still great.
(In case you’re wondering, I try to
keep a little of each food for a long,
long time, to see just
how
long it will
remain good. I
do
rotate my long-
term storage food, using the oldest
and replacing it with newer food in an
ongoing process.)
I keep two gallons of honey, stored
in quart jars.
Besides these two sweeteners, I
keep 10 pounds of brown sugar and 5
pounds of powdered sugar, stored in
the bag they come in until I’m ready
to use them. These bags are stored in
the plastic garbage can, along with
the white sugar and much more. The
only problem I’ve had regularly with
brown sugar is hardening in the bag.
I’ve cured this by breaking the sugar
into chunks, dropping them into a
gallon glass jar and adding a piece of
paper towel, dampened with water.
Close the jar and in a few days the
sugar will be soft again.
Miscellaneous dry goods
Powdered egg
is a handy dry food
to keep on the pantry shelves. The
modern powered egg is much better
than the old “green eggs” of military
service days. Not only is it great in
cooking, but it tastes pretty good too.
I keep three #10 cans, which hold
almost a gallon, on my pantry
shelves.
Powdered margarine and butter
are another “must have” for most
families. These are reconstituted with
either water or vegetable oil, with the
oil tasting much better. I keep three of
each, even though we have a cow and
goats. One never knows when they
may be dry and you need butter.
Powdered cheese
is a great product
that stores easily. I use it in macaroni
and cheese, on popcorn, in potatoes
au gratin, casseroles, and more. I
keep about 10 pounds of a powdered
cheese sauce that I buy from a local
restaurant supply house quite inex-
pensively.
Dry yeast
is a definite must in a
long-term storage pantry, as well as
in everyday use. I buy mine in 1-
pound vacuum packed aluminum foil
bags. Unopened and frozen, they last
indefinitely. Unopened and on the
shelf, they’ll last for a couple of
years. Opened and on the shelf, dry
yeast is active for about a year or a
little more. I keep an unopened bag in
my propane fridge’s freezer, figuring
that if an emergency situation occurs,
causing us to have to do without the
fridge, my yeast will still be good for
better than a year. I have another one
on the shelf that I use every day.
Baking soda
is also a necessary
baking leavening agent, also useful
for an antacid, deodorant, cleaner,
and more. It keeps on the shelf forev-
er. I keep 5 pounds.
January/February 2002 Backwoods Home Magazine
44
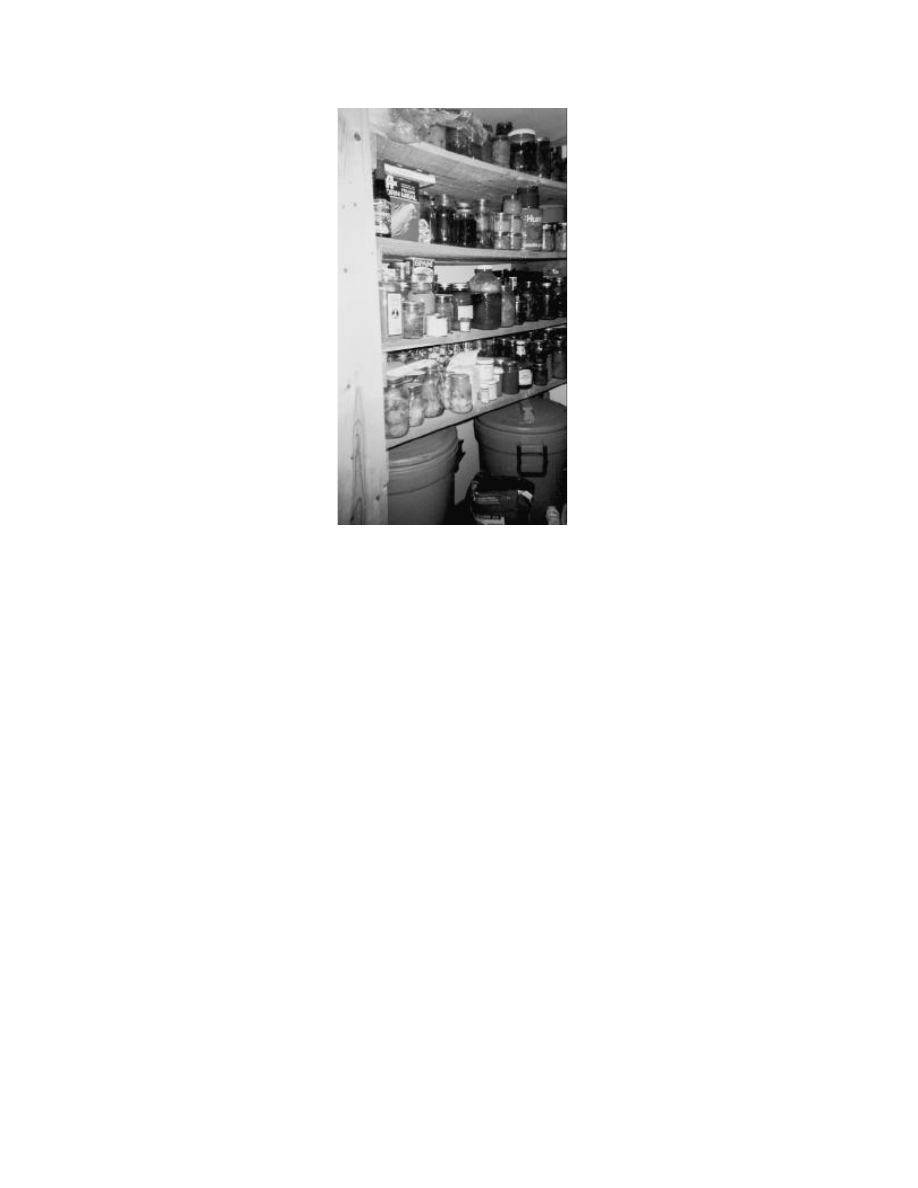
A full pantry staves off hunger.

Baking powder
is hard to do with-
out. You’ll need it for quick breads,
such as cornbread and biscuits, which
are very important in emergencies
because you can eat well and spend
only minutes in baking. It keeps well
for years without losing its leavening
ability. I keep two large tins, one to
use and one to store.
Salt
is needed, not only to improve
the flavor of foods but in meat preser-
vation and canning. I keep 10 pounds
of iodized salt in 1-pound boxes, and
10 pounds of canning salt. Canning
salt is used in pickles because table
salt contains chemicals that some -
times cause pickles to soften or dis-
color. Dry salt will keep forever. If it
should harden, beat it with a hammer
and it will be made useable.
Dry milk
is a necessity, even for
those of us who have dairy animals.
One never knows when your animals
may be dry and you need milk—
today. Dehydrated milk does
not
taste
as good as fresh, no matter whose
claims say theirs does. But it is great
for cooking and it will work on cereal
or for chocolate milk. The boxes at
your local store will last for years
with no change in taste. I keep about
10 pounds of dry milk, even though
we have dairy animals.
Spices
are indispensable. Be sure to
store a wide variety of your favorites.
True, spices do lose some of their fla-
vor in a year or so. But better to have
an old spice than no spice. They will
“keep” forever, but will slowly lose
their potency. I buy most of mine in
oriental markets and restaurant sup-
ply houses.
Miscellaneous canned
necessities
Peanut butter
isn’t just for kids,
folks. It’s a tasty, great protein source
that’s versatile, as well. No one
guesses that the secret ingredient in
my best stir-fry is a tablespoonful of
chunky peanut butter. Remember that
besides peanut butter sandwiches and
spread on toast, you can bake cookies
and other deserts with this protein-
filled treat. Unopened, it’ll last for
years.
Shortening
and
vegetable oils
will
make cooking more of a pleasure, not
to mention all the baking you may
want to do. Most shortenings will
store indefinitely in the pantry and
unopened bottles of vegetable oils
will be fine for over a year, usually
longer. Rotate the oils more frequent-
ly than the solid shortening. You will
probably like using corn oil to recon-
stitute your powdered margarine and
butter, instead of water. You’ll use
more shortening and vegetable oil in
a year than you’d guess. I store a
dozen cans of shortening and 6 large
bottles of vegetable oil.
Dehydrate foods at home
Unless you need sealed cans of
dehydrated foods, you can dehydrate
food for long-term storage yourself.
It’s amazing how easy it is to dry
foods at home. While I home-can a
huge variety of foods, I also rely on
dehydrated foods, which compliment
the canned foods. For instance,
canned peas taste like nasty mush.
Sorry Jolly Green, it’s the truth. So
instead of canning my peas, I dehy-
drate them. When rehydrated, they
taste almost as good as fresh.
You can dehydrate foods on cookie
sheets in a gas oven, with only the
pilot on, in the oven of a wood cook
stove with a slow fire and the door
open, over a register, or in the back of
your station wagon or Suburban on a
hot day. I’ve dried foods on sheets,
laid out on tin porch roofs, and in hay
mows, protected from insects and
dust by cheesecloth or old curtains.
But, finally, I caught a killer sale at
Wal-Mart and bought a round plastic
electric dehydrator. (Vita-Mix also
sells these.) I’ve dehydrated bushels
of produce and it’s showing no sign
of weakening. I also bought two extra
trays 10 years back, which help.
We live far off grid, but use the
dehydrator when we have the genera-
tor on for a few hours for my writing
or tool use. It’s a little peculiar, but it
works.
Peas
are very easy to dehydrate at
home. Simply shell your peas, then
dip them into boiling water for one
minute to blanch them. If you don’t,
the flavor will not keep as well. Let
them drip dry, then spread them out
on your trays, one layer deep.
Dehydrate until they are hard and
puckered. If using a cookie sheet, stir
them a time or two.
Cool and pour into airtight, vermin-
proof containers. I use odd shaped
glass jars. I keep at least two gallons
in storage, and they’ll last for years.
Rehydrate in boiling water and let
them steep for an hour or two. For
use in soups and stews, simply sprin-
kle a handful or two of dried peas
into your stock. Simmer until done.
Simple and tasty.
Not enough peas in the garden to
dehydrate? Buy some on-sale frozen
peas, thaw ‘em, and go at it. They
work fine.
Onions
and
garlic
are about as easy
as it gets. I peel them and slice whole
round slices off, about an eighth of an
inch thick. Place in a single layer on
your tray and begin dehydrating. Dry
until quite dry. I then chop them,
either using a blender (when the gen-
erator is on) or in a food grinder.
Dump the chopped onions out on a
cookie sheet and dry further, until
crunchy-dry. These may be stored as
is or reduced to a textured powder to
use in cooking as onion powder. I do
some of each, and keep a quart of
onion powder, a half pint of garlic
powder, a quart of minced onion, and
a half pint of minced garlic on my
pantry shelf. I use these every day.
Sweet corn
i s a n o t h e r o f m y
favorites. I briefly boil a couple
dozen ears of corn, then cut the ker-
nels off the cob and lay them on a
drying tray in a single layer. Corn
needs to be stirred often if on a cook-
ie sheet, but is fine on a screen or reg-
ular dehydrator tray. Dry until tough
January/February 2002 Backwoods Home Magazine
45

and hard, then store in an airtight jar
or other container. To rehydrate and
use as fresh corn, I boil it for one
minute, then place in the fridge
overnight. The next day it’s hard to
tell from fresh corn. This sweet corn
will keep for years in decent storage.
If you run out of fresh corn, frozen or
canned corn will dehydrate fine.
Carrots
dehydrate great at home.
Slice or dice the carrots into ¼-inch
pieces. Blanch for one minute in
steam or boiling water. Drip dry and
put on a tray in a single layer.
Dehydrate until leathery and quite
hard.
Green beans
dry fine, too. Simply
cut into one inch pieces, blanch for a
minute, dry, and lay in a single layer
on the tray. They should be leathery-
brittle. Green beans take a little more
time to rehydrate. You can’t just put a
handful into a casserole and bake it.
They’ll still be tough. They should be
rehydrated the night before and kept
in the water they were boiled in
overnight in the fridge.
Peppers
of all kinds dehydrate
wonderfully. The old way was to
string them by the stems and hang in
the sun on a porch wall. But if you
live in a humid climate, you’ll proba-
bly have molded peppers if you use
this method. So use the dehydrator
method. Seed the peppers, then halve
thin-walled hot peppers or slice thick-
walled peppers, such as bell peppers,
in ¼-inch wide slices. Dehydrate in a
single layer until crunchy.
Broccoli
works great dehydrated,
which is lucky because it is terrible
when canned. Cut into small flow-
erettes and blanch. Lay out in a single
layer and dehydrate to a very crisp
texture, like artificial little trees. It
works great in cheese and broccoli
soup and casseroles.
Fruits
are simple to dehydrate, too.
You can just slice ripe
bananas
¼ -
inch thick onto your tray and dry
them to a leathery-hard disc.
Peach
slices are equally easy. Make your
own raisins from whole seedless
grapes. Just stem them, sort and lay
out in a single layer. Easy? You bet.
Apples
can be peeled (or not) and
sliced ¼-inch thick into a bowl of
water with a good squeeze of lemon
and a teaspoonful of salt in it to pre-
vent discoloration. Then they are drip
dried and laid in a single layer on the
dehydrator trays. Apples dry to a
leathery-crisp texture. I keep about 3
gallons of dehydrated apple slices, as
they cook up quickly and easily in
recipes from pies to granola. We like
them for treats, too.
Strawberries
d r y n i c e l y w h e n
sliced ¼-inch thick. You’ll want these
dehydrated to a crisp texture. I’ve
used a lot of fresh ones, but have
bought frozen strawberries on a great
sale and done them up with equal
success. I put up as many dehydrated
strawberries as I have and am glad for
them come winter.
Home dehydrating is easy and the
food tastes good. An added bonus is
that a bushel of produce can be dehy-
drated and stored in a couple of jars.
Many foods contain up to 90 percent
water. Pick up a good book on dehy-
drating food, and go at it.
Canning foods
While you can buy up a bunch of
canned meats, vegetables, fruits,
jams, jellies, pickles, and so forth at
the store to put in a long-term storage
pantry, it’s a good idea to learn to
home-can foods. Both will have an
indefinite shelf life, but home-canned
foods will be much more tasty and
nutritious. And if a situation develops
where you can not buy more store-
bought food, you can reuse your jars
and rings (not lids) and home-can
more food to restock your pantry. All
it takes is a garden and a little skill.
Nearly anything you see canned in
the store can be canned at home,
including meat. Here’s how:
Equipment needed:
• Water bath canner for high-acid
foods, such as fruit, pickles, jelly,
jams, preserves, tomatoes and tomato
sauce. A “Big blue” canner costs $21-
$27 and lasts indefinitely.
• Pressure canner for low-acid
foods, such as vegetables and meats.
(No, they do not blow up.) This can-
ner has a gauge or weight on top,
along with a lock-down heavy lid.
Cost new is $89-$139. Lasts indefi-
nitely. (I bought a used one for $5.)
• Canning jars, from half pint
upwards, depending on your needs.
Cost new is $5.49-$6.49 per dozen,
including new rings and lids. Jars last
indefinitely, rings 20+ years with
care. I’ve been given boxes and
boxes, bought others for less than $1
a dozen at flea markets and auctions.
Ask around. Standard canning lids
must fit correctly.
• Lids to fit jars, either wide mouth
or regular. Cost $.94 to $1.89 per
dozen (wide mouth are more expen-
sive). One use only.
• Canning book or manual, such as
Ball Blue Book.
Cost $5.95-$18.
Lasts indefinitely (or until a new one
comes out with the latest safe canning
information).
• Jar funnels, jar lifters, and lid
wands to pick up hot lids are all
cheap and last forever.
High-acid foods
Fruits, tomatoes, pickles, etc.
High-acid foods are the easiest to
can, as they require no pressure can-
ning. High-acid foods do not develop
bacteria that cause food poisoning. If
they go bad, they mold or ferment
instead. Yucky, but not deadly.
Canning with a water bath canner
processes foods at water-boiling tem-
perature, which seals the jars.
Whenever I begin to can any food, I
always get out my canning manual no
matter how many hundreds of times
I’ve put up the same exact food. You
should do the same. While you are
looking through it for the food you
are going to water bath can today,
take a gander at the altitude chart if
you live above 1,000 feet. You will
need to adjust the time upwards by 5
January/February 2002 Backwoods Home Magazine
46

minutes for altitudes between 1,001-
3,000 feet, adding another five min-
utes for altitudes between 3,001 and
6,000 feet, another five for altitudes
between 6,001 and 8,000 feet, and so
on. We live at 4,200 feet, so I add 10
minutes to all processing times.
Okay, let’s can peaches to see how
to use the water bath canner. The
basic process is the same, but there
are differences for each food, so read
your canning manual before starting.
1. Get out your jars, and check for
cracks or nicks in the rim; any dam-
aged jars need to be thrown away
because they will not seal and will
often break during processing.
2. Wash jars and rings in hot soapy
water. Rinse and leave in hot water
until needed.
3. Select only sound, ripe peaches
(unripe peaches will not peel easily).
4. To peel peaches, dip them in a
kettle of boiling water for a minute
only, then drain and put into cold
water. This loosens the skin, making
them easy to slip off.
5. Cut peaches in half. Remove pit.
Leave in halves or cut into desired
slices. Drop pieces into a large bowl
containing cold water and either half
a cup of lemon juice or a commercial
product to prevent darkening, such as
Fruit Fresh.
6. Place jar on dry folded towel and
pack peaches, leaving half an inch of
head space (head space is just room
at the top of the jar).
7. Pick out enough new jar lids for
your jars and bring to a boil in
enough water to just cover them.
Keep them in hot water until you are
ready to use them.
8. Cover peaches with boiling hot
syrup (see your manual for propor-
tions of this sugar and water solu-
tion), leaving half an inch of head
space.
9. Slide a wooden spoon or rubber
spatula down between the peaches to
let air bubbles escape and more syrup
contact the fruit.
10. Wipe the jar rim well with a
clean damp cloth. Place hot lid on jar
and screw down ring firmly tight. Use
no force.
11. Place jars on rack of full, hot,
water bath canner. Never place hot
jars in contact with anything cold or
vice versa, as they will break.
12. When the canner is full, the
water should cover all of the jars by
one inch. If you need to add more
water, use a tea kettle of hot water to
bring the level up to the necessary
point.
13. Bring water to a rolling boil
with the top on the canner. When it
begins to boil vigorously, begin your
timing. For altitudes below 1,000
feet, you’ll need to process your
peaches for 25 minutes for pints and
30 minutes for quarts.
14. When the time is up, turn off
heat and remove the jars from the
canner carefully with a jar lifter.
Place on a dry folded towel, out of
drafts, to cool. Don’t tighten any
bands that seem loose. The jars will
seal. When the jars are cool (over
night), inspect seals. A sealed jar will
have a tight indentation in the center
of the flat lid. It will not give on pres-
sure from a finger in the center. The
contents of an unsealed jar should be
eaten at once or refrigerated.
15. Remove the bands and wash if
necessary. The bands are not neces-
sary to maintain the seal and may
cause rust to form. Store the jars in a
dark, dry, relatively cool place.
That’s all there is to water bath can-
ning. If you can boil water and tell
time, you can do it easily.
Low-acid foods
Vegetables, meats, stews, etc.
Remember, none of these foods can
be safely canned in a hot water bath
canner, no matter what your grandma
or auntie used to do. It is simply not
safe.
In the water bath canning process
we had to adjust the time we
processed our foods, according to
altitudes above 1,001. In a like man-
ner, we must adjust the pressure we
process our foods with for altitudes
above 1,001. Check your canning
manual for the correct pressure for
your altitude.
Before you start, unless your canner
is new, have the pressure gauge
checked by your extension office to
make sure it reads correctly. Most do,
but to be safe have it checked.
Some pressure canners have
weights over a pressure valve, but for
simplicity’s sake, we’ll assume your
pressure canner has a gauge, as most
do today.
Let’s do up a batch of chili. Most
foods are pressure canned in nearly
the same way, but, again, check your
canning manual for other foods. For
recipes with mixed ingredients, sim-
ply process the food for the longest
length of time required for any single
ingredient. In this case, it’s meat.
1. Select crack and nick-free jars.
2. Make a large pot of your favorite
chili; the beans do not have to be
completely tender, but well cooked.
3. Wash jars in hot soapy water,
then rinse, keeping hot until needed.
4. Boil enough lids for your jars and
keep in hot water until needed.
5. Place jar on dry folded towel and
carefully ladle your chili into the jar,
leaving one inch head space.
6. Wipe jar rim with damp, clean
cloth. Place hot lid on and screw
down ring firmly tight. Use no force.
7. Place jars on rack in pressure
canner, containing two inches of hot
water. (Or the amount recommended
by manufacturer.)
8. Fasten pressure canner lid firmly
with steam valves open. Turn on heat.
9. Exhaust steam forcefully for 10
minutes.
10. Close petcock or vent, allowing
pressure to build.
11. Hold at correct pressure (10
pounds for altitudes below 1,000 feet)
for an hour and fifteen minutes
(pints), or an hour and a half (quarts).
Adjust heat as needed.
January/February 2002 Backwoods Home Magazine
47

12. When time is up, turn off heat.
When gauge returns to zero, carefully
release any remaining steam and
remove lid, taking care to avoid any
steam in canner.
13. Lift out jars carefully with jar
lifter and place on a dry, folded towel,
away from drafts, to cool. Do not
tighten any loose bands.
14. When cool, check for seal.
Sealed jars dent inward and do not
give under the pressure of a finger in
the center.
15. Remove rings and wash jars.
Store in a dark, cool, dry place.
I told you it was easy.
When opening the jar, again check
the seal, then open it and inspect and
sniff the product. If any of these rais-
es questions of quality, throw it out
where animals and children can not
get hold of it. To be safe, always
bring low-acid foods to boiling tem-
perature for 15 minutes before eating.
Now, using your home food pro-
cessing skills, you can effectively and
cheaply stock up enough food to last
your family through any hard time.
Be sure to store goodies, such as
fruits, favorite canned recipes, jams,
pickles, etc. When one is having wor-
ries, nothing helps like a little treat.
Here are some samples of home
canned foods you can store and use:
Apples, applesauce, apricots, baby
foods, asparagus, barbecue sauces,
beans of all types, beef roasts, stew
meat, beets, blackberries, cabbage,
corn, carrots, celery, cherries, cheese,
chicken, chili, clam chowder, clams,
conserves, corned beef, crab apple
jelly & pickles, cranberry sauce,
elderberry jelly, elk, fish, grapefruit,
grapes, grape jelly, greens, jams,
ground beef, jellies, juices, lamb,
maple syrup, mixed vegetables,
mincemeat, moose, mushrooms, okra,
parsnips, peaches, pears, peppers,
pickles, pie fillings, plums, plum jelly
and conserve, poke, pork, potatoes,
poultry, preserves, pumpkin, rabbit,
raspberries, rhubarb, salsa, sauer-
kraut, sausage, seafoods, soups, taco
meat, taco sauce, tomatoes, tomato
catsup, tomato sauce, turkey, turnips,
venison, watermelon pickles, wild
game, fowl, and much more.
Remember though, there are 52
weeks in a year, so if times get tough
you will need more food than you
first think. There may be no fast food,
only homecooked meals. Calculate
carefully and err on the bountiful
side, rather than have your family go
hungry. And can a wide variety. No
family likes to eat beans every meal.
Pet foods
Perhaps the easiest foods to store
for your dogs and cats are dry foods.
Under decent storage conditions, a
good quality dog or cat food will
remain fresh for at least a year. Store
a high quality dry food, not the
“cheaper” brands. As with most
everything, you get what you pay for.
Add up what your pets eat in a week,
a month, then multiply it by 12. Store
in rodent-proof containers.
It’s also a good idea to include a
few cans of quality dog and cat food
for a treat now and then. I knew a
lady who survived the depression
with her dear fox terrier. The woman
was very poor and could not afford
any dog food, whatsoever. And, of
course, there were very few table
scraps. So to feed her beloved pet,
she trapped woodchucks and
muskrats, which she skinned for a
few dollars and canned the boned
meat for her dog. Coupled with a few
meager table scraps, her fox terrier
came through the hard times fat and
sassy.
You and your family can come
through hard times in triumph, not
merely “survive” them. All it takes is
a bit of planning, a lot of hard work,
and some ingenuity.
∆
January/February 2002 Backwoods Home Magazine
48
Wyszukiwarka
Podobne podstrony:
Long term food storage By Jackie Clay
7 mistakes of Food Storage By Vicki Tate
Intertrochanteric osteotomy in young adults for sequelae of Legg Calvé Perthes’ disease—a long term
Female Genital Mutilation long term psychological?fects
Long term Management of chronic hepatitis B
Long term
Critical carbon inputs to maintain soil organic carbon stocks under long term finger millet (Eleusin
long term sequential RANKL and OPG expression in lipopolysaccharide induced rat peripheral lesions
Yarbro, Chelsea Quinn Long Term Investment
HS SPME a tool for new insights into the long term thermo
44 Mindset for Long term success
Food Storage Containers
Canning 101 pickles, fruits, jams, jellies, etc By Jackie
Quality of life and disparities among long term cervical cancer suvarviors
Alexander, Smales Intelligence, Learning and Long Term Memory
Andrew Austin IEMT & Long Term Anxiety DVD Cover
Keeping your food cold By Michael Hackleman
Solar food drying By Marcella Shaffer
więcej podobnych podstron