
TRANSMISSION SERVICING - A/T
1993 Mitsubishi Montero
1993 TRANSMISSION SERVICING
Chrysler/Mitsubishi Automatic Transmission
Dodge; Ram-50
Mitsubishi: Montero & Pickup
IDENTIFICATION
AUTOMATIC TRANSMISSION APPLICATIONS TABLE
Model Transmission/Transaxle
Ram-50
RWD & 4WD ................... Model R4AC1 Transmission
Montero ..................... Model V4AW2 Transmission
Pickup
RWD & 4WD ................... Model R4AC1 Transmission
LUBRICATION
SERVICE INTERVALS
Transaxle/Transmission
Check fluid level every 12 months or 15,000 miles. Change
fluid and filter every 30,000 miles. If vehicle is operated under
severe conditions, change fluid more often. If severe darkening of
fluid and strong odor are noted, bands should also be adjusted.
Transfer Case
On 4WD and AWD models, change transfer case fluid every 30,
000 miles.
CHECKING FLUID LEVEL
Transaxle/Transmission
1) Park vehicle on level area. Ensure oil is at normal
operating temperature, parking brake is engaged, and engine is at
idle. Move gear selector through each position, stopping briefly at
each selection.
2) Place gear selector in Neutral, and clean area around
dipstick tube. Ensure fluid level is between lower and upper marks,
but never over upper mark, in HOT range. Add or drain fluid if
necessary.
CAUTION: If severe darkening of fluid and strong odor are noted,
change fluid and filter, and adjust bands.
Transfer Case
Lubricant level should be to bottom of fill hole on side of
transfer case.
RECOMMENDED FLUID
Transaxle/Transmission
Use Chrysler Plus/Mitsubishi Plus ATF, Dexron or Dexron-II
ATF.
Transfer Cases
Use SAE 75W-85 gear oil with API GL-4 rating or higher.
FLUID CAPACITIES
TRANSAXLE/TRANSMISSION REFILL CAPACITIES TABLE
Refill Dry Fill
Application Qts. (L) Qts. (L)
Montero .................... 5.8 (5.5) .......... 7.4 (7.0)
Pickup & Ram-50 .......... (1) 4.2 (4.0) ........ 7.4 (7.0)
(1) - Idle engine in Neutral, then add fluid to bring level
between notches at "H" mark.
TRANSFER CASE REFILL CAPACITIES TABLE
Application Pts. (L)
Montero ......................................... 4.9 (2.3)
Pickup & Ram-50 ................................. 4.6 (2.2)
DRAINING & REFILLING
NOTE: Although manufacturer recommends changing only fluid, the
oil filter/screen may also require replacement. If replacing
oil filter/screen, note length and location of all bolts.
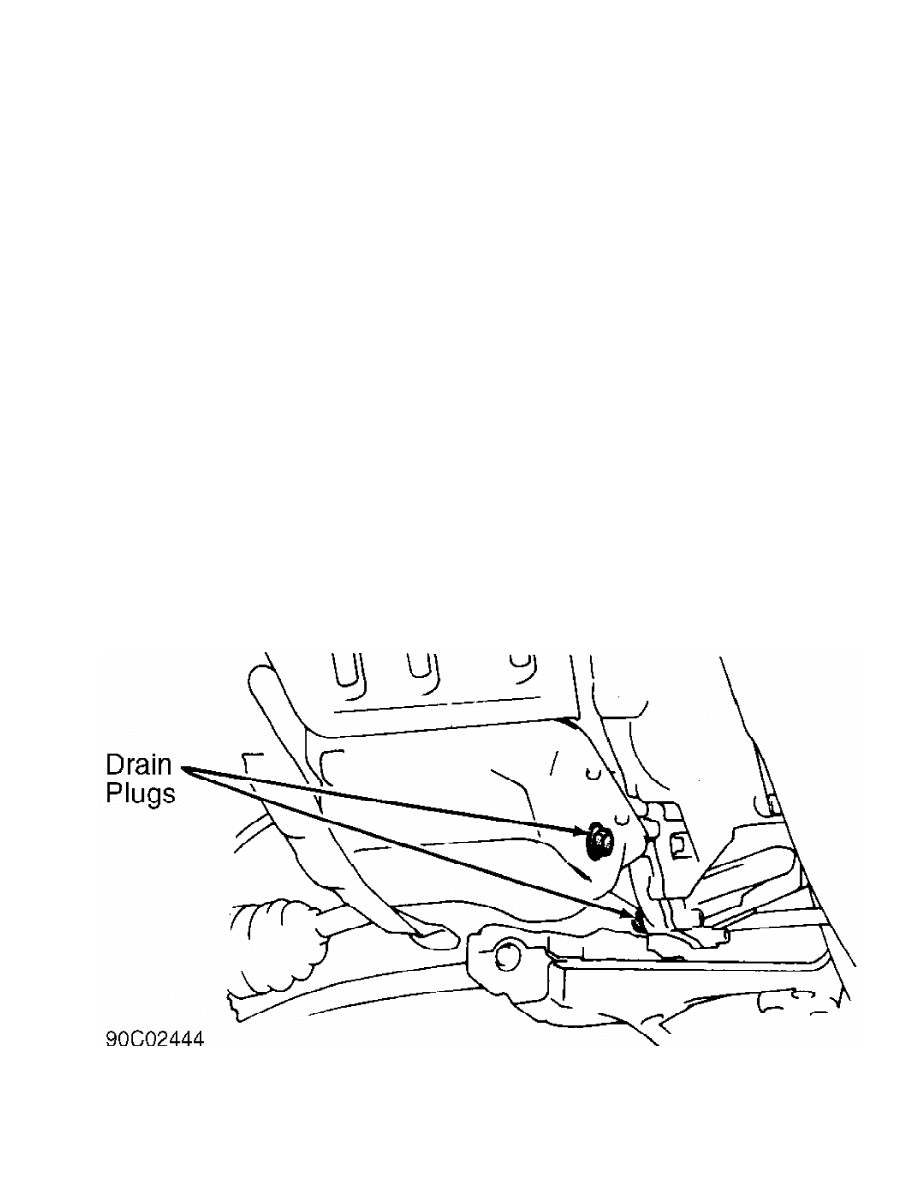
Fig. 1: Locating Drain Plugs
Courtesy of Mitsubishi Motor Sales of America.
Transmission
1) Remove drain plug (if equipped) from transmission pan, and

allow fluid to drain. On models without drain plug, oil pan must be
removed to drain fluid. Remove oil filter/screen if necessary.
2) If oil filter/screen is replaced, tighten bolts to
specification. See TORQUE SPECIFICATIONS TABLE at the end of this
article. Clean oil pan, replace gasket, and install oil pan. Tighten
oil pan bolts and drain plug to specification. See TORQUE
SPECIFICATIONS TABLE at the end of this article. Fill transmission,
through filler tube, with 5.3 qts. (5.0L) of Dexron-II ATF on Montero,
or 2.0 qts. (1.9L) on all others. Start engine, and allow to idle for
2 minutes.
3) Shift transmission into each position, ending in Neutral.
Check fluid level with engine running at idle. If necessary, add
sufficient fluid to bring level to lower mark of dipstick. Recheck
fluid level after transmission is at normal operating temperature.
Transfer Case
Drain plug is located on bottom of transfer case. Change
drain plug gasket whenever fluid is changed. Lubricant level should be
at bottom of fill hole on side of transfer case.
ADJUSTMENTS
KICKDOWN BAND
Pickup & Ram-50
1) Locate kickdown band adjusting screw on left side of
transmission case. Loosen lock nut, and back off 5 turns. Ensure
adjusting screw turns freely in transmission case.
2) Using torque wrench, tighten adjusting screw to 72 INCH
lbs. (8 N.m). Back off adjusting screw 2 7/8 turns. Hold adjuster
screw in this position, and tighten lock nut to 30 ft. lbs. (41 N.m).
LOW-REVERSE BAND
Pickup & Ram-50
1) Raise vehicle, drain transmission, and remove oil pan.
Loosen adjusting screw lock nut, and back off nut 5 turns. Ensure
adjusting screw turns freely in lever.
2) Using torque wrench, tighten band adjusting screw to 30
INCH lbs. (3.5 N.m). Back off adjusting screw 6 turns. Hold adjusting
screw in this position, and tighten lock nut to 25 ft. lbs. (34 N.m).
3) Reinstall oil pan using new gasket. Tighten pan bolts to
150 INCH lbs. (17 N.m). Refill transmission with specified fluid.
TRANSMISSION THROTTLE CONTROL
CAUTION: On Pickup and Ram-50, always adjust throttle control cable
whenever idle is adjusted.
Pickup & Ram-50
1) Ensure engine idle is adjusted correctly. Ensure throttle
lever and throttle cable bracket are not bent. Pull lightly on inner
throttle cable.
2) While in closed throttle position, measure gap between
inner cable stopper and outer cable housing. Adjust cable as necessary
to obtain a gap of .031-.059" (.79-1.50 mm). See Fig. 2 (STEP 1).
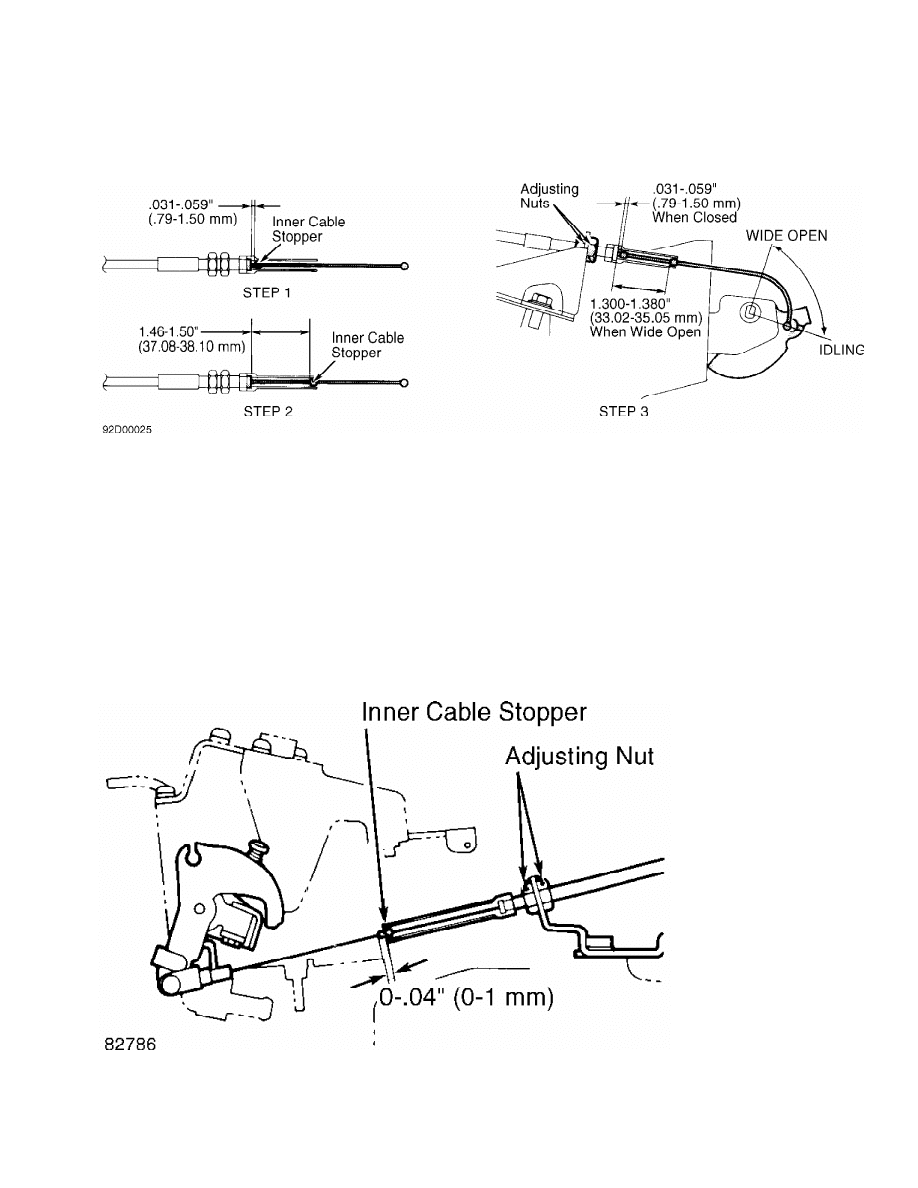
Fig. 2: Adjusting Kickdown Cable (Pickup & Ram-50)
Courtesy of Mitsubishi Motor Sales of America.
3) While holding throttle in wide open position, pull on
inner throttle cable. Adjust bellcrank as necessary to obtain a gap of
1.46-1.50" (37.08-38.10 mm) between inner cable stopper and outer
cable. See Fig. 2 (STEP 2).
4) With throttle fully closed, recheck gap between inner
cable stopper and outer cable housing. Gap should be .031-.059" (.79-
1.50 mm). See Fig. 2 (STEP 3). While holding throttle in wide open
position, pull on inner throttle cable. Check for a gap of 1.30-1.38"
(33.02-35.05 mm).
Montero
Ensure throttle lever and throttle cable bracket are not
bent. Ensure distance between inner cable stopper end and dust cover
is 0-.04" (0-1.0 mm). See Fig. 3.
Fig. 3: Adjusting Throttle Cable (Montero)
Courtesy of Mitsubishi Motor Sales of America.
SHIFT LINKAGE
Montero
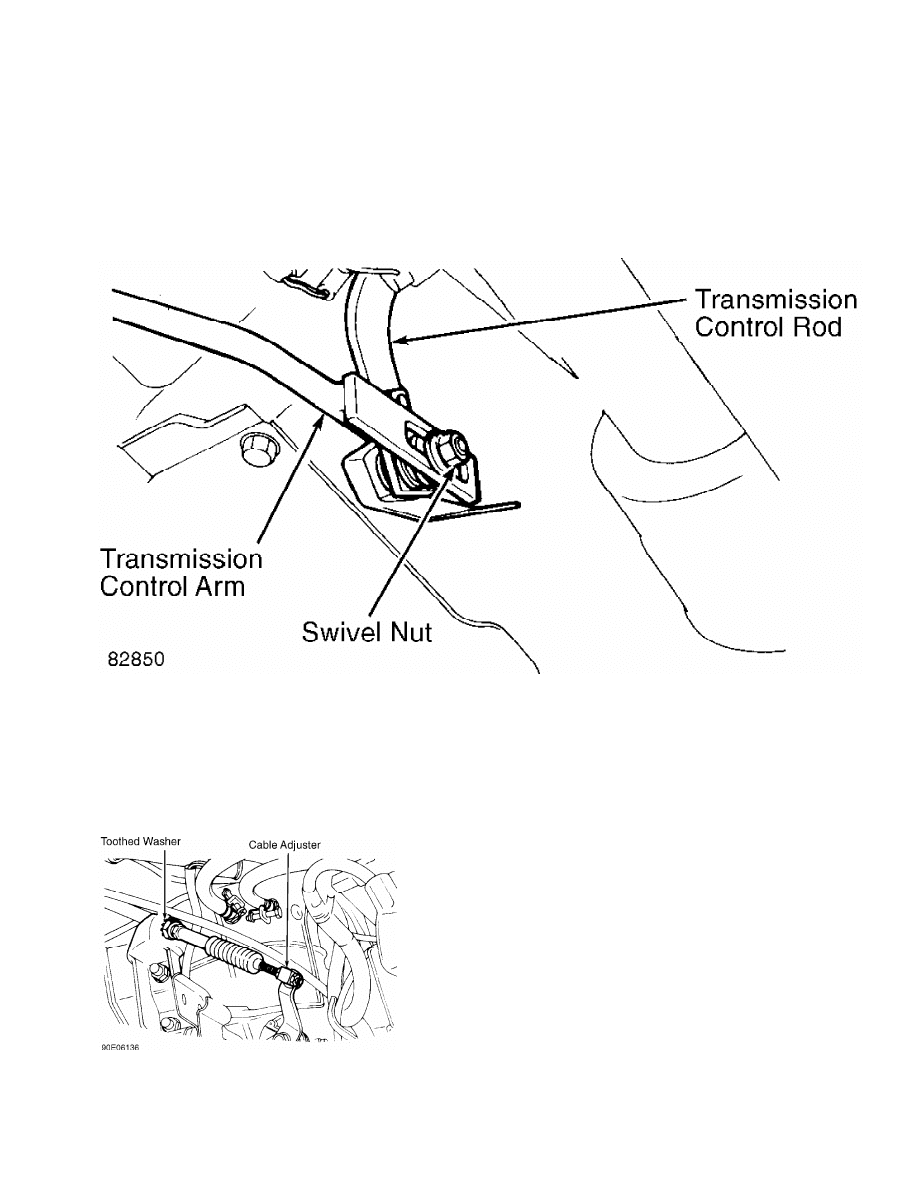
Loosen swivel nut on transmission control rod. See Fig. 4.
Ensure shift and transmission levers are both in Neutral. Tighten
swivel nut.
Fig. 4: Adjusting Shift Linkage (Montero)
Courtesy of Mitsubishi Motor Sales of America.
Pickup & Ram-50
Adjust shift cable at transaxle/transmission end of cable.
Place shift lever in Neutral. Ensure shift lever and neutral safety
switch are in Neutral position. If cable was replaced, ensure toothed
washer is installed. See Fig. 5. Turn adjuster at cable end so it fits
into manual lever on transaxle/transmission, and no slack exists in
cable. See Fig. 5.
Fig. 5: Adjusting Shift Cable (Pickup & Ram-50)
Courtesy of Mitsubishi Motor Sales of America.
SHIFT LEVER SLEEVE
NOTE: Pickup and Ram-50 do not have shift lever sleeve.
Montero
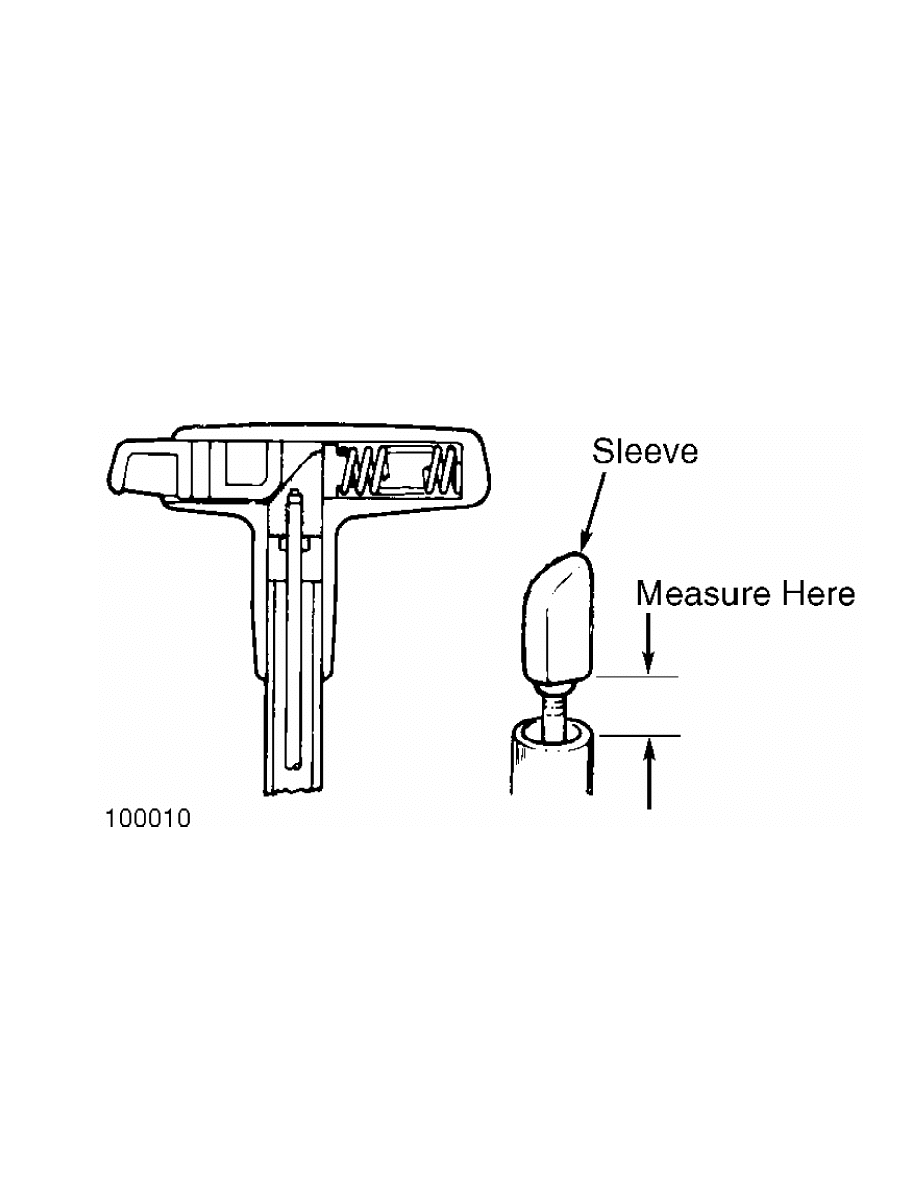
To adjust shift lever sleeve, remove shift handle on top of
shift lever. With lever in Neutral, turn sleeve so distance between
sleeve and lever end is within specification. See SHIFT LEVER SLEEVE
CLEARANCE SPECIFICATION table. See Fig. 6. Ensure beveled side of
sleeve faces toward push button (if equipped).
SHIFT LEVER SLEEVE CLEARANCE SPECIFICATION TABLE
Application Clearance In. (mm)
Montero ............................. .72-.74 (18.2-18.9)
Fig. 6: Adjusting Shift Lever Sleeve (Montero)
Courtesy of Mitsubishi Motor Sales of America.
NEUTRAL SAFETY SWITCH
Montero
1) Neutral safety switch is located under shift lever
console. Remove neutral safety switch connector. See Fig. 7.
2) Using an ohmmeter, check continuity for each position of
transmission control lever. See Fig. 7.
3) After ensuring correct continuity in all positions, move
selector lever to "N" position. Loosen adjusting nut of control cable.
Loosen park/neutral switch mounting bolt.
4) Adjust neutral safety switch by turning park/neutral
switch so that the bosses for aligning "N" position on park/neutral
switch are aligned with the "N" position adjustment lever. Tighten
park/neutral switch mounting bolt to specification. See TORQUE
SPECIFICATIONS TABLE at the end of this article.
5) Gently pull end of transmission control cable in direction
of arrow. See Fig. 7. Tighten adjusting nut to specification. See
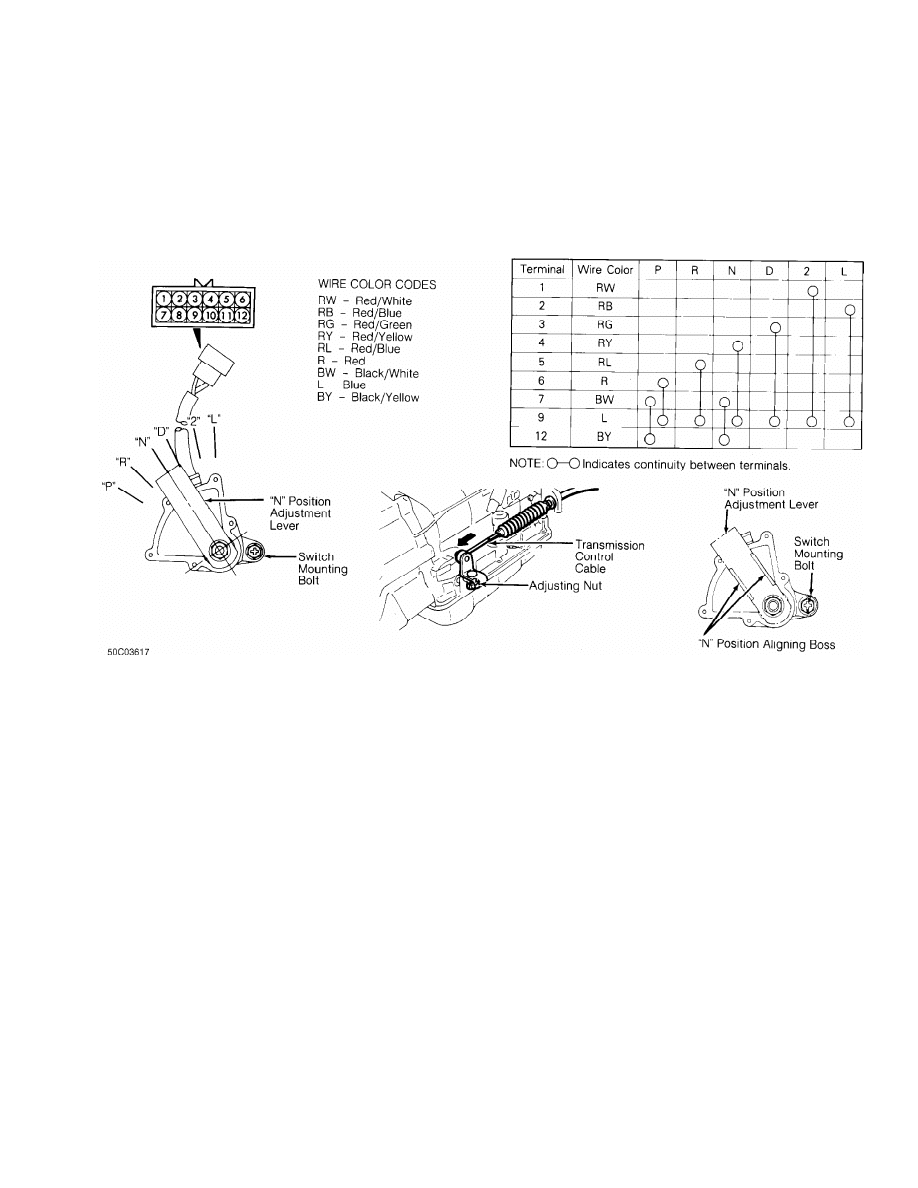
TORQUE SPECIFICATIONS TABLE at the end of this article.
6) Ensure selector lever is in "N" position after adjustment.
Ensure each range of the transmission functions correctly at
appropriate position of the selector lever.
Fig. 7: Adjusting Neutral Safety Switch (Montero)
Courtesy of Mitsubishi Motor Sales of America.
Pickup & Ram-50
Neutral safety switch is part of transmission-mounted neutral
safety/back-up light switch assembly, and is non-adjustable.
TORQUE SPECIFICATIONS
TORQUE SPECIFICATIONS TABLE
Application Ft. Lbs. (N.m)
Drain Plug
Transaxle/Transmission
Montero ....................................... 13-17 (18-24)
Pickup & Ram-50 ............................... 22-25 (30-35)
Transfer Case ................................. 22-25 (30-35)
Transmission Control Cable
Adjusting Nut ....................................... 17 (24)
INCH Lbs. (N.m)
Oil Filter/Screen Bolt
Montero ..................................... 43-52 (4.9-5.9)
Pickup & Ram-50 .................................... 36 (4.0)
Oil Pan Bolt
Montero ..................................... 36-42 (4.0-4.8)
Pickup & Ram-50 .................................... 156 (18)
Park/Neutral Switch Mounting Bolt (Montero) ......... 48 (5.4)

Wyszukiwarka
Podobne podstrony:
71 TRANSMISSION SERVICING M T
transmission servicing mt
C102957 0 SERVICE POWER TRANSMISSION
C102962 A SERVICE TRANSMITTER UNIT
transmission removal and installation at
At Your Service
At your service 2
Transmisja WAP
Prezentacja firmy MARSTATE SERVICE BHP PPOZ PPT
Sieci media transmisyjne
Media Transmisyjne
AT kurs analityka giełdowego 3
WISL Pods I cyklu AT
hplj 5p 6p service manual vhnlwmi5rxab6ao6bivsrdhllvztpnnomgxi2ma vhnlwmi5rxab6ao6bivsrdhllvztpnnomg
PAT DS 350 Graphic Modular GM Service Data
więcej podobnych podstron