For
personal
use
only!
B e a d e d B e a d B r i g a d e # 3 | 2 0 0 3
©Eva Maria Keiser
E-mail: keiserdesigns@gmail.com
Pattern is for Personal Use Only
Unique beadwork and beyond...
eva maria
KEISER
D
ESI
GNS

For
personal
use
only!
DIScloSuRES
Notice of Rights:
Notice of
l
iability:
All rights reserved. No part of
this booklet may be reproduced
or transmitted in any form by any
means, electronic, mechanical,
photocopying, recording, or
otherwise without written
permission of the copyright
holder. Any and all contents of
this booklet are intended for
personal use only. Any other
use, especially commercial
use, is forbidden under law
without written permission of the
copyright holder.
The information distributed in this
booklet is on an “As-Is” basis,
without warranty.
While every effort has been
made to ensure the information
herein is accurate, due to
differing tools, and/or individual
skills, the author shall have no
liability to any person or entity
with respect to any loss or
damage caused or alleged to be
caused directly or indirectly by the
instructions contained herein.
Product names and services
identified throughout this
booklet are used in an editorial
fashion only and for the benefit of
such companies with no intention
of infringement of the trademark.
No such use, or the use of any
trade name, is intended to
convey endorsement or any
other affiliation with these
instructions.
Trademarks:
Unique beadwork and beyond...
E-mail: keiserdesigns@gmail.com
eva maria
KEISER
D
ESI
GNS
For
personal
use
only!
E-mail: keiserdesigns@gmail.com
©Eva Maria Keiser Designs
Page 3 of 7
Beaded Bead Brigade #3 ©2003
Notions
6 lb. test
Fireline
#12
beading needles
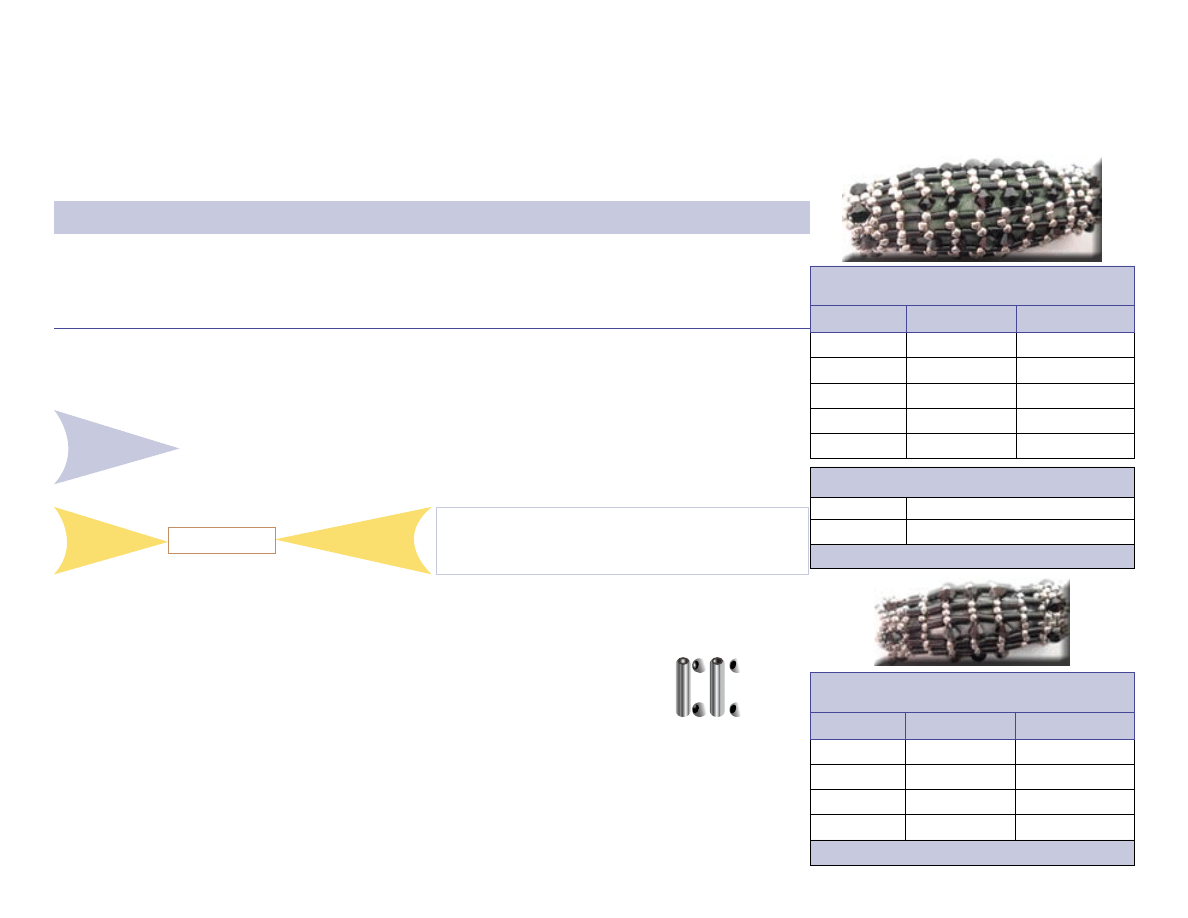
Supplies for Small BBB3
12 ladder sets
Quantity
Size
Type
1 each
25 x 10 mm
oval
30 each
3mm
bicone
5 grams
#1
bugle
5 grams
15/0
seed bead (SB)
Supplies for Large BBB3
14 ladder sets
Quantity
Size
Type
1 each
50x18mm
oval
28 each
4mm
bicone
28 each
3mm
bicone
7 grams
#1
bugle
7 grams
11/0
seed bead (SB)
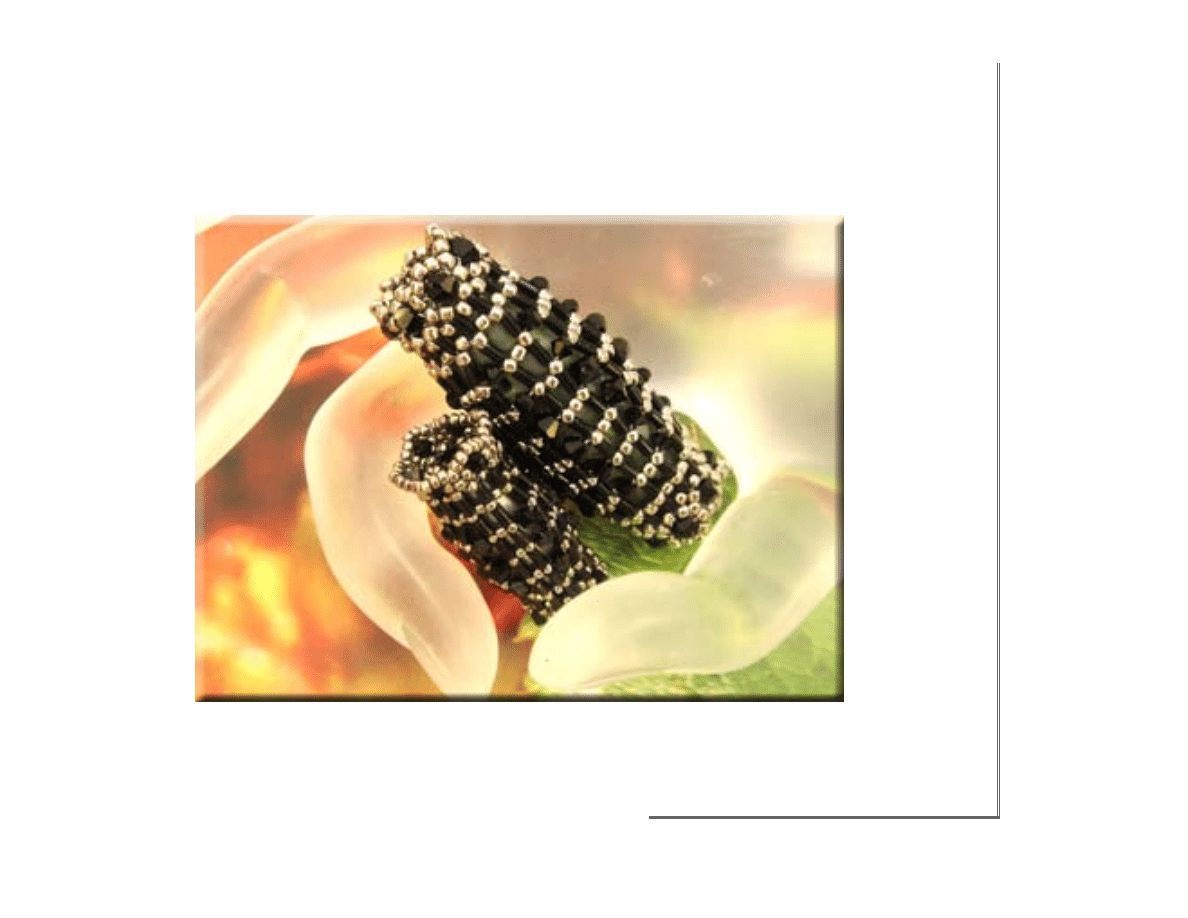
About BBB #3
BBB #3 is comprised of an even number of ladder-stitched bugle End Rings, positioned on each
end of a focal bead.The End Rings are foundational, to the body Spine Sets and End Caps.
A herringbone variation creates vertical spines, spaced horizontally with 3 or 4mm
beads. The girth showcases textural and visual interest to the overall design.
Design Note
BBB#3 - Large = 11/0 sead bead (SB)
BBB#3 - Small = 15/0 sead bead (SB)
Note:
This design requires several passes thru bugle beads, therefore, knotting, gluing, and/or waxing
are not initially recommended.
When bead is completed, weave in and secure thread ends as you prefer.
Tension is moderate, unless otherwise noted.
Fig.1-b
Working with 2 needles from the center of 36 inches (91.5cm) of 6# Fireline, double
a.
needle ladder stitch crisscrossing thru bugles only, as follows:
String
b.
, (1)Bugle, (1)SB-Left, (1)SB-Right, (1)Bugle, crisscross; (1)SB-L, (1)SB-R (
Fig.1-b)
REPEAT
:
For Large BBB3: (14)bugles and (14)SB (pivot beads) each side
For Small BBB3: (12)bugles and (12)SB (pivot beads) each side
Note:
Seed beads between bugles are place holders; referred
to as "pivot beads". Pivot beads also hide thread path.
Join bugle sets to form circle; further secure by needing thru next two bugle sets again.
c.
Place stop beads to secure both thread ends, to be used for
d.
EndCapsandweavingintothefinishedpiece,
DO NOT CUT!
Make
e.
TWO
(2) End Rings
Note: The End Rings ladder stitchs are worked with
two needles; remaining steps = single needle.
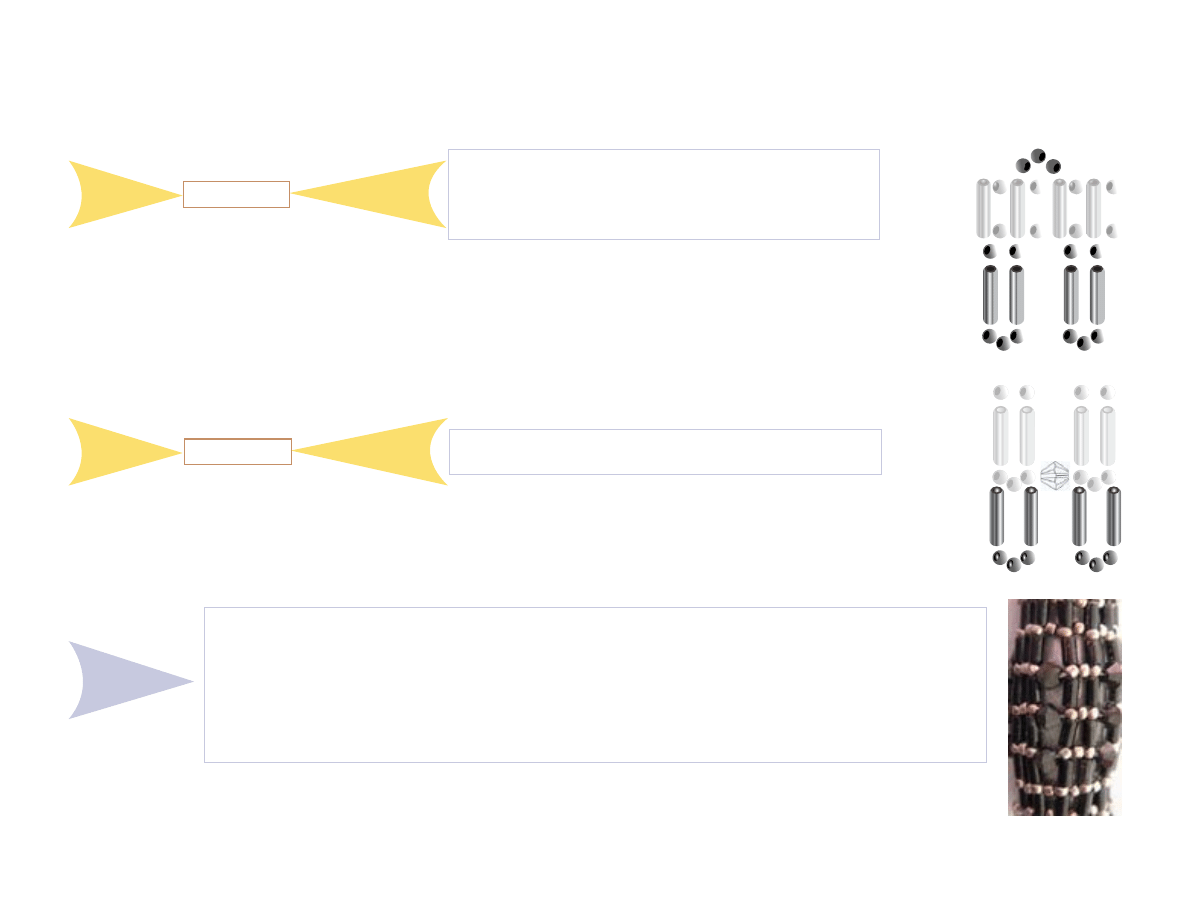
End Rings
Step 1
Ladder Stitch
Beaded Bead Brigade #3
Techniques: Ladder, Peyote, Herringbone
For
personal
use
only!
E-mail: keiserdesigns@gmail.com
©Eva Maria Keiser Designs
Page 4 of 7
Beaded Bead Brigade #3 ©2003
Thread a #12 beading needle on a wingspan of 6# Fireline,
a.
Secure thread end with a Stop Bead, leaving 8 inch tail
Needle exits a bugle;
b.
String (1)SB, (1)bugle, (3)SB; (
center of 3SB group = “point bead”
), (1)bugle, (1)SB (
Fig.2-b)
Needle up thru next bugle in End Ring, string (3)SB, skip pivot SB between
c.
bugles; needle down thru next bugle, repeat the round (
Fig.2-c)
EXIT - 1SB, 1bugle, 1SB next to point bead (
d.
Fig.2-d
)
Note: Spine Sets #1 are supported by the End Rings and set up
Spine Sets #2 and #3, or combinations thereof.
See BBB3 Diagrams for Spine Set comfiguration
Tip: Work Spine Sets on a mandrel or in your hand. The focal
bead will be inserted when Spine Set joins second End Cap.
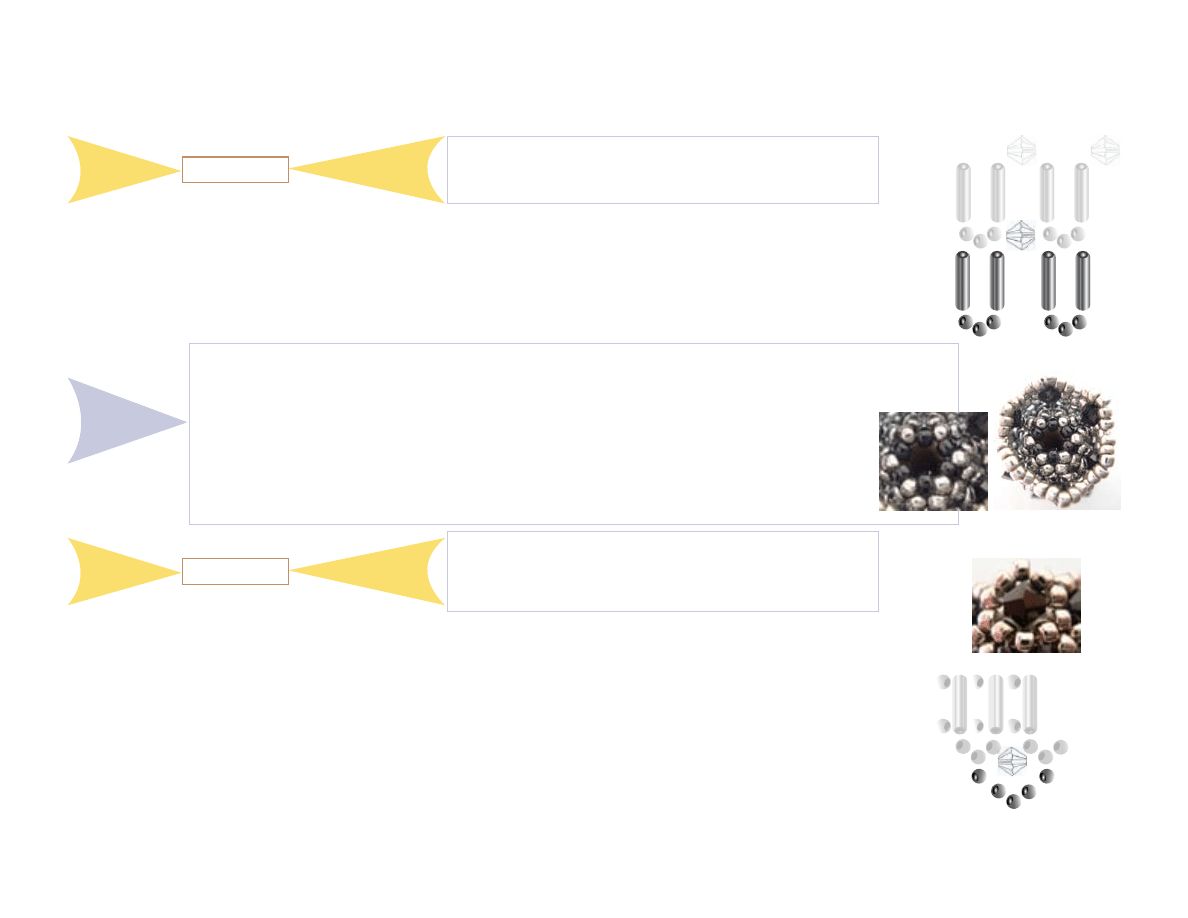
Spine Set #1
Step 2
Herringbone
String (1)bugle, (3)SB, (1)bugle,
a.
needle to and thru SB next to point bead (
Fig.3-a)
Pick up (1)3mm, needle thru SB next to point bead in next Spine Set, repeat the round, (
b.
Fig.3-b)
EXIT - (1)bugle, (1)SB, next to point bead (
c.
Fig.3-c
)
Spine Set #2
Step 3
Herringbone
Note: Spine Sets #2 continues the vertical line
and appends a
3mm
bead to Spine Set #1.
Before proceeding -
See BBB3 Diagrams for Spine Set configuration
If you are making BBB3-Large, continue to Step #4
If you are working BBB3- Small, continue to Step #5
Configurations are:
For Large BBB3: (1)End Ring, (1)Spine #1, (2)Spine #2, (2)Spine #3, (1)Spine #2 (1)Spine #1, (1)End Ring
For Small BBB3: (1)End Ring, (1)Spine #1, (2)Spine #2, (1)Spine #1, (1)End Ring
(
Fig.DN-1)
Design Note
Note:
Pay particular attention to Spine Set #1 thread path when joining second End Cap. You have
been adding new rows with Spine Sets and also appending previous rows with a horizontal
bead; thus the second End Cap join calculates a horizontal bead with the last Spine Set.
Fig.2-d
Fig.2-b
Fig.2-c
(
Fig.DN-1)
Fig.3-a
Fig.3-b
Fig.3-c
For
personal
use
only!
E-mail: keiserdesigns@gmail.com
©Eva Maria Keiser Designs
Page 5 of 7
Beaded Bead Brigade #3 ©2003
Optional:
If the bead opening is large, enhance End Ring from the inside, as follows:
Using a thread end from End Caps; needle to a pivot bead
a.
next to bugle ladders in Step #1 inside the End Ring
String (3)SB between pivot beads , Step Up to 3SB point bead
b.
Place (1)SB between each point bead of 3SB, (tension is snug), pass thru circle twice
c.
Weave thread ends, secure and end (
d.
Fig.DN-2)
Design Note
End Cap
Step 5
Peyote
Note: Working thread continues and completes End Cap.
Use non-working threads on first End Ring to complete first
End Cap. All other threads are woven and secured within.
Complete this step on both End Rings
Needle to point bead in End Ring (one End Cap will be worked in the opposite direction from the other)
a.
Pick up (1)3mm, (for BBB3 Small)
b.
OR
(1)4mm, (for BBB3 Large) placing one between each point bead in End Ring, repeat the round, (
Fig.5-b)
Step Up, EXIT - 3 or 4 mm, needle thru one more SB and 3 or 4mm set (
c.
Fig.5-c
)
Pick up (1)SB, place between each 3 or 4mm, repeat the round, (
d.
Fig.5-d)
Step Up, Exit - 1SB, down thru next 3 or 4mm and up to next SB (
e.
Fig.5-e
)
String (3)SB, place between each SB, repeat the round, (
f.
Fig.5-f)
Step Up, needle thru row a second time, (tension is snug), Secure all thread ends, and ENJOY! (
g.
Fig.5-g
)
End Cap
Fig.5-c
Fig.5-e
Fig.5-g
Fig.5-b
Fig.5-d
Fig.5-f
Spine Set #3
Step 4
Herringbone
Note: Spine Set # 3 continues the vertical line with a
4mm
bead between the seed beads next to the point beads.
See BBB3 Diagram for Spine Set configuration
String (1)bugle, (3)SB, (1)bugle,
a.
needle to and thru SB next to point bead (
Fig.4-a)
Pick up (1)4mm, needle thru SB next to point bead in next Spine Set, repeat the round, (
b.
Fig.4-b)
EXIT - (1)bugle, (1)SB, next to point bead. (
c.
Fig.4-c
)
Fig.4-c
Fig.4-a
Fig.4-b
(
Fig.DN-2)
For
personal
use
only!
E-mail: keiserdesigns@gmail.com
©Eva Maria Keiser Designs
Page 6 of 7
Beaded Bead Brigade #3 ©2003
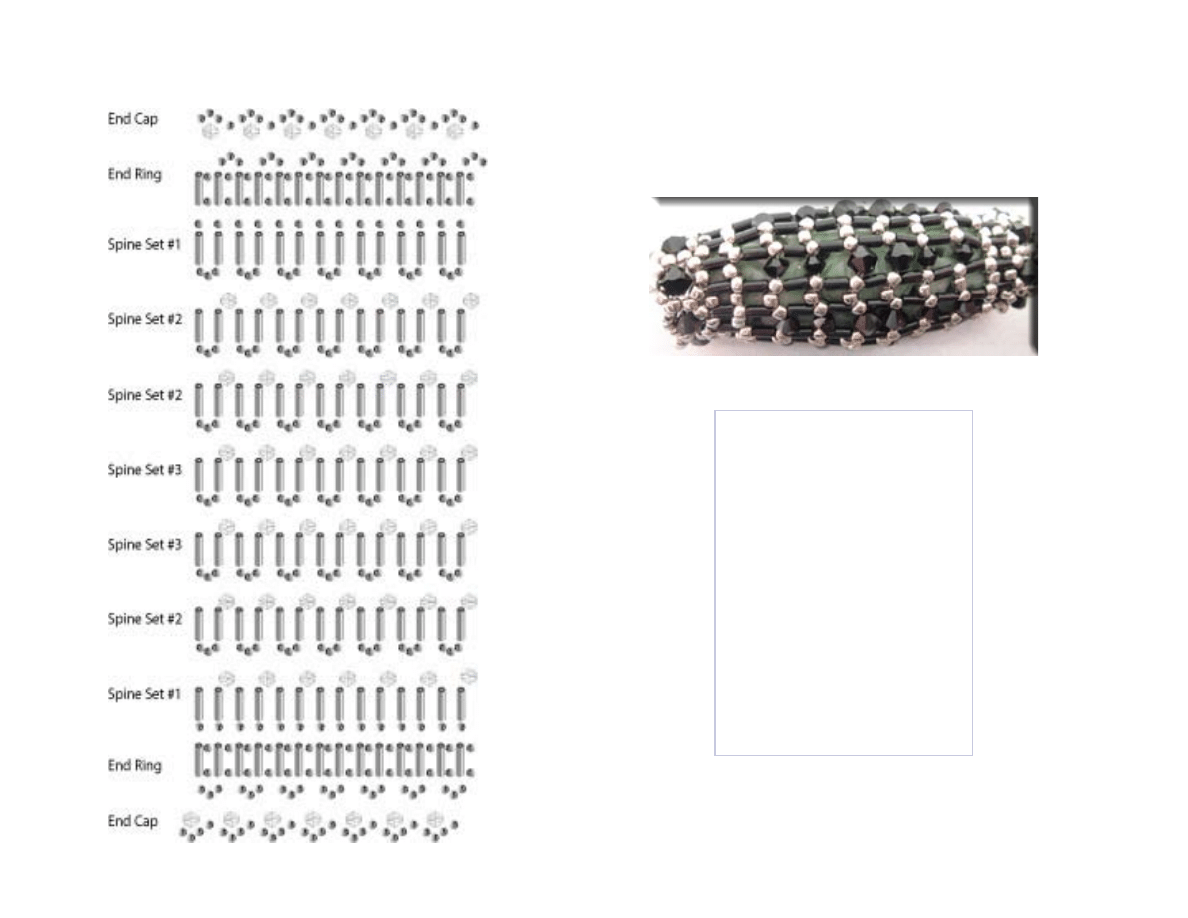
LargeBBB3configuration:
(1)End Cap
(1)End Ring
(1)Spine Set #1
(2)Spine Set #2
(2)Spine Set #3
(1)Spine Set #2
(1)Spine Set #1
(1)End Ring
(1)End Cap
For
personal
use
only!
E-mail: keiserdesigns@gmail.com
©Eva Maria Keiser Designs
Page 7 of 7
Beaded Bead Brigade #3 ©2003
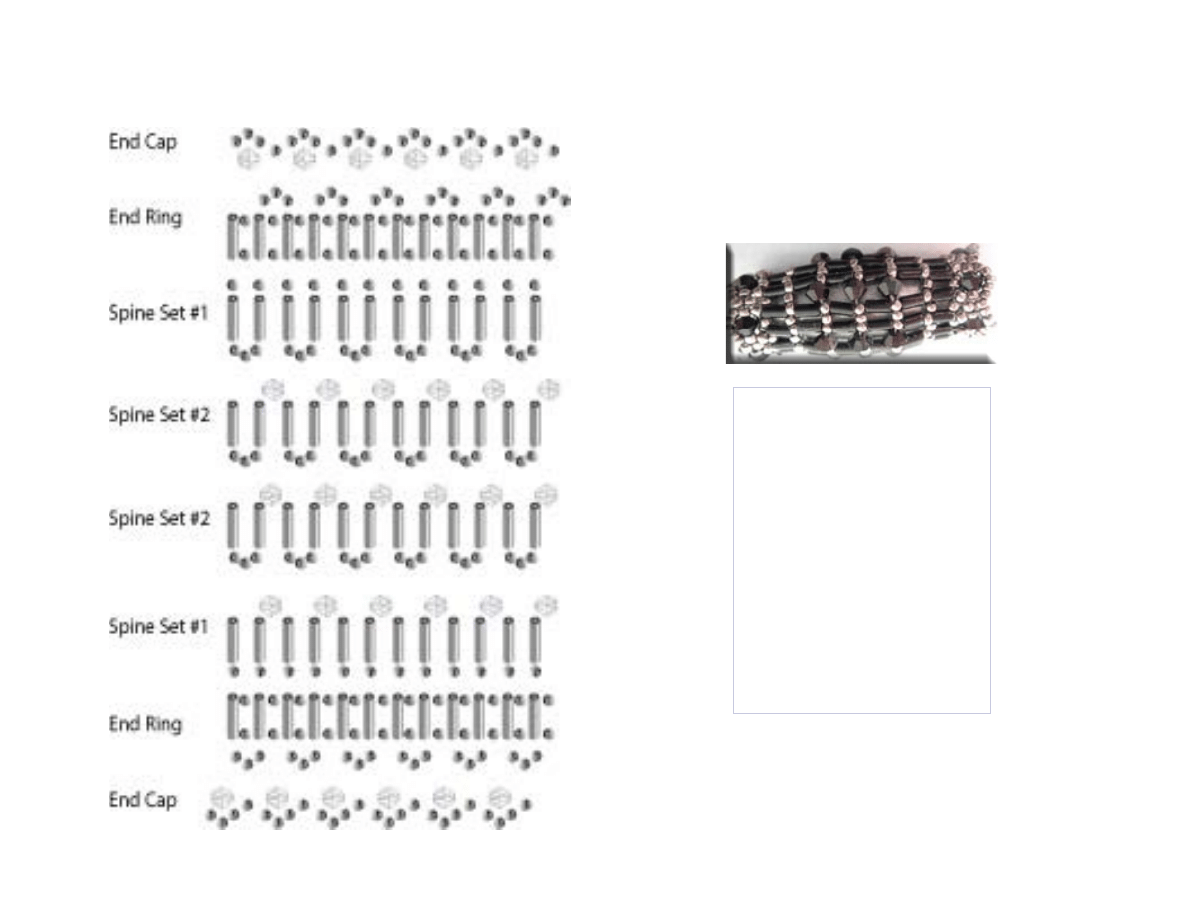
SmallBBB3configuration:
(1)End Cap
(1)End Ring
(1)Spine Set #1
(2)Spine Set #2
(1)Spine Set #2
(1)Spine Set #1
(1)End Ring
(1)End Cap
Wyszukiwarka
Podobne podstrony:
eva maria keiser desings (6)
eva maria keiser desings
eva maria keiser desings (2)
eva maria keiser desings (3)
eva maria keiser desings (4)
eva maria keiser desings (2)
eva maria keiser desings (7)
ewa maria keiser desings Four Corner Bling
Nos vemos Paso a paso CD Eva Maria Lloret Ivorra
Nos vemos cwiczenia A1 A2 z 2CD Ivorra Eva Maria Lloret Ribas Rosa Wiener Bibiana Gorrissen Margari
Eva Maria Bartenschlager Richtige Hundeernährung
samosprawdzenie, pedagogika uczelnia warszawaka, podstawy psychologii ogólnej, wykłady Maria Jankows
10 COMON ?VA
Fragment wywiadu z Marią Wiernikowską n
Mann - Czarodziejska gora, Maria Kurecka „Czarodziej
proces pielęgnowania, OIOM- Proces, Maria Kwiatkowska
Interna 13.06.2011 - ver.1, giełda made by Maria, Mariola, Michał i Ols
więcej podobnych podstron