For
personal
use
only!
© 2 0 0 4
E-mail: eknow@msn.com
www.keiserdesigns.com
©2000-2008 All Designs Eva Maria Keiser. All Rights Reserved.
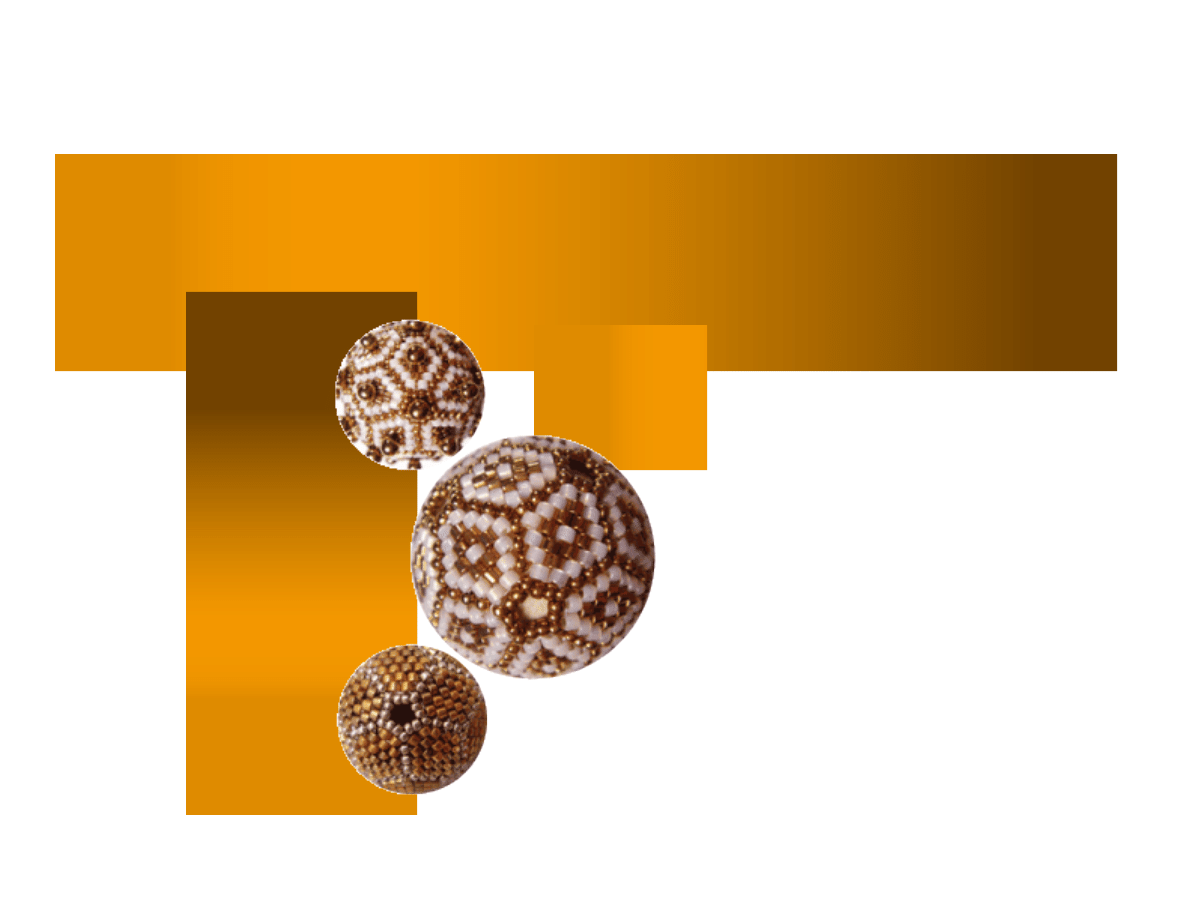
on’t know much about geometry?
No worries. Beading bridges the
gap.
Peyote twenty (20)
equilateral triangles.
Then fashion them into a
polyhedron jewel, inviting
intrigued observers to delight
in a beaded interpretation of an
icosahedron.
For
personal
use
only!
Page 2 of 9
E-mail: eknow@msn.com
www.keiserdesigns.com
©2000-2008 All Designs Eva Maria Keiser. All Rights Reserved.
Poly-Palooza Series ©2004
All rights reserved. No part of
this booklet may be reproduced
or transmitted in any form by any
means, electronic, mechanical,
photocopying, recording, or
otherwise without written
permission of the copyright
holder. Any and all contents of
this booklet are intended for
personal use only. Any other
use, especially commercial
use, is forbidden under law
without written permission of the
copyright holder.
The information distributed in
this booklet is on an “As-Is”
basis, without warranty.
While every effort has been
made to ensure the information
herein is accurate, due to
differing tools, and/or individual
skills, the author shall have no
liability to any person or entity
with respect to any loss or
damage caused or alleged to be
caused directly or indirectly by
the instructions contained herein.
Product names and services
identified throughout this booklet
are used in an editorial fashion
only and for the benefit of such
companies with no intention of
infringement of the trademark.
No such use, or the use of
any trade name, is intended
to convey endorsement or
any other affiliation with these
instructions.
For
personal
use
only!
E-mail: eknow@msn.com
www.keiserdesigns.com
©2000-2008 All Designs Eva Maria Keiser. All Rights Reserved.
Poly-Palooza Series ©2004
LeveL: IntermedIate
technIque: Peyote
Braided Wire - Fireline® Crystal™ 6#
•
Scissors - designated for braided wire only
•
Size 12 beading needles
•
Optional: Thread Burner
•
Optional: Double-sided “tacky” tape, (See Page 7)
•
Optional: 25mm wooden bead - plain, (See Page 7)
•
tooLs and notIons:
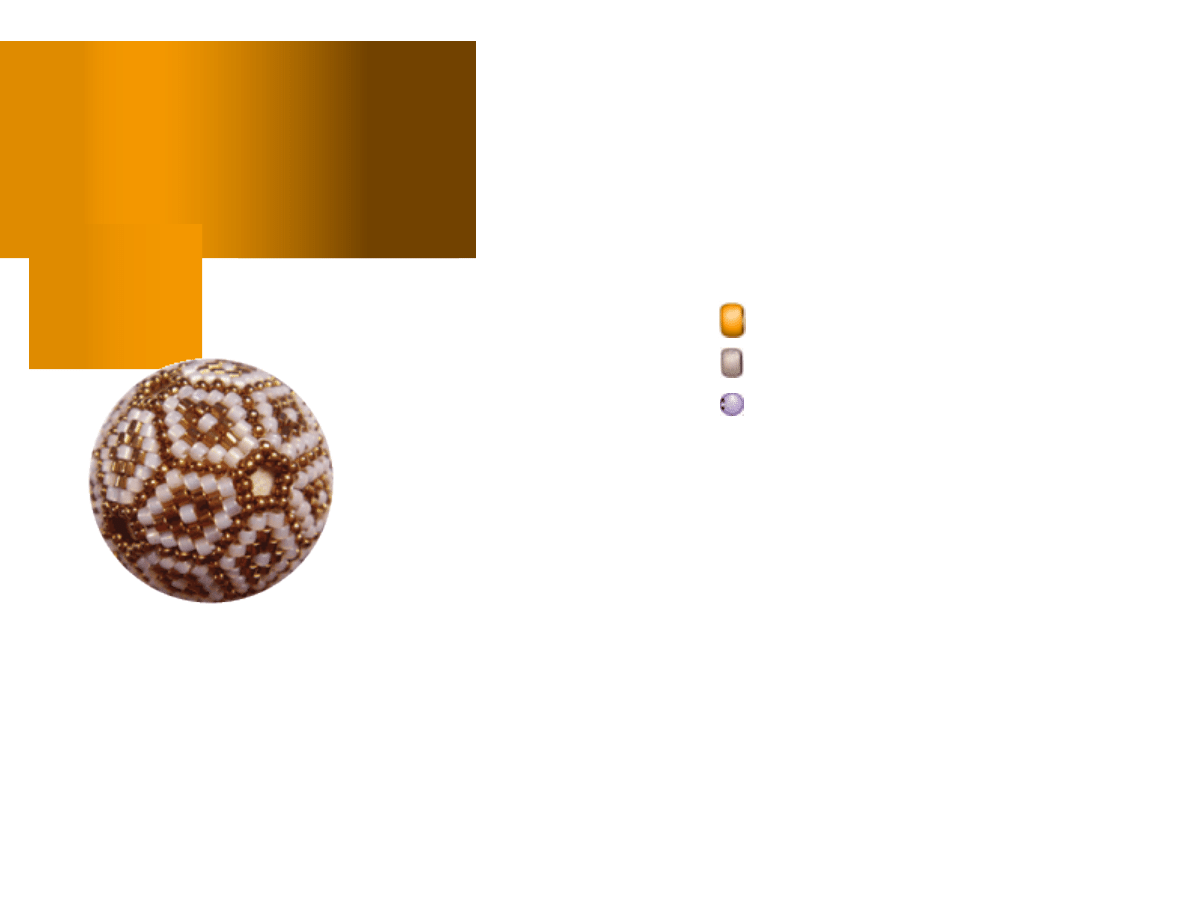
5 grams
A
Main Color - cylinder bead - size 11
25mm
Wooden bead - painted
1 each
Alternate Color - seed bead - size 15
5 grams
C
5 grams
B
Alternate Color - cylinder bead - size 11
materIaLs:
— Eva Maria
consIderatIons:
Due to multiple thread passes, avoid knotting, adhesives,
•
and/or waxing.
Whenselectingcylinderbeads,considerthefinishanddurability.
•
Make a small peyote test sample. Weave multiple thread paths,
•
to test the bead strength and the thread tension tolerance.
25mm wooden bead is covered with twenty (20) equilateral
triangles, also known as a regular icosahedron.
Icos is Greek for “twenty” and
hedron is an Indo-European word
meaning “seat”.
An icosahedron has twelve
(12) vertices (where the edges
meet), 20 equilateral triangles
(face), and 30 edges.
The simplicity of one of
these geometric beauties on a
chain is sure to make an artistic
statement.
Expand the triangle dimensions to create holiday ornaments; just
imagine larger sizes for tassels or spheres, as home decor elements.
May you be awesomely inspired to explore and express the
possibilities of size, color, and pattern combinations from your own
imagination.
“Do not worry about your difficulties in mathematics.
I can assure you mine are still greater.”
– Albert Einstein
For
personal
use
only!
Page 4 of 9
Roaring 20’s
Poly-Palooza Series ©2004
E-mail: eknow@msn.com
www.keiserdesigns.com
©2000-2008 All Designs Eva Maria Keiser. All Rights Reserved.
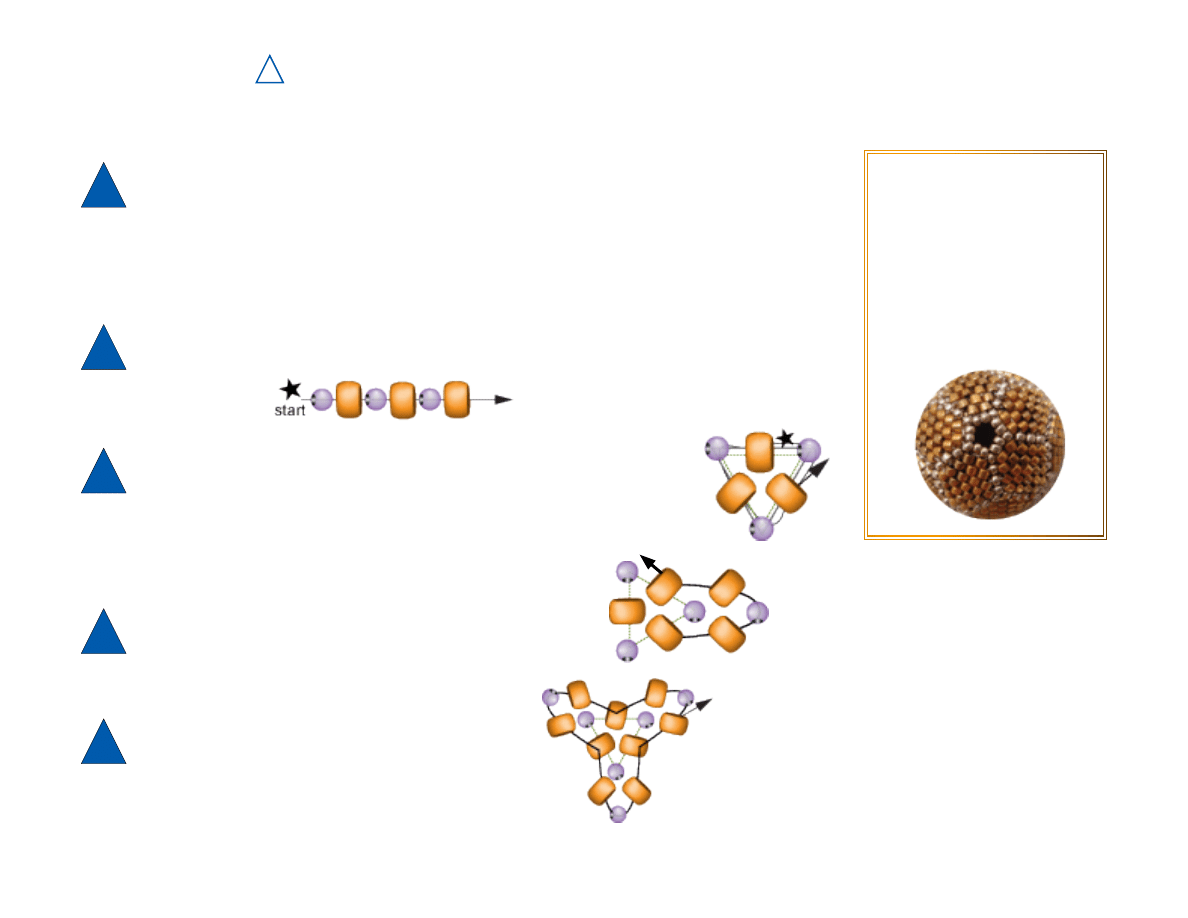
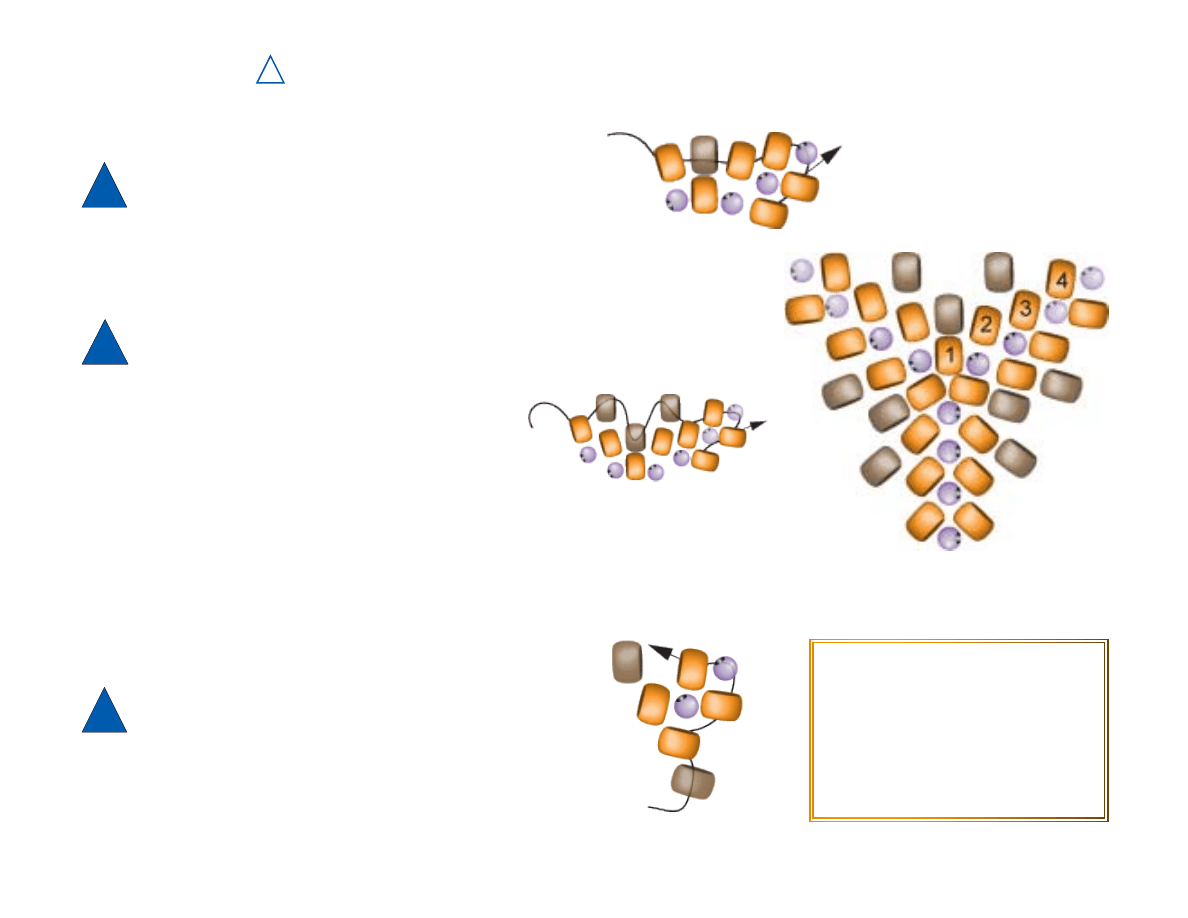
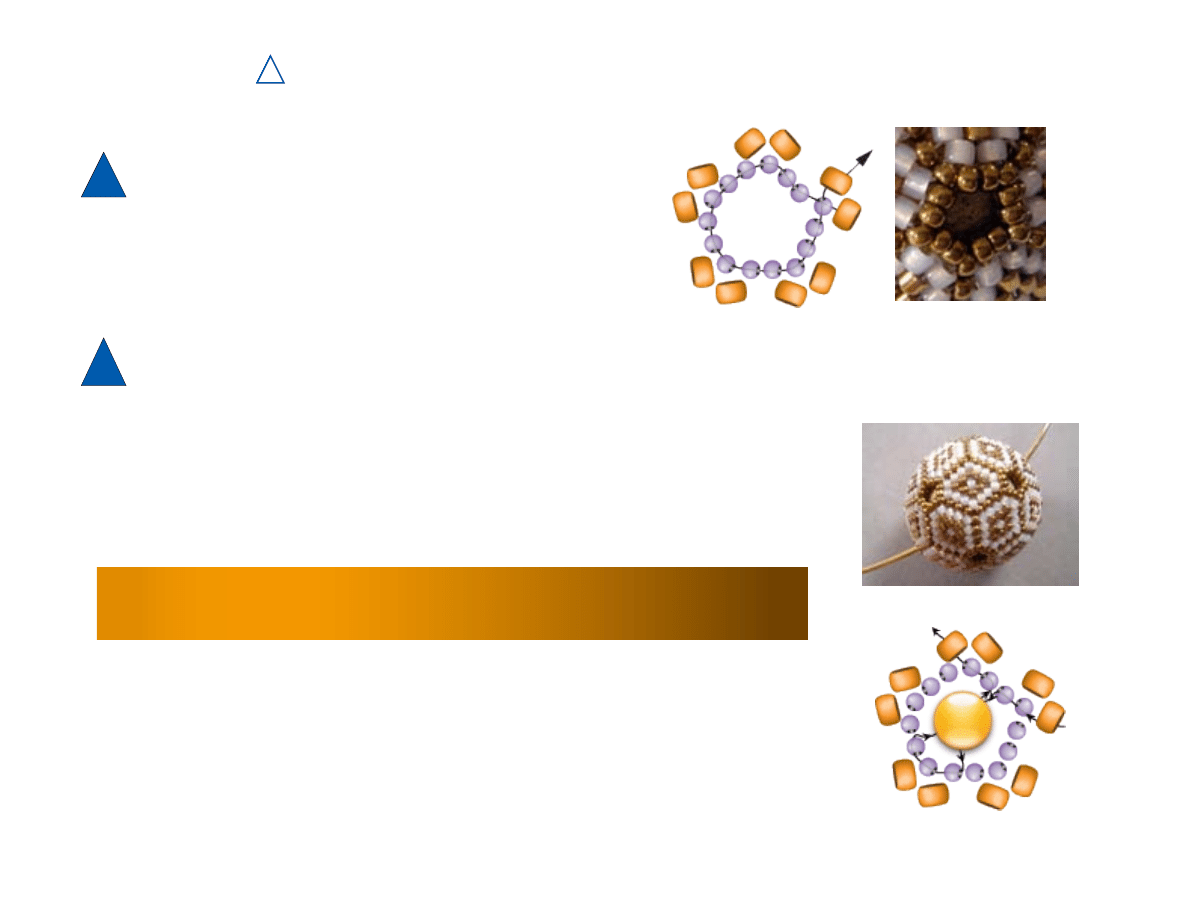
trIangLe center
1
Single - thread a #12 beading needle on a minimum of twelve (12) inches
(30.5cm) of braided wire.
2
Alternating (1)C and (1)A, string a total of 6 beads, leaving a six (6) inch
(15.2cm) tail.
3
tensIon: moderate
Pass the thread thru all beads twice, forming a triangle.
Tighten the working and tail threads by pulling both ends slowly and gently.
Forward the needle and EXIT the second A.
Check thread tension again; to avoid knots and/or looping.
corner Increase
NOTE:
The “C” bead is a
spacer bead, bridging the
cylinders;camouflaging
threads,anddefiningthe
triangle pattern. The “C” is
also referred to as the “spine”
bead. Keep the tension in
mind;tooloose,theCfloats,
too tight, the C protrudes, or
horror of horrors – breaks!
5
Repeat the corner increases twice more,
(remembering to skip over the C in the previous row)
STEP UP thru 2(A), EXITING the corner A.
4
Pick up (1)A, (1)C, and (1)A. This is the corner increase.
Skip over the C in previous row, EXIT the next A.
NOTE:
If you prefer working with longer thread, an arms length easily completes
two (2) triangles.
Designer Tip:
Apatterndefiningthesteps
is offered in this lesson.
Consider a solid color for
an understated, yet elegant
beaded bead.
For
personal
use
only!
Page 5 of 9
E-mail: eknow@msn.com
www.keiserdesigns.com
©2000-2008 All Designs Eva Maria Keiser. All Rights Reserved.
Roaring 20’s
Poly-Palooza Series ©2004
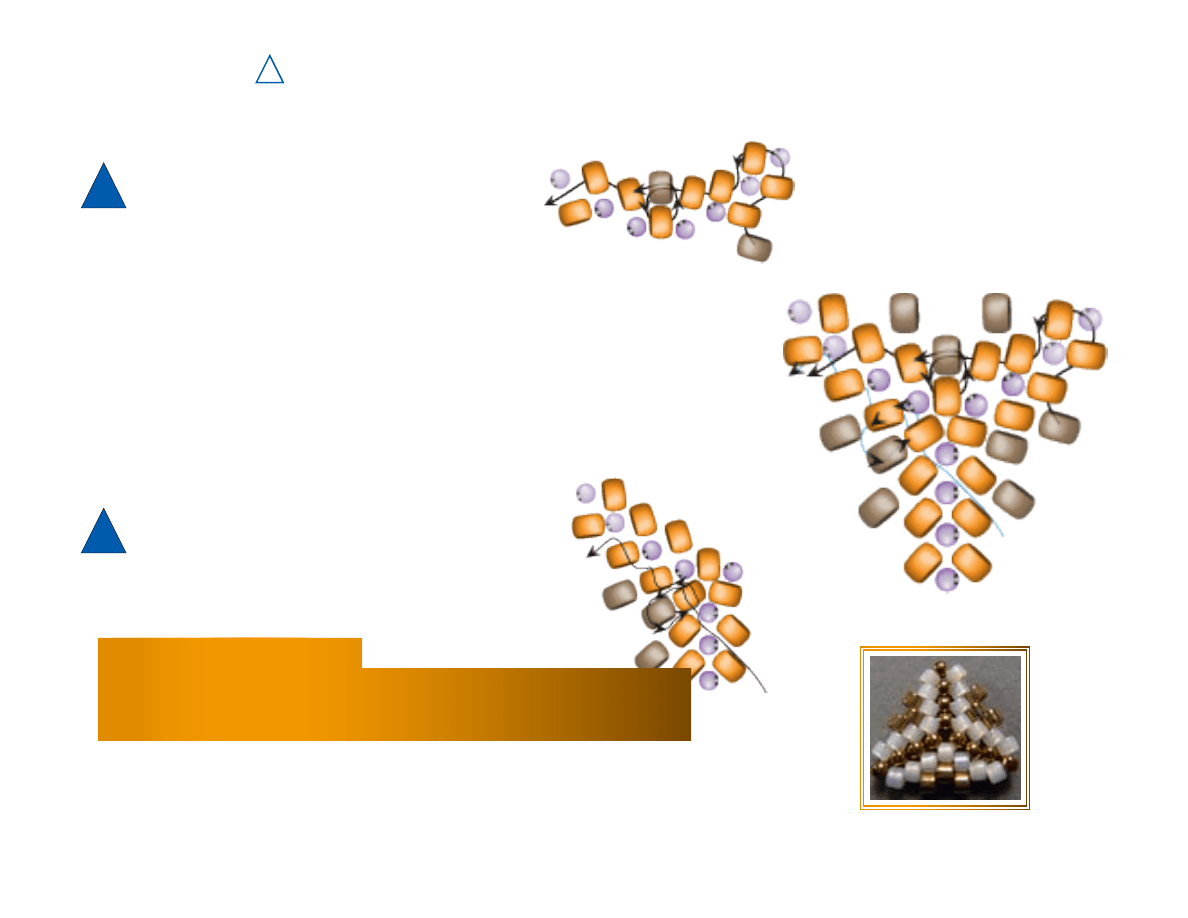
trIangLe sIdes
Repeat the corner increase.
Pick up (1)B, pass thru and EXIT the next A.
Continue the corner increase and (1)B across triangle side, twice more.
STEP UP thru 2(A), EXITING the corner A.
6
trIangLe sIzIng
7
Repeat the corner increase.
Pick up (1)B, pass thru next B, pick up (1)B, EXIT next A.
Repeat twice more, for a total of four (4) “UP” and four (4)
spine beads.
STEP UP 2(A), EXITING the corner A.
secure WorkIng thread
8
To cover the 25mm wooden bead exactly the triangle size is
four (4) “UP” beads.
STOP CORNER INCREASE HERE!
Forward the needle thru the next C and EXIT the corner A.
NOTE:
To increase the triangle size repeat corner increase and triangle sides.
Forlargersizes,aformorstuffingisrecommended,asitwillcollapse.
When you have reached the desired size, continue with Step 8.
EXAMPlES:
4 “UP” beads = 25mm
5 “UP” beads = 30mm
10 “UP” beads = 50mm
15 “UP” beads = 3 inch (7.6cm)
Completed 4 “UP” Equilateral Triangle
For
personal
use
only!
Page 6 of 9
Roaring 20’s
Poly-Palooza Series ©2004
E-mail: eknow@msn.com
www.keiserdesigns.com
©2000-2008 All Designs Eva Maria Keiser. All Rights Reserved.
9
Forward the needle to the center of the triangle.
Pass thru the next two A’s, EXIT the A.
Continue up to the adjacent B, EXIT the B.
Make a U-TURN and stitch a full circle around the center A.
Pass thru the adjacent B again, EXIT the B.
Continue forward thru the next two A’s, EXIT.
Pull thread gently to tighten circle stitch, TRIM.
secure taIL thread
The tail thread exits an A in the triangle center.
Make a U-TURN into and pass thru the adjacent B.
Circle back around the A.
Continue thru the next two A’s. EXIT
Pull thread gently to tighten the circle stitch, TRIM.
10
secure WorkIng thread (contInued)
NOTE:
By selecting the adjacent B, less thread passes thru the center A.
This allows for extra thread passes as new thread and/or future turns become necessary.
rePeat stePs 1 thru 10; make a totaL of tWenty (20)
IndIvIduaL trIangLes.
For
personal
use
only!
Page 7 of 9
E-mail: eknow@msn.com
www.keiserdesigns.com
©2000-2008 All Designs Eva Maria Keiser. All Rights Reserved.
Roaring 20’s
Poly-Palooza Series ©2004
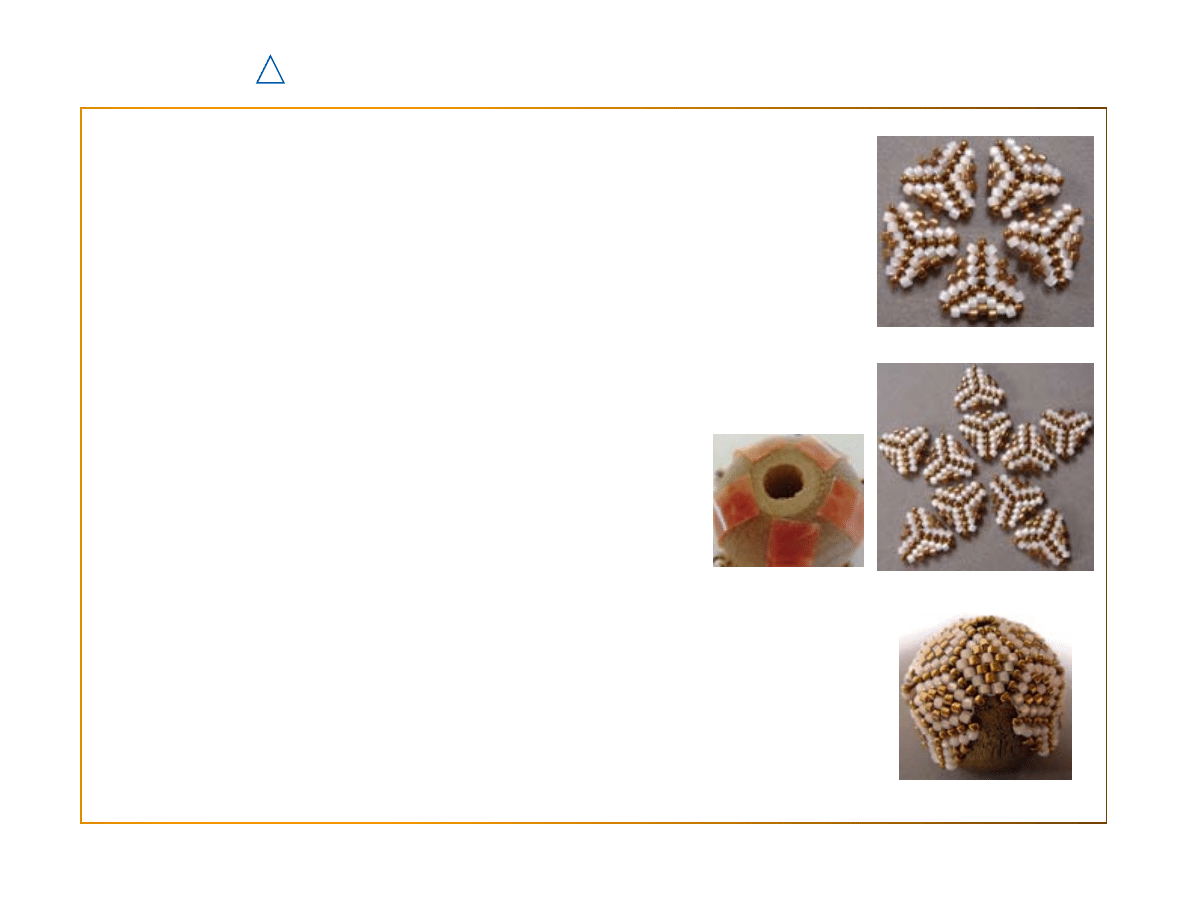
oPtIonaL steP: Pre-assembLy
NOTE:
The pre-assembly offers a visual guide prior to joining the triangles. The optional
materials, (double-sided “tacky” tape and a plain 25mm wooden bead) are used here.
Ontheplain25mmwoodenbead,verticallyandevenlyplaceatleastfive(5)thinstripsofthe
A.
“tacky” tape from the end, to the center. DO NOT TAPE OVER OPENINGS.
(
NOTE:
Youdonotwanttoputthe“tacky”tapeonyourfinished(painted)
wooden bead, as it shows through the openings. Also, removing the tape will damage
thepaintedfinish).
Position ten (10) individual triangles on one side of the taped 25mm wooden bead as follows:
1).Placefive(5)trianglesaroundthebeadopening,to
form the bead-cap. The “C” beads will crest the opening.
2).Placefive(5)triangles,adjacenttoeachofthebeadcaptriangles,
forming one side of the circumference.
(
NOTE:
To even up the join rows prior to the zip-up stitch, beads are
added during the triangle joins, (See Step 13).
As you work the “join” steps, remove the sections needed from the pre-assembled bead, and then
B.
replace the joined triangles back on the bead; completing the visual guide of Side 1.
Remove Side 1 from the “tacky” plain bead, and replace with the painted 25mm bead.
C.
AS-YOU-WISH, repeat the “pre-assembly” steps for Side 2, and/or proceed to Step 11.
D.
Bead cap placement
“Tacky” tape placement
Bead placement - Side 1
Circumference placement
For
personal
use
only!
Page 8 of 9
Roaring 20’s
Poly-Palooza Series ©2004
E-mail: eknow@msn.com
www.keiserdesigns.com
©2000-2008 All Designs Eva Maria Keiser. All Rights Reserved.
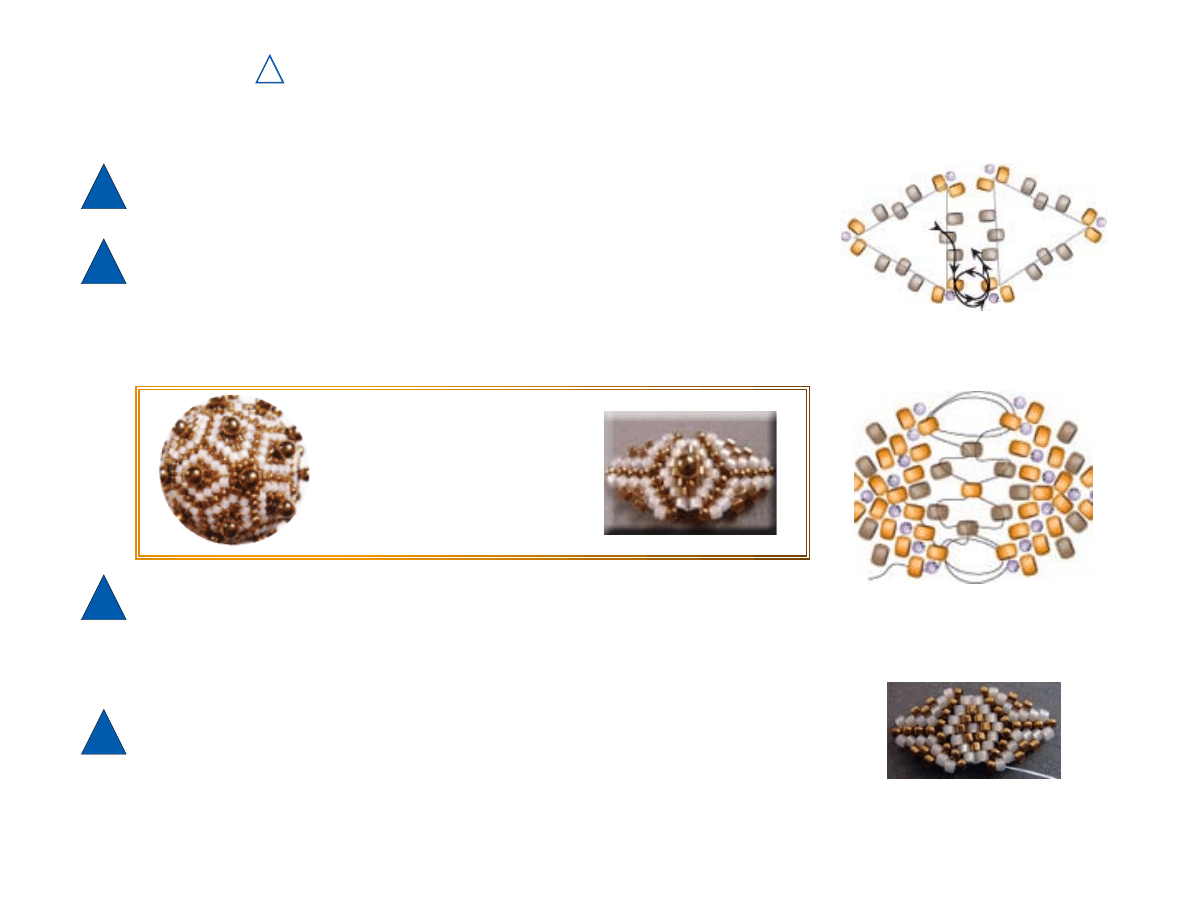
assembLy - bead caP
Completed Triangle Join
Thread a comfortable length of braided thread. Weave working thread into the triangle from
the center out. EXIT a corner A. Weave in the tail thread, TRIM.
11
12
Work up the triangle side. Between existing “UP” beads, place 1B, 1A, and 1B.
Pull the thread gently to tighten stitches. EXIT a corner A.
13
Circle stitch around the opposite A corners. EXIT a corner A.
Position the needle towards the triangle center.
Zip stitch the triangle by zigzagging between the “UP” beads. EXIT a corner A.
Pull the thread gently to tighten. Continue thru the next C, and EXIT the next corner A.
REPEATSteps12-14;completingatotaloffive(5)triangles.EXITaC.
14
Working thread EXITS a corner A.
Needle into an adjacent triangle corner A. Circle stitch around the two corners. Position
the needle toward the triangle center, EXITING the corner A.
NOTE:
The full circle stitches reinforce and support the corner joins.
NOTE:
This step prepares the “UP” beads for the even count required, prior to the “ZIP” stitch.
Designer Tip:
Small Fringe, (drop beads)
accent triangle openings and
joins nicely.
For
personal
use
only!
Page 9 of 9
E-mail: eknow@msn.com
www.keiserdesigns.com
©2000-2008 All Designs Eva Maria Keiser. All Rights Reserved.
Roaring 20’s
Poly-Palooza Series ©2004
bead caP fInIsh
bead cIrcumference
With thread EXITING a C, place (2)C’s between each C already in
place around the bead cap opening. EXIT a C and the next corner A.
Position the needle towards the triangle center.
Weave the working thread into the zipped area, TRIM.
REPEAT Steps 11 -15 for a total of two (2) bead caps.
15
Repeat Steps 11-15 for the remaining ten (10) triangle joins; starting and ending thread as
needed.
During the circumference joins, you may need to turn around and/or re-position the needle
direction for the next triangle join.
1.) Forward thru two (2) cylinders
2). Pass up thru an adjacent cylinder
3). Forward and EXIT either the left or right corner cylinder bead
CompletethetrianglejoinopeningswiththeCfills,(SeeStep15)
Weave in any remaining working and/or tail threads. TRIM.
16
Embellish the ten (10) circumference triangle join openings with 3mm beads.
With the thread EXITING between two C’s, pick up a 3mm bead and position it diagonally across the
opening. Stitch between two C’s across the opening. Continue down thru adjacent C and up between the
next two C’s.
Pass back thru the 3mm bead, EXITING between the original two C’s. Continue to each remaining
opening and repeat. Weave thread into the “zipped” areas. Trim.
embeLLIsh trIangLe joIn oPenIngs (oPtIonaL):
Completed Bead Cap Join
Completed icosahedron
Wyszukiwarka
Podobne podstrony:
eva maria keiser desings (6)
eva maria keiser desings
eva maria keiser desings (2)
eva maria keiser desings (5)
eva maria keiser desings (4)
eva maria keiser desings (2)
eva maria keiser desings (7)
ewa maria keiser desings Four Corner Bling
Nos vemos Paso a paso CD Eva Maria Lloret Ivorra
Nos vemos cwiczenia A1 A2 z 2CD Ivorra Eva Maria Lloret Ribas Rosa Wiener Bibiana Gorrissen Margari
Eva Maria Bartenschlager Richtige Hundeernährung
samosprawdzenie, pedagogika uczelnia warszawaka, podstawy psychologii ogólnej, wykłady Maria Jankows
10 COMON ?VA
Fragment wywiadu z Marią Wiernikowską n
Mann - Czarodziejska gora, Maria Kurecka „Czarodziej
proces pielęgnowania, OIOM- Proces, Maria Kwiatkowska
Interna 13.06.2011 - ver.1, giełda made by Maria, Mariola, Michał i Ols
więcej podobnych podstron