For
personal
use
only!
© 2 0 0 3 - 2 0 0 9
G a l a x y s e r i e s
E-mail: eknow@msn.com
www.keiserdesigns.com
©2000-2009 All Designs Eva Maria Keiser. All Rights Reserved.
S
e
eing S
tar
s ©2003

For
personal
use
only!
Disclosures
N
ot
ice of Rights:
N
ot
ice of Liabilit
y:
All rights reserved. No part of
this booklet may be reproduced
or transmitted in any form by any
means, electronic, mechanical,
photocopying, recording, or
otherwise without written
permission of the copyright
holder. Any and all contents of
this booklet are intended for
personal use only. Any other
use, especially commercial
use, is forbidden under law
without written permission of the
copyright holder.
The information distributed in
this booklet is on an “As-Is”
basis, without warranty.
While every effort has been
made to ensure the information
herein is accurate, due to
differing tools, and/or individual
skills, the author shall have no
liability to any person or entity
with respect to any loss or
damage caused or alleged to be
caused directly or indirectly by
the instructions contained herein.
Product names and services
identified throughout this booklet
are used in an editorial fashion
only and for the benefit of such
companies with no intention of
infringement of the trademark.
No such use, or the use of
any trade name, is intended
to convey endorsement or
any other affiliation with these
instructions.
Tr
ademarks:
Page 2 of 9
E-mail: eknow@msn.com
www.keiserdesigns.com
©2000-2009 All Designs Eva Maria Keiser. All Rights Reserved.
Galaxy Series ©2003

For
personal
use
only!
E-mail: eknow@msn.com
www.keiserdesigns.com
©2000-2009 All Designs Eva Maria Keiser. All Rights Reserved.
Page 3 of 9
Seeing Stars ©2003
Galaxy Series ©2003-2009
seeing stars
Braided Wire - Fireline® 6#
◊
Scissors - Designated for braided wire only
◊
Size 12 beading needles
◊
Chain noose pliers (optional for pulling thread)
◊
Tools and noTions:
MaTerials:
7 gram (A) 11/0 cylinder bead - Color 1
◊
7 gram (B) 11/0 cylinder bead - Color 2
◊
7 gram (C) 11/0 cylinder bead - Color 3
◊
5 gram (D) 15/0 seed bead
◊
Techniques: PeyoTe
skill level:
working knowledge of PeyoTe
suggesTions:
Due to multiple thread passes, avoid knotting,
◊
adhesives, and/or waxing.
Whenselectingcylinderbeads,considerthefinishand
◊
durability.
Make a small peyote test sample. Weave multiple
◊
thread paths, to test the bead strength and the thread
tension tolerance.
W
elcome to the 2009 graphically enhanced
version of the “Seeing Stars” pattern; available for
purchase online since 2006.
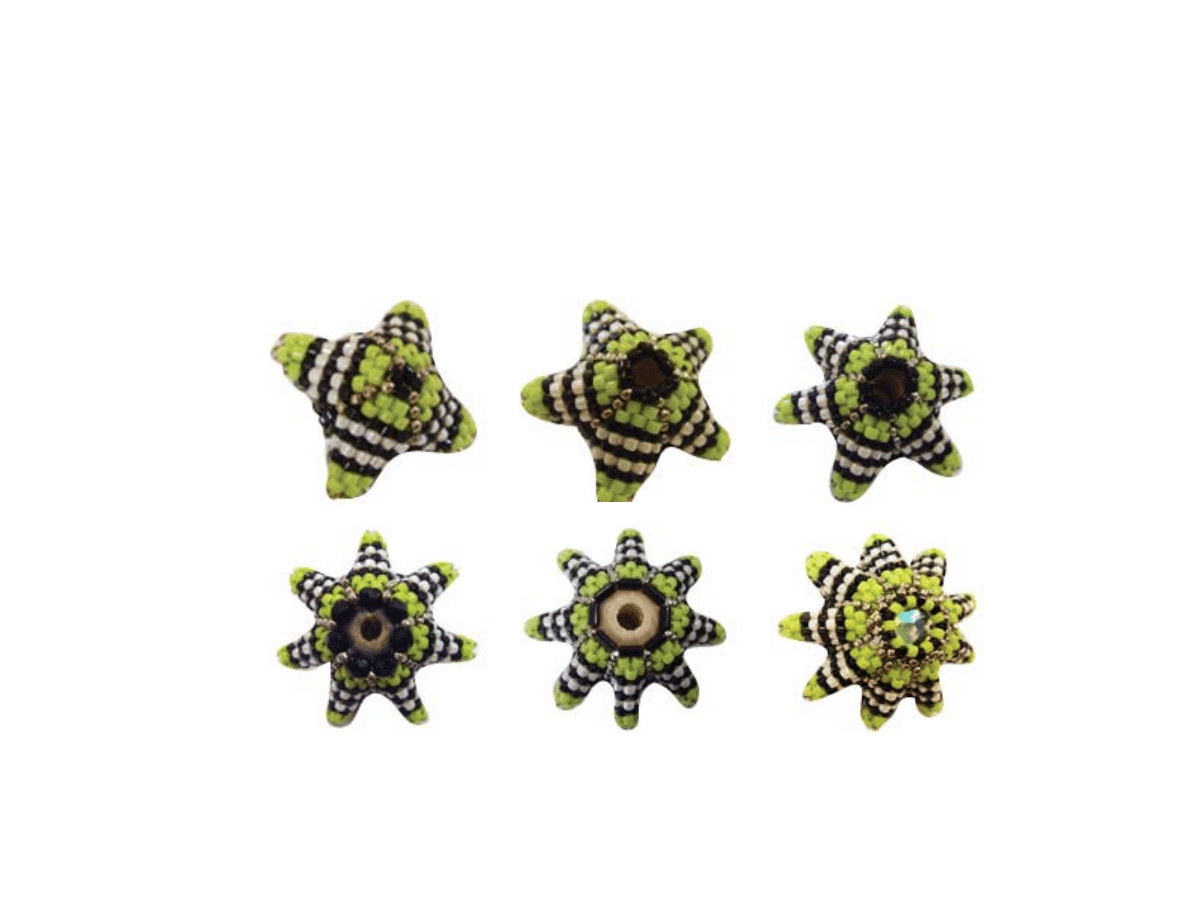
Fashion quadrilateral squares and join them
back-to-back to form star points. Begin your
galaxy with a one inch (25mm) 5-sided star;
(pentagram). Then fill your galaxy with multiple star
polygons, such as: 6-(hexagram), 7-(heptagram),
8-(octagram), and the impressive 9-(enneagram)
sided star.
A single quadrilateral joined to a star point,
functions nicely as a bail, to showcase on a chain.
Connect several for bracelets, necklaces, or curtain
tie-backs. Remember them as holiday ornaments.
May you have fun making one “Seeing Star” for all
the “Stars” in your world.
- Eva Maria Keiser
Pr
oject O
ver
vie
w:

For
personal
use
only!
E-mail: eknow@msn.com
www.keiserdesigns.com
©2000-2009 All Designs Eva Maria Keiser. All Rights Reserved.
Page 4 of 9
Seeing Stars ©2003
Galaxy Series ©2003-2009
2
- Pick up [1B, 1D, 1B], skip #4 and pass thru #5 bead.
(FIG. 3 - Photo 3)
-
Repeat [1B, 1D, 1B], between (#5 and #7);
(#7 and #1); (#1 and #3).
- STEP-UP thru #3 and #9.
(FIG. 4 - Photo 4)
round 2 - corner increase:
Tension: ModeraTe
PHOTO 3
FIG. 3
PHOTO 4
FIG. 4
1
- Thread 36 inches, (92cm); leave a 6 inch, (15cm) tail. DO NOT WAX.
- Pick up [8A].
(FIG. 1 - Photo 1)
FIG. 1
round 1 - cenTer circle:
PHOTO 1
FIG. 2
- Pass thru #1 bead again to form a circle.
DO NOT GLUE OR KNOT.
- Pass thru all the beads in the circle once more.
- Continue thru the #1 bead, and STEP-UP thru #2 and #3
(FIG. 2 - Photo 2)
- Gently increase the tension to tighten the circle.
PHOTO 2
Steps 1 thru 6 make one (1) quadrilateral square
For
personal
use
only!
E-mail: eknow@msn.com
www.keiserdesigns.com
©2000-2009 All Designs Eva Maria Keiser. All Rights Reserved.
Page 5 of 9
Seeing Stars ©2003
Galaxy Series ©2003-2009
PHOTO 5
round 3 - side increase:
The thread exits #9; continue the corner increase:
- Pick up [1A, 1D, 1A], skip #10 and pass thru #11.
SIDE INCREASE:
- Pick up [1A], pass thru #12.
- Repeat corner and side increase in the round.
-
STEP-UP thru #9 and #21.
(FIG. 5, Photo 5)
3
FIG. 5
Know your way around peyote? Work from the graph. (See page 8)
NOTE:
The 15/0 adds interest, hides the corner threads, enhances star center embellishment, supports the bead strength,
and sets the tension. The 15/0 floats if the thread tension too loose, and buckles when too tight.
4
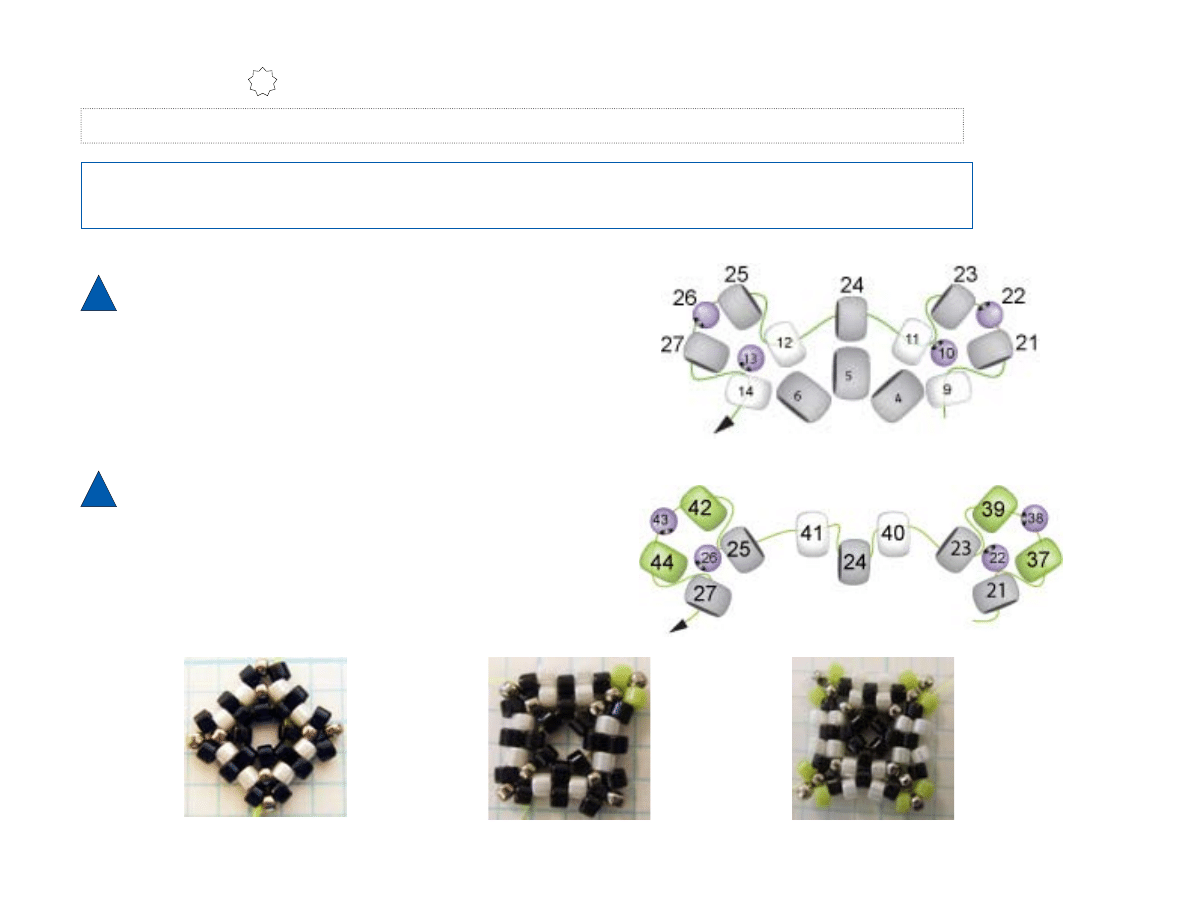
round 4 - PaTTern color change:
The thread exits #21; continue the corner increase:
- Pick up [1C, 1D, 1C], skip #22 and pass thru #23.
SIDE INCREASE:
- Pick up [1B], pass thru #24;
- Pick up [1B], pass thru #25.
- Repeat corner and side increase in the round.
-
STEP-UP thru #21 and #37.
(FIG. 6, Photo 6-a and 6-b)
FIG. 6
PHOTO 6-a
PHOTO 6-b
For
personal
use
only!
E-mail: eknow@msn.com
www.keiserdesigns.com
©2000-2009 All Designs Eva Maria Keiser. All Rights Reserved.
Page 6 of 9
Seeing Stars ©2003
Galaxy Series ©2003-2009
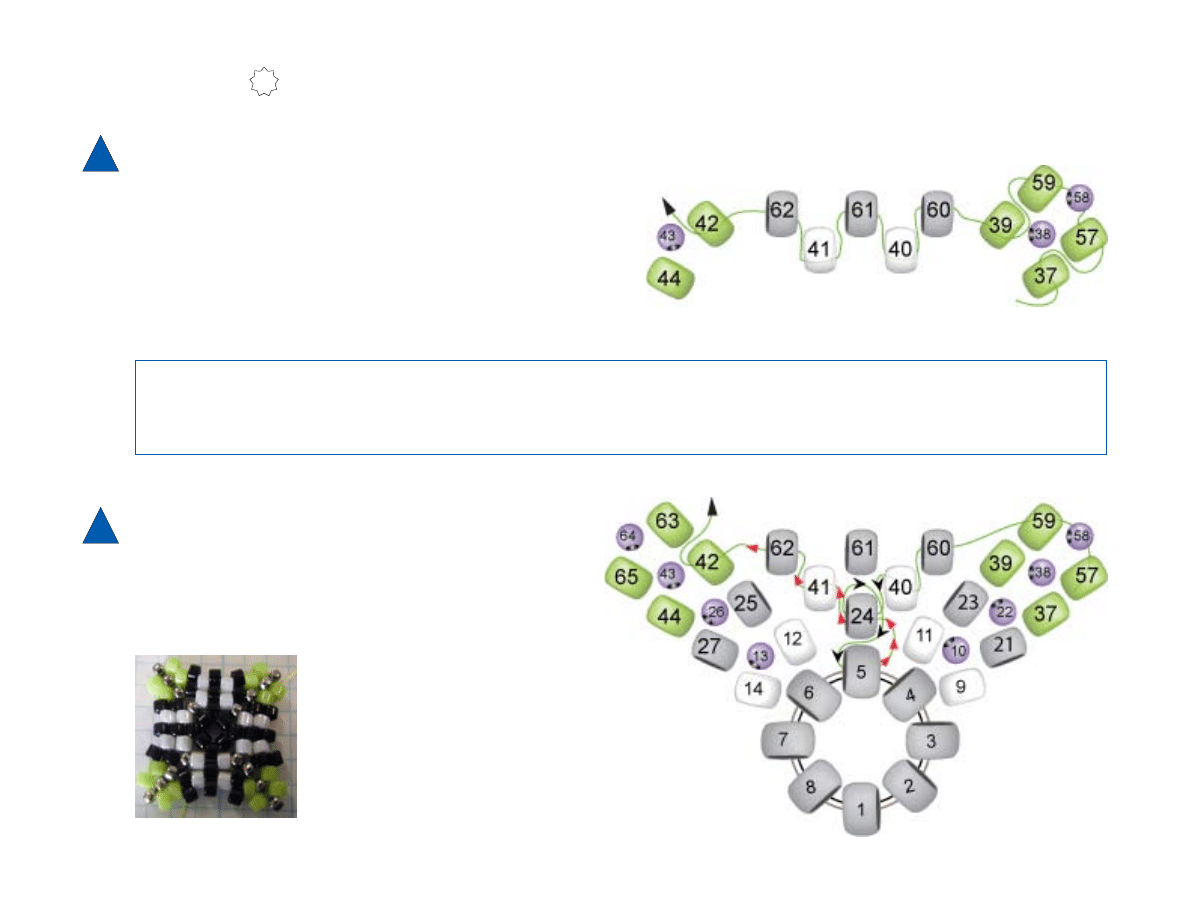
5
round 5: one five (5) “uP” Bead square
The thread exits #37; continue the corner increase:
- Pick up [1C, 1D, 1C], skip #38 and pass thru #39.
SIDE INCREASE:
- Pick up [1A], pass thru #40;
- Pick up [1A], pass thru #41;
- Pick up [1A], pass thru #42.
- Repeat corner and side increase in the round.
-
STEP-UP thru #37 and #57.
(FIG. 7, Photo 7)
FIG. 7
NOTE:
Rounds 1 thru 6 complete one (1) quadrilateral square. One (1) square = one (1) star point.
Determine how many squares are required to make the star of your choice. (See Chart, page 7).
For taller stars continue Round 5 (Corner and Side increases), then work Round 6.
(Photo 8)
PHOTO 7
6
round 6: end corner and side increases - one five (5) “uP” Bead square is coMPleTe!
Thread exits #57; pass thru #58 and #59.
- Weave thread towards the side increase bead in Round 3,
-Weaveafigureeightarounditandthebeadbelow,
- Weave up towards a corner increase,
- Check thread tension, trim thread..
(FIG. 8)
FIG. 8
For
personal
use
only!
E-mail: eknow@msn.com
www.keiserdesigns.com
©2000-2009 All Designs Eva Maria Keiser. All Rights Reserved.
Page 7 of 9
Seeing Stars ©2003
Galaxy Series ©2003-2009
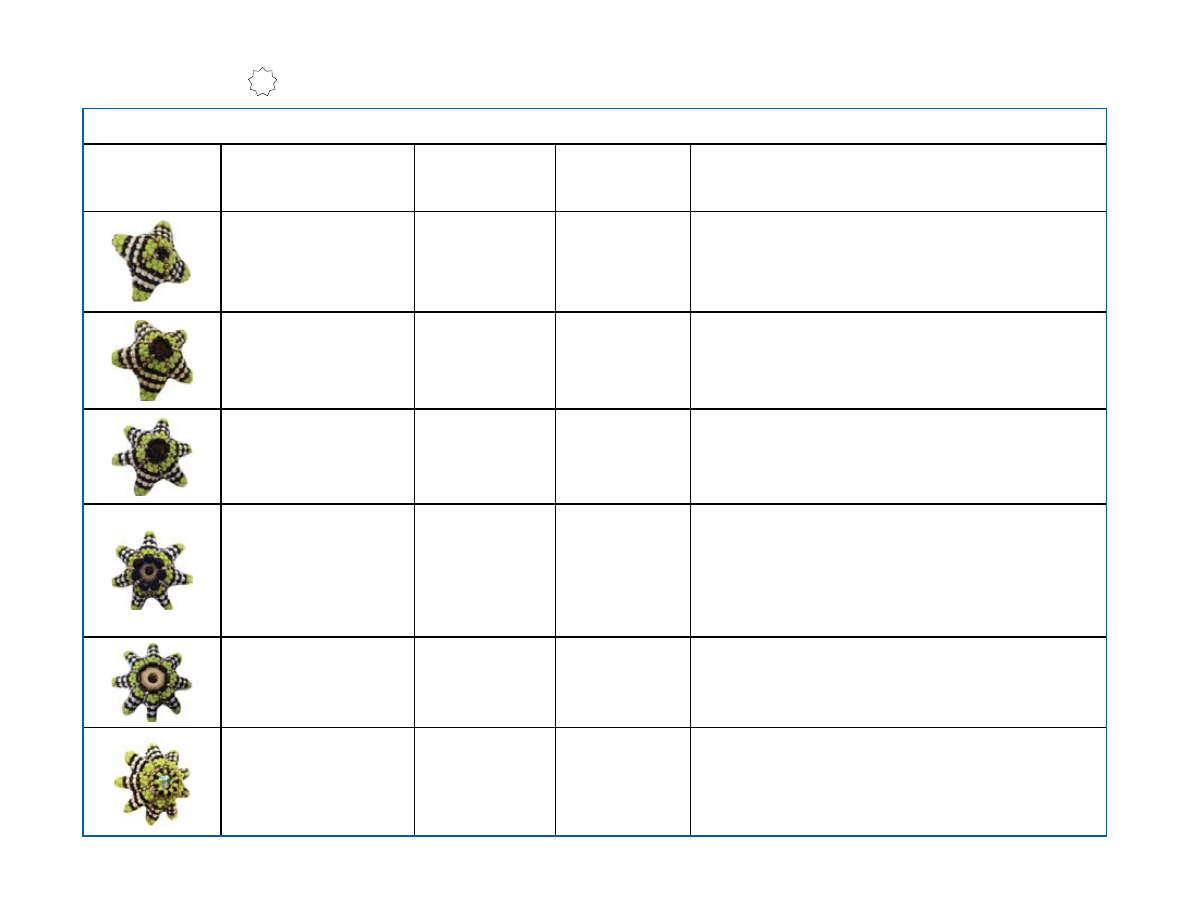
Table 1: Five “Up” Star Sizing
Samples
Interior Center
Bead Size
Star
Size
# Of Star
Points
Center Closure
Suggestions:
12mm bead
25mm
Four (4)
square star
[1A]; (between D) x 4
- Pass thru circle two times; secure thread.
12mm bead
25mm
Five (5)
pentagram
[2A]; (between D) x 5
- Pass thru circle two times; secure thread.
14mm bead
28mm
Six (6)
hexagram
[2A]; (between D) x 6
- Pass thru circle two times; secure thread.
15mm bead
30mm
Seven (7)
heptagram
[3A];
OR
[1 - 3mm bead]; (between D) x 7
[1D]; (between 3mm) x 7
- Pass thru circle two times; secure thread.
16mm bead
32mm
Eight (8)
octagram
[1 - #1 Bugle]; (between D) x 8
- Pass thru circle two times; secure thread.
18mm bead
(Shown: 18mm
crystal in center)
34mm
Nine (9)
enneagram
[2D; 1A; 2D]; (between D) x 9
[1C]; (between A) x 9
- Pass thru circle two times; secure thread.
For
personal
use
only!
E-mail: eknow@msn.com
www.keiserdesigns.com
©2000-2009 All Designs Eva Maria Keiser. All Rights Reserved.
Page 8 of 9
Seeing Stars ©2003
Galaxy Series ©2003-2009
NOTE:
Rounds 1 thru 6 complete one (1) quadrilateral
square.
One (1) square = one (1) star point.
Determine how many squares are required to
make the star of your choice.
(See Chart on page 7)
For taller stars, continue Round 5 (Increase
Corner and Sides), then work Round 6.
Fill larger sized stars to support and expand their
structure. Otherwise they will have a two-sided
flat surface.
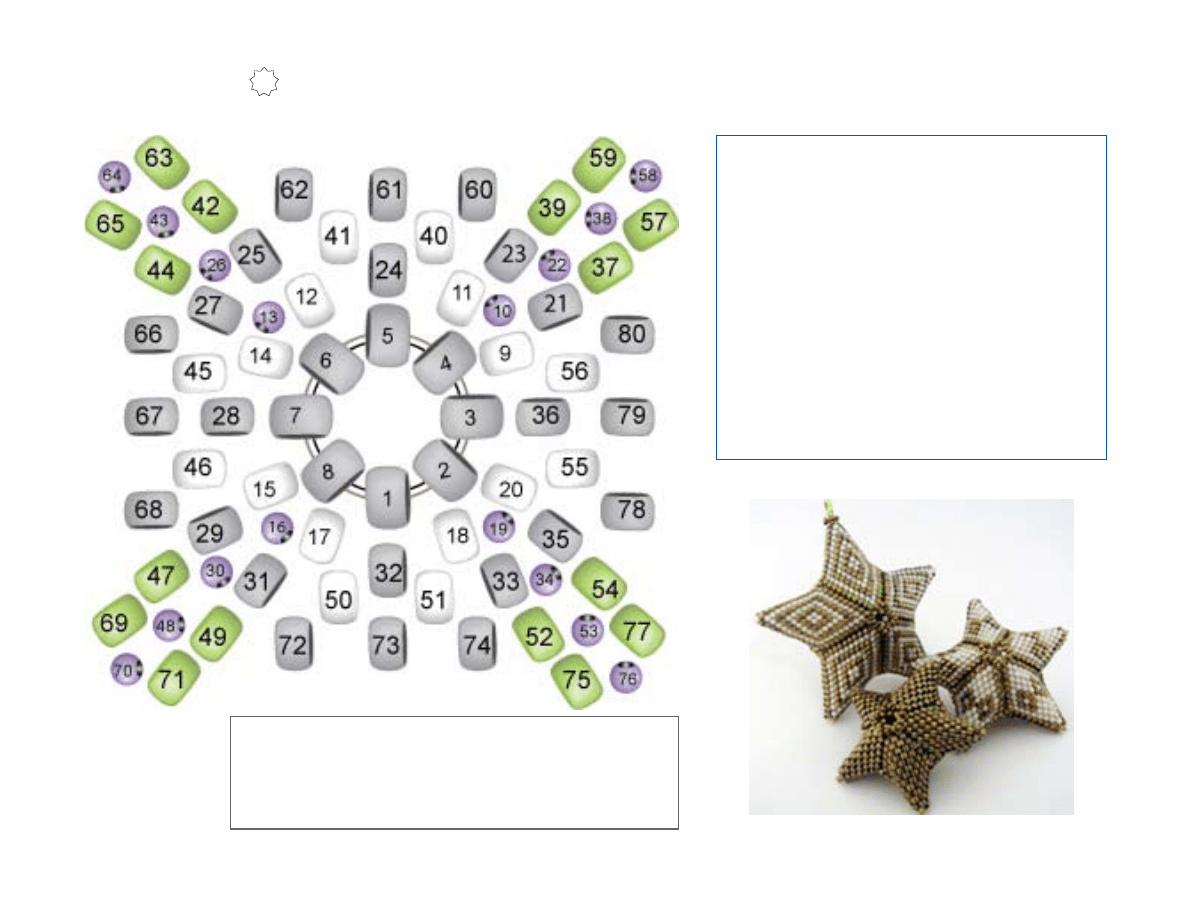
graPh: one five (5) “uP” Bead square
PHOTO 8
©2003 “Seeing Stars Trio”
Keiser Designs
Size Examples:
(Photo 8)
7 “up” beads x 5 star points = 1.5 inch (37.5mm)
9 “up” beads x 5 star points = 2 inch (50mm)
11 “up” beads x 5 star points = 2.5 inch (75mm)

For
personal
use
only!
E-mail: eknow@msn.com
www.keiserdesigns.com
©2000-2009 All Designs Eva Maria Keiser. All Rights Reserved.
Page 9 of 9
Seeing Stars ©2003
Galaxy Series ©2003-2009
Joining sTar PoinTs
1
2
NOTE:
Star points are joined by zipping together squares. For the correct zip count, an additional row of beads is required.
- Thread 60 inches, (152cm); leave a 6 inch (15cm) tail. DO NOT WAX
- Use a “stop bead”; the working thread exits a left or right corner bead.
- Pass thru the (D) and next corner bead.
- Pick-up [1B,1B,1B,1B] x 4 (sides only).
- Pass thru corner beads. (DO NOT INCREASE).
(FIG.9)
- Thread exits a corner bead and passes thru the adjacent corner bead.
- Circle around the both corner beads one and one-half times.
- Zip down thru one row, circle next corner beads two (2) times.
- Zip up and down sides, adding zip beads as needed.
(FIG.10, Photo 9)
-Insertbeadorstuffingpriortozippingthelastsquare.(Seechartonpage7).
(Photo 10)
FIG. 10
NOTE:
Place squares back to back at right angles. Add zipping rows as needed to join squares.
PHOTO 9
PHOTO 10
3
- Weave the working thread to a star center opening.
- Pass thru a corner and the (D) bead.
- Refer to the center closure suggestions. (See Table on page 7). Do both sides of the star.
- Weave in, secure, and end all thread tails.
congraTulaTions!
anoTher sTar is Born.
FIG.9
Wyszukiwarka
Podobne podstrony:
eva maria keiser desings (6)
eva maria keiser desings
eva maria keiser desings (2)
eva maria keiser desings (3)
eva maria keiser desings (5)
eva maria keiser desings (4)
eva maria keiser desings (2)
ewa maria keiser desings Four Corner Bling
Nos vemos Paso a paso CD Eva Maria Lloret Ivorra
Nos vemos cwiczenia A1 A2 z 2CD Ivorra Eva Maria Lloret Ribas Rosa Wiener Bibiana Gorrissen Margari
Eva Maria Bartenschlager Richtige Hundeernährung
samosprawdzenie, pedagogika uczelnia warszawaka, podstawy psychologii ogólnej, wykłady Maria Jankows
10 COMON ?VA
Fragment wywiadu z Marią Wiernikowską n
Mann - Czarodziejska gora, Maria Kurecka „Czarodziej
proces pielęgnowania, OIOM- Proces, Maria Kwiatkowska
Interna 13.06.2011 - ver.1, giełda made by Maria, Mariola, Michał i Ols
więcej podobnych podstron